GETTING STARTED
CRM stands for Customer Relationship Management but sometimes many businesses call it “Customer Really Matters”. kpi.comCRM Tool helps to keep track of your customers, observe their behavior towards your business, receive feedback from them and instantly fulfill customer requests. kpi.com CRM tool helps you to attract more customers to your business and once achieved, will allow you to develop the relationship and increase loyalty.
kpi.com CRM Tool can be accessed on the main menu of the system:
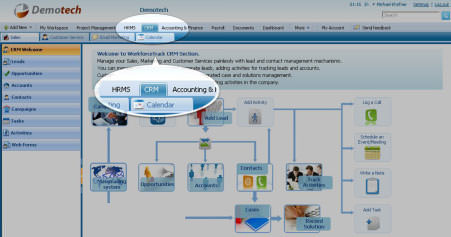
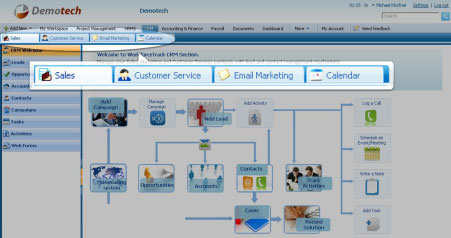
The CRM Tool consists of four main sections:
Sales – manage your sales activities with customers and prospects, run sales and marketing campaigns, create web forms to register new leads and schedule follow up activities.
Customer Service–allows you to manage yourcases, solutions, accounts and contacts in this section.
Email marketing– allows you to mass mail to your leads, clients and contacts for marketing and advertising purposes.
Calendar–use this handy tool for organizing events and activities. Calendar can be linked and synchronized with your Google calendar.
The following diagram summarizes the main sections and functions in the kpi.com CRM Tool and how they are connected. You are recommended to review this diagram before starting to use the CRM Tool.

1. Leads are contacts of your potential customers. This is normally the first step when a contact is registered in the CRM Tool. However, you may add a new contact directly as an Opportunity and/or a Contact.
2. Leads that show interest in your offer are usually converted to Opportunities. When a Lead is converted to an Opportunity, an Account and a Contact records are created in the CRM Tool.
3. Opportunities are the chances that your contact might buy your product or gets interested in your service. Leads are marked as Opportunities to reflect the process of sending quotes, an invoice or entering negotiations for a sale with the contact.
4. Accounts are company details of your customers, suppliers, resellers and etc. When a Lead is converted to an Opportunity, anAccount record is automatically created to store the company details of your contact.
5. Contacts are your customers, clients, suppliers, resellers and etc. When a Lead is converted to an Opportunity, a Contact record is automatically created to store the contact details. In fact, Contacts are all people connected to your company activities.
6. Email messages that are received from your Contacts are registered as Cases.
7. Resolved/closed Casesare moved to the Solutions list. It keeps the record of all your responses to your Contacts.
8. For each Contact or Lead you may add an Activity, such as Log a call, Schedule an event/meeting, Add a task or Send SMS.
9. Campaigns are all marketing and advertising activities that promote your business and generate potentialcustomers. CRM Tool allows you to create and manage your marketing campaigns that bring new Leads.
10. You may use the Massmailing system as part of your marketing campaign or to send an email message to your Leads, Opportunities and Contacts in bulk.
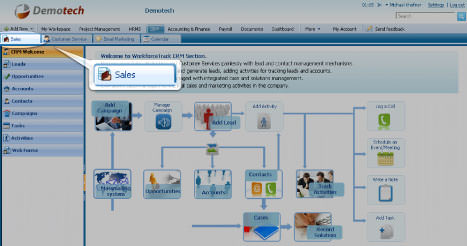
SALES PANEL
In the sales panel you can manage your customers, accounts, and leads. You can also organize your marketing campaigns, create web forms that help increase the sales volumes.
The Sales panel consists of:
Leads are contacts of your potential customers gathered from different sources.
Opportunities are the contacts of that might buy your product or gets interested in your service.
Accounts are the companies whom you are dealing with, while Contacts, Leads and Opportunities are the people you are dealing with. Accounts list contain all the information related to your actual customers and clients.
Contacts list includes details about people who are connected to your companies.
Campaigns are all marketing and advertising activities that promote your business and generate potential customers.
Activities are all the plans based on customers support ranging from logging a call and scheduling an event such as meetings, presentations and etc.
Web Forms allow you to create a contact form and place it on your website (e.g. “Request a sales quote” form). Once the website visitor fills in the form, a Case or a Lead is created in kpi.com CRM.
Note that not all users are able to have access to CRM section or have access to some of its features due to user permissions.
LEADS
Leads are your potential customers. The Leads list contains a list of contacts, which you treat as your possible clients.
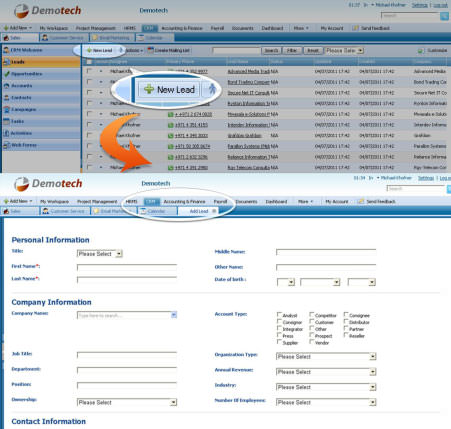
ADD LEAD
To add a new Lead, go to Leads subsection, and click New Lead button located on top left side of the page, fill in the form and click the Save button.
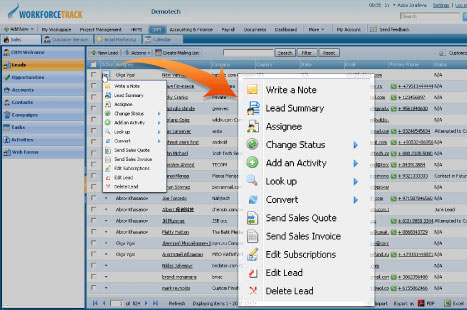
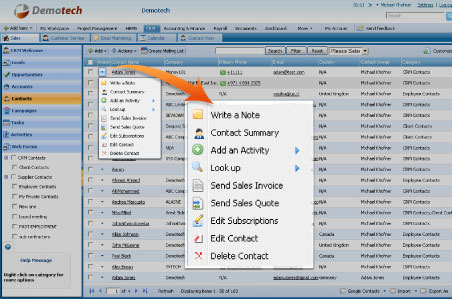
ACTION
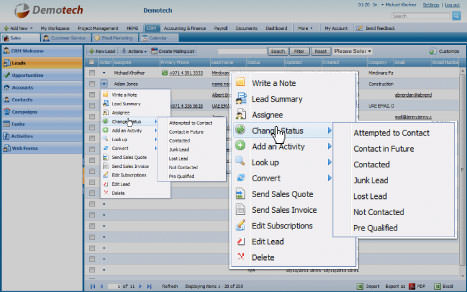
By default the Action dropdownis available on the first column of the Leads list. Once clicked, dropdown gives several options as displayed on the screenshot:
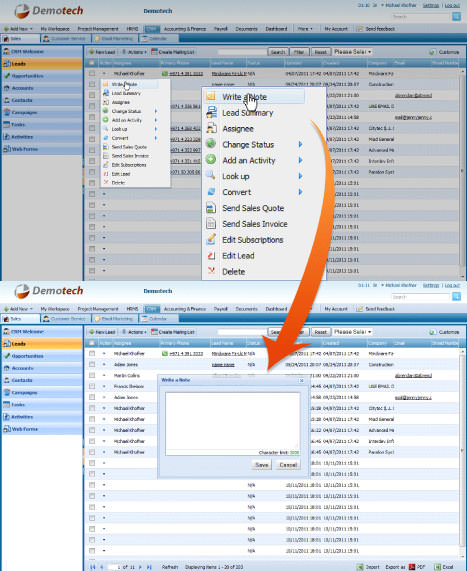
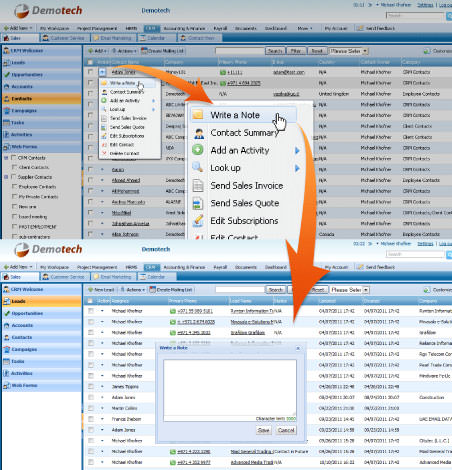
WRITE A NOTE
You can keep notes for each Lead. Click the action dropdown and select the Write a Note option.
VIEW LEAD SUMMARY
Click the Lead Summary button from the action dropdown to view full information on a Lead.

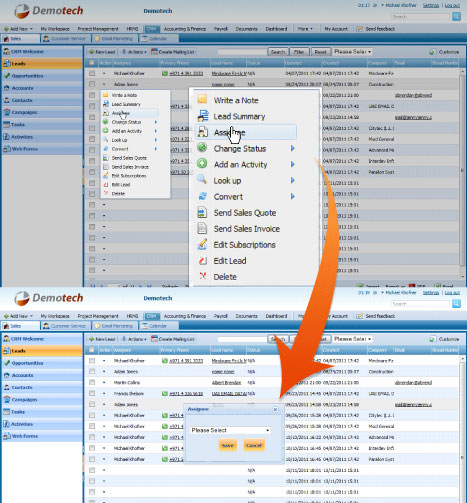
ASSIGNEE
You can assign one of your employees who will be responsible for dealing with the Lead and turning it to an actual customer. To set an assignee for a lead, choose Assignee option from the Action dropdown and save the selected assignee as displayed on the screenshot:
CHANGE STATUS
You can change the status of your lead to different types such as Attempted to Contact, Contacted, Contact in the Future and etc as displayed on the screenshot.
ADD ACTIVITY
You can add an activity such as log a call, schedule an event/meeting, add a task or send SMS. Adding an activity can be done though lead summary view or the Action dropdown.
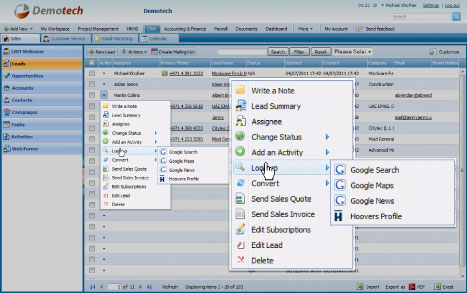
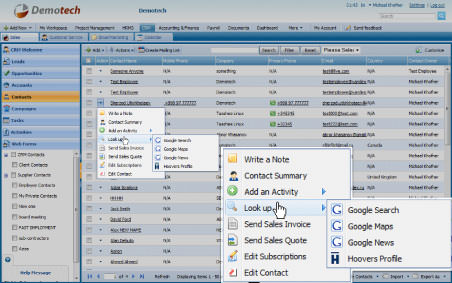
LOOK UP
In order to get more information about your Leads, you can use Look up function which searches the contact details (or others) using Google Search, Google Maps, Google News, and Hoovers Profile.
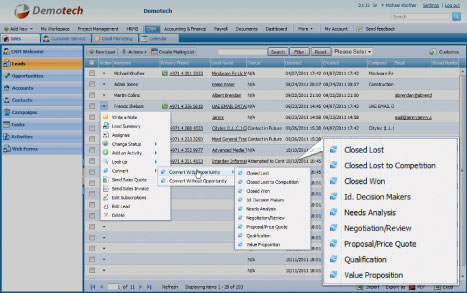
CONVERT INTO OPPORTUNITY
Opportunities are the chances that your client might buy your product or gets interested in your service. Leads are marked as Opportunities to reflect the process of sending a quote, an invoice or entering negotiations for a sale with the contact.
You can convert your Leads to Contacts either with an opportunity or without an opportunity.
There are different kids of opportunities that you should choose and set the due date of that opportunity.
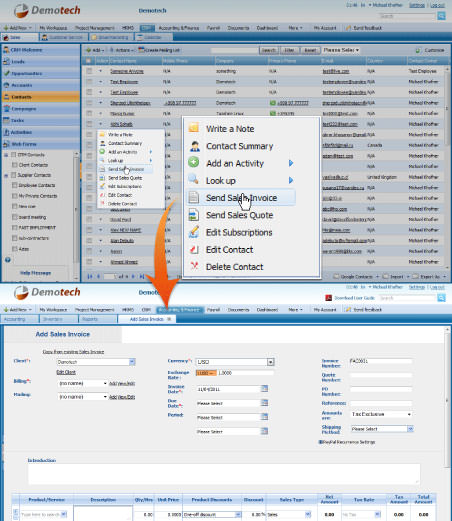
SEND SALES QUOTE AND INVOICE
By clicking on Send Sales Quote or Send Sales Invoice from the Action dropdown you will be forwarded to Accounting & Finance Section, where you fill in the form and send sales quote or invoice to your Lead.
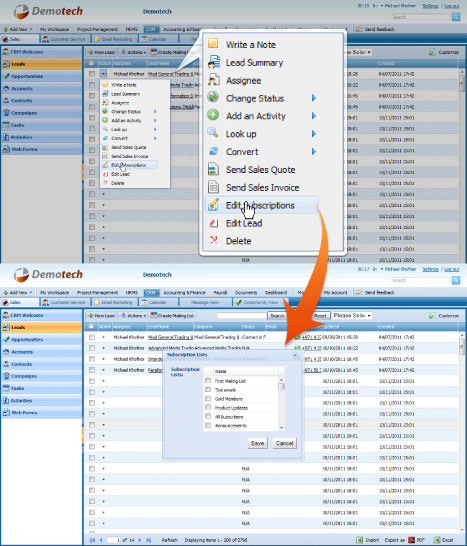
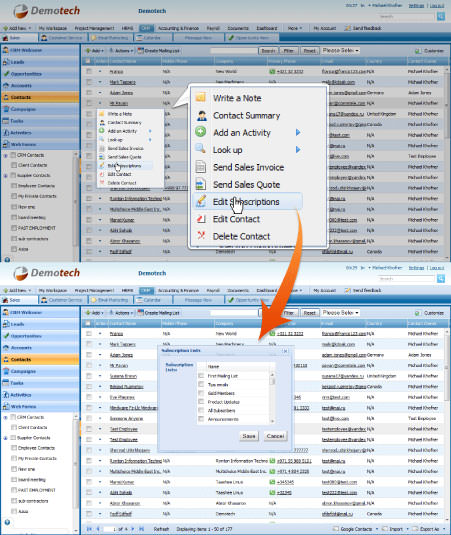
EDIT SUBSCRIPTIONS
You can add a Lead contact to a subscriptions list by choosing Edit Subscriptions option and then selecting a mailing list where you want to add the Lead.
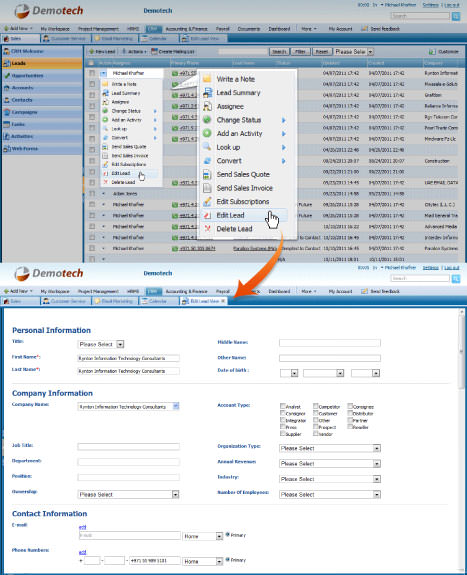
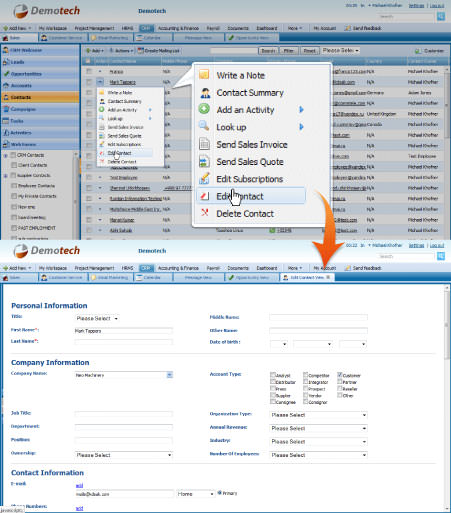
EDIT LEAD
Click on the Edit a Lead option from the Action dropdown to make changes in the lead details
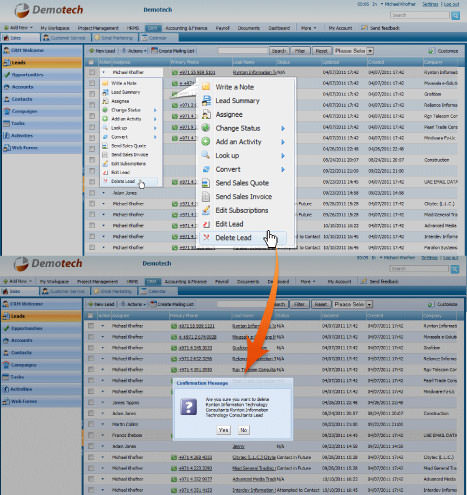
DELETE LEAD
Choose Delete Lead optionfrom the action dropdown to remove your lead from the list.
OPPORTUNITIES LIST
kpi.com Opportunities are the chances that your client might buy your product or gets interested in your service. Leads are marked as Opportunities to reflect the process of sending quotes, an invoice or entering negotiations for a sale with the contact.
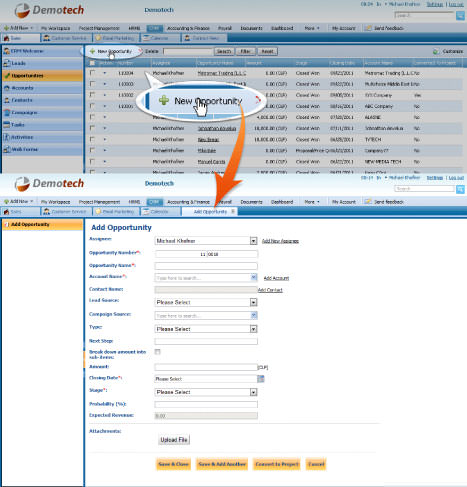
Add an Opportunity
To add a new Opportunity, go to Opportunities subsection and click New Opportunitybutton located on top left side of the page, fill in the form and click the Save button.
ACTION
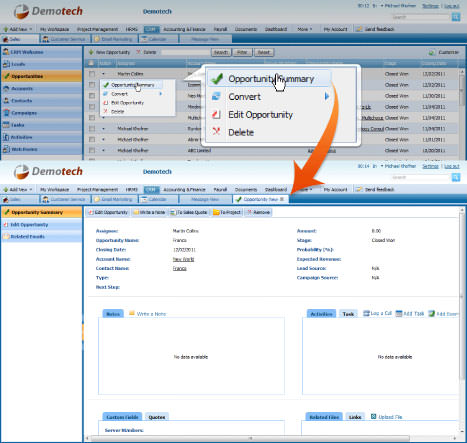
By default the Action dropdown is available on the first column of the Opportunities list. Once clicked, dropdown gives several options as displayed on the screenshot:

VIEW AN OPPORTUNITY SUMMARY
Click the Opportunity Summary button from the action dropdown to view the full opportunity information in a new window.
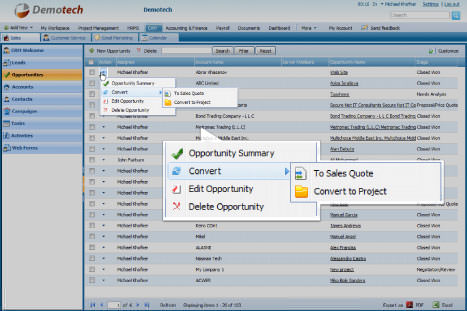
CONVERT OPPORTUNITY
Opportunities can be converted to a Sales Quote once there is a possibility of selling your products/services or they can be converted to a project if you want to manage your clients in a certain project.
You can convert an opportunity to a sales quote or a project by selecting Convert option from the Action dropdown.
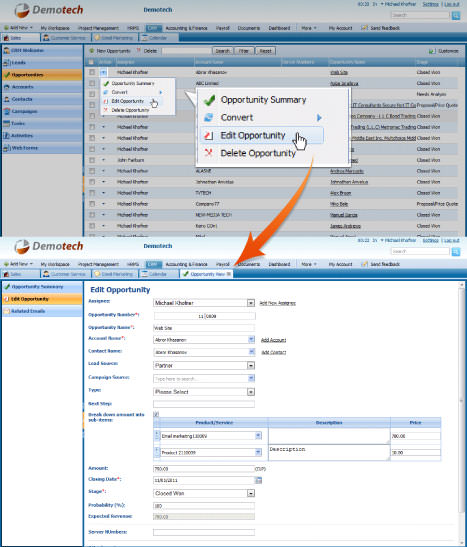
EDIT OPPORTUNITY
Select the Edit Opportunity option froom the Action dropdown make changes to the Opportunity.
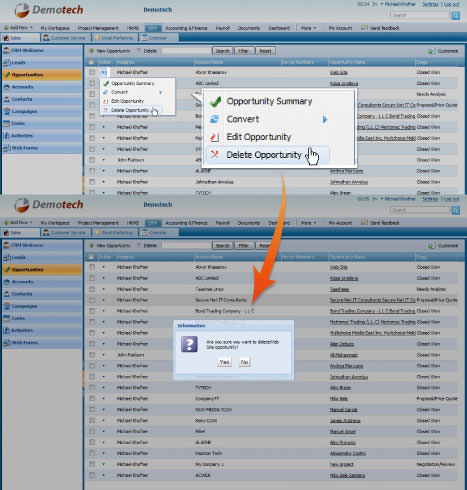
DELETE AN OPPORTUNITY
Choose Delete Opportunity option from the Action dropdown to remove your opportunity from the list.
ACCOUNTS LIST
Accounts are company details of your customers, suppliers, resellers and etc. Account can relate to several contacts (representatives of accounts whom you can contact to deal with the company).
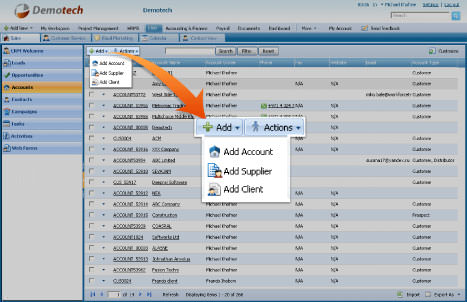
ADD AN ACCOUNT
To add a new Account, go to Accounts subsection,click Add button and select the Add Account option, fill in the form and click the Save button.
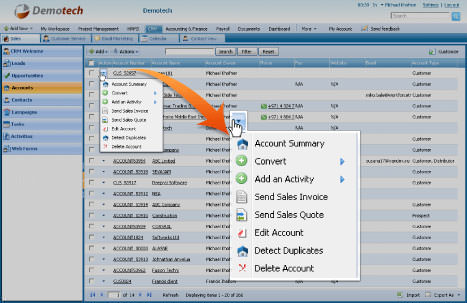
ACTION
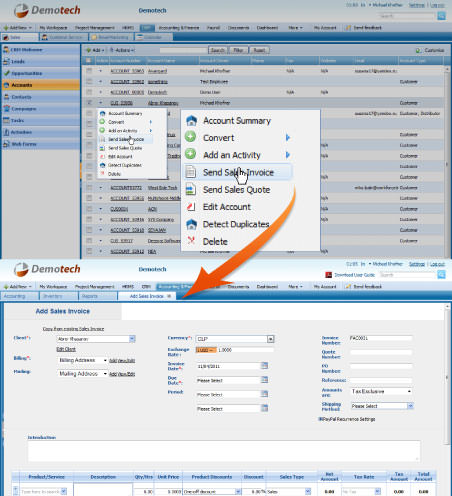
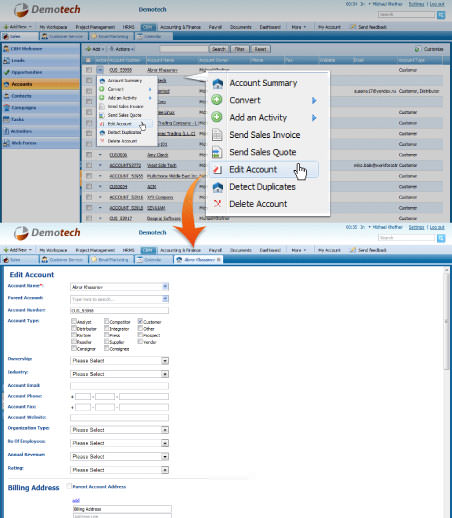
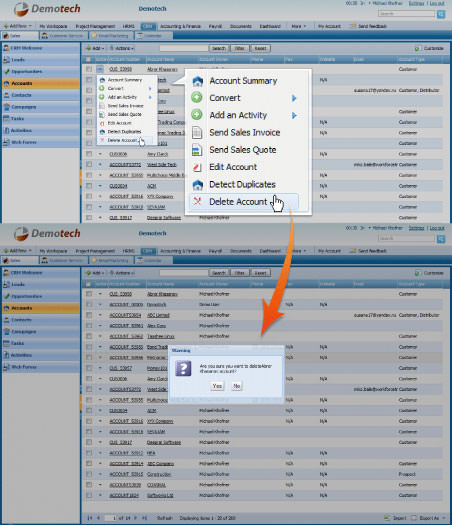
By default the Action dropdown is available on the first column of the Accounts list. Once clicked, dropdown gives several options as displayed on the screenshot:
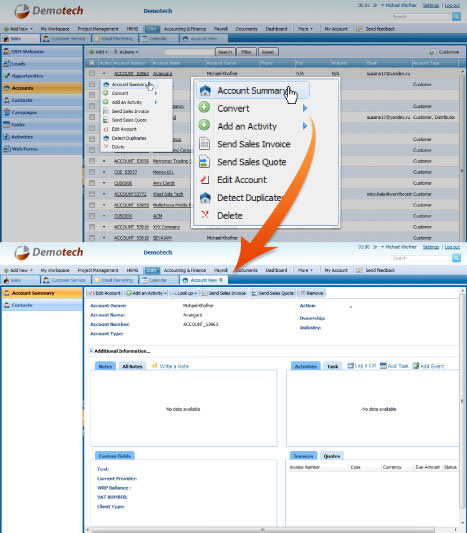
VIEW ACCOUNT SUMMARY
Click the Account Summary option from the action dropdown to view the full account information in a new window.
CONVERT ACCOUNT TYPE
Converting an Account allows you to classify an account as a customer, partner, distributor, supplier and etc. To convert an Account, click the action dropdown and select the Convert option as displayed on the screenshot.

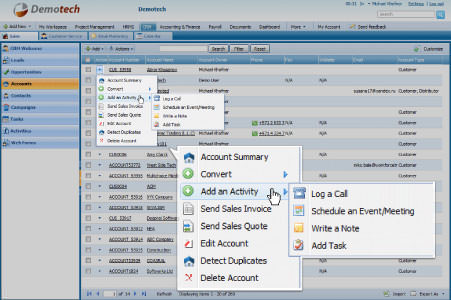
ADD ACTIVITY
You can add an activity such as log a call, schedule an event/meeting, write a note or add a task. Adding an activity can be done through Lead Summary view or the Action dropdown.
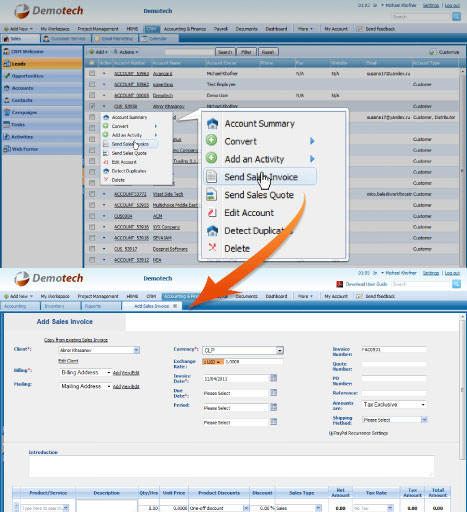
SEND SALES QUOTE AND INVOICE
By clicking on Send Sales Quote or Send Sales Invoice from the action dropdown you will be forwarded toAccounting & Finance section, where you fill in the form and send sales quote or invoice to your lead.
EDIT ACCOUNT
Select the Edit Account option froom the Action dropdown make changes to the Account.
DETECT DUPLICATES
The Detect Duplicates option in the Action dropdown helps find accounts with the same name.
DELETE ACCOUNT
Choose Delete Account option from the Action dropdown to remove your Account from the list.
CONTACTS LIST
Contacts are your customers, suppliers, resellers and etc.The Contacts list stores the details of all people whoare connected to your company activities. They can be called as contact people.
ADD CONTACT
To add a new Contact, go to Contacts subsection, click the Add button and select the Add a Contact option, fill in the form and click the Save button.

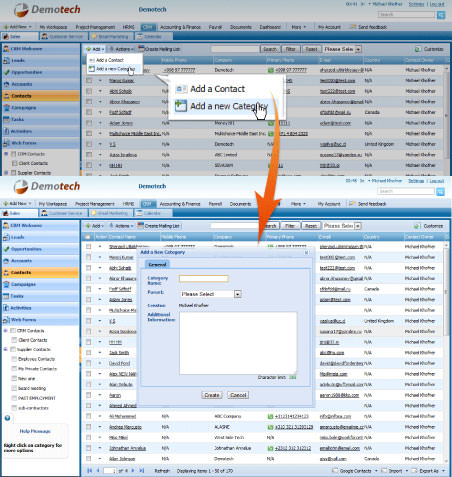
ADD CATEGORY
You can group Contacts into categories. To add a new Category, go to Contacts subsection, click the Add button and select the Add a Category option, fill in the form and click the Save button.
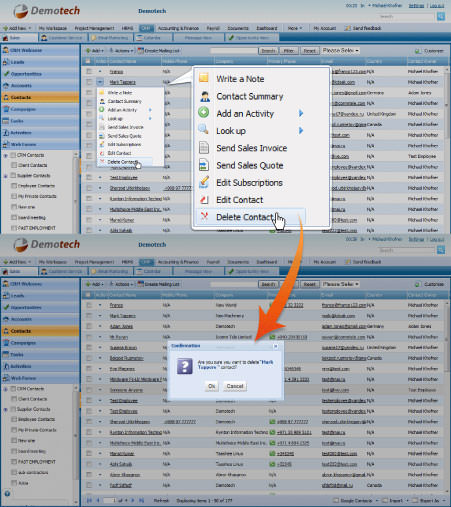
ACTION
By default the Action dropdown is available on the first column of the Contacts list. Once clicked, dropdown gives several options as displayed on the screenshot:
WRITE A NOTE
You can keep notes for each Contact. Click the action dropdown and select the Write a Note option.
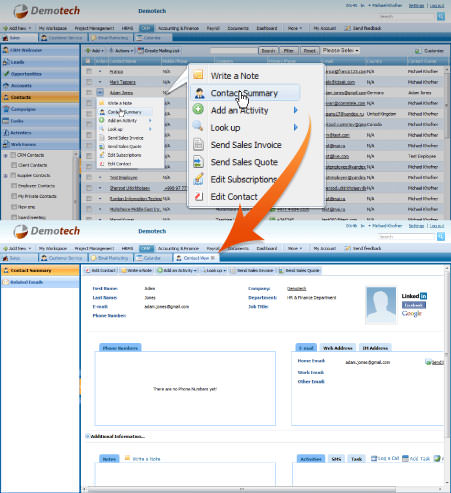
VIEW CONTACT SUMMARY
Click the Contact Summary button from the Action dropdown to view the full contact information in a new window. Alternatively, you can click on the contact names to view the contact details.
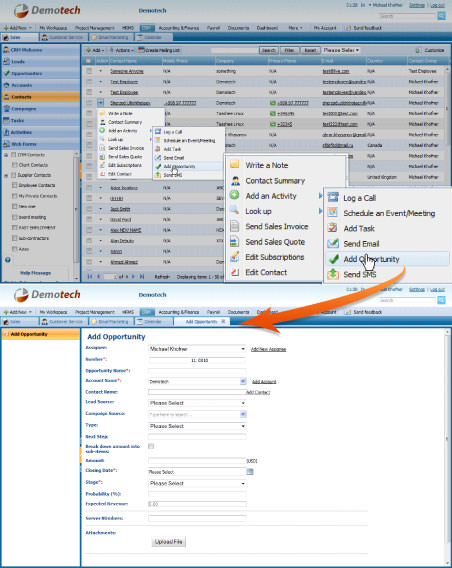
ADD ACTIVITY
You can add an activity such as log a call, schedule an event/meeting, add a task, send email, add opportunity, or send SMS.
LOOK UP
In order to get more information about your Leads, you can use Look up function and searche the contact details using Google Search, Google Maps, Google News, and Hoovers Profile.
SEND SALES QUOTE AND INVOICE
By clicking on Send Sales Quote or Send Sales Invoice from the action dropdown you will be forwarded to Accounting & Finance Section, where you fill in the form and send sales quote or invoice to your lead.
EDIT SUBSCRIPTIONS
You can add a contact to a subscriptions list by choosing the Edit subscriptions option on the Action dropdown and selecting a mailing list to which you want to add a contact.
EDIT CONTACT
Select the Edit Account option from the Action dropdown make changes to the Account.
DELETE CONTACT
Choose Delete Contact option from the Action dropdown to remove the Contact from the list.
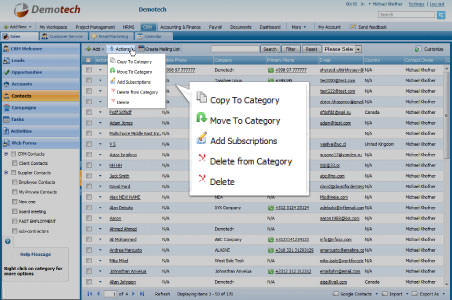
ACTION BUTTON
Click on the Action button to copy or move the selected Contacts to a category, Delete from a category, or Delete the Contacts. Make sure you have ticked the Contacts you want to take Action on.
CAMPAIGNS LIST
Campaigns are all marketing and advertising activities that promote your business and generate potential customers. This list contains your campaigns that you have launched.
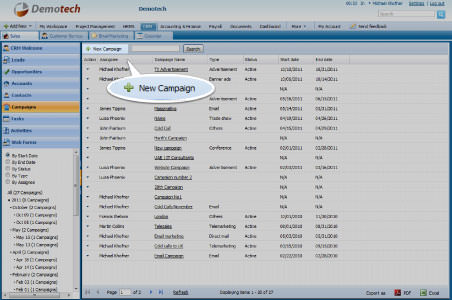
ADD CAMPAIGN
To add a new Campaign, go to Campaigns subsection, and click New Campaign button on the top left side of the page, fill in the form and click the Save button.
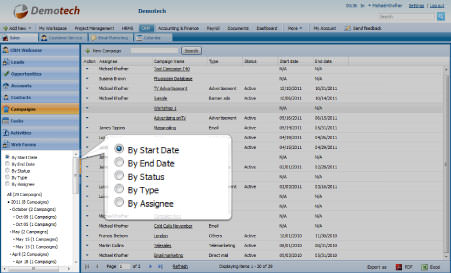
SORT THE LIST
Under the left sidebar, a select box allows you to filter the list of campaigns displayed on the screen.
ACTION
By default the Action dropdown is available on the first column of the Campaigns list. Once clicked, dropdown gives several options as displayed on the screenshot:
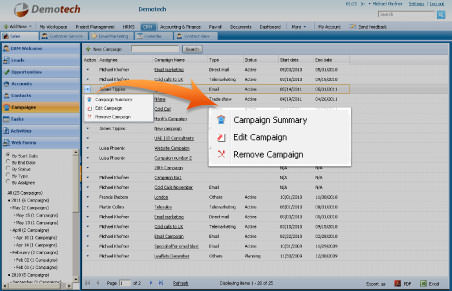
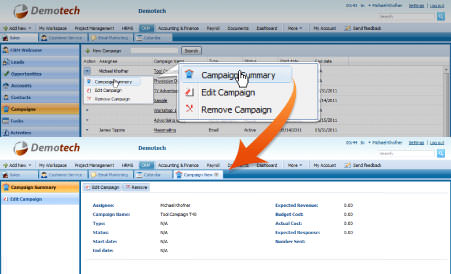
VIEW CAMPAIGN SUMMARY
Click the Campaign Summary button from the action dropdown to view the full campaign information in a new window.
EDIT CAMPAIGN
Select the Edit Campaign option from the Action dropdown make changes to the Campaign.
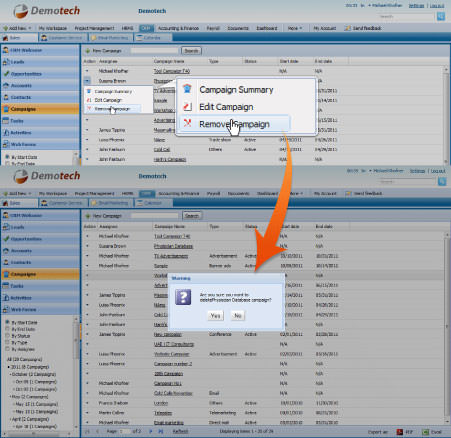
REMOVE CAMPAIGN
Choose Delete Campaign option from the Action dropdown to remove your campaign from the list.
TASKS LIST
The tasks under CRM are the same as under Project management section.The tasks section reflects all tasks that are related to particular projects.
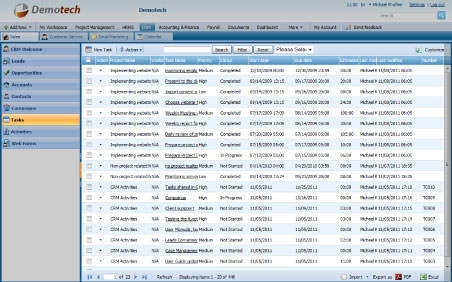
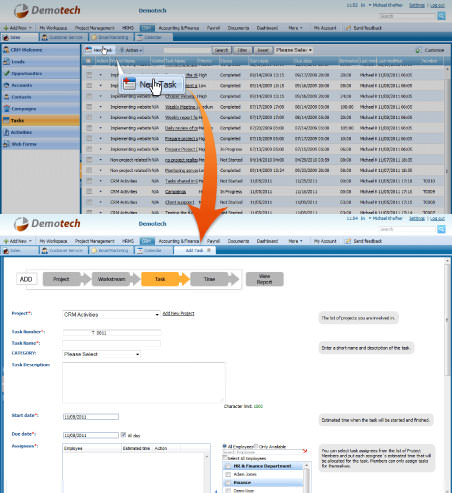
ADD TASK
To add a new Task, go to Tasks subsection, and click New Task button on the top left side of the page, fill in the form and click the Save button.
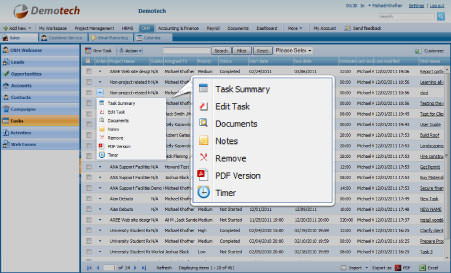
ACTION
By default the Action dropdown is available on the first column of the Tasks list. Once clicked, dropdown gives several options as displayed on the screenshot:
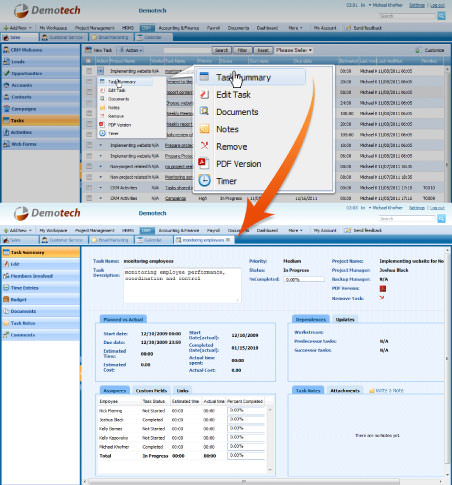
VIEW TASK SUMMARY
Click the Task Summary button from the action dropdown to view the full task information in a new window. Alternatively, you can click the activity task name which is underlined to view the event details.
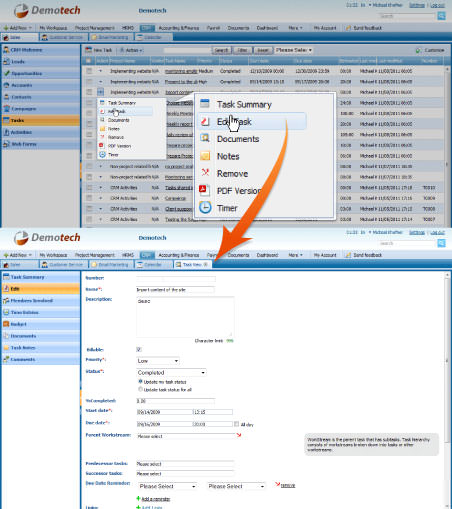
EDIT A TASK
Select the Edit Task option from the Action dropdown make changes to the Task.
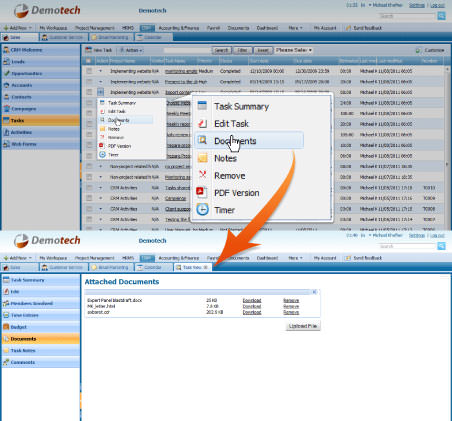
VIEW DOCUMENT
Click Documents option from the Action dropdown to view the related documents uploaded. If you do not have any documents in the list, you can upload a new one by pressing the Upload File button.
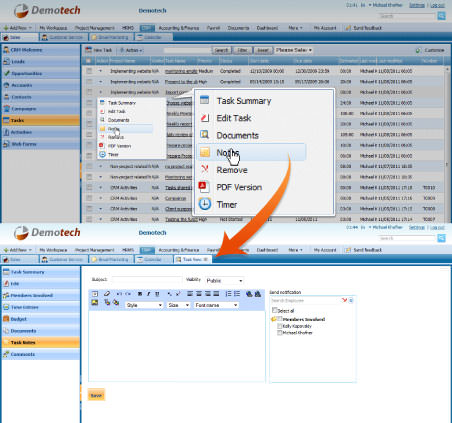
TASK NOTES
Notes option from the Action dropdown allows to you save notes and comments for each task. You can make your notes visible for yourself only or the members the task is assigned to. Once a note is made visible for Public, task members will get an email notification about the note you entered.
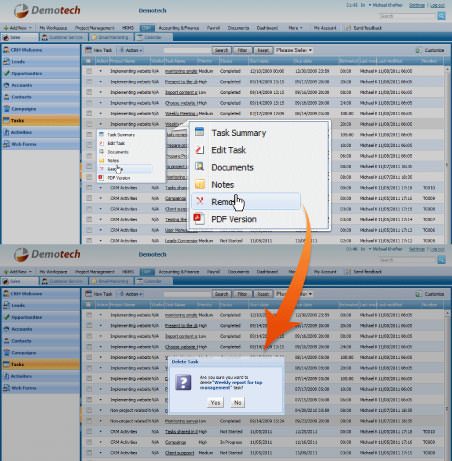
DELETE A TASK
Select the Remove option from the Action dropdown to remove a task from the list.
PDF VERSION
This option from the action dropdown enables you to save the task details in a PDF format.

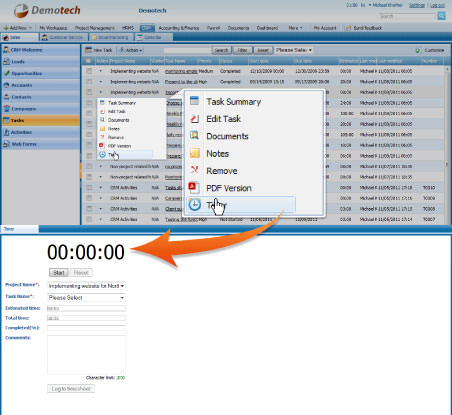
TIMER
Timer will help you calculate the time you spend on a task. Click on the Start button to start the timer, and Stop button to stop it. Clicking on the Log to timesheet button, the calculated time spent on the task will be saved in the < b>Timesheet form in the Project Management section.
TASK SUMMARY SECTION
Task summary section can be accessed either from the Action dropdown or by clicking the task name. The section consists of several subsections.
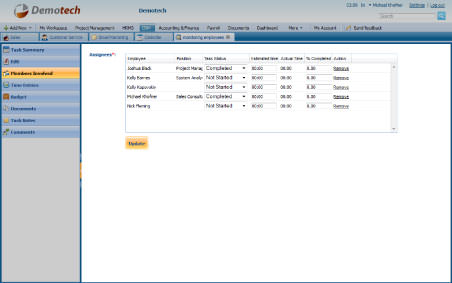
MEMBERS INVOLVED
In this section you can assign the task one of the members in the dropdown list, enter task status, time estimates and % completion for the task.
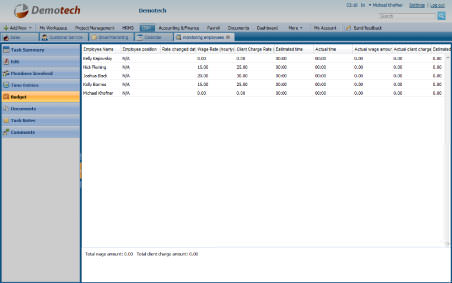
BUDGET
In this section, you can view the task budget, consisting of the following parameters:
- Rate changed date – the date when the Wage rate, or the Client Charge rate values have changed. The Range changed date is taken into account when Actual Wage amount and Actual client charge amount values are calculated.
- Wage Rate (hourly) – is the hourly rate of the employee, calculated piding the monthly wage by the number of hours in month.
- Client Charge Rate – is the hourly rate charged to the client.
- Estimated time – is the estimated time for the task, set in the Members Involved section.
- Actual time – is the time spent on completion of the task.
- Actual wage amount – is the Wage Rate (hourly) multiplied by the Actual time value.
- Actual client charge amount– is the Client Charge Rate multiplied by the Actual time value.
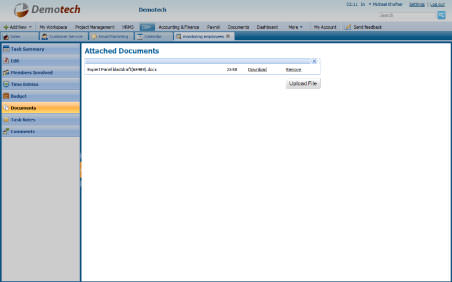
DOCUMENTS
List of files attached to a task is provided in this section. You can attach files/documents to your task by pressing the Upload File button.
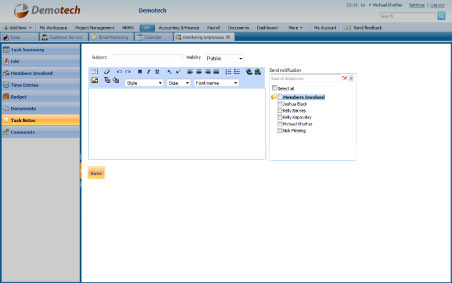
NOTES
View or add notes to a task. You can make the visibility of your notes as Private (visible only to you) or Public (visible to all task members). Once you make the visibility Public, select the members that you want to send an email notification about the note you entered.
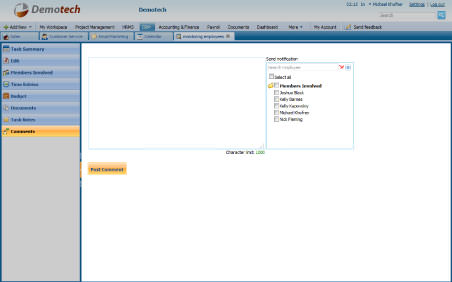
COMMENTS
View or add comments to a task. Once you add a comment select the members that you want to send an email notification about the comment you entered.
ACTIVITIES LIST
Activities are your Action on your Leads, Contacts and Accounts such as calls, and events.
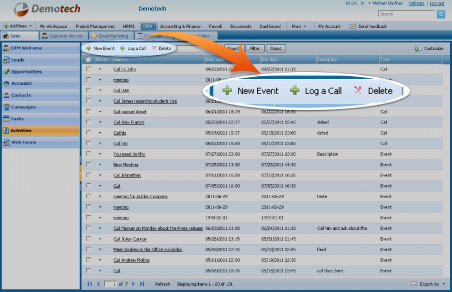
ADD NEW ACTIVITY
To add a new Activity, go to Activities subsection, and click New EventorLog a call button on the top left side of the page, fill in the form and click the Save button.
ACTION
By default the Action dropdown is available on the first column of the Activities list. Once clicked, dropdown gives several options as displayed on the screenshot:
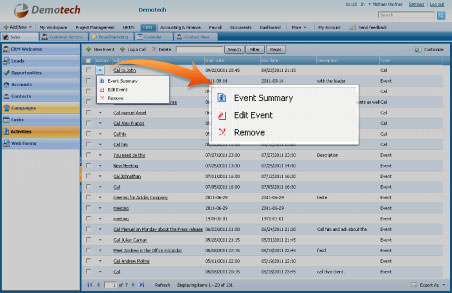
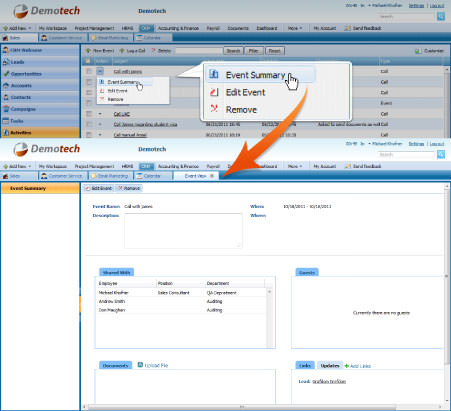
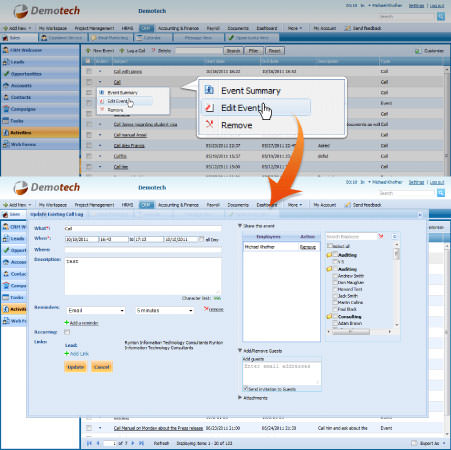
VIEW EVENT SUMMARY
Click the Event Summary button from the Action dropdown to view full information on theevent in a new window. Alternatively, you can click the Activity subject name to view the event details.
EDIT EVENT
Select the Edit Event option from the Action dropdown make changes to the Event.
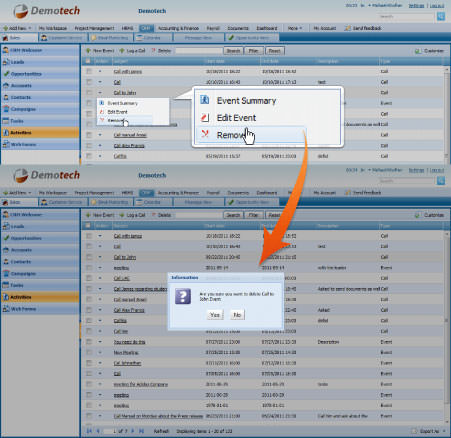
DELETE EVENT
Choose Removeoption from the Action dropdown to remove the event from the list. Alternatively, you can tick the events that you want to remove and press Delete.
WEB FORMS LIST
Web Forms allow you to create a contact form and place it on your website (e.g. “Request a sales quote” form). Once the website visitor fills in the form, a Case or a Lead is created in kpi.com CRM.
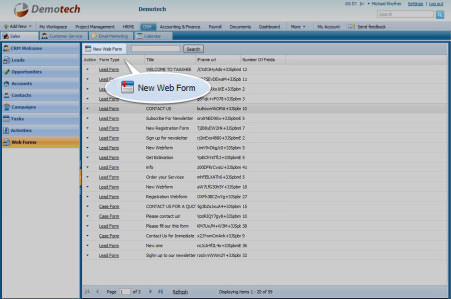
ADDWEB FORM
To add a new Web Form, go to Web Forms subsection, and click New Web Form button on the top left side of the page, fill in the form and click Save button.
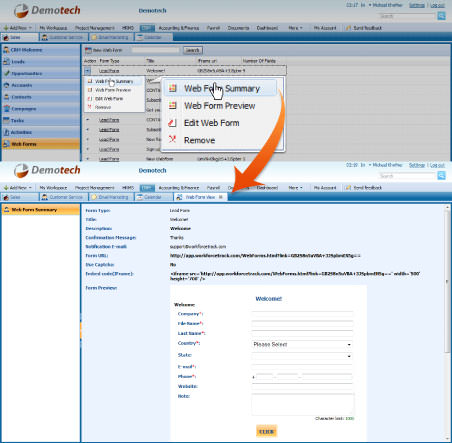
ACTION
Action dropdown is located next to each Web form in the list. The dropdown gives several options as displayed on the screenshot:
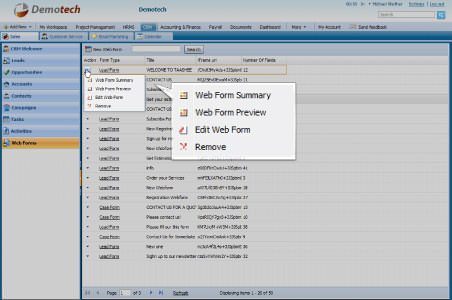
WEB FORM SUMMARY
Click the Web Form Summary button from the Action dropdown to view the full web form information in a new window. Alternatively, you can click the web from name to view the web form details.
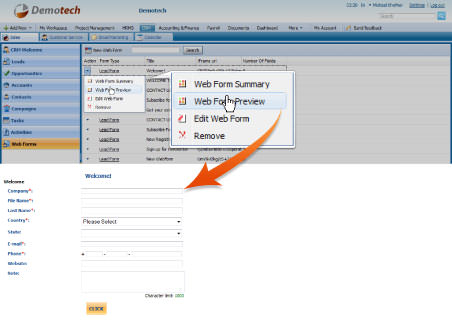
WEB FORM PREVIEW
Click on the Web form Preview option to preview the web form as it is displayed on a web page.
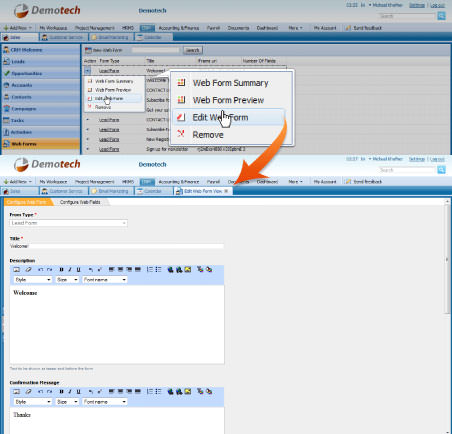
EDIT WEB FORM
Select the Edit Web Form option from the Action dropdown make changes to the Web Form.
DELETEWEB FORM
Select the Removeoption from the Action dropdown to remove your Web Form from the list.

CUSTOMER SERVICE
Customer Service panel, allows you to manage your cases, solutions, accounts and contacts in this section.
The customer service panel consists of:
Accounts –company details of your customers, suppliers, resellers and etc.
Contacts – contact details of your customers, clients, suppliers, resellers and etc.
Cases – email requests received from your Contacts.
Solutions – a list of resolved or closed Cases.
ACCOUNTS AND CONTACTS
Please refer to the Accounts and Contacts sections in the Sales Panel of the CRM tool.
CASE MANAGEMENT
Cases are email requests received from your Contacts.
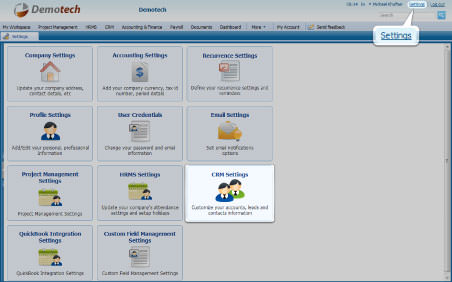
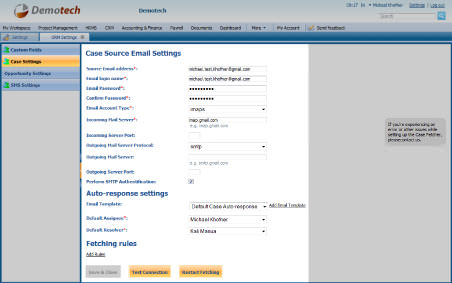
CONFIGURE EMAIL
You can configure email messages to be automatically fetched as cases from your mailbox.Go to Settings section, choose CRM settings and then Case settings. Fill in the form with the mailbox details.
Enter email address, password, mail server and then choose an assignee and a resolver form the employee options.
Under Fetching Rules, you can assign a person to certain emails that contain or does not contact a particular work in the sender/receiver email address. You can also move some cases to trash if they contain the word indicated.
Finally you test the connection or restart fetching.
All the emails coming to the email address you added will also be visible in cases.
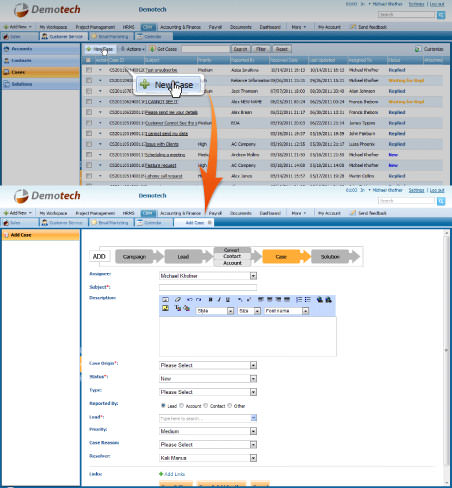
ADD CASE
Normally, cases are received automatically from your customers but you can add it manually by clicking the New Case button on the top left side of the page, fill in the form and click Save button.
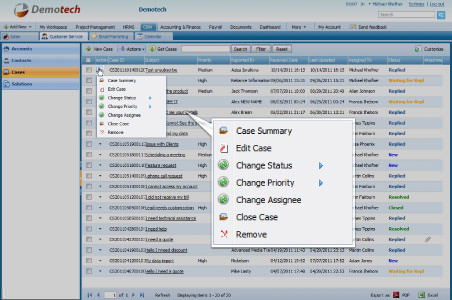
ACTION
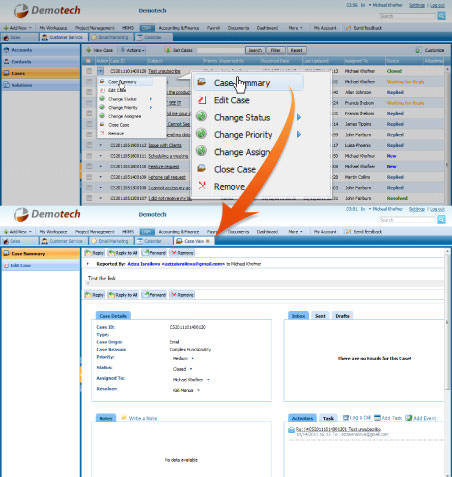
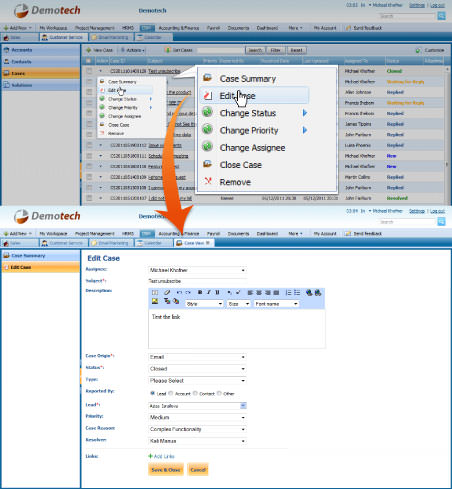
By default the Action dropdown is available on the first column of the Cases list. Once clicked, dropdown gives several options as displayed on the screenshot:
Click the Case Summary button from the action dropdown to view the full case information in a new window. Alternatively, you can click the case subject which is underlined to view the case details.
EDIT CASE
Select the Edit Case option from the Action dropdown make changes to the Case.
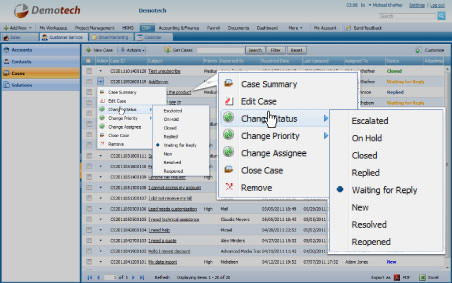
CHANGE STATUS
All Cases have a status “New” by default.A replied Case status automatically changes to “Replied”. You can also change the status manually from the Action dropdown as displayed on the screenshot:
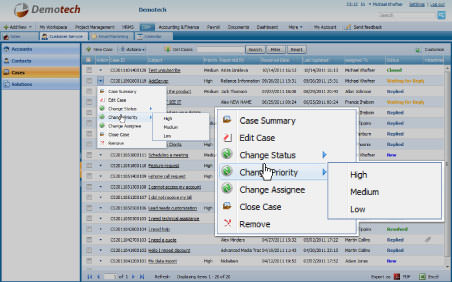
CHANGE PRIORITY
By default, the priority for all Cases is set to “Medium”. You can change the Case priority to “High” or “Low” from the Action dropdown as displayed on the screenshot.
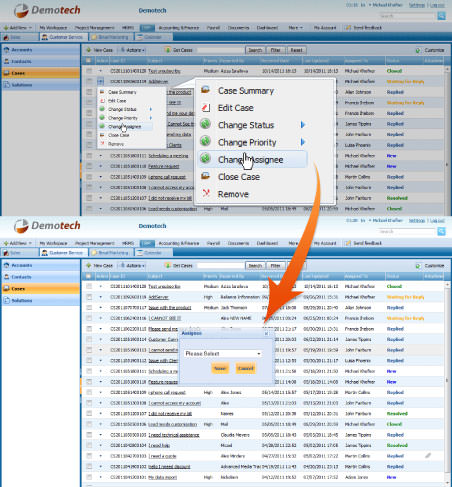
CHANGE ASSIGNEE
Change the case assignee by pressing Change Assignee from the Action dropdown and selecting another assignee from the options provided.
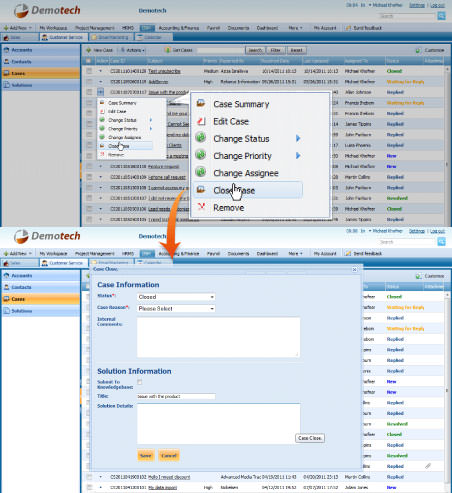
CLOSE CASE
Select Close Case from the Action dropdown to close the Case. You can close the Case with a solution by filling in solution details. The provided solution will appear in Solutions list.
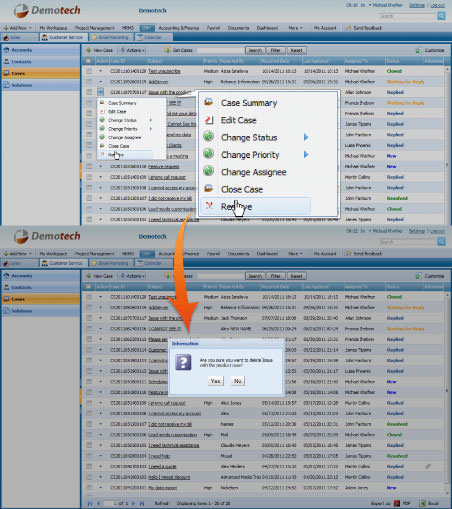
REMOVE
Choose Remove option from the Action dropdown to remove the Case from the list.
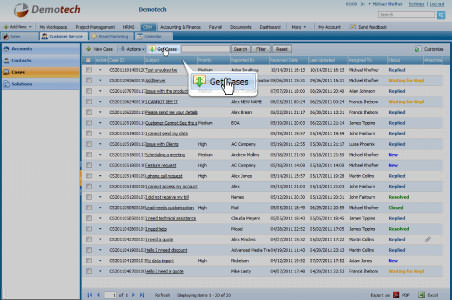
UPDATE INCOMING CASES
Click the Get Cases button to fetch new cases from the email address configured in the Settings section.The page will refresh andyou willsee all incoming Cases.
SOLUTIONS LIST
The Solutions section includes all your solutionsto your Cases.It keeps the record of all your responses to your Contacts.
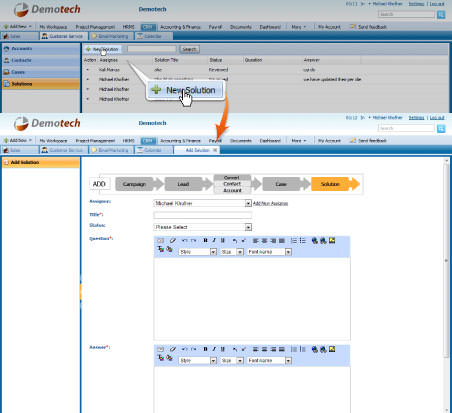
ADD A SOLUTION
Solutions are added automatically once a Case is closed and the solution details are provided on the Close Case form. To add new Solution manually, go to Solutions subsection, and click the New Solution buttonon the top left of the page, fill in the form and click the Save button.
ACTION
By default the Action dropdown is available on the first column of the Solutions list. Once clicked, dropdown gives several options as displayed on the screenshot:
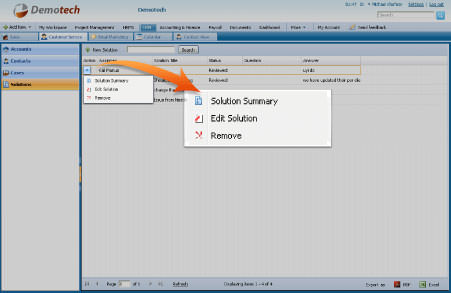
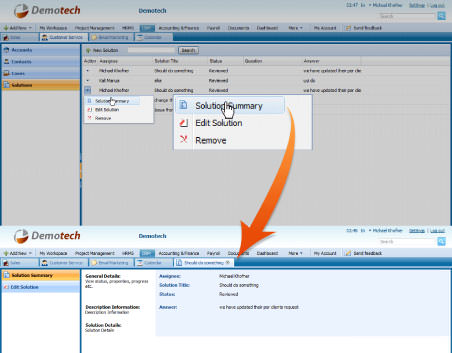
VIEW SOLUTION SUMMARY
Click the Solution Summary button from the Action dropdown to view the full information ona Solution in a new window.
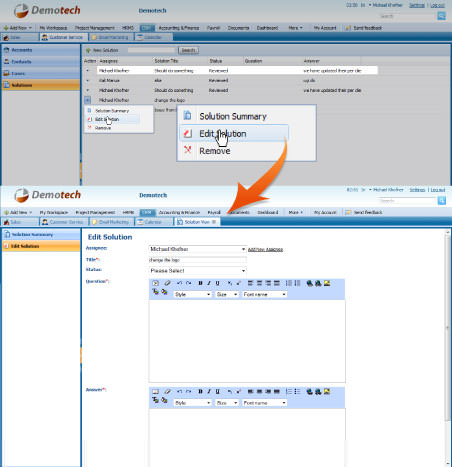
EDIT SOLUTION
Select the Edit Solution option from the Action dropdown make changes to the Solution.
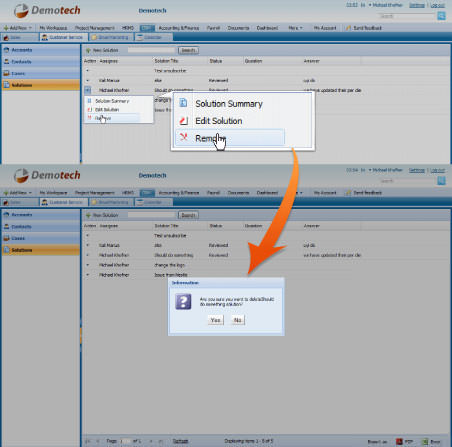
DELETE SOLUTION
Choose Remove option from the Action dropdown to remove your Solution from the list.
EMAIL MARKETING
Email Marketing section provides mass mailing tools, allowing sending bulk email messages to your Leads, and Contacts.
The Email Marketing panel consists of:
Mailing List– contains subscription lists.
Draft Messages – contains your saved messages.
Sent Messages – contains all sent mass mailing messages.
Queued Messages – contains messages that are scheduled to be sent on a certain date and time.
MAILING LIST
Use mass mailing tool to send email messages to your Leads and Contacts in bulk. Mass mailing is available in the Leads and Contacts sections.
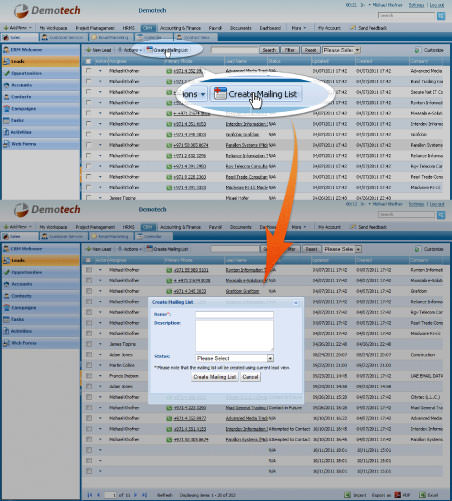
ADD MAILING LIST
To create a Mailing List, on the Leads or Contacts section tick the contacts you want to add to your mass mailing list and click the “Create mailing list” button. The newly added Mass Mailing List will appear in Email Marketing section.
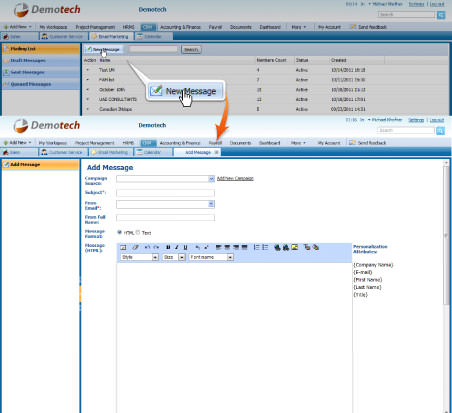
ADD MESSAGE
To create message for mass mailing, click the New Message button on the top left of the page and fill in the message details. You can schedule the message tobe sent on a particular date and time, save the massage as a draft, or send the message to selected groups straight away.
ACTION
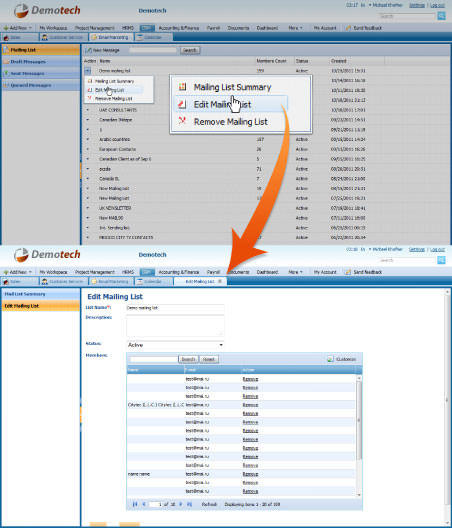
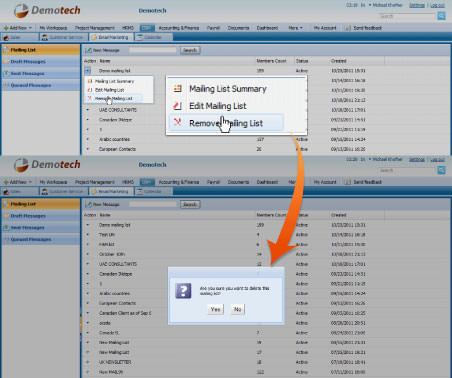
By default the Action dropdown is available on the first column of the Mailing List. Once clicked, dropdown gives several options as displayed on the screenshot:
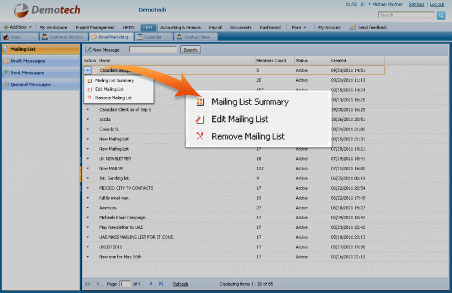
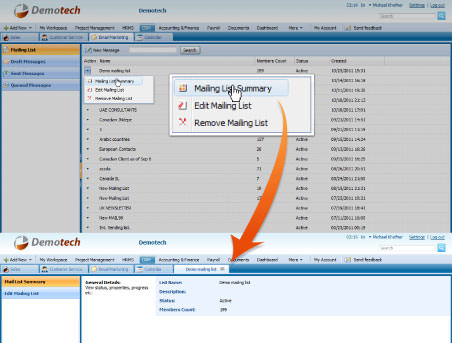
VIEW MAILING LIST SUMMARY
Click the Mailing List Summary button from the Action dropdown to view the full mailing list information in a new window.
EDIT MAILING LIST
Select the Edit Mailing List option from the Action dropdown make changes to the Mailing List.
DELETE MAILING LIST
Choose Remove Mailing List option from the Action dropdown to remove a Mailing List from the list.
DRAFT MESSAGES LIST
The page contains all messages saved as a draft.
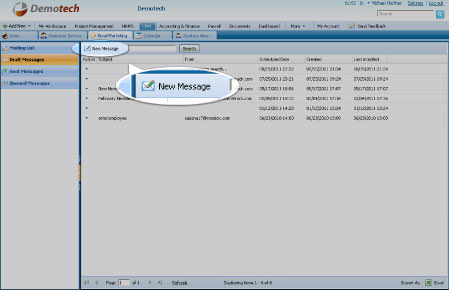
ADD DRAFT MESSAGE
To create message for mass mailing, click the New Message button on the top left of the page and fill in the message details. You can schedule the message tobe sent on a particular date and time, save the massage as a draft, or send the message to selected groups straight away.
ACTION
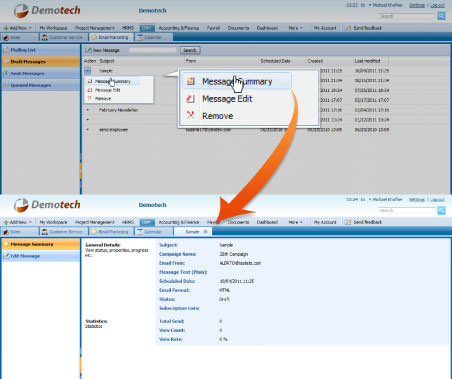
By default the Action dropdown is available on the first column of the Draft Messages list. Once clicked, dropdown gives several options as displayed on the screenshot:
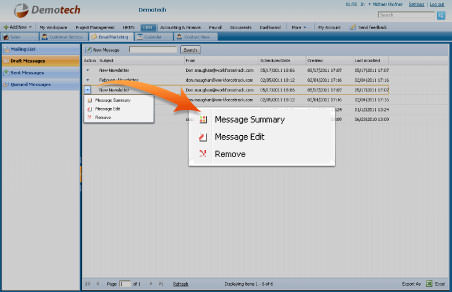
VIEW MESSAGE SUMMARY
Click the Message Summarybutton from the Action dropdown to view full details of the message in a new window.
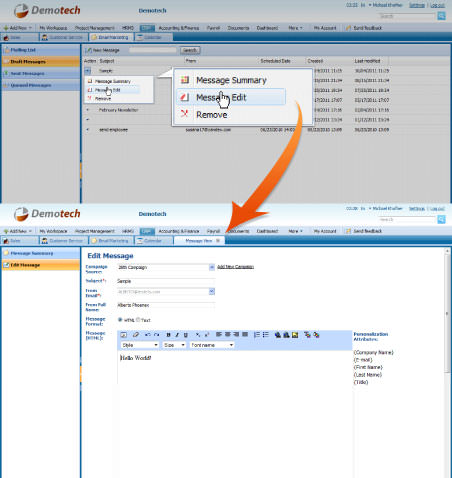
EDIT MESSAGE
Select the Message Edit option from the Action dropdown make changes to the Draft Message.
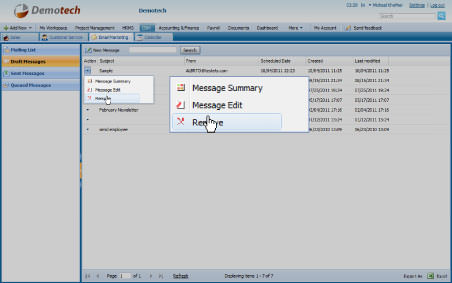
DELETE DRAFT
Choose Remove option from the Action dropdown to remove your draft message from the list.
SENT MESSAGES LIST
All sent messages are stored in the Sent Messages List section. This section also provides the number sent messages per Mailing List, the number of messages that did not reach receivers (bounced), the number of receivers who have clicked on unsubscribe link in sent email (unsubscribed), number of views (opens) of sent email by receivers.
ADD NEW MESSAGE
To create message for mass mailing, click the New Message button on the top left of the page and fill in the message details. You can schedule the message tobe sent on a particular date and time, save the massage as a draft, or send the message to selected groups straight away.
ACTION
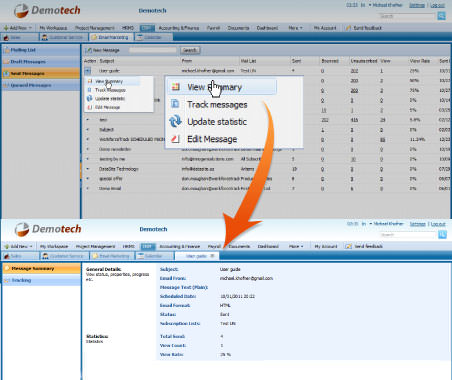
By default the Action dropdown is available on the first column of the Sent Messages list. Once clicked, dropdown gives several options as displayed on the screenshot:
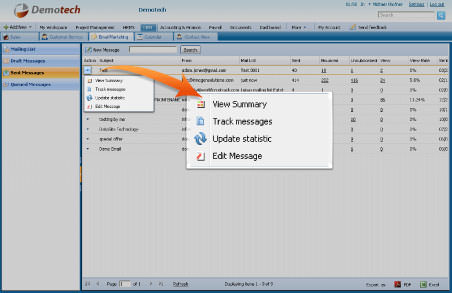
VIEW A MESSAGE SUMMARY
Click the View Summary button from the action dropdown to view the full message information in a new window.
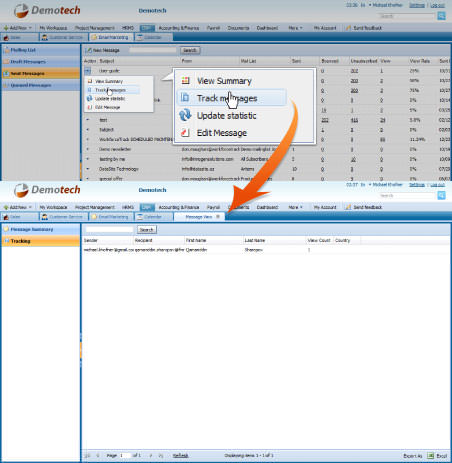
TRACK MESSAGES
Click on the Track messages option from the Action dropdown to view message details sent to each recipient.
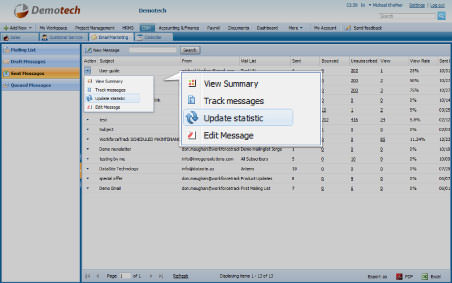
UPDATE STATISTIC
You can also update the statistics using Update statistic option.
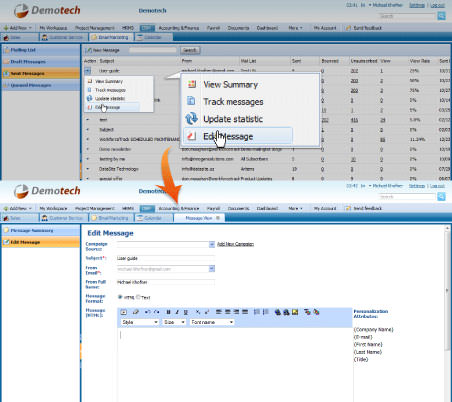
EDITMESSAGE
Select the Edit Message option from the Action dropdown make changes to the Message schedule it for another delivery.
QUEUED MESSAGES LIST
List of messages scheduled for sending can be seen in the Queued Messages section.
ADD NEW MESSAGE
To create message for mass mailing, click the New Message button on the top left of the page and fill in the message details. You can schedule the message tobe sent on a particular date and time, save the massage as a draft, or send the message to selected groups straight away.
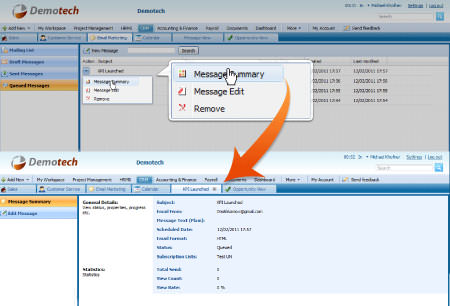
ACTION
Action dropdown is located next to each message in the list. The dropdown gives several options as displayed on the screenshot:
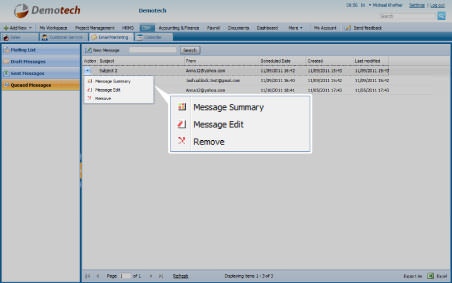
VIEW MESSAGE SUMMARY
Click the View Summary button from the Action dropdown to view the full information on the message in a new window.
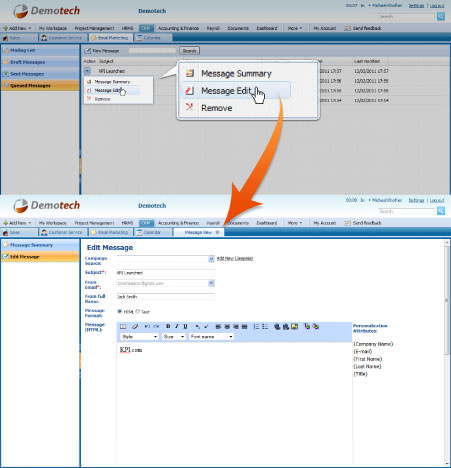
EDIT MESSAGE
Select the Edit Message option from the Action dropdown make changes to the Message.
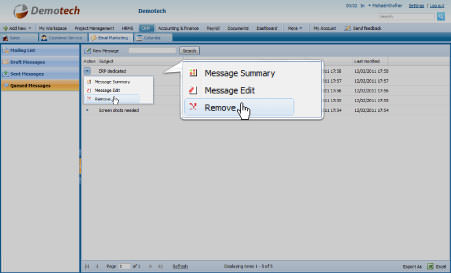
REMOVE MESSAGE
Choose Remove option from the Action dropdown to remove your queued message from the list.
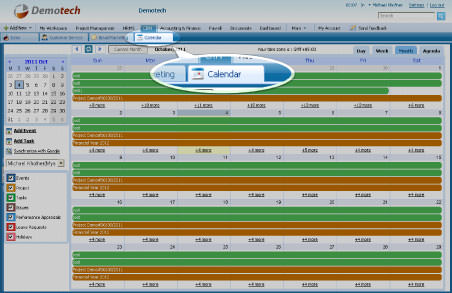
CALENDAR
kpi.com Calendar is a handy tool for organizing events and activities. You can add events, tasks and activities using your calendar. kpi.com Calendar is configurable with your Google calendar: you can synchronize both calendars with one another.
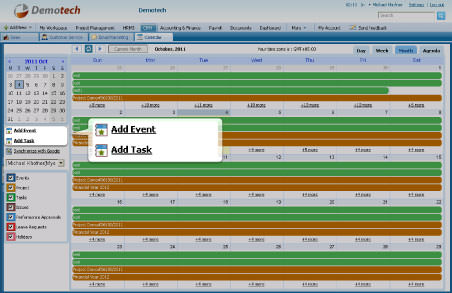
ADD EVENTS
To add a new Event, go to Calendar section, and click the Add Event link on the left navigation bar of the page, fill in the form and click the Save button. You can also add event by clicking on the corresponding calendar area.
CONFIGURE YOUR CALENDAR WITH GOOGLE CALENDAR
In order to synchronize your kpi.com Calendar with your Google mail calendar you need to link up your kpi.com account to your Google account. Please follow the steps below:
1. Sign into your Google mail account on the same browser that you opened kpi.com Calendar tool.
2. On the kpi.com Calendar section, click the configure with Google link. Select your Google account for configuring in the page that opens. Click Continue after selecting the account.
3. In the Grant Access page that opens, select Grant access button to confirm the access. To deny the access, click on Deny access.
Once you have completed the above steps, you have linked up your kpi.com account with your Google account.
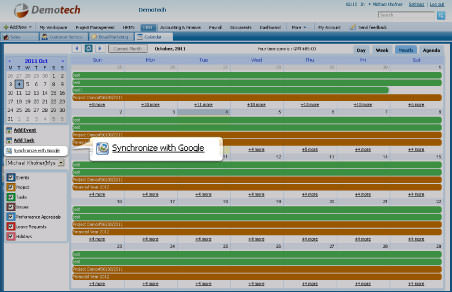
SYNCHRONIZE WITH GOOGLE
Before synchronizing your kpi.com Calendar with your Google Calendar, make sure you have configured your calendar with Google Calendar. Please follow the steps below to Synchronize your kpi.com Calendar with your Google Calendar.
1. Click on the synchronize with Google link
2. A pop up window appears asking for the period of data to synchronize. You can transfer all or tick specific ones to transfer. In order to set the period manually uncheck the tick box and set the dates. Click the Synch button.
3. You will get a confirmation if your synch was successful.
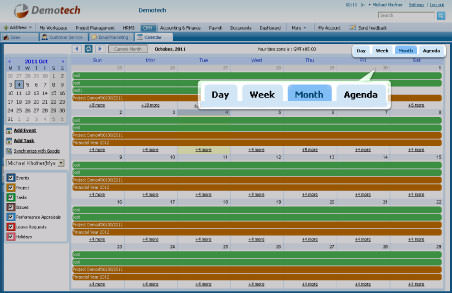
DAILY CALENDAR
To see the daily calendar, you need to pick DAY tab on the top corner. By default, current day is displayed. You can add/delete/edit calendar activities in this mode in the main panel or using the links at the left.
WEEKLY CALENDAR
You can view your calendar in a weekly mode by choosing the WEEK tab on the top right of the calendar page. By default, current week is displayed. You can add/delete/edit calendar activities in this mode in the main panel or using the links at the left.
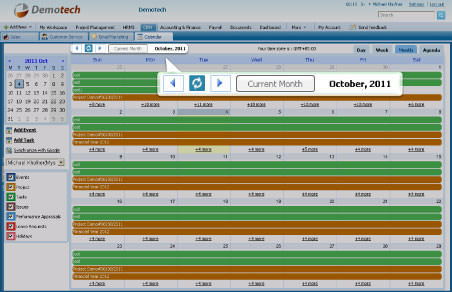
MONTHLY CALENDAR
To see a monthly calendar, you need to pick MONTH tab on the top corner. By default, currentmonthis displayed. You can add/delete/edit calendar activities in this mode in the main panel or using the links at the left.
AGENDA
By clicking on the AGENDA tab you can view all the coming events on one page.
VIEW CURRENT CALENDAR PERIOD
If you are viewing calendar period other than the current period, you can easily navigate back to the current period by just click on the Current Week, Current Month, and Today buttons depending on the period you are working on.