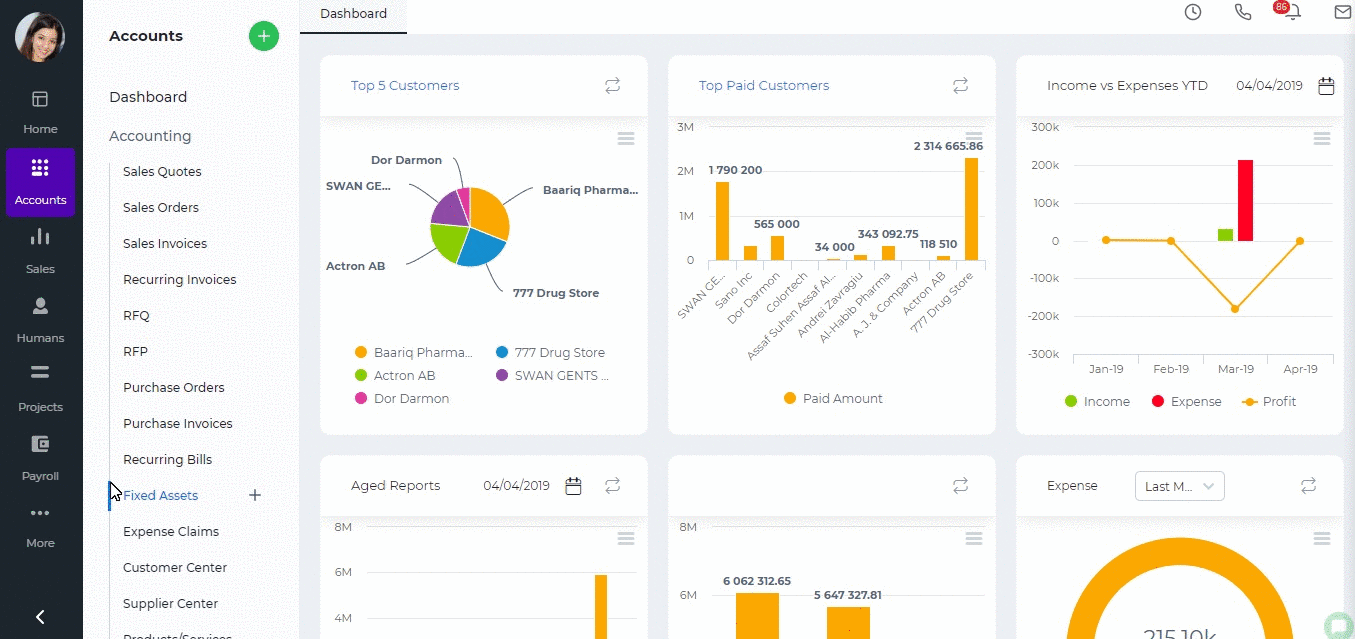
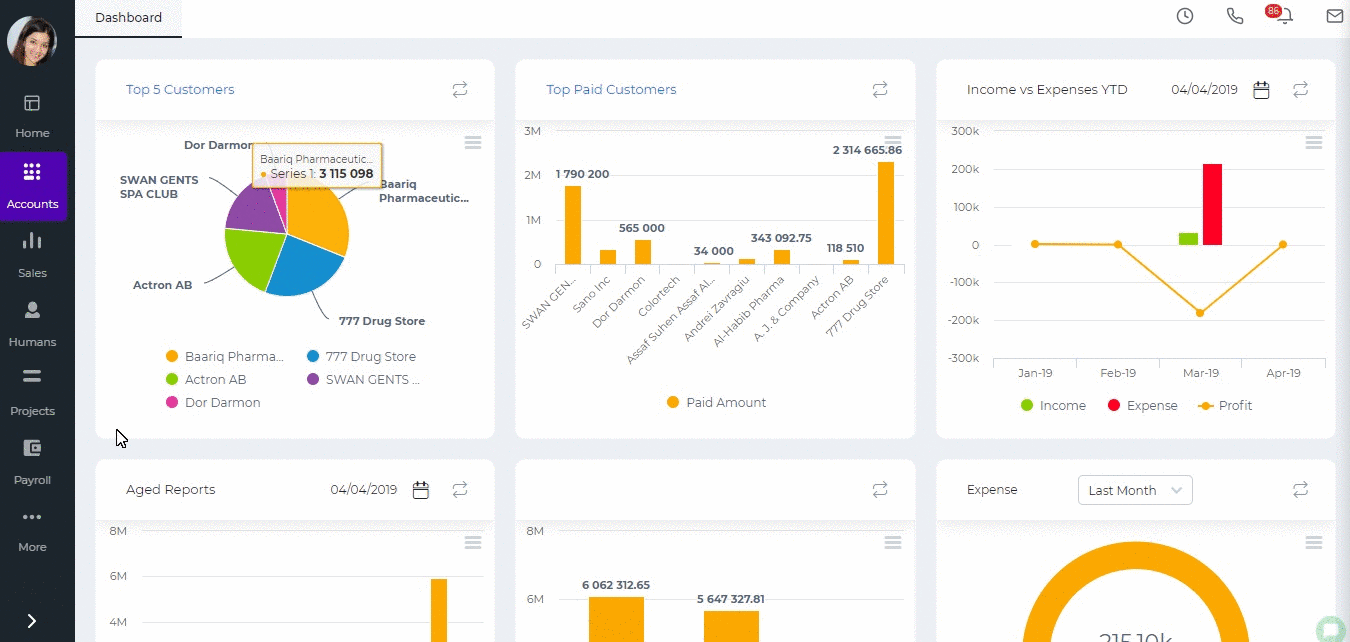
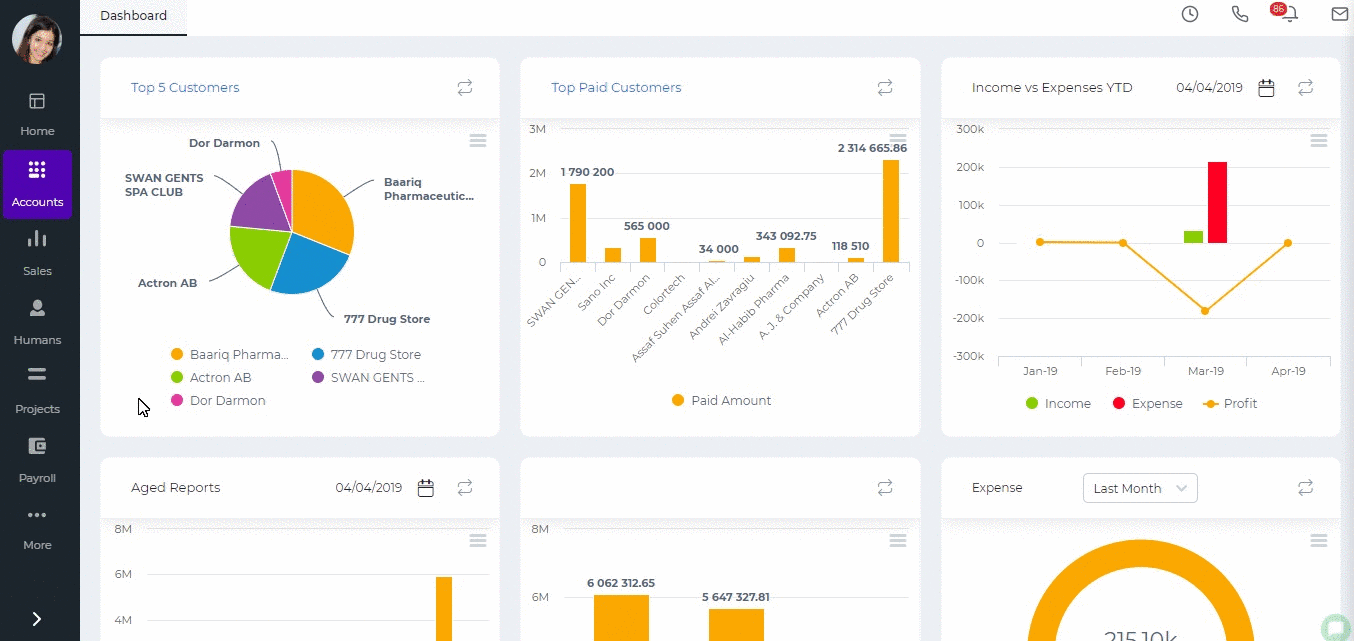
Accounting Overview
Accounting Overview
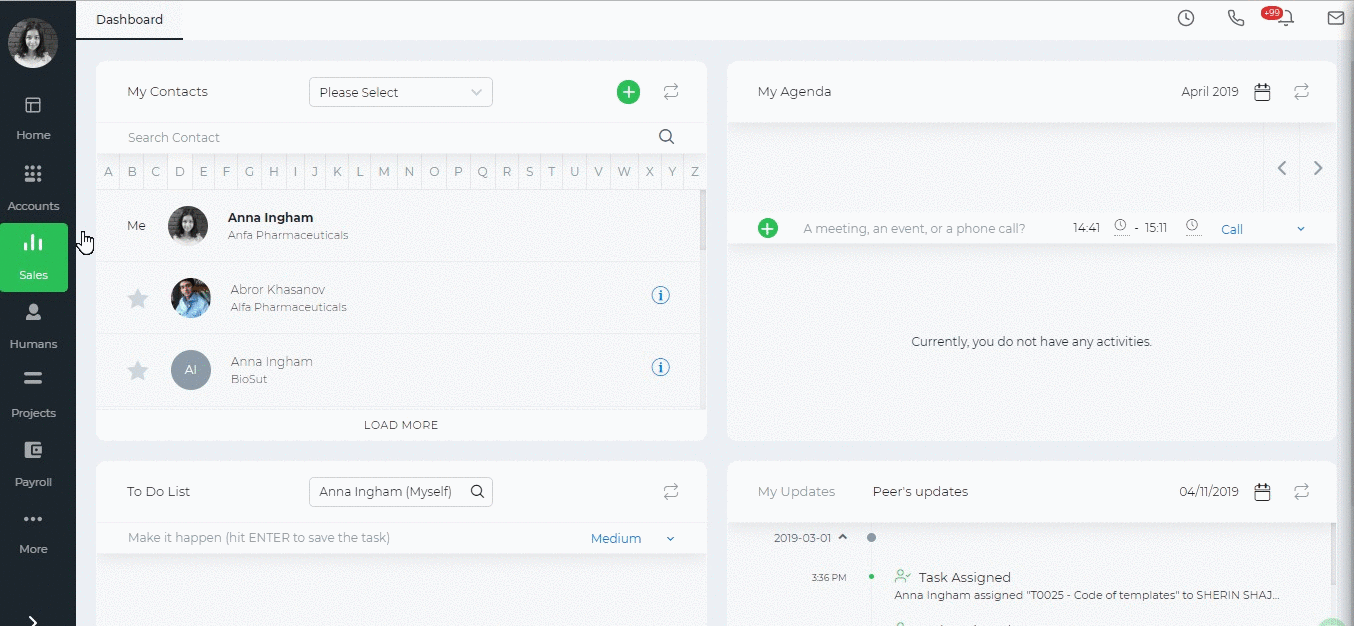
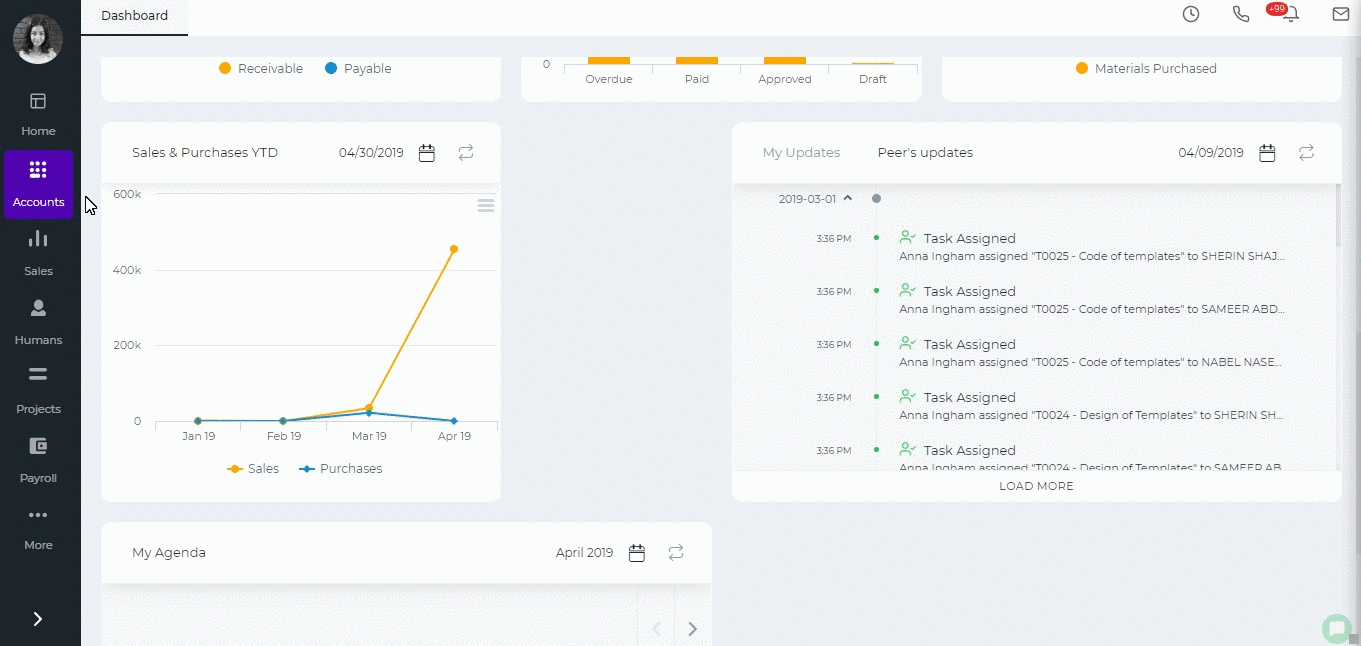
kpi.com offers accounting solution for small and medium businesses, allowing them to manage their daily sales, purchases, expenses, fixed assets and inventory transactions routine. But there is more than just bookkeeping. With
kpi.com you can offer your services online by setting up a storefront.
Within
kpi.com you can invite your customers into the system allowing them to track quotes, orders and invoices issued.
If you have sales personnel, you can also add them to your company, so they can take care of their sales, and employees can track their expenses within one system, and there is no hassle to maintain separate spreadsheets or extra platforms.
You can use the system for the purposes of bookkeeping, reporting with integrated functionalities of financial documents flow management where you will be able to add sales invoices, sales quotes, purchase orders, and purchase invoices. You can either follow the links below or find what you need in appropriate Accounting and Finance Sections on the left.
Accounting Settings
Accounting Settings
Accounting Settings can be accessed through the main Settings.
Accounting Settings lets you view and change the majority of the most important settings ranging from seeing your invoice templates and giving different discounts to your products and services to creating shipping methods and working with your charts of accounts.
Invoice Settings
Invoice settings includes set up details for due date terms, options for switching on/off some options in Accounting, Payment Gateways which are linked to sales invoices using which your customers can make online payment directly, default options for bank accounts, options for PDF naming, default introduction and payment terms and your logo.
 Financial Settings
Financial Details are the following:
Financial Settings
Financial Details are the following:
- Conversion Date - the year when your financial transactions start.
- Financial Year End - the date when you fiscal year ends.
- Currency - your base currency.
- Close Posting Periods Before - you can choose the date before which nobody can post transactions.
- Exchange Rate Floating Points - the number of decimals available in exchange rates.
- Calculation Scale - the decimal points for prices.
- VAT Return Report - switch on/off the VAT report under Accounts module.
- Enable Inventory Transactions - switch on/off inventory transactions.
Sales Tax is for entering your company tax details like Tax ID number, Tax ID Name, Tax Period, Tax Basis etc and also the switch on options for showing tax in invoices and in reports.
Additional Settings includes switch on/off options for:
- Enable Post Dated Transactions - transactions will not be posted until the date arrives.
- Select Depreciation Date - you will be able to select a depreciation date for fixed assets.
- Product Price in Multi Currency - you will be able to choose currencies in products and relates prices.
- Restrict When Credit Limit Exceeds - the system will not allow you to create a sales invoice when the customer credit limit is over.
- Department/Cost and Profit Centers - enabling budgets per department. For more information click here.
- Update Cost Price as of Last Purchased Date - the cost price in the product summary changes to according to the last purchased price.
- Double Confirmations - pop ups for confirmations.
 Account Numbering
You can set up automatic numbering for Chart of Account categories.
Account Numbering
You can set up automatic numbering for Chart of Account categories.
 Numbering Settings
You can set up numbering for Products, Fixed Assets, Expense Claims, Stock Adjustment, Stock Transfer, Manual Transactions, Bank Payments, Bank Receipts, Cash Payments, Cash Receipts, Customer Prepayments, Supplier Prepayments, Invoices, Quotes, Purchase Orders, Purchase Invoices, and Credit Notes. You can also restart the numbering each year.
Numbering Settings
You can set up numbering for Products, Fixed Assets, Expense Claims, Stock Adjustment, Stock Transfer, Manual Transactions, Bank Payments, Bank Receipts, Cash Payments, Cash Receipts, Customer Prepayments, Supplier Prepayments, Invoices, Quotes, Purchase Orders, Purchase Invoices, and Credit Notes. You can also restart the numbering each year.
 Tax Rates
You can create different tax rate which later you will be able to use in accounting transactions like invoices, purchase orders, expense claims etc.
Currency Rates
You need to create and set up all the currencies you use in your financial transactions here.
Discounts
Discounts can be created here which can later be used in all accounting transactions.
Measurements
You can create unit of measurements for the items used in invoices and orders. The unit of measurements can be items, kilograms, liters, meters etc.
Product Category
Different categories for your products and services can be created here. You can categorize your items by their color, audience they are made for, such as age group, sex, region and so on.
Brands
Brands of your products can be added and viewed in this section of the Accounting Settings.
Shipping Method
Different type shipping methods can be created with the price, account and names.
Payment Methods
In this section, you can specify methods of payments such as Bank transfer, Cash, Cheque, Credit/Debit card, Wire Transfer.
Invoice Templates
Several type of custom invoice templates are presented and available for purchase.
Product Table Settings
More information is available about the product table settings here.
Chart of Accounts
You can find the chart of accounts which is a listing of all accounts used in the general ledger of an organization. The charts are usually sorted in order by account number, to ease the task of locating specific accounts. You can edit, add and remove chart of accounts here.
Tax Rates
You can create different tax rate which later you will be able to use in accounting transactions like invoices, purchase orders, expense claims etc.
Currency Rates
You need to create and set up all the currencies you use in your financial transactions here.
Discounts
Discounts can be created here which can later be used in all accounting transactions.
Measurements
You can create unit of measurements for the items used in invoices and orders. The unit of measurements can be items, kilograms, liters, meters etc.
Product Category
Different categories for your products and services can be created here. You can categorize your items by their color, audience they are made for, such as age group, sex, region and so on.
Brands
Brands of your products can be added and viewed in this section of the Accounting Settings.
Shipping Method
Different type shipping methods can be created with the price, account and names.
Payment Methods
In this section, you can specify methods of payments such as Bank transfer, Cash, Cheque, Credit/Debit card, Wire Transfer.
Invoice Templates
Several type of custom invoice templates are presented and available for purchase.
Product Table Settings
More information is available about the product table settings here.
Chart of Accounts
You can find the chart of accounts which is a listing of all accounts used in the general ledger of an organization. The charts are usually sorted in order by account number, to ease the task of locating specific accounts. You can edit, add and remove chart of accounts here.
Created by Aziza Israilova
April, 2019
Activities
Activities
Activities are Interviews and Calls registered for particular candidates. To add a new interview or a call go to Humans>>Recruitment>>Activities and click plus button. Enter the call details. You can also link the activity to a project, contact, lead, task etc. Email reminders are also available to remind you about the due date of the activity.
Created by Aziza Israilova,
April 2019
Activities
Activities
Activities contain the list of your events and calls registered either from the Calendar or from the Activities. To add an activity go to Sales>>Activities and click on plus button. Choose Event or Log a Call. Activities you add here will be available in your Calendar as well.
Created by Aziza Israilova,
April 2019
Add a Task
Add a Task
Task is an activity based on a certain project that needs to be completed within a specified period of time.
To create tasks, go to the Projects section and click the Add New and fill out the form with the task details.
Tasks are related to certain projects. The system has 2 default projects: CRM Tasks and Non-project related hours.
CRM Tasks is the default project for CRM activities. All tasks created from the Sales section will be saved under this project.
Non-Project Related Hours is the default project to which you can add trivial tasks that are not related to any project. All employees are involved in this project, so you can assign any employee to the tasks.
Task number is automatically generated when you select the project. If the task is the first one in the selected project, then the task number will be T0001.
In the assignee's box, you need to assign employees who will be working on the task. Estimated time is the approximate hours to complete the task for each employee and it is required to calculate the budget and costs of the project.
If you do not show the estimated time, the task percentage completion and budget sheet planned costs cannot be calculated.
Add New Assembly Item
Add New Assembly Item
To add an
Assembly item, go to Accounts>>Product/services listing page and click
plus icon and choose Product.
The form will appear with the following fields:
- Product Type – Select Assembly Item type and following fields will be available:
- Product Name – Write name of the Assembly Item.
- Product Number – Product number will be set automatically. You can set your own numbering in Settings, Numbering Settings and Product Numbering.
- Category – Choose a category of the Assembly Item. You can add new Category here in dropdown clicking Add New or in Settings, Product Categories and Add Category.
- Tax Rate – Tax rate to the per unit of Assembly Item.
- Cost Price – Cost price of the Assembly Item to the company.
- Selling Price – Selling price of the Assembly Item to customers.
- COGS Account – Cost of Goods Sold account. By default Materials Purchased will be set, you can choose other COGS account in dropdown menu.
- Income Account – Sales account will be set by default, you can choose another income account from dropdown menu.
- Is purchased from supplier – tick the check box if the Assembly item is purchased from supplier and you can select assembly in order to include it on the Purchase Order/Purchase Invoice form.
- Bill of Materials – in this box select inventory items to include it on the materials list, the fields such as: Description, type, cost will be automatically filled after selecting an item. Then specify, how many of the item is needed in the “Qty” box. Total box will calculate total cost of the item. If you wish to add more items to build assembly item, click the plus icon and select another item to add in the materials list.
- Quantity on Hand – Number of the Assembly Item that company has currently in Stock.
- Reorder Point – Enter the level of inventory when an order should be made with suppliers to bring the inventory up.
- Asset Account – Choose an asset account from dropdown menu to register your Assembly Item to your Stock.
- Total Value – Total cost of the product/services, it will be calculated automatically based on the cost price and Quantity on Hand of the Assembly Item.
- As of – Select the date that Assembly item came to your Stock, if you have Assembly Item in your Stock.
If you are going to input more data about the Assembly Item you can click More options: SKU number, UPC number, Unit measurement, Vendor, Manufacturer, Part number.
Created by Aziza Israilova,
April 2019
Add New Employee
The
Employees section of the
Humans/Projects or the Settings>>Users and Priviliges module stores the personal information of employees in the system. Only administrators, directors and HR managers are eligible to add a new employee to the system.
To add a new employee, go to
Humans or Projects or Settings>>
Users and Privileges and then
Employees section and click add.
First Name – Employee’s first name
Last Name – Employee’s last name
E-mail – Employee’s email address (Since an activation link will be sent to an employee’s email address, it is recommended to provide a valid email address)
Role – Employee’s position at the company
To assign a role to the person, select the roles from the existing list. Following roles are available in the system by default:
- Employee
- Administrator
- Director
- Accountant
- HR Manager
- Sales Manager
- Customer Service Representative
- Sales Person
Then choose a department and a location if needed.
No Access – If this box is checked, the employee will not receive an activation email and they will not have access to the system. You will just keep employee information in the application, however, you will be able to generate payruns for them.
ESS User – Employee Self-Service User. If this box is checked, the user will have very limited access to the application and their user access level cannot be changed.
In the new user interface, you need to add your employee first and then go to edit employee form and add more details.
Add New Inventory Item
Add New Inventory Item
To add a new
Inventory Item, go to Product/Services page and click
Add. Here are the description of the fields:
Product Type – Select
Inventory Item type following fields will be available:
Product Name – Write the name of Inventory Item.
Product Number – Product number will be set automatically. You can set your own numbering in Settings, Numbering Settings, Product Numbering.
Category – Choose a category of the product or service. You can add new Category here in dropdown clicking
Add New or in Settings, Product Categories and Add Category.
Tax Rate – Tax rate to the per unit of Inventory Item.
Cost Price – Cost price of the Inventory Item to the company.
Selling Price – Selling price of the Inventory Item to customers.
COGS Account – Cost of Goods Sold account. By default
Materials Purchased will be set, you can choose other COGS account in dropdown menu.
Income Account –
Sales account will be set by default, you can choose another income account from dropdown menu.
Quantity on Hand – Number of the Inventory Item that company has currently in Stock.
Reorder Point – Enter the level of inventory when an order should be made with suppliers to bring the inventory up.
Asset Account – Choose an asset account from dropdown menu to register your Inventory Item to your Stock.
Total Value – Total cost of the product/services, it will calculated automatically based on the cost price and Quantity on Hand of the Inventory Item.
As of – Select the date that Inventory item came to your Stock.
If you are going to input more data about the Inventory Item you can push
More options: SKU number, UPC number, Unit measurement, Vendor, Manufacturer, and Part number.

Add New Non-Inventory Item
Add New Non-Inventory Item
To add a new Non-Inventory Item, go to Product/Services page and click Add. Here are the description of the fields:
Product Type – Select
Non-Inventory Item type and following fields will be available:
Product Name – Write the name of Non-Inventory Item.
Product Number – Product number will be set automatically. You can set your own numbering in Settings, Numbering Settings, Product Numbering.
Category – Choose a category of the Non-Inventory Item. You can add new Category here in dropdown clicking
Add New or in Settings, Product Categories and Add Category.
Tax Rate – Tax rate to the per unit of Non-Inventory Item.
Rate – Selling price of the Non-Inventory Item to customers.
Account –
Sales account will be set by default, you can choose another income account from dropdown menu.
If you want to show this Non-Inventory Item in purchase documents (Purchase Order, Purchase Invoice, or supplier Credit Note), you need to check
"Is purchased from supplier" check-box. And following fields show up:
Purchase Price – Cost price of the Non-Inventory Item to the company.
Expenses Account – Select an expense account to track expenditure.
If you are going to input more data about the Non-Inventory Item you can push
More options: SKU number, UPC number, Unit measurement, Vendor, Manufacturer, and Part number.
Add New Product/Service
Add New Product/Service
To create Product/Services, go to Accounts>>Products and Services and click on the plus icon and choose Product.
The form will appear with the following fields:
Product Type – Select a type of product you are going to save. It can be Inventory Item, Non-Inventory Item,Service, Assembly Item, Other Charge and Product Group.
If you select Inventory Item type following fields will be available:
Product Name – Write the name of Product or Service.
Product Number – Product number will be set automatically. You can set your own numbering in Settings, Numbering Settings, Product Numbering.
Category – Choose a category of the product or service. You can add new Category here in dropdown clicking Add New or in Settings, Product Categories and Add Category.
Tax Rate – Tax rate to the per unit of product or service.
Cost Price – Cost price of the product to the company.
Selling Price – Selling price of the product to customers.
COGS Account – Cost of Goods Sold account. By default Materials Purchased will be set, you can choose other COGS account in dropdown menu.
Income Account – Sales account will be set by default, you can choose another income account from dropdown menu.
Quantity on Hand – Number of the products that company has currently in Stock.
Reorder Point – Enter the level of inventory when an order should be made with suppliers to bring the inventory up.
Asset Account – Choose an asset account from dropdown menu to register your inventory item to your Stock.
Total Value – Total cost of the product/services, it will calculated automatically based on the cost price and Quantity on Hand of the Inventory Item.
As of – Select the date that Inventory item came to your Stock.
[video width="1342" height="602" mp4="https://www.kpi.com/wp-content/uploads/2016/12/add-product.mp4"][/video]
Add Project
Add Project
To add a new project go to Projects module and click Projects subsection. Click the plus button and choose Project or Quick add. The quick add is a short form with important project information only.
- Enter the project name and choose the start and end dates.
- Choose project status.
- Choose the customer if needed.
- Clone Project Widget gives you an option to copy project details from an existing project.
- Choose involved employees and enter their hourly rates. This is import to calculate employee costs in the Budget Sheet.
- Upload attachments and add notes if needed and save.
After you have saved the project you add tasks, workstreams and log tlimesheet entries to the project.
Created by Aziza Israilova,
April 2019
Add Reference
Add Reference
If the Reference Settings is enabled in your account, you will be able to add extra status, priority, types, and others related to all sections of the system such as leads, projects, accounts, tasks, etc.
For example: To add a new case status, perform the following steps:
- Go to Settings>>Reference.
- Search Case Status.
- Click the actions to edit.
- Click on Plus icon which will populate a new line to add a new status.
- Type the name and the description of the status and save.
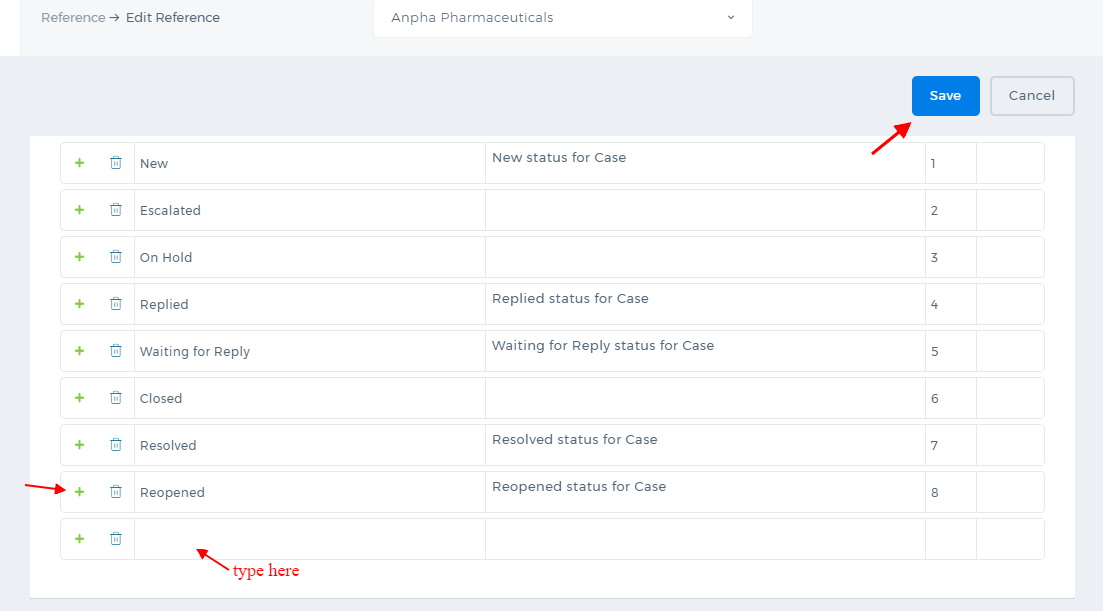
Once you save the changes, the new case status will be available in the
Cases.
The
Reference Settings is not available by default. To enable the feature, contact our technical support team.
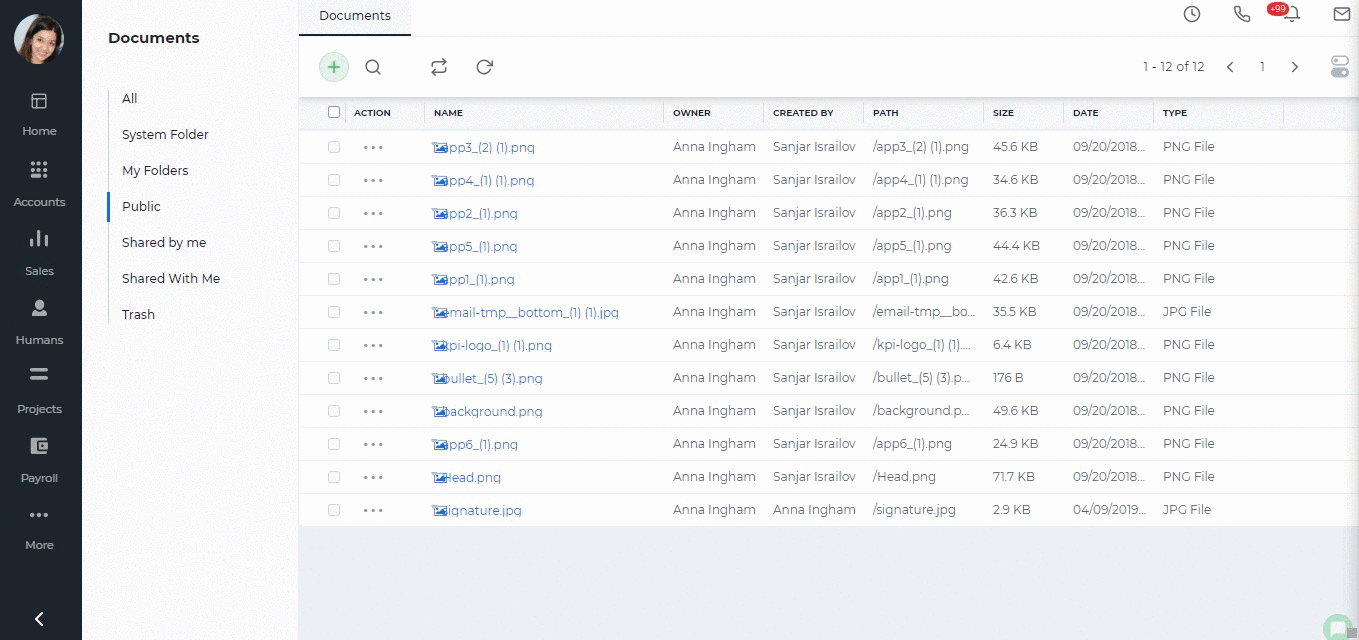
Adding Pictures into the Signatures
Uploading a picture
In order to upload a picture you need to go to Documents>>Public>>Upload File (which size should be 5 mbs per upload)
Then, you need to get a URL of that uploaded file, go to Action menu and copy the URL of chosen file.
 Afterwards, go to the Settings>>Email Templates>>Signature, where you can Add New Signature or Edit existing one. You can add a picture by pasting your copied URL link.
Created by Aziza Israilova,
April 2019
Annual Leave Report
Annual Leave Report
Annual Leave balances are added in Leave Allowances page.
Annual Leave Report shows each employee's current leave balances as of date chosen.
The formula for the Current Balance is as follows: Number of Worked Days( Leave allowance days/365 ) - Taken Days.
Number of worked days will be calculated depending on Effective start date and Effective end dates. Effective start date can be employee's hire date or opening balance date. If employee's Hire Date is earlier than Opening Balance date, then the Opening Balance Date is going to be the Effective start date. If employee was hired after Opening balance date, then his Hire date will be taken as Effective start date.
Effective end date is the date chosen from the date-picker on top of the report or Employee's resignation date.
For example, Aziz Djalilov's Hire Date is September 18, 2017 and till December 26, 2017 he has worked 99 days in total. He is Allowed to take 30.6 days as an annual leave in 2017. So his current balance is: 99(30.6/365) - 0 = 8.3
 Opening Balance Date for Leaves
The Administrator can set an opening balance date for all employees leave balances, which means that the leave balances are effective starting from that date. The opening balance can be set from Settings>>Humans>>Leave Reasons>>Edit Leave.
This date is also shown in the Annual Leave Report.
If the Hire Date is before the Opening Balance date, then the balances effective date is going to be the Opening Balance Date. If the Hire Date is after the Opening Balance date, then the balances effective date is going to the Hire Date.
So the number of worked days depends on the Effective Start Date.
Opening Balance Date for Leaves
The Administrator can set an opening balance date for all employees leave balances, which means that the leave balances are effective starting from that date. The opening balance can be set from Settings>>Humans>>Leave Reasons>>Edit Leave.
This date is also shown in the Annual Leave Report.
If the Hire Date is before the Opening Balance date, then the balances effective date is going to be the Opening Balance Date. If the Hire Date is after the Opening Balance date, then the balances effective date is going to the Hire Date.
So the number of worked days depends on the Effective Start Date.
 Opening Balance Days
If the employees already have the balances as of the opening balance date, then the opening balances are just added to the current balance, so the formula is as follows: Number of Worked Days( Leave allowance days/365 ) - Taken Days + Opening Balance Days.
The Opening Balance Days column can be enabled from the Customize icon on the right hand side corner of the report.
After the column is enabled, a double click helps you to enter opening balance days for each employee.
Opening Balance Days
If the employees already have the balances as of the opening balance date, then the opening balances are just added to the current balance, so the formula is as follows: Number of Worked Days( Leave allowance days/365 ) - Taken Days + Opening Balance Days.
The Opening Balance Days column can be enabled from the Customize icon on the right hand side corner of the report.
After the column is enabled, a double click helps you to enter opening balance days for each employee.
Created by Aziza Israilova,
April 2019
Appraisal Settings
Appraisal Settings
Use Competencies for Appraisal – If you enable the checkbox, you will be able to review employees by their competencies.
Use goals for appraisals - If you enable the checkbox, you will be able to review employees by their assigned goals.
Enable Employee Rate – You can choose if an employee can rate himself/herself in this checkbox.
Score Scale – Default score scales of appraisals from 1 to 7. You can define your own score scales.
If your company operates under the Forced Distribution Ranking Percentage Scheme, you should define scores from 1 to 100.

Appraisals Archive
Appraisals Archive
Appraisals archive list shows all appraisals completed and approved by manager. You can add new appraisals, edit and view the existing ones or generate their PDF version.
The Appraisals Archive is available in Humans>>Performance Appraisals>>Appraisals Archive.
Created by Aziza Israilova,
April 2019
Approval Process
Approval Process
Some organization procedures require top management's approval like expense claims, cash advances, leave requests etc. Kpi.com offers approval processes for Leave Requests, Cash Advances, Expense Claims, Additional Payments, Sales Quotes, RFP, Manual Entries, RFQ, Company Rules.
To set up the approval process go to Settings>>Automation>>Approval Process and select the form from the dropdown.
Choose the "Approver". The approver can be determined by the role or by the employee name. Then choose the conditions which further determines the actions if the item is approved or rejected.
You can add as many steps as needed in your organization. The approval can be two-level, three-level and so on.
Once you are done, "Save" the settings.
Assembly Products
Assembly Products
Assembly Item – is a type of line items, which is used in filling sales or purchase form. Assembly item consists of inventories and assemblies (subassemblies) which build a single Assembly item. Items in the assembly are called Bill of Materials, those are the components parts of Assembly item.
Assembly items can be used when you are dealing with the customer related process on (Sales Quotes, Sales Orders, Sales Invoices, or customer Credit Notes). If you selected "purchased from supplier" while building an assembly item, Assembly item would appear in the supplier process on Purchase Orders, Purchase Invoices, or supplier Credit Notes).
Use Assembly item in order to:
· Customize the price of assembled items
· Quick access to information about finished goods
What's the difference between
Assembly Item and
Product Groups?
Assembly item and Product group may seem the same as they include a group of items which are under one item in the list of Product/services in
kpi.com. However, they are not the same and have distinctive differences between each other.
Product Group is used when you often enter the same items and their quantity while recording sale or purchase form. You can make a group of inventory, non-inventory and service items include in one product group. You can avoid entering the same line items each time individually and add only one product group of items.
Assembly items let you combine inventory items and all these inventories make a new price into new finished goods that you offer to your customers. Also in assembly item, you can add assembly cost or other services which should be included in the list of
Bill of materials.
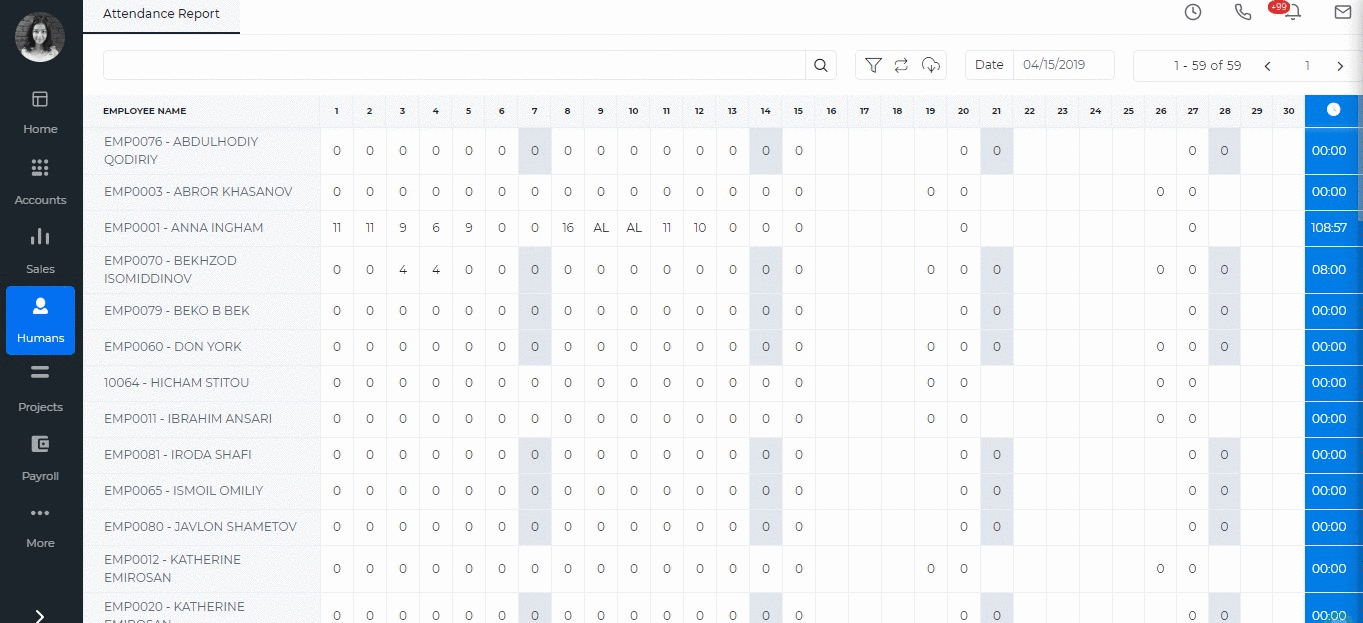
Attendance Report
Attendance Report
Attendance Report shows the number of hours worked by your employees in a month. The data is based on the in/out hours. It also shows leave requests taken, holidays, not approved leave requests and total hours for the month.
You can change the in/out hours by double-clicking on the cells and entering the time.
If you already have a file containing the employee hours then you can import the data into the report. click on the Import/Export button, choose the Import option and download the template and make changes. If you already have downloaded the template, you can skip this step and upload the file. The uploaded file will overwrite what was available in the report.
Note that the entered came and left hours should follow the timeslot hours. Otherwise, the import process will fail.
You can also filter the report by employee name, by department, timeslot or by employee status and view the report in Excel format by exporting into Excel.
Created by Aziza Israilova,
April 2019
Attendance Tracking
Attendance Tracking
Attendance Tracking page shows all company employees and their timeslots. A click on the employee name forwards you to the Employee's attendance profile page where you can see his/her leave requests, leave status and in/out hours.
This page helps you manage the in/out hours of your employees. For example, if an employee cannot come to office and is working outside office, you can change his/her status to "In" (by clicking on the status dropdown) to register time for the correct attendance report.
Created by Aziza Israilova,
April 2019