Supplier Center
Supplier Center
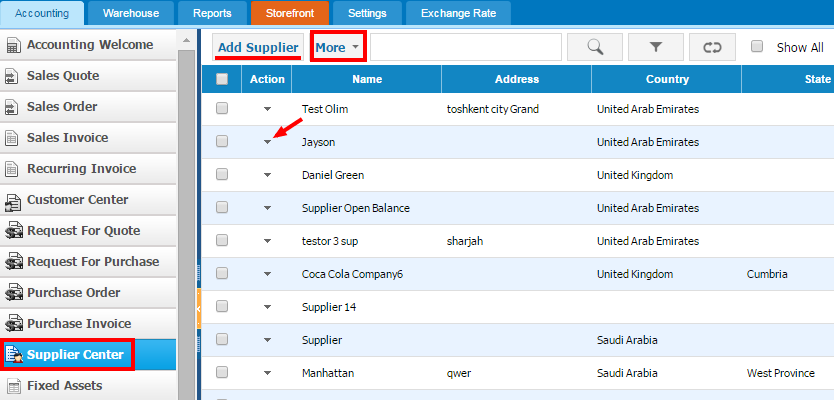
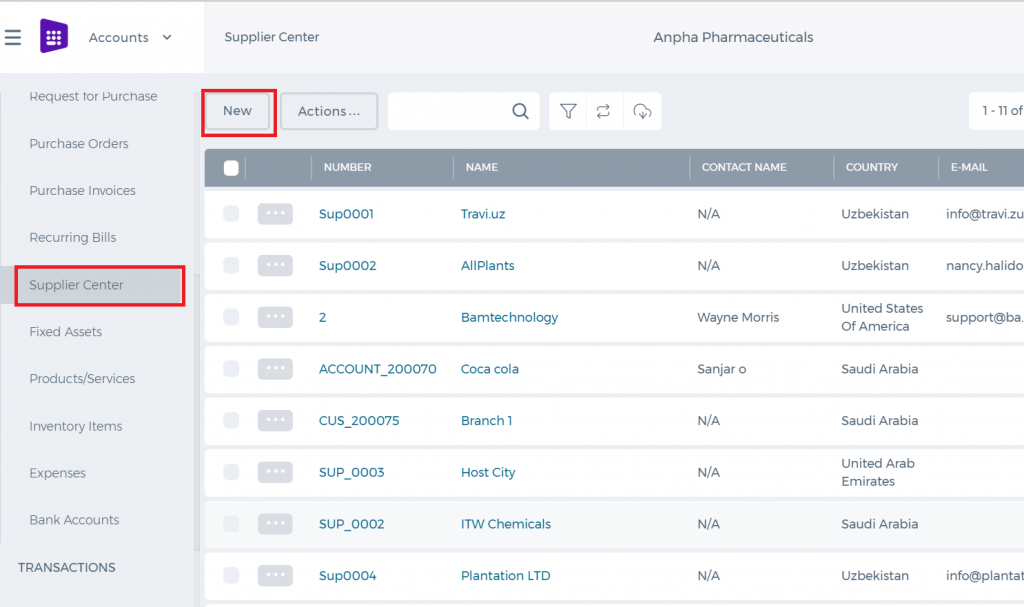
1. To create a new Supplier, go to
Supplier Center from listing page and click
Add Supplier.
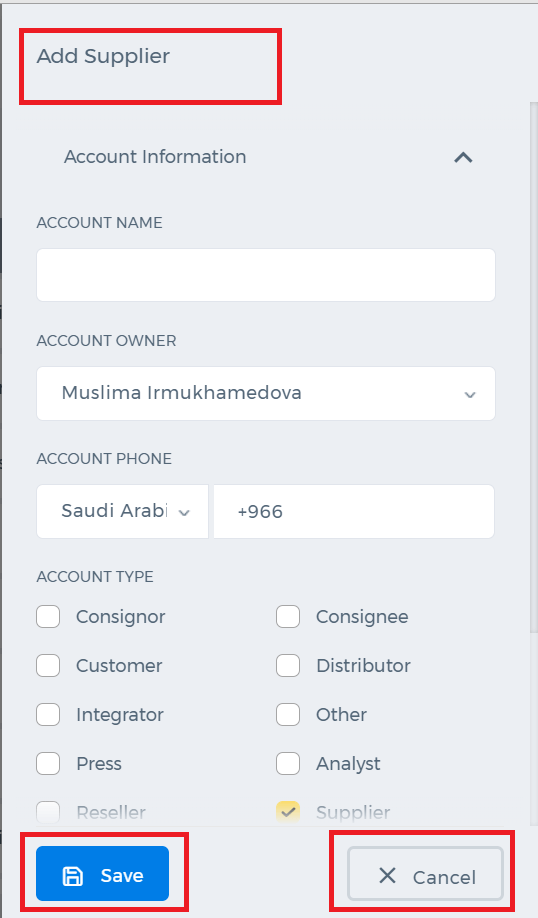
2. You should fill out all asked information while creating
new Supplier;
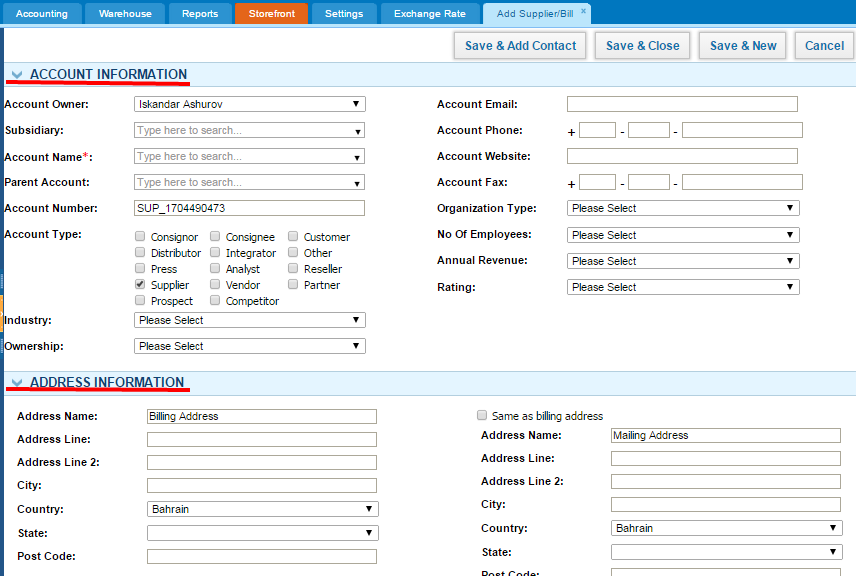
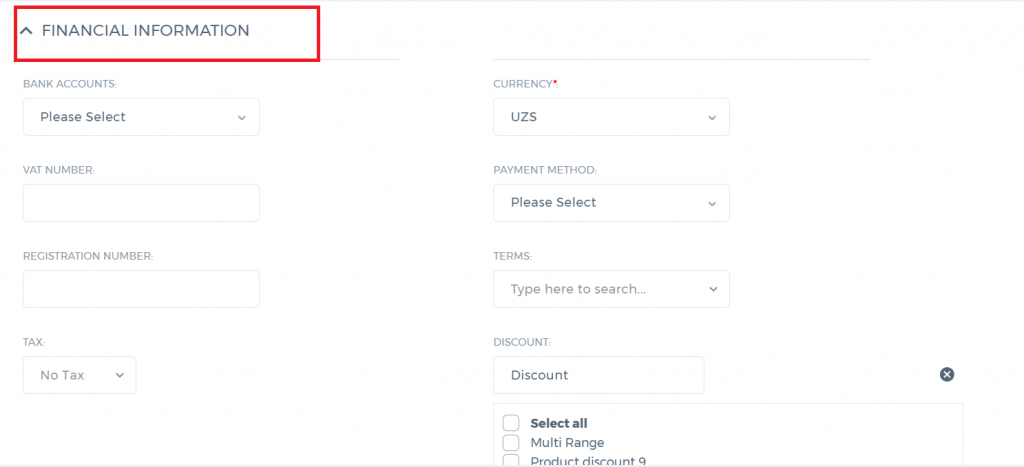
3. You may enter Account, Address, Financial and Additional informations respectively;

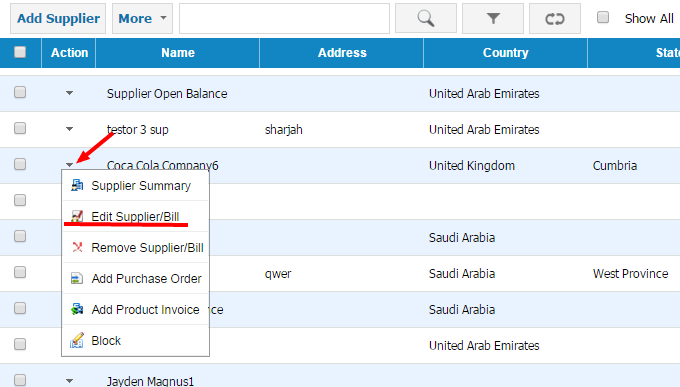
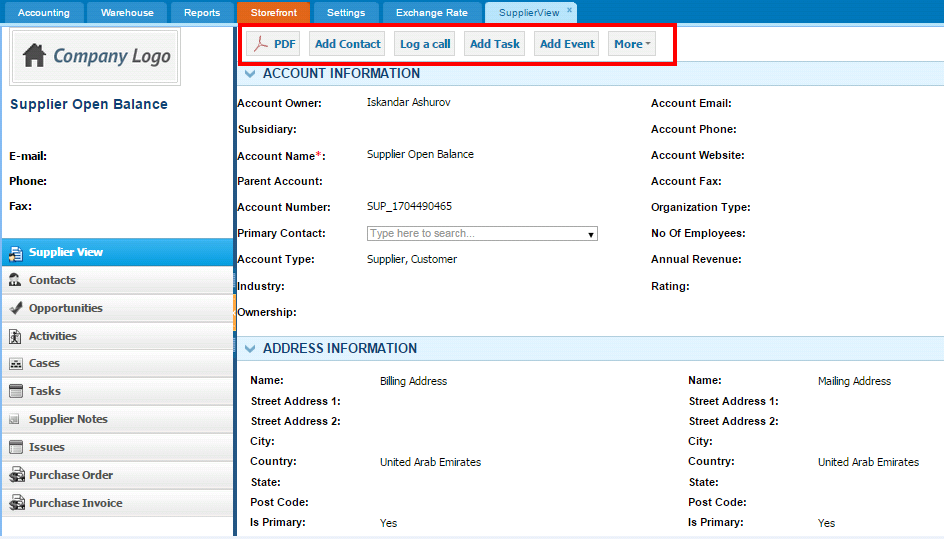
4. In
Action Bar you may see Supplier summary, Edit Supplier/Bill with remove Supplier and you may Add Purchase Order with Add Product Invoice and Block;
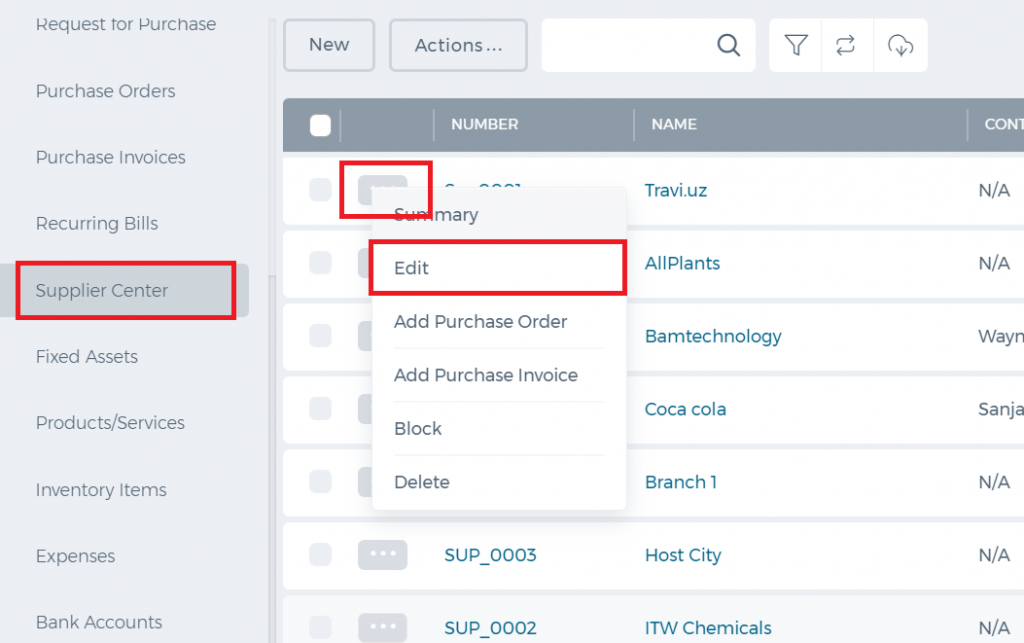
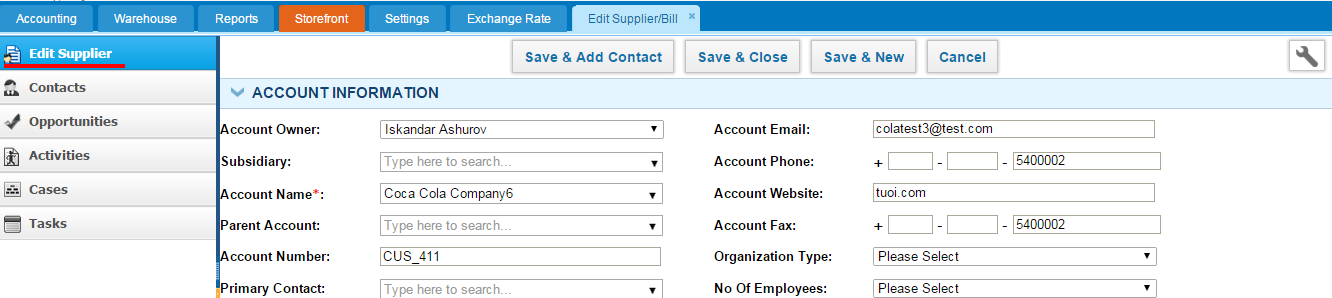
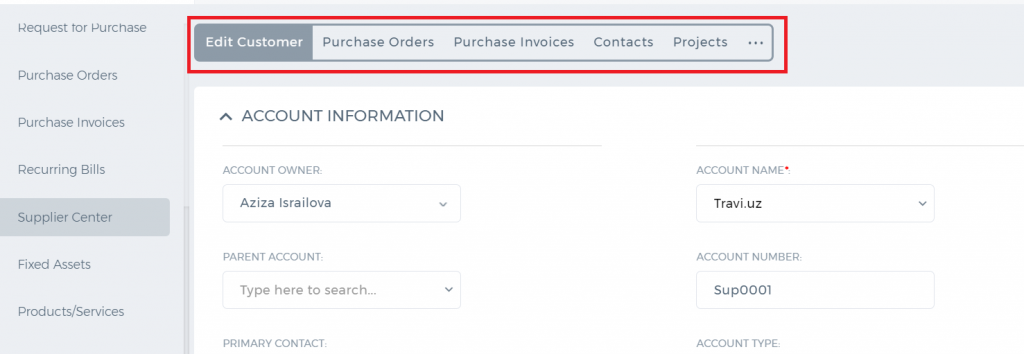
5. By
editing Supplier information you may edit Supplier informations, Contact changes, Opportunities, Activities with its Cases and Tasks
6. The
Supplier View can help to see Supplier information and you may send Purchase Order and Purchase Invoice respectively
How to add Purchase Invoice
How to add Purchase Invoice
To create
Purchase Invoice, go to
Purchase Invoice listing page and click
Add or use hot keys"ALT+p" (for Google Chrome) and "Shift+Alt+p" (for Mozilla Firefox).
If you are already in
Accounting and Finance section you can go to
+ Add New on
top left-corner and dropdown menu will appear, here you can click on the Purchase Invoice.
The form will appear with the following fields:
 Supplier
- Choose a company or an organization or a person you are sending an order from the list of Suppliers. You can also lookup the suppliers from the search box. If there are no suppliers registered in your company you can add
new Supplier from
Add new link just in the Supplier dropdown.
Project - Select the project which you want to relate this Purchase Invoice to.
Date - Indicate the date Purchase Invoice is created (Transaction will be registered on this date in your General Ledger).
Due Date - Indicate the Due Date which you need to pay for bill.
Invoice # - Enter the number of the Purchase Invoice. You can put here the number of the invoice that your supplier send you.
PO Number – if you have converted the Purchase Invoice from Purchase Order the number of the purchase order will be set here or you can add manually while creating new Purchase Invoice.
Amounts – Select the type of applying taxes (Tax Exclusive or Tax Inclusive).
Item – Title of the product or serevice, required field. You can select from existing products/services or type here not-listed items.
Description – Description of the product which can be editable.
Qty – Enter the quantity of the product or services.
U/M – You can specify the unit of measurement.
Price – Cost price of the product or services
Discount – Enter the discount percentage.
Asset Acc. – Enter an expense or asset type General Ledger (GL) account for bookkeeping purposes.
Net Amount – Net amount displays the amount after applying the discount.
Tax Rate – Choose the tax rate from the tax rate dropdown menu. Tax rates are applied in percentage.
Total Amount – The total amount of each line is displayed here.
Payment Instructions/Notes – Write Payment Instructions or Notes in the box below. This will be printed in PDF version of the Purchase Invoice.
How to add post dated check
How to add post dated check
If you have customer who does prepayment to their account but you don’t want to mess your account receivable report
Users can enable Post Dated Check from Accounting Settings >> Financial Settings and tick Post Dated Checkbox.
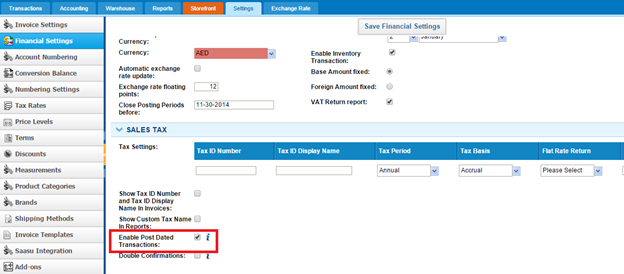
Once you activated PDC option, you can do postdated checks using Checks/Supplier credits tabs in Transactions module if you want to pay suppliers’ invoices.
Pay from Checks tab.
Open Accounting >> Transactions >> Check tab and click on New button:
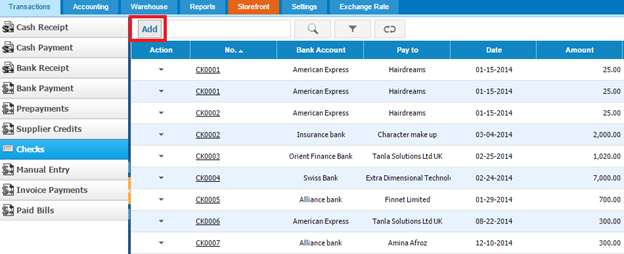
In the following screen, fill out following fields:
Bank – choose bank account from which you are going to pay
Date – select PDC date
Post Dated – tick checkbox if you are going to use PDC option
Account – choose account payable (currency) account
Amount – indicate amount of the PDC
Description – leave a description if you need for further transactions
Name – select supplier from dropdown option by typing letters.
Once you post check, system will remember transaction date and its amount. When a transaction date comes, system will post it in accounting reports and you can apply it to supplier’s invoices.
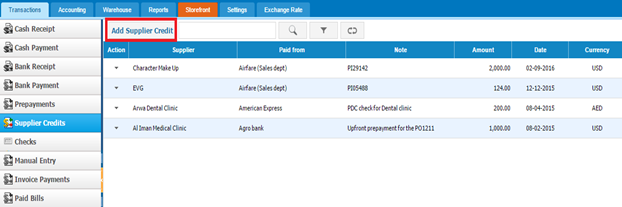
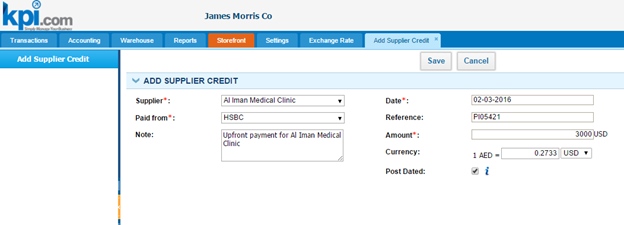
Alternatively, you can use Supplier Credit option from Transactions module.
In supplier credit form, you should fill following fields:
Supplier – select supplier whom you are going to add PDC
Paid From – choose bank account from which you paid for supplier
Note – leave a note if needed.
Date – PDC date
Reference – reference for the added PDC
Amount – indicate amount of PDC
Currency – if supplier’s currency different from base currency specify exchange rate
Post Dated – give a tick if a supplier’s credit is PDC
Once you PDC transactions, you can apply them to purchase invoices using Apply Credit option
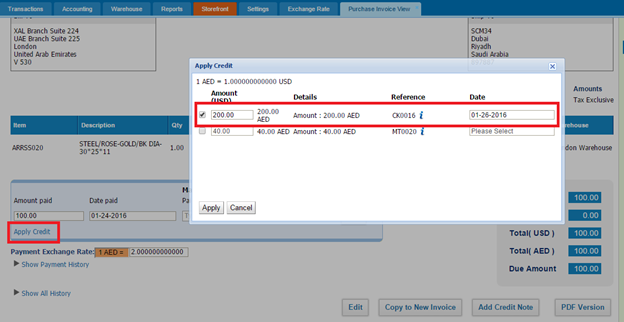
Note: Transaction of PDC will not be shown in Apply Credit option, unless PDC date comes.
PDC for customers
To add PDC for customers, open Accounting section >>Transactions tab >> Prepayment
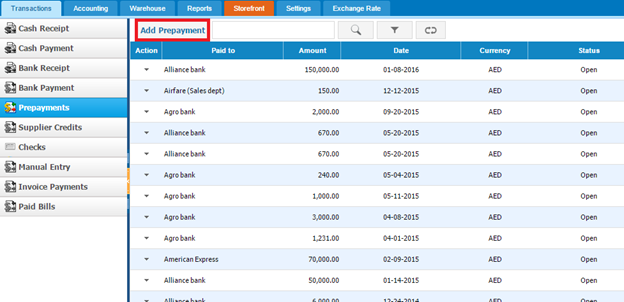
In the following form you should fill out following fields:
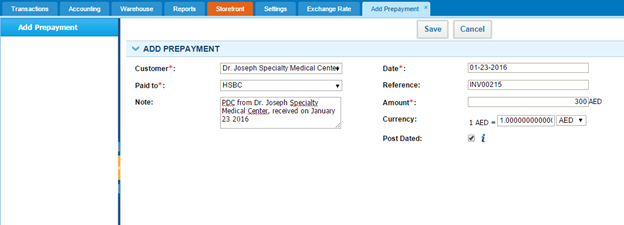 Customer
 – select customer who did PDC
Paid –indicate bank account which should receive payment
Note – leave a note if needed
Date – choose PDC date
Reference – write a reference
Amount – indicate amount of PDC
Currency – if customer paid in another currency indicate exchange rate
POST dated – tick PDC checkbox
Once you add PDC check, you can apply it for customer invoices and it work the same like for suppliers.

How to add Check
How to add Check
To create Checks, go to Checks listing page and click Add
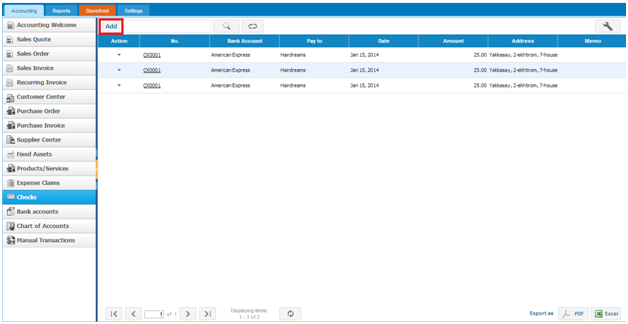
The form will appear with the following fields:
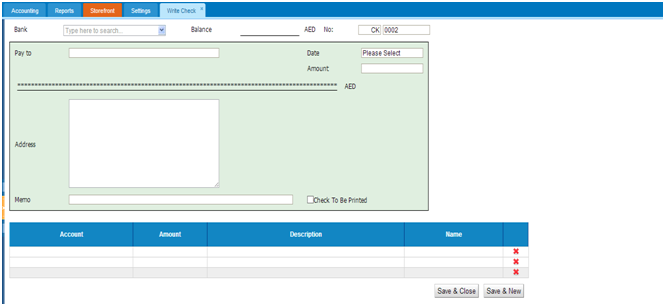 Bank
Bank – select a bank account from dropdown list
Balance – balance of the selected bank
No - check’s registration number
Pay to – write receiver of the funds
Date –indicate the date check is created
Amount – money amount which is going to be spent
Address – address of the receiver
Memo – write notes if you need
Check to be printed – click if you are going to print the check
Account – select an account from your chart of account list. In order to pay for Supplier select Accounts Payable account and then Name field will be active, you can select Supplier here.
Amount – enter the payment amount
Description – write description if there any need
Name – this field will be active once you select Accounts Receivable and Accounts Payable accounts only, and will be used to link the amount to Supplier and Customers.
Recurring Invoice
Recurring Invoice
If you have partners or clients whom you bill invoices on certain amount of goods and services on a recurring basis, it may be time consuming and irritating as you have to fill the same Sales invoice for the specific client repeatedly. However, you can automatize this process with
kpi.com to save your time and energy. In
kpi.com you can create recurring invoices which will be automatically send on particular date and time. Advantages of recurring invoices in
kpi.com are that users can set recurring invoices to send daily, weekly or monthly. Accordingly, you can specify the date when the recurring invoices will end sending or set the recurrences time after that sending will end.
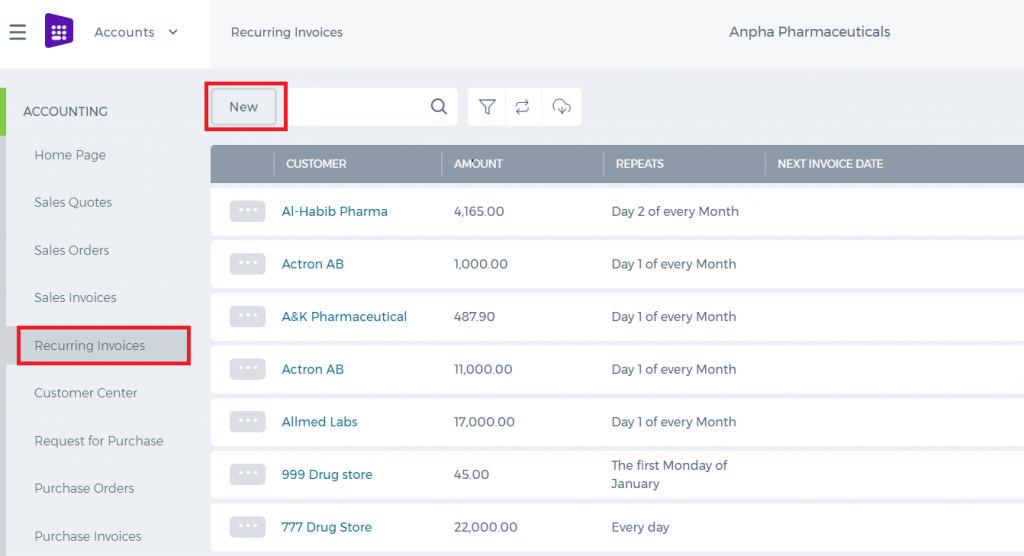
To create recurring invoice, go to
Accounting & Finance >>
Recurring Invoice listing page and click
Add recurring invoice.

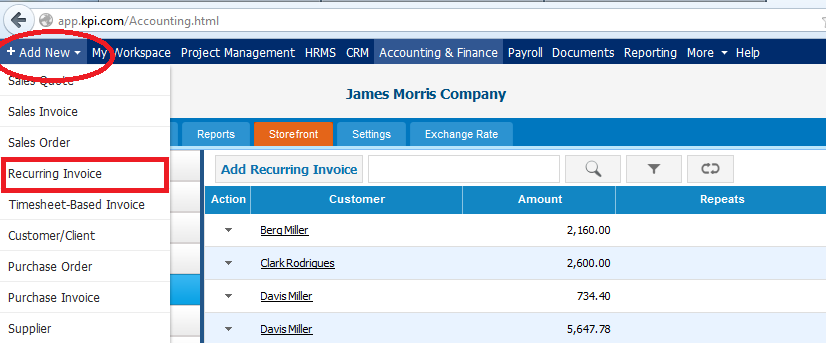
If you are already in
Accounting and Finance section you can go to
+ Add New on top left-corner and dropdown menu will appear, here you can click on the
Recurring Invoice.
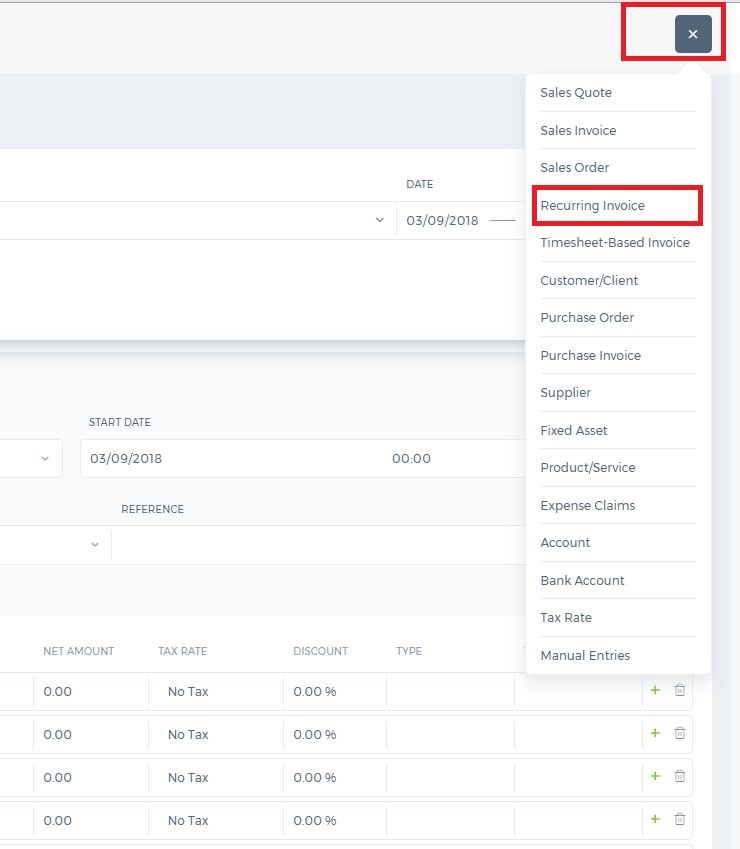
The form will appear with the following fields:
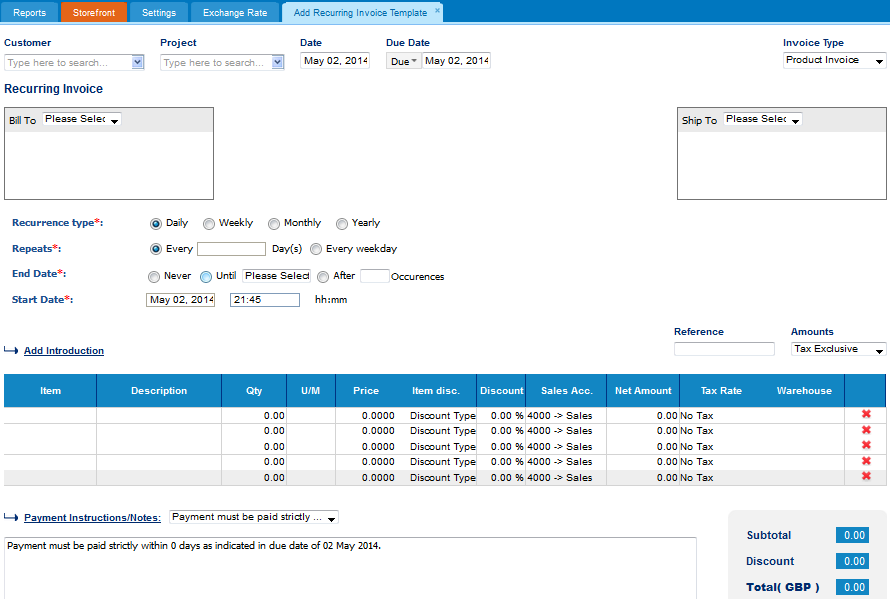
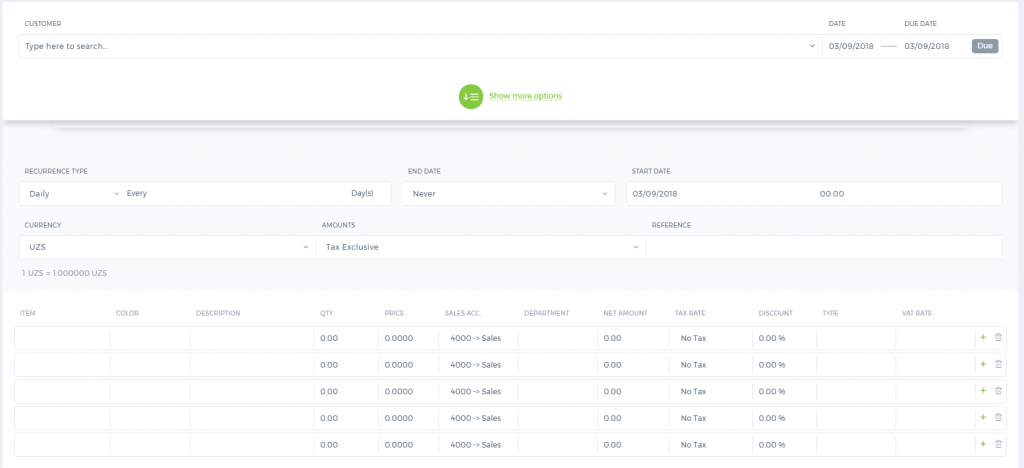
After you have indicated a Customer, Project, Date and type of the Invoice; you should set the recurrence type of the Invoice and regarding the type of the recurrence “Repeats” field will be automatically changed with the respect to recurrence type. After the repetition date, you will specify the ending date of the invoice and start date & time that are indicated in the next box. Then you will fill the items of the invoice and after that, you can
Save & Approve or
Approve& Email the invoice. Sent invoices will be saved in the sales invoices listing page.
Timesheet based Invoice
Timesheet based Invoice
When you are project managing/contracting, you would need to aggregate timesheet entries on this project and raise invoices to your customer based hours spent, which can be accomplished via Timesheet Invoice.
Create Timesheet Invoice
To raise an invoice based on timesheet entries, you need to have a project related to a customer and have approved and non-billed hours.
Once you have unbilled hours, go to
Accounting & Finance section of
kpi.com. Click
+Add New, then
Timesheet Based Invoice. Select a customer and billable project(s).
Set Invoice Period and Invoice Type
You can present timesheet invoice to your customers in various formats, based on your selection of Invoice Type.
Invoice Type
Detailed Invoice includes line for each timesheet entry, including task name, assignee's name and timesheet entry date.
Group by Assignees - one invoice line per assignee, including project name, assignees name and task names
Group by Tasks - invoice lines grouped by task and assignee, including project's name, task name, assignee's name, and task description.
Group by Project - invoice line for project's total, including project name and description.
How to add Sales Invoice
How to add Sales Invoice
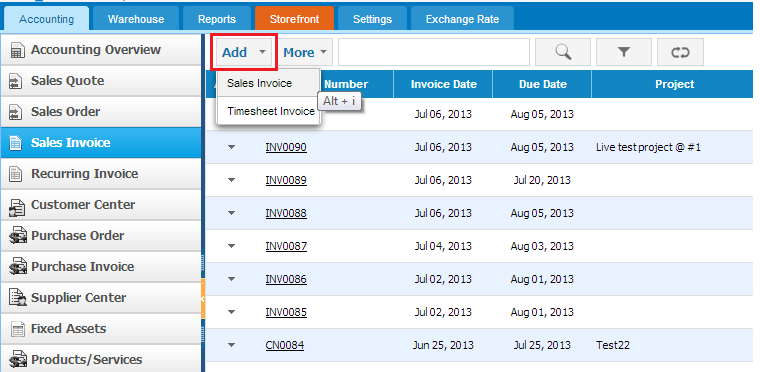
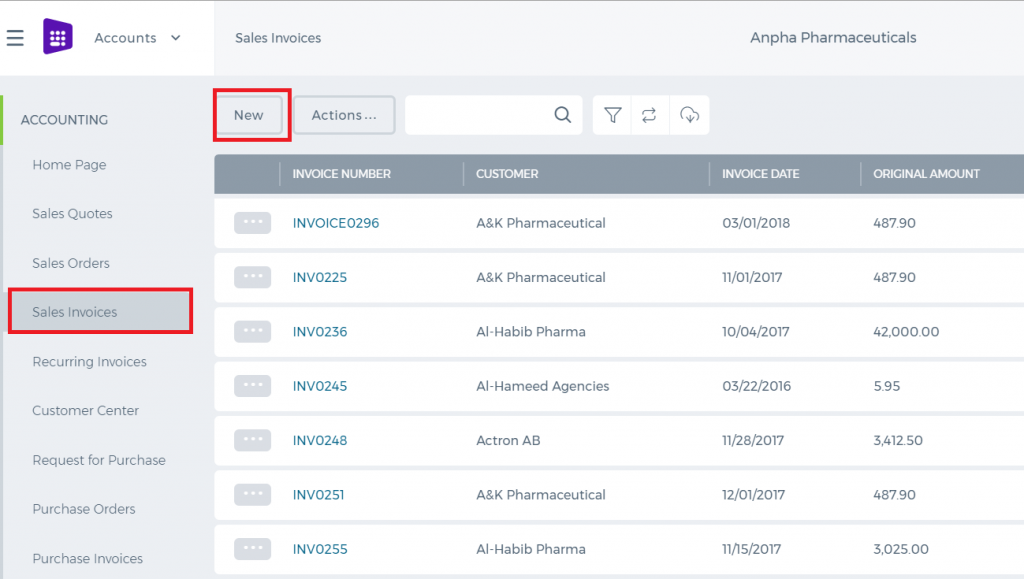
To create a
Sales Invoice, go to
Sales Invoice listings page and click
Add.
The form will appear with the following fields:

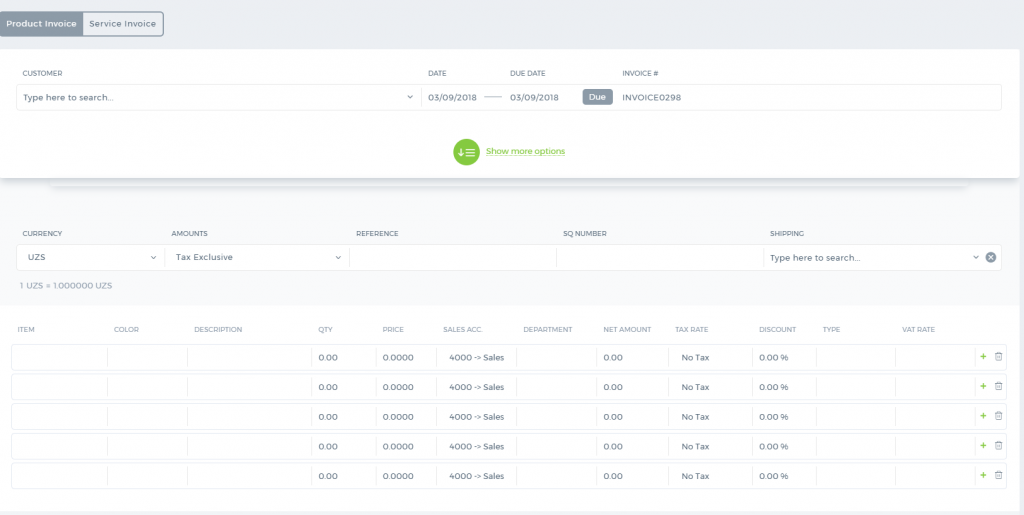
Sales Invoice
Sales Invoice
Sales Invoices can be created from conversion of sales quotes/orders or using the "Add" button from the Sales Invoice listing.
There are two types of invoices: Sales Invoice and Timesheet Based Invoice. The Timesheet Invoice is covered in another wiki article.
Sales Invoices can be added by Sales Persons, Managers, Accountants, Directors and Admins.
While adding an invoice, you need to fill in some mandatory fields like Customer Name, Dates, Item Name, Quantity and Price.
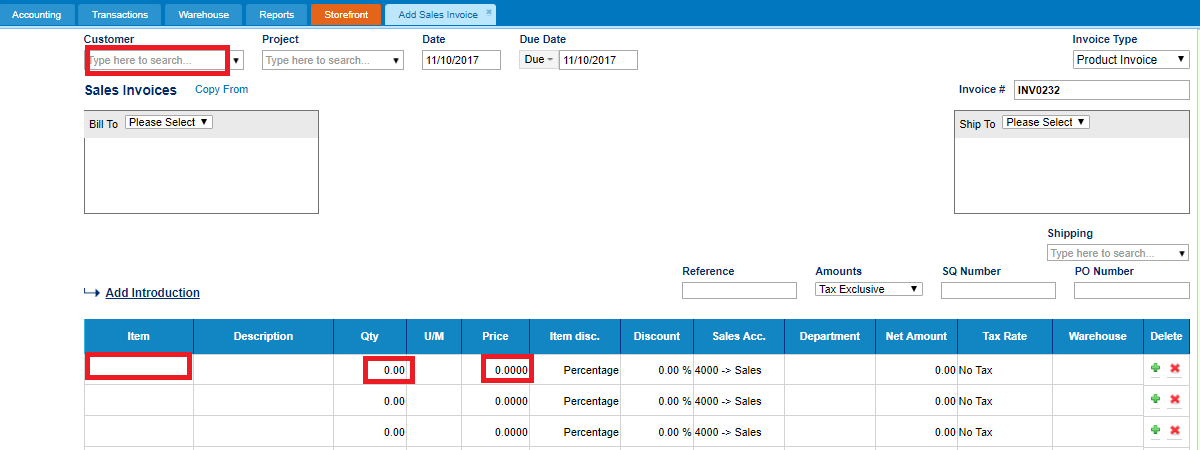
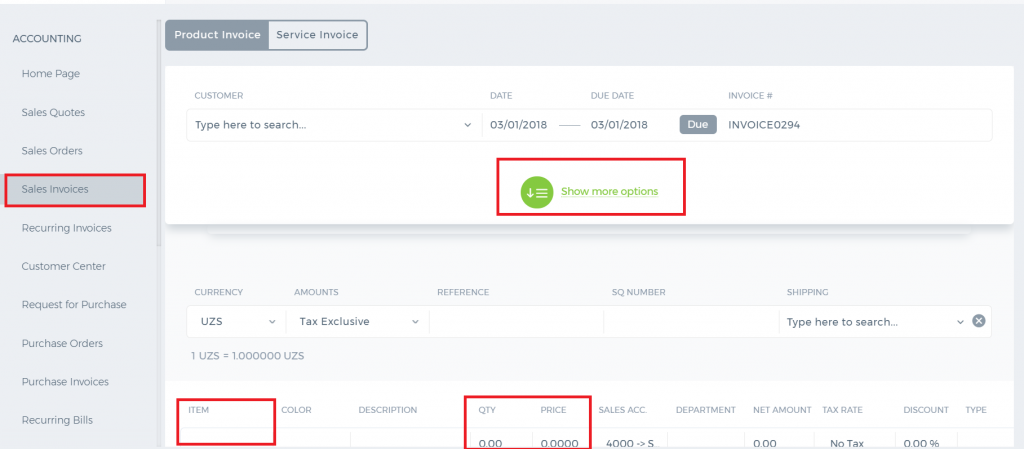 The Invoice number is provided automatically. However, you can still change it manually.
If you use multiple warehouse feature, then you will also need to choose the warehouse from which you are selling the item.
The Invoice number is provided automatically. However, you can still change it manually.
If you use multiple warehouse feature, then you will also need to choose the warehouse from which you are selling the item.
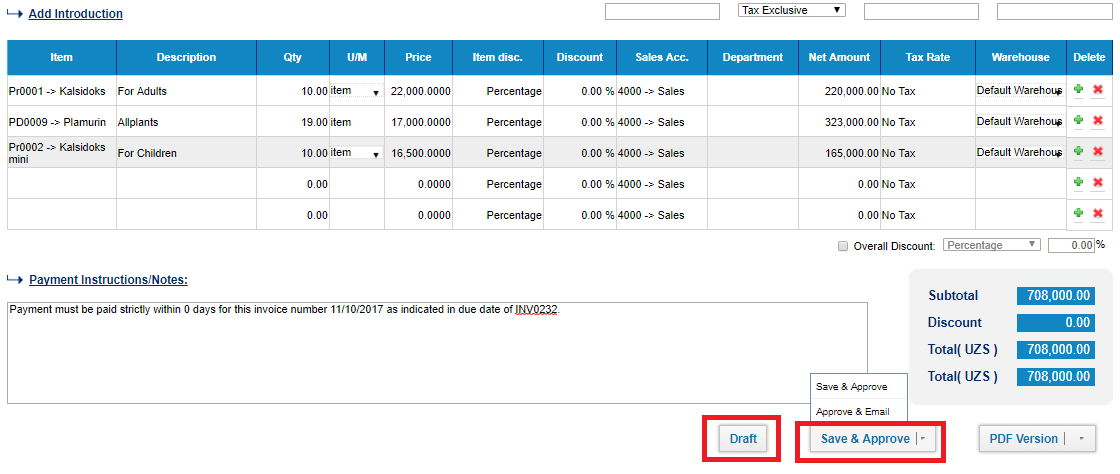
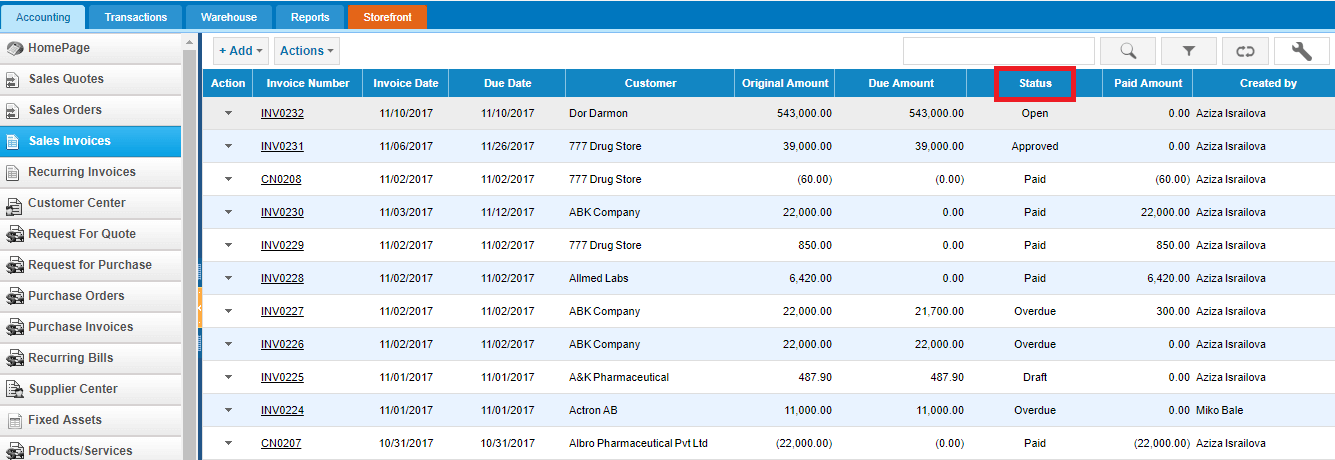
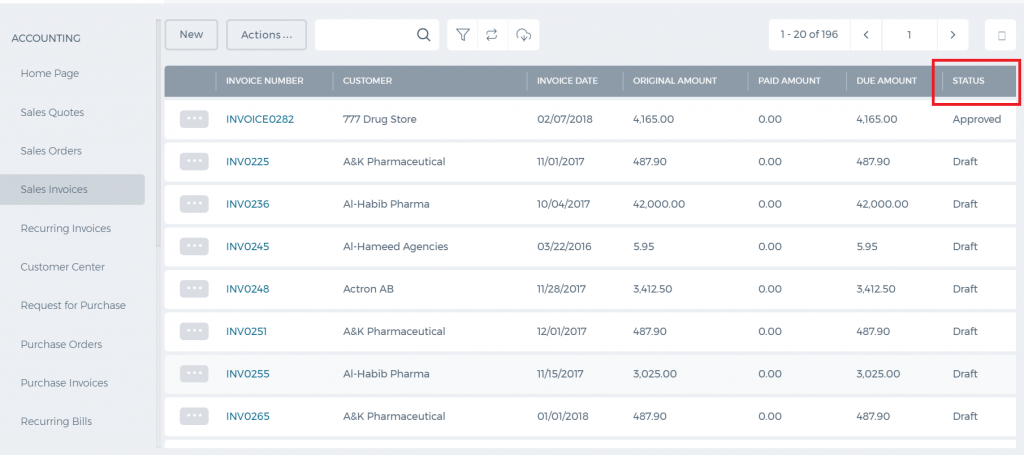
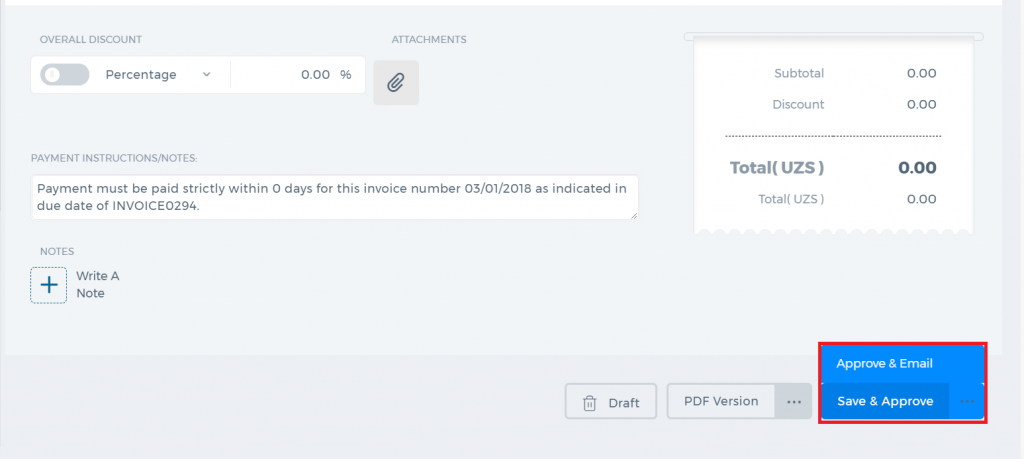 The invoice can be saved as Draft, Approved or Open. When you click "Save & Approve", the status of the invoice changes to Approved. When you save and email the invoice to your client, the status changes to "Open". Whenever the invoice due date is exceeded, the invoice status changes to "Overdue".
 For any Overdue, Approved or Open invoices, you can receive payments.
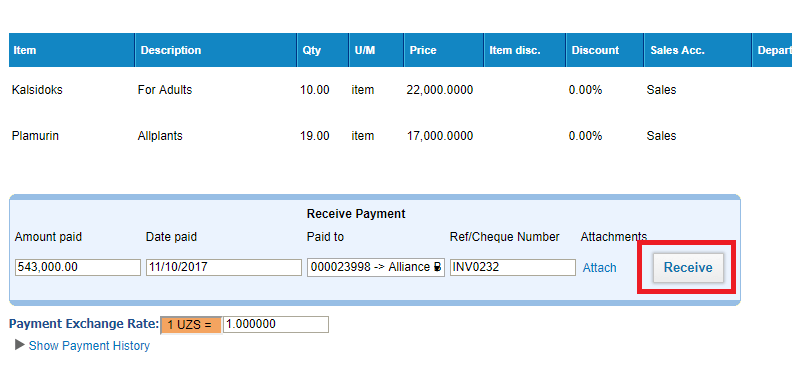
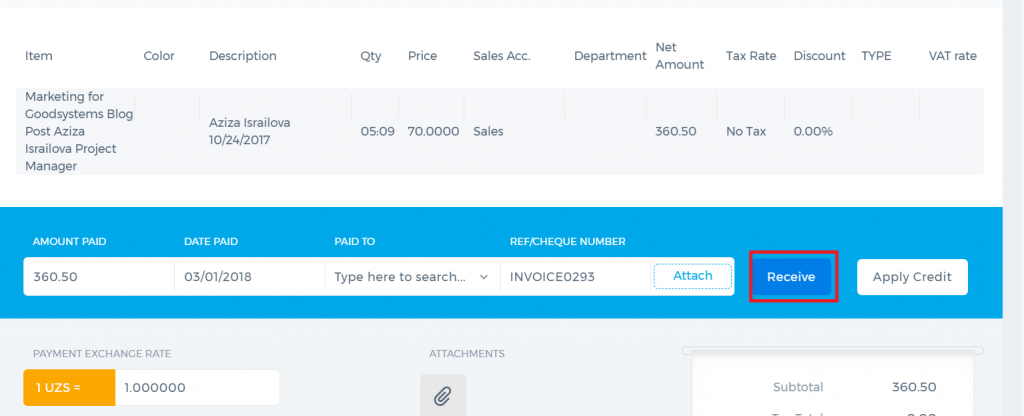 Enter the amount paid, date paid and the account the payment is made to. Then click the Receive button. The invoice status changes to Paid.
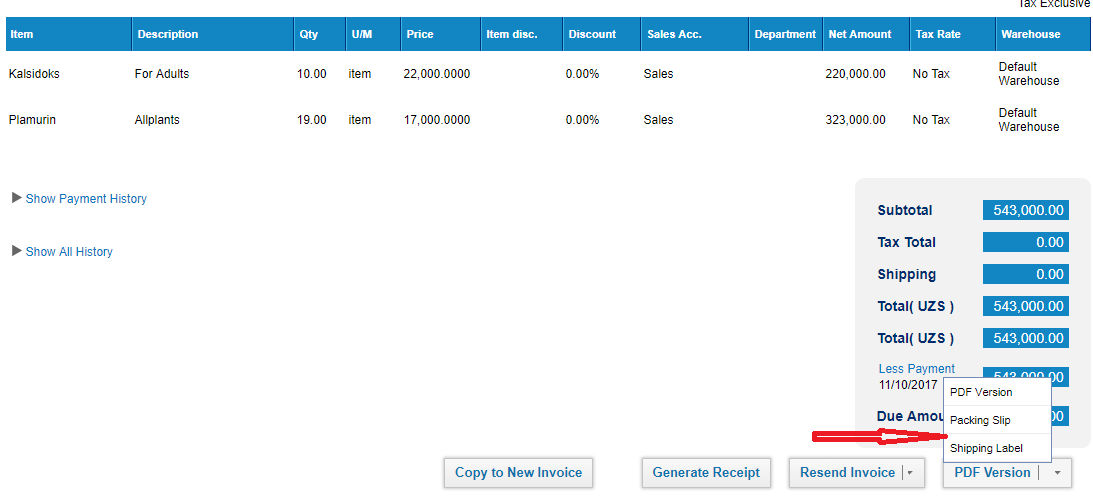
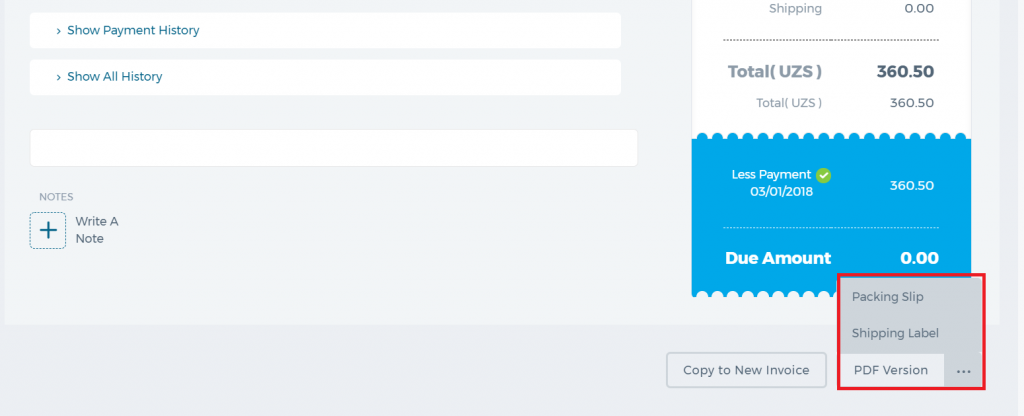
The PDF version of the invoice can be generated either from the Actions dropdown in the listing page or from the Invoice summary. If you click the arrow in the PDF button, you will be able to generate the Packing Slip or Shipping Label PDF.
Enter the amount paid, date paid and the account the payment is made to. Then click the Receive button. The invoice status changes to Paid.
The PDF version of the invoice can be generated either from the Actions dropdown in the listing page or from the Invoice summary. If you click the arrow in the PDF button, you will be able to generate the Packing Slip or Shipping Label PDF.
 Invoice Actions
A click on the actions dropdown in the invoice list gives you several options as shown in the screen shot below.
Invoice Actions
A click on the actions dropdown in the invoice list gives you several options as shown in the screen shot below.
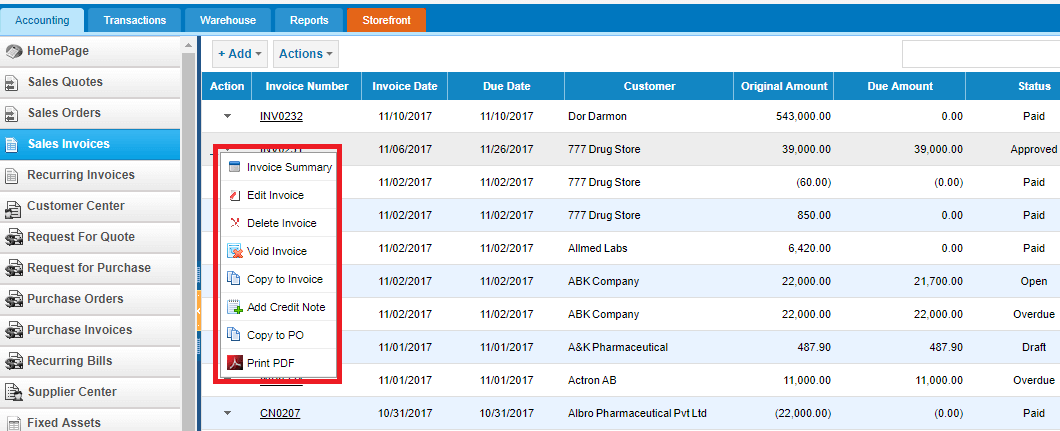
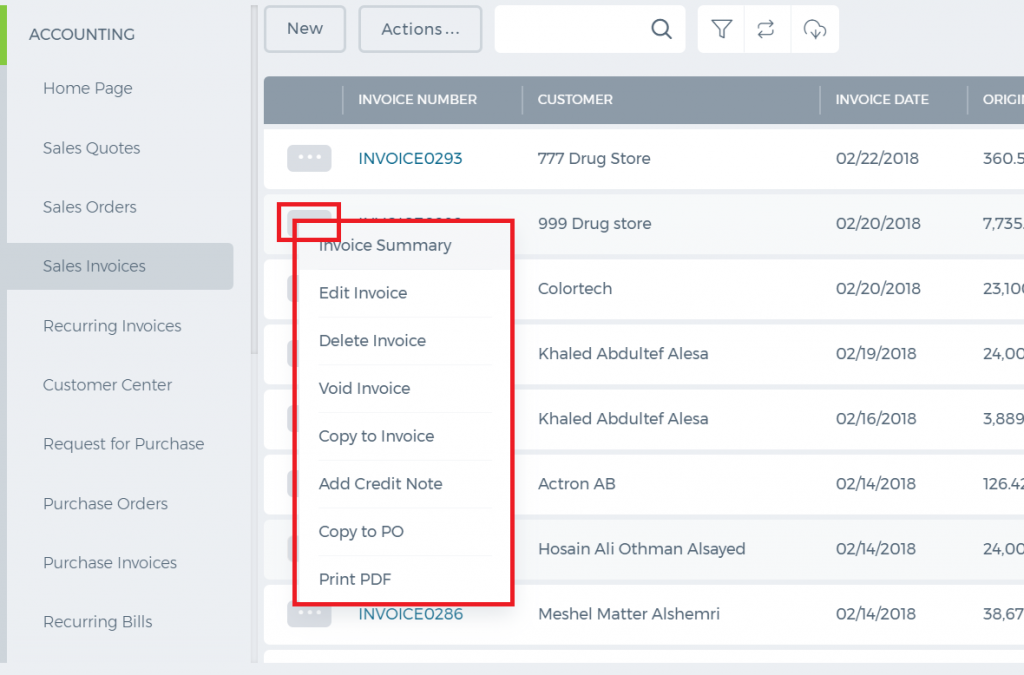 All Approved, Overdue, Draft and Open invoices can be edited or voided.
Void creates a reverse transaction, which means the historical data will remain.
Delete removes the invoice and clears all transactions related to it from the application.
Copy to either copies all invoice details to a new invoice or a new purchase order.
Add Credit Note is used in cases when customer returns the products sold fully or partially (for any default or other reasons). The Credit Note deducts the amount returned.
When adding the credit note, enter the quantity or amount returned and save.
All Approved, Overdue, Draft and Open invoices can be edited or voided.
Void creates a reverse transaction, which means the historical data will remain.
Delete removes the invoice and clears all transactions related to it from the application.
Copy to either copies all invoice details to a new invoice or a new purchase order.
Add Credit Note is used in cases when customer returns the products sold fully or partially (for any default or other reasons). The Credit Note deducts the amount returned.
When adding the credit note, enter the quantity or amount returned and save.
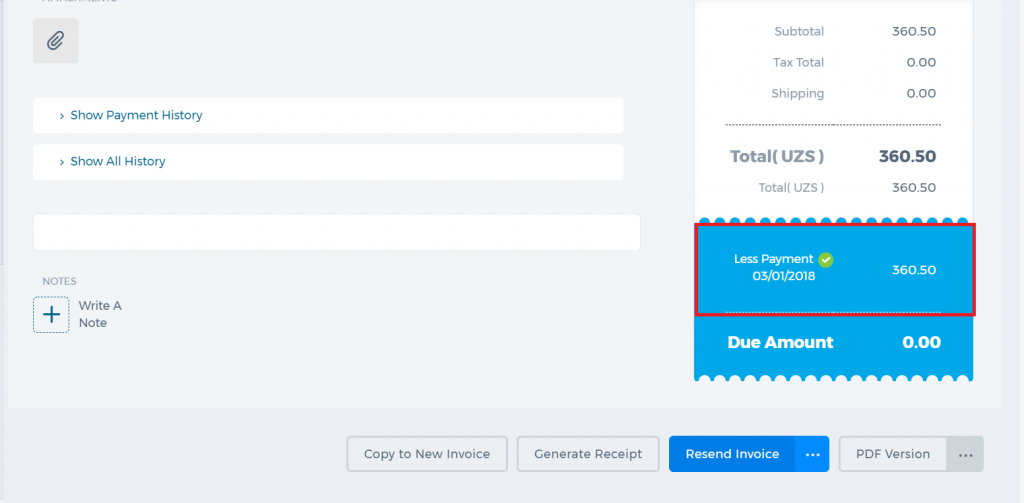
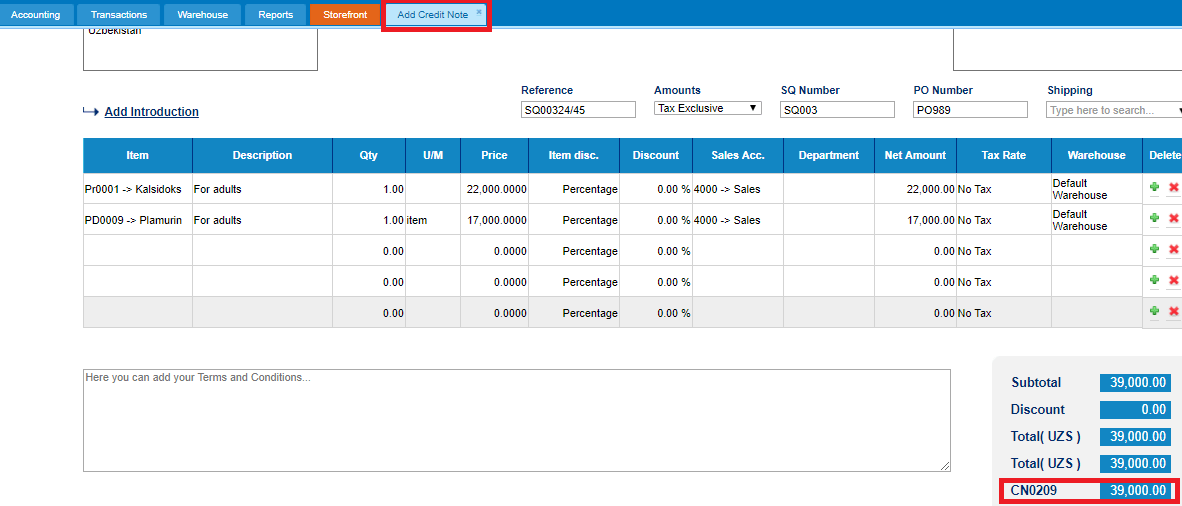 This credit note will be shown in the invoice totals as in the screenshot below:
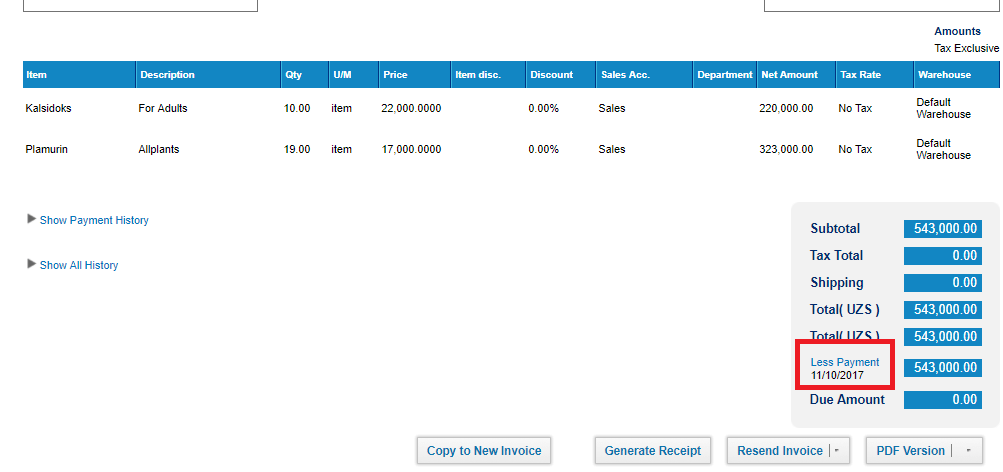
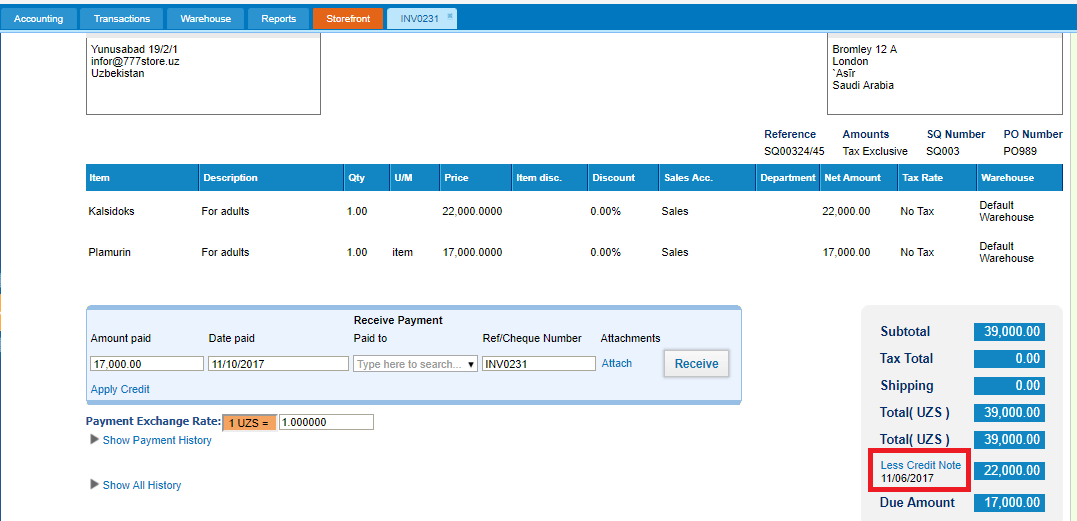 Paid Invoices
Paid invoice summary includes the "Generate Receipt" button which exports the PDF version of the payment receipt.
As mentioned above, paid invoices cannot be edited. However, if you still need to make changes to the paid invoice, then you should first delete the payment and then edit the invoice.
Go to the invoice summary, click the Less Payment option from the totals and choose either delete or void. After that you will be able to edit the invoice details.
Paid Invoices
Paid invoice summary includes the "Generate Receipt" button which exports the PDF version of the payment receipt.
As mentioned above, paid invoices cannot be edited. However, if you still need to make changes to the paid invoice, then you should first delete the payment and then edit the invoice.
Go to the invoice summary, click the Less Payment option from the totals and choose either delete or void. After that you will be able to edit the invoice details.
Multi-currency in Invoices
Multi-currency in Invoices
Once you have enabled the 'Multiple Currency' feature in Accounting Settings >> Financial Settings you can change the currency in invoices.
Then, when you create an invoice, you can see a currency dropdown field on the top corner of right panel in Add New Invoice page (click here).
Once you set the exchange rate the price of line items in the invoice will change accordingly.
How do I use Sales Orders
How do I use Sales Orders?
How do I use Sales Orders?
There are three steps in the process of using a sales order.
- Fill out the sales order or convert from sales quote.
a) At the time a customer places an order, you fill out a sales order with the customer information and a line item for each product and service ordered.
b) Once your Sales Quote approved by Customer, you convert to Sales Order.
- Fulfill the sales order.
Fulfilling the sales order is simply getting the products or services to your customer.
Inventory: If you're providing a product you keep in inventory, you can print a pick list from the sales order so you know exactly what to pull from inventory to fulfill the order. If you need to package the products for shipping, you can also print a packing slip from the sales order.
Service: If you're providing a service, schedule the service provider.
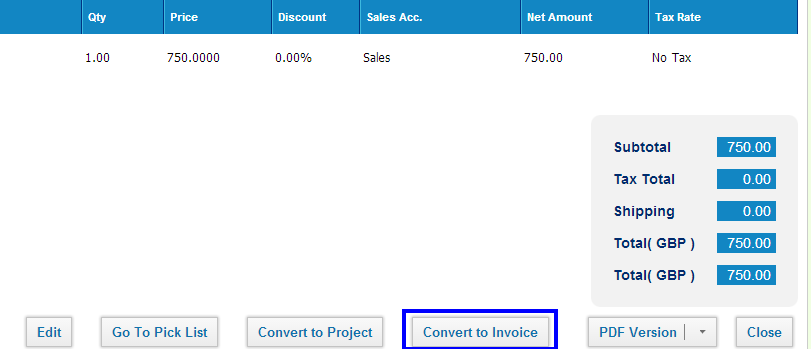
- Convert to the invoice.
The last step in completing the sale is converting the sales order to an invoice.
 *Important:
 When you create and fill out a sales order, you haven't recorded the sale—you've only recorded the information you need to fulfill the order. The sale is recorded only after you create an invoice. For example, items you sell are not deducted from inventory until you create an invoice based on the sales order.
How to add Sales Order
How to add Sales Order
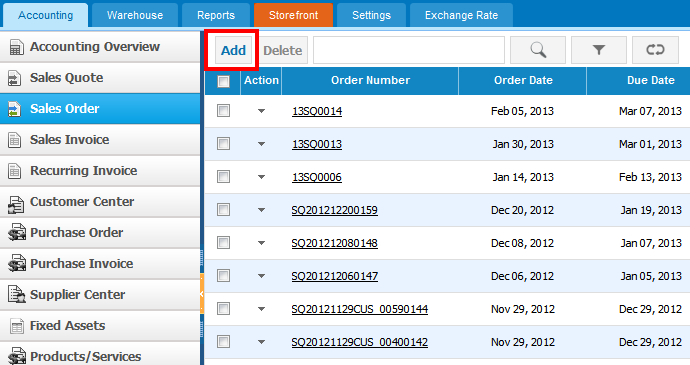
To create a Sales Order, go to
Sales Order listings page and click
Add.
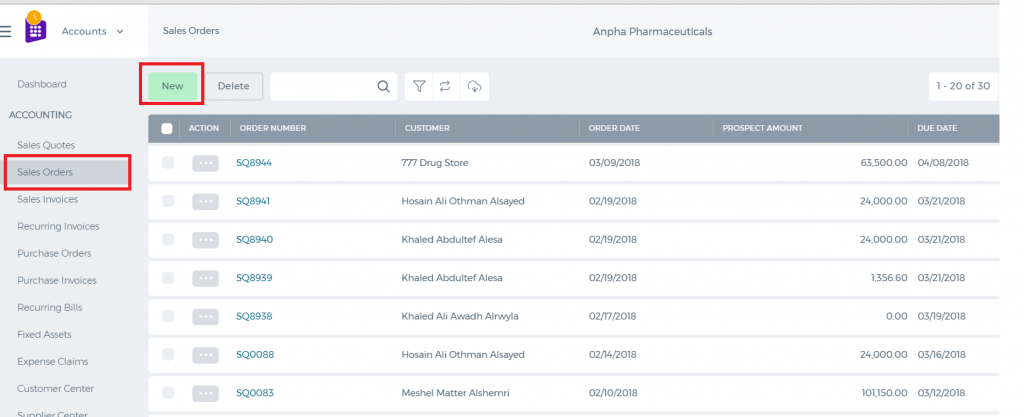
The form will appear with the following fields:
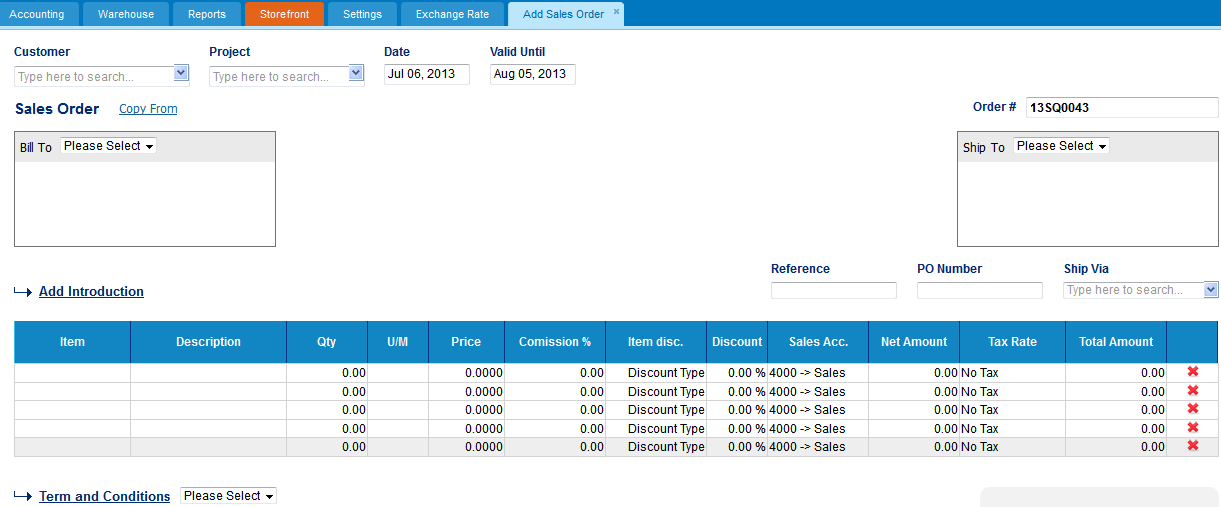
 Customer -
 Select a company or an organization or a person you are sending a quote from the list of customers. You can also lookup the customers from the search box. If there are no customers registered in your company you can add
new customer from
add new link just in the customer dropdown.
Project - Select the project related to the Customer. Note that only the projects that belong to the customer will appear here.
Date - Indicate the date quote is created.
Valid Until - Indicate the deadline until which the Sales Quote will be valid for.
Order # - Edit or use default quote number selected using Accounting Settings, Sales Quote Numbering Settings. In order to change the numbering format of the quote, please go to settings, accounting settings, invoice settings, invoice numbering and choose appropriate format there.
Ship Via – Choose a shipping method from the search box. If there is no shipping method, you can click on the
Ship Viadropdown to fill in the form and save it.
Add Introduction - Enter introduction text to the body of the quote. Introduction text will appear at the header of the sales quote.
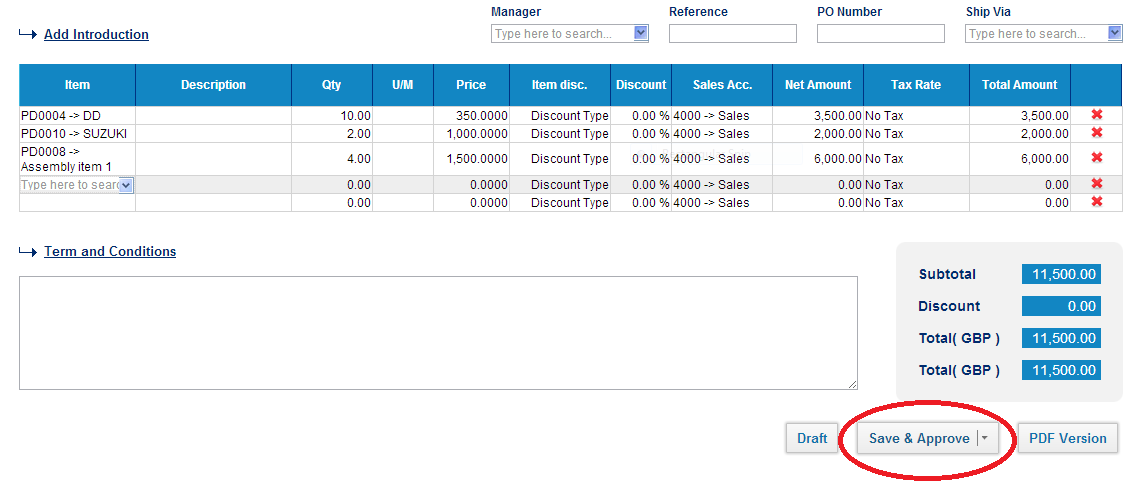
Add line Items:
Click
Item cell in order to add products or services to your sales quote.
Item – title of the product, required field. You can select from existing products/services or type here not-listed items.
Description – description of the product which can be editable.
Qty – enter the quantity of the product.
U/M – you can specify the unit of measurement.
Price – selling price of the product.
Commission % – Commission split option enables you to define the amount of commission earned by Sales Person. You can assign commission rates to products & services while adding products/services or generating Sales Quotes. Then you can split quote commissions among sales person and sales managers, as well as track and get reports.
Discount – enter the discount percentage
Sales Acc. – enter the GL account for bookkeeping purposes
Net Amount – net amount displays the amount after applying the discount
Tax Rate – choose the tax rate from the tax rate dropdown menu. Tax rates are applied in percentage
Total Amount – the total of each line is displayed here
Terms and Conditions – Write terms and conditions in the box below. There is a character limit of up to 1000 characters in the box.
Sales Order
Sales Order
Sales Order is a second deed, once the Sales Quote is accepted and is an affirmation document mailed to the purchaser before delivering the goods or services.
Sales orders help you manage the sales of the products and services your customers order. Using sales orders is optional that you can convert Sales Quote to Sales Invoice directly.
Once Sales Order created the stock amount of the inventory will not be deducted, however you can see how many items were ordered (On Sales Order) in Products/Services listing page.
Create a Sales Order
To create a Sales Order, go to Sales Order listings page and click Add.
Sales Order Reference
| Status |
Edit |
Delete |
| Sales Order |
Yes |
Yes |
| Picked |
Yes |
Yes |
| Packed |
Yes |
Yes |
| Shipped |
Yes |
Yes |
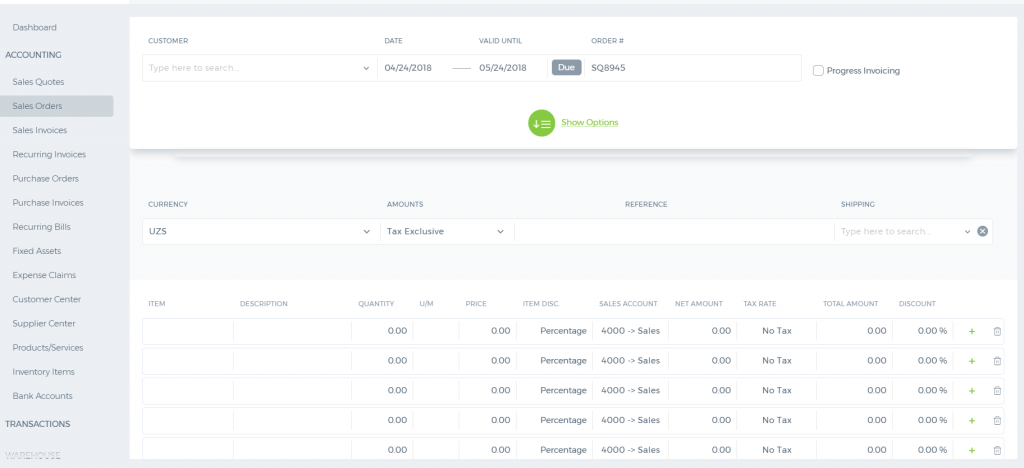
Progress Invoicing
Progress Invoicing
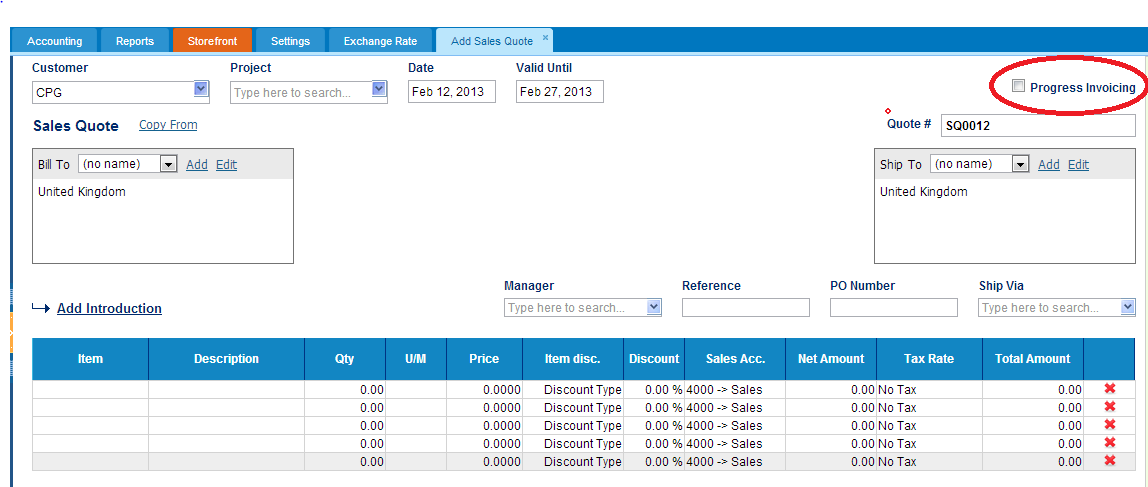
You can charge your customers partially either by percentage or by line items enabling ‘progress invoicing’ in
Sales Quotes. When adding a new
Sales Quote, check the relevant box as highlighted:
Then you go on to create a typical quote by indicating the Customer, Project (only if applicable) and listing theProducts/Services. Having introduced the items, you can submit your quote for approval.
As soon as the client agrees upon the estimates, quote status adjusts accordingly. You should go to the summary of the
Sales Quote and hit “
convert to invoice” button. The system gives you two choices: create an invoice by Percentage or by Item. Note that, you will need to stick with one of these options for this particular quote.
Let’s say you want to invoice by line item in a following way:
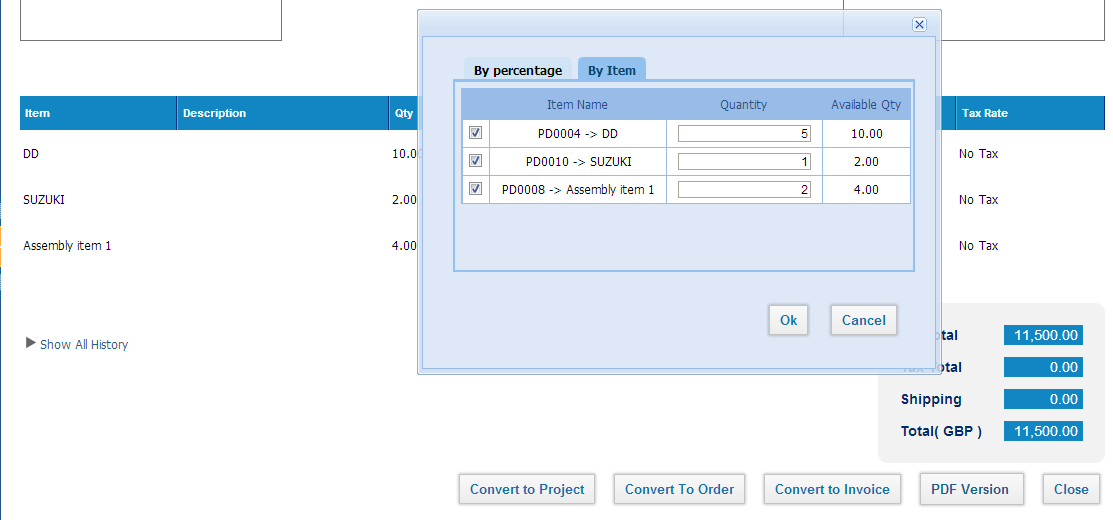
Once the ‘to be invoiced’ quantities are shown, click ‘OK’ to proceed. The system creates an invoice for the chosen items and you will need to fill out the missing details before you approve.
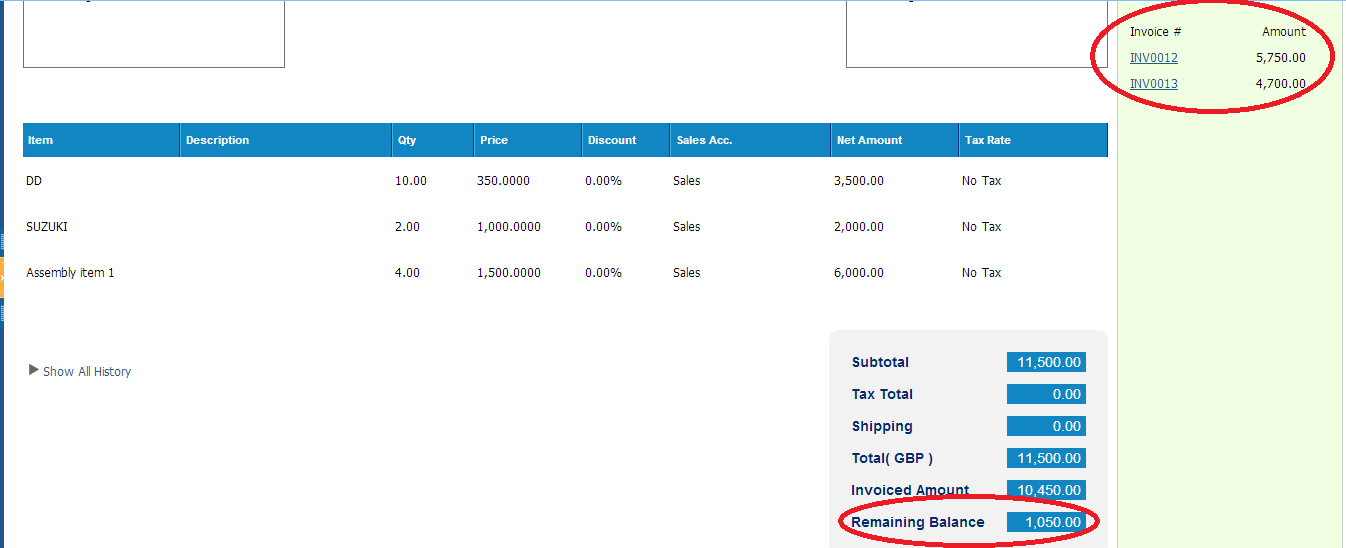
To track how many and what invoices created against a progress invoicing enabled
Sales Quote, go to the summary page of the
Sales Quote, and from the right-hand bar, locate the list of invoices issued. And from subtotals table, check
Remaining Balance. Next time when you create a progress invoice against this very
Sales Quote, the window will show the available quantities for each product.
How to convert Sales Quote to Order, Invoice & Project
How to convert Sales Quote to Order, Invoice & Project
Once the Sales Quote is in open status, and the client has approved Quote, you can record that by clicking Client Approve.
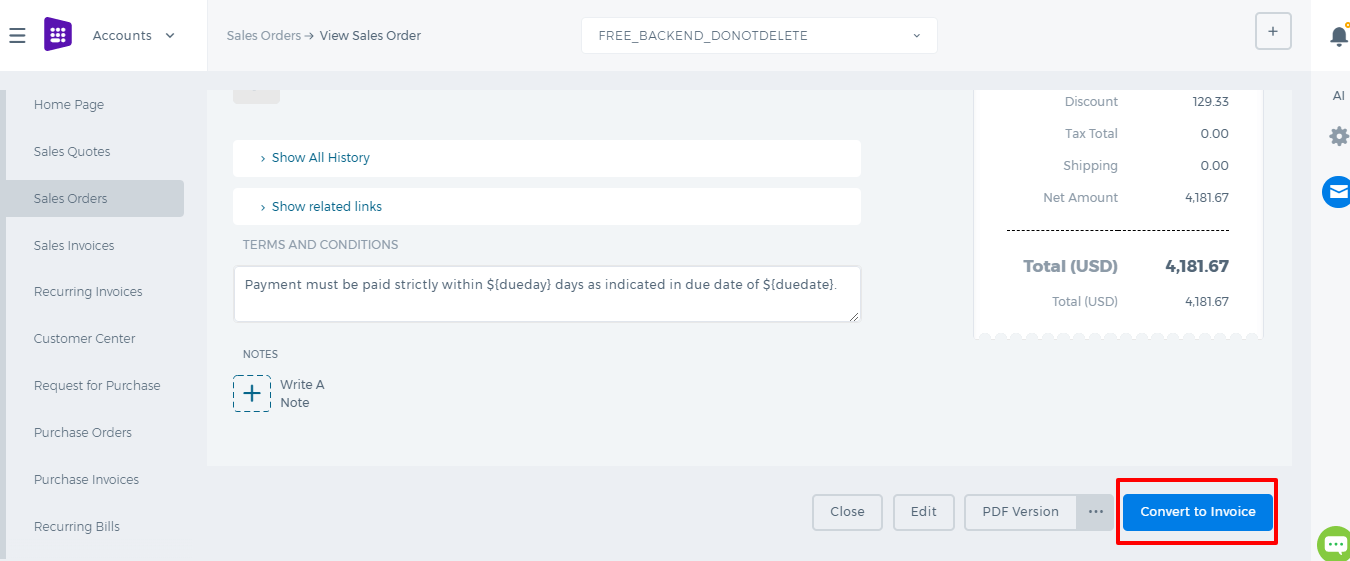
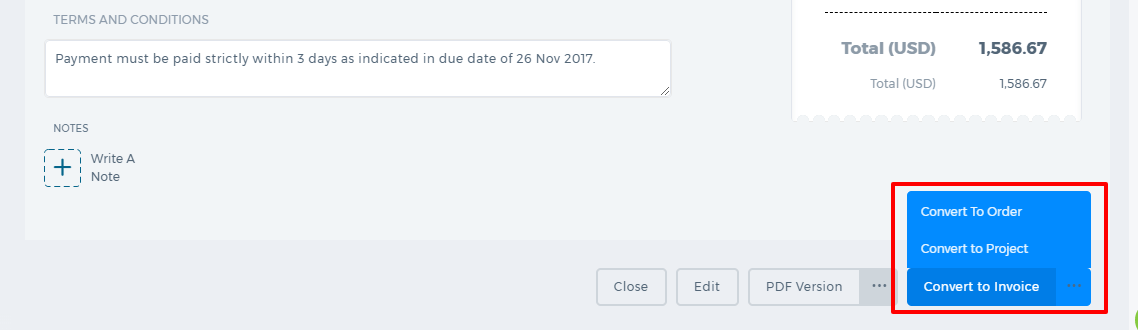
When the Quote is approved by the client, you can convert your Quote to Sales Order, Sales Invoice and Project using approprate buttons.
- If client has rejected the Quote, you can change the Quote terms and send the Quote back to client later.
When you choose a Manager to approve a Sales Quote and even after the Manager has approved theSales Quote, you cannot convert it to Order.
How to add Sales Quote
How to add Sales Quote
To create a Sales Quote, go to
Sales Quote listings page and click
Add.
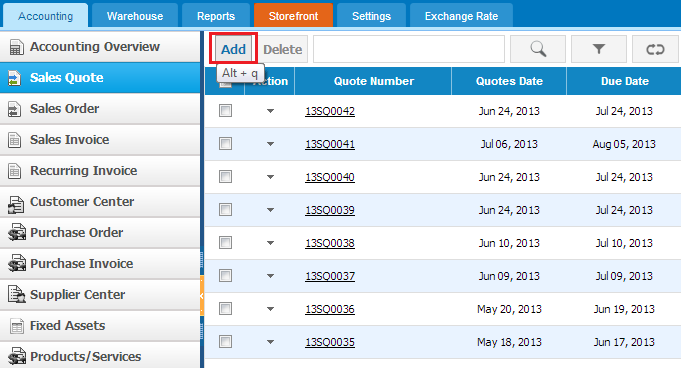
The form will appear with the following fields:
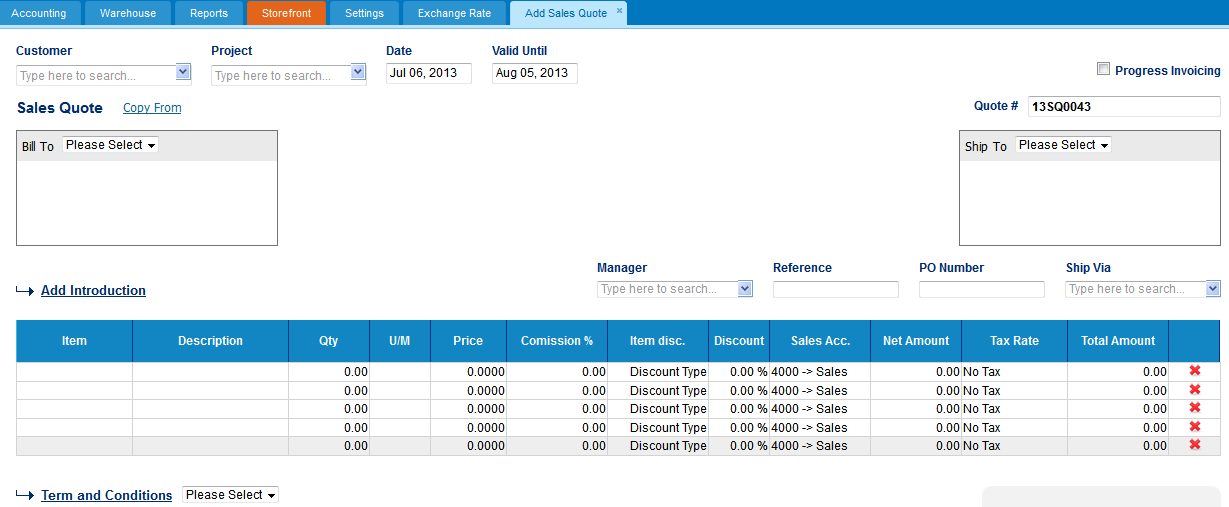 Customer -
 Select a company or an organization or a person you are sending a quote from the list of customers. You can also lookup the customers from the search box. If there are no customers registered in your company you can add new customer from
add new link just in the customer dropdown.
Project - Select the project related to the Customer. Note that only the projects that belong to the Customer will appear here.
Date - Indicate the date quote is created.
Valid Until - Indicate the deadline until which the Sales Quote will be valid for.
Quote # - Edit or use default quote number selected using Accounting Settings, Sales Quote Numbering Settings. In order to change the numbering format of the quote, please go to Settings, Invoice settings, Saels Quote numbering and choose appropriate format there.
Progress invoicing - (also called progress billing, percentage of completion billing, or partial billing)Progress Invoicing enables you to create an invoice from a sales quote by billing your customer for a percentage of the original quote. In order to generate
Progress Invoicing tick
Progress Invoicing check box.
Manager – you can select manager to submit Sales Quote for Manager approval.
Ship Via – Choose a shipping method from the search box. If there is no shipping method, you can click on the
Ship Via dropdown to fill in the form and save it.
Add Introduction - Enter introduction text to the body of the quote. Introduction text will appear at the header of the sales quote.
Add line Items:
Click
Item cell in order to add products or services to your sales quote.
Item – title of the product, required field. You can select from existing products/services or type here not-listed items.
Description – description of the product which can be editable.
Qty – enter the quantity of the product.
U/M – you can specify the unit of measurement of the line items.
Price – selling price of the product.
Commission % – Commission split option enables you to define the amount of commission earned by Sales Person. You can assign commission rates to products & services while adding products/services or generating Sales Quotes. Then you can split quote commissions among sales person and sales managers, as well as track and get reports.
Discount – enter the discount percentage.
Sales Acc. – enter the GL account for bookkeeping purposes.
Net Amount – net amount displays the amount after applying the discount.
Tax Rate – choose the tax rate from the tax rate dropdown menu. Tax rates are applied in percentage.
Total Amount – the total of each line is displayed here.
Terms and Conditions – Write terms and conditions in the box below. There is a character limit of up to 1000 characters in the box.
Sales Quote
Sales Quote
Sales Quote provides the prospective customer with a quote of how much the work should cost. With this function, a manager can handle Sales Order and Sales Invoice. Sales Quote can be used in kpi.com as part of CRM and Project Management Modules. It can be sent to contacts, leads, accounts and customers. Project Managers can use Sales Quotes in order to create proposals and send them to clients before the start of the project
Create Sales Quote
To create a Sales Quote, go to Sales Quote listings page and click Add.
Sales Quote Reference
| Status |
Edit |
Delete |
| Draft |
Yes |
Yes |
| Approved |
Yes |
Yes |
| Rejected |
Yes |
Yes |
| Approved by Client |
No |
Yes |
| Invoiced |
No |
Yes |
| Converted |
No |
Yes |
What can you do after creating a Sales Quote?
Save as a Draft - you can edit and change Sales Quotes. It is not shown for your Customer.
Save & Approve – once you save & approve your Sales Quote would be available for Customer’s consideration.
Approve & Email – when you click Approve & Email Sales Quote will be approved and sent to your Customer a notification with attached PDF version of Sales Quote.
Submit for Approval – you can submit Sales Quote for manager approval by choosing manager in Managerfield. Managers who can approve Sales Quote are following: Administrator and Director.
Print PDF Version – once you have filled in all required fields, you can generate print version of Sales Quote by clicking on PDF Version button.
Client Approve – Once the quote is sent to client, client can approve the quote by logging in to KPI, or you can approve quote yourself once quote is marked as open.
Client Reject – Once the quote is sent to client, client can reject the quote by logging in to KPI, or you can reject quote yourself once quote is marked as open. Client can add reasons of rejection as note in pop-up window.
If the client has rejected the quote, you can change the quote terms and send the quote back to the client later.
Convert to Order – Once the quote is approved by the client, you can convert your quote to sales order usingConvert to Order button.
Convert to Invoice - Once the quote is approved by client, you can convert your quote to sales invoice usingConvert to Invoice button.
Progress invoicing - (also called progress billing, percentage of completion billing, or partial billing) Progress Invoicing enables you to create an invoice from a sales quote by billing your customer for a percentage of the original quote.
In order to generate Progress Invoicing go to the Sales Quote Add Form and tick Progress Invoicing on right-top.
Likewise, you can edit, delete, copy to Purchase Order, copy to Sales Quote and print PDF of your Sales Quote created.
Sales Overview
Sales Overview
Sales Quote/Sales Order/Sales Invoice
In
kpi.com you can create a sales quote, order and invoices in multi-currencies.
To create a sales quote go to Sales Quote listings page and click Add. After you fill in relevant fields, you can either send the quote to your customer or register without emailing.
Apart from it, like from anywhere else in the system, you can upload attachments and carry internal notes in all add-forms.
If you are looking for progress invoicing or, so called, partial billing, go to Sales Quote and enable Progress Invoicing checkbox. By approving the quote you are now ready to slice the estimate amount into as many invoices as you want. Yet no worries, you will never loose track of how much issued and how much left, as you can find the answers going back to the quote.
Issuing Sales Invoice is quite similar to creating Sales Quote, yet comes with more bells and whistles. By enabling “Serial Number Tracking” add-on, you can sell not only quantities of items, but assign serial numbers, so you can be on top of what serial number items are sold and which ones are remaining. In addition, you can register a customer Credit Notes to invoices issued.
Recurring Invoices is another feature that comes with very flexible scheduling options, through which you can control any time interval for sending invoices.
In addition, if you maintain projects and need to charge your customer for hours registered in Timesheet Entries in Project Management module at kpi.com, you can do so by clicking Timesheet Invoice from Sales Invoice listings. By clicking Timesheet Invoice you aggregate employee hours spent on a certain project within an interval you set. Then select the right invoice details to email your client.
From Customer Center, you can create customers; add their beginning balances and credit limits, so you can manage not only accounts receivables but also risks associated with it. Invoice payments and customer deposits can as well as be registered from Customer Center under
More option.
Customer Center
Customer Center
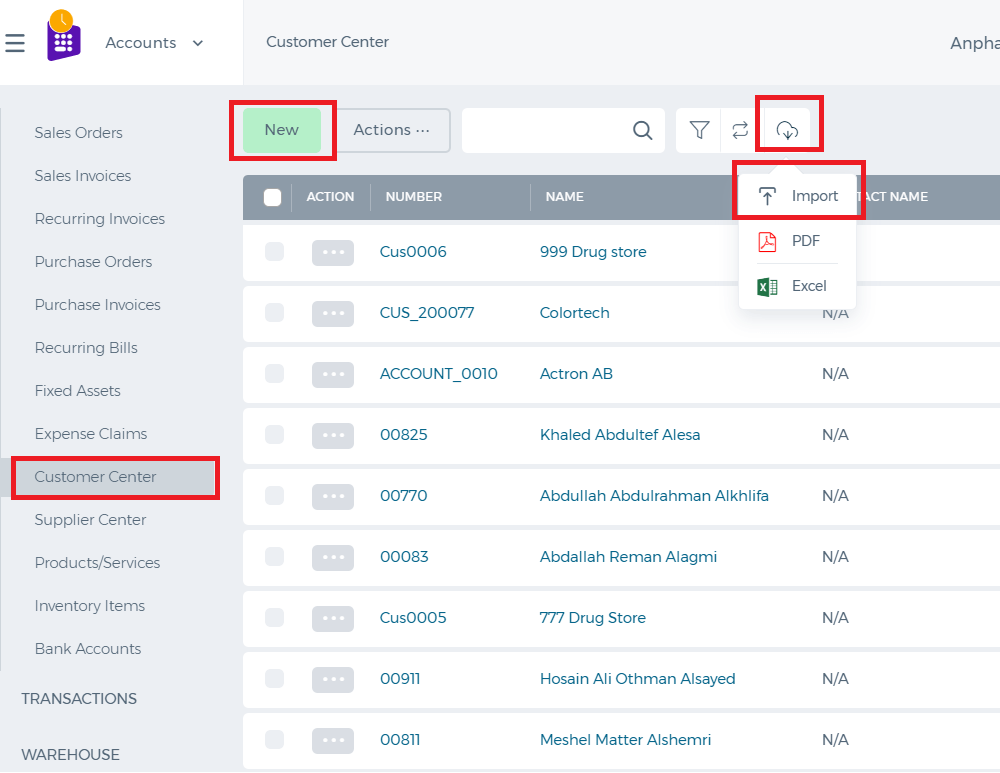
Customer Center involves all companies added/imported either from CRM or Accounting with the "Customer" type.
You can add customers manually using the "Add" button or import the list of customers using the "Import" button.
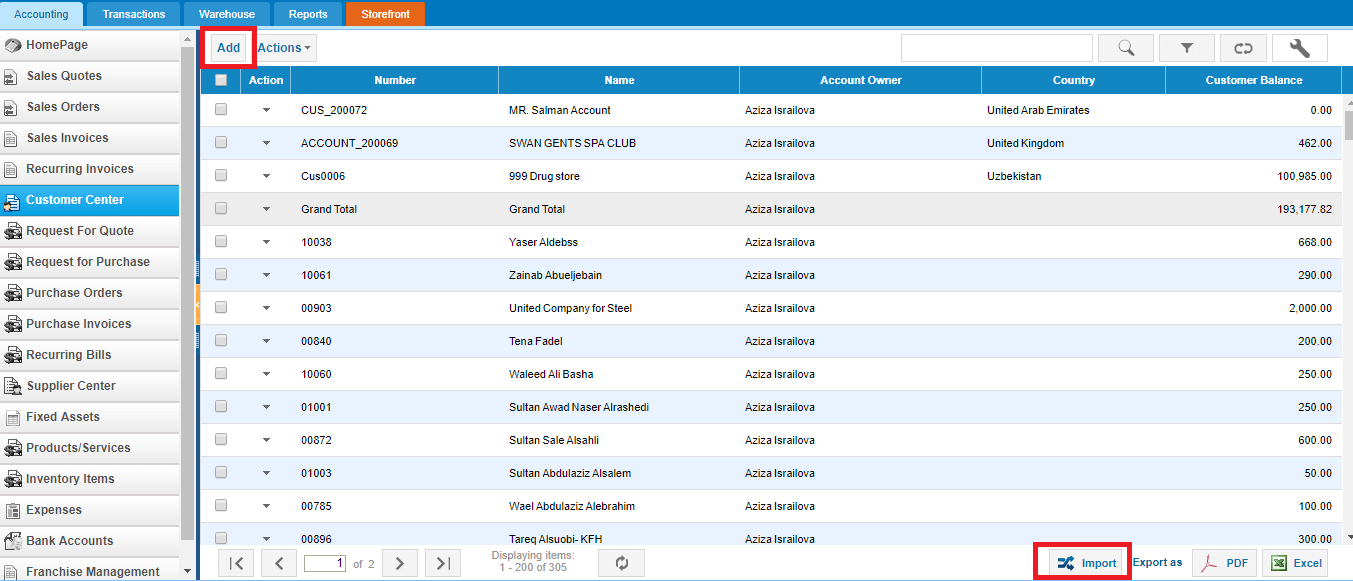
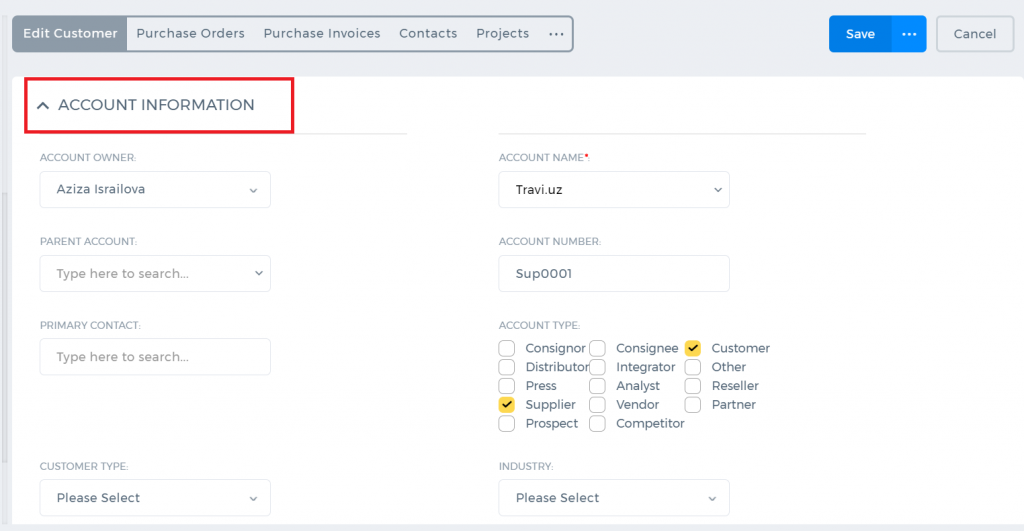
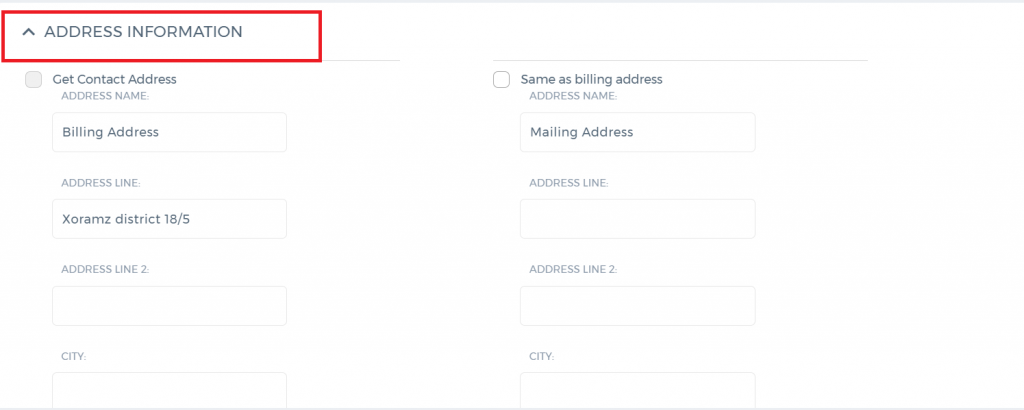
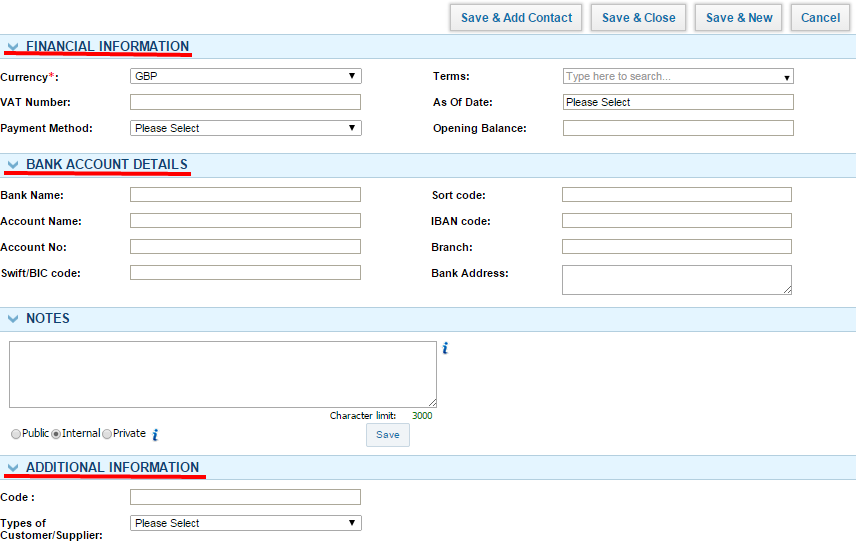
While adding the customer, fill in all the necessary information related to the customer such as the account information, address information, and financial information:
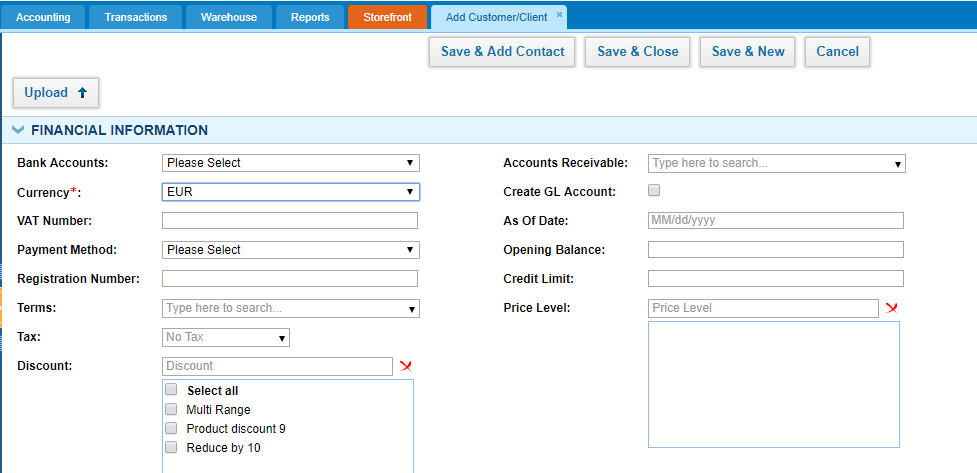
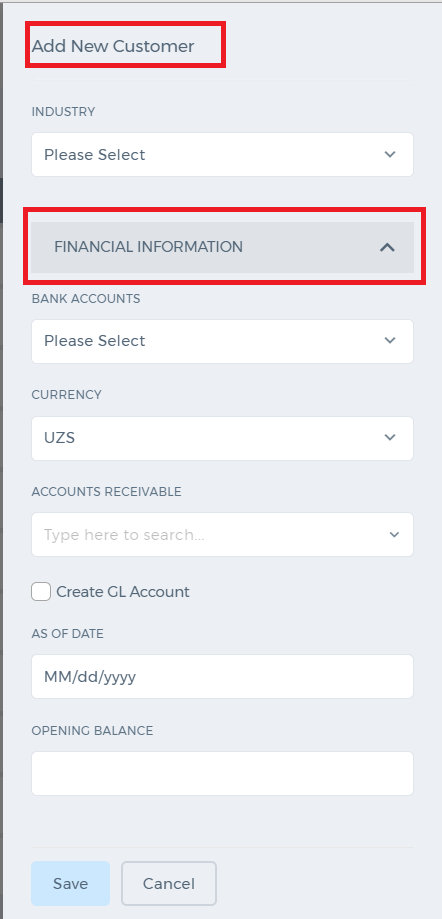 Bank Accounts
 - if you use only one bank for this customer transactions, choose the default bank account.
Currency - choose the customer currency (if multiple-currency option is enabled).
VAT Number - if customer uses VAT, enter the VAT number.
Payment Method - choose the method the customer makes the payments such as cash, wire transfer, credit card, debit card etc.
Terms - choose the invoice period terms. Once chosen this will be default for all invoices of this customer.
Tax - choose the default tax for this customer (not required field).
Discount - choose the default discount you usually offer to this customer.
Accounts Receivable - by default the customer transactions are posted under the default chart of account called "Accounts Receivable". However, if your books record customer transactions to other current asset account then choose that account from this look up field.
Create GL Account - This check box will be used to create an account in chart of accounts listing for the Customer. If it is checked, general ledger account will be created as sub account of Accounts Receivable. Account Name will be same as Customer name.
As of Date - choose the date the customer balance is effective from.
Opening Balance - enter the amount/balance of the customer as of the date chosen on the above field.
Credit Limit - if the customer has the credit limit, enter that amount. Invoicing and transactions will not allow you to post balances more than that account.
Price Level - choose the price level if applicable.
After that click "Save & Close". The customer will show up on top of the list.
Customer Balance
You can generate the customer statement by clicking on the customer balance shown in the screen shot below:
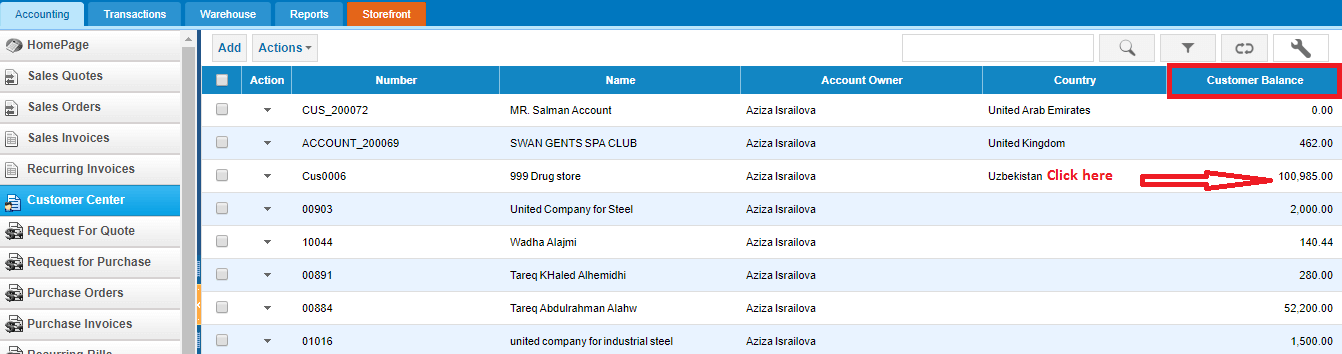

Based on the period you choose from the date picker on top of the report, you will see all related customer transactions.
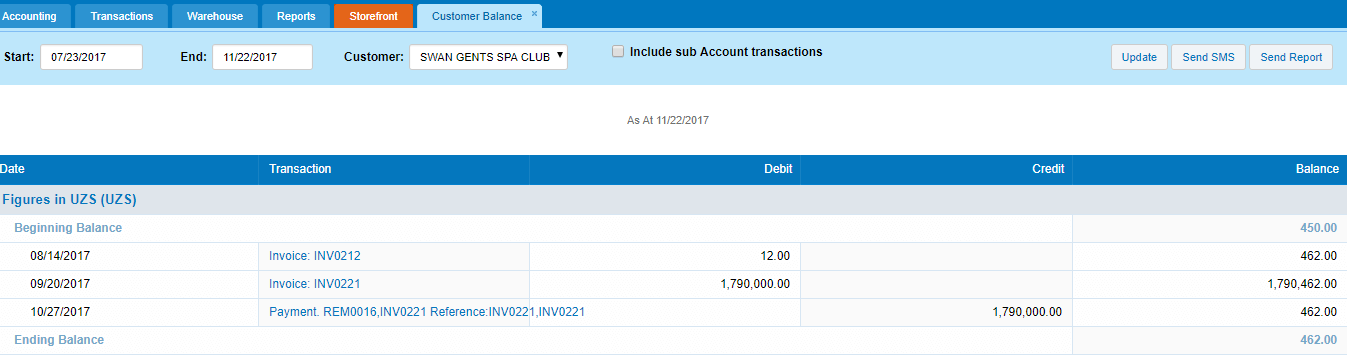
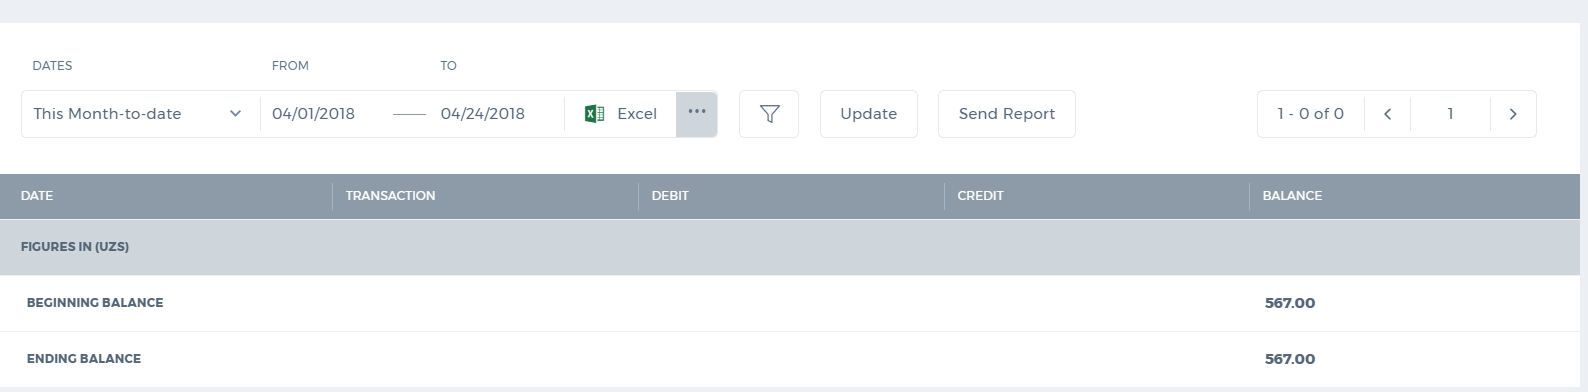
You can send the report directly to the customer using the "Send Report" button. The customer will receive the balance in the email as an attachment.
You can also export the report to Excel and PDF.
Serial Numbers
Serial Numbers
Serial Numbers are not available by default. You can request the support team to activate the add-on to your account (support@kpi.com).
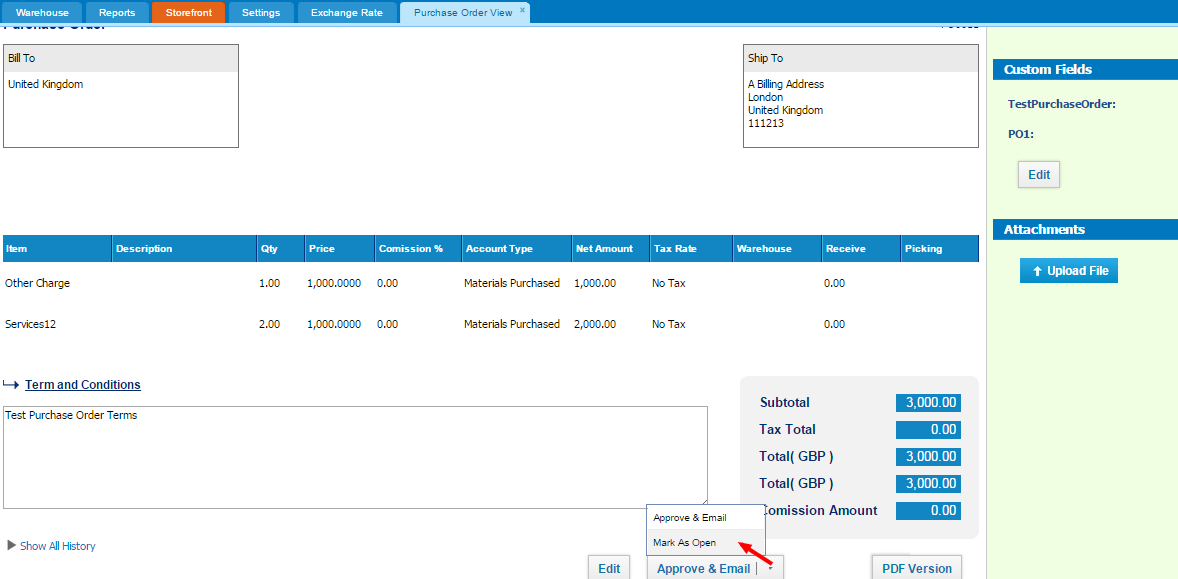
1. To set
Serial Numbers in products, go to
Purchase Orders from list of menu, and choose
Purchase Order that you need. The bottom of the page you may see
Approve & Email button, click the dropdown list and choose Mark As Open ( if it is not Marked As Open)
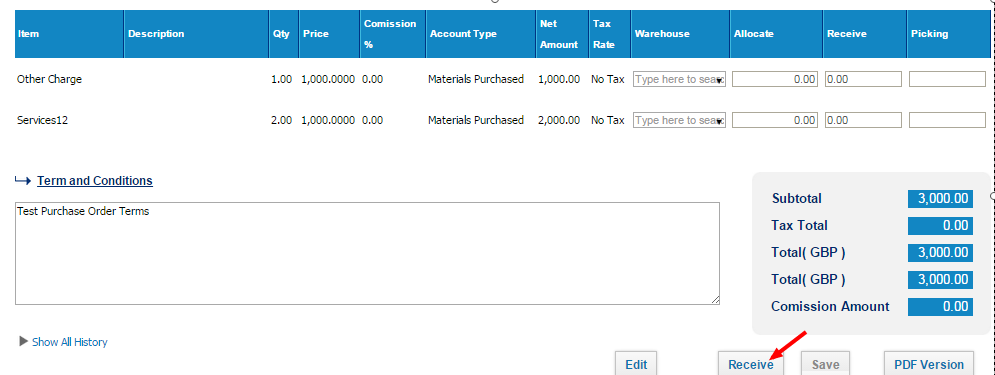
2. Then click
Receive button
3. There are
Assign Serials button on the rigt side of the page. click it:
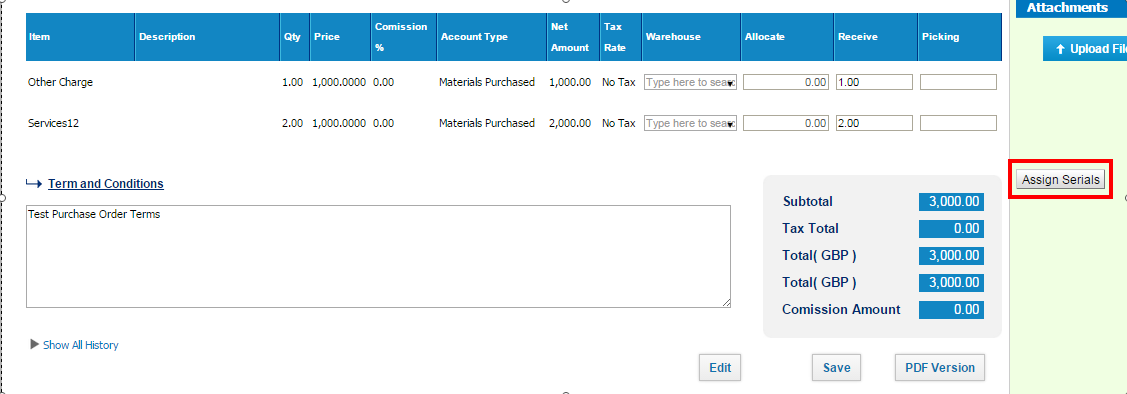
4. When you click it, there are
Assign Serial Numbers window. enter all serial numbers and data to each fields
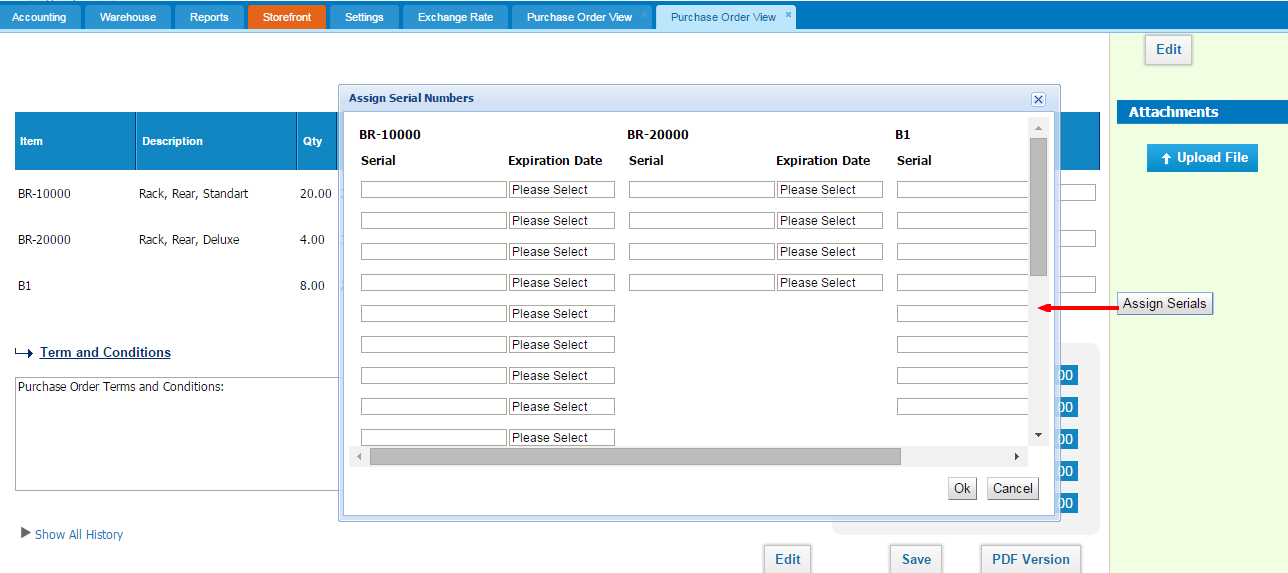
5. Finally,
save all entries.
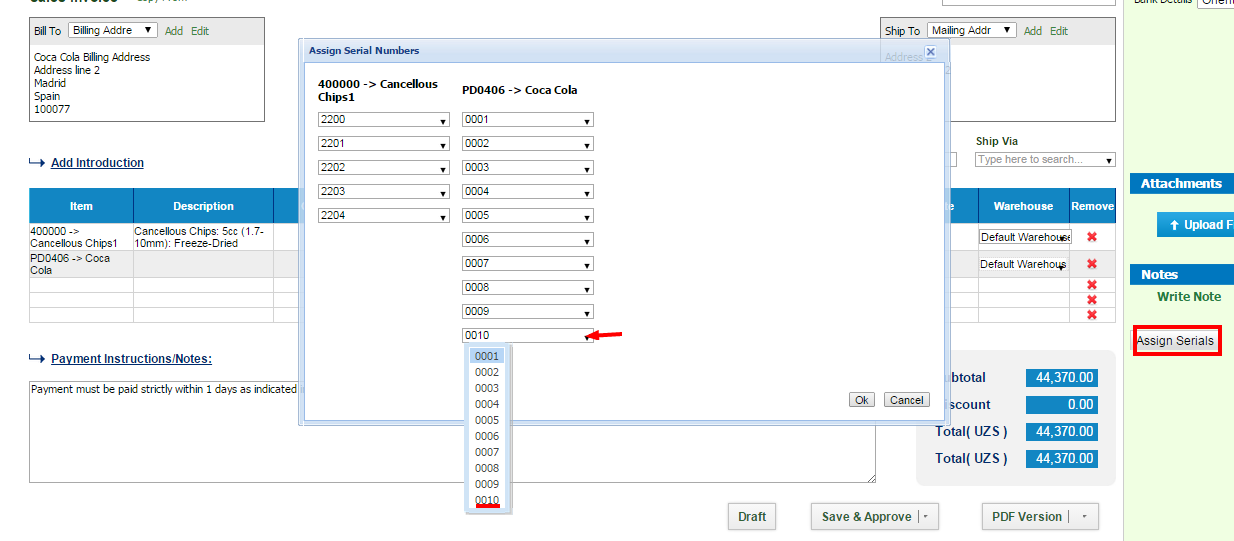
6. In addition, While
Sales Invoicing, if you choose the items which you entered with
Serial Numbers you may identify them. Click the
Assign Serials button on the right side:

7. When open
Assign Serial Numbers window, you should select items serial number from dropdown list and press
Ok
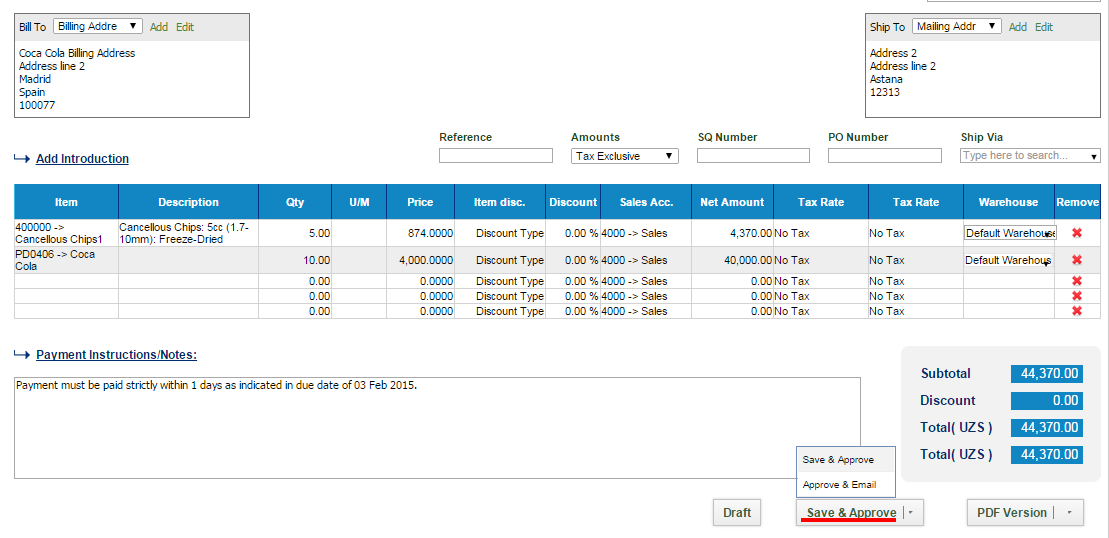
8. After selecting Serial Numbers you may
Save & Approve your Sales Invoice
Add-ons Library
Add-ons Library
You can request for add-ons in Accounting and Finance, Settings, Add-Ons menu.
kpi.com add-ons library, where you can tweak and gear the application towards your needs. Each add-on comes with an additional monthly fee. After you request an add-on for your account, sales team representative will contact you and assist with setting up the feature in your company account.
 Multiple Warehouse – Easily manage multiple warehouses and item locations by enabling this feature.
Serial Number Track – Attach serial numbers when receiving and selling items and be on top of serials via reports.
Landed Cost – Allocate expenses to your purchase items to arrive at better cost per item.
Double Tax - By enabling this add-on, you can apply two tax rates at the same time per line item in your Sales Invoice and Purchase Invoices. (Apt for Canada, Indonesia)
Multiple Warehouse – Easily manage multiple warehouses and item locations by enabling this feature.
Serial Number Track – Attach serial numbers when receiving and selling items and be on top of serials via reports.
Landed Cost – Allocate expenses to your purchase items to arrive at better cost per item.
Double Tax - By enabling this add-on, you can apply two tax rates at the same time per line item in your Sales Invoice and Purchase Invoices. (Apt for Canada, Indonesia)