Project Subsections
Project Subsections
Documents
The
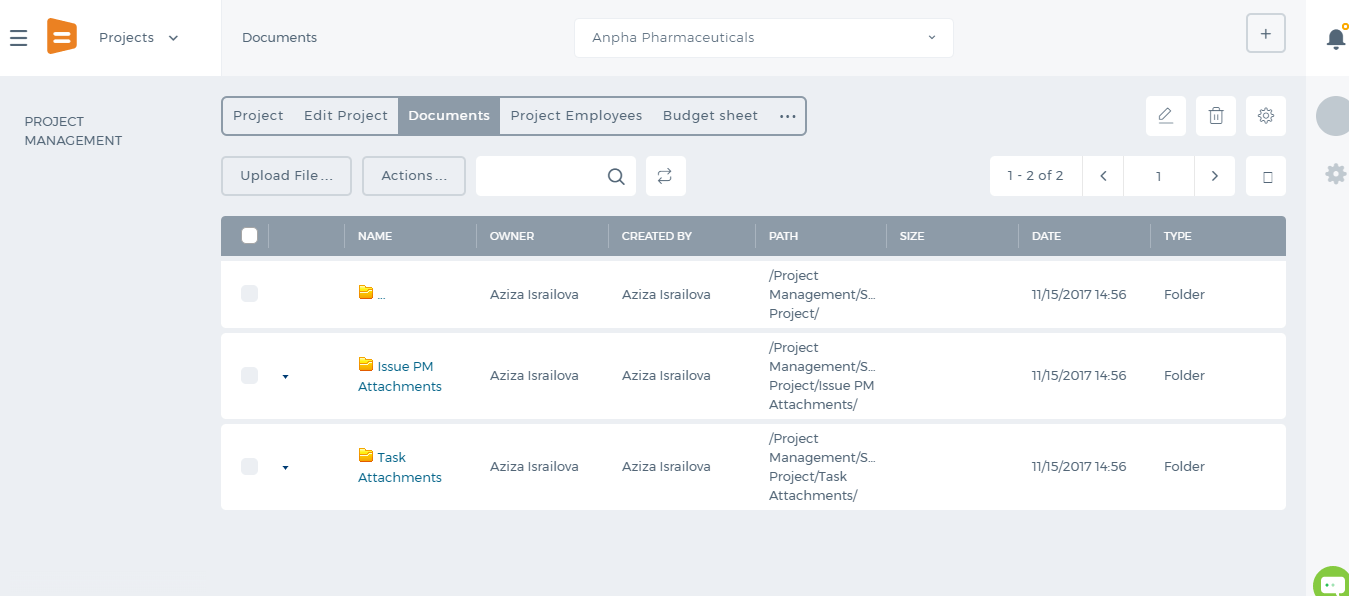
Documents section stores all documents uploaded to the project showing the date of the upload, the owner, and the type. You can upload additional documents either to the kpi.com storage or to Google Docs by clicking the
Upload File. Besides, documents can be linked to the existing Google documents or kpi.com documents.

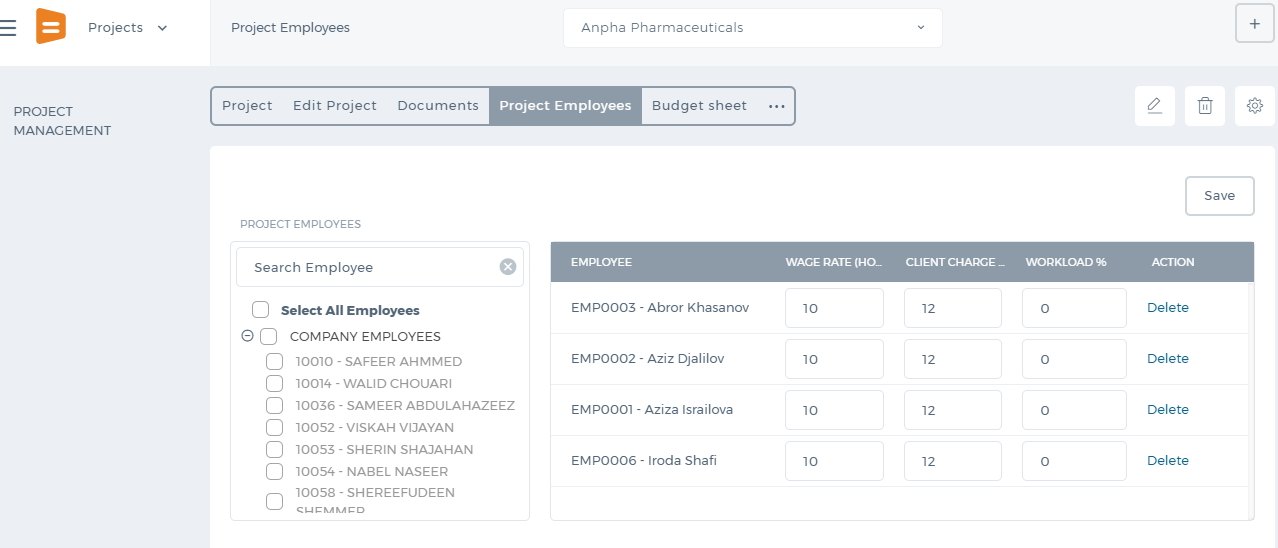
Project Employees
You can add more empoyees or remove them from the project. You can also change their wage rates here.
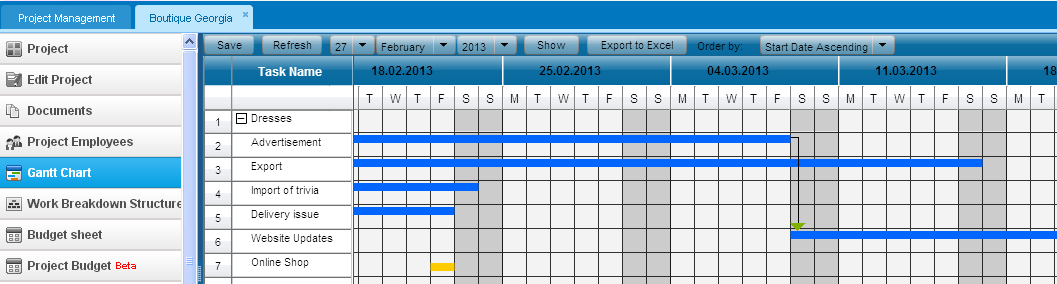
Gantt Chart
Show the Schedule of the Project and the Project Work Breakdown structure in a bar chart basis. You can change the dates of the tasks by clicking the task bar twice and moving them.
The Gantt Chart is currently not available in the new user interface.
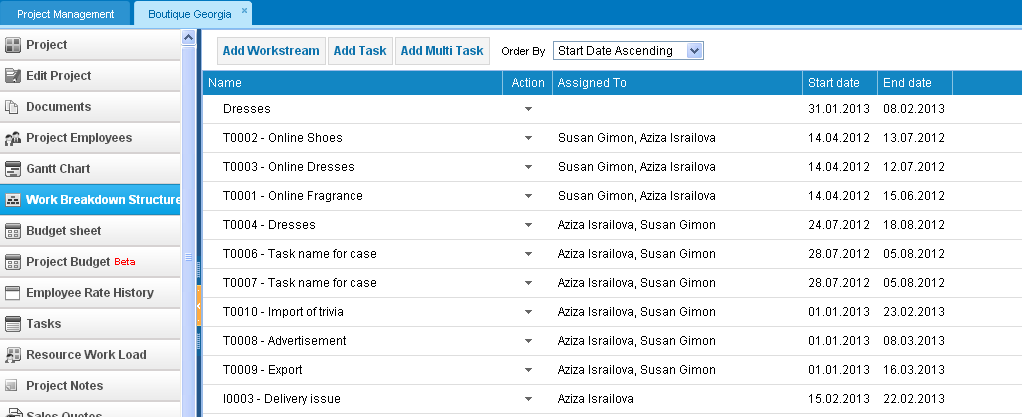
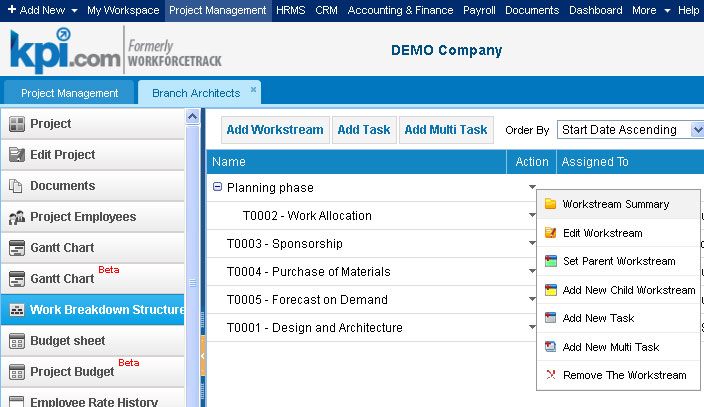
Work Breakdown Structure
This section shows the hierarchy of workstreams and tasks. You can create workstreams by clicking the
Add Workstream. You can add tasks and multitasks as well.
From the
Actions dropdown on
Workstreams, you can edit the existing workstreams, set parent/child workstreams, add tasks and remove the workstream.
Work Breakdown struction is not available in the new user interface.
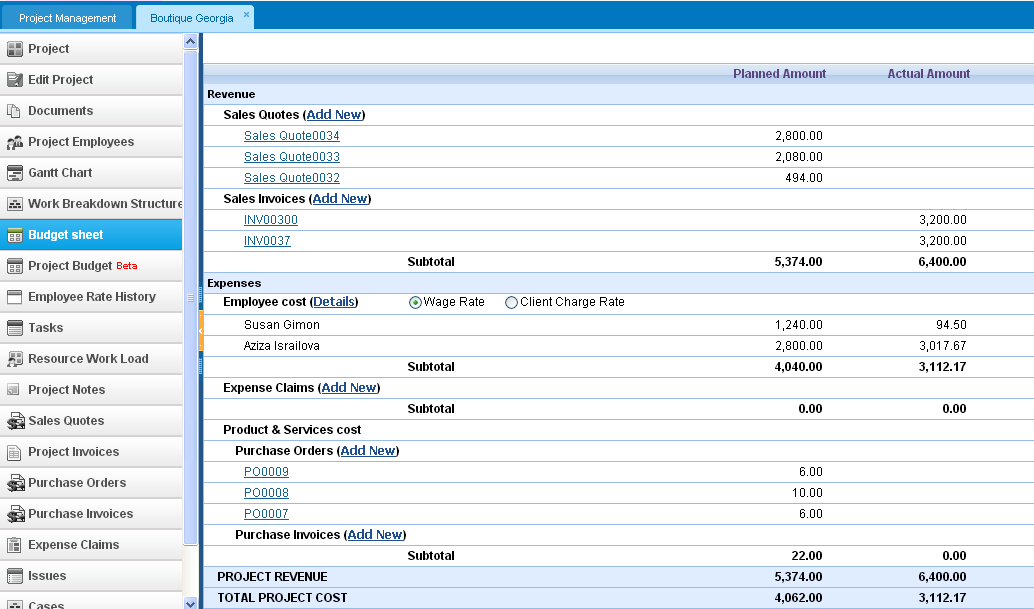
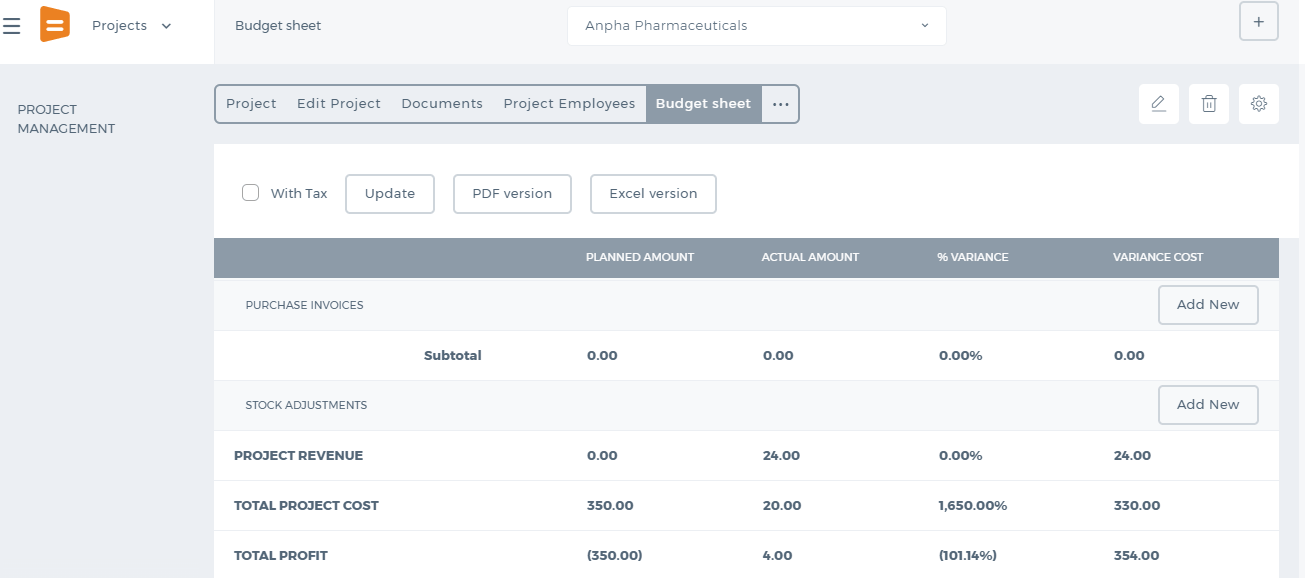
Budget Sheet
The Budget Sheet shows the
Planned and the
Actual Project Cost; as well as the
Revenue with the difference between the planned amounts and actual amounts.
The Revenue part is derived from the
Sales Quotes and
Sales Invoices created for the client of the current project. The
Sales Quotes is displayed as the
Planned Revenue, whereas the
Sales Invoices as the
Actual Revenue.
Expenses Part of the budget sheet uses
Employee Costs and
Expense Claims and
Purchases to show the amounts.
Planned Employee Cost is taken from the
Wage Rate of Employees multiplied by the Estimated Timegiven for each tasks.
Actual Employee Cost is taken from the
Wage Rate of Employees multiplied by the Approved Timesheet hours.
Expense Claims show the amount, when the expense claim is related to the project.
Purchase Order and
Purchase Invoice amounts are also considered as expense in the
Project Budget Sheet.
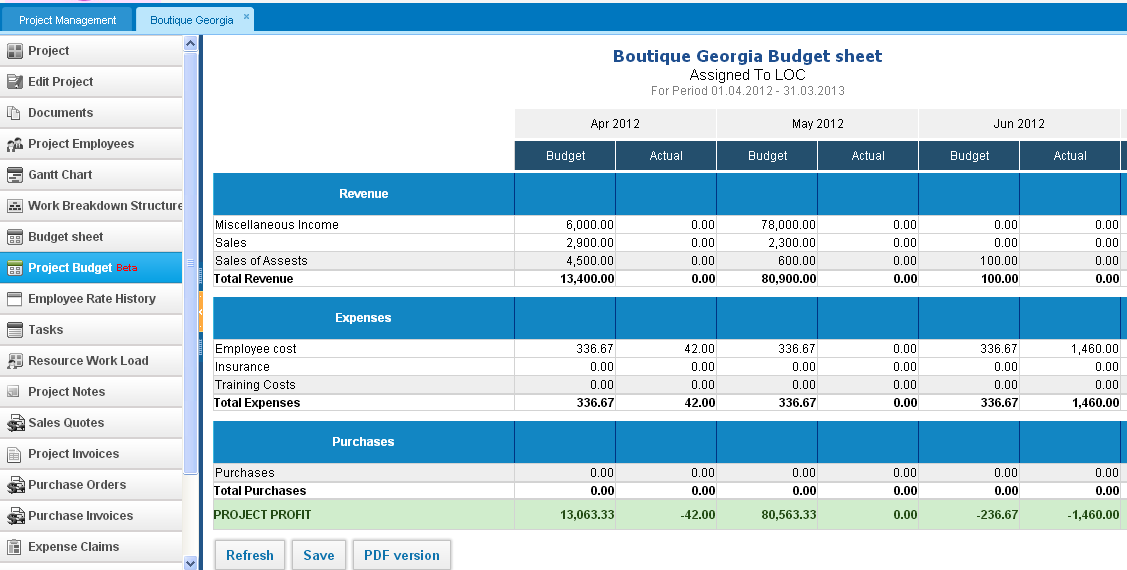
Project Budget Beta
The Project Budget displays the profit and loss report for the consequent project period by month. You can view the Planned Income vs. Actual Income and compare them using the Difference in figures and percentages.
Budget column shows the planned amounts for Revenue and Expenses. Actual columns show the real incurred Revenue and Expenses.
Budget:
- Revenue fields are filled out manually. Click the cells and enter your forecasted revenue.
- Expenses include employee costs and other expenses that you can enter manually. Budget employee costs are taken from the estimated hours per month and the wage rate. The budget employee costs cannot be edited.
- Purchases are also filled out manually. Click the cells and enter the planned purchase figures.
Actual:
- Revenue displays the transaction amounts taken from the sales invoices. Note that the sales invoice start time should match with the Project Period. If you cannot still see the Actual Revenue, you need to specify the account type the Sales Invoice was issued, such as Sales, Sales of Assets, Miscellaneous Income and etc.
- Expenses shows the employee costs and expense claim amounts. Employee costs are taken from the approved timesheet hours per month and the employee wage rates.
- Purchases show the transactions made by Purchase Orders and Purchase Invoices. Note that the purchase status of the order should be Received.
You can see the totals at the end of the report by scrolling to the right side of the page and save the PDF version of the Project Budget Report.
This report is not yet available in the new user interface.
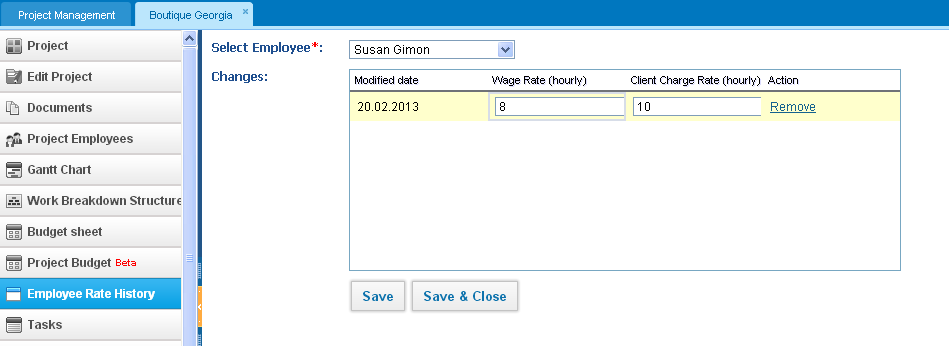
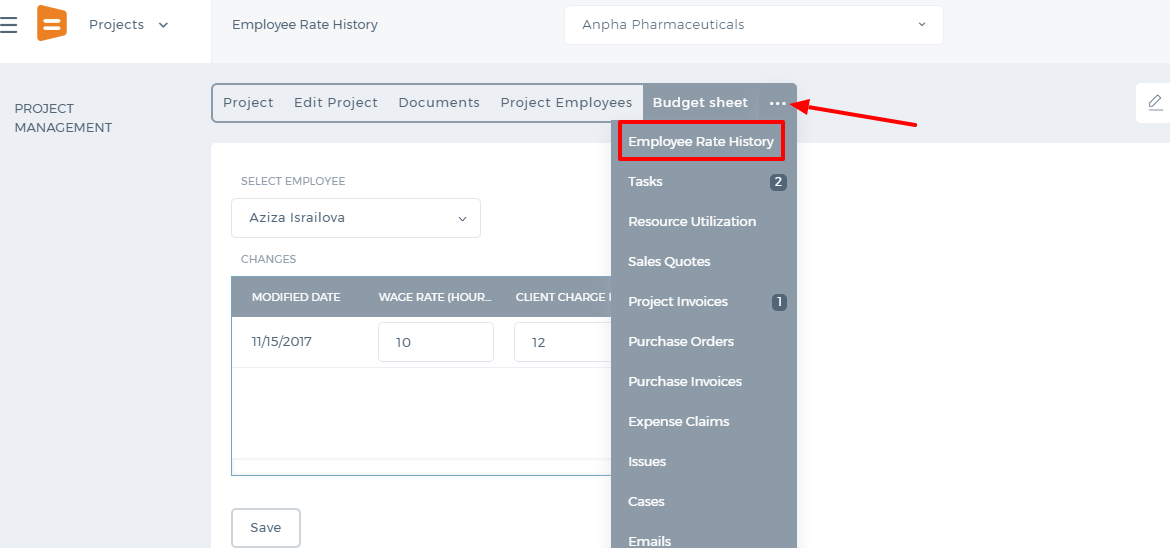
Employee Rate History
You can change the
Involved Employee’s Wage and
Client Charge Rates. The system will keep the last updated rates and show the date when it was updated. To change the employee wage rate, remove the current one and enter a new rate and save. All previous employee costs will be calculated using the old wage rate. After you have entered the new rate, the system will start to calculate using the new rate for further timesheet entries.
Tasks
This section lists all the tasks related to the project you selected. For more details on this section, go to the
Project Management - Tasks.
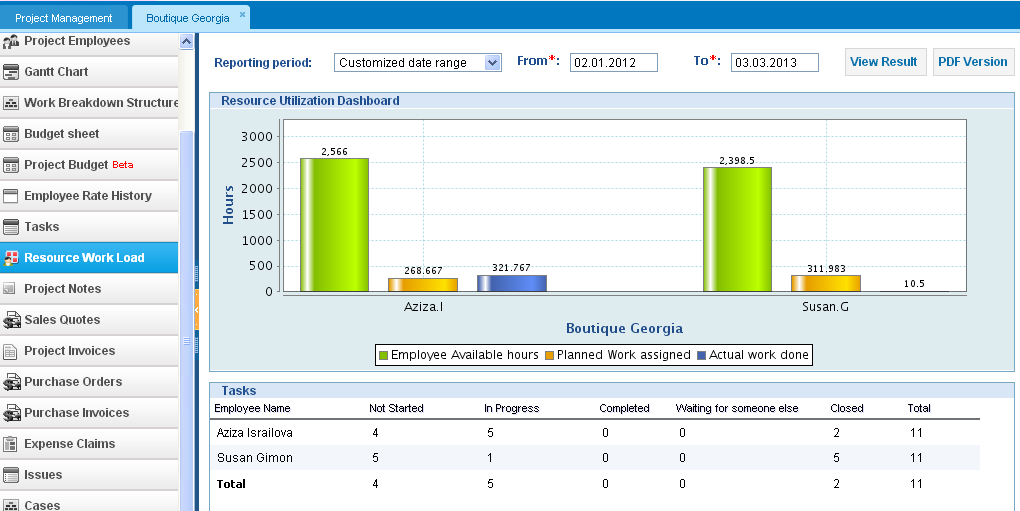
Resource Workload
Resource Workload page displays the
Resource Utilization Dashboard and
Tasks Status Report per employee.
- The green bar - the available hours of an employee (taken from the timeslot assigned to employees).
- The orange bar - the planned work assigned (taken from the estimated time of assigned tasks within the project).
- The blue bars - the actual work done based on the approved timesheet hours.
This section is not yet available in the new user interface.
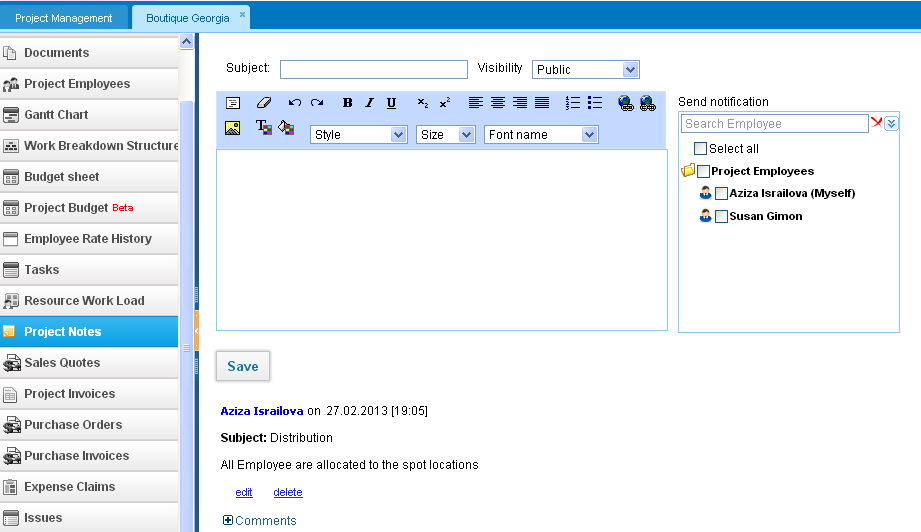
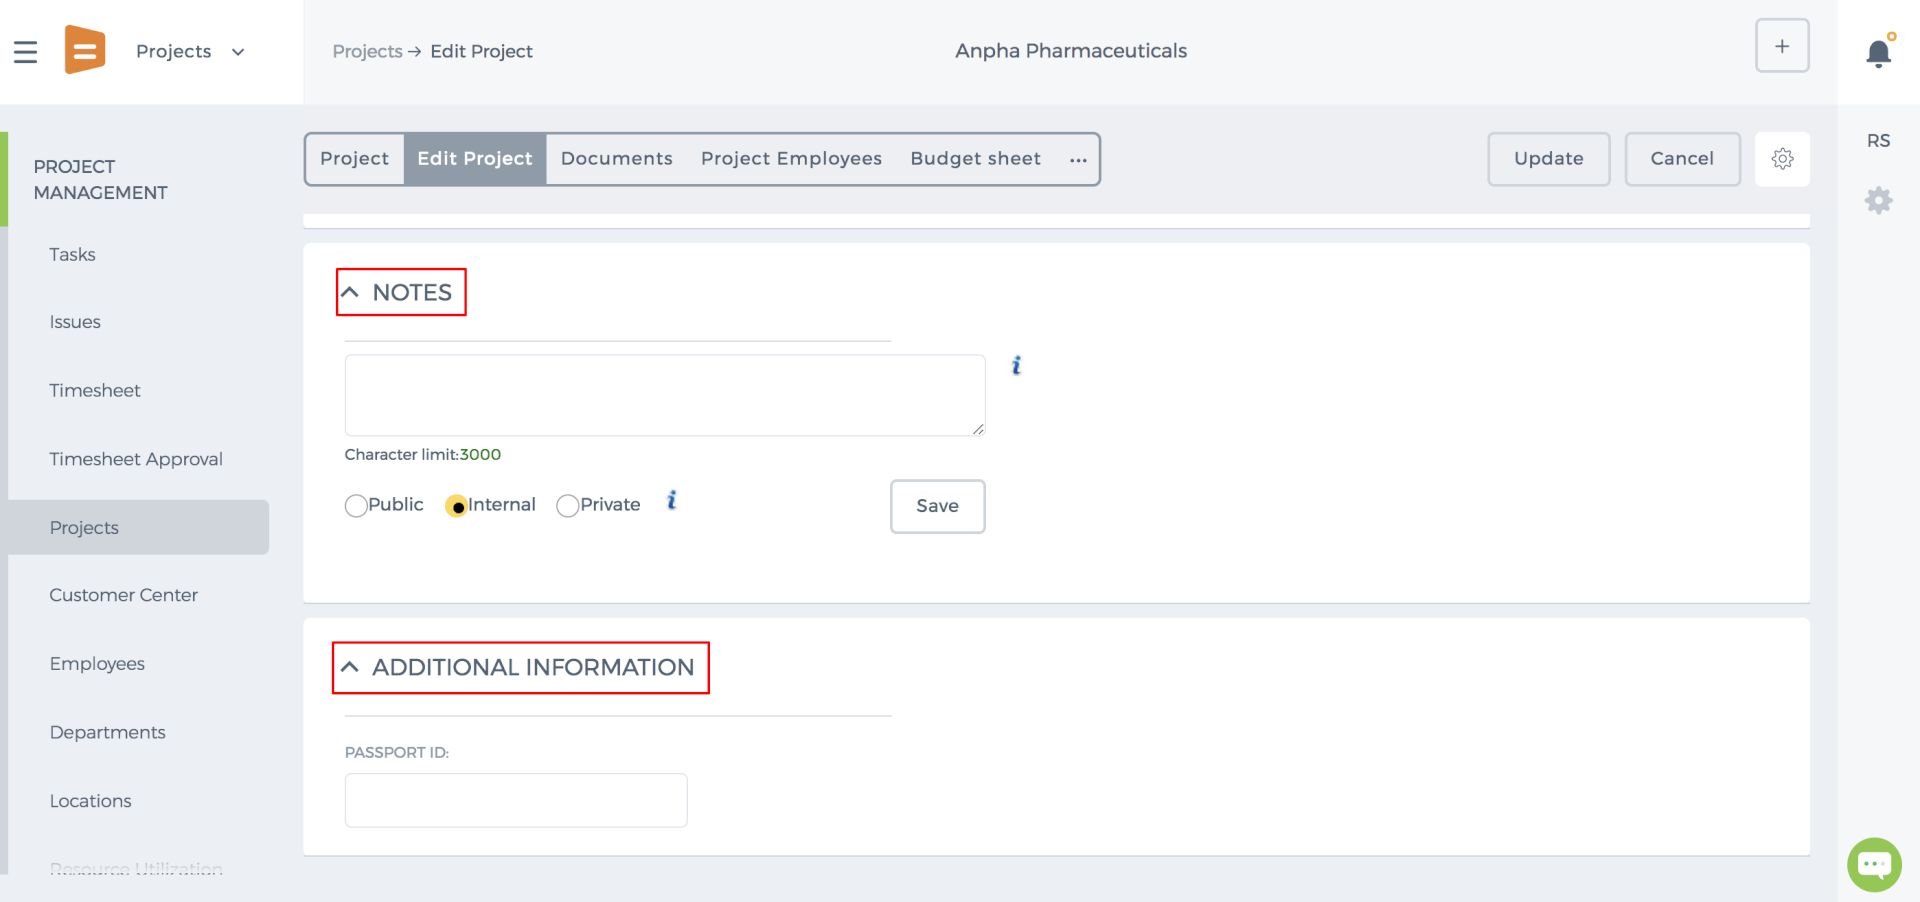
Project Notes
You can save notes and make them public so that all involved employees will be able to view the project note. Or you can just keep the note private for your own reference.

Even though the notes are public, they will not be visible to the clients who have access to the system.
You can also send the notification to employees. To do that, tick the checkbox next to the employee name and save the note.
This section is not available in the new user interface.
Sales Quotes
The Sales Quotes page stores all sales quotes related to the project. The page is view only. Once you click the
Sales Quote link, you will be redirected to the
Accounting & Finance page to see the
Quote Summary.
Project Invoices
This Project Invoices page stores all issued sales invoices related to the project. The page is view only. Once you click the
Sales Invoice link, you will be redirected to the
Accounting & Finance page to see the
Invoice Summary.
Purchase Orders
The Purchase Orders page stores all purchase orders related to the project. The page is view only. Once you click the
Client link, you will be redirected to the
Accounting & Finance page to see the
Purchase Order Full Summary.
Purchase Invoices
This page stores all issued purchase invoices related to the project. The page is view only. Once you click the
Purchase Invoice link, you will be redirected to the
Accounting & Finance page to see the
Invoice Summary.
Expense Claims
This page stores all expense claims related to this project. The page is view only. Once you click the
Expense Claim link, you will be redirected to the
Accounting & Finance page to see the full summary.
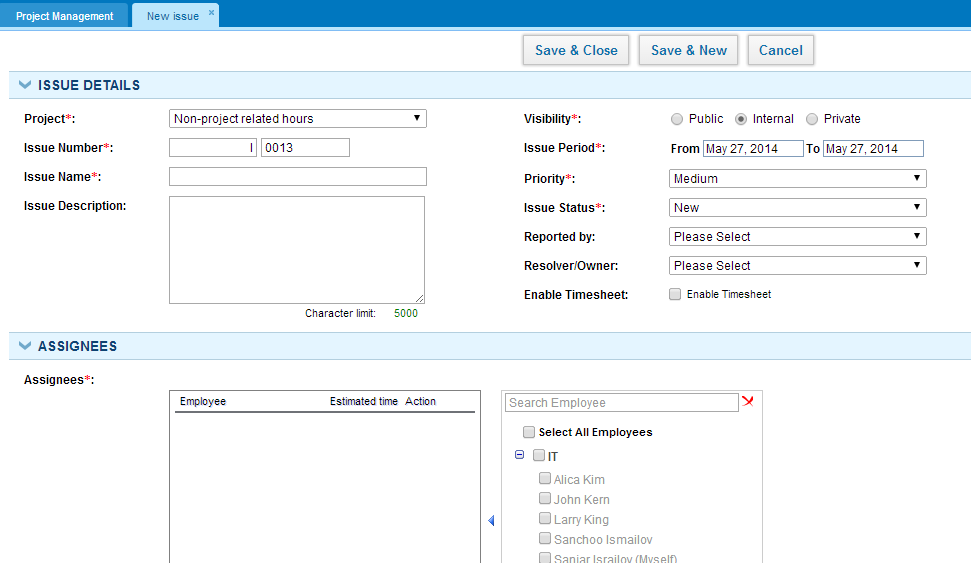
Issues
In this page you can add issues that you may face or have faced during the project implementation. To create a new issue, click the
New Issue, fill in the form and save.
You can also enable timesheet for the issue. Once it is enabled, the issue will appear in your
Timesheet.
Cases
This section shows the cases that you have created or linked the existing cases to the
Project.
Emails
The Emails section displays the emails that you have sent from the
Project Summary or the email you have linked to the project from the
Message Center.
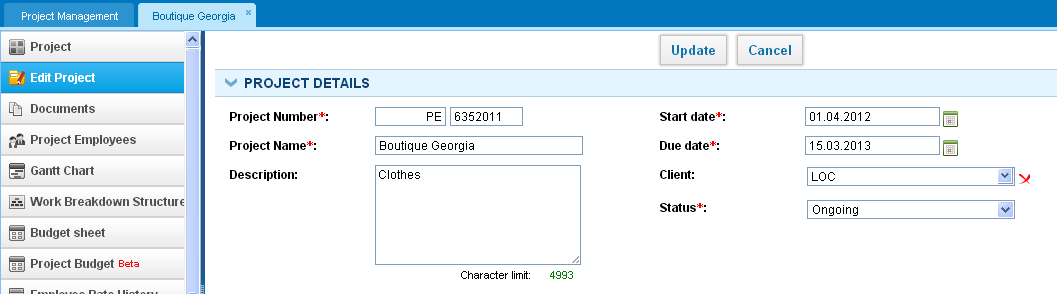
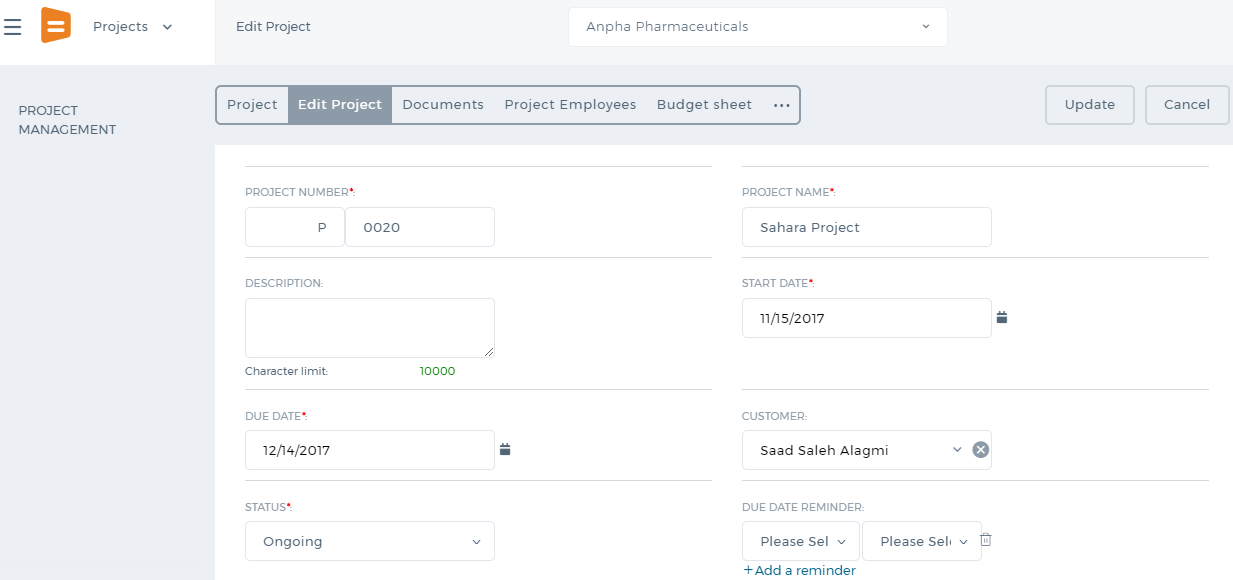
Edit Project
Edit Project
In the
Edit Project subsection you can make changes to the project details such as start/end date, project number and project name, project status, client name, additional information related to the custom fields. To change the Employee Wage Rates, go to the
Employee Rate History.
Add Project
Add Project
Add Project
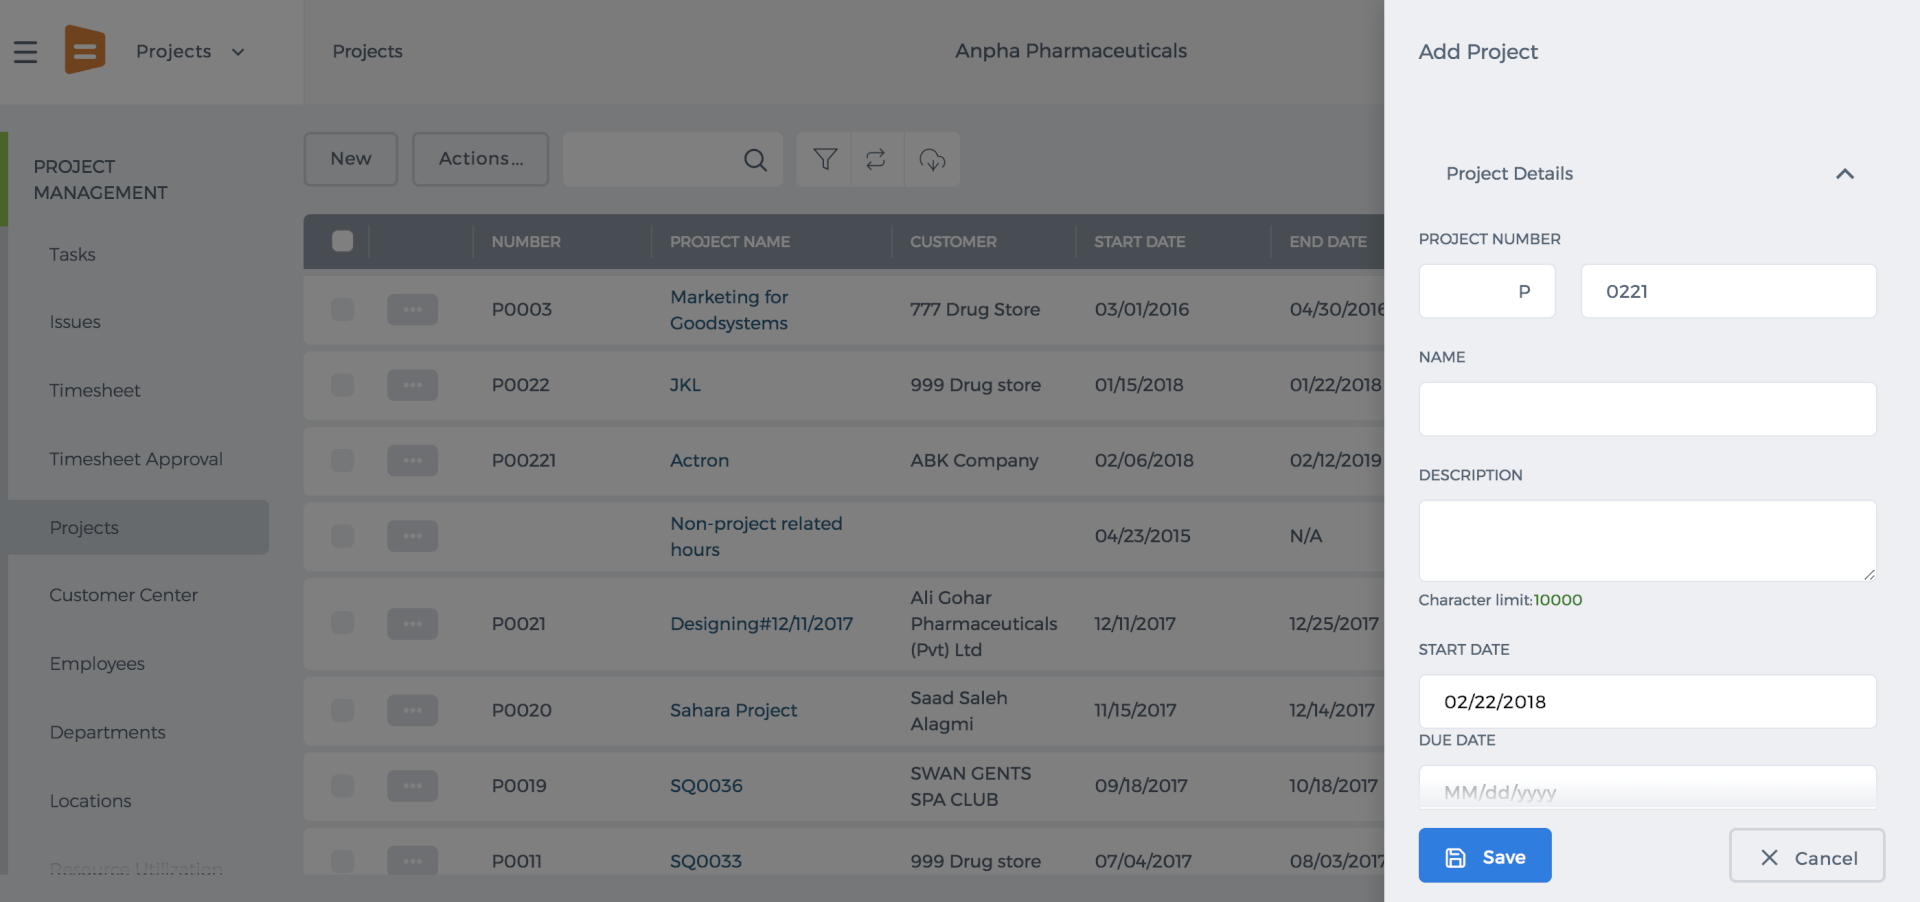
Click New Project and fill in the form that appears after.
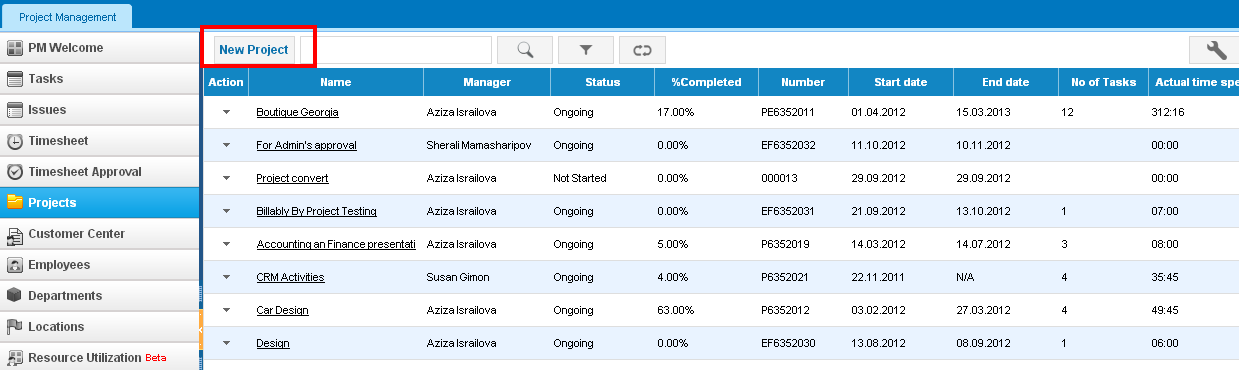
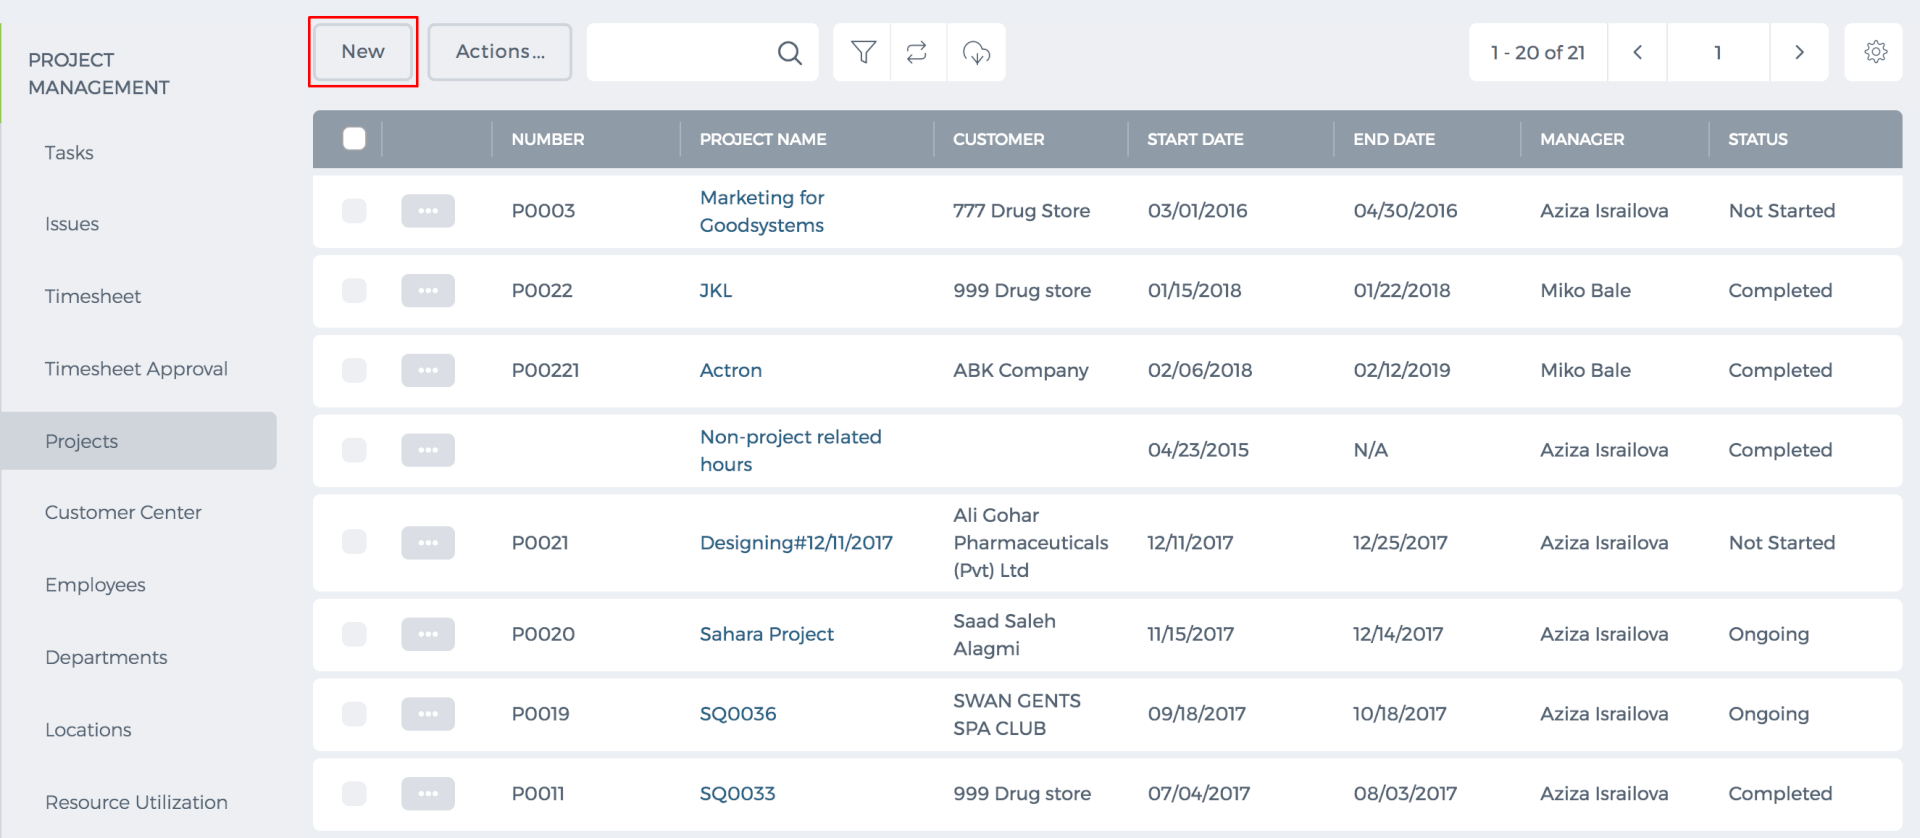 The fields with the red asterisks are compulsory to fill in to save the project successfully.
1. Enter the project name and description.
2. Choose start and end dates of the project which are also compulsory fields to fill in.
3. Choose the client name, if the project relates to a client. If it relates to several clients, click Add New Client. However, the project is linked to the main client that you add first for invoicing purposes. Other clients added through the Add New Client link are just for the information purposes. You can also add links to customers/supplier through the Add Links option.
The fields with the red asterisks are compulsory to fill in to save the project successfully.
1. Enter the project name and description.
2. Choose start and end dates of the project which are also compulsory fields to fill in.
3. Choose the client name, if the project relates to a client. If it relates to several clients, click Add New Client. However, the project is linked to the main client that you add first for invoicing purposes. Other clients added through the Add New Client link are just for the information purposes. You can also add links to customers/supplier through the Add Links option.
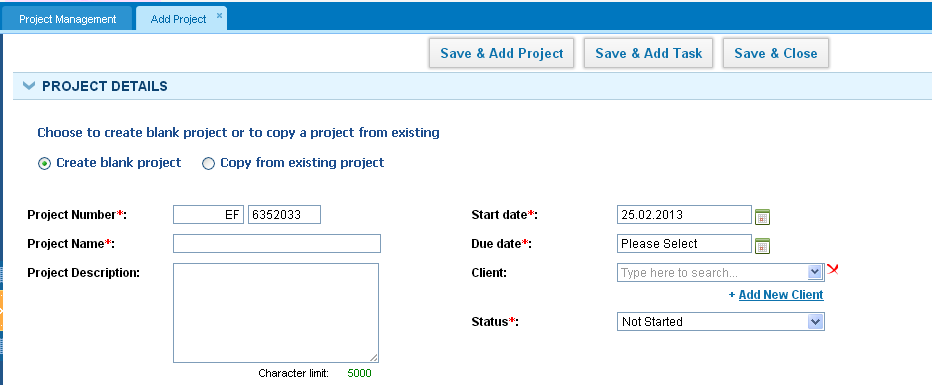
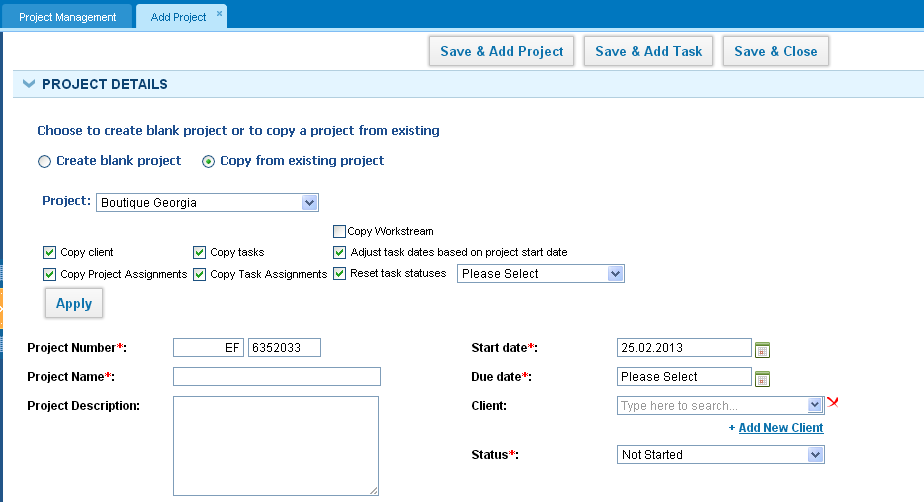
 Copy from Existing Project
This function enables you to copy the details of an existing project to a new one. Click Copy from Existing Project and choose the project from the dropdown. You can determine what information to copy by ticking the boxes Copy Client, Copy Tasks, Copy Project Assignments, Copy Task Assignments. You can also adjust tasks start dates based on the new project start date. If you are copying the tasks as well, you can reset all tasks status to another status from the dropdown.
Once you have determined what information to copy, you can click Apply. The form will be prefilled with relevant information.
Copy from Existing Project
This function enables you to copy the details of an existing project to a new one. Click Copy from Existing Project and choose the project from the dropdown. You can determine what information to copy by ticking the boxes Copy Client, Copy Tasks, Copy Project Assignments, Copy Task Assignments. You can also adjust tasks start dates based on the new project start date. If you are copying the tasks as well, you can reset all tasks status to another status from the dropdown.
Once you have determined what information to copy, you can click Apply. The form will be prefilled with relevant information.
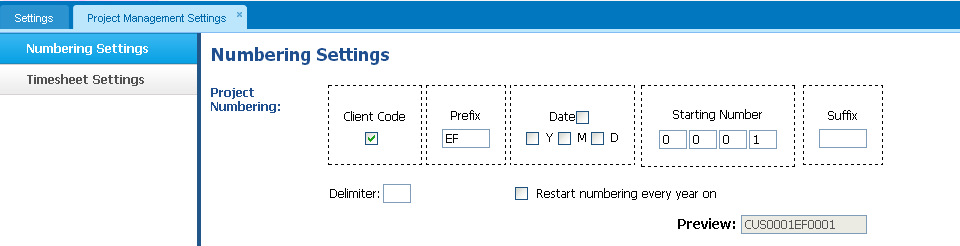
Change Numbering Settings
By default, the project number field is filled out automatically by the system. If you want to change the project number, you can just change it manually. If you want to change the whole format, go to
Settings > Project Management Settings > Numbering Settings.
The client code box enables the customer number to appear as a project number. The prefix is the combination of a letter that appears before the project number. The suffix is the combination of the letter that appears after the project number. You can also change the place of the boxes, such that client code appears at the end for example. To do that, drag and drop the boxes. You can preview how the project number would appear after you made changes. The delimiter is the sign that separates the project prefix, number, suffix. The delimiter can be any sign like a comma, dot, bracket and etc.
 Additional Information
This tab shows you the custom fields you have created for the
Project section.
If you have additional information to enter into the project, custom fields can help you with that. You can create custom fields from
Settings > Custom Field Management Settings.
Once you create the custom field, it will show up in the
Project Forms.
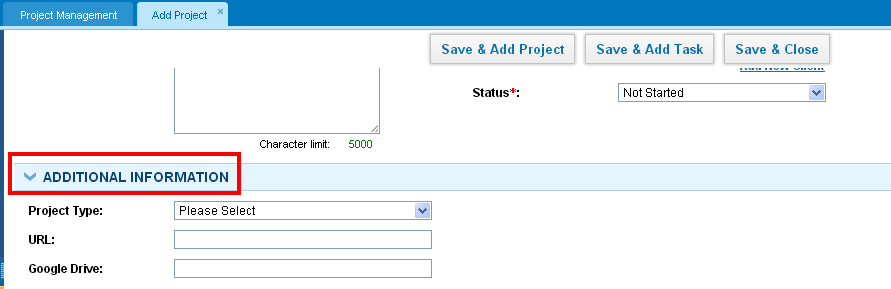
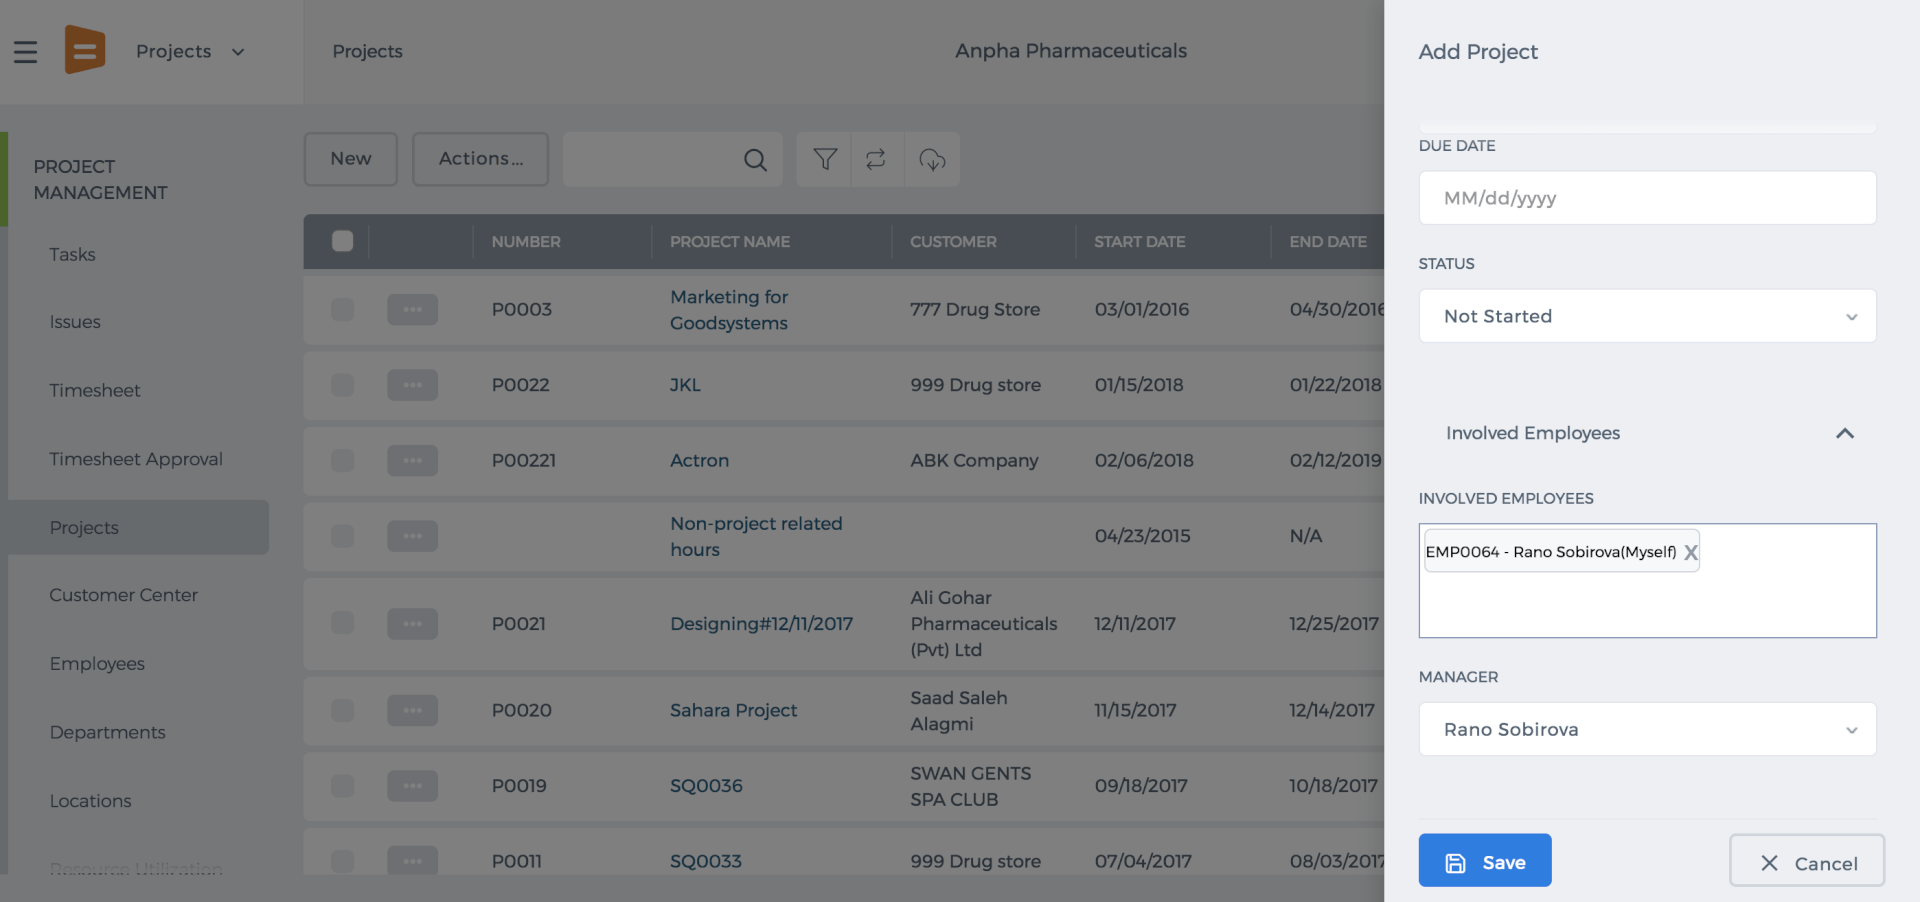
In the new user interface of kpi.com, you can include notes and additional information. Firstly, you should add the project then edit it to insert additional information as shown below.
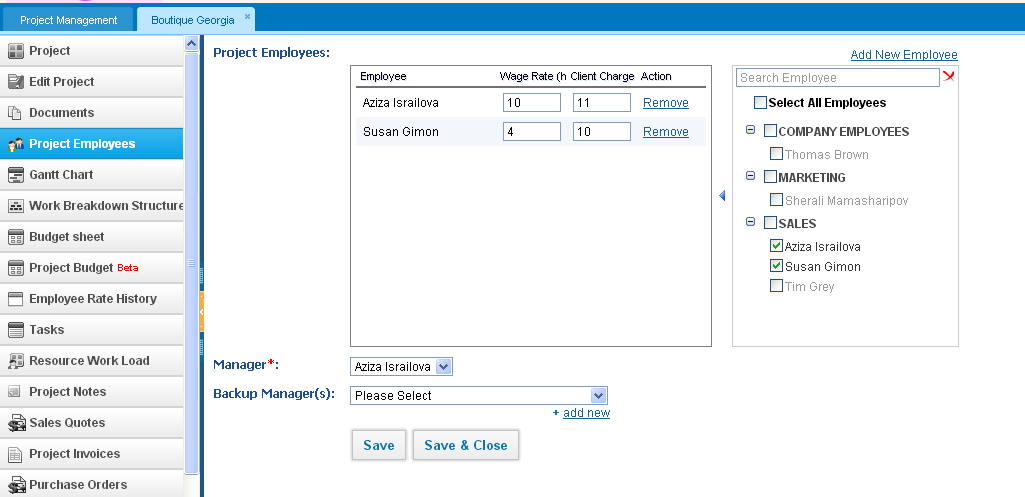
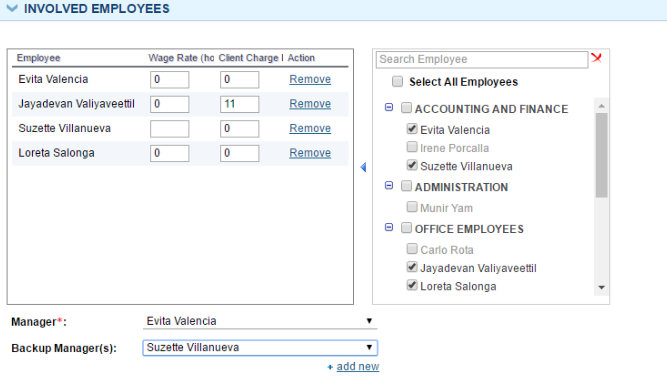
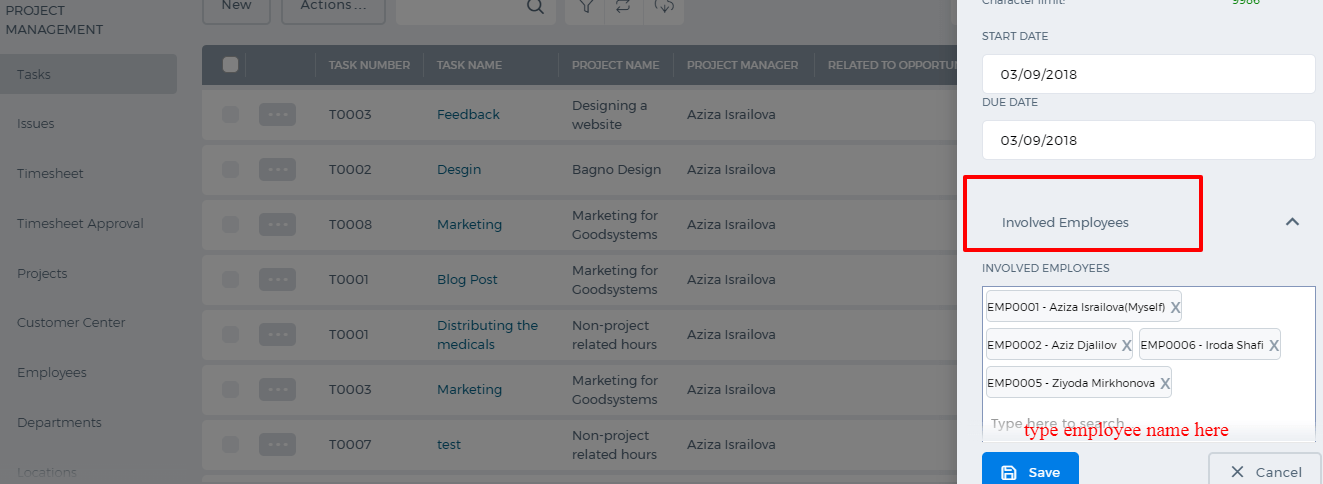
 Involved Employees
1. Choose the employees who are involved in the project. Enter their wage rate and client charge rate.
Wage Rate is the amount that you pay for employee per hour.
Client Charge Rate is the timesheet hours billed to your client for the work done on the project. Client charge rate is used in the Timesheet-Based invoice.
2. Select the project manager. The project manager is the person who will be approving the timesheet entries of employees and will have full access to the project by default (this access can be changed from the Permission Management settings).
3. Select the backup manager if there is an assistant of the project manager. The backup manager will have the same access to the project page and is able to approve/reject timesheet entries. If there is more than one backup manager, you can add new lines of managers by clicking
Add New.
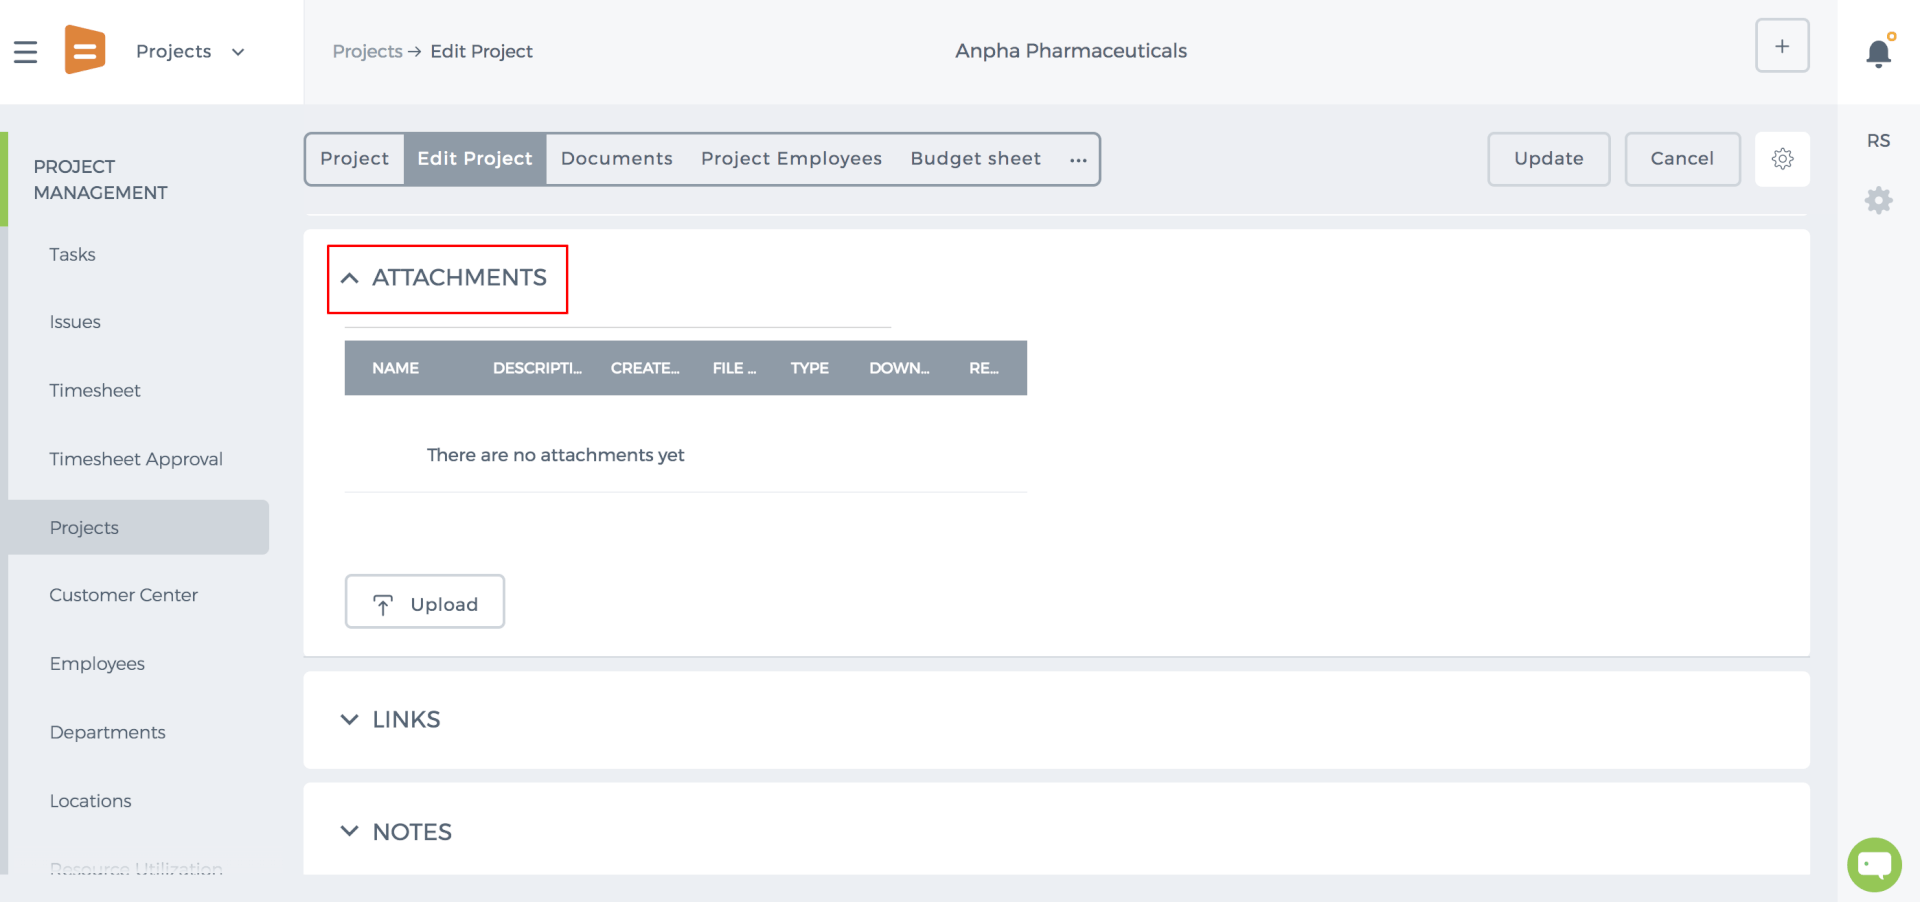
 Attachments
You can upload files and documents related to the project by clicking
Upload. You can either upload to the kpi.com storage or to your Google Documents and link to your existing Google Documents or to your kpi.com documents.
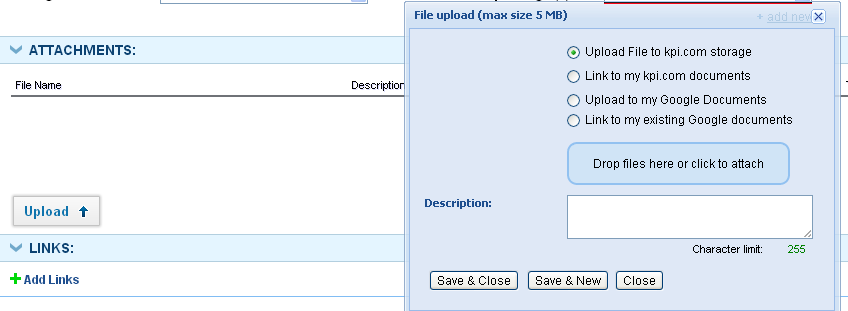
In the new user interface of kpi.com, you should add the project then edit it to attach documents by clicking the
Upload button as shown below.
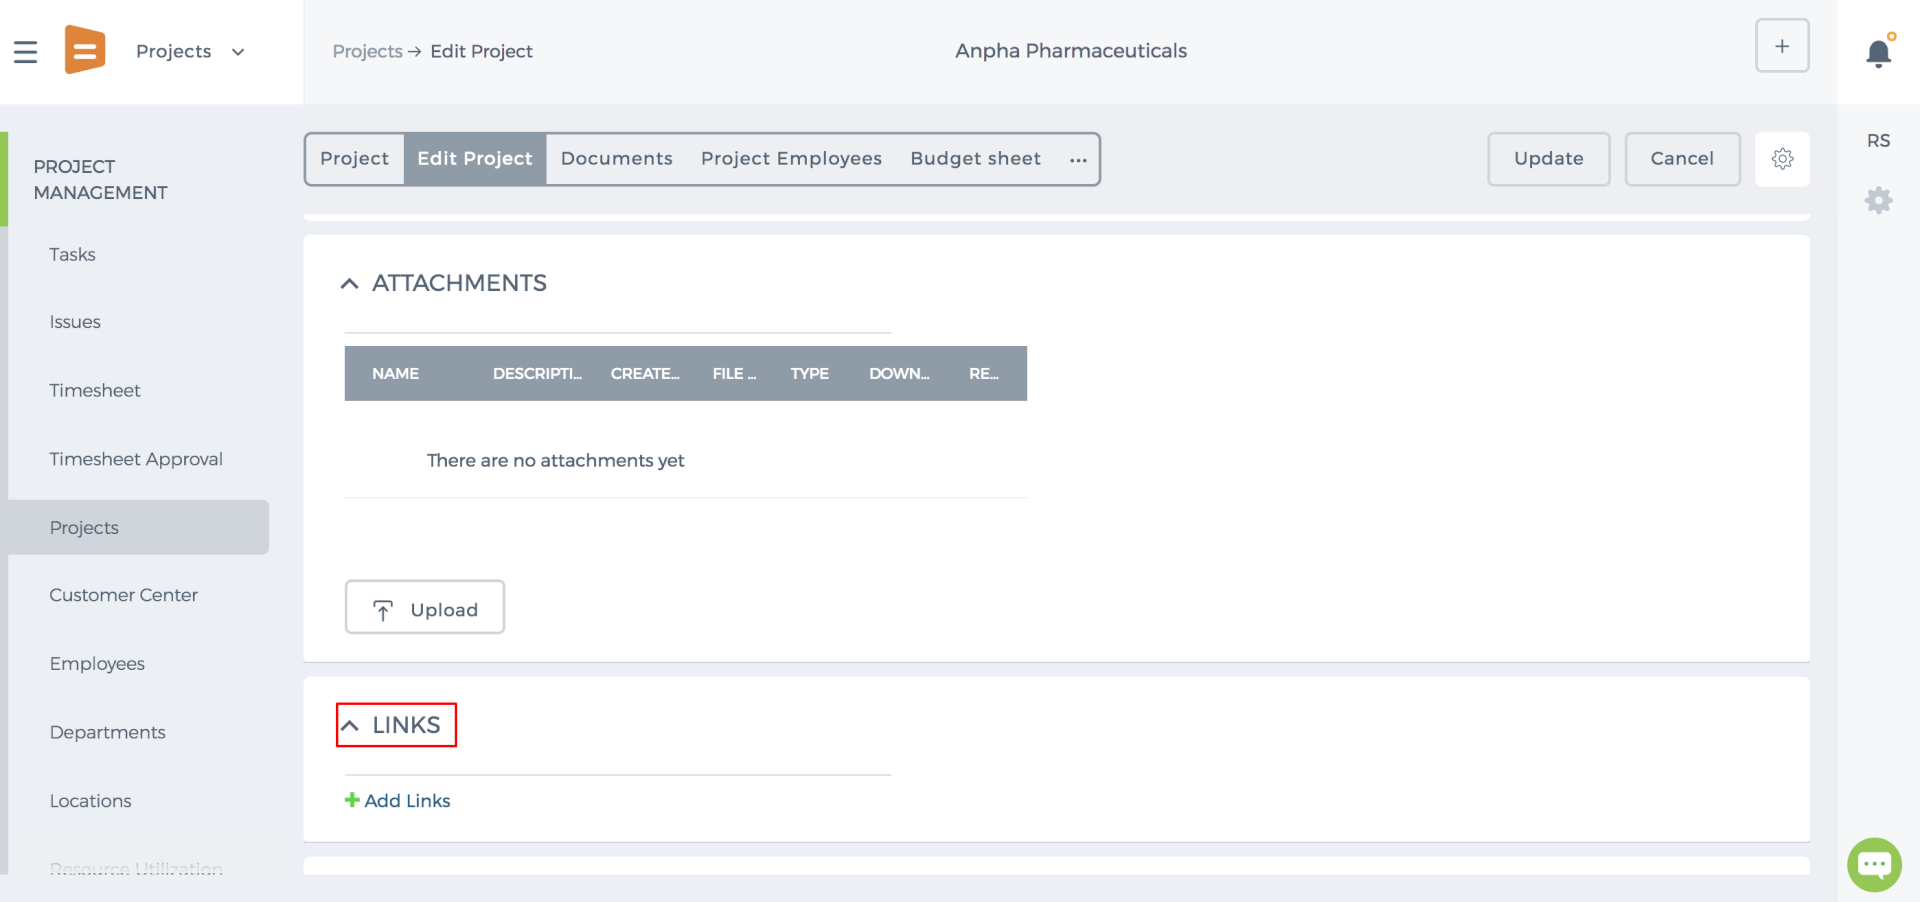
 Add Links
You can add links to other kpi.com items that are related to the project. You can add links to Contacts, Cases, Events etc. Once you click the link you will be redirected to the
Item’s Summary page.
 Save Project
After you have filled out all the compulsory fields of the add project form, you can click
Save & Close which will save the project and redirect you to the
Project Listing page.
You can either
Save & Add Project to save the current project and open a new form to create another new project or
Save & Add Task to save the project and open a task form under the current project.
Timesheet Weekly Totals
Timesheet Weekly Totals
Timesheet weekly totals do not reflect the filter applied.
Weekly totals only display the information for that week irregardless of the filters, e.g client, project, workstream.
Timesheet Approval
Timesheet Approval section is available by default for Project Managers, Backup Managers, and Administrators who can review employees’ timesheets and approve/reject them.
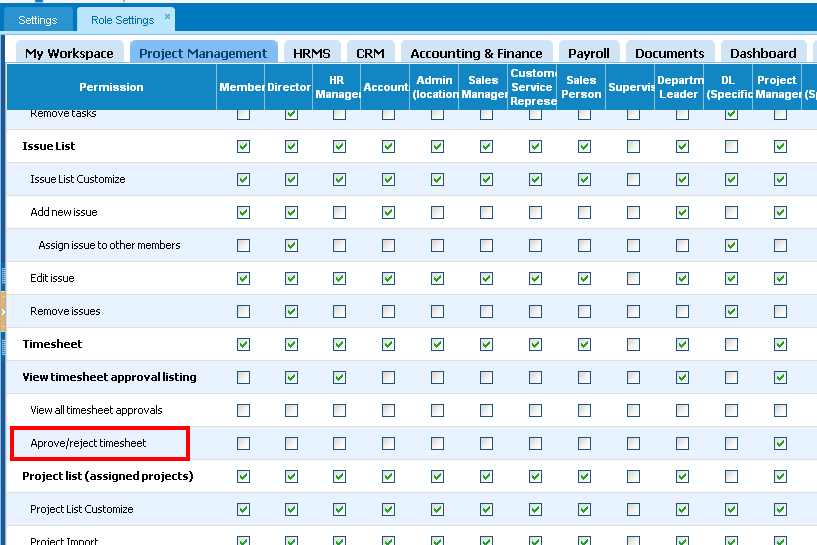
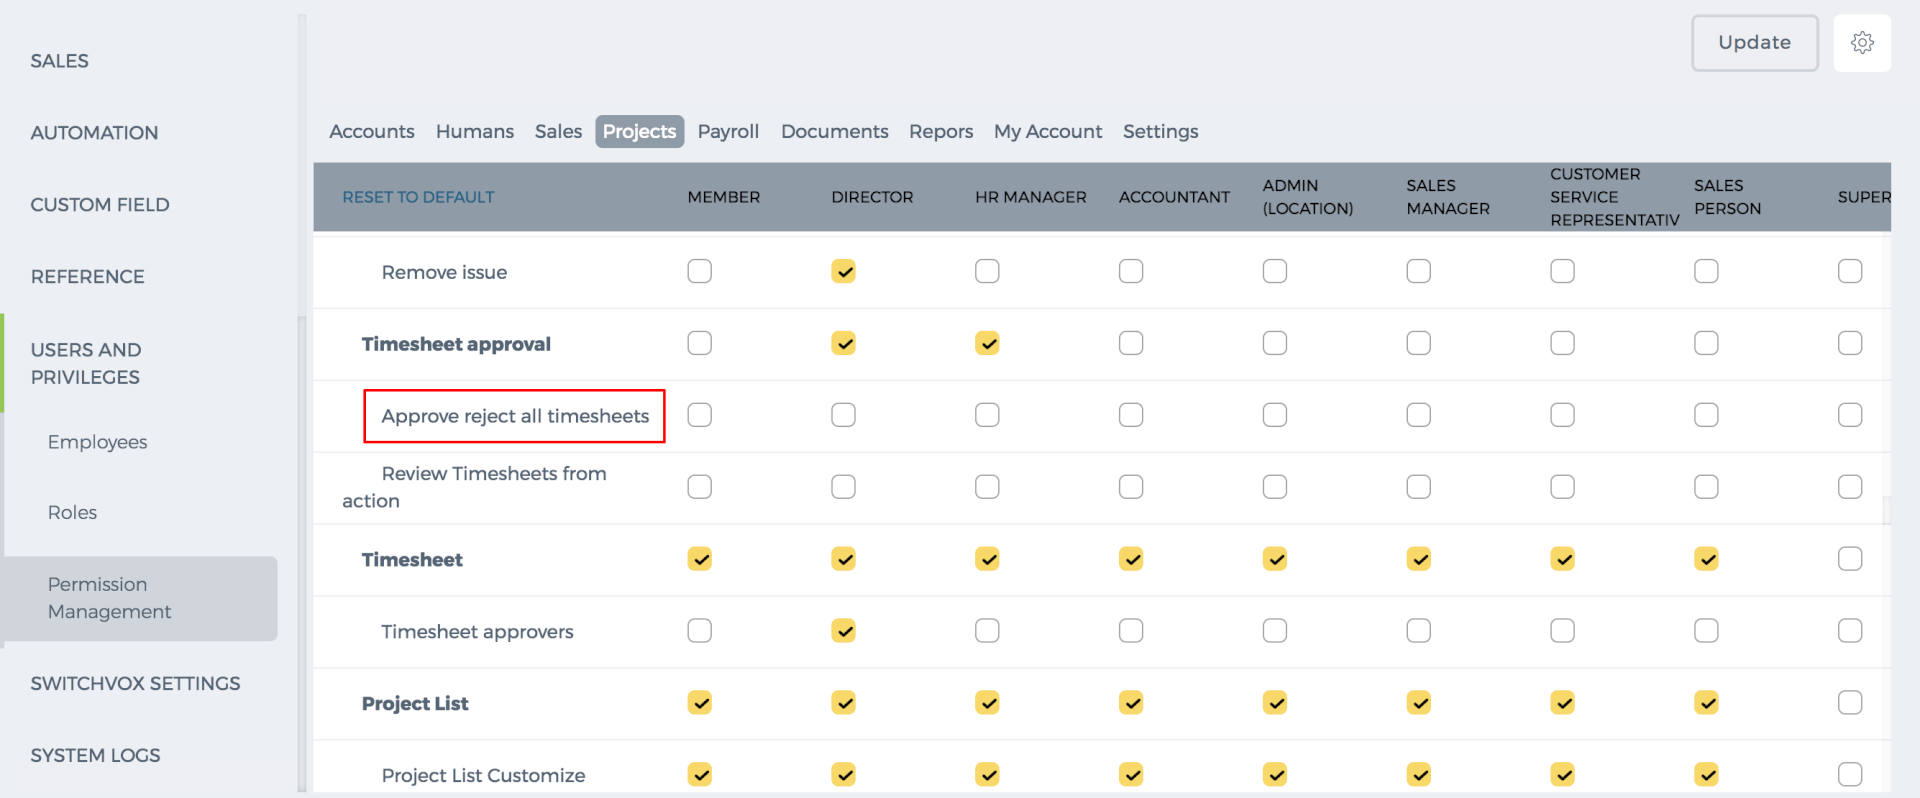
 You can also give the timesheet approval permission to other users from the Permission Management Settings. Please go to Settings>>Permission Management Settings>>Project Management and tick the option “Timesheet Approval” and “Approve/Reject all Timesheet” for other user roles.
 Review Timesheets
To review timesheets, go to the Actions dropdown and click Review. In this page, you can approve/reject timesheets.
Review Timesheets
To review timesheets, go to the Actions dropdown and click Review. In this page, you can approve/reject timesheets.
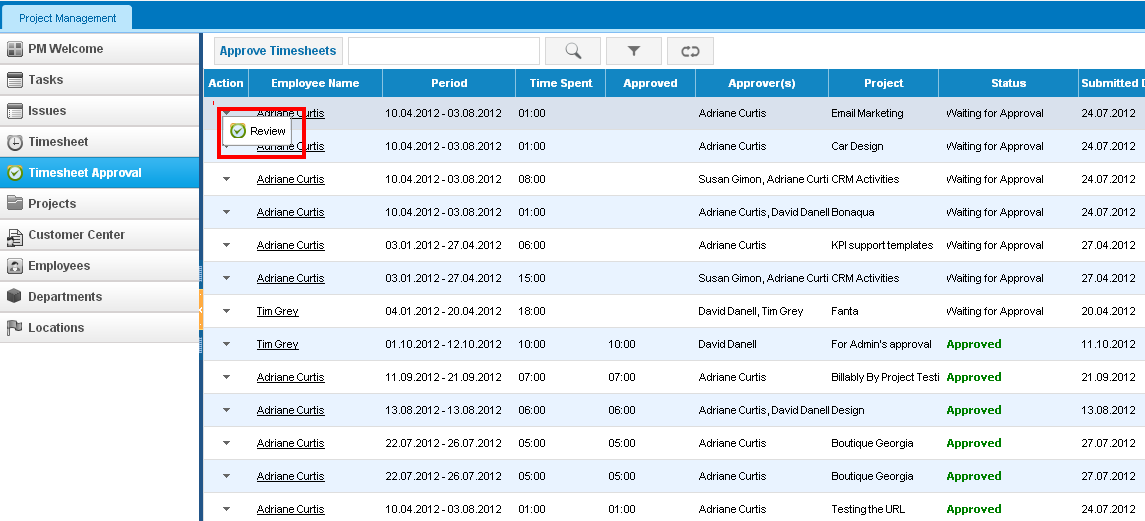
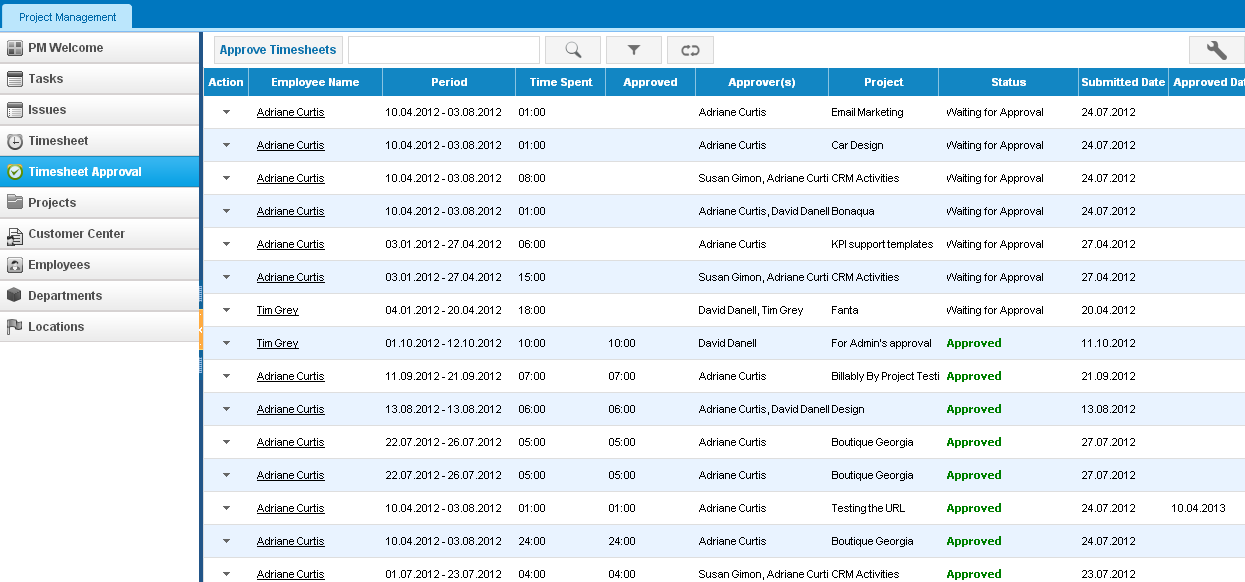
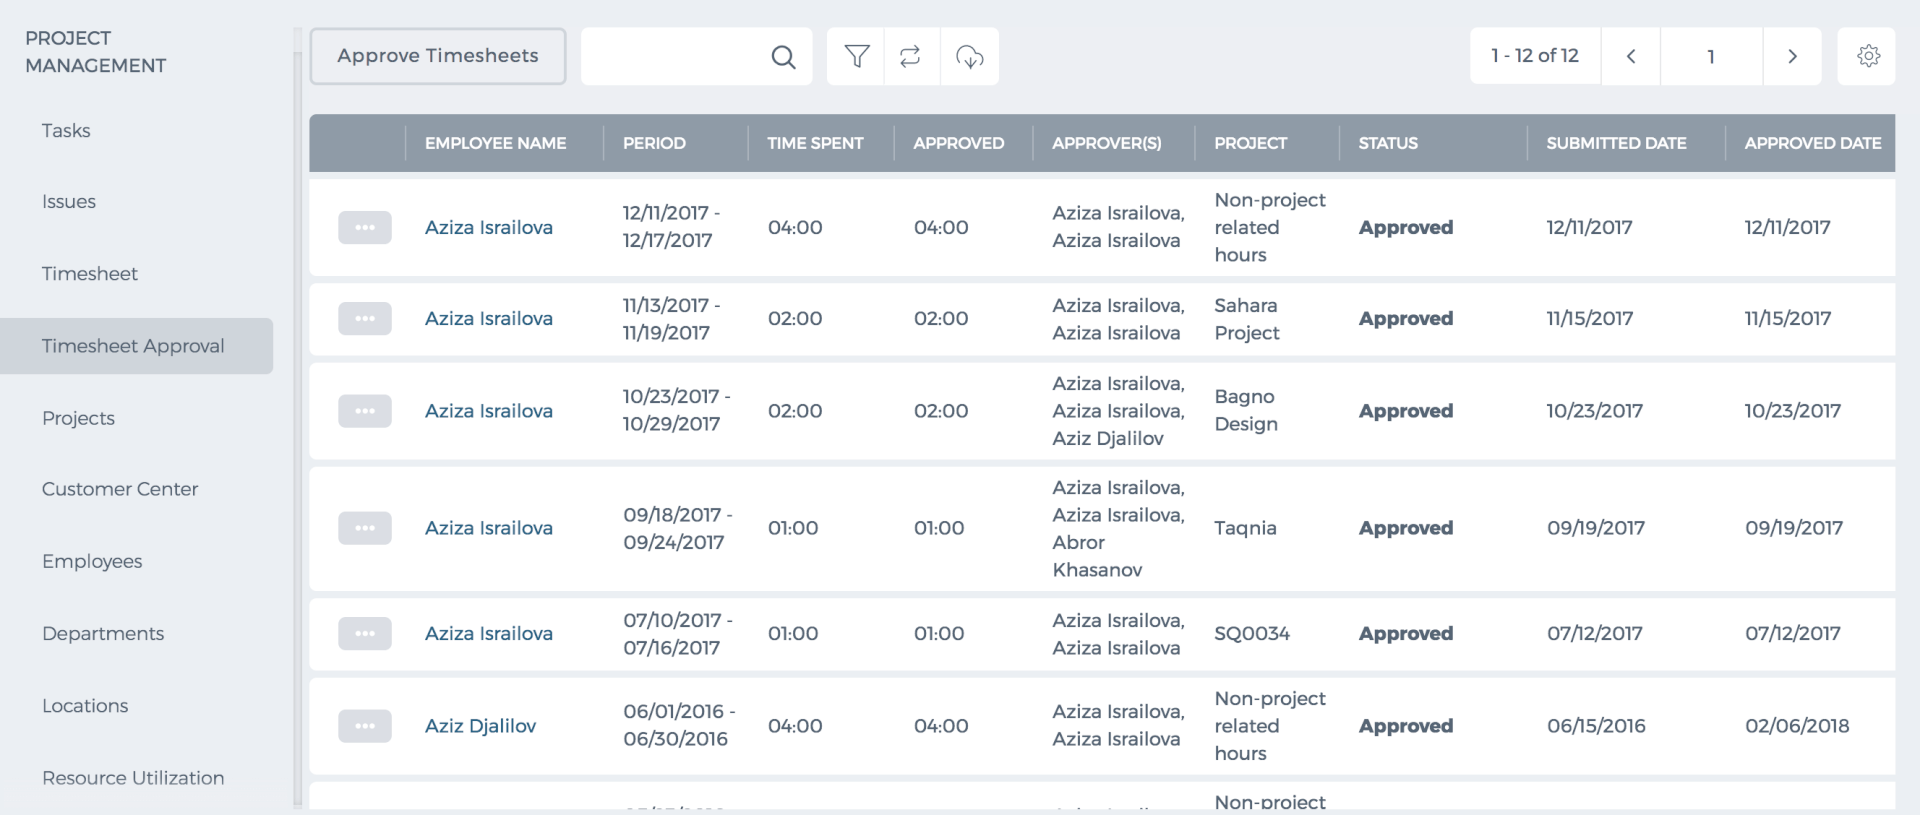
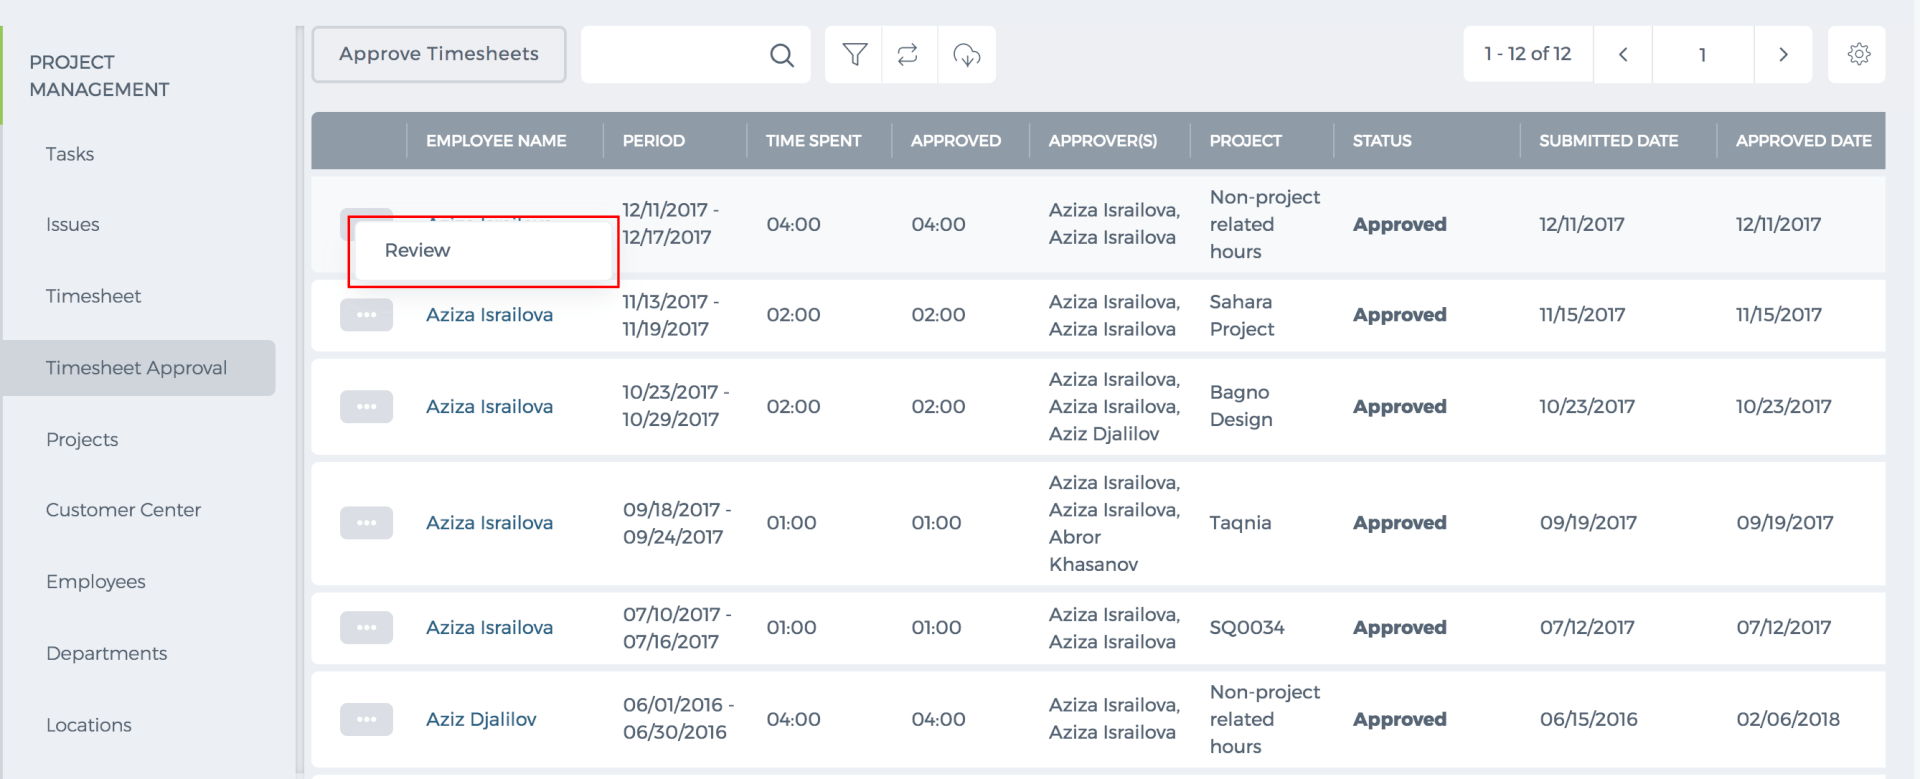 Approve Timesheets
Timesheets can be approved in batch or one by one. To approve/reject timesheets in batch, click on “Approve Timesheet” button. Select the Date period range, projects and employees, optionally, and “View Results”. The system will populate all submitted timesheets for the period you have chosen.
You can also use Group by dropdown to look at timesheet at separate columns which are grouped by project, client or date.
Approve Timesheets
Timesheets can be approved in batch or one by one. To approve/reject timesheets in batch, click on “Approve Timesheet” button. Select the Date period range, projects and employees, optionally, and “View Results”. The system will populate all submitted timesheets for the period you have chosen.
You can also use Group by dropdown to look at timesheet at separate columns which are grouped by project, client or date.
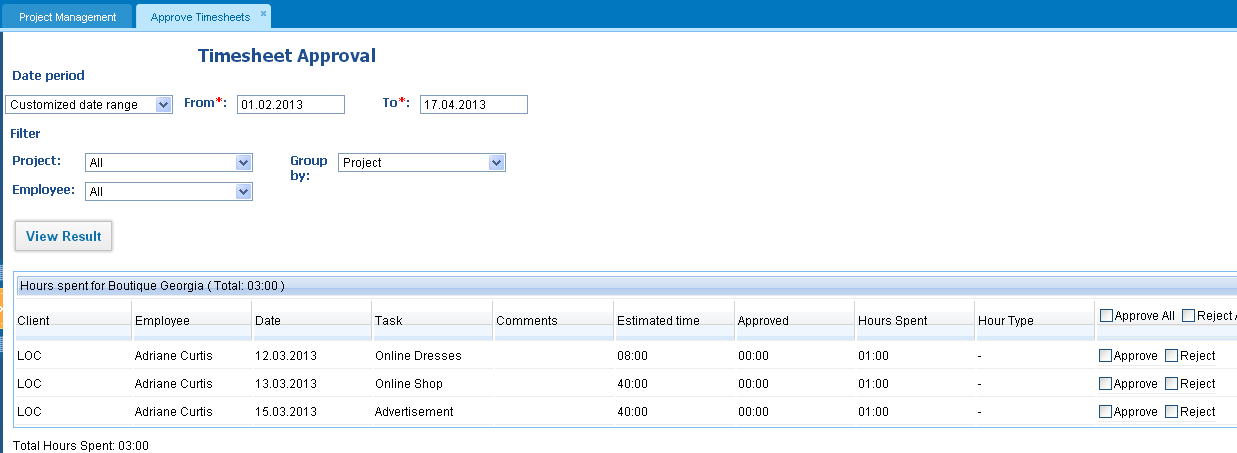
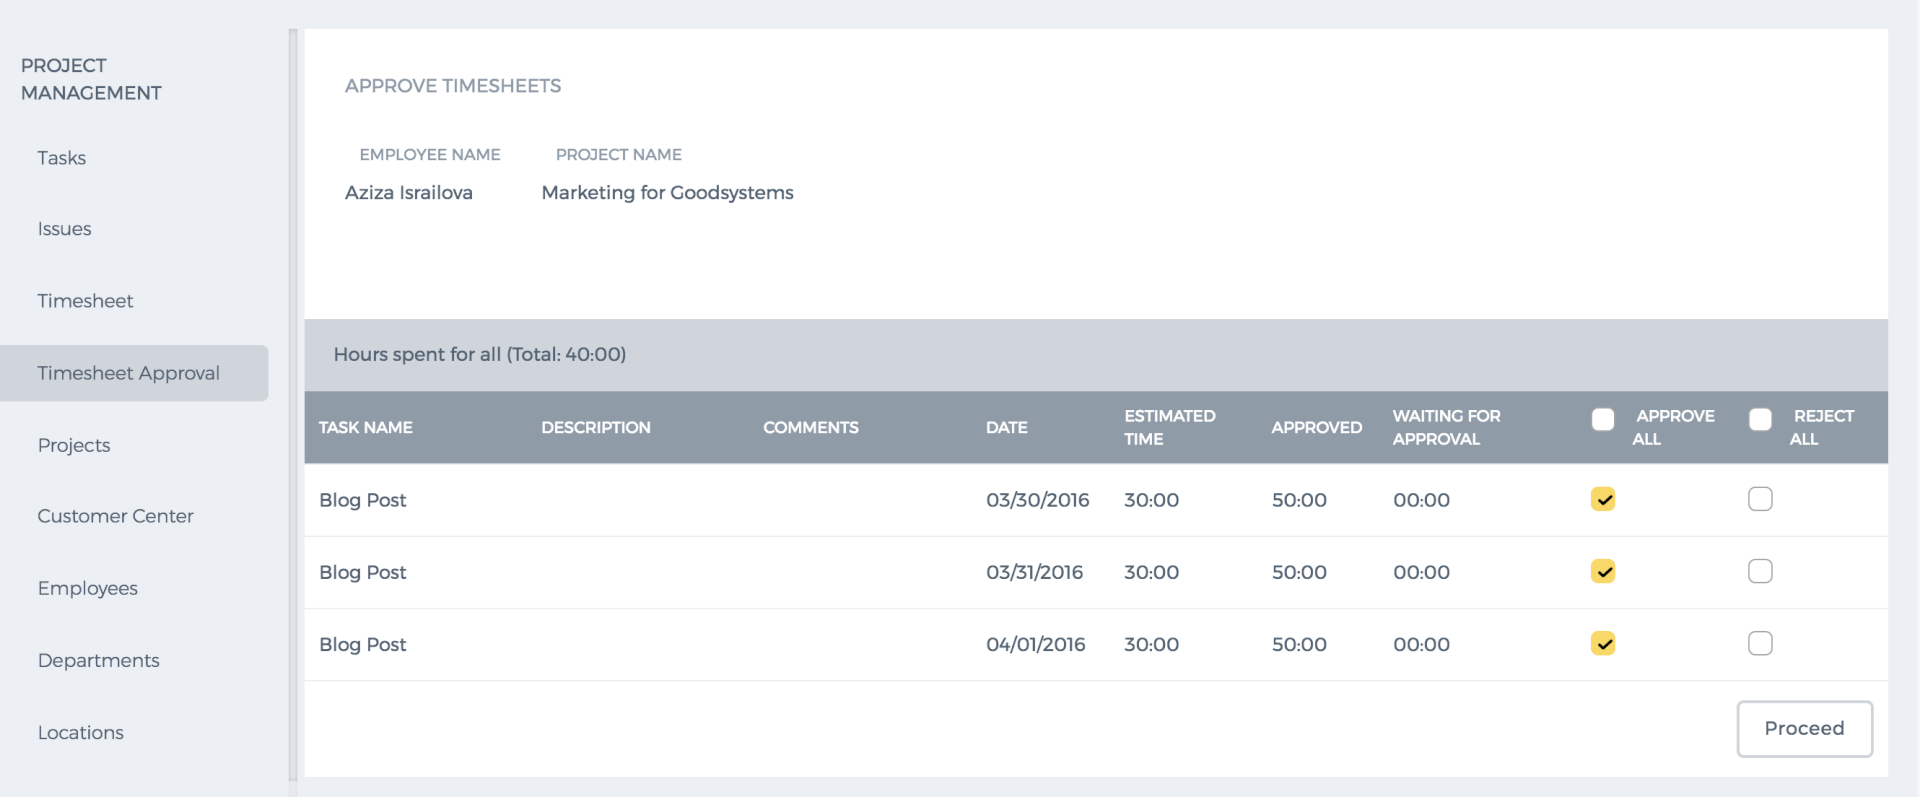 To approve the timesheet, you need to tick either specific “Approve” boxes or “Approve all” and to reject it, you need to tick “Reject” boxes.
While rejecting the timesheet, you can leave comments on the reason why you rejected it. The comment will show up in Task summary page.
Approved Hours
Approved time entries will be reflected as actual time spent in Task Summary page. The task’s percentage of completion is also calculated using the actual time spent if “Automatic” calculation is turned on.
Approved hours can be reviewed again and be rejected from Timesheet Approval Page. To reject the hours that have been previously approved, click on Actions and Review.
Timesheet-Based Invoice also uses approved hours to bill clients.
To approve the timesheet, you need to tick either specific “Approve” boxes or “Approve all” and to reject it, you need to tick “Reject” boxes.
While rejecting the timesheet, you can leave comments on the reason why you rejected it. The comment will show up in Task summary page.
Approved Hours
Approved time entries will be reflected as actual time spent in Task Summary page. The task’s percentage of completion is also calculated using the actual time spent if “Automatic” calculation is turned on.
Approved hours can be reviewed again and be rejected from Timesheet Approval Page. To reject the hours that have been previously approved, click on Actions and Review.
Timesheet-Based Invoice also uses approved hours to bill clients.
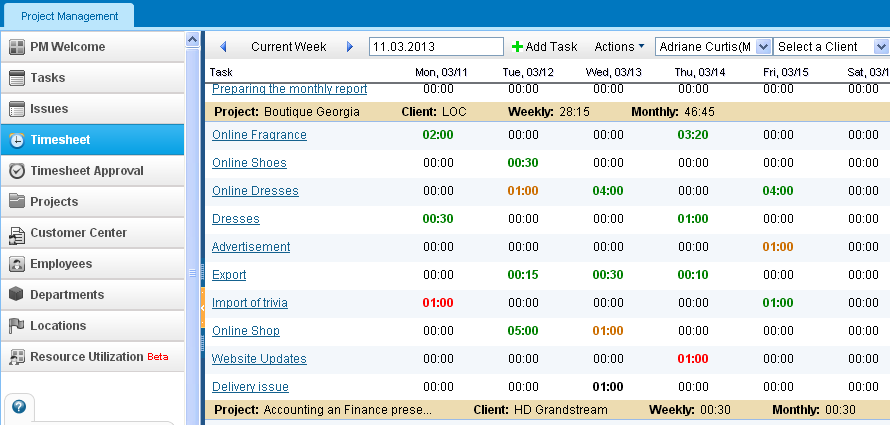
Timesheet
Timesheet
Timesheet reflects the time entries of projects and tasks. Timesheet calendar navigation lets you easily jump to the exact day/time period. The actual and planned time spent feature allows comparing the time limits assigned for the exact project and task.
The Actual Time shows the time entries for the particular week and month, whereas the Planned Time shows the employee timeslot hours per week and month.
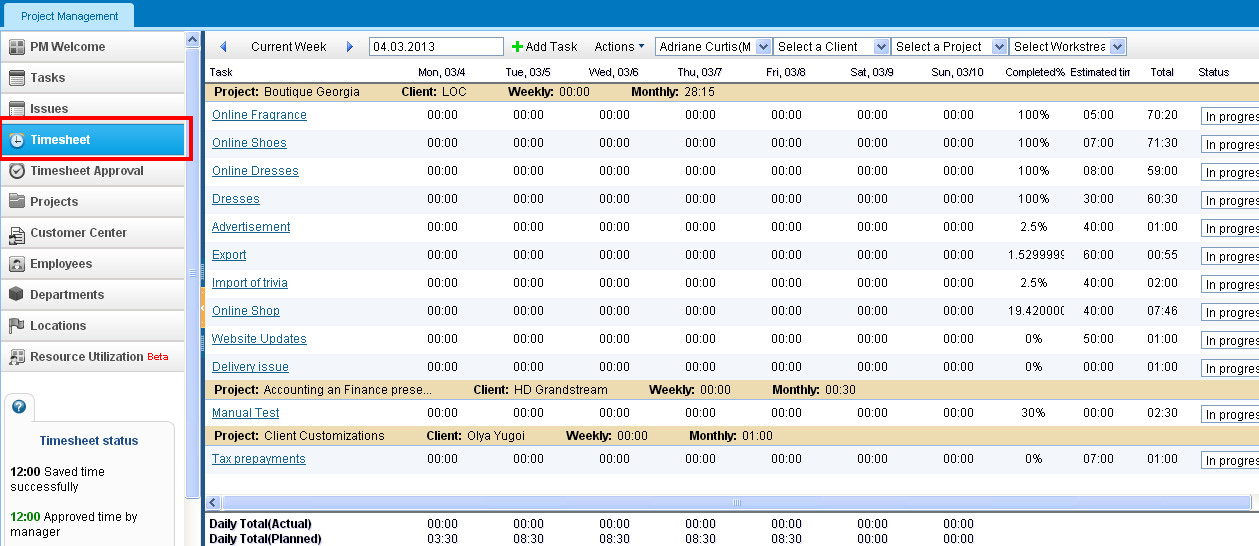
Time Entries
Time hours can be entered by clicking the boxes under the weekdays and pressing enter. While entering total time entries, comments can also be left and saved in the comment box.
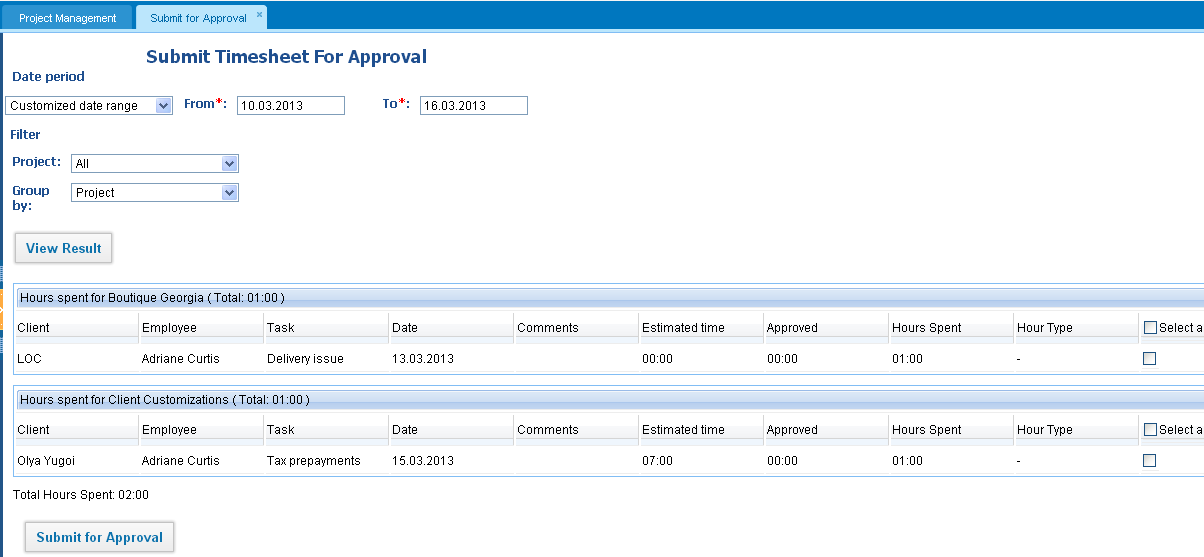
Submit the Timesheet for Approval
The pre-filled timesheet form can be submitted for project manager`s or backup manager’s approval. This function is located in the
Actions dropdown on the top menu of
Timesheet section.
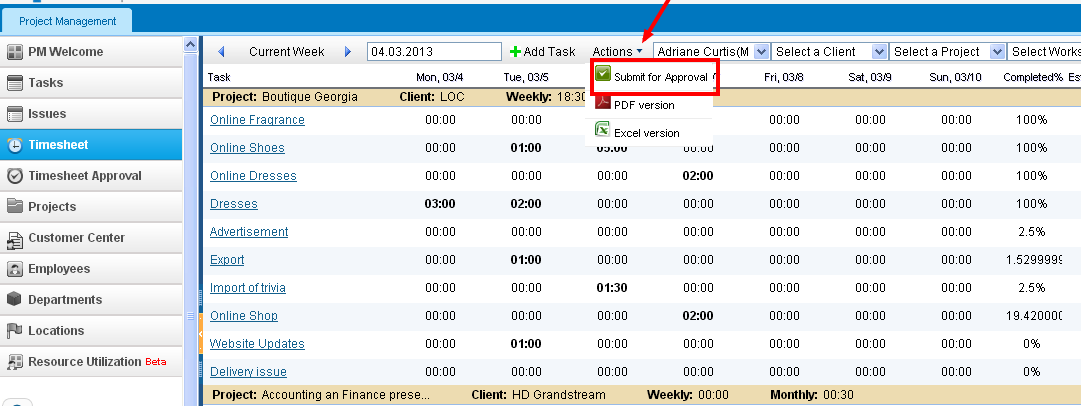
While submitting the timesheet for approval, you need to choose the date range for which you have filled in timesheet. You can also filter by project or group by client/project name. Finally, you can view the results for the period chosen, select time entries to submit and hit proceed.
Your timesheet request will be reflected in Project Manager’s, Backup Manager’s and Administrators' approval list.
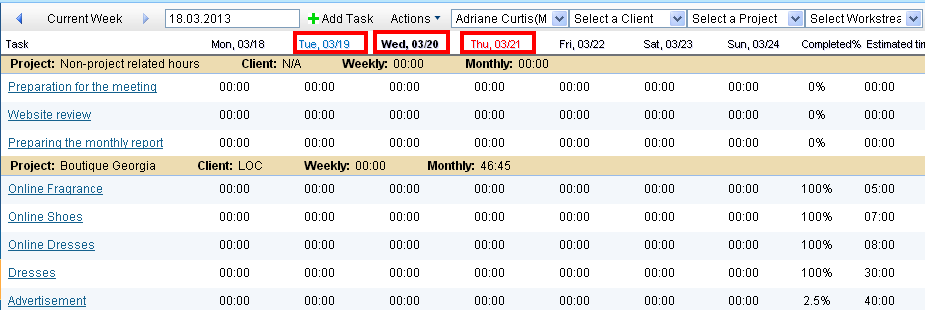
 Status of Time Hours
Once you register the time in your timesheet, it will be reflected in black meaning it has been successfully registered.
Submitted time entries for approval are shown in orange, while approved hours are in green and rejected hours in red.
If the time has not been successfully saved, the system will show it in cursive.
Status of Dates
The bold date means the current date.
Red dates mean the holidays.
Blue dates - the approved leave requests for the period.
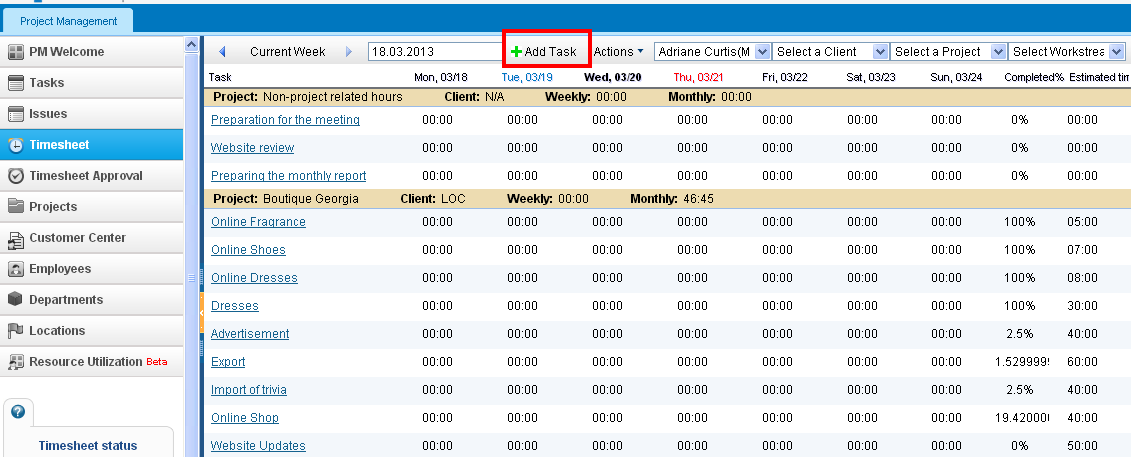
Add Task
You can add tasks directly from the
Timesheet page by clicking on the
Add Task icon. Link to create task.
 Change the Status of Project/Task
In timesheet pane, you can change the status of a task. To do so, click the field under
Status column of project list.
Export the Timesheet
You can export the timesheet as
PDF and
Excel versions by clicking functions in the
Actions dropdown on the top menu of the
Timesheet page.
Time-Sheet Editor Role
This role enables the user to access other employee’s timesheet and make changes to their timesheet by adding hours, submitting them for approval, changing the status of their tasks and etc.
This role can be given for users from the
Employees section. Choose the employee, edit the profile, and tick the
Timesheet Editor role in the Account Information part and save.
Timesheet Filter
You can filter your timesheet by Client Name, Project Name and Workstream by choosing the options from the dropdowns on top of the timesheet page.
Issue Management
Issue Management
Issue Management is a section that keeps track of list of problems related to the projects or issues occurred during the project implementation. On this page, resolvers and managers can add new issues to the list or remove the existing ones while through the Actions dropdown, the issue details can be viewed and edited. The list can be exported to PDF and Excel using the feature buttons below the screen.

Add Issue
To add a new issue to the list go to the
Issues subsection and click the
New Issue function located on the top menu. You need to fill in the appeared form and click
Save & Close.
View Issue Details
Issue details can be viewed through the
Action dropdown of issue list. You can see the summary of the issue, edit the details and leave issue notes on this page.

Remove Issue
To remove an issue from the list, click the
Remove option in the
Actions dropdown of issue list.
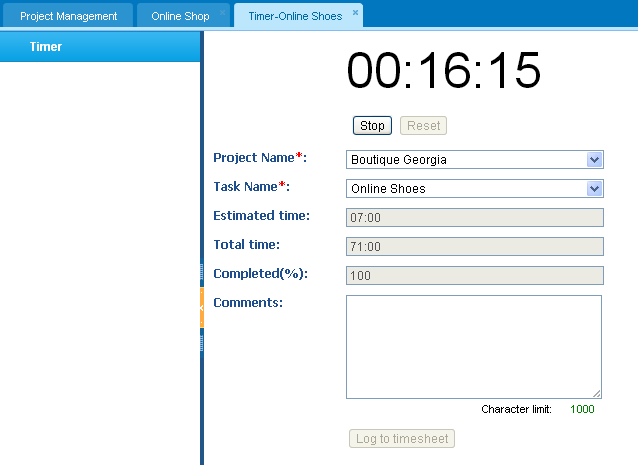
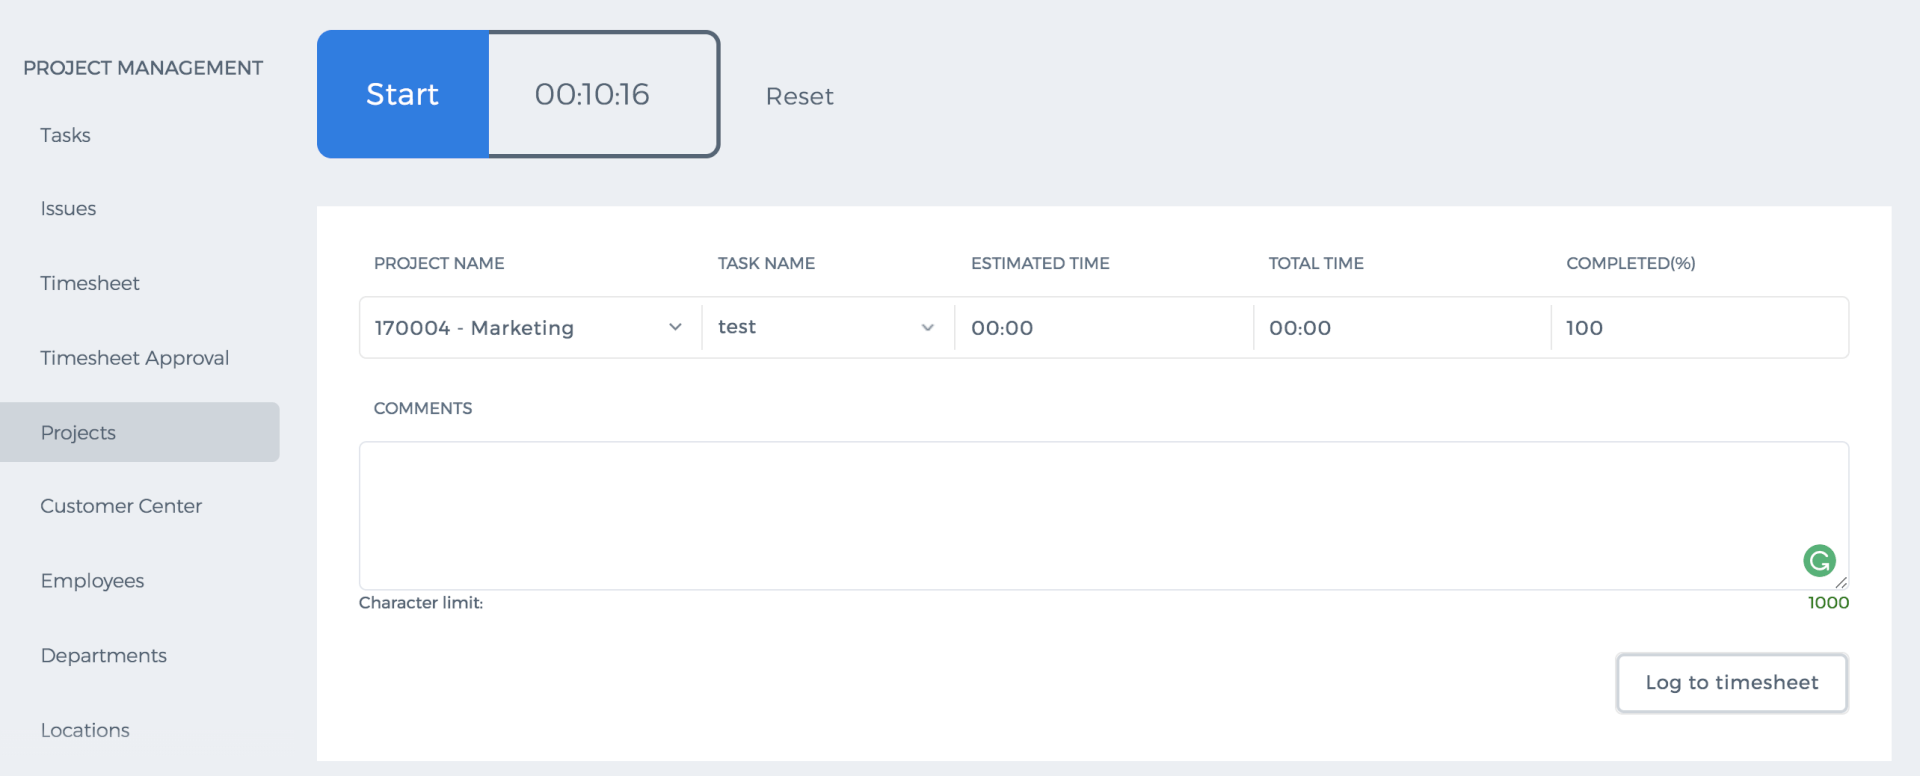
Timer
Timer
Timer is like a stopwatch which calculates the time spent on a particular task. You can run a timer and stop it when you finish the task. This way you will exactly know how much time you spent on the task. Then you can register the time spent to the
Timesheet using "Log to Timesheet" button.
You can access
Timer from the
Task Summary page or from the
Actions dropdown of Task list.


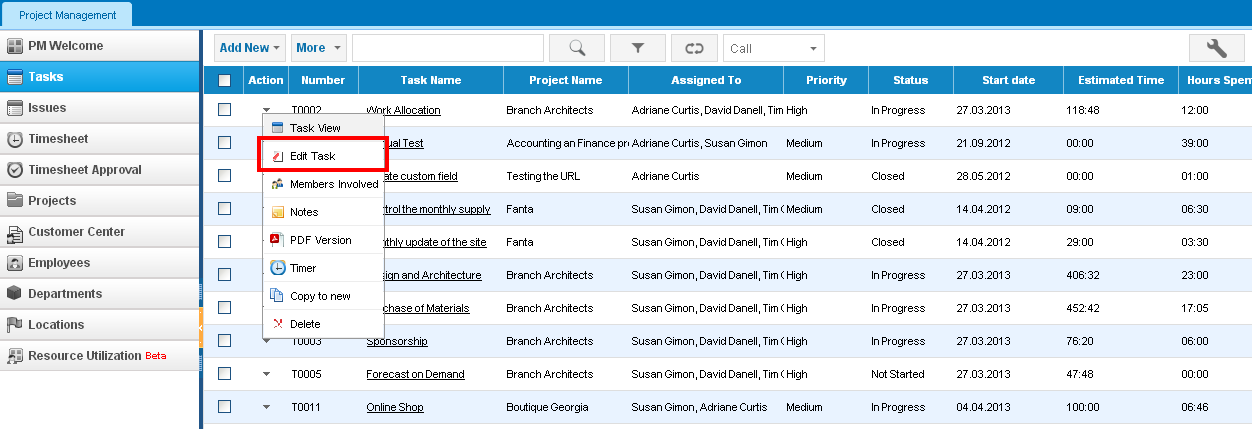
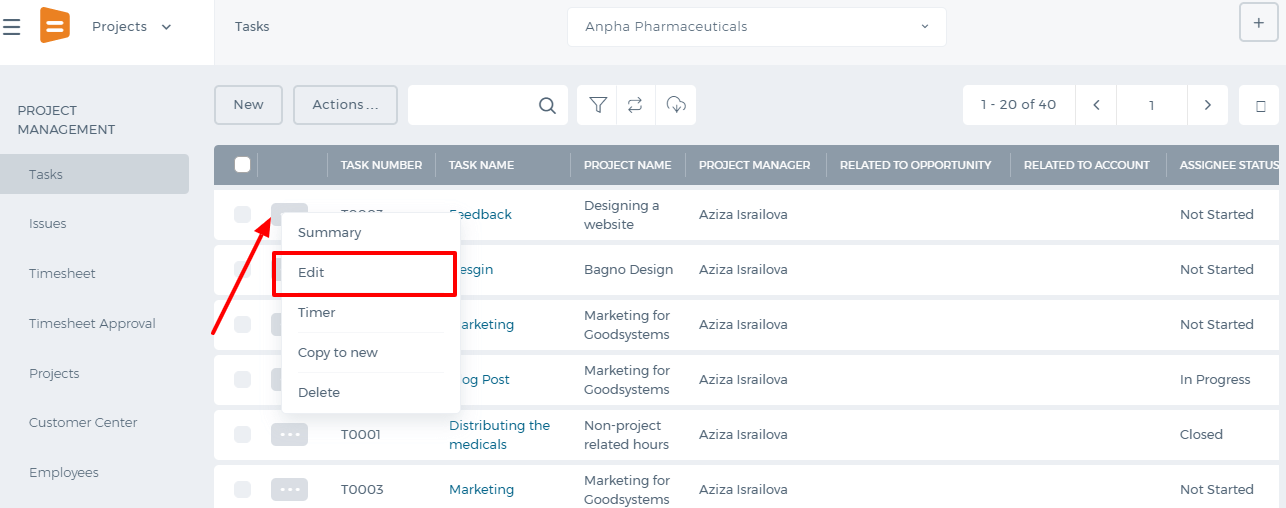
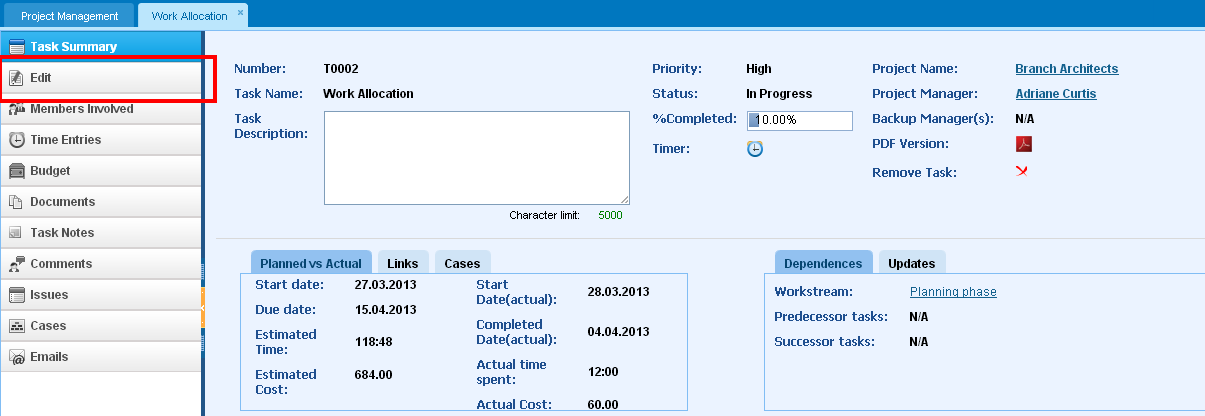
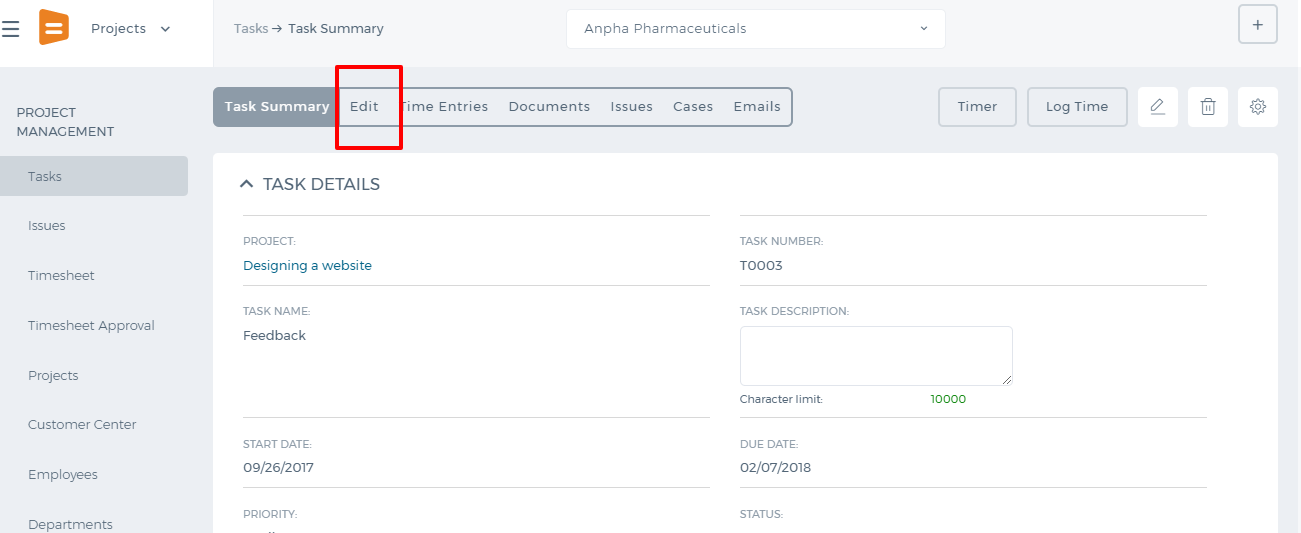
Edit Task
Edit Task
There are two ways of editing tasks. First is through the actions dropdown in Task listing.
Second is from Task Summary page using "Edit" subsection.
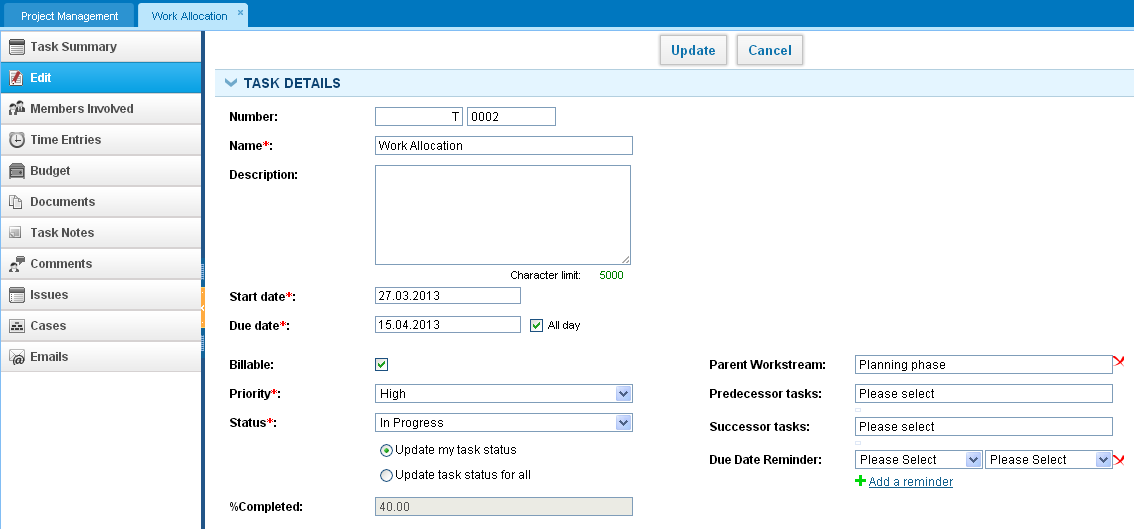
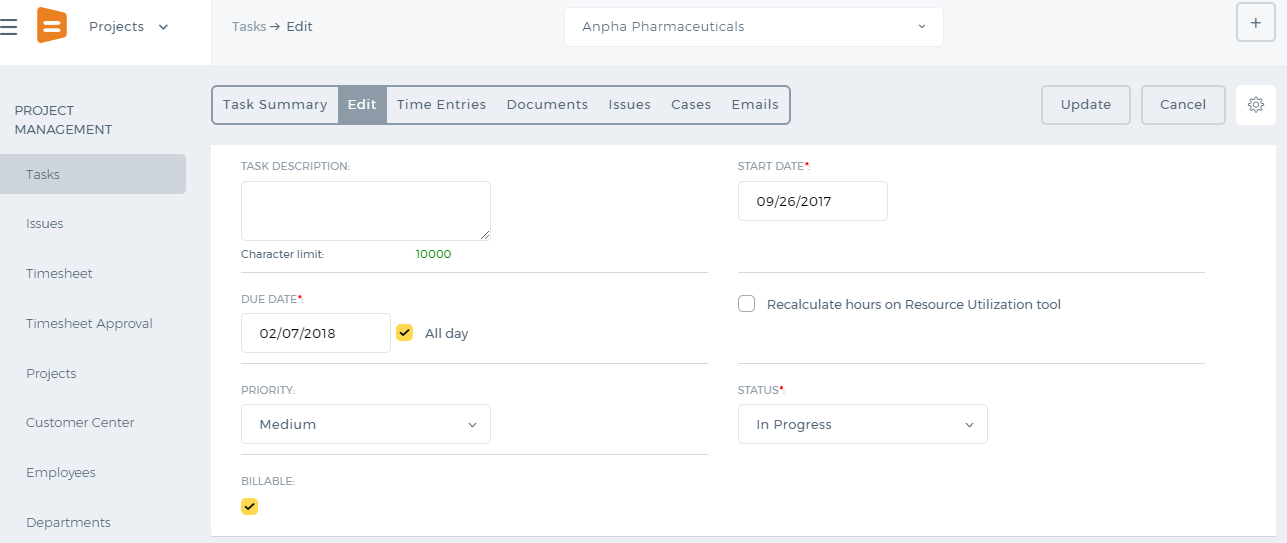
In "Task Edit" form, you can change the task details like Number, Name, Description, Start/End dates, Status and others.
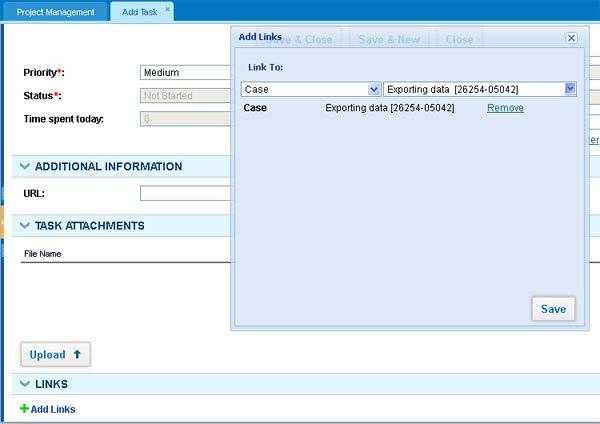
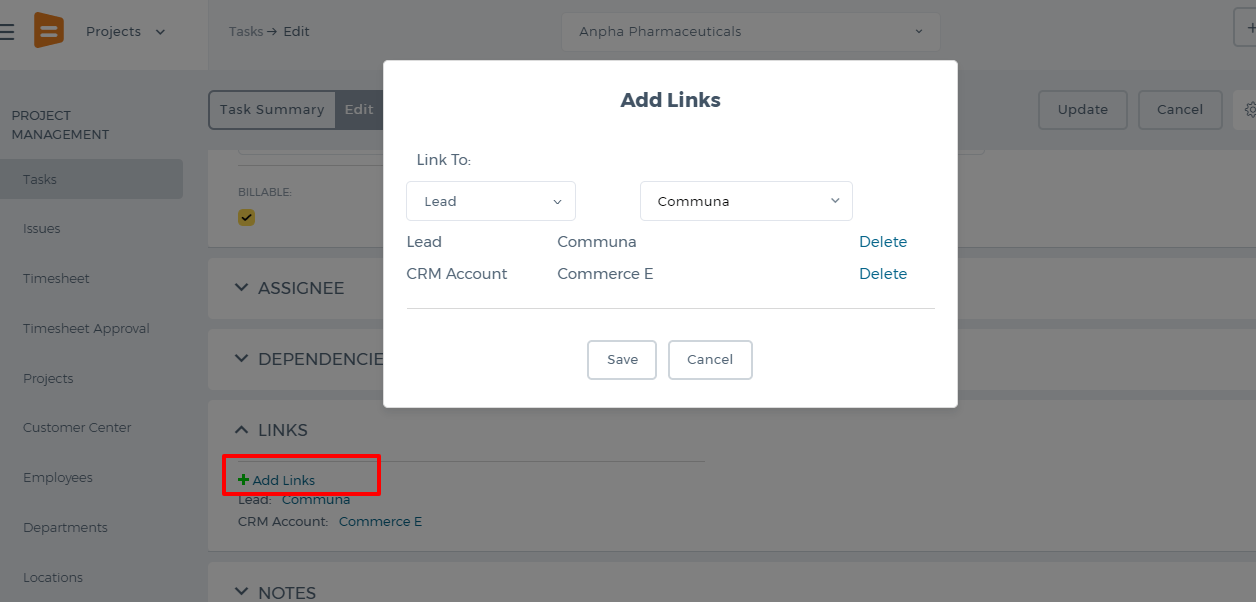
Task links
Task links
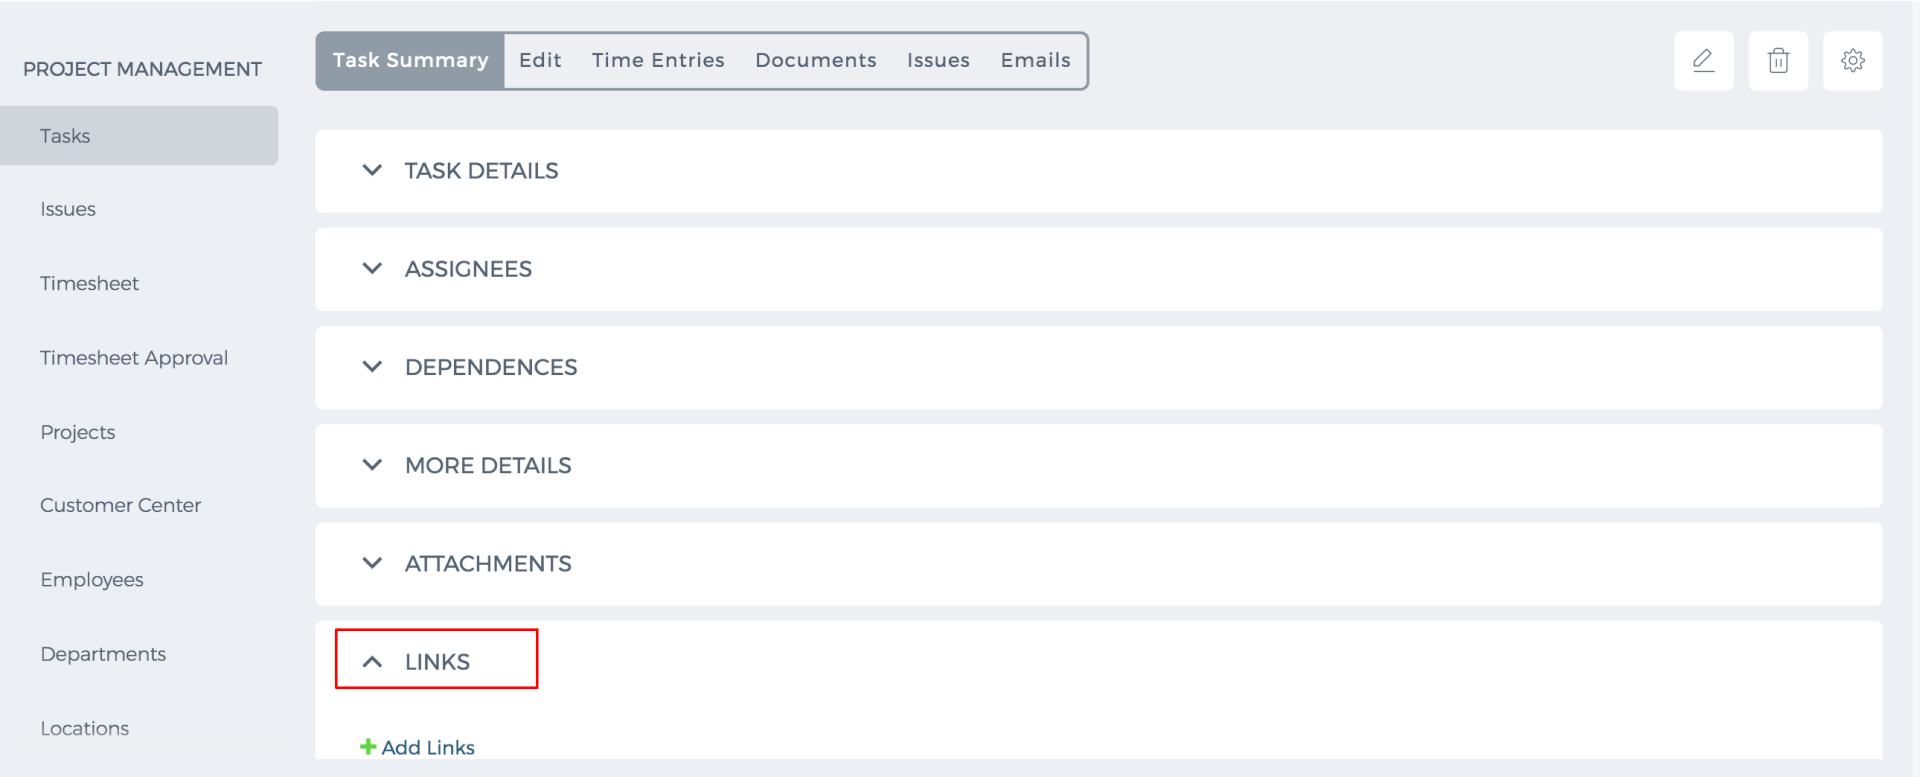
Links are very useful option in kpi system to set a relation between two related items and easily navigate through them. You can add links to other system items those are related to the task.
Task links can be added from
Add/Edit task forms or
Task summary pages by clicking on the
Add Links option. Links may be added to Contacts, Cases, Events, Issues, Opportunities etc. Once you add a link and click the link, you will be redirected to that related
Item's Summary page.
Task Status
Task Status
Task Status
The Status field shows the task’s status for the employees involved. In the kpi.com, the status of a task can be defined as a global task status or a status for a particular employee. For example, the overall status of a task can be
In Progress, however, for a particular employee the task can be
Completed. If every employee completes the task, then the
overall task status will become
Completed as well. So here, you can set the task status for yourself only.
Recurring task
Recurring task
A recurring task is a project-related task that can repeat at regular intervals (such as daily, weekly, monthly etc) and always have the same duration and attributes. For example, you might define the daily project progress meeting as a recurring task.
To create a recurring task in kpi system click on the
Advanced Options on
Add task form and tick the
Recurring checkbox. It will show different recurrence options:
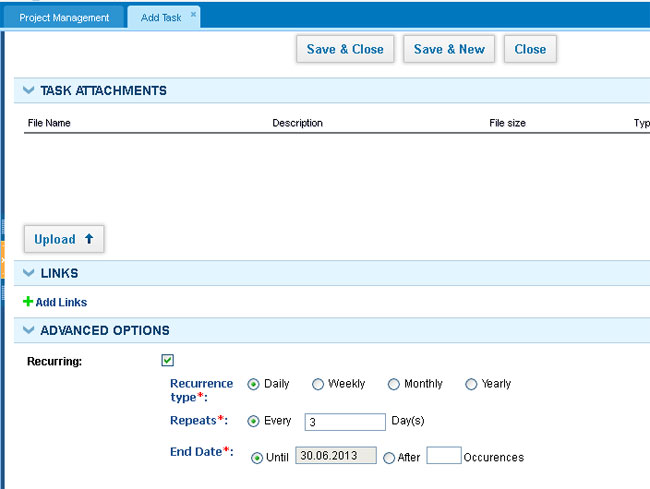
Once you have checked recurrency option and fill the blanks, you can see your all repeated tasks in
Task list in
Projects.
However, the recurring task option is not yet available in the new user interface.
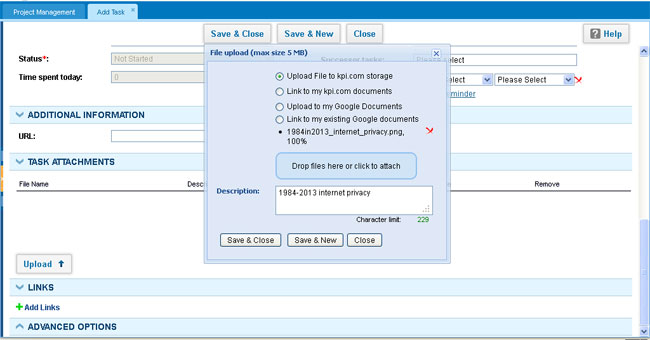
Task Attachments
Task Attachments
You can upload documents related to the task
by clicking the
Upload button in the task form. Files can be uploaded to either to the System storage or to your Google Documents, also you may link your existing System and Google documents to the tasks. Once you upload your documents, all task related users will be able to see the task attachments.
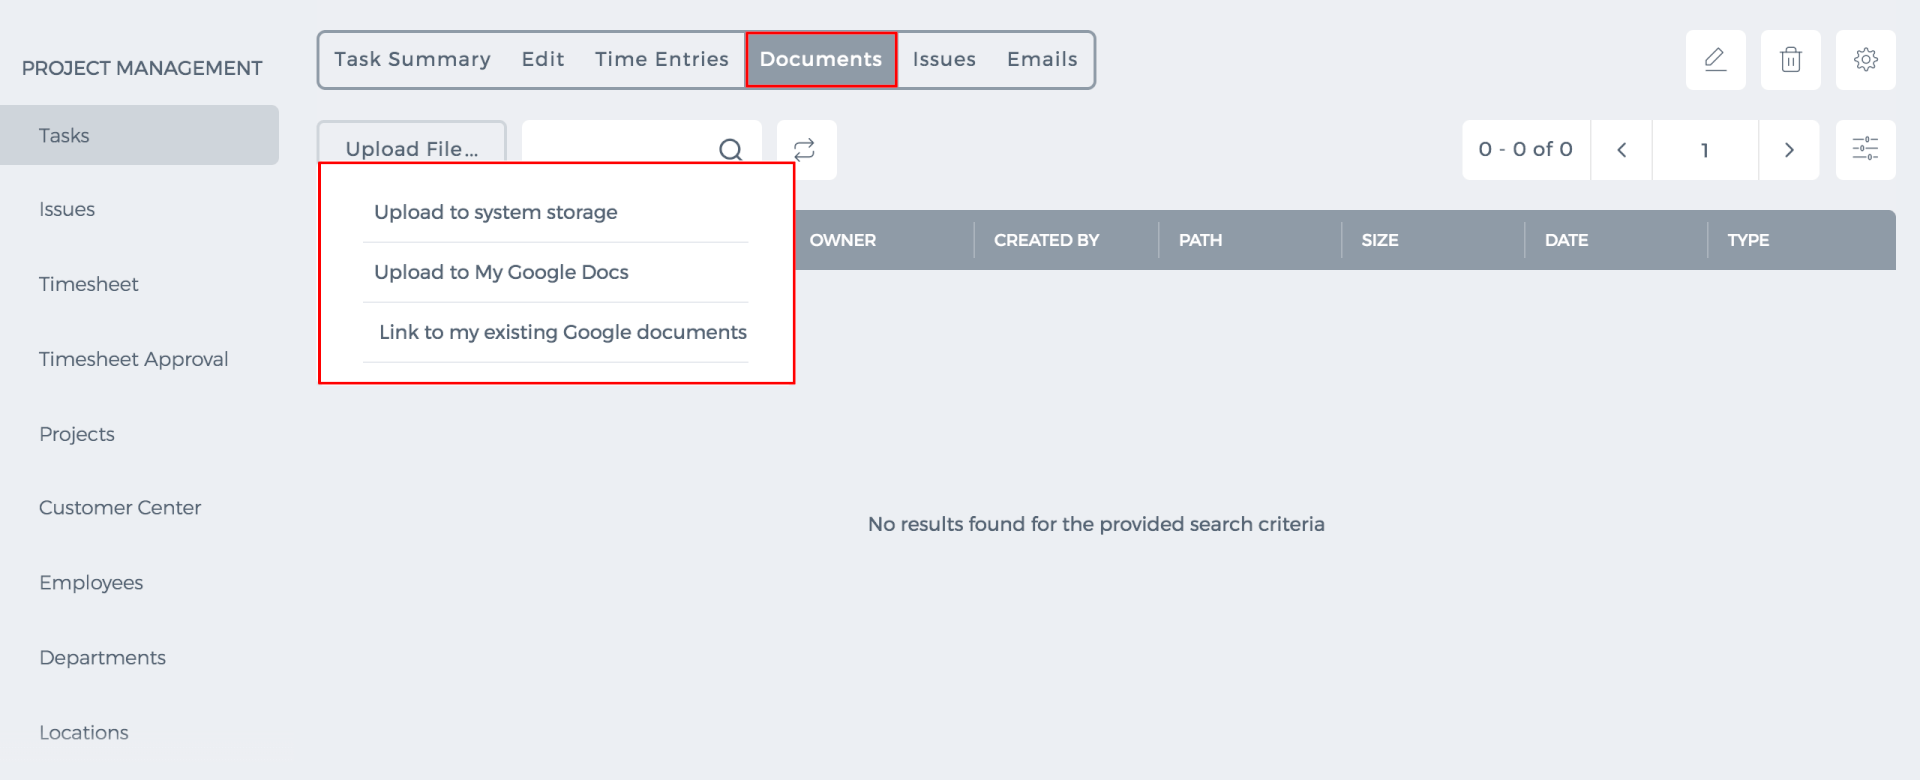
In new User Interface, firstly create a new task, then view this task in the task list by clicking on it. To upload documents, choose the document section in the below-mentioned tab and press on the
Upload File button. Files can be uploaded to either to the System storage or to your Google Documents, also you may link your existing System and Google documents to the tasks. Once you upload your documents, all task related users will be able to see the task attachments.
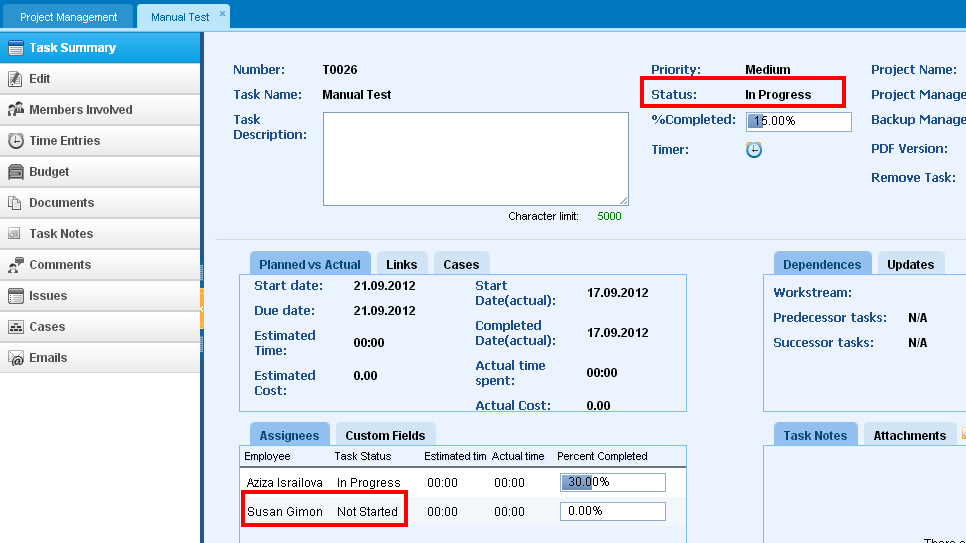
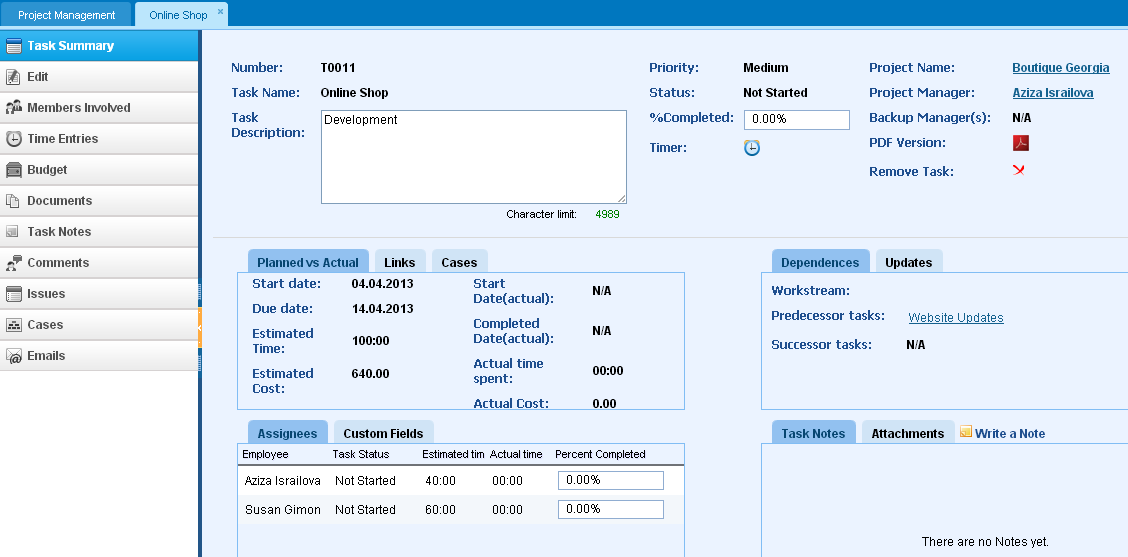
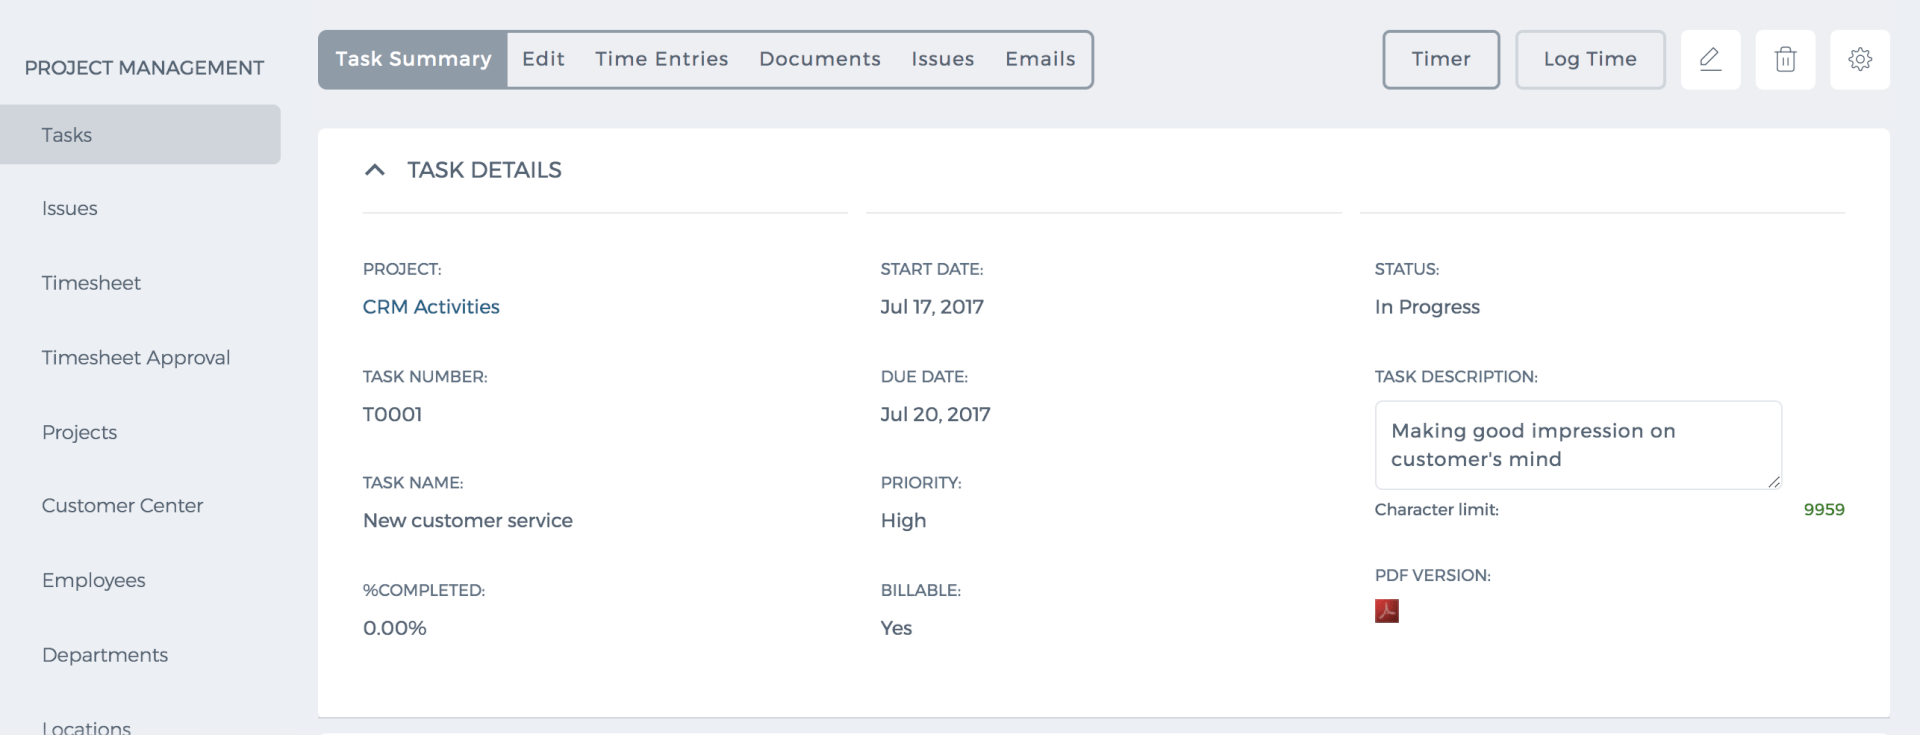
Task Summary
Task Summary
This page shows the overall summary of task details.
If you have approved hours, you will be able to compare the actual time spent on a task to the estimated time in the
Task Summary page.
In the
Task Summary, you will see each assignee’s actual time spent on the same task.
You can get the PDF version of the task summary. You can also see the links and updates to employees regarding the task.
 Percentage Completed
The completion of tasks can be calculated automatically or manually. By default, the task percentage completion is calculated manually.
The system calculates it using the estimated time for each employee and actual time spent. If the actual time equals the estimated time, the percentage completed will become 100 percent under
Automatic Percentage Calculation. However, it does not mean that the task is completed. You can change the status of the task later to
Completed when it is really fulfilled. Note that to be 100% completed, all employees’ task’s completion should be 100%. If one employee has completed the task for 50% and the other for 70%, then the overall task’s percentage completion will be 85%=(50+70)/2.
Under manual calculation, when you change the task status to
Completed, the percentage completed will become 100%.
Estimated Cost
The estimated cost is calculated using the wage rates of each employee and multiplying it to the estimated time. For example, if estimated time to be sent to a task is 30 hours and the wage rate of the assignee per hour is $10, then the estimated cost will become $300.
Actual Cost
Actual cost is based on the actual time spent on a task. Actual time is only the approved task hours. So if your actual time is 40 hours and your wage rate is $10 per hour then the cost of the task will be $400.
Timer
The timer is like a stopwatch which calculates the time spent on a particular task. You can run a timer and stop it when you finish the task. This way you will exactly know how much time you spent on the task. Then you can register the time spent to the
Timesheet. You can access
Timer from the
Task Summary or from the
Actions dropdown.
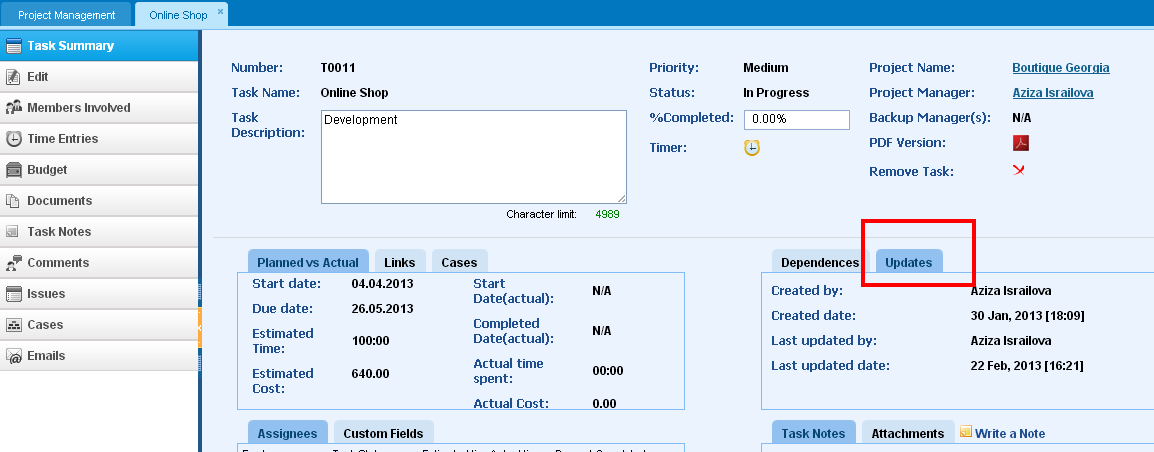
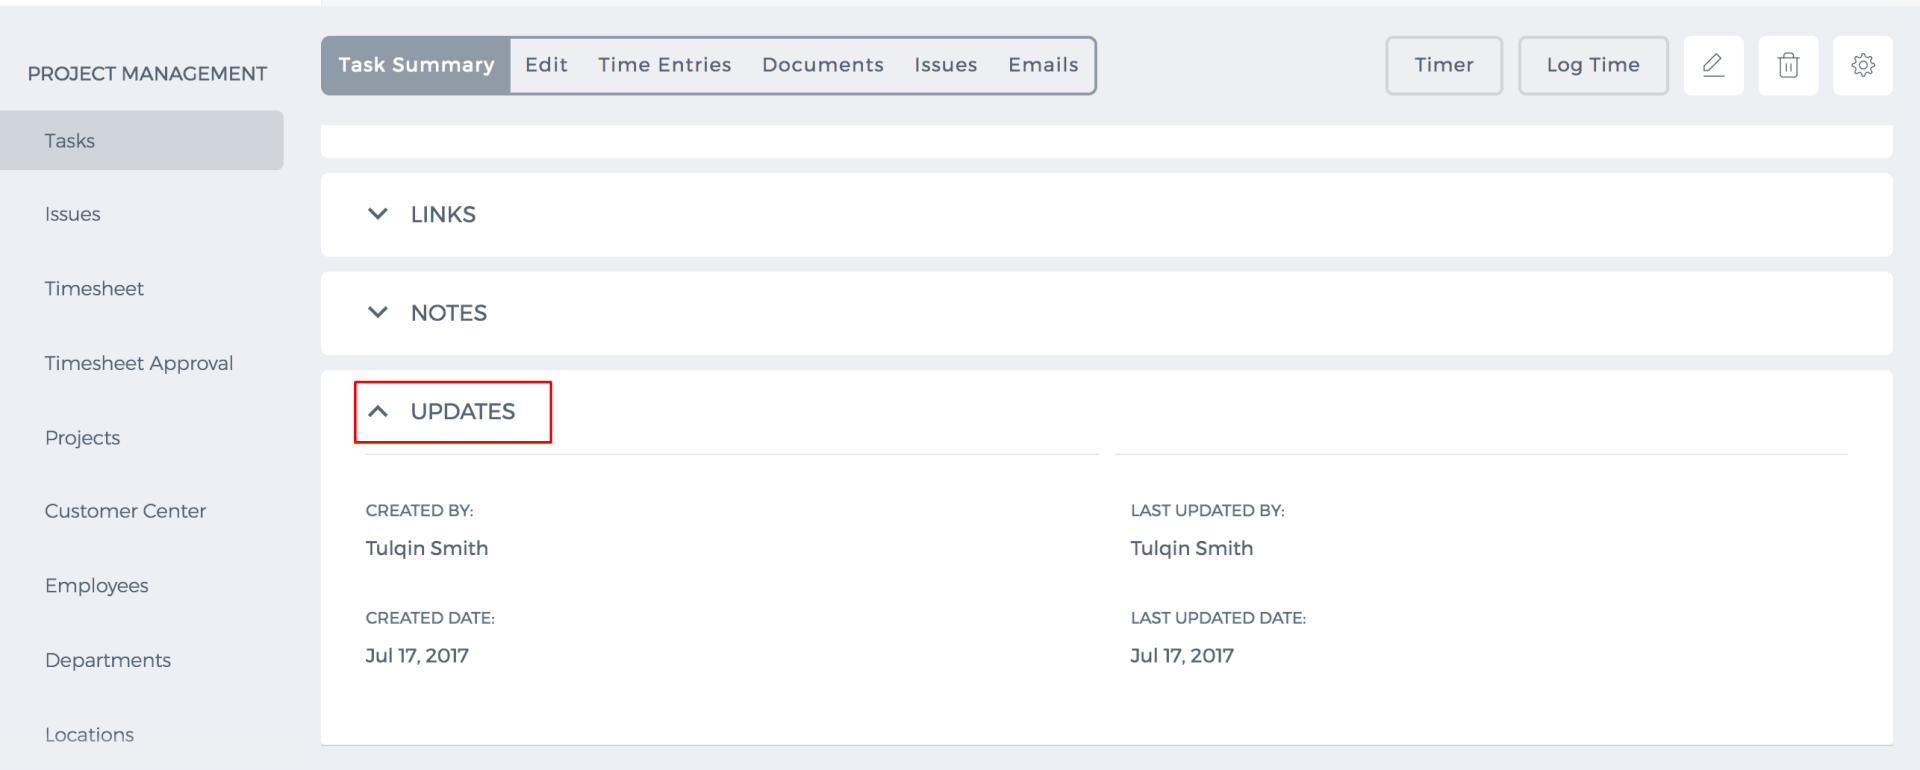
 Updates
This tab shows you the created date of a task and last updated date as well as the employee who updated it.
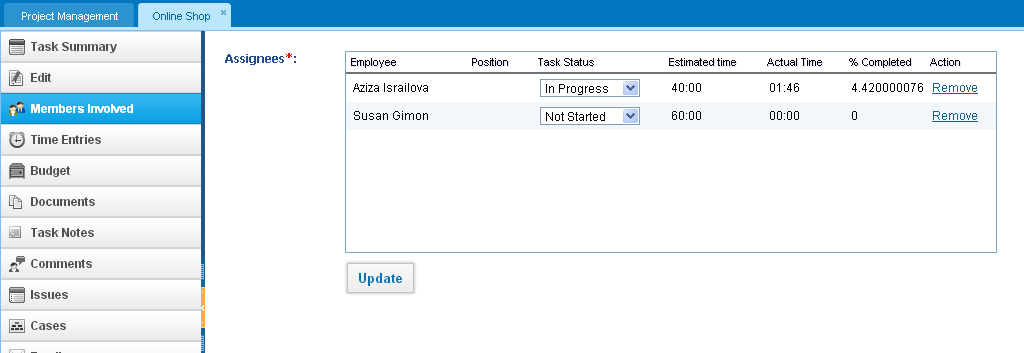
 Members Involved page
In this page, you can change the status of task for each assignee and change the estimated time allocated for them. Although, this page is available to all task members (view only), you need to be the manager or the backup manager to change the estimated time and assignees.
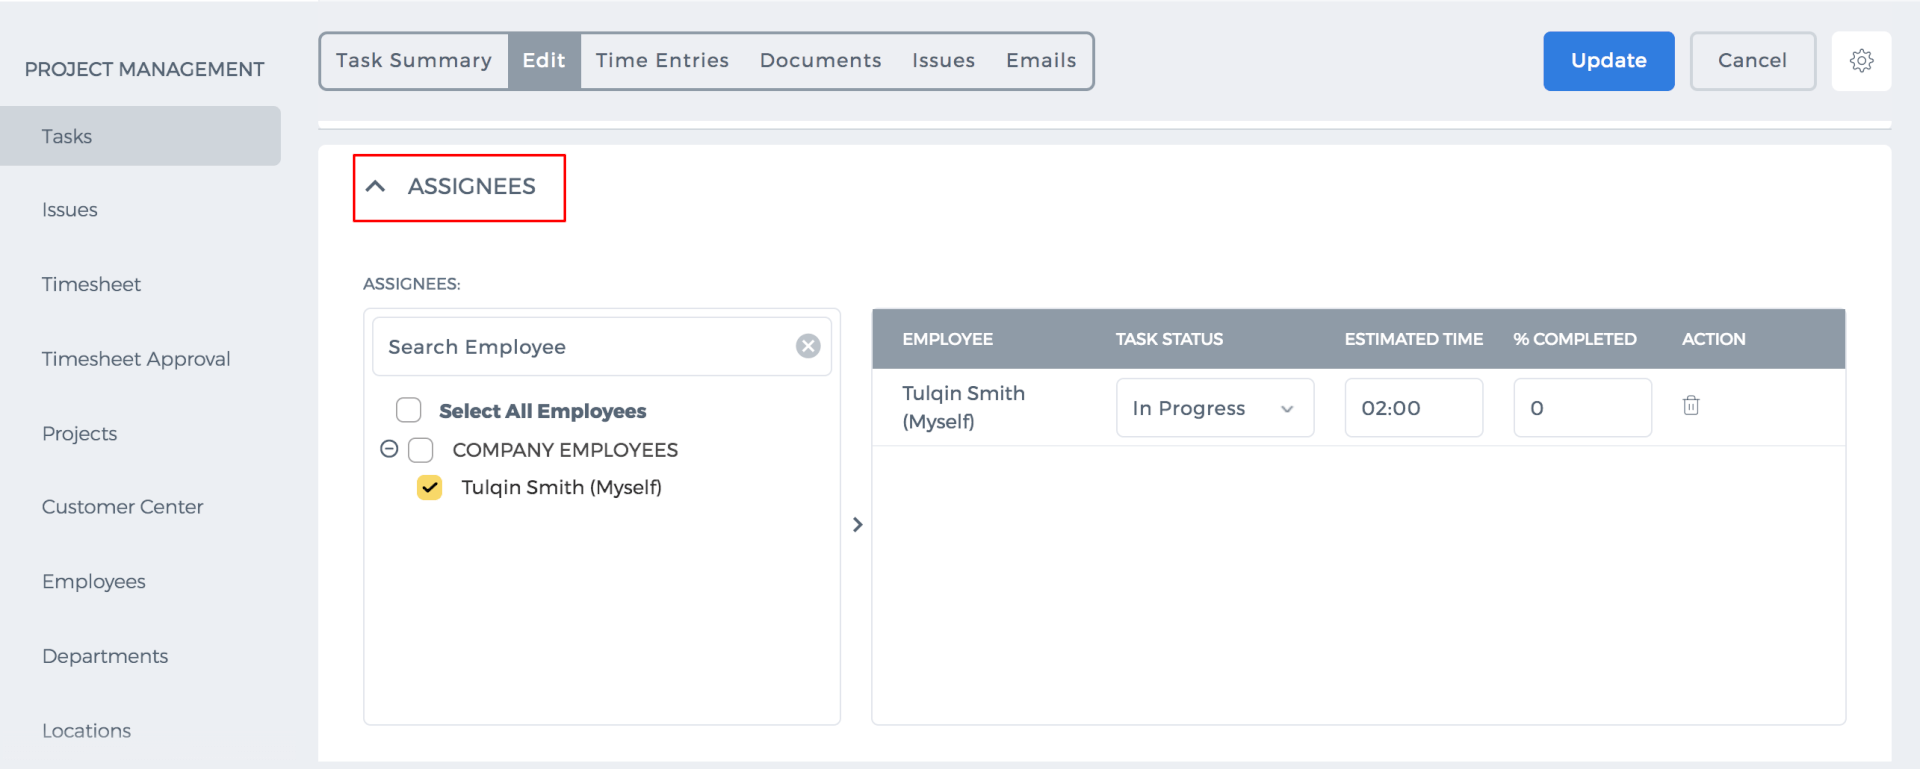
If
Resource Utilization section is enabled to your account, you can change the estimated time for employees from the
Resource Utilization page, not from the
Tasks Members Involved page. Members involved page will be for view only.
To edit estimated time for employees, go to Resource Utilization section of the Project Management Module.

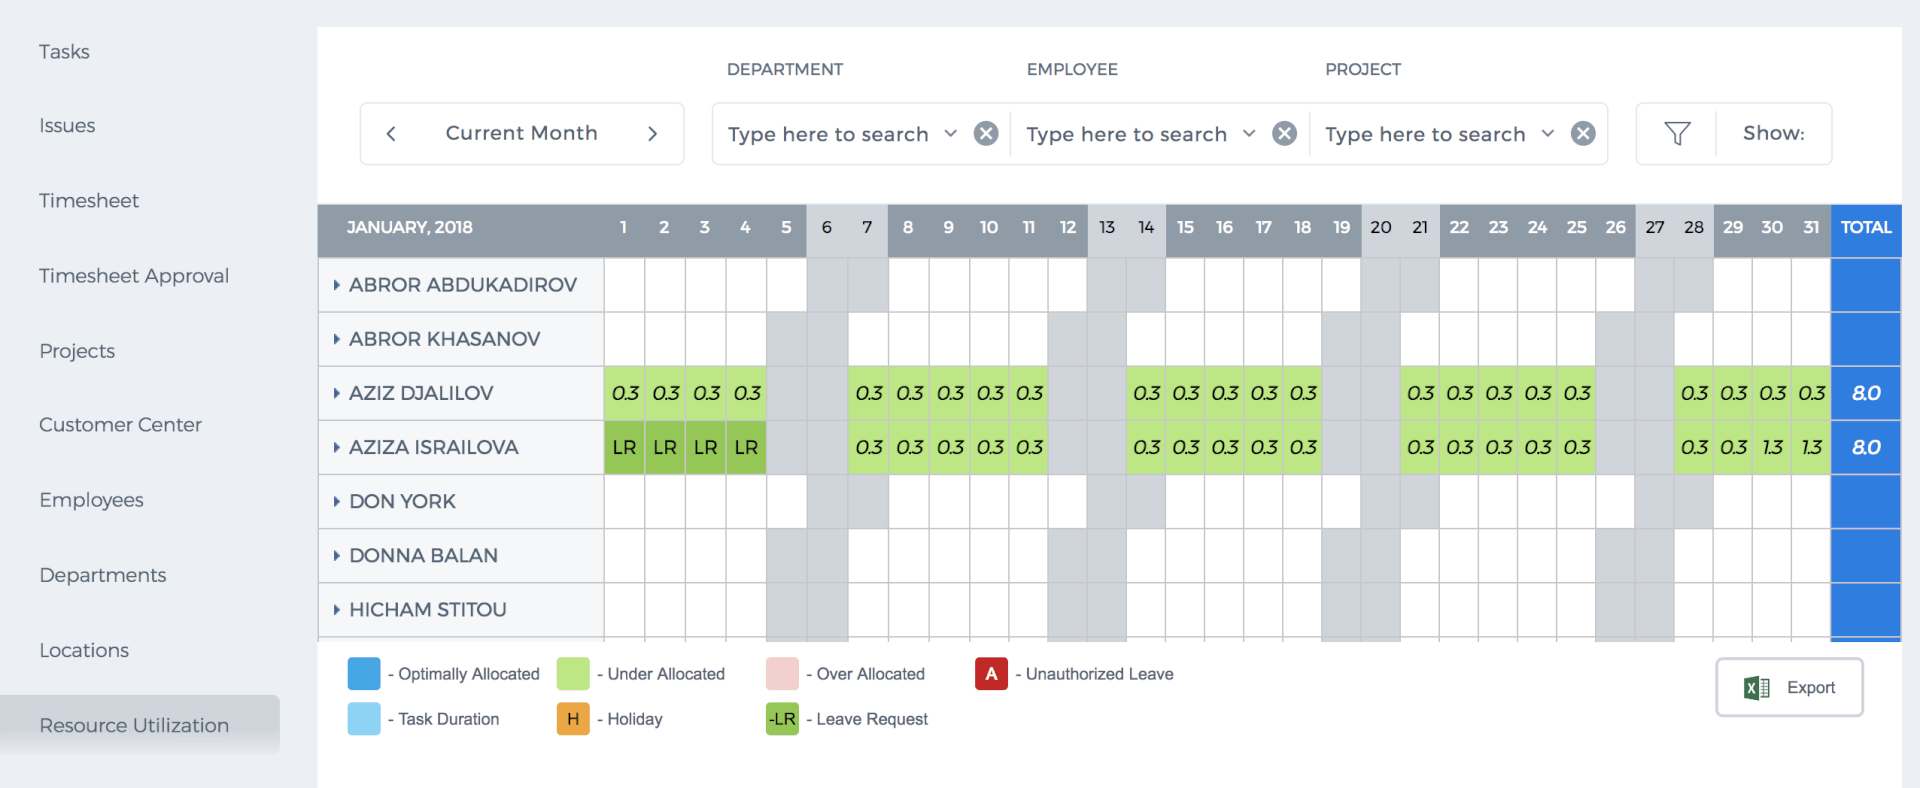
Click on the drop-down next to an employee name which will populate all projects ongoing in the current month. Next, click on the project drop-down which will populate tasks. The tasks row shows estimated time allocated for each day. You can change the estimated time by double-clicking on the cell.
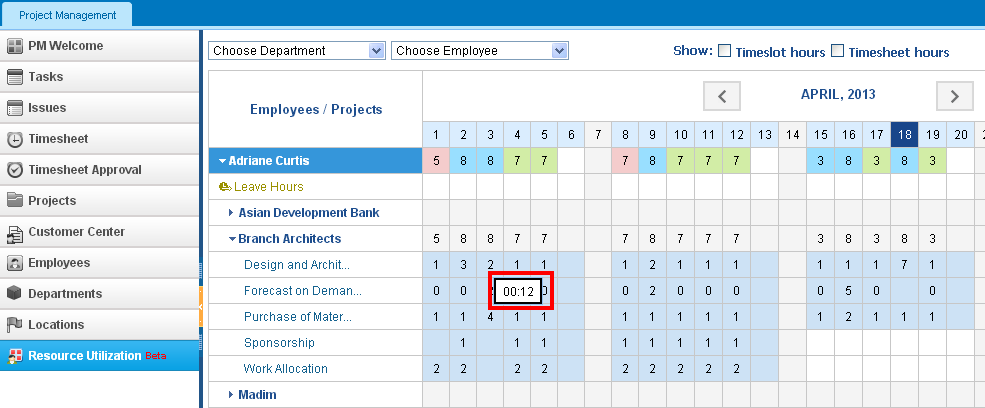
As indicated at the bottom of the Resource Utilization page:
Optimally Allocated - shows the same amount of time allocated as in the timeslot hours set for the employee
Over Allocated - shows more time allocated for tasks than in the timeslot
Under Allocated - shows less time allocated for tasks than in the timeslot
Task Duration - shows when a task starts and ends
Holiday - shows holidays where you cannot enter time
To compare the timeslot hours to the estimated time allocated, tick the Timeslot Hours box on top of the page.
To compare timesheet hours to the estimated time allocated, tick the Timesheet Hours box on top of the page.
You can also filter by department or employee from the dropdowns located on top of the page.
Time Entries page
This section shows you the data about the total time spent by each assignee in the task and time entry dates.
Budget
Employees may have two types of wage rates: simple wage rate and client charge rate. Wage rate is the amount that you pay for employee per hour. Client charge rate is the timesheet hours billed to your client for the work done on the project. Client charge rate is used in the Timesheet-Based invoice. The budget page shows you how much time was spent and the cost of the task based on employee rates per hour.
Documents page
This section will store all related files and documents to the task. If you have uploaded a file to the task, other assignees will also have access to this document.
Task Notes
This page enables you to leave your thoughts and notes for the task. If you make it private, no-one other than you can see the note. If you make it public, everybody involved in the task will see the notes except for the project’s client.
Comments
This page shows the rejected hours’ comments and your own comments left when you register a timesheet. You can send edit or delete those comments. If you create a new comment, you can send notification to the other members of the task.
Issues
Issues are the problems or obstacles that you have faces while working on the task. If there have been some issues related to the task, you can save them here and all other members will have access to the Issues.
Cases
Tasks can be linked to cases in the
CRM section which might be the tickets of your customers. You can also create cases manually using the button
Add New. In order to link cases to your tasks, go to the
Task Summary - Linkstab. Click
Add Links and search for the case and add. The cases subsection will show these links to cases.
Emails
This page stores related emails of the task. Emails can be also linked through the add links option.
Task custom fields
Task custom fields
Custom fields extend the attributes of tasks, so if you have additional information to enter into the task, custom fields can help you with that. You can create your own custom fields from
Settings section - Custom Field Management Settings. Once you create the custom field, it will be displayed in Task Forms.
The Additional Information area displays the custom fields you have created for the
Task forms.

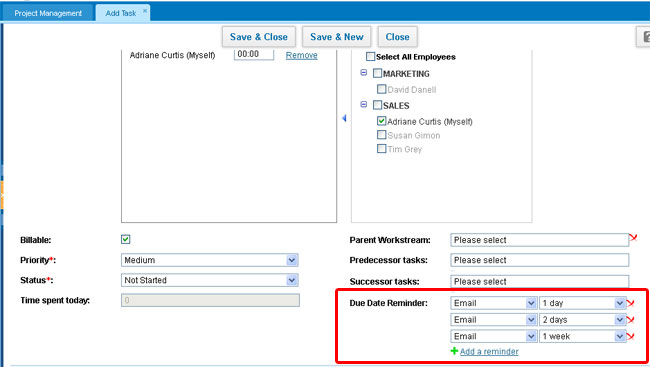
Task due reminder
Task due reminder
You can set an email reminder for the due date of tasks, so that you become aware when you should end the task. Once you set a notification reminder, all task assignees will receive an email notification about the expiration of the task. You can set several reminders for the task by using "Add reminder" link under the Due date reminder option.
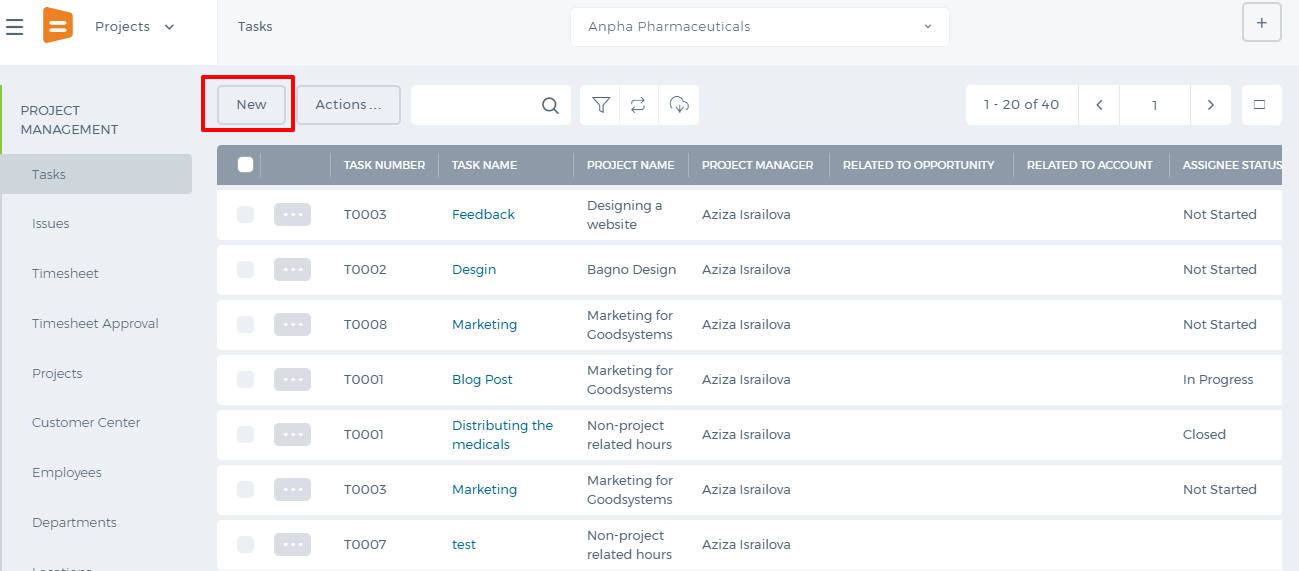
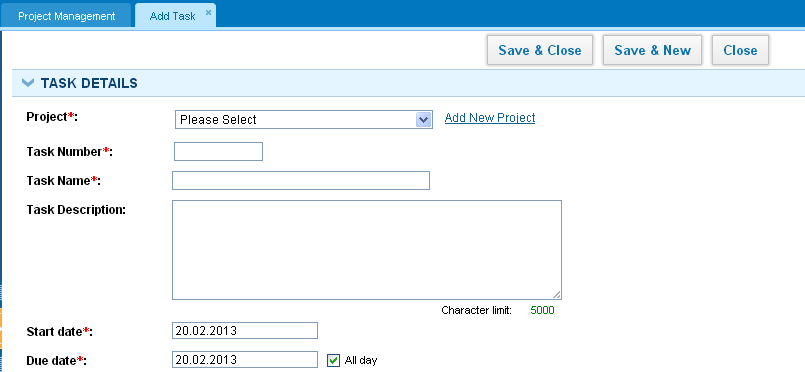
Create Task
Task is an activity based on a certain project that needs to be completed within a specified period of time.
To create tasks, go to the
Projects section and click the
Add New and fill out the form with the task details.

Tasks are related to certain projects. The system has 2 default projects:
CRM Tasks and
Non-project related hours.
 CRM Tasks
 is the default project for CRM activities. All tasks created from the
Sales section will be saved under this project.
Non-Project Related Hours is the default project to which you can add trivial tasks that are not related to any project. All employees are involved to this project, so you can assign any employee to the tasks.
There are required fields that you have to fill in to save the task successfully; those fields are labeled with the red asterisks.
Task number is automatically generated when you select the project. If the task is the first one in the selected project, then the task number will be T0001.
In the assignees box, you need to assign employees who will be working on the task. Estimated time is the approximate hours to complete the task for each employee and it is required to calculate the budget and costs of the project.

If you do not show the estimated time, the task percentage completion and budget sheet planned costs cannot be calculated.
The estimate time in the new user interface can be added in the task edit form.
Advanced Options
Task can be created automatically by setting the recurring tasks. The system will create the same task on the specified date. Click the
Advanced Options and select
Recurring.

Add Links
You can add links to other system items those are related to the task. The links can be added to Contacts, Cases, Events etc. Once you click the link, you will be redirected to the
Item Summary page.
Recurring tasks is not yet available in the new user interface.
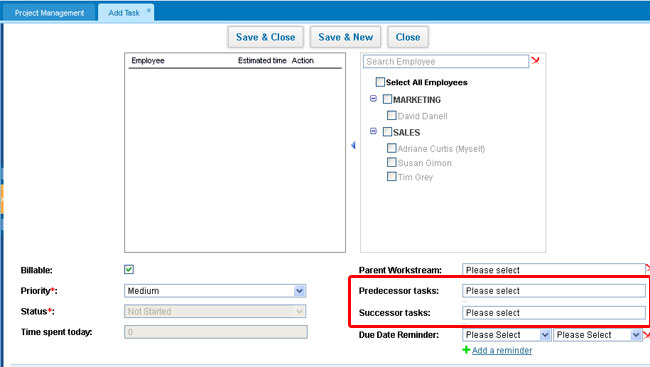
Predecessor and Successors
Predecessor and Successors
Tasks maybe related to each other, which is called task dependency. If one task ends, the other task may start immediately. If there is a task that should start before the current task, then you can add Predecessor Task. If there is some other task that should start after your current task, then add Successor Task.
Predecessor and Successor Tasks must have been added before and should exist in the Task list of current project.
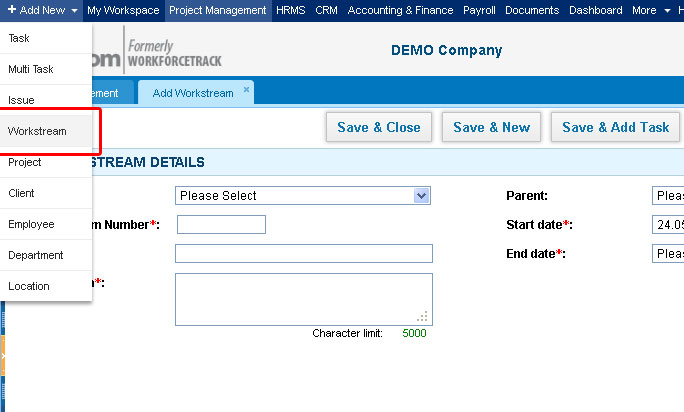
Workstreams
Workstreams
Workstream is a project's milestone. You can use workstreams to group your tasks and divide your projects into phases. For example, tasks related to design, can be included in a workstream called "Design Tasks" or tasks related to coding can be included in a workstream called "Development Stream" etc. You may even assign parent and child workstreams for particular workstream within the project.
Add workstream
The easiest way to add a workstream is from the Add New option from the top menu:
You can manage Project Workstreams from the Project Work Breakdown stucture page:
Beta Workspace
Beta Workspace
Beta Workspace is a section where you can customize your dashboard. You can add widgets, remove them, make changes and drag and drop.

You can add tasks, cases, invoices, leads, accounts, opportunities, events, sales quotes and leave requests right from the Beta Workspace page using the "Create New" icons.
You can change the view of the widget and its settings by clicking on the settings icon next to the refresh icon.
[caption id="" align="alignnone" width="1076"]
Beta Workspace[/caption]