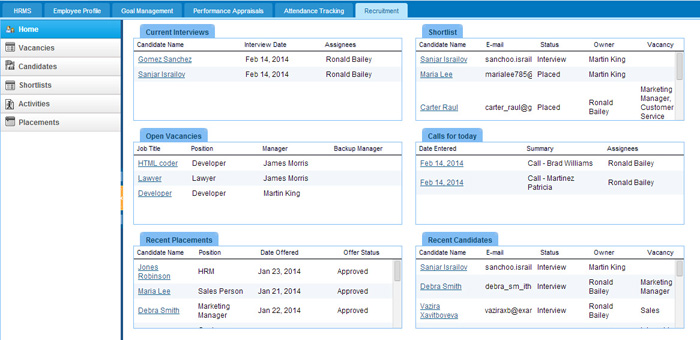
Shortlists
In order to add a candidate to shortlist, click on Select Candidate button from Shortlists listing.
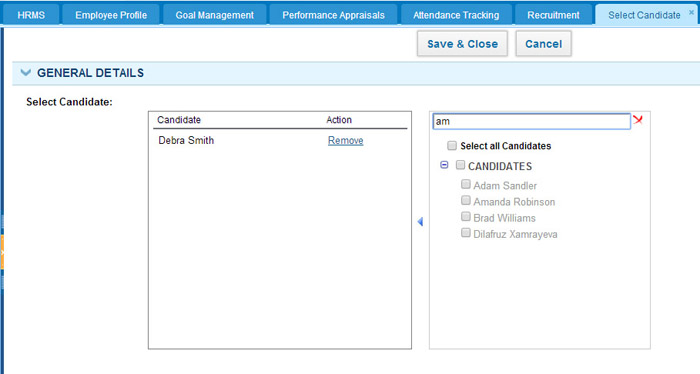
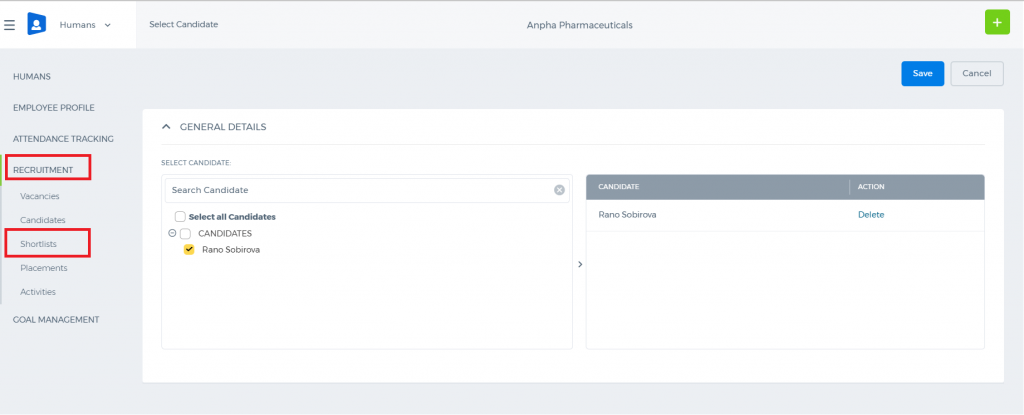 Search for candidate name on the right, tick it and click Save & Close (you can select more than one candidate). Once the candidate is added to shortlist, their status will change to “Shortlist”.
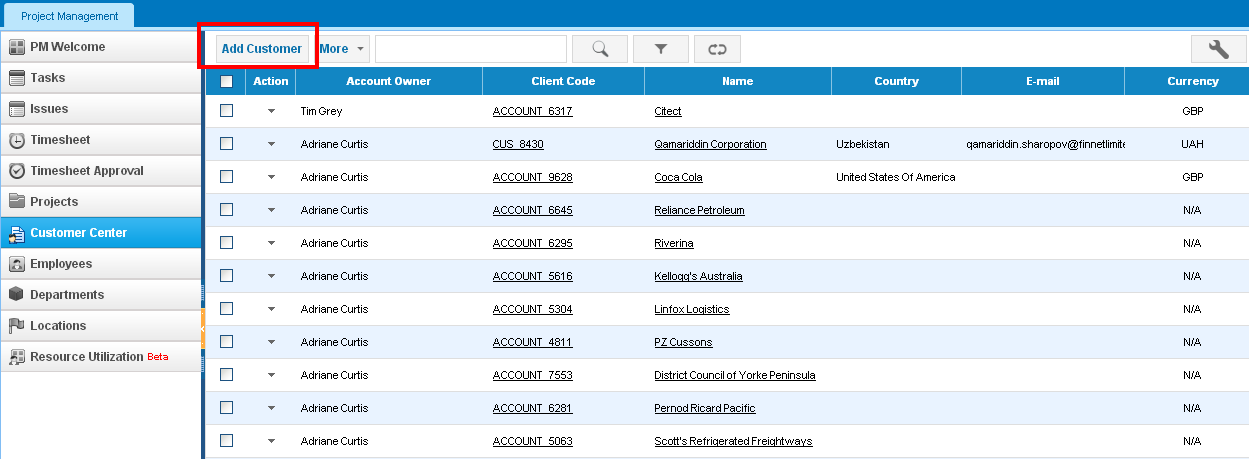
You can also add the candidate to shortlist from Candidates listing.
Search for candidate name on the right, tick it and click Save & Close (you can select more than one candidate). Once the candidate is added to shortlist, their status will change to “Shortlist”.
You can also add the candidate to shortlist from Candidates listing.
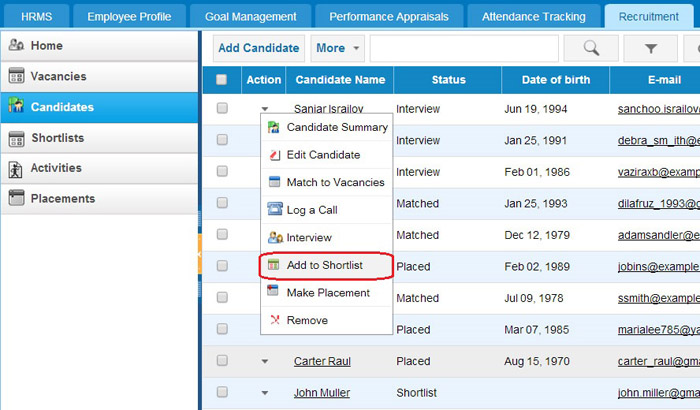
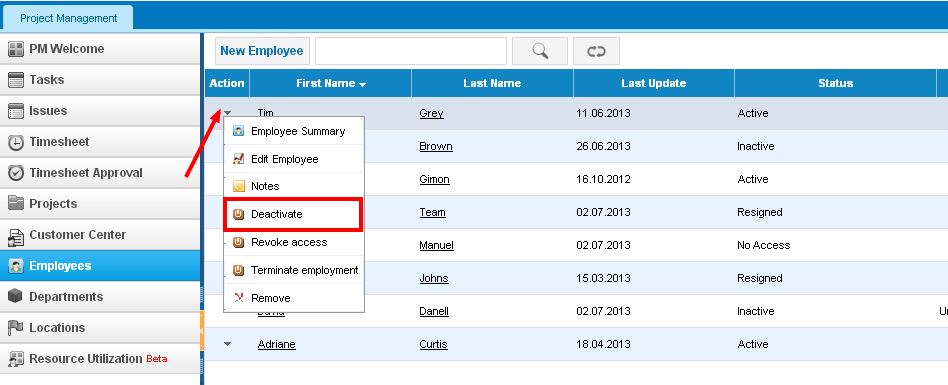
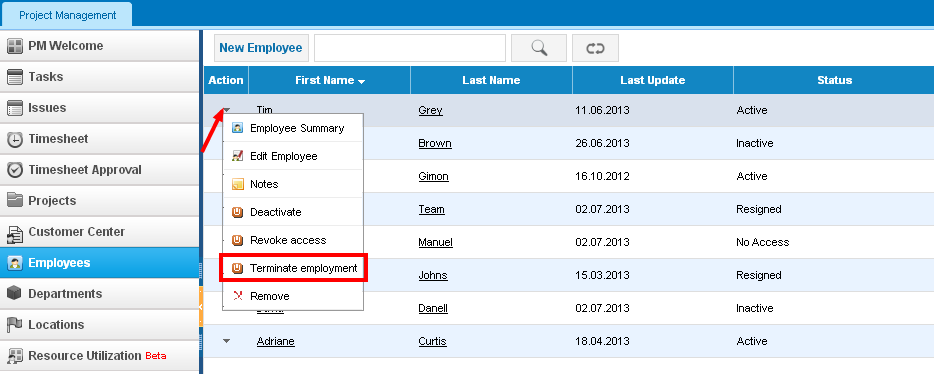
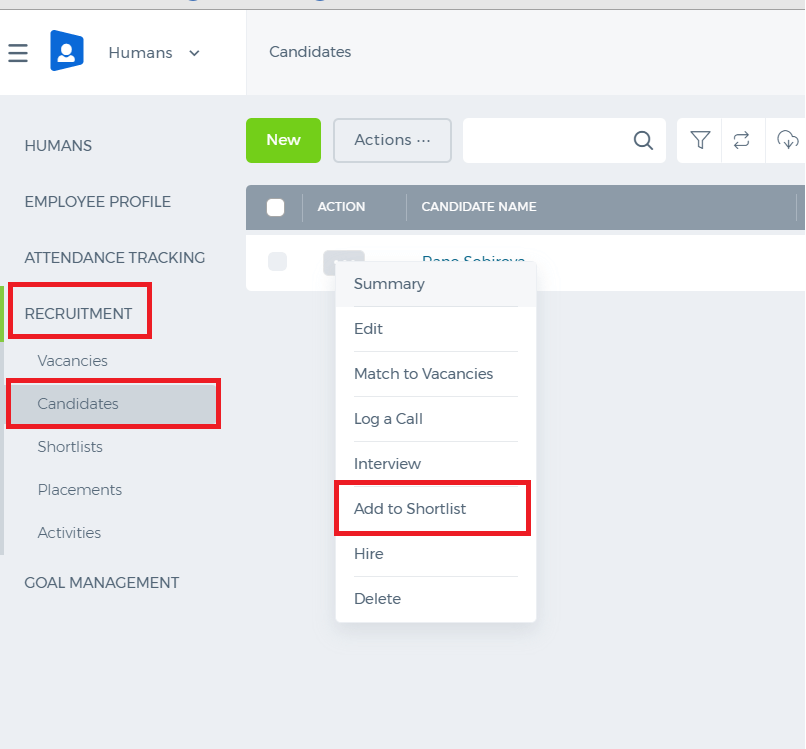 You need to find a required candidate, click Action and select “Add to Shortlist”.
Search for candidate name on the right, tick it and click Save & Close (you can select more than one candidate). Once the candidate is added to shortlist, their status will change to “Shortlist”.
You can also add the candidate to shortlist from Candidates listing.
You need to find a required candidate, click Action and select “Add to Shortlist”.
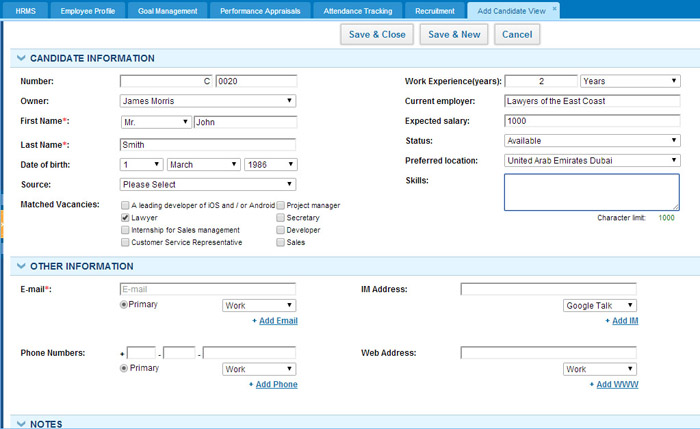
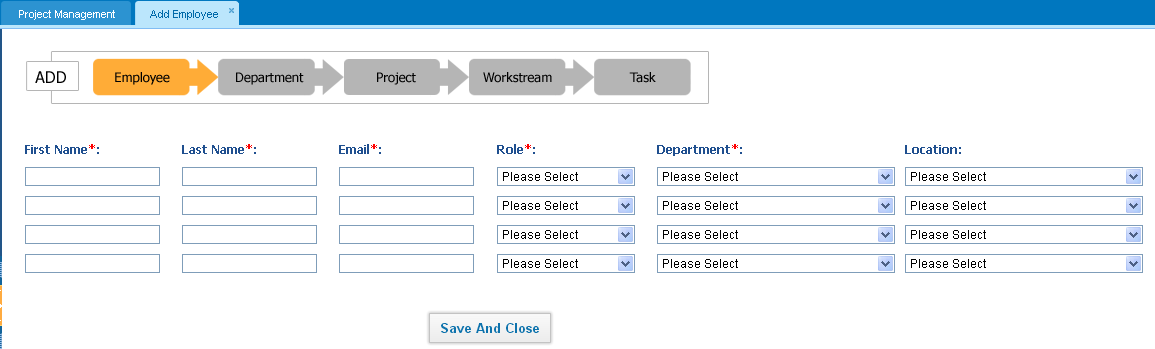
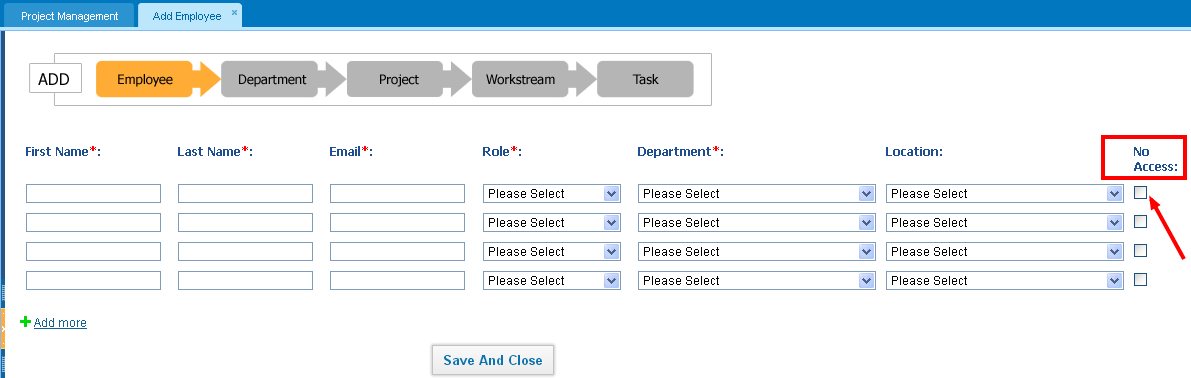
 Fill in the following fields (fields with red asterisk are compulsory):
Number–Unique number, assigned to this candidate (you can leave default one, or edit it)
Owner–Employee, responsible for contacting this candidate
First name – First name of the candidate
Last name – Last name of the candidate
Date of birth – Date of birth of the candidate
Source – Choose the way this candidate was found
Matched Vacancies – tick vacancies, for which this candidate might be suitable
Work experience (years)–amount of previous work experience(can be specified in months or years)
Current employer – Current employer of the candidate
Expected salary – Salary, which this candidate is expecting to have
Status – Current status of this candidate
Preferred location – Choose location, where this candidate would prefer to work
Skills – List of skills that this candidate possesses
E-mail – One or more e-mail addresses of the candidate
Phone Numbers–One or more phone numbers of the candidate
IM Address – One or more Instant Messenger addresses of the candidate
Web Address – One or more web addresses of this candidate
You can fill in candidate’s address information, add some extra notes or attachments. Also, candidate can be linked to Project, Contact, Lead, Opportunity etc.
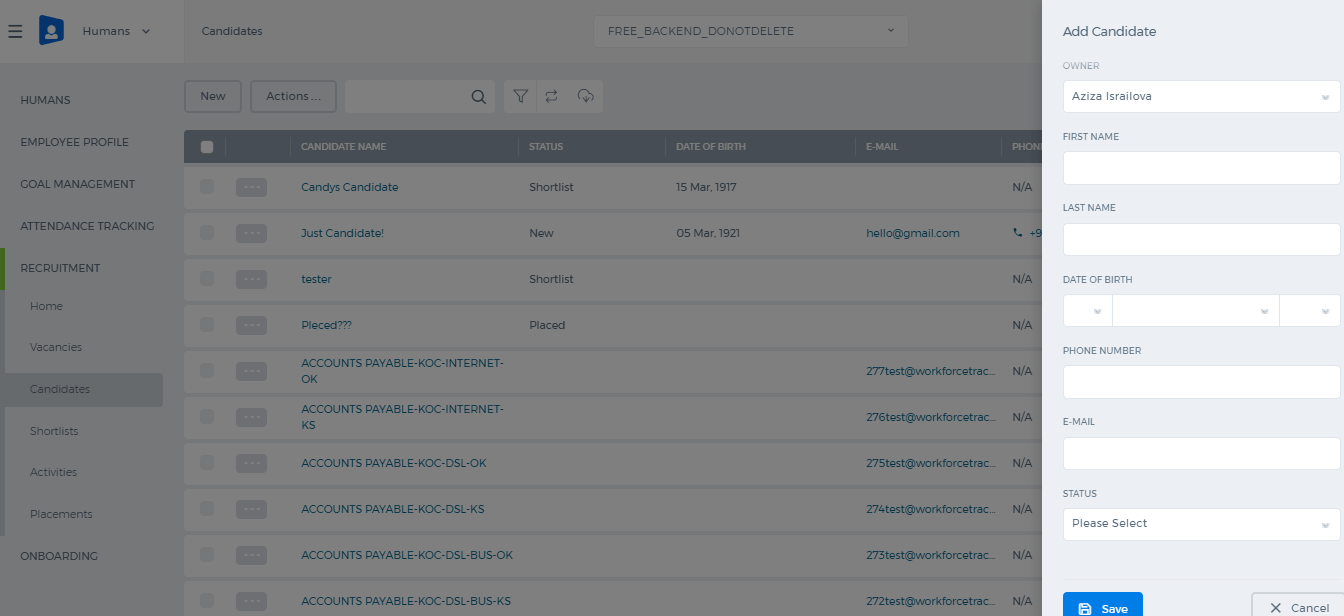
Candidates Listing
In order to perform different manipulation on candidates from this listing, you need to click on the Action menu.
Fill in the following fields (fields with red asterisk are compulsory):
Number–Unique number, assigned to this candidate (you can leave default one, or edit it)
Owner–Employee, responsible for contacting this candidate
First name – First name of the candidate
Last name – Last name of the candidate
Date of birth – Date of birth of the candidate
Source – Choose the way this candidate was found
Matched Vacancies – tick vacancies, for which this candidate might be suitable
Work experience (years)–amount of previous work experience(can be specified in months or years)
Current employer – Current employer of the candidate
Expected salary – Salary, which this candidate is expecting to have
Status – Current status of this candidate
Preferred location – Choose location, where this candidate would prefer to work
Skills – List of skills that this candidate possesses
E-mail – One or more e-mail addresses of the candidate
Phone Numbers–One or more phone numbers of the candidate
IM Address – One or more Instant Messenger addresses of the candidate
Web Address – One or more web addresses of this candidate
You can fill in candidate’s address information, add some extra notes or attachments. Also, candidate can be linked to Project, Contact, Lead, Opportunity etc.
Candidates Listing
In order to perform different manipulation on candidates from this listing, you need to click on the Action menu.
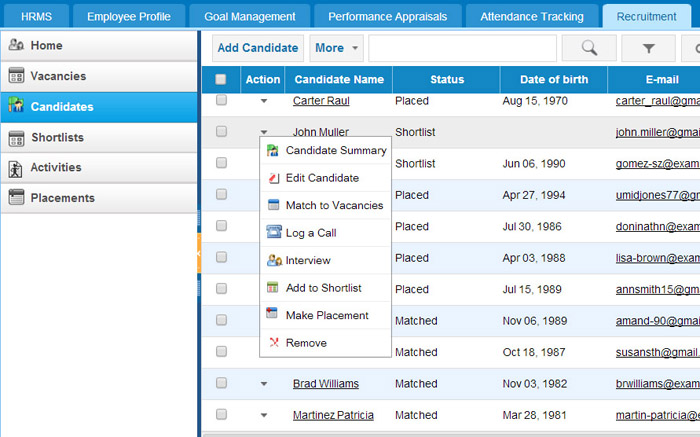
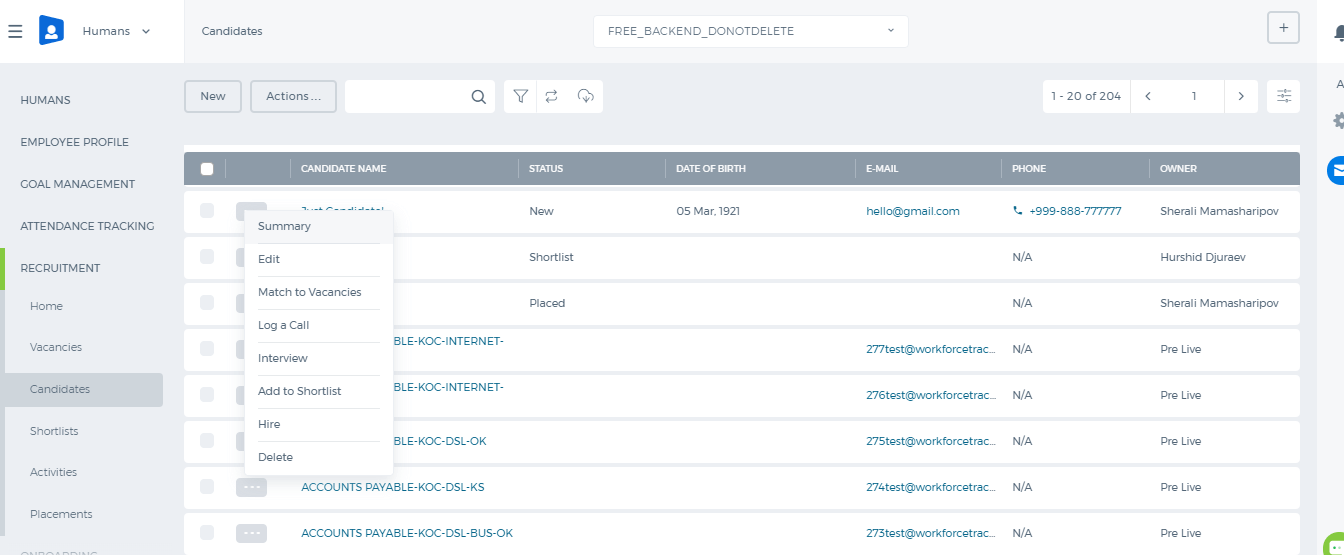 You can Match this candidate to active vacancies, log an Event (Call or Interview) for him/her or add him/her to Shortlist.
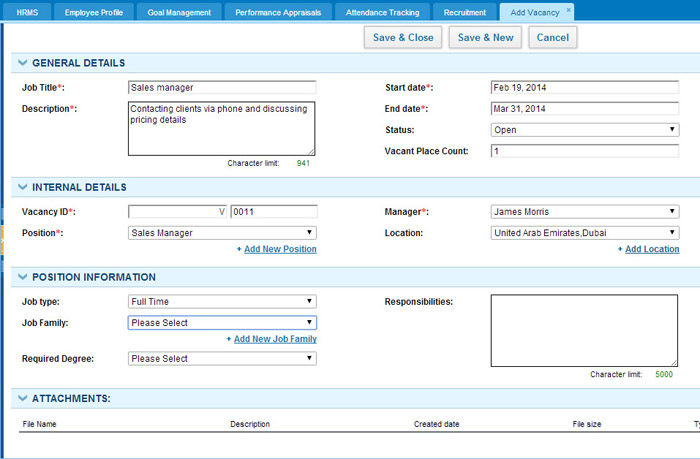
 Fill in the following fields (fields with red asterisk are compulsory):
Job Title–Vacancy name.
Description–Short description of this vacancy.
Start Date–Vacancy creation date.
End Date–Vacancy end date.
Status–Current status of this vacancy.
Vacant Place Count–the number of places available.
Vacancy ID–Unique number assigned to this vacancy (you can leave default one, or edit it).
Position – Select appropriate position from the drop-down list or create a new one.
Manager–Employee, responsible for managing candidates for this vacancy.
Location–Choose location, where this vacancy is located (or add a new location).
Job type–Part-time or full-time.
Job family–Choose job family from the list (or add a new job family).
Required Degree– Minimumeducational degree required to be qualified for this job.
Responsibilities–Short description of responsibilities, which this job will include.
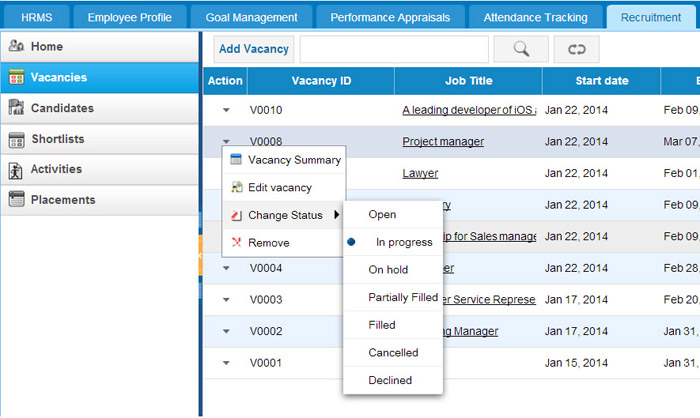
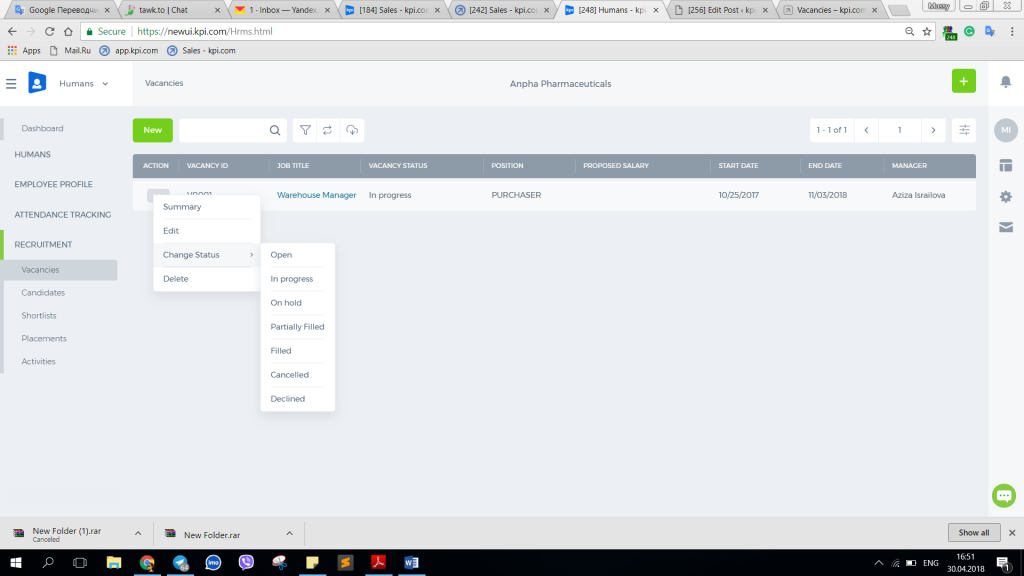
Change Vacancy Status
In order to change vacancy status, you can Edit this vacancy or change it directly from Vacancies listing
Fill in the following fields (fields with red asterisk are compulsory):
Job Title–Vacancy name.
Description–Short description of this vacancy.
Start Date–Vacancy creation date.
End Date–Vacancy end date.
Status–Current status of this vacancy.
Vacant Place Count–the number of places available.
Vacancy ID–Unique number assigned to this vacancy (you can leave default one, or edit it).
Position – Select appropriate position from the drop-down list or create a new one.
Manager–Employee, responsible for managing candidates for this vacancy.
Location–Choose location, where this vacancy is located (or add a new location).
Job type–Part-time or full-time.
Job family–Choose job family from the list (or add a new job family).
Required Degree– Minimumeducational degree required to be qualified for this job.
Responsibilities–Short description of responsibilities, which this job will include.
Change Vacancy Status
In order to change vacancy status, you can Edit this vacancy or change it directly from Vacancies listing
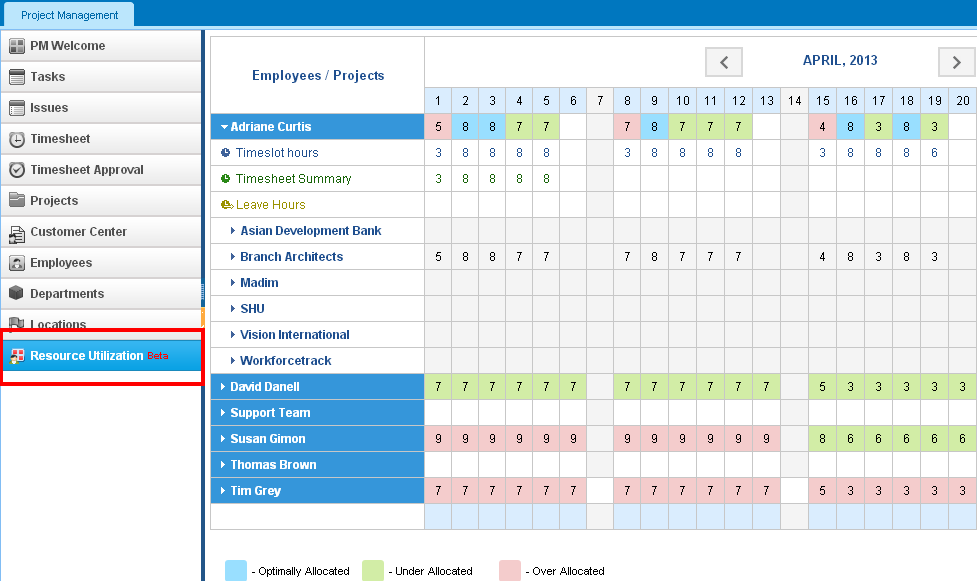
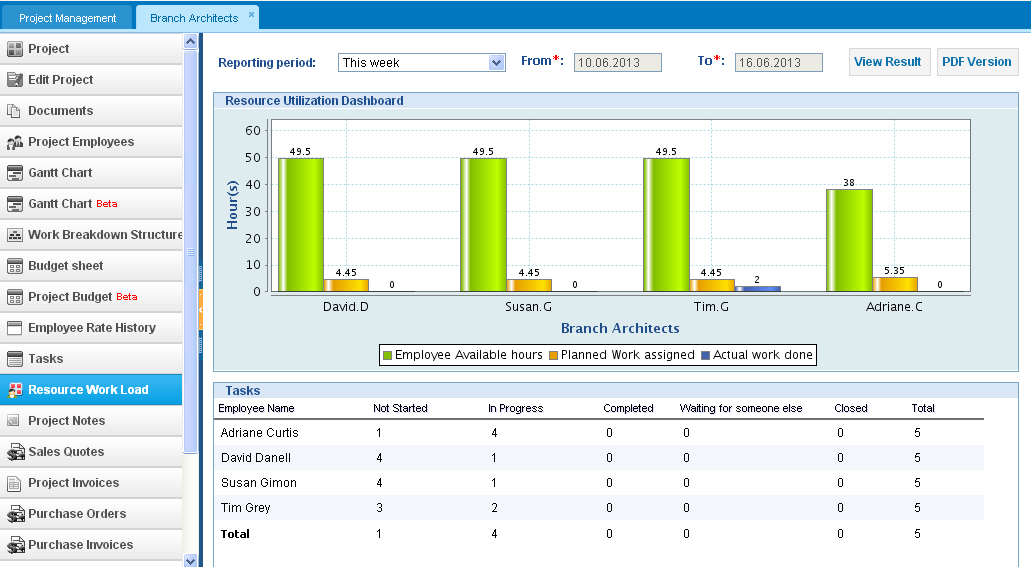
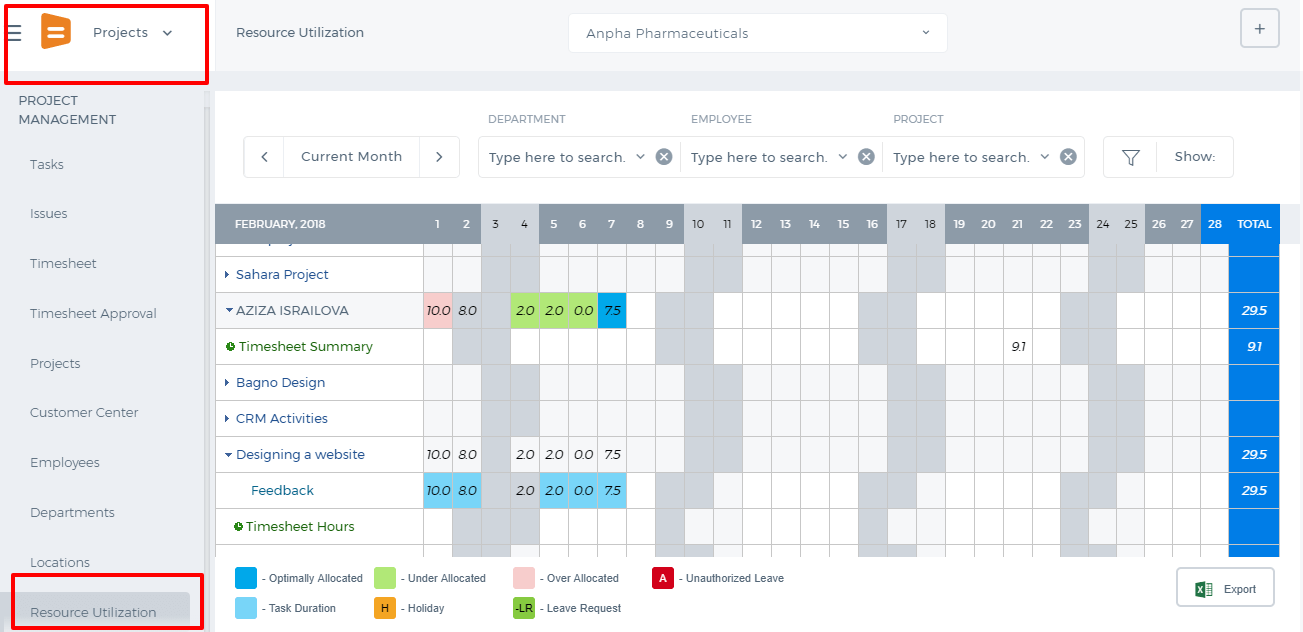 As indicated in the bottom of the Resource Utilization page:
Optimally Allocated - shows the same amount of time allocated as in the timeslot hours set for the employee
Over Allocated - shows more time allocated for tasks than in the timeslot
Under Allocated - shows less time allocated for tasks than in the timeslot
Task Duration - shows when task starts and ends
Holiday - shows holidays where you cannot enter time
To compare the timeslot hours to the estimated time allocated, tick the Timeslot Hours box on top of the page.
To compare timesheet hours to the estimated time allocated, tick the Timesheet Hours box on top of the page.
You can also filter by department or employee from the dropdowns located on top of the page.
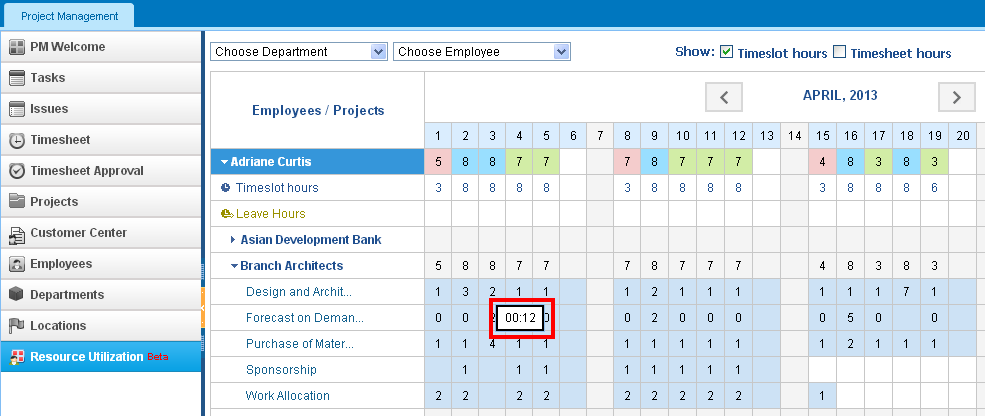
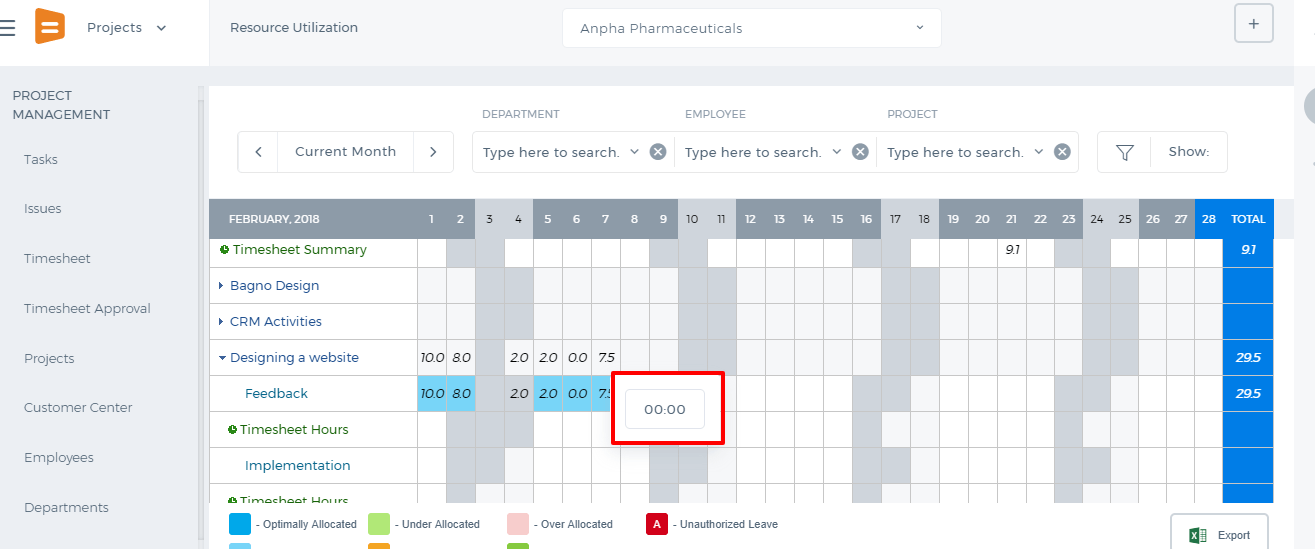
Edit Esimated Time
To edit estimated time for employees, go to Resource Utilization section from the Project Management Module.
Click on the dropdown next to an employee name which will populate all projects ongoing in the current month. Next, click on the project dropdown which will populate tasks. The tasks row shows estimated time allocated for each day. You can change the estimated time by double clicking on the cell.
As indicated in the bottom of the Resource Utilization page:
Optimally Allocated - shows the same amount of time allocated as in the timeslot hours set for the employee
Over Allocated - shows more time allocated for tasks than in the timeslot
Under Allocated - shows less time allocated for tasks than in the timeslot
Task Duration - shows when task starts and ends
Holiday - shows holidays where you cannot enter time
To compare the timeslot hours to the estimated time allocated, tick the Timeslot Hours box on top of the page.
To compare timesheet hours to the estimated time allocated, tick the Timesheet Hours box on top of the page.
You can also filter by department or employee from the dropdowns located on top of the page.
Edit Esimated Time
To edit estimated time for employees, go to Resource Utilization section from the Project Management Module.
Click on the dropdown next to an employee name which will populate all projects ongoing in the current month. Next, click on the project dropdown which will populate tasks. The tasks row shows estimated time allocated for each day. You can change the estimated time by double clicking on the cell.
 Resource Workload
 subsection under Project Summary page is available when Resource Utilization is active in your account. If this feature is not active, the Resource Workload chart will not be available under the Project Summary.
Resource Workload
Resource Workload subsection under Project Summary page is available when Resource Utilization is active in your account. If this feature is not active, the Resource Workload chart will not be available under the Project Summary.
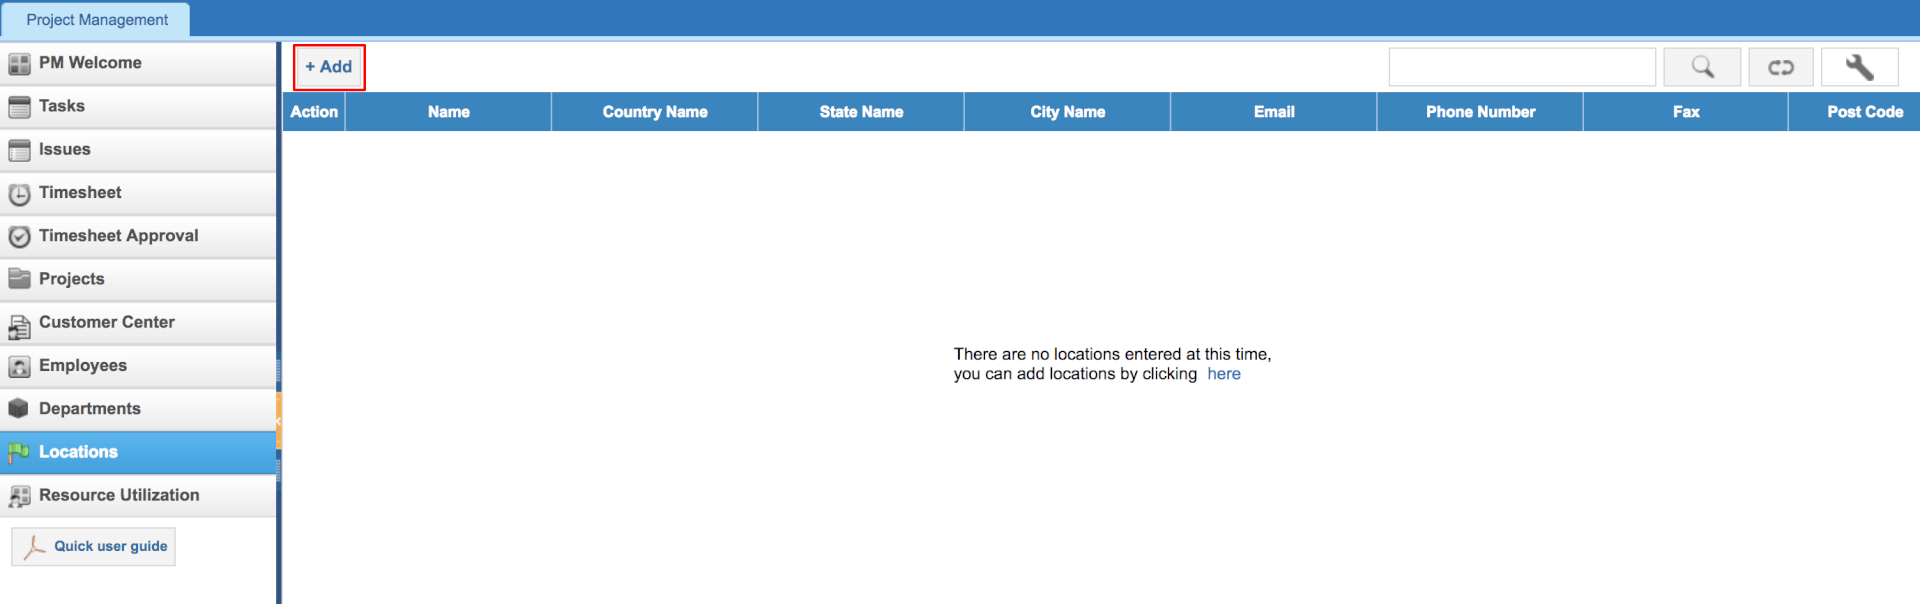
 Edit a Location
You will find Edit Location function from the Action dropdown in Locations list. You need to implement changes and click Update.
Edit a Location
You will find Edit Location function from the Action dropdown in Locations list. You need to implement changes and click Update.
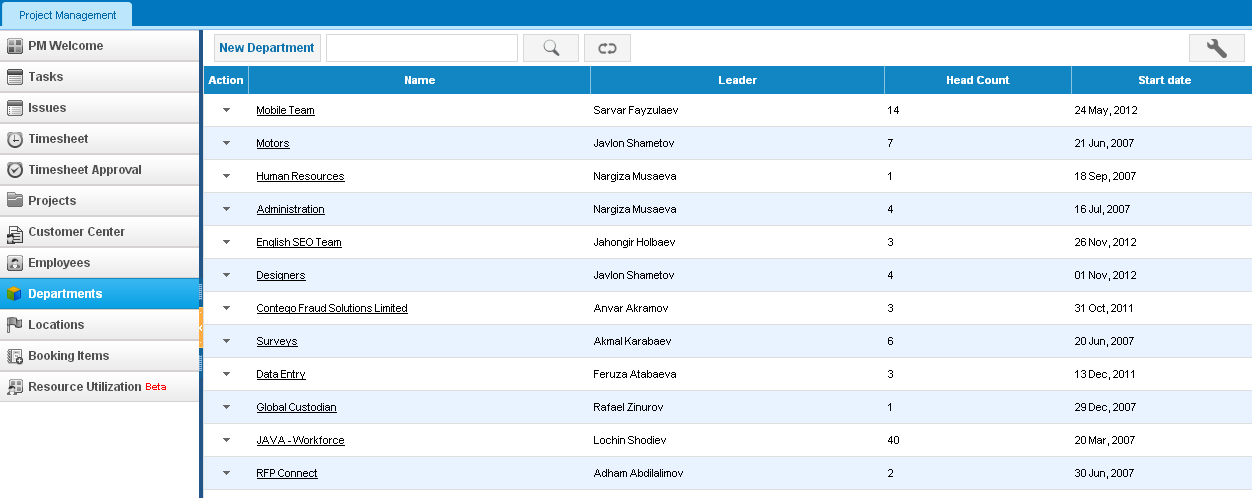
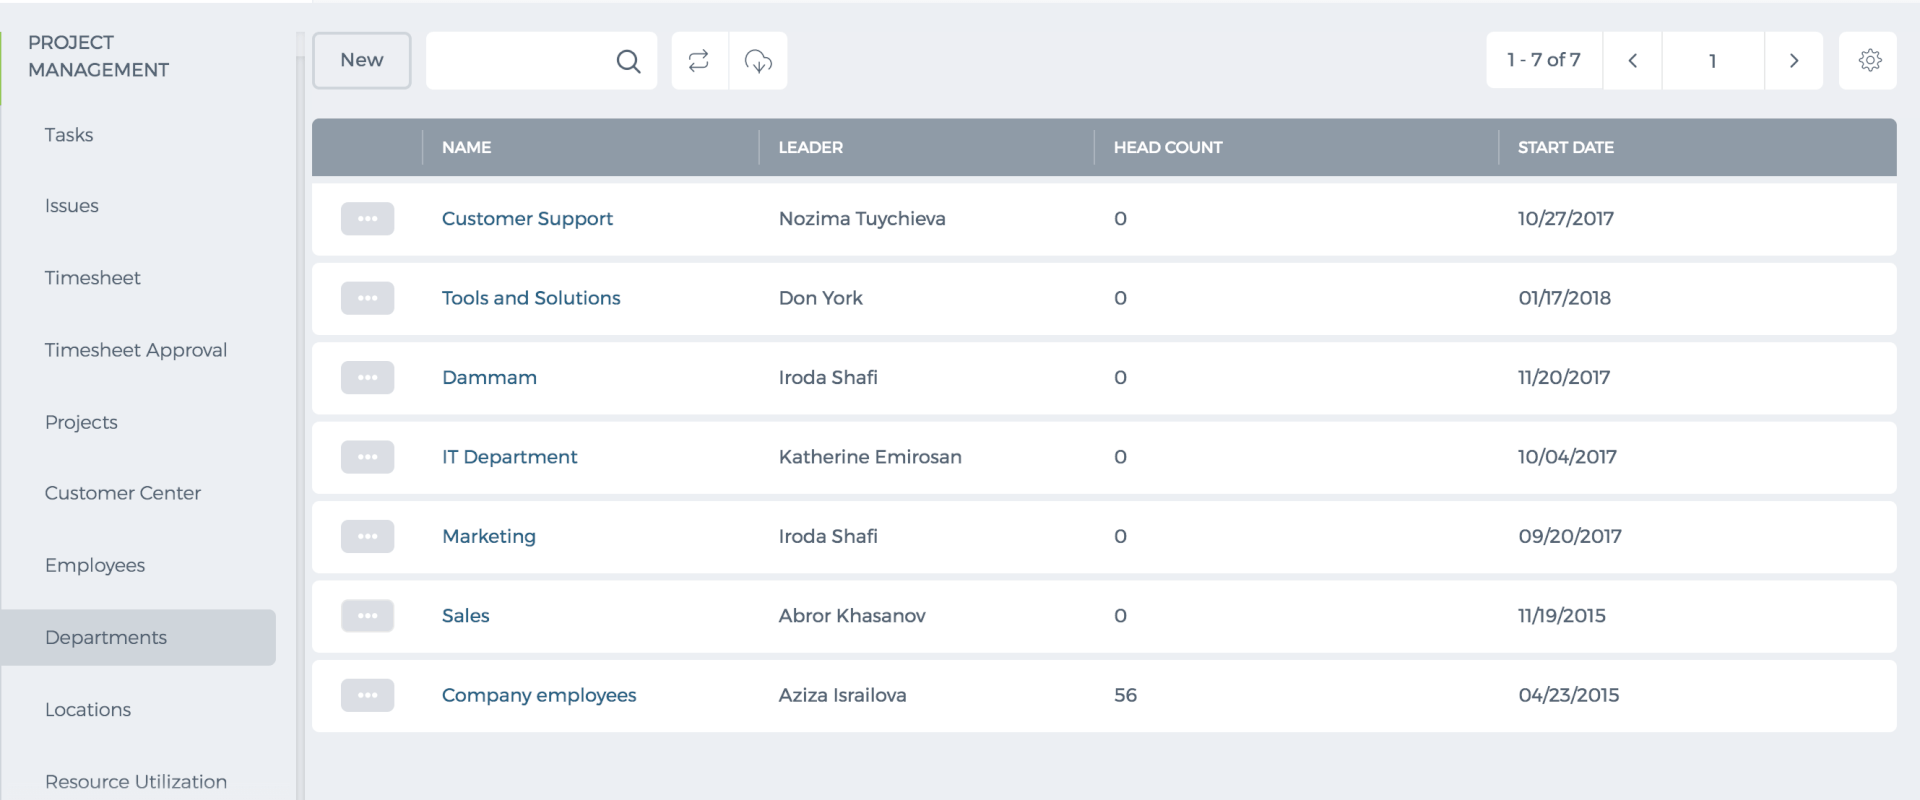 New Department
To create a new Department, go to either Project Management or HRMS module and then go to Department section. Click on Add New button and fill in the form. You need to assign members and a department leader to a new department.
New Department
To create a new Department, go to either Project Management or HRMS module and then go to Department section. Click on Add New button and fill in the form. You need to assign members and a department leader to a new department.

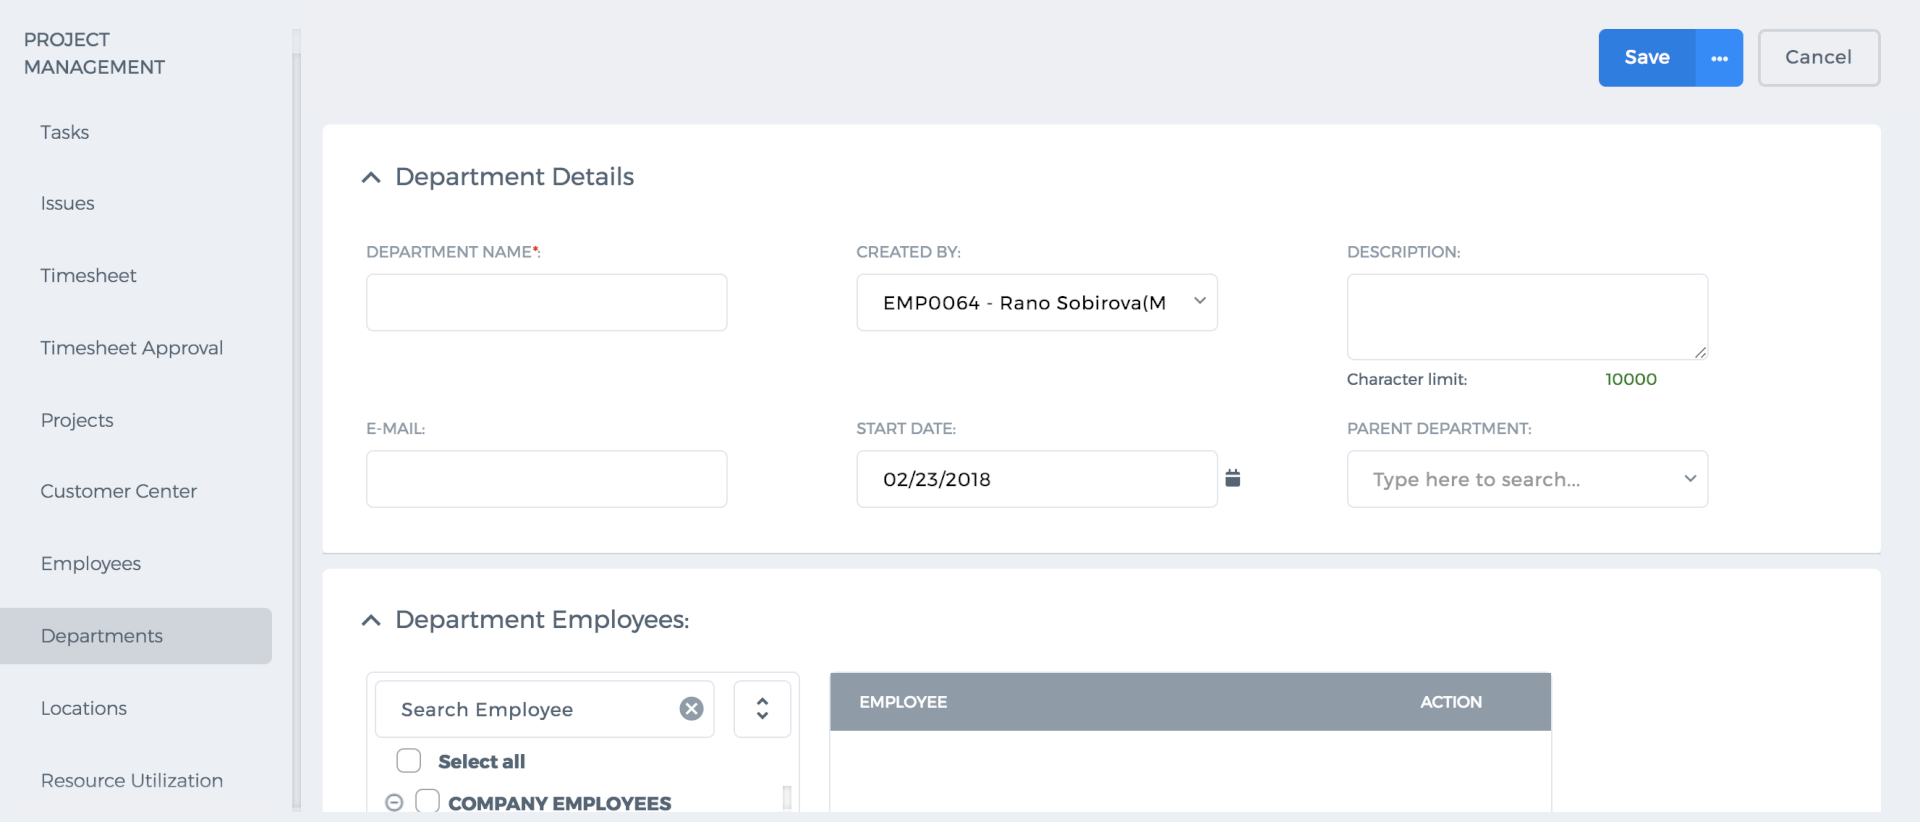 A department leader will be able to approve leave requests, expense claims of department members.
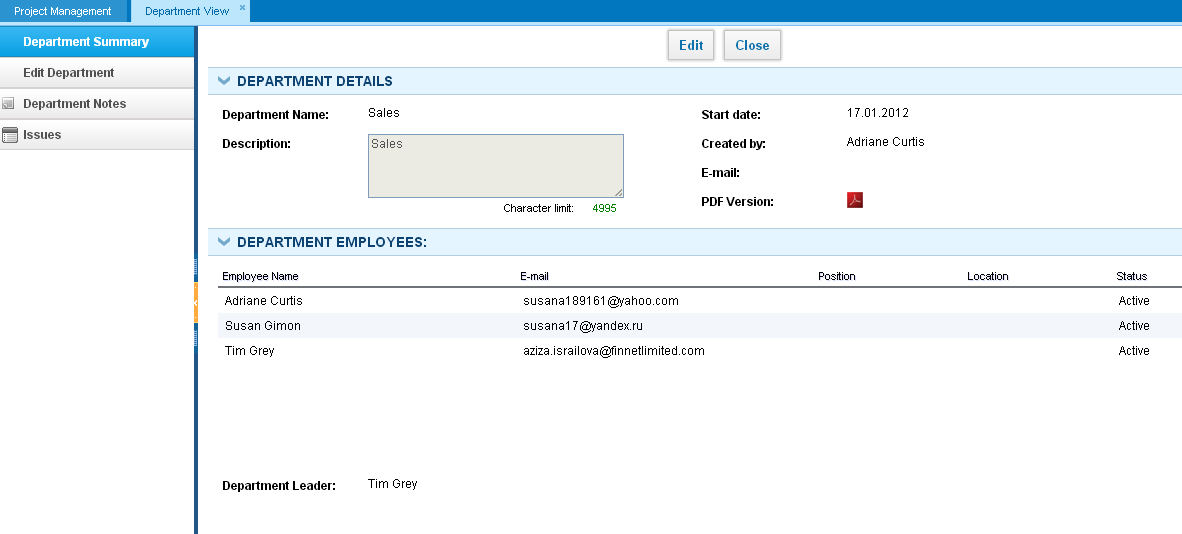
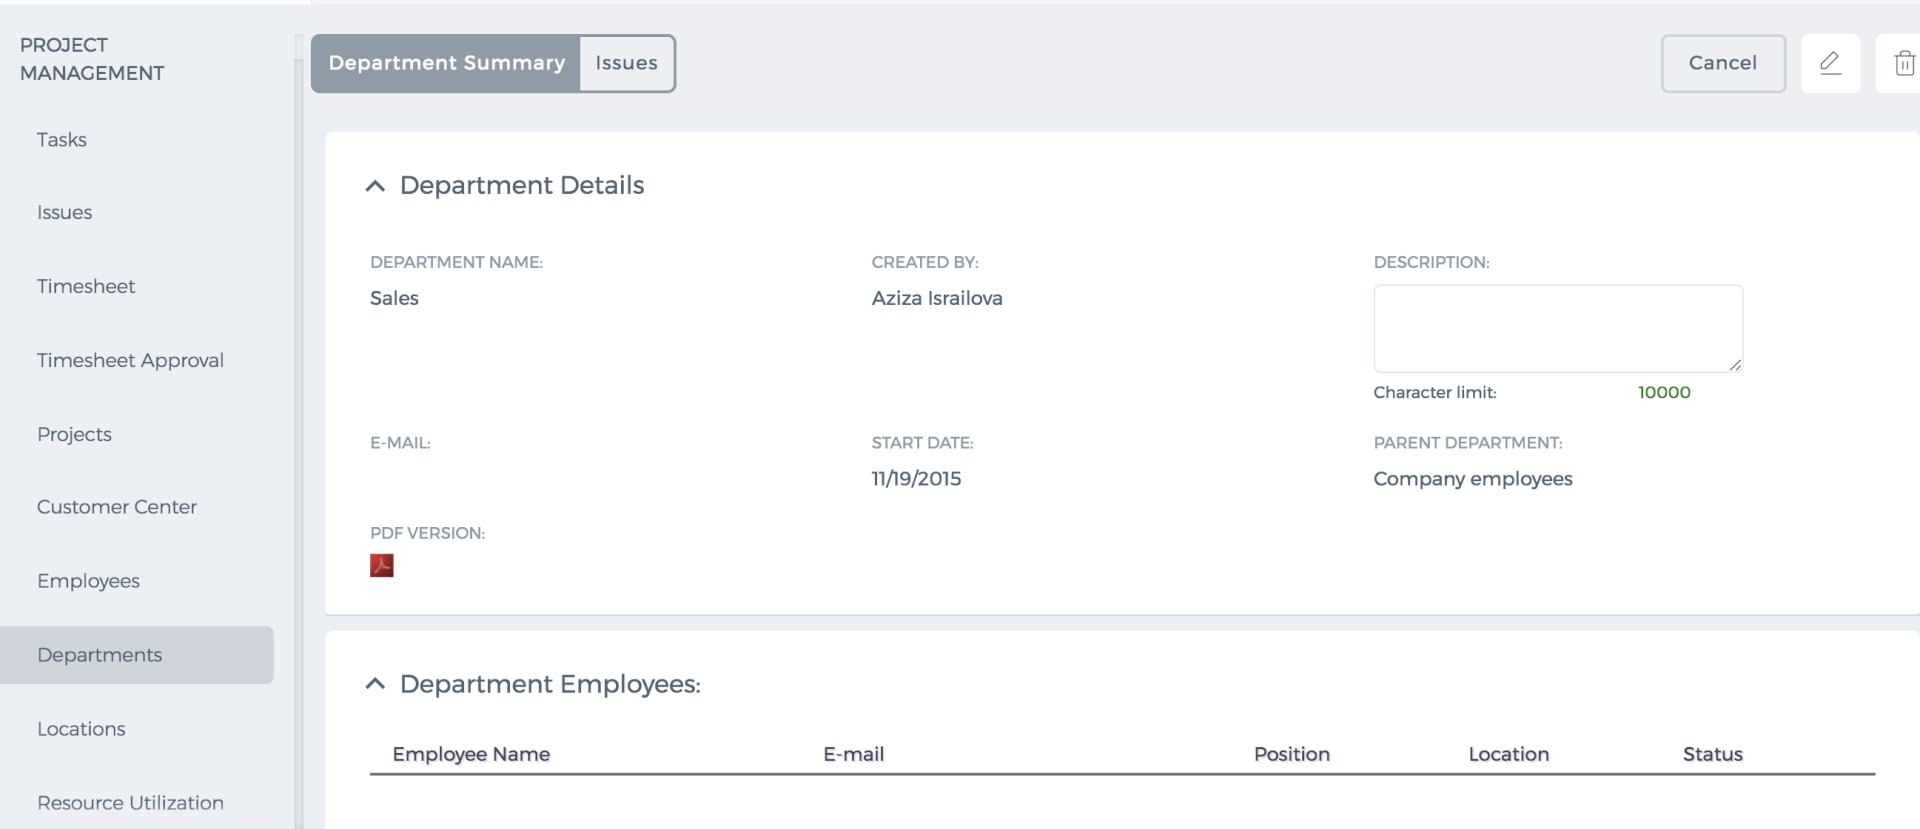
Department Summary
This page shows the details of the department such as when it was created, by whom it was created, members of the department and the leader of the department. You can also convert the department summary to a PDF version by click on the PDF icon.
A department leader will be able to approve leave requests, expense claims of department members.
Department Summary
This page shows the details of the department such as when it was created, by whom it was created, members of the department and the leader of the department. You can also convert the department summary to a PDF version by click on the PDF icon.
 Edit Department
To edit a department, please click on the Actions dropdown in the Department's list and make changes to the department such as changing the department leader, changing the name, description or the start date.
Edit Department
To edit a department, please click on the Actions dropdown in the Department's list and make changes to the department such as changing the department leader, changing the name, description or the start date.
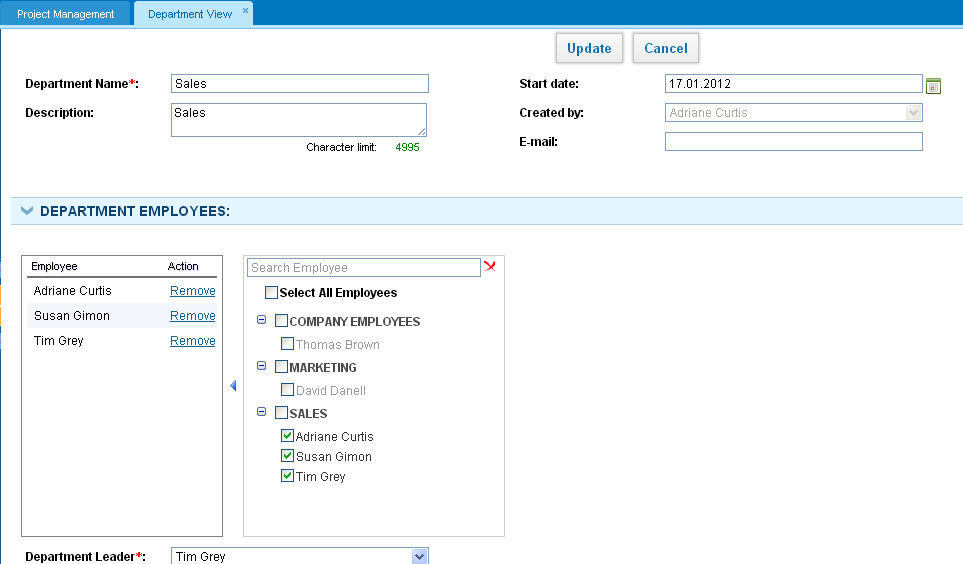
 Also, you can remove some of the employees from the department either by unchecking the checkbox or by clicking the remove action. By default, when you remove employees from a department, they are moved to Company Employees department. Note that one employee cannot be a member of two or more departments.
When an employee is moved to another department, the further timesheet entries will be reflected in a new department’s timesheet report. Older timesheet entries will be reflected in old department’s timesheet report.
Department Notes
You can leave some notes to the department you belong to. To do that, please go to Departments section, click on actions dropdown and choose Department Notes. You can make the notes public or private and save.
Delete Department
To delete a department, please go to Departments section and click on the actions dropdown and “Remove”. Once you approve removing an existing department, you will be asked to movedepartment members to another department.
Department Issues
In this section, you can add and keep track of issues related to the department. To create a new issue in the system, click on New Issue button and fill in the form. All members of the department are able to create issues and view existing ones by default.
Also, you can remove some of the employees from the department either by unchecking the checkbox or by clicking the remove action. By default, when you remove employees from a department, they are moved to Company Employees department. Note that one employee cannot be a member of two or more departments.
When an employee is moved to another department, the further timesheet entries will be reflected in a new department’s timesheet report. Older timesheet entries will be reflected in old department’s timesheet report.
Department Notes
You can leave some notes to the department you belong to. To do that, please go to Departments section, click on actions dropdown and choose Department Notes. You can make the notes public or private and save.
Delete Department
To delete a department, please go to Departments section and click on the actions dropdown and “Remove”. Once you approve removing an existing department, you will be asked to movedepartment members to another department.
Department Issues
In this section, you can add and keep track of issues related to the department. To create a new issue in the system, click on New Issue button and fill in the form. All members of the department are able to create issues and view existing ones by default.
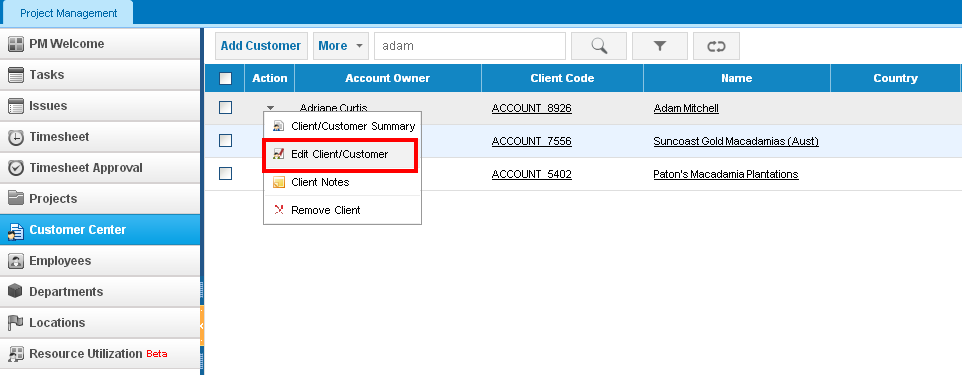
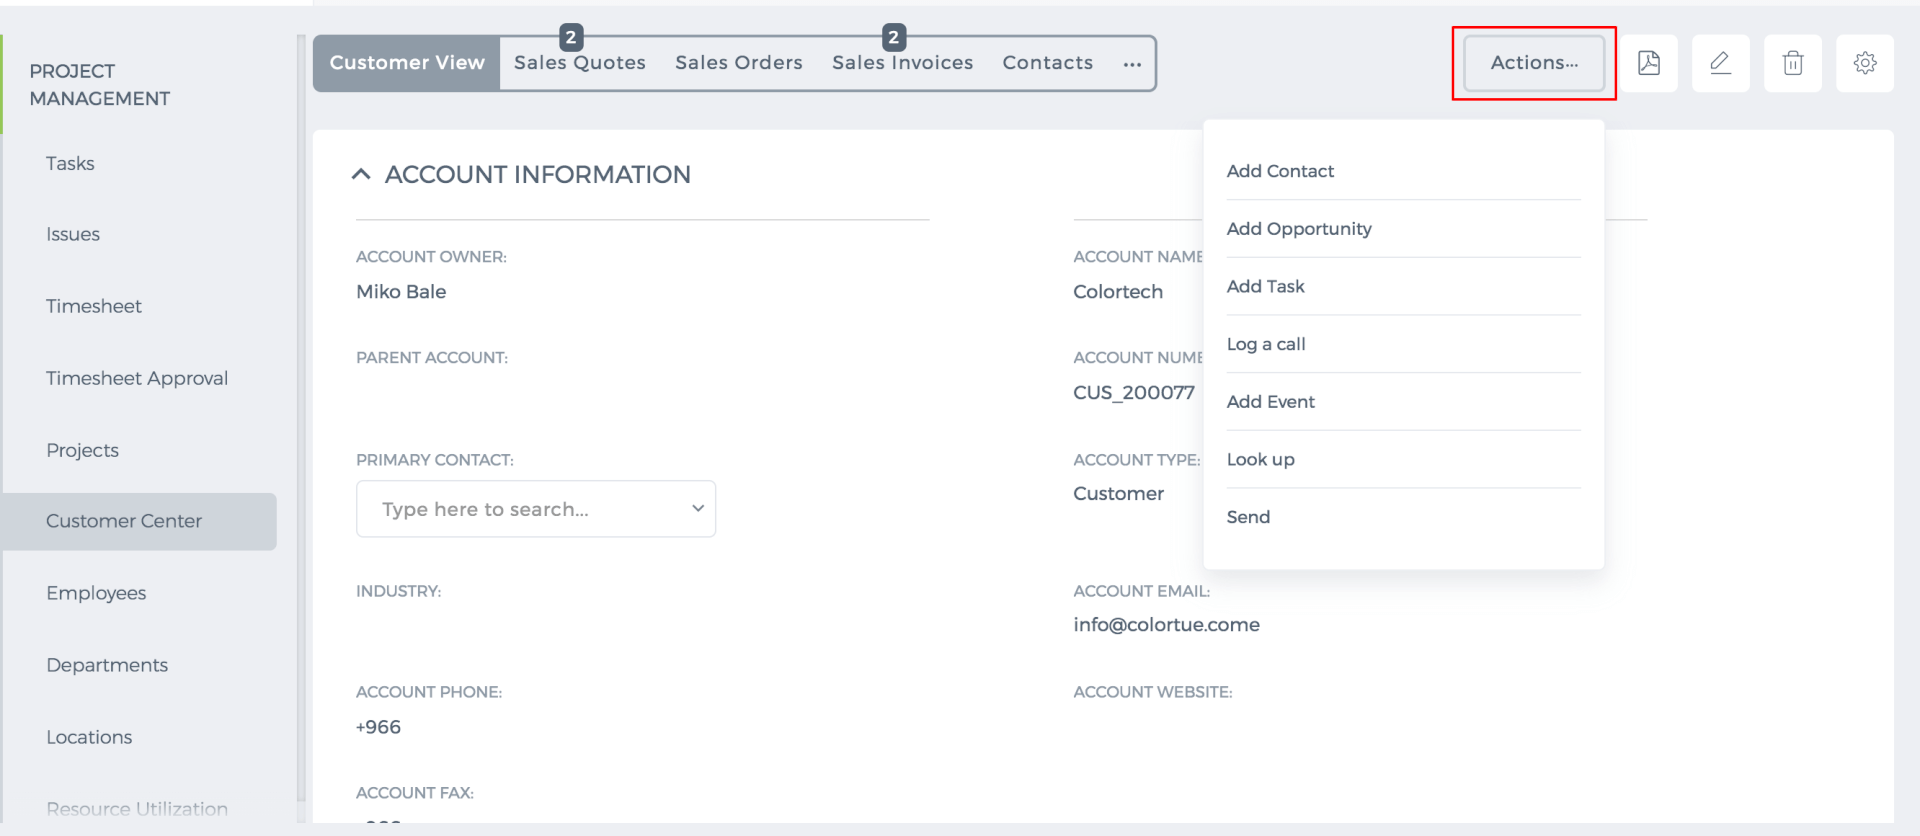
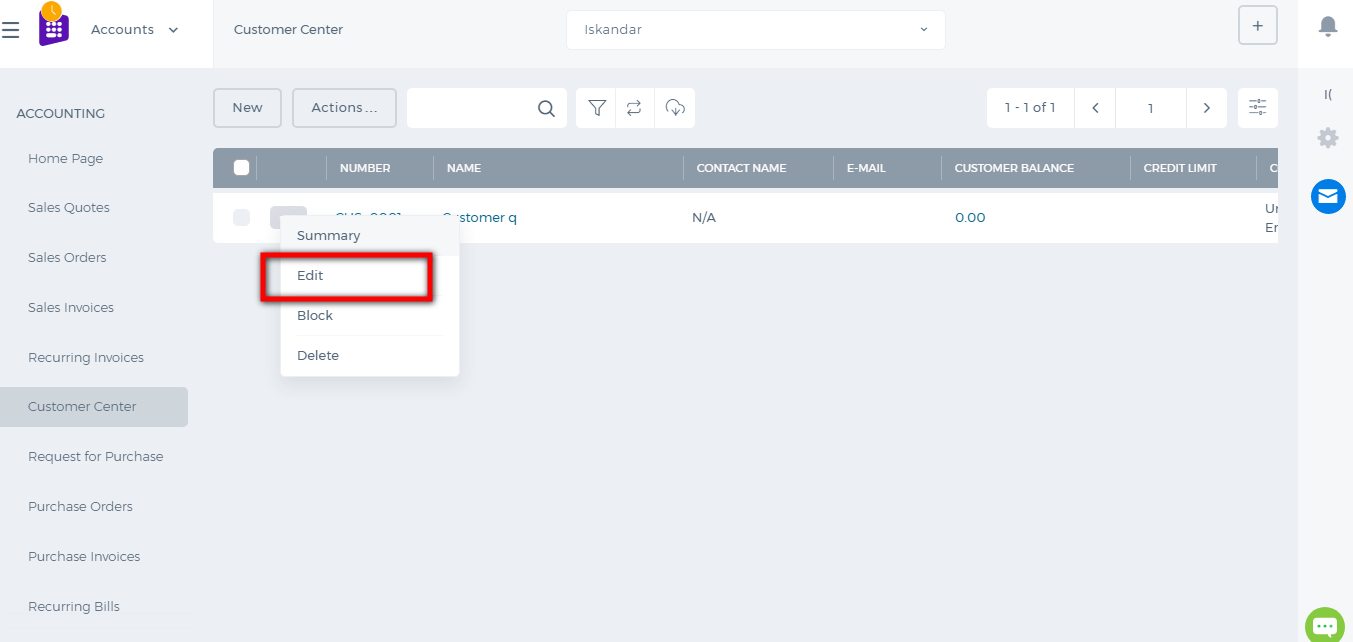 You can also edit the Customer details from the Customer Summary page. Just click on the edit icon shown below:
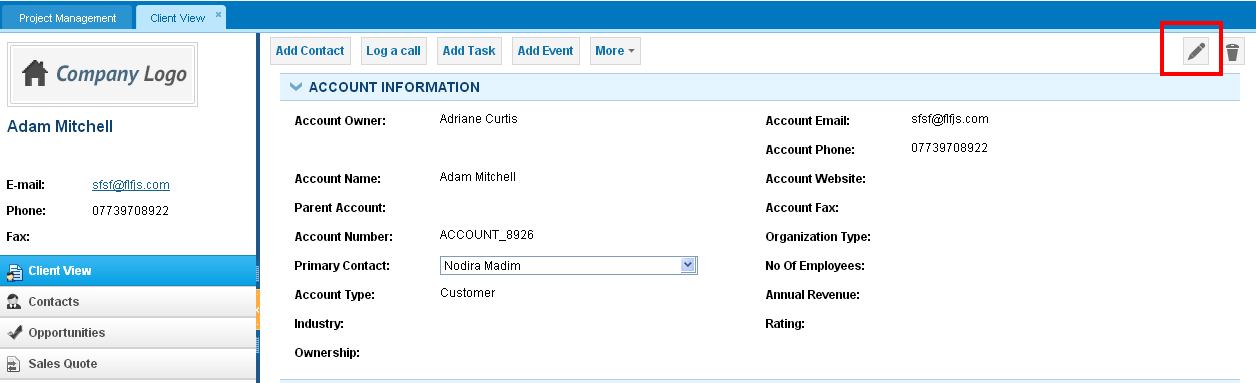
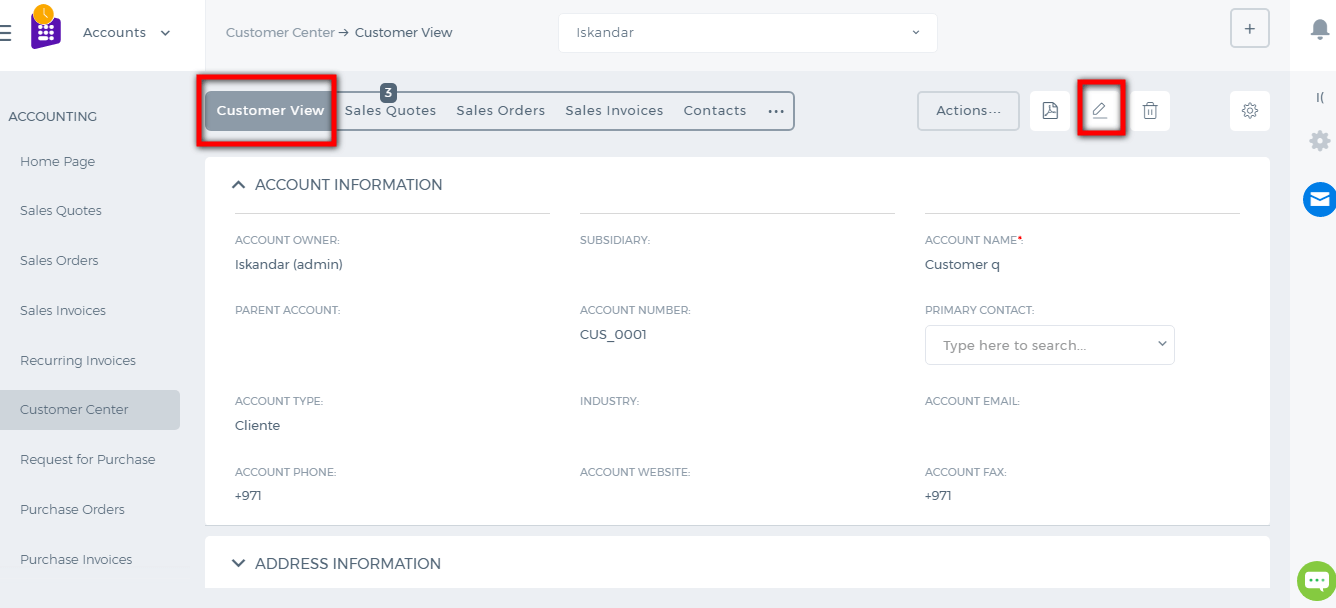 Once you update the Customer profile, the changes will be saved in all sections for the Customer.
 Once you have successfully added the customer, you can relate the customer to Sales Quotes, Sales Invoices, Sales Orders, Projects, Opportunities, and others.
All the related items will be visible in the Customer Summary subsections
Once you have successfully added the customer, you can relate the customer to Sales Quotes, Sales Invoices, Sales Orders, Projects, Opportunities, and others.
All the related items will be visible in the Customer Summary subsections
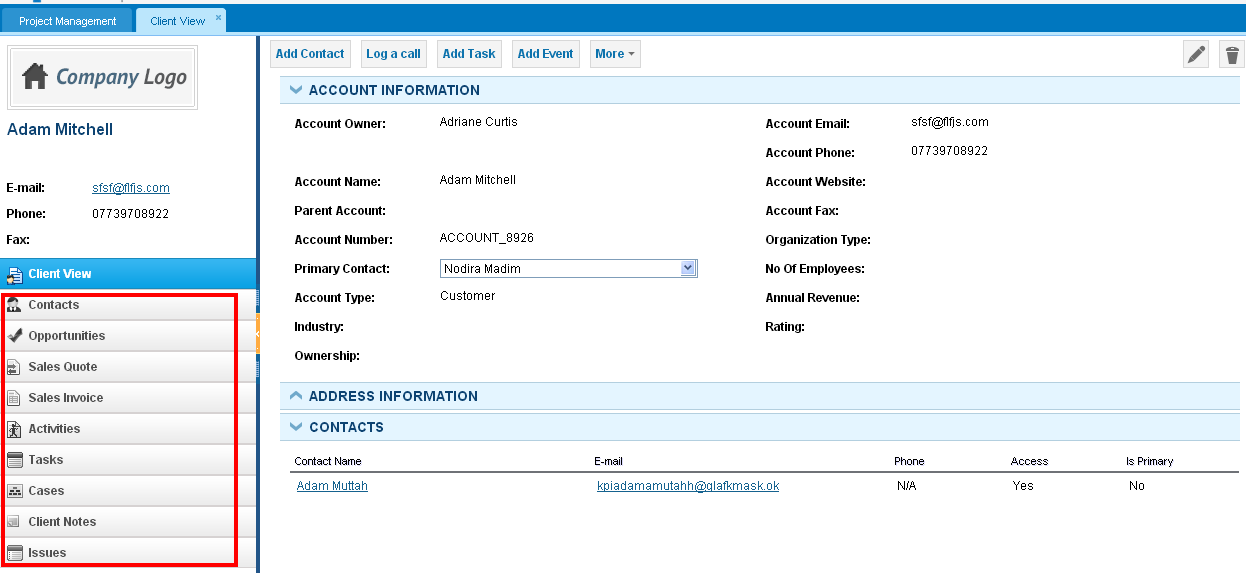
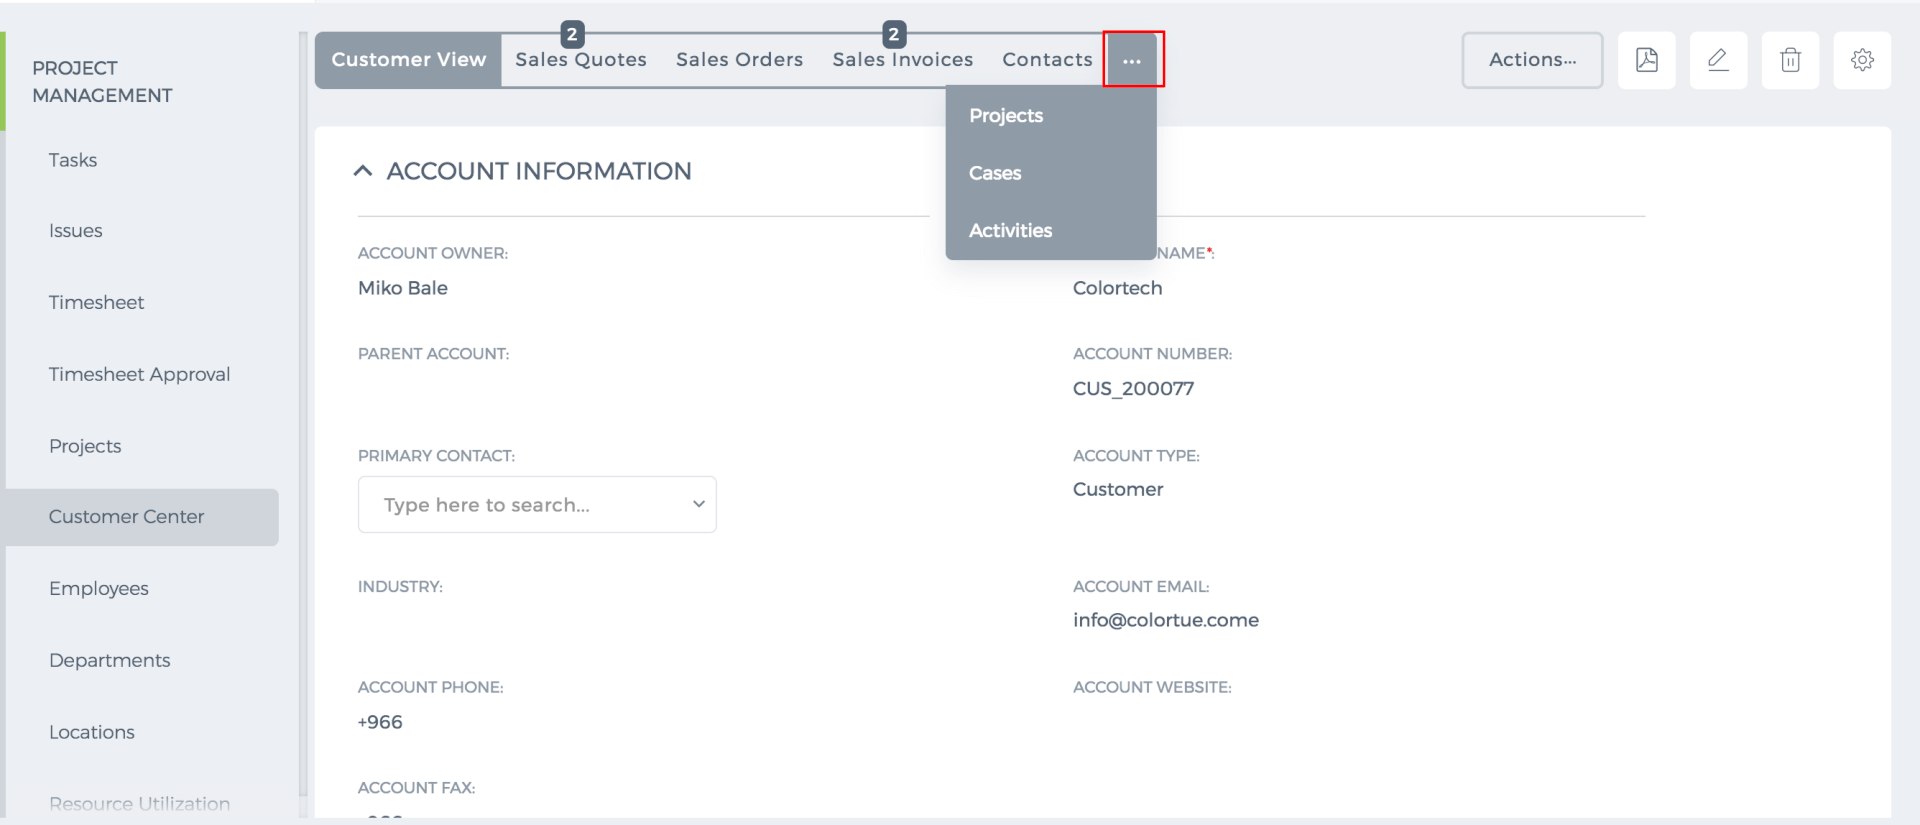
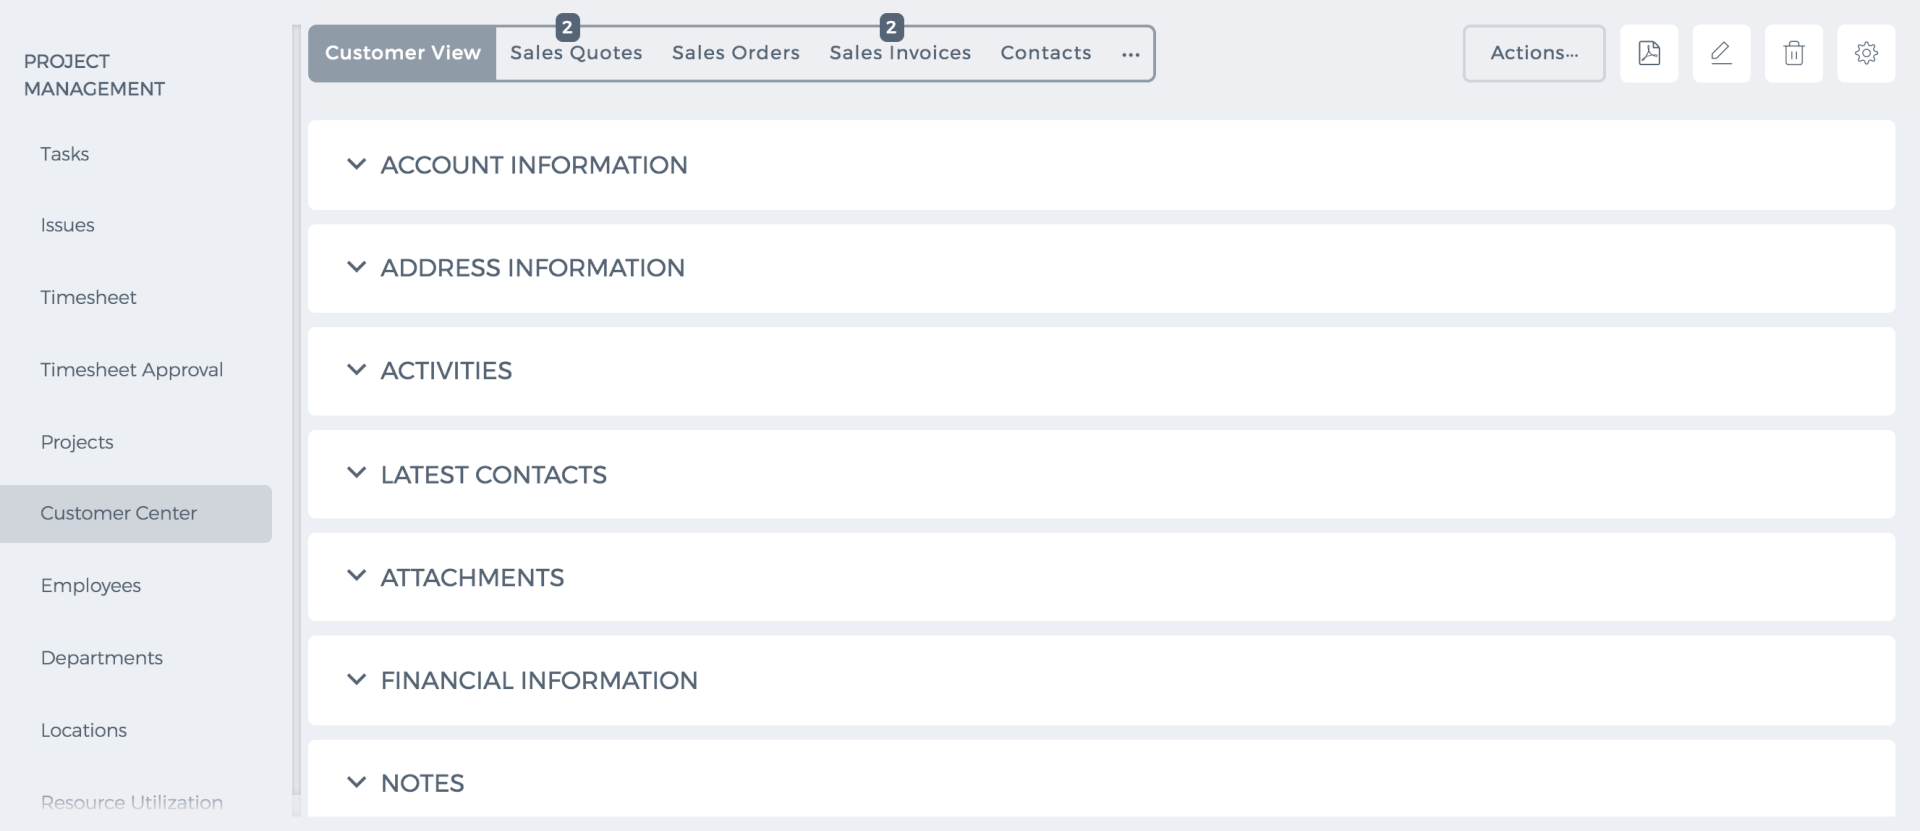 In new User Interface, you have the opportunity to link projects, cases, and activities by clicking the additional "..." button
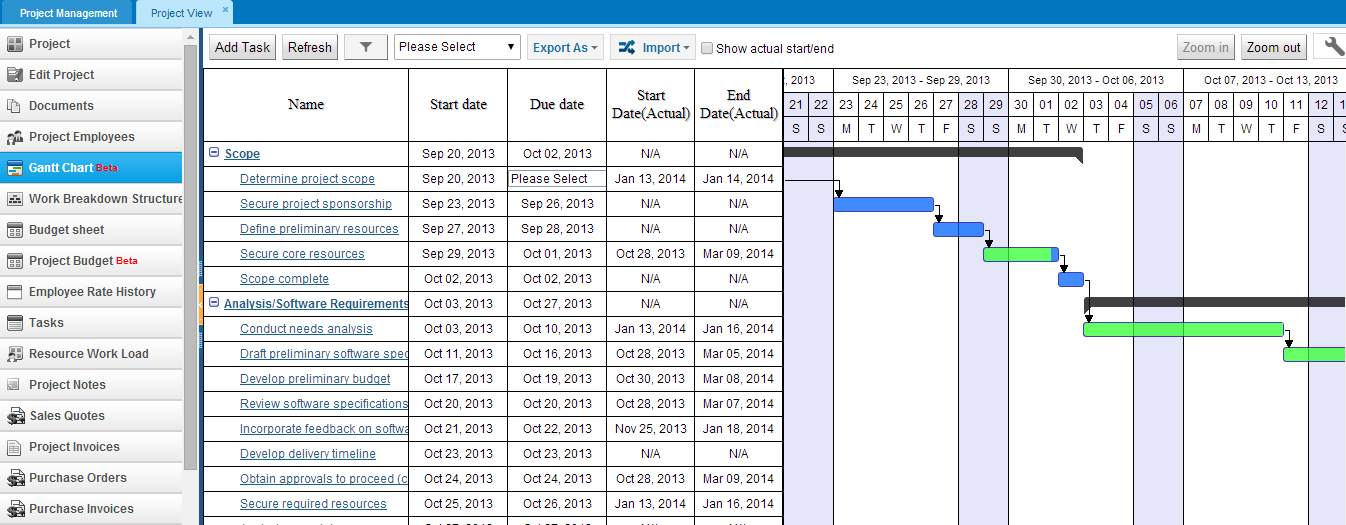
 -filter the tasks by changing start and end date. After you have indicate start and end date, filter automatically changes moves back to the beginning of the week (Monday) and ending date will be automatically changed to the end of the week (Sunday).
In the next box after filter box you can select an employee to filter the Gantt Chart.
Export as –you can export your Gantt on excel
Note: Exported excel sheet will be the same as the current view of the Gantt Chart on the browser.
Import –import your projects to the system on MS project file, system will not upload projects in other formats.
Show actual start/end –tick the checkbox to see the actual start and end date of the tasks.
Zoom in/out – with this button you will be able to zoom in/out the second part of the Gantt chart where you will be able to see the daily, weekly and monthly tasks of the project.
Customize Panel- in this panel you can add columns to be seen on the Gantt chart or vice versa hide on the Gantt chart.
Moreover, in the Gantt chart with the quick cell edit option you can change information about dates, priority, estimated time and specify whether it is billable or not. In the second part also you can change the period of the tasks by moving the box of the task, also you can see how the tasks are interrelated with the specific color and what other colors mean:
Black color stands on the top of the tasks which means that this task is the Workstream of other tasks. By dragging this box you can change the start and end date time of the worksteam.
Blue color means incompleteness and the size of the box indicates start and end date of the task. You can change the date of the task by dragging and dropping the task.
Green color, in contrast with the black color means completeness of the task.
Pointers after the task which is linked to other task shows that next task is successor task which should be completed after the current task and the task which is pointing to another task is processor task.
Further, administrator of the company can change permission to Gantt chart and limited roles or role will change the Gantt chart and other will be able to just view the Gantt chart.
-filter the tasks by changing start and end date. After you have indicate start and end date, filter automatically changes moves back to the beginning of the week (Monday) and ending date will be automatically changed to the end of the week (Sunday).
In the next box after filter box you can select an employee to filter the Gantt Chart.
Export as –you can export your Gantt on excel
Note: Exported excel sheet will be the same as the current view of the Gantt Chart on the browser.
Import –import your projects to the system on MS project file, system will not upload projects in other formats.
Show actual start/end –tick the checkbox to see the actual start and end date of the tasks.
Zoom in/out – with this button you will be able to zoom in/out the second part of the Gantt chart where you will be able to see the daily, weekly and monthly tasks of the project.
Customize Panel- in this panel you can add columns to be seen on the Gantt chart or vice versa hide on the Gantt chart.
Moreover, in the Gantt chart with the quick cell edit option you can change information about dates, priority, estimated time and specify whether it is billable or not. In the second part also you can change the period of the tasks by moving the box of the task, also you can see how the tasks are interrelated with the specific color and what other colors mean:
Black color stands on the top of the tasks which means that this task is the Workstream of other tasks. By dragging this box you can change the start and end date time of the worksteam.
Blue color means incompleteness and the size of the box indicates start and end date of the task. You can change the date of the task by dragging and dropping the task.
Green color, in contrast with the black color means completeness of the task.
Pointers after the task which is linked to other task shows that next task is successor task which should be completed after the current task and the task which is pointing to another task is processor task.
Further, administrator of the company can change permission to Gantt chart and limited roles or role will change the Gantt chart and other will be able to just view the Gantt chart.

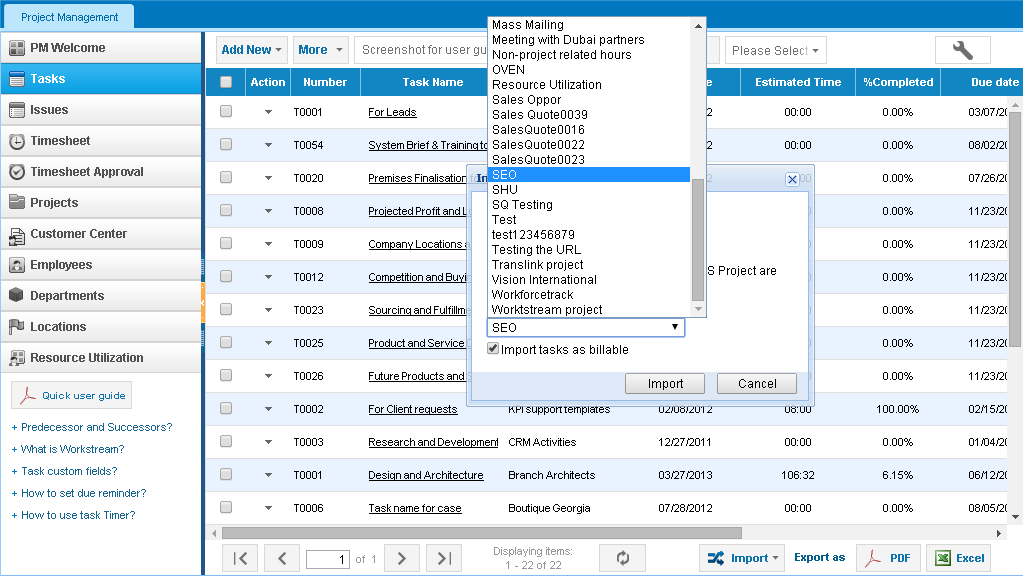
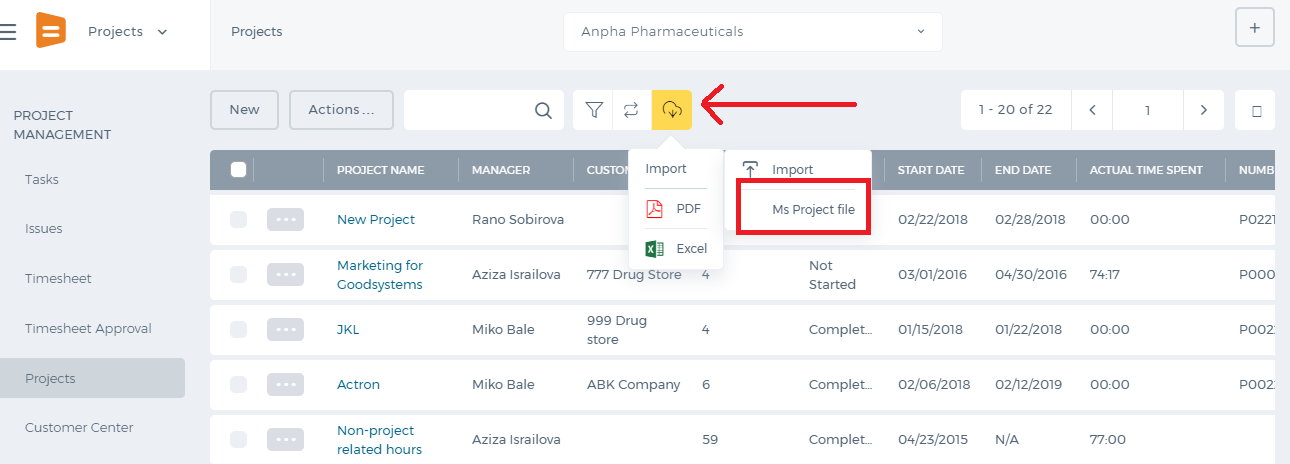 Then, you need to choose a file to import and select to which project you want to import your tasks by Select Filedropdown. Note that only .mpp and .xml files exported from MS Project are allowed to be imported. Also, there is a box called Import tasks as billable,which you need to tick, if you need to invoice your customers based on task worked hours
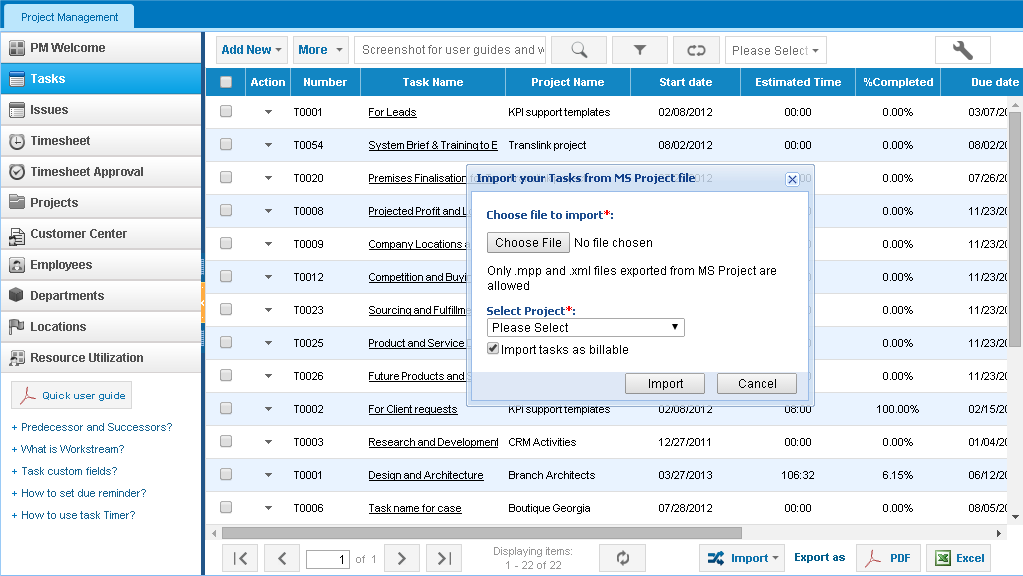
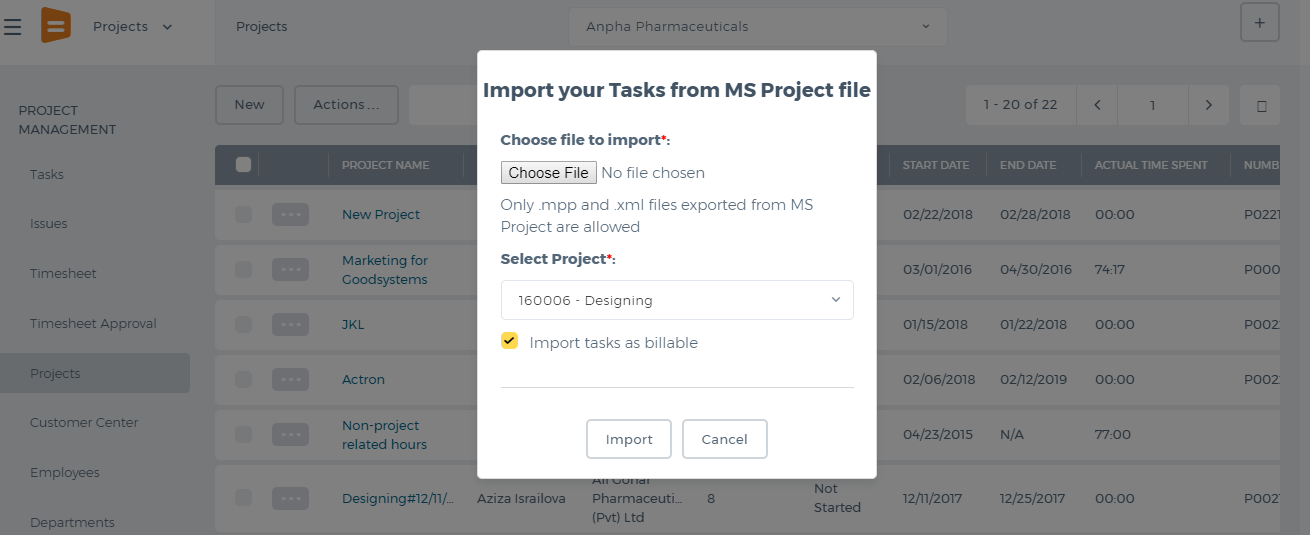 After selecting a project, click on Import and wait until it imports those tasks from MS Project file. The tasks will appear in the Task list.
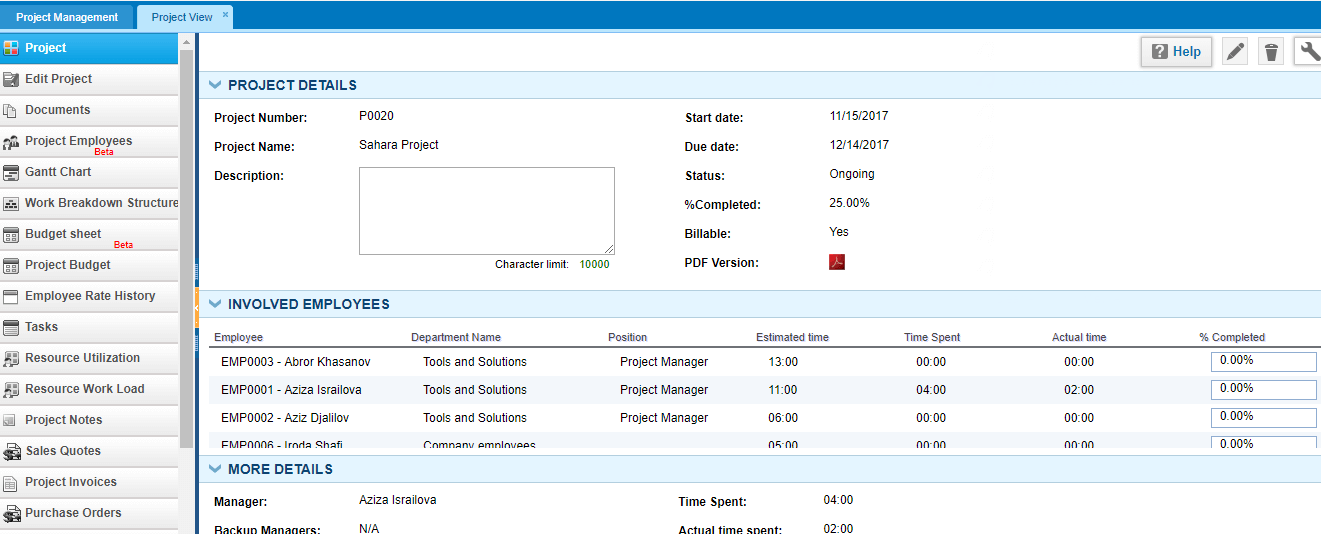
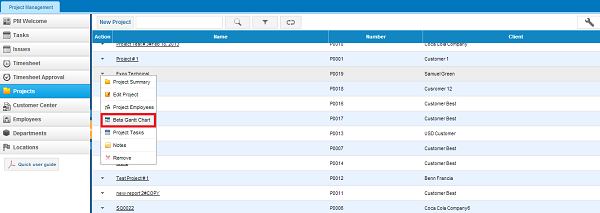
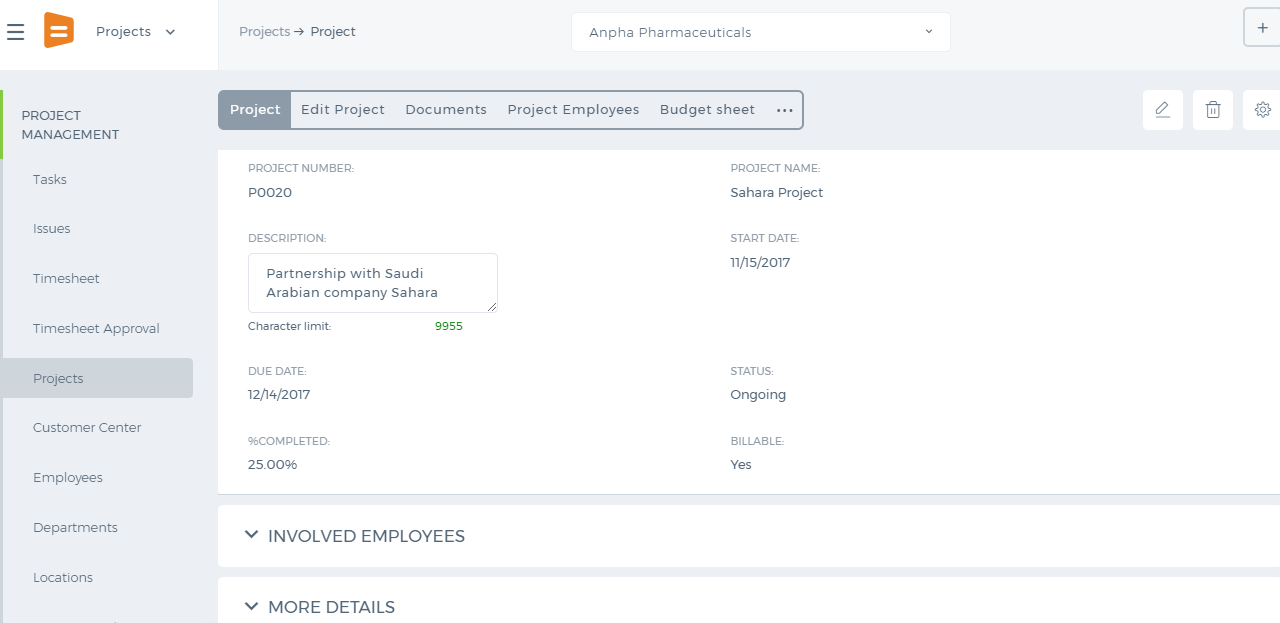 To view other information about the project, you need to click on More Details, Involved Employees, Task Details and other hidden tabs in the new user interface.
Percentage Completed displays what percentage of the project has been completed. It is calculated using the completion percentage of each task and dividing it to the number of project tasks.
Planned vs Actual tab displays planned start/end dates, and actual start/end dates. Actual Date is the date when employees started working on the tasks by entering the timesheet and completing the project. Planned Date is the date that you set while creating the project.
To view other information about the project, you need to click on More Details, Involved Employees, Task Details and other hidden tabs in the new user interface.
Percentage Completed displays what percentage of the project has been completed. It is calculated using the completion percentage of each task and dividing it to the number of project tasks.
Planned vs Actual tab displays planned start/end dates, and actual start/end dates. Actual Date is the date when employees started working on the tasks by entering the timesheet and completing the project. Planned Date is the date that you set while creating the project.