Business Goals
Business Goals
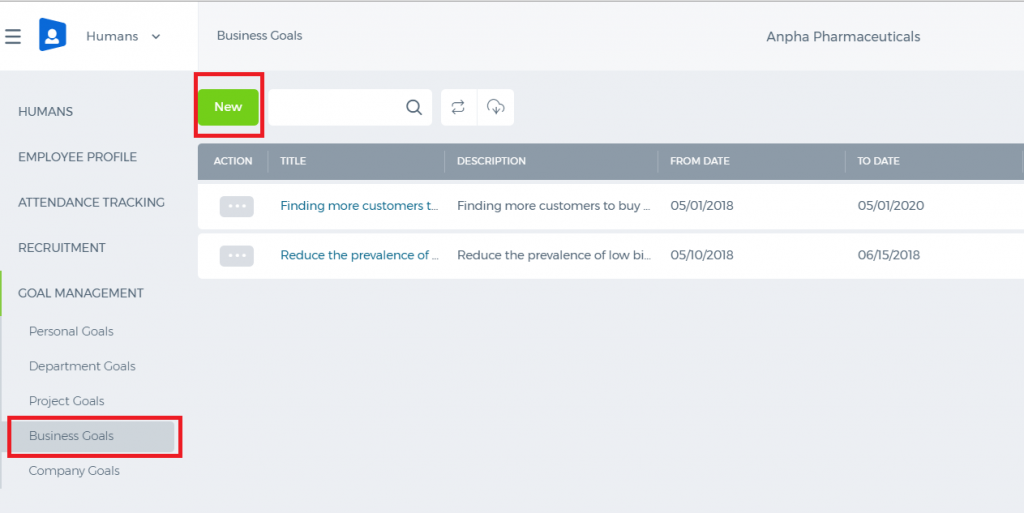
Business Goals include specific and measurable company goals that need to be achieved in the specific period of time. Business Goals can be viewed by company members, while only HR Managers, directors and administrators are able to add business goals.

Add/Edit Business Goal
To add a business goal, go to the
Goals tab in the
Business Goals section and click
Add New Business Goal.
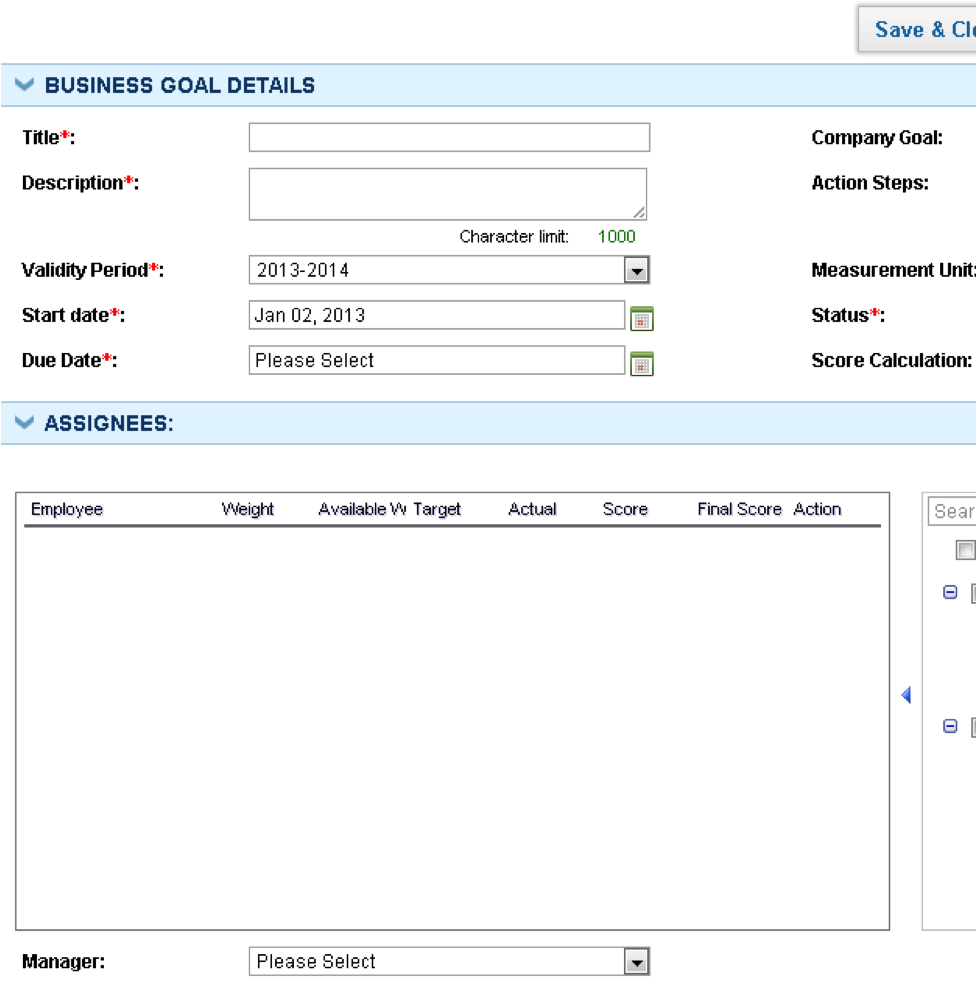
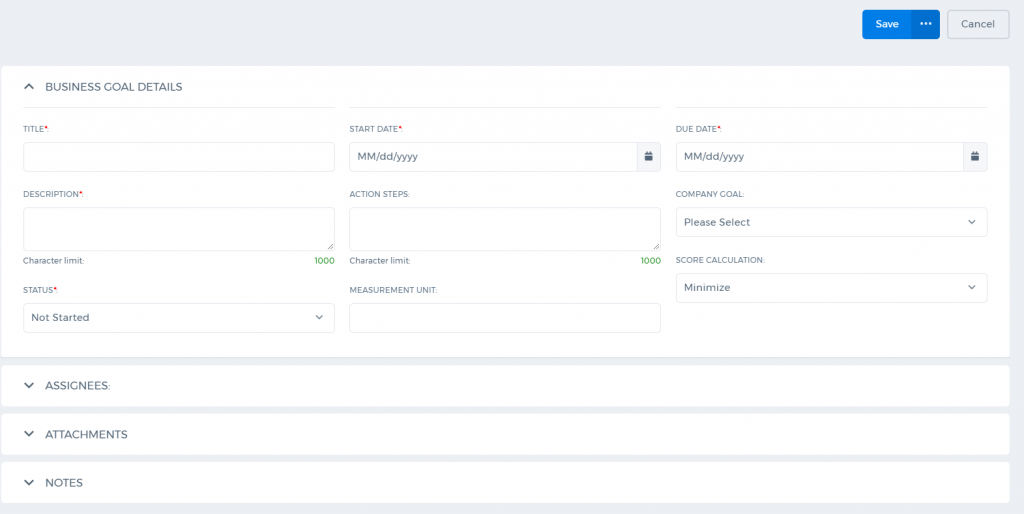
Enter the following details:
Title – the Short title of the goal
Description – Short description of the goal
Validity period – Choose the period for which the goal belongs too. You can add Validity Periods in
Settings – HRMS Settings – Validity Periods.
Start Date – The date when the goal implementation should start
End Date – The date when the goal implementation should end
Department – Choose a department for which business goal is being added
Company Goal – If the business goal is the part of the company goal (strategic goal), choose the company goal from the Company Goal dropdown, or leave this field blank
Action Steps – Describe all action steps that need to be taken by an employee in order to achieve the goal
Measurement unit – Indicate the measurement units of the goal (dollars, days)
Status – Indicate the current status of the goal
Score Calculation – Choose
Minimize, if the intent of the goal is to minimize the figures (for example to reduce costs). Choose
Maximize, if the intent of the goal is to maximize the figures (for example, to increase the revenues).
Assignees – Choose the employees for whom the goal needs to be assigned from the list of employees checkbox.
Chosen employees will appear in assignees table. Provide the details about goals weight, target, and actual figures. Actual figures may be left blank if they are not available, and they can be edited by the employee, in employee view.
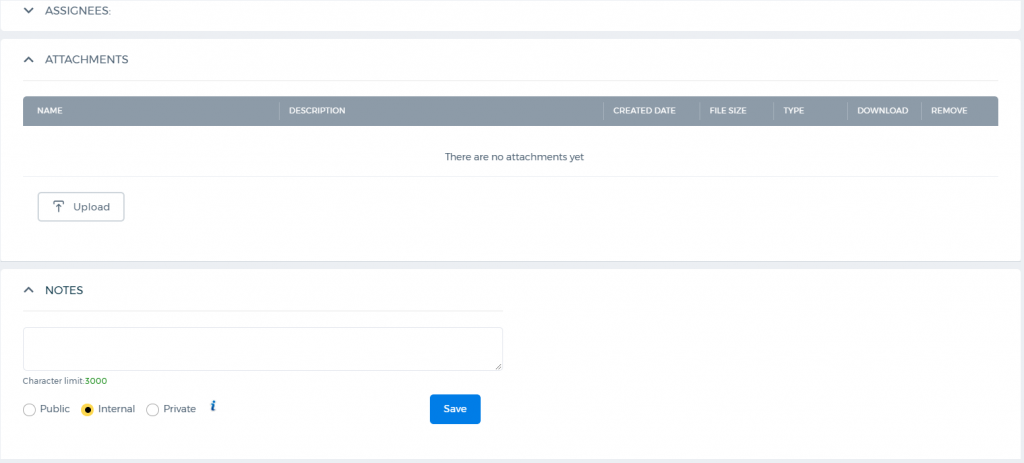
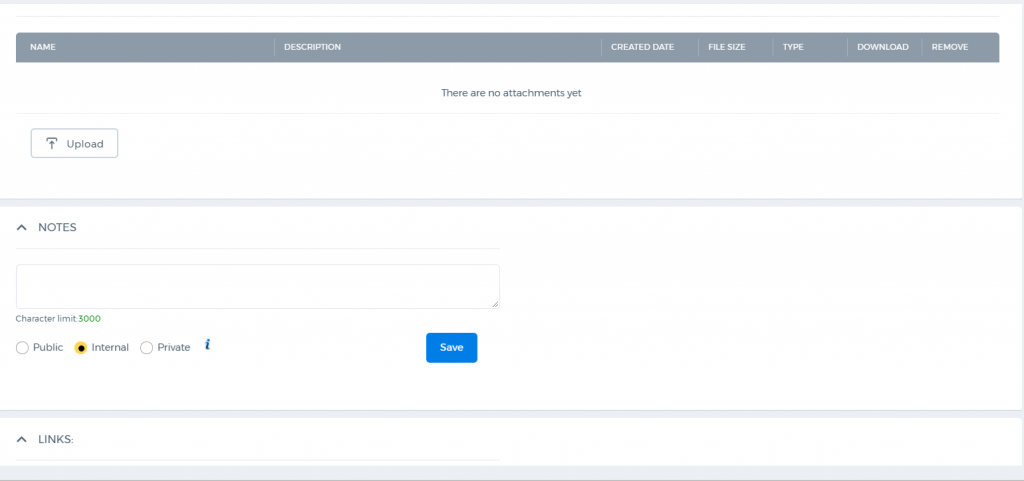
Notes – Additional notes about the goal.
After entering all the details of the goal, click
Save & Close or
Save & New.
Score and final calculation
Based on targets and actual, performance scores are calculated while adding goals. If actual figures are not available, the performance score will not be calculated. However, employees can write up actual figures themselves later. When actual figures are entered by an employee, the system automatically calculates the performance score (final score) and it can be used while conducting performance appraisals.
The formulae to calculate the score are the following:
| ACTUAL/TARGET x 100 (for KPI MAXIMIZE, the HIGHER the BETTER) |
| TARGET/ACTUAL x 100 (KPI MINIMIZE: the LOWER the BETTER) |
The formula to obtain the final score: SCORE x WEIGHT/100.
Final scores can be used to determine bonus allocations, salary increase, and promotions.
Project Goals
Project Goals
Project Goals keep all project related goals which need to be achieved in a specific period of time. Project Goals can be viewed by Project Managers and project members, while only Project Managers, HR managers, directors and administrators are able to add project goals.
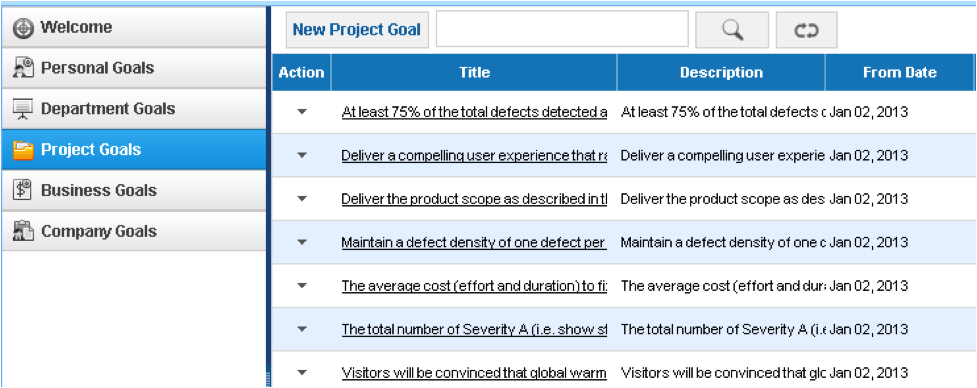
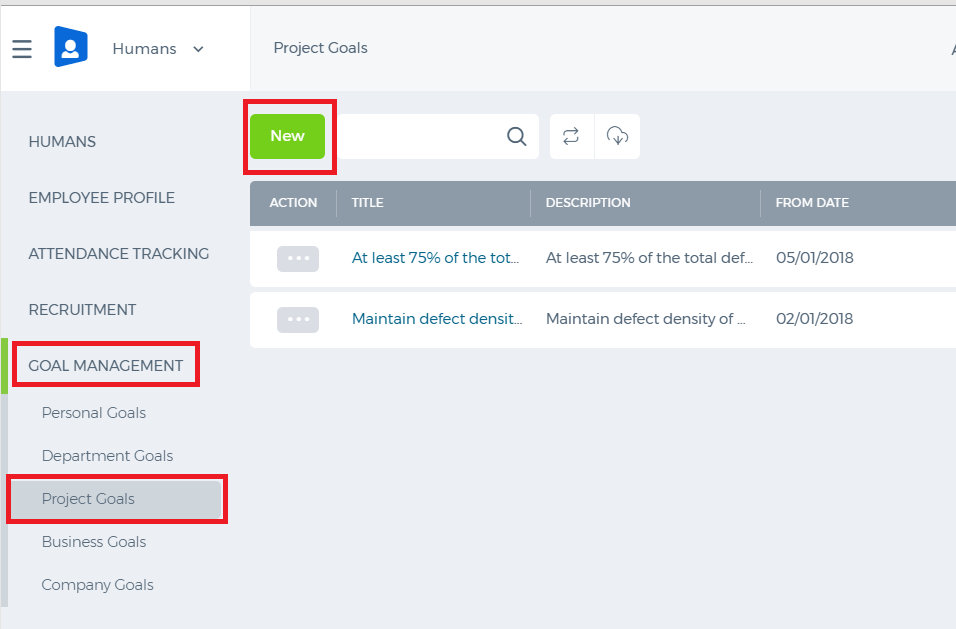
Add Project Goal
In order to add a project goal, go to
Project Goals listing and click the
New Project Goal or go to the
Add Newmenu and click
Project Goal.
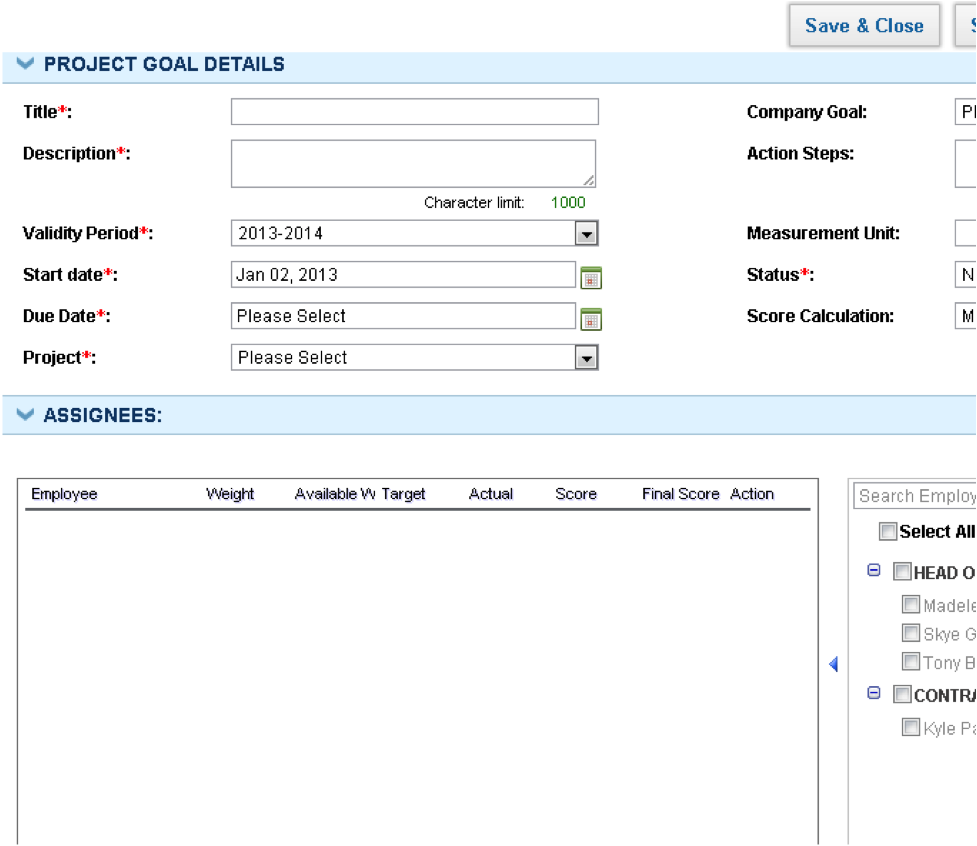
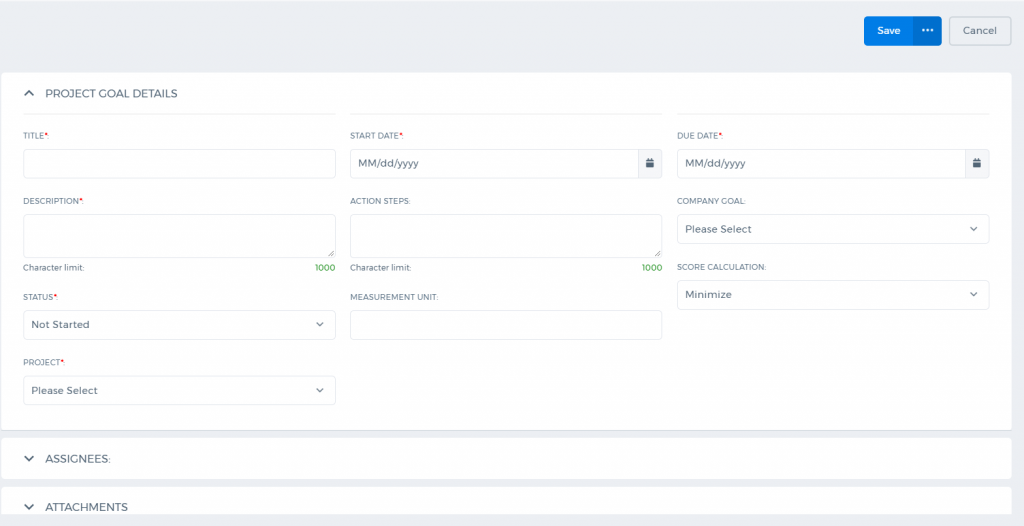
Enter following details in order to add a project goal:
Title – Short title of the goal
Description – Short description of the goal
Validity Period – Choose the period for which the goal belongs too. You can add Validity Periods in
Settings – HRMS Settings – Validity Periods.
Start Date – The date when the goal implementation should start
End Date – The date when the goal implementation should end
Project – Choose a project for which the project goal is being added
Company Goal – If the project goal is part of Company Goal (strategic goal), choose company goal from Company Goal dropdown, or leave this field blank
Action Steps – Describe all action steps that need to be taken by employee in order to achieve goal
Measurement Unit – Indicate the measurement units of the goal (dollars, days)
Status – Indicate the current status of the goal
Score Calculation – Choose
Minimize, if the intent of the goal is to minimize the figures (for example to reduce costs). Choose
Maximize, if the intent of the goal is to maximize figures (for example, to increase the revenues).
Assignees – Choose employees for whom the goal needs to be assigned from the list of employees checkbox.
Chosen employees will appear in the assignees table. Provide details about the goals weight, target and actual figures. Actual figures may be left blank if they are not available, and they can be edited by an employee, in Employee View.
Notes – Additional notes about the goal.
Score and Final Calculation
Based on targets and actual, performance scores are calculated while adding goals. If actual figures are not available, the performance score will not be calculated. However, employees can write up actual figures themselves later. When actual figures are entered by an employee, system automatically calculates the performance score (final score) and it can be used while conducting performance appraisals.
Formulae to calculate the score are following:
| ACTUAL/TARGET x 100 (for KPI MAXIMIZE, the HIGHER the BETTER) |
| TARGET/ACTUAL x 100 (KPI MINIMIZE: the LOWER the BETTER) |
The formula to obtain the final score is: SCORE x WEIGHT/100.
Final scores can be used to determine bonus allocation, salary increase, and promotions.
Once all the details of the goal are entered, click
Save & Close or
Save & New.
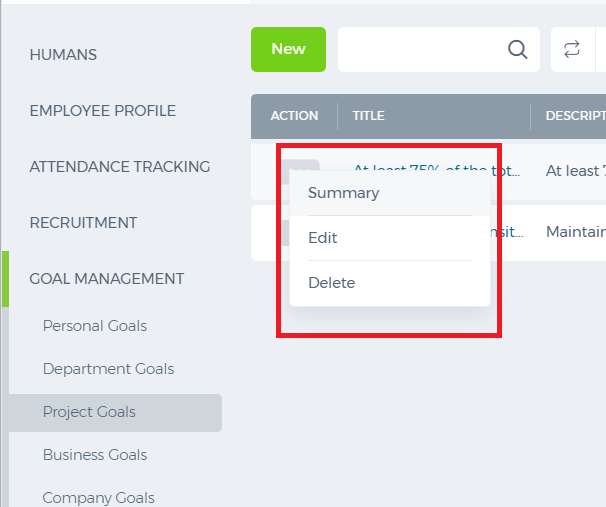
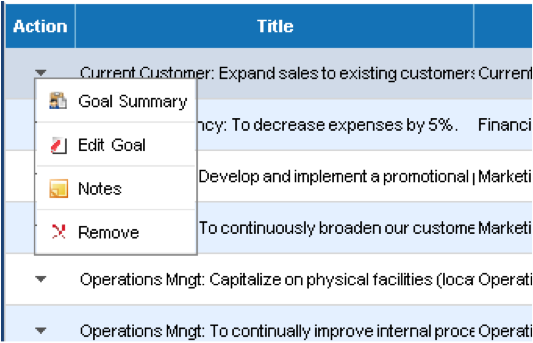
Project Goals Action Menu
You can view project goal summary, edit the goal, add notes to the goal, or remove the goal (administrators only) in the Project Goal Action menu.

 Goal Notes
In order to add notes to your goal, click
Notes from the
Action dropdown.
Enter the following details:
Subject – The subject of the note
Description – Full description of the note
Visibility – You can control the visibility of the notes. Selecting the
Public option makes your note visible to public, whereas the
Private option hides the content from the public completely.

Department Goals
Department Goals
Department Goals are goals and objectives to be achieved by specific departments. Department Goals can be entered linked to company goals (strategic goals). Department Goals can be entered by Department Leaders, HR Managers, Directors and Administrators.
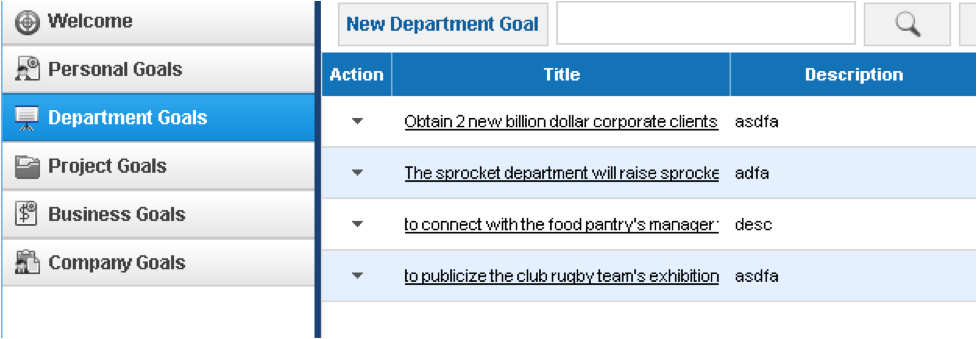
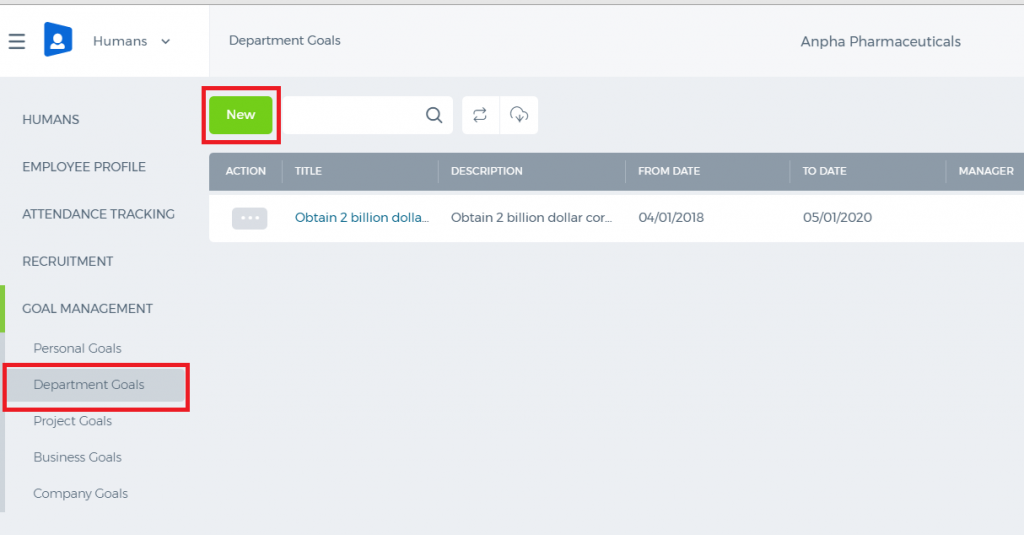
In order to add a department goal, go to
the
Goals tab in the
Department Goals section and click
Add New Department Goal.
Enter the following details:
Title – the Short title of the goal
Description – Short description of the goal
Validity Period – Choose the period for which the goal belongs too. You can add validity periods in
Settings – HRMS Settings – Validity Periods
Start Date – The date when the goal implementation should start
End Date – The date when the goal implementation should end
Department – Choose a department for which a department goal is being added
Company Goal – If the department goal is a part of the Company Goal (strategic goal), choose the Company Goal from the Company Goal dropdown, or leave this field blank
Action Steps – Describe all action steps that need to be taken by an employee in order to achieve the goal
Measurement Unit – Indicate the measurement units of the goal (dollars, days)
Status – Indicate the current status of the goal
Score Calculation – Choose
Minimize, if the intent of the goal is to minimize the figures (for example to reduce costs). Choose
Maximize, if the intent of the goal is to maximize figures (for example, to increase the revenues).
Assignees – Choose employees for whom goal needs to be assigned from the list of employees checkbox.
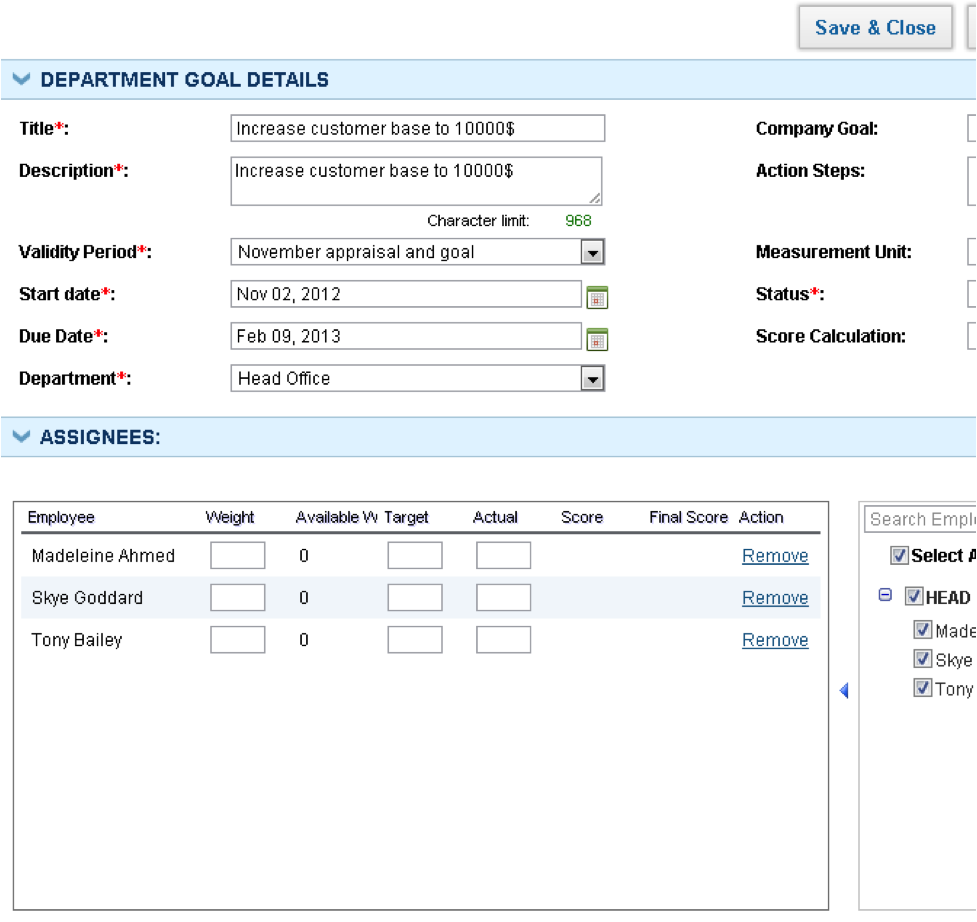
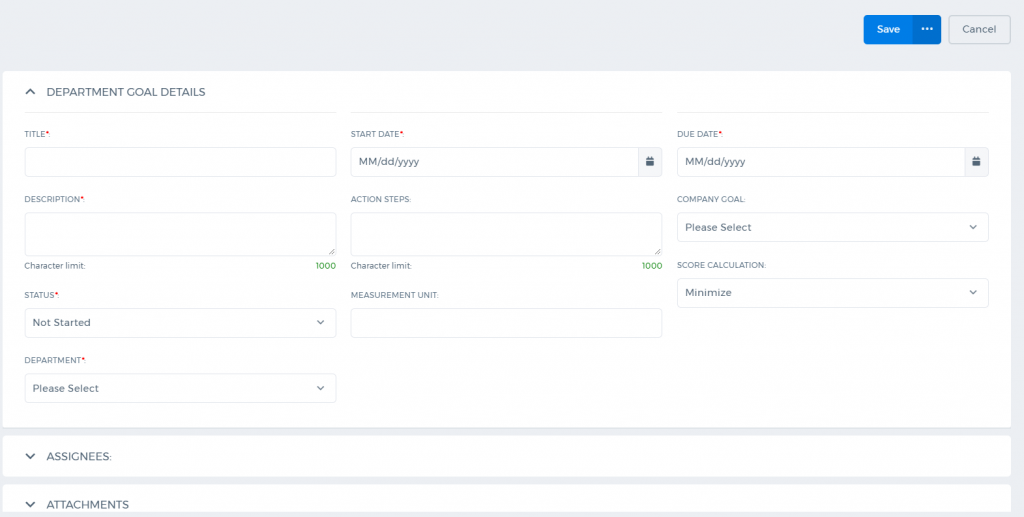
Chosen employees will appear in an assignees table. Provide details about goals weight, target, and actual figures. Actual figures may be left blank if they are not available, and they can be edited by an employee, in
Employee View.
Notes – Additional notes about the goal.
Once all details of the goal are entered, click
Save & Close or
Save & New.
Score and Final Calculation
Based on targets and actual, performance scores are calculated while adding goals. If actual figures are not available, the performance score will not be calculated. However, employees can write up actual figures themselves later. When actual figures are entered by an employee, system automatically calculates the performance score (final score) and it can be used while conducting performance appraisals.
The formulae for calculating the score are following:
| ACTUAL/TARGET x 100 (for KPI MAXIMIZE, the HIGHER the BETTER) |
| TARGET/ACTUAL x 100 (KPI MINIMIZE: the LOWER the BETTER) |
The formula to obtain the final score is: SCORE x WEIGHT/100.
Final scores can be used to determine bonus allocation, salary increase, and promotions.
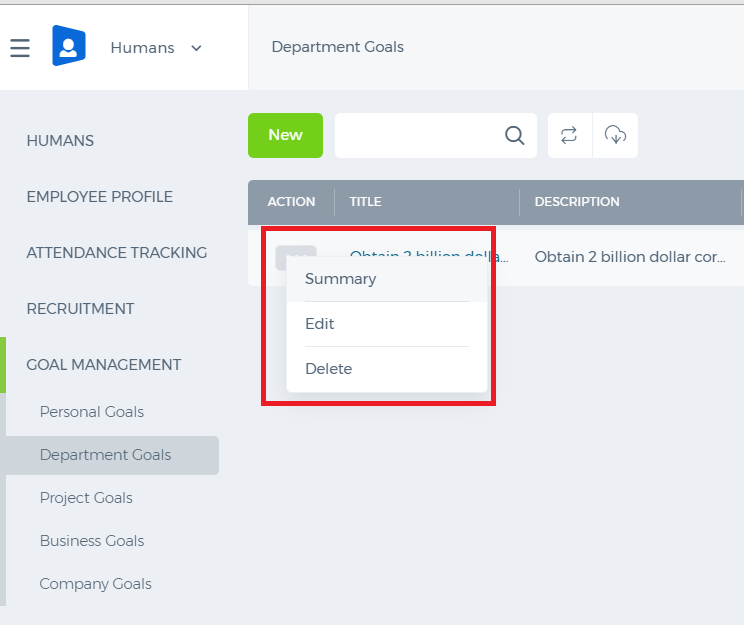
Department Goals Action Menu
You can view the department goal summary, edit the goal, add notes to the goal, or remove the goal (administrators only) in Department Goal action menu.
Goal Notes
To add notes to your goal, click
Notes from the
Action dropdown.
Enter the following details:
Subject – The subject of the note
Description – Full description of the note
Visibility – You can control the visibility of the notes. Selecting the
Public option makes your note visible to public, whereas the
Private option hides the content from the public completely.

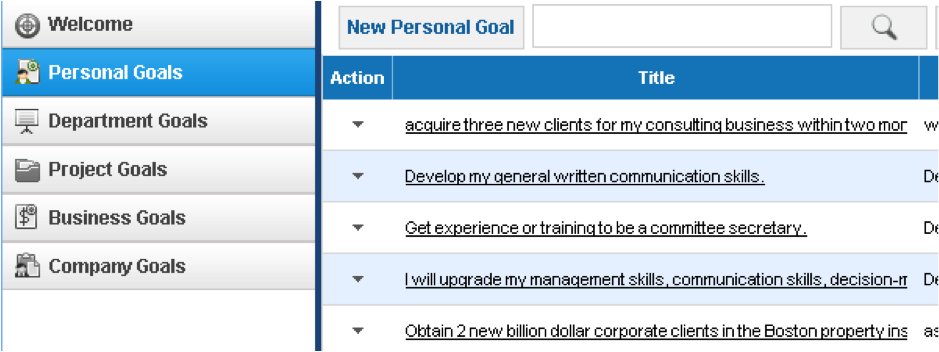
Personal Goals
Personal Goals
Personal goals are career development goals that an employee intends to achieve in given time-period. If personal goals are related to company goals too, they can be assessed in
Performance Appraisals sections.
Employees are able to view their own personal goals in
Goal Management –
Personal Goals section.
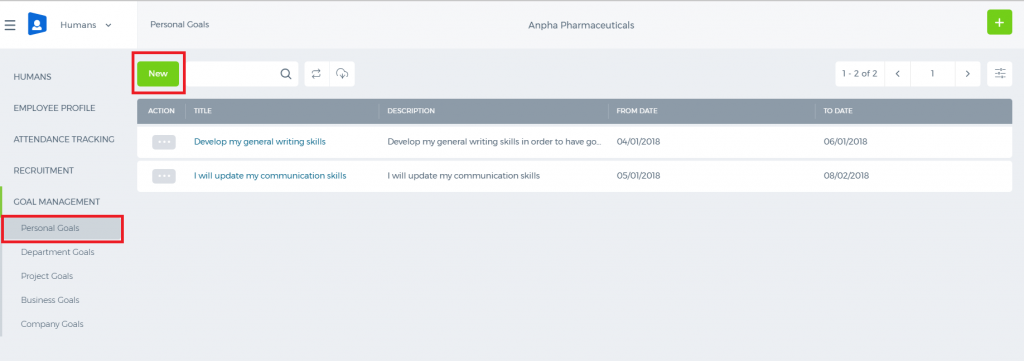
Add/Edit Personal Goal
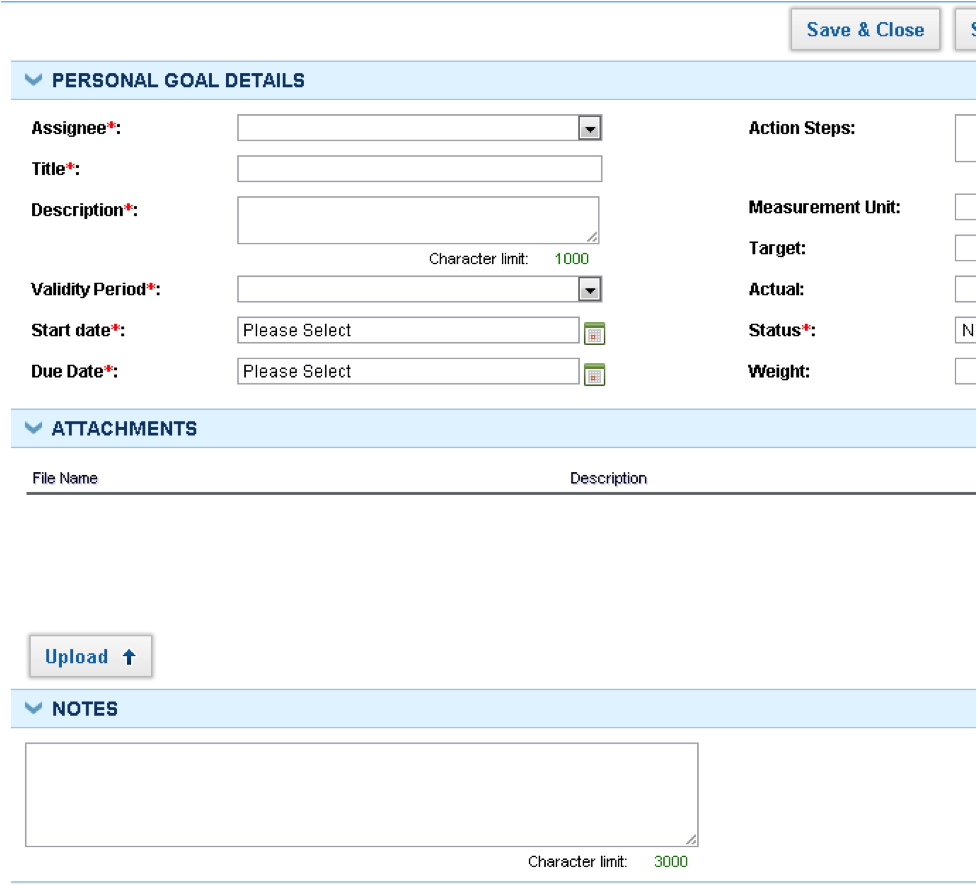
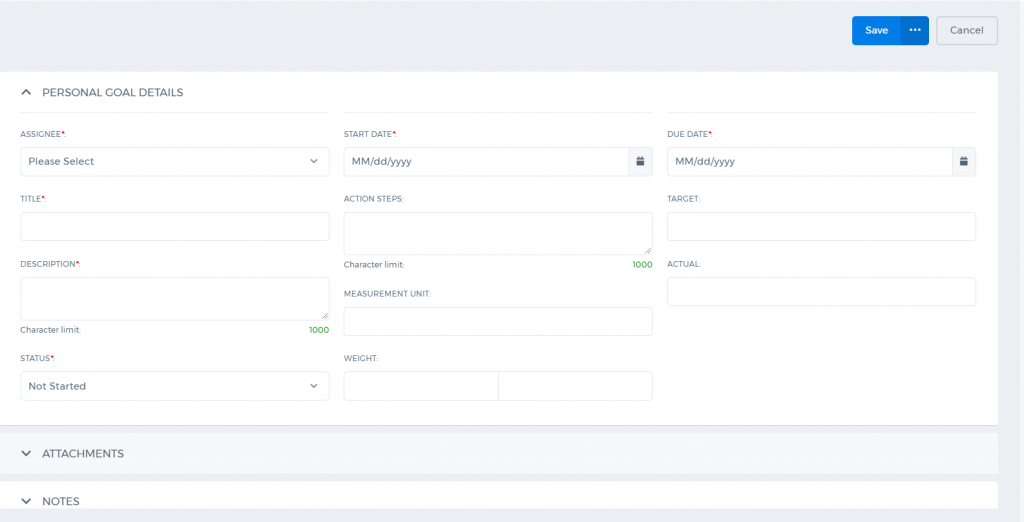
Fill in following details in adding Personal Goal:
Assignee – If the employee is adding the personal goal for himself/herself, the assignee field will be populated with employee’s name. HR Managers, directors, department leaders can add personal goals for other employees
Title – the Short title of the goal
Description – Short description of the goal
Validity Period – Choose the period for which the goal belongs too. You can add Validity Periods in
Settings –
HRMS Settings –
Validity Periods.
Start Date – The date when the goal implementation should start
End Date – The date when the goal implementation should end
Action Steps – Describe all action steps that need to be taken by the employee in order to achieve the goal
Measurement Unit – Indicate the measurement units of the goal (dollars, days)
Target – Indicate the numeric target of the goal
Actual – Indicate the actual figure of the goal. The field can be left blank to be filled later.
Status – Indicate the current status of the goal
Weight – Indicate the weight of the goal, between the other goals of the employee
Notes – Additional goal notes can be attached here.
After filling the fields, click
Save & Close to save Personal Goal.
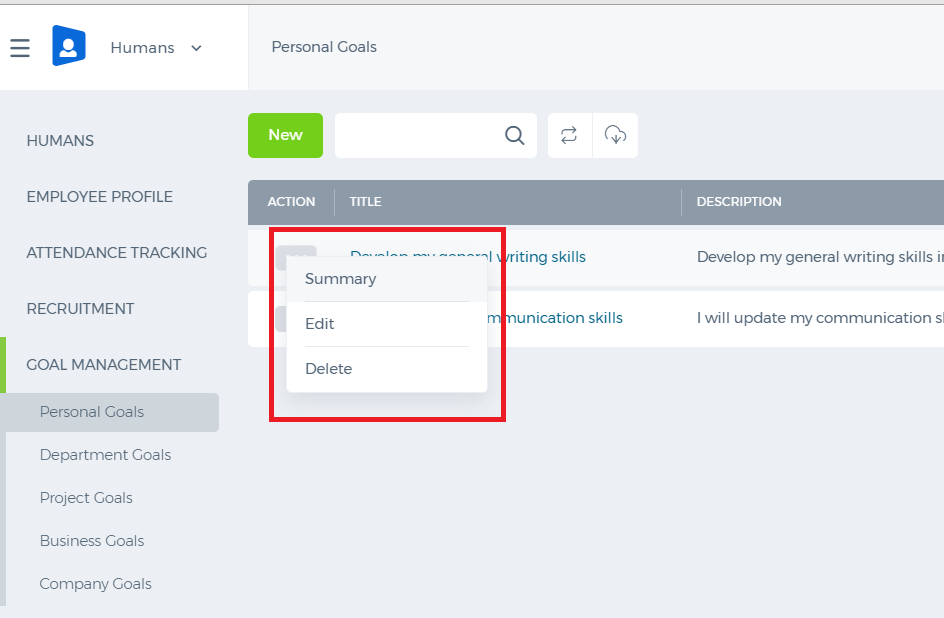
Personal Goals Action Menu
You can view personal goal’s summary, edit goal, add notes to the goal, or remove the goal (administrators only) in the personal goal action menu.

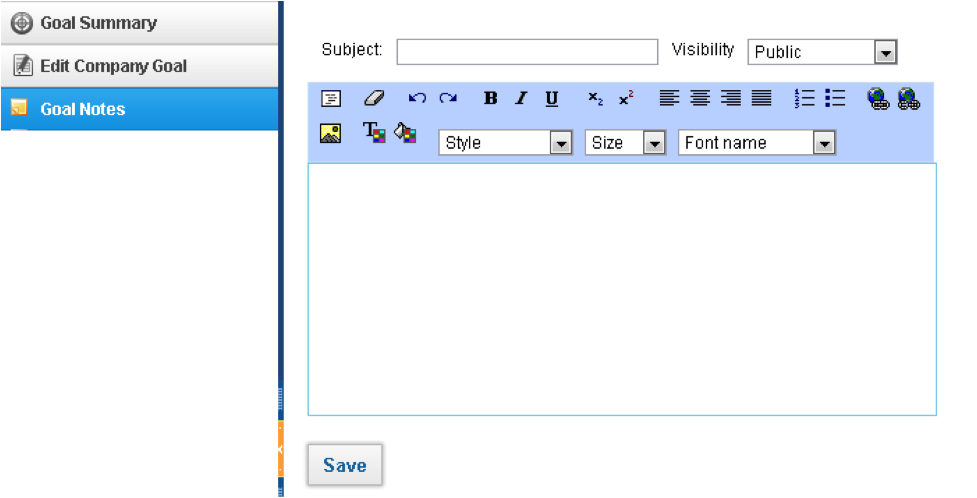
Goal Notes
To add notes to your goal, click the
Notes link from the
Action drop-down.
Enter the following details:
Subject – The subject of the note
Description – Full description of the note
Visibility – You can control the visibility of the notes. Selecting the
Public option makes your note visible to the public, whereas the
Private option hides the content from the public completely.
Company Goals
Company Goals
Company goals are strategic long terms goals that are defined in simple sentences, but do not have measurable targets yet. Strategic goals can then be broken down into specific and measurable department goals, business goals or project goals.

Add/Edit Company Goal
Administrators, HR Managers, Directors, Department leaders are able to add/edit company goals to the system.
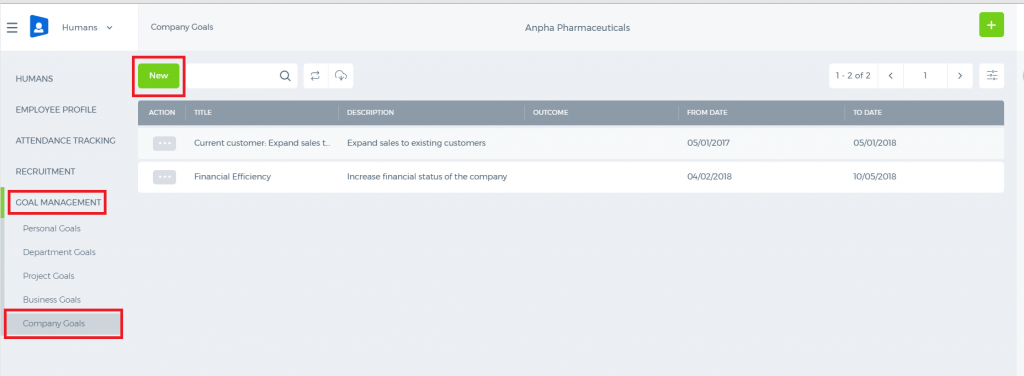
In order to add company goal go to the
Company Goals listing and click the
New Company Goal, or go to the
Add New menu and click the
Company Goal link.
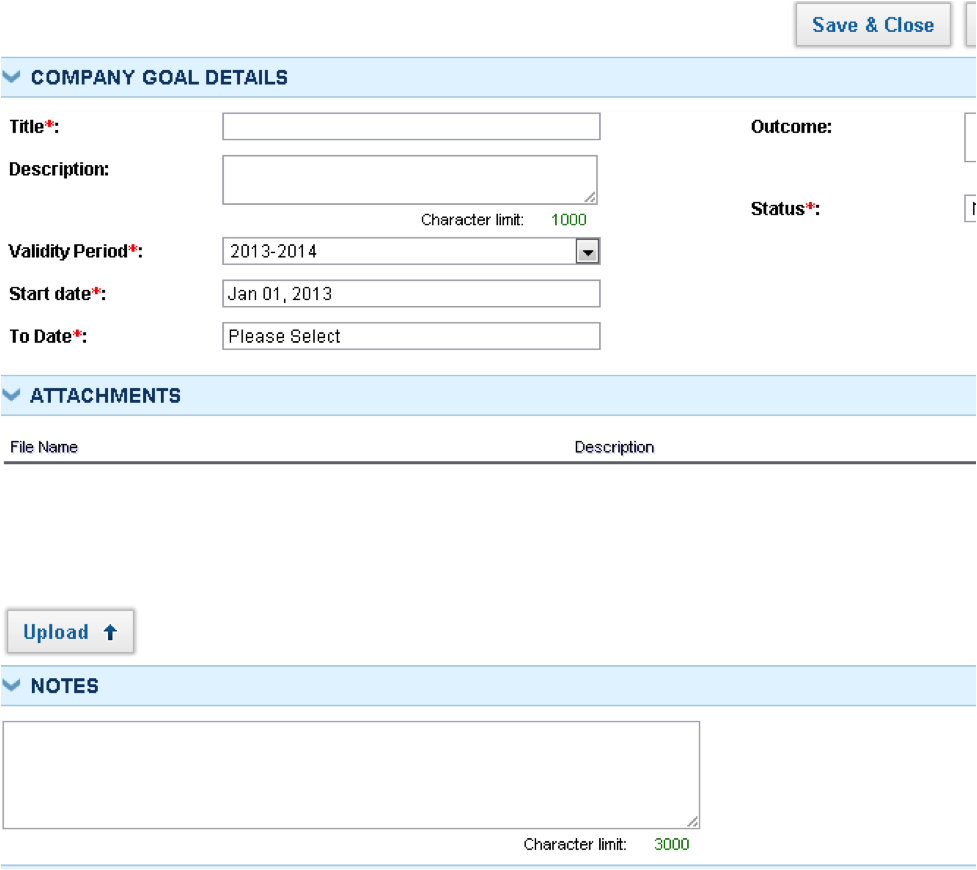
Fill in the following details when adding company goal:
Goal Title – Short title of the goal
Description – Short description of the goal
Validity Period – Choose the validity period of the goal.
Start Date – Choose when the goal should start
End Date – Choose the date when the goal should end
Outcome – Describe all outcomes of the company goal
Status – Choose the status of the goal
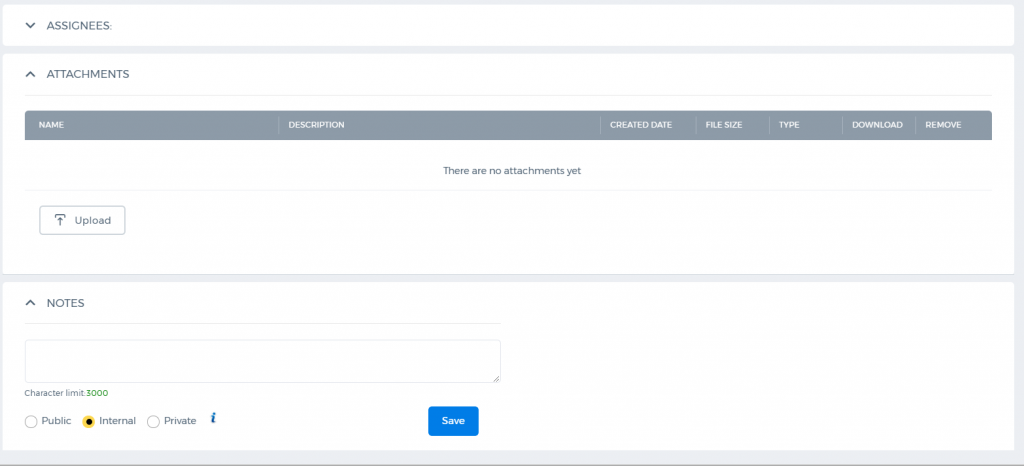
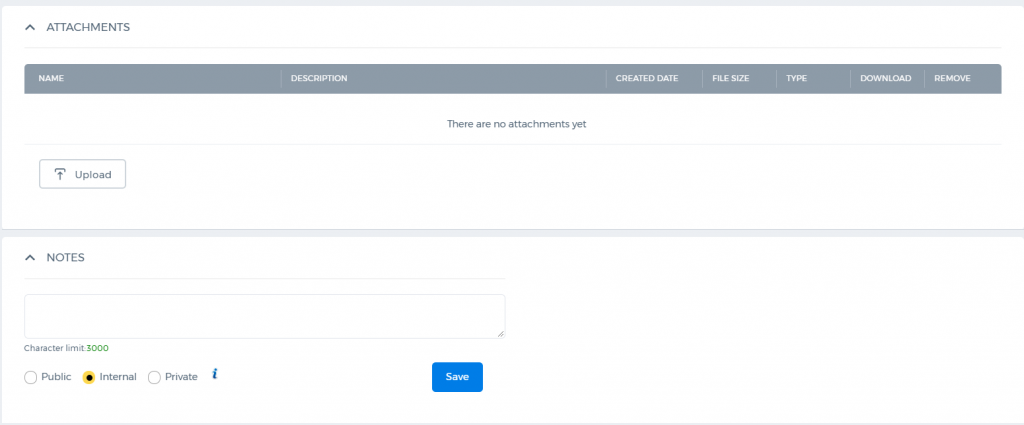
Attachments – Attachments related to goal. You can read about document attachments
here.
Notes –Notes or additional information about strategic objective
Click
Save & Close button to save the company goal.
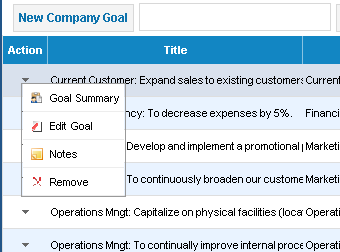
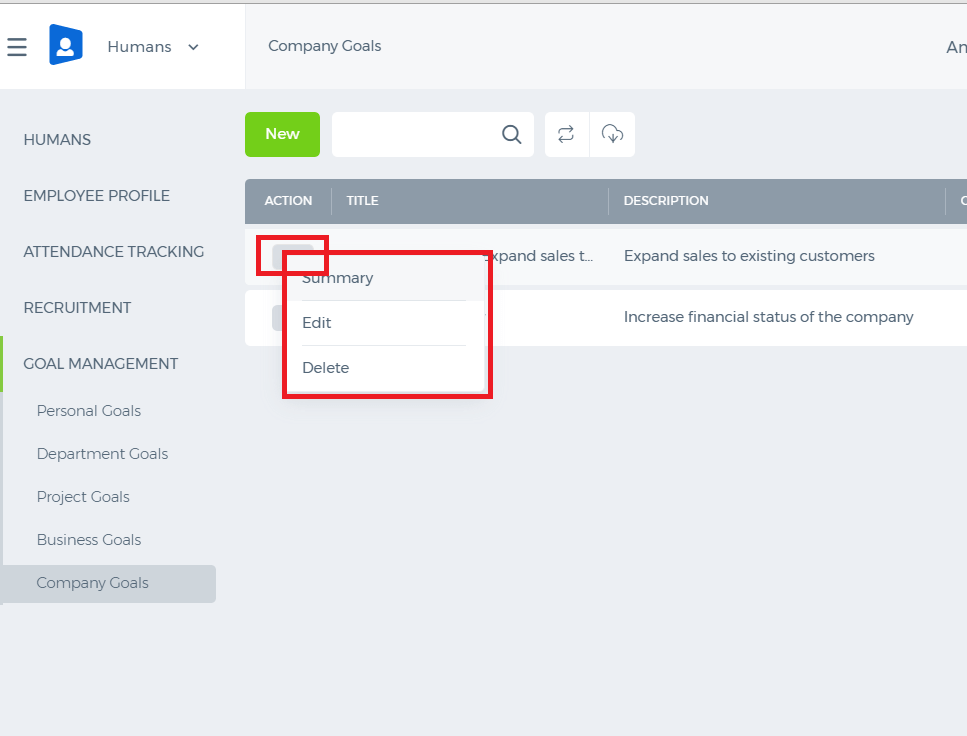
Company Goals Action Menu
You can view the company goal summary, edit the goal, add notes to the goal, or remove the goal (administrators only) in company goal action menu.
 Goal Notes
To add notes to your goal, click
Notes link from the
Action dropdown.
Enter following details in order to add notes:
Subject – the subject of the note
Description – full description of the note
Visibility – You can control the visibility of the notes. Selecting the
Public option makes your note visible to public, whereas the
Private option hides the content from the public completely.

Goal Management
Goal Management
HRMS Goal Management Tool helps your organization to define strategic goals for your company and to break them down into business, department, and project goals and assign them to employees. Employees can view their own goals, edit actual figures and give comments and change the status of the goals.
Goals can be added/edited by HR managers, directors, administrators, department leaders. Employees are able to view their own goals and write actual figures.
Employee Profile Summary
Employee Profile Summary
Employee Profile Summary shows an employee's personal information, employee permanent/temporary addresses, bank account details, documents, custom fields, employment details, dependants, internal employments and past employments.
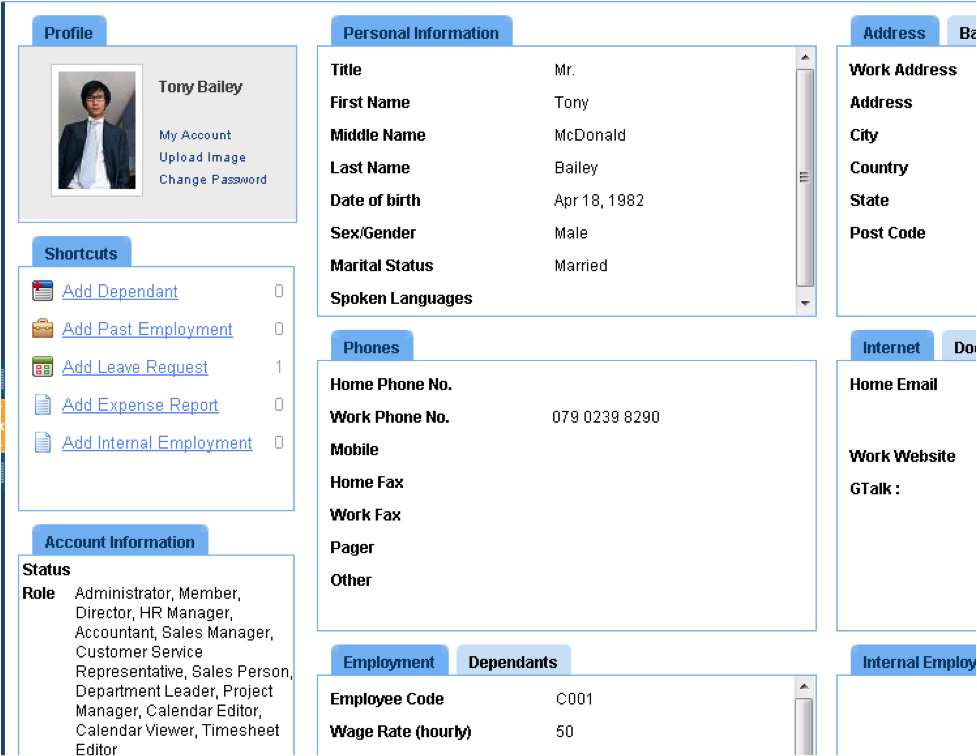
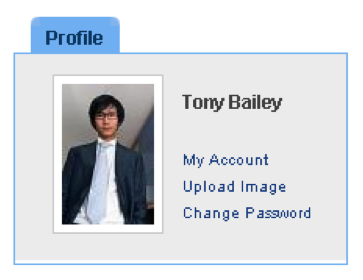
Profile
The
Profile widget contains links to upload image, to change password and to view account details.
To upload image, click the
Upload Image button and indicate the format of the image:
.png,
.jpg, or
.bmp.

If you upload the image with a big size, the system will crop and upload it. Therefore, the quality may not be the same as original.
 My Account
My Account
My Account link is available
only for administrators of the kpi.com. If you click the
My Account link, you will be redirected to the subscription page of kpi.com. You may buy a new subscription or extend the current one here.
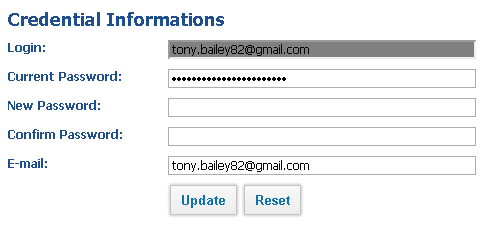
Change Password
Pressing this button will redirect you to the
Settings –
User Credentials page. You can update your email address, but note that your username will not be changed, if you update your email here. You should remember your old username in order to login to the system again, or ask kpi.com Support Team if you really need your username to be changed.
Account Information
You can view your own account activation status and your roles available in kpi.com.
Only administrators are able to change employee roles in the system. If you need your role to be changed, please contact your administrator.
Edit Profile
Employees are able to edit their own profile: personal details, address, phone details, bank details, and documents. HR Managers are able to edit everything that employee's profile and as well as, employment details. Administrators are able to edit everything that employees and HR managers can, and additionally, employee’s roles.
The following details need to be indicated while editing an employee profile:
Personal Information
First Name – Enter the first name of an employee
Last Name – Enter the last name of an employee
Middle Name – Enter the middle name if available
Date of Birth – Select the employee’s birth date
Gender – Select the gender
Marital Status – Select the marital status
Spoken Languages – Indicate all spoken languages of the employee.
Contact Details
You can indicate as many contact details as you want. Since employee contacts can be synced with Google, all employees contact details can be entered as Google Contacts.
Email – Edit an email of an employee and indicate the type of the email. You can add as many emails as you want, but one of them should be selected as primary.
Phone Numbers – Add phone numbers of an employee with country codes.
IM Address – Indicate all IM addresses of an employee.
Web Address – Indicate all web addresses/blogs an employee has.
Address Information
Enter address information: Address Type, Address Line 1, Address Line 2, City, Country, State, Post Code here.
Employment Information
Employee Code – Enter an employee’s employment code as specified in HR rules of your company. You can configure the employee code format in
Settings - Project Management Settings – Numbering Settings – Employee Number Settings.
Department – Select the department in which the employee is enrolled. You can add the department to the system by going to the
HRMS –
Departments menu.(The employee may be a member of only one Department.)
Position – Select the employee’s position. You can add a position by going to the
HRMS –
Positions –
Add New Position.
Location – Select the office location in which the employee mainly works. You can add locations from the
HRMS –
Locations –
Add New Location.
Supervisor – You can select any employee as a supervisor. Supervisors can assess employees and add goals to their subordinates.
Wage Rate – Select hourly wage rate of the employee. Wage rate will be used in payroll and in invoicing project timesheet to clients.
Client Charge Rate - Select the Client Change Rate for the employee. Client Charge Rate is used in billing clients for employees project hours.
Bank Account Information
Bank accounts are used in payroll and in the
Accounting and Finance Module as information. Indicate following details in order to add the bank account of the employee:
- Bank Name
- Account Number
- Account Name
- Bank Address
- Swift/Bic Code
- Sort Code
- IBAN Code
Account Information
Only administrators can edit account information of the employee.
Account Status – By default, the account status appears as active, but it can be deactivated by administrators.
Role – Choose the employee’s role from the options indicated below:
| Director - |
has higher levels of permissions: can see all projects, tasks, employees and can view any other listings in the company without any restrictions. |
| HR Manager - |
has full access to the HRMS system, can view all leave requests, can approve those leave requests, and has full control over employees, positions, salary grades and departments. HR manager additionally has a member access role for other sections. |
| Accountant - |
has full level access to the Accounting and Finance System. Accountants can create sales quotes, sales invoices, etc. They can also make manual transaction entries and view reports. Accountants can view other sections with member access role. |
| Admin Location - |
Administrators of office locations, can view all projects, tasks, employees, and all other data in the location, but cannot see data of other locations. |
| Sales Manager - |
can add, remove, and change the status of all cases, add solutions and close cases in the CRM section. |
| Customer Service Representative - |
can add, remove, and change the status of all cases, add solutions, and close cases in the CRM section. |
| Sales Person - |
can see assigned leads, accounts and contacts, work with leads and tasks. Sales person has access to the CRM sections, but to see other sections, he/she has to be a member by default. |
| Department Leader - |
can see all projects, tasks, employees and positions in his/her department. Can add new employees to the department, and also can initiate performance appraisals to employees in their own department. |
| Project Manager - |
has full control over the Project Management section. He/She can add projects, tasks, assign employees to the project, approve timesheet, and view reports. |
| Member - |
default role in the system. Members can view their own data only, and can remove their own data only. Members can add tasks to themselves, once assigned to the project; they can edit their own information in employee profile, and submit expense claims for approval. |
| Calendar Editor - |
can see other people's calendar, can add events to other people, and also remove events from the events lists of others. |
Once you have added all details about the employee, you can save the profile.
Add/Edit Dependant
Dependants are employee’s relatives, who can be contacted in case of emergency.
In order to add a dependant, go to
Employee Profile – Add Dependant.
To edit the dependant, go to
Dependants widget in
Employee Profile page, select
Dependant and click
Edit.
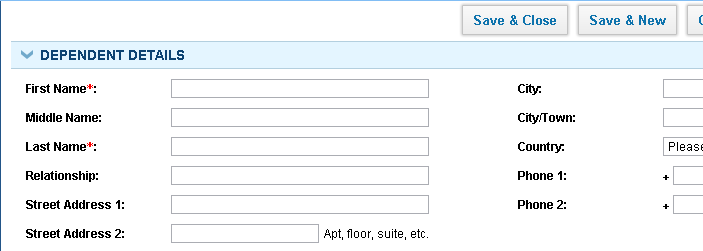
Indicate the First Name, the Middle Name, the Last name, Relationship, the address information of the dependant.
Add/Edit Past Employments
To add past employments, go to
Employee Profile –
Add Past Employment.
To edit past employments, go to
Past Employments widget – select
Past Employment and click
Edit.
Indicate the following details to add/edit Past Employment:
- Company
- Start Date
- End Date
- Department
- Location
- Position
- Role
- Reference
- Comments
Add/Edit Internal Employment
To add internal employment, go to
Employee Profile –
Add Internal Employment.
To edit internal employment details, go to the
Internal Employments widget – select the
Internal Employmentand click the
Edit button.
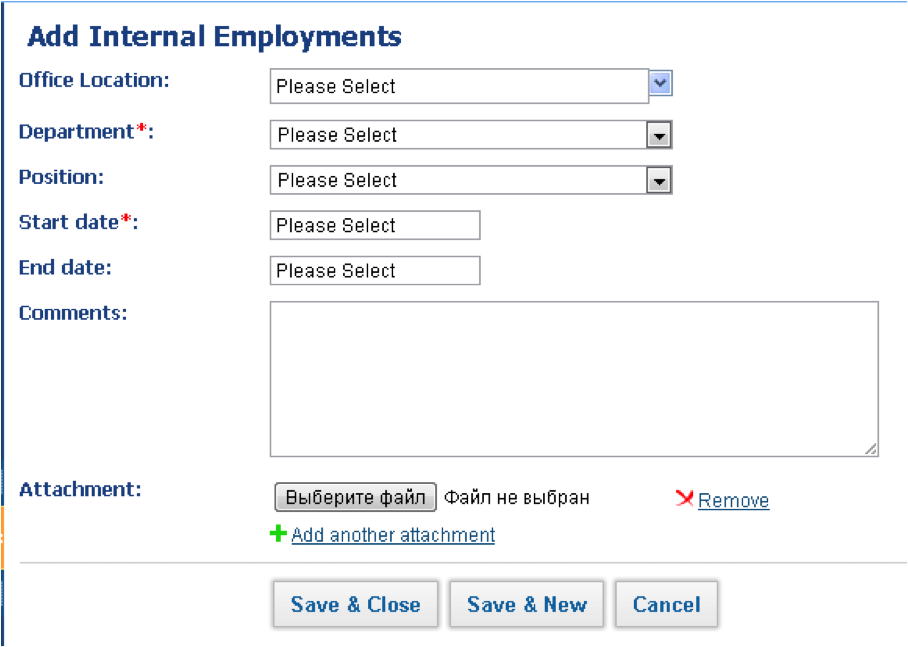
In order to add Internal Employment, fill in the following details:
- Office Location
- Department
- Position
- Start Date
- End Date
- Comments
- Attachments
Employee Profile
Employee Profile
The Employee Profile section is a resource page of information about all employees within the company. It consists from the following sub-sections:
Employee Profile Summary page includes basic details about an employee.
Leave Requests section shows an employee information about his/her leave requests.
Expense Reports feature lets a user to add and view expense claim details.
Goals section is all about different types of objectives. Several categories of goals can be added and be viewed on this page.
Talent Profile is a personal page of an employee. It includes the list of educations, awards and competencies of an employee.
Incident List illustrates the list of issues occurred in a company within employees. The user can easily find out about the name, description, date, status and resolver of an issue on this right page.
Documents section contains employee-related attachments needed to complete the profile.
Employees are able to view their own profile, and edit their own personal data, while HR Managers, Directors, Administrators can view an employee profile of all employees and edit personal and system related data.
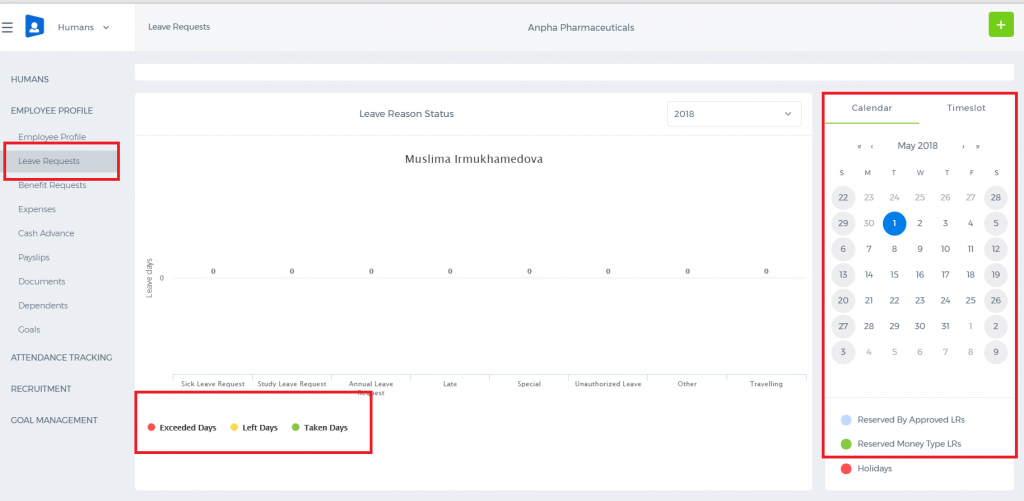
Leave Requests
Leave Requests
The Leave Requests section within the Employee Profile shows all leave requests taken by an employee and the leave request statistics. Employees can view the status of their own leave requests for the year.
The Leave Request statistics shows the figures only for the current year.
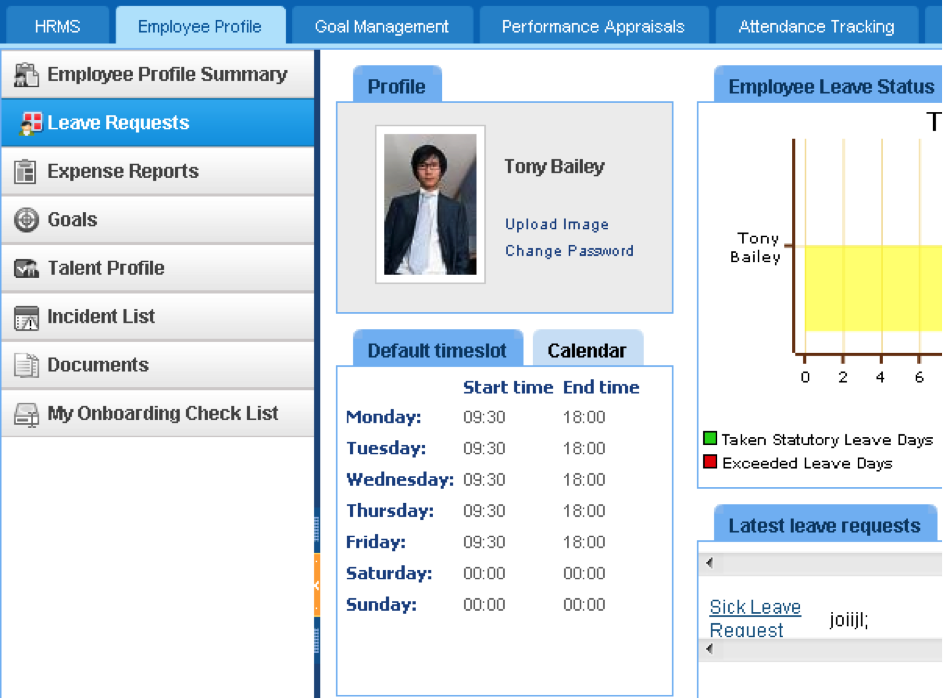
 Default Timeslot
The
Default Timeslot widget shows a schedule of an employee for the current year. Only administrators and HR managers are able to change the schedule for individual employee, and it can be done in the
Settings –
HRMS Settings –
Timeslots.
Calendar
The calendar widget shows the days reserved by the leave requests days and holidays.
Employee Leave Status
The widget displays the overall statistics of how many days are left in the employee’s leave allowance for the current year. Only the approved leave requests are calculated as the taken statutory leave days.
Latest Leave Requests
The widget shows all latest leave requests of the employee with the leave request details.
Pending Requests are the requests that are not yet approved by managers, while approved ones considered as a permission to take the leave request and to calculate the leave days in statistics.
Add New Leave Request
To add
New Leave Request as an employee, go to
Add New Menu and choose the
Leave Request option.
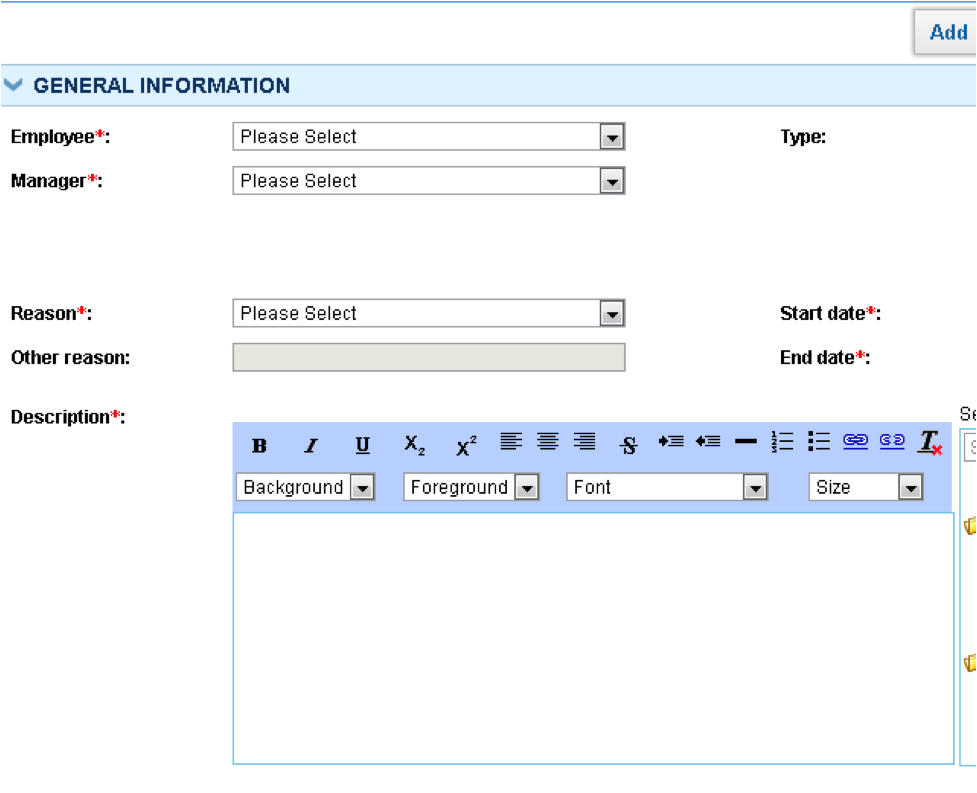
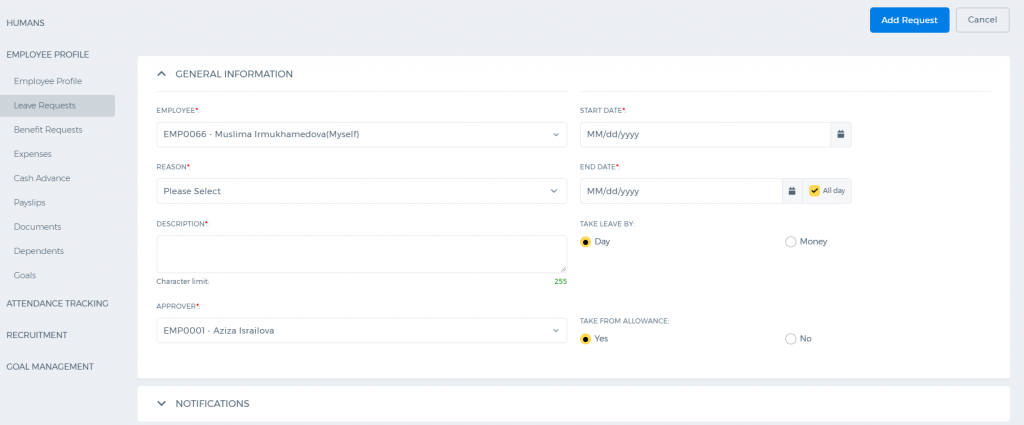
Fill in the following details in the
Add New Leave Request window:
Employee – A member by default. Depending on your role, you can register leave requests to other employees as well.
Manager – Select the manager who will approve the leave request. By default, supervisors, department leaders, directors, administrators will appear in the list of the managers for the leave request approval.
Reason – Select the leave request reason from the available options.
Description – Short description of the leave request.
Type – Select the leave request type. If the leave request is paid, the leave request days are not subtracted from salaries in the payroll.
Start Date – Select the start date and time of the leave request.
End Date – Select the end date and time of the leave request.
Notification – Select employees who must be notified about your/employee’s absence.
You may attach additional documents providing justification for your absence.
Once all details are filled, click the
Add Request button.
HR Appraisal Approval
HR Appraisal Approval
HR Managers can approve or reject period appraisals sent by department leaders. Approved period appraisal scores are calculated in bonus distribution. When period appraisal is rejected, department leaders should review existing appraisal scores again, and resend for approval.
Select the department at the top of the Appraisal Approval listing. Select the Period Appraisal from listing and click View. You will be able to view scores of all employees and approve or reject the period appraisals.
Period Appraisals
Period Appraisals
Department leaders are able to view period appraisals tab in
Performance Appraisals Section, if forced distribution ranking system is enabled for your company.
Contact kpi.com support team in order to activate forced distribution ranking system for your company.
Reviewed and completed departmental period appraisals are sent for HR’s approval. If period appraisals are approved by HR, the scores from appraisals can be used for calculating bonus amounts for employees.

How to send Period Appraisals for Approval
Note that department leaders should complete all employee appraisals for selected validity period, before sending them for HR’s approval. Also, if scores do not fit forced ranking distribution percentage, the system will not send period appraisals for approval.
1. To send period appraisals, select the
Validity Period from the
Performance Appraisal Cycle dropdown on the top of the listing.
2. Select the
Employee Appraisals to be sent for the HR’s approval
3. Click
Send for HR’s Approval.
Reviewed and completed departmental period appraisals are sent for the HR’s approval. If period appraisals are approved by the HR, the scores from appraisals can be used for calculating bonus amounts for employees.
Performance Notes
Performance Notes
Performance Notes are issues related to employees in the system (breach of performance rules). Once you add performance note to your employee, you will be able to see the performance note, while reviewing the appraisal in the same period.
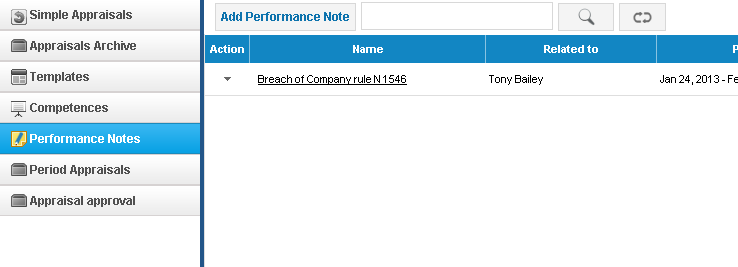
Add New Performance Note
Depending on your role, you will be able to add performance note to other employees. In order to add new performance note, go to
Performance Notes, and click
Add Performance Note.
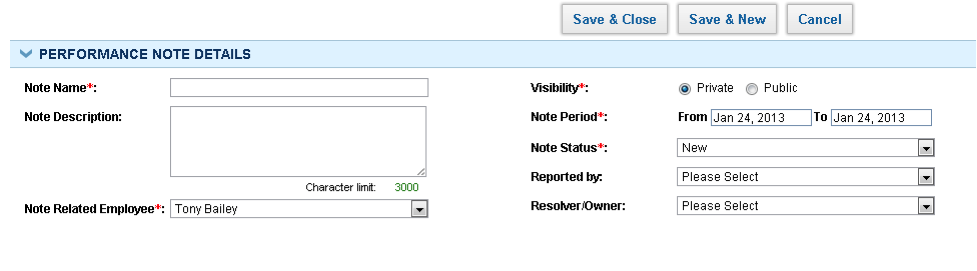
Indicate following details:
Note Name – The short title of the performance note
Note Description – Indicate the description of the performance note
Note Related Employee – Indicate the employee for whom the note is addressed
Visibility – You can control the visibility of the notes. Selecting the
Public option makes your note visible to public, whereas the
Private option hides the content from the public completely.
Note Period – Indicate the start and the end dates of the performance note (when the performance issue should be resolved)
Note Status – Indicate the status of the issue
Reported by – Indicate the employee who reported the issue
Resolver/Owner – Indicate the responsible person to close the issue.
Competencies
Competencies
Competencies list shows all competencies available in the system by default. You can add your own competencies and build templates based on them.
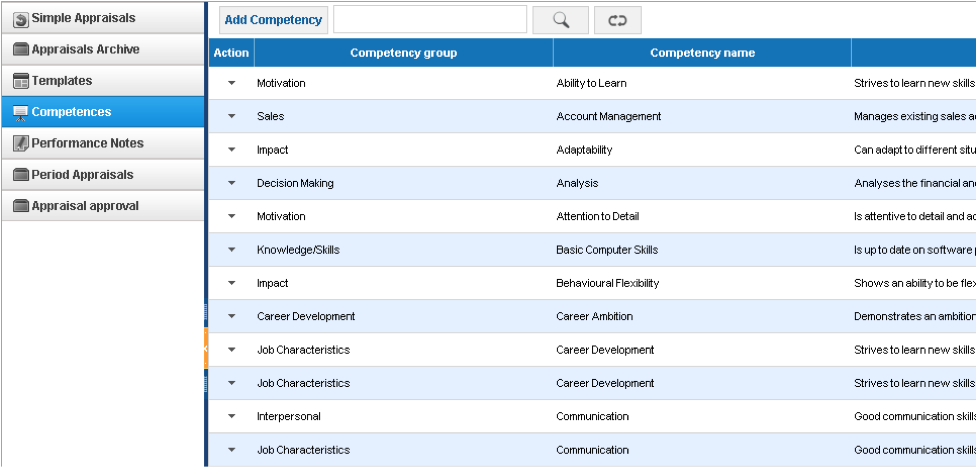 Add Competency
In order to add new competency, click Add Competency from the competencies listing.
Add Competency
In order to add new competency, click Add Competency from the competencies listing.
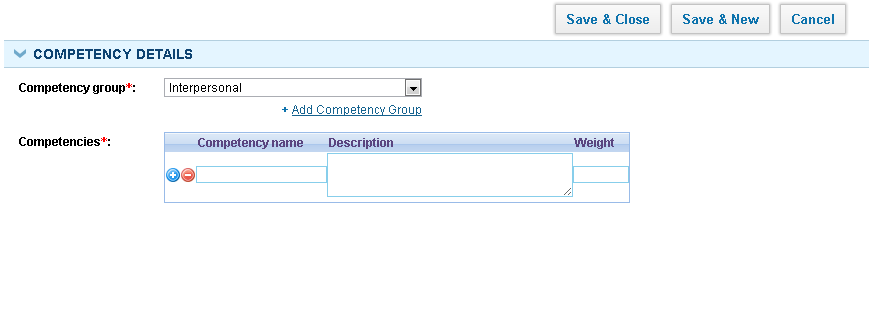 First, select competency group, or add your own competency group by clicking Add new competency group link. Add competency name, description and weight. Clicking + icon will add new line to a table, and you will be able to add more competencies in selected competency.
Templates
Templates
Competency templates can be found from
Performance Appraisals tab –
Templates section.
Default Template is available for all companies after signup.
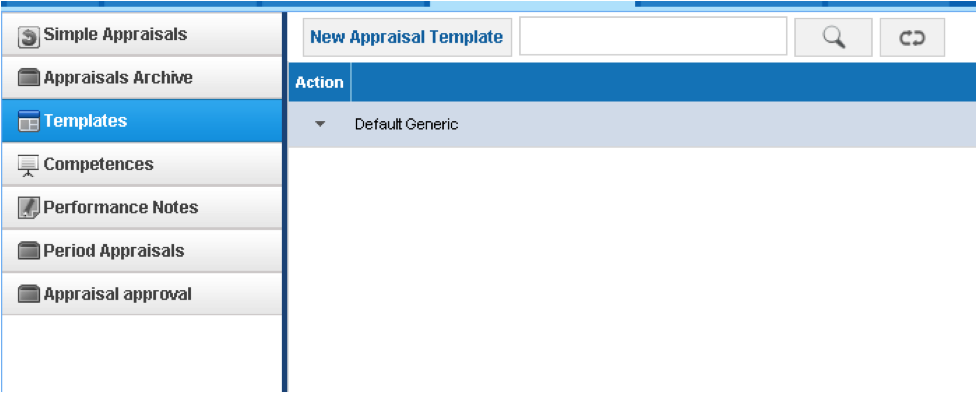
Add/Edit Template
In order to add new template, click the
New Appraisal Template button, from templates listing.
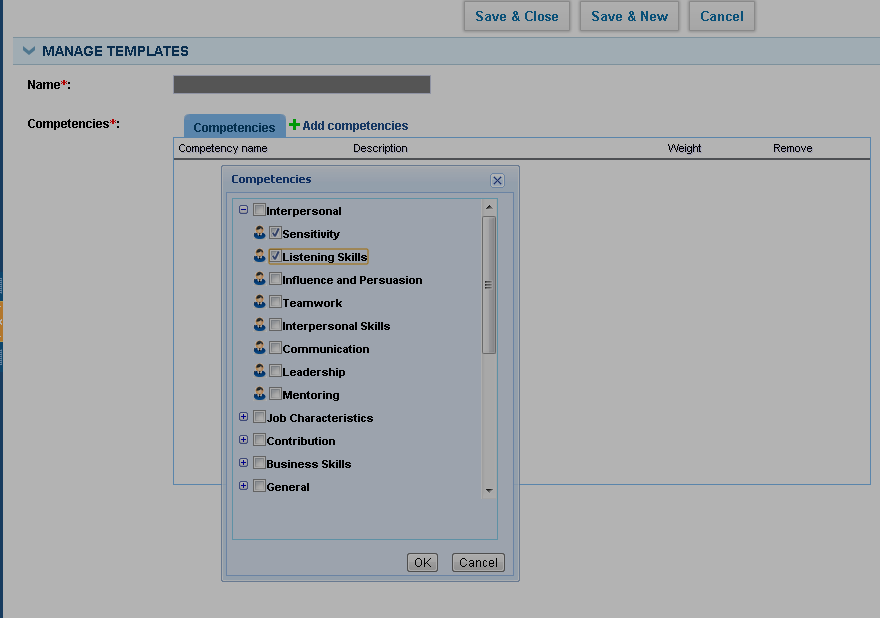
Indicate following details:
Template Name - the name of the competency template
Competencies - click
Add Competencies and add competencies to performance appraisal template by selecting relevant checkboxes in a popup.
Appraisals Archive
Appraisals Archive
Appraisals archive list shows all appraisals completed and approved by manager. It is possible to delete draft appraisals in
Appraisals Archive. Administrators are able to remove the closed appraisals.
Export to PDF
Export to PDF
Appraisals can be exported to pdf in any stage of the assessment. Just click the PDF icon in the Performance Appraisals tab.
The PDF also displays comments history and employee’s performance notes.
Employee Self Review
Employee Self Review
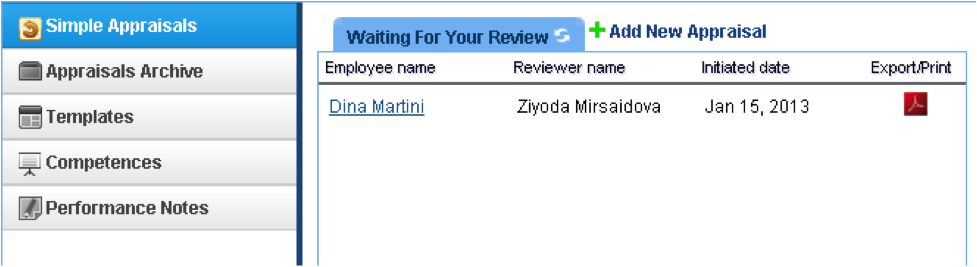
Once managers review the appraisal and send to employees for self-review, employees will receive an email notification with a link to view their appraisal. Employees can also log in to their account and view the appraisal in
Waiting for Your Review tab of
Performance Appraisals section.

Employees should click the appraisal and leave their own review or rate as indicated below:
Employee-Manager comments are shown as comments history, if the number of comments is more than 3. Employees should complete the review and click the
Review and Submit to Reviewer button.
Managers then, can close the appraisal, or review and send to employee until the agreement is reached.
Performance Appraisals
Performance Appraisals
Roles
HR Managers, Administrators, Department Leaders, Directors, can assess employees' profiles and view the performance appraisals tab. However, whether they will be able to assess employees or not depends on
Performance Appraisal Settings (Settings – HRMS – Performance Appraisals). Employees are able to initiate appraisals to themselves and to view their own appraisals.
Initiate Appraisal
Your user role and
Performance Appraisal Settings will determine if you can initiate appraisals, and to whom you can initiate the appraisals. Department leaders can initiate appraisals to employees in their own department; whereas HR Managers, directors, administrators can initiate appraisal to all employees.
In order to initiate appraisal, click
Add New Employee Appraisal from add new menu or go to the
Performance Appraisals tab and click
New Appraisal.
Depending on your role and
Appraisal Settings ( Settings – HRMS Settings), you will be able to assess employees by selecting an employee from
Employees dropdown.
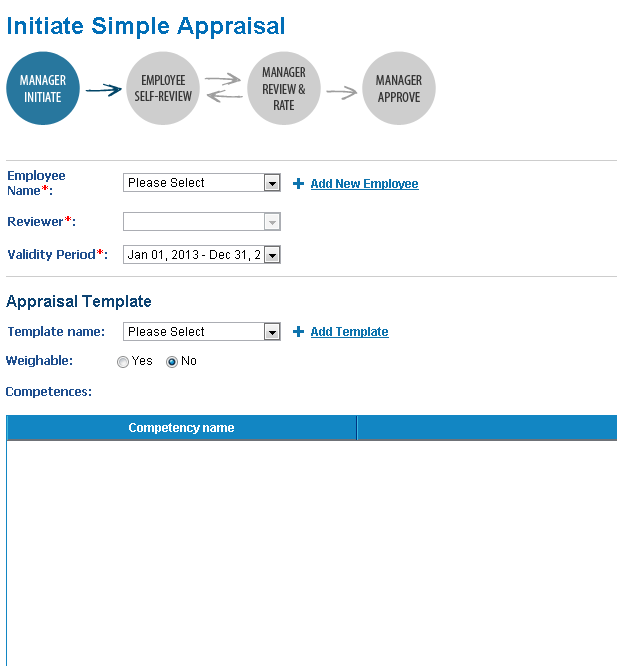
Fill in following details in order to be able to initiate the appraisal:
Employee Name – Select one of your employees to be reviewed from the
Employees dropdown.
Reviewer – You can select other managers who should review employees. When you do so, appraisal is first sent to an employee for the self-review, then sent to a reviewer. Otherwise, you should choose yourself as a reviewer.
Validity Period – Choose a validity period for which the performance appraisal belongs. Validity periods are performance management or goal management cycles, for which appraisals/goals to all employees should be complete. In order to add Validity Periods, go to
Settings –
HRMS Settings –
Validity Periods.
Appraisal Template – If
Use competencies in appraisal checkbox has been ticked in
HRMS Settings, it will be possible to review employees by their competencies.
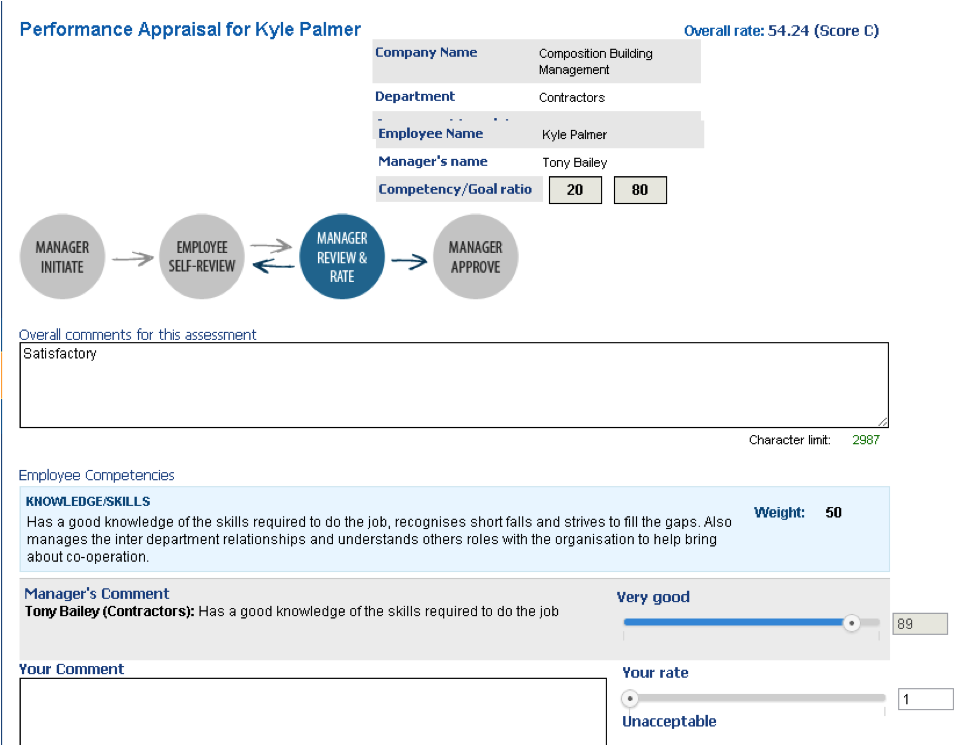
Template Name - Select competencies template from the list or add a new appraisal template straightly. Competency templates are list of all competencies grouped together for assessment. When you select the template, the lists of competencies appear in the competencies list:
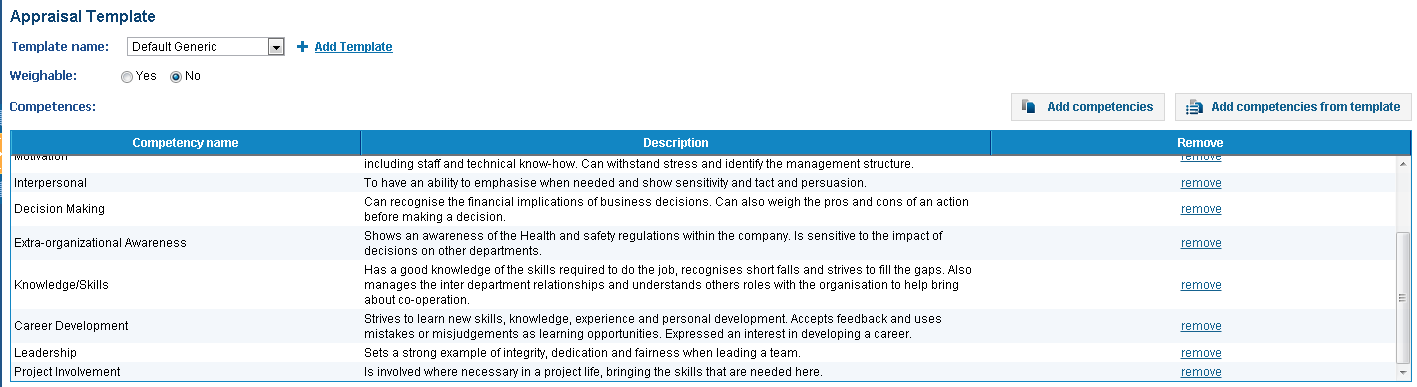
If you mark appraisal as weightable, you will be able to give scores and calculate performance appraisal scores based on weighted averages.
Assigned Goals - all employees assigned goals will appear here. In order to add a goal for an employee, click
Add Business Goal,
Add Department Goal,
Add Project Goal or
Add Personal Goal links.
Once all goals and competencies are there, you can give scores to each competency/goal and weighted averages will be calculated straightaway.
Initiate and Send to Employee
This button will initiate an appraisal and send it to an employee for self review. An employee should log in to his/her account and view the appraisal in the
Performance Appraisals –
Waiting for your review tab. The employee can review the appraisal by just giving comments or by giving employee scores. Whether employees can give scores to themselves can be configured in
Settings –
HRMS Settings –
Appraisal Settings –
Enable Employee Rate.
Initiate and Review
When initiate and review button is pressed, manager will be able to review the employee by each competencies or goals and write comments in boxes.
Once the appraisal review is complete, managers either can approve and close the appraisal, or send to the employee for the self-review.
Placements
Placements
Placement can be added only for
Candidates, which are already shortlisted.
Add new placement
In order to add a new
Placement, go to
Placements listing and click on
Add Placement.
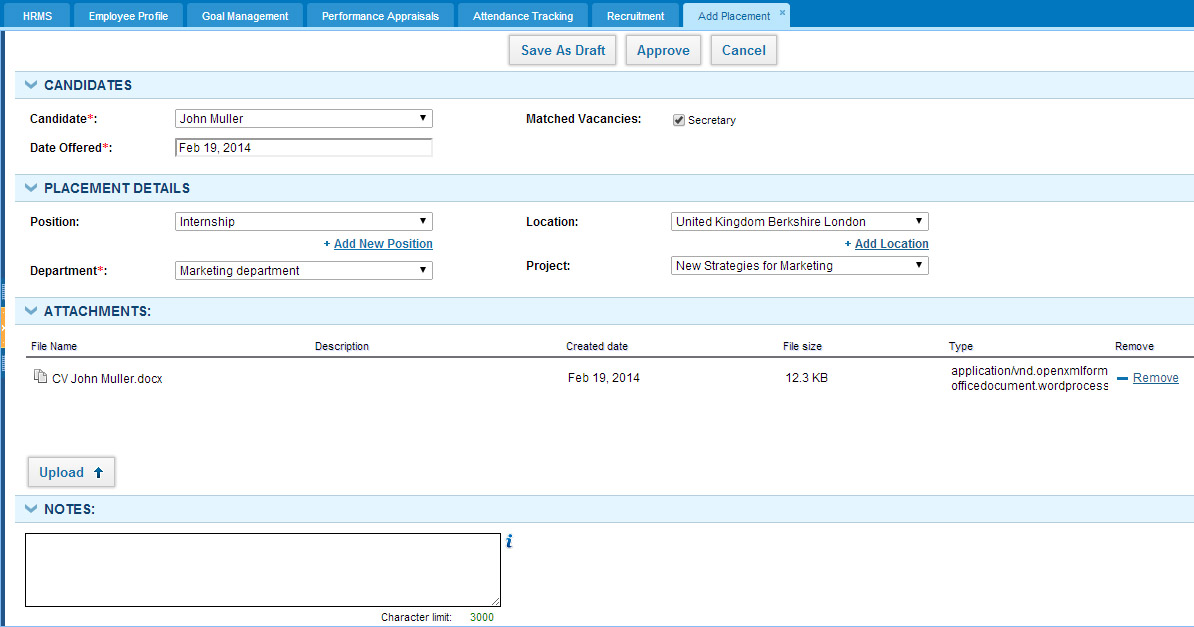
 Candidate
 – Choose candidate to be placed.
Date Offered – Date, when placement was offered to this candidate.
Matched Vacancies – List of vacancies, which this candidate was matched to.
Position – Position, on which this candidate is being placed. You can also add a new Position.
Department – Choose department that you are going to allocate this candidate to.
Location – Choose location where this candidate is going to work. You can also add a new Location.
Project –Choose project that this candidate will be assigned to.
On
Add Placement form you can upload some related attachments or add notes, as well.
You can then save this placement as draft and get back to it later, approve it or approve and hire his candidateright away. Once you hire him/her, his/her status will become
Hired and he/she will appear in the list of employees in the
HRMS section.
Activities
Activities
Activities are
Interviews and
Calls registered for particular candidates.
Add new interview
In order to add a new Interview, go to
Activities listing, click on
Add New and choose
Interview.
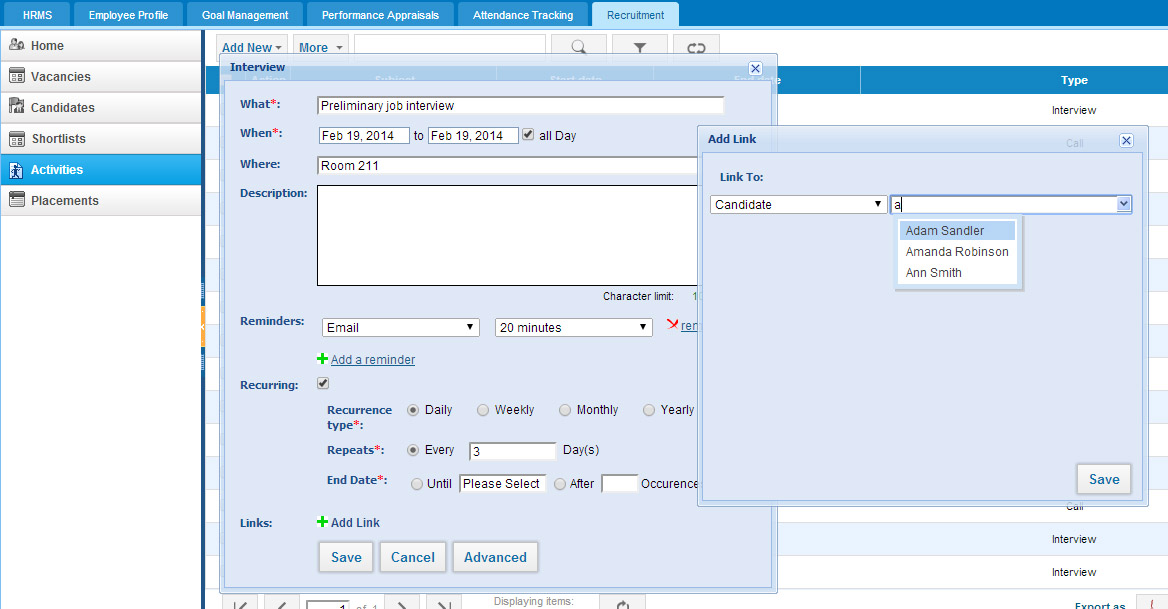
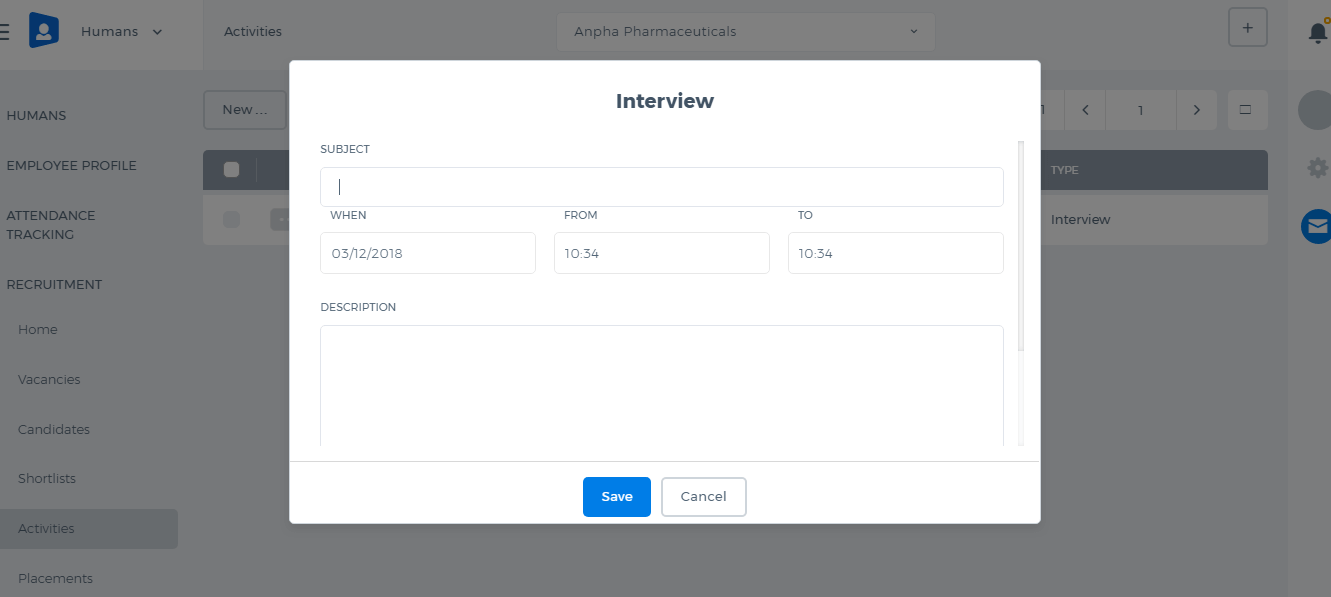
Fill in the following fields:
What – Interview name or any other relevant details.
When – Start and end date and time of the Interview (tick “All Day”, if it’s going to take a whole day or you don’t know the exact time).
Where – Specify place where Interview will take place.
Description – Short description or plan of the Interview.
Reminders – Set when you would like to be reminded of this Interview (you can add more than one reminder).
Recurring – If this Interview will take place more than once in regular time intervals, you can set up recurring settings. Firstly, specify how often it’s going to repeat, then once in how many days it will repeat, and finally when it should stop.
Links – You will need to link this Interview with particular Candidate. Press Add Link, choose Link To – Candidate and search him/her in the appeared look-up field (you can link Interview to more than one Candidate).
Add new call
In order to add a new
Call, go to
Activities listing, click on
Add New and choose to
Log a Call.
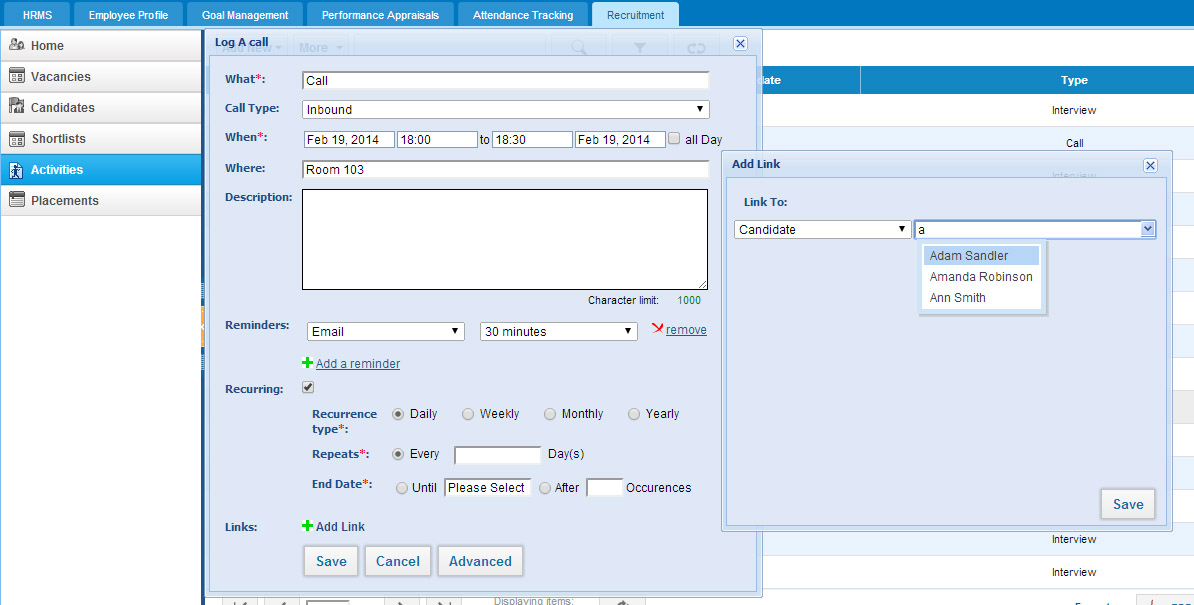
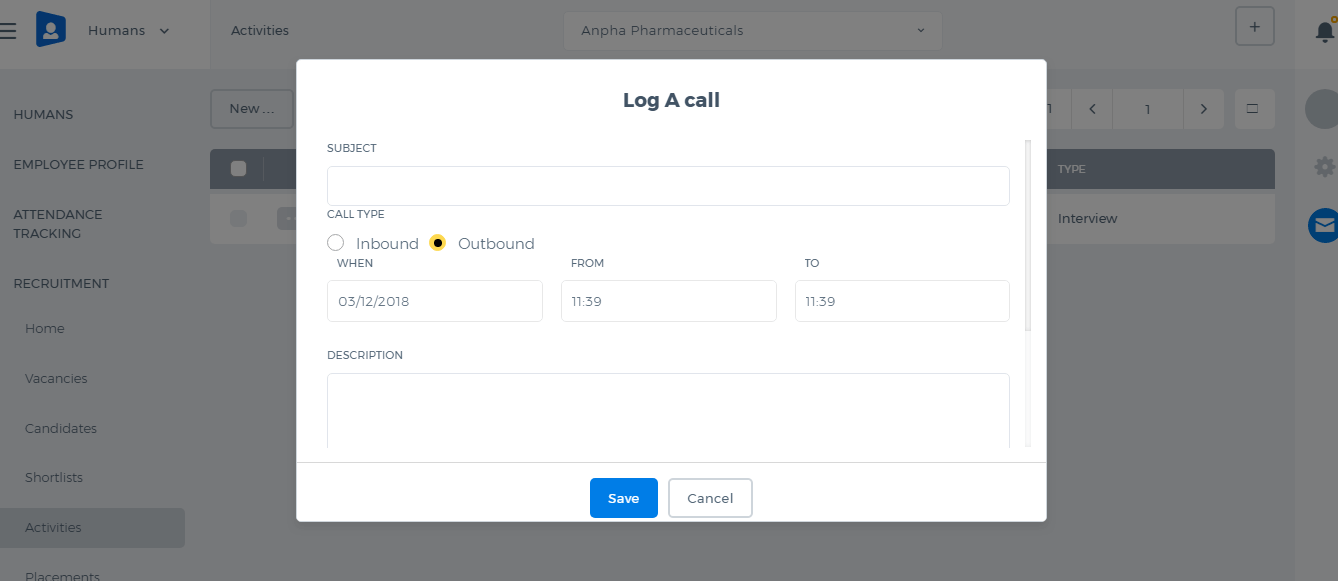 What
What – Call name or any other relevant details.
Call Type – Choose if this call will be Inbound or Outbound.
When – Start and end date and time of the Call (tick “All Day”, if it’s going to take a whole day or you don’t know the exact time).
Where – Specify place where Call will take place.
Description – Short description or plan of the Call.
Reminders – Set when you would like to be reminded of this Call (you can add more than one reminder).
Recurring – If this Call will take place more than once in regular time intervals, you can set up recurring settings. Firstly, specify how often it’s going to repeat, then once in how many days it will repeat, and finally when it should stop.
Links – You will need to link this Call to particular Candidate. Press Add Link, choose Link To – Candidate and search him/her in the appeared look-up field (you can link Call to more than one Candidate).
Activities can also be added directly from
Candidates and
Shortlists listings, with the help of
Action menu.