Tax Rates
Tax Rates
To charge your clients and suppliers for the taxes while selling or buying goods and services, firstly you should add taxes rate in the
Accounting settings. Then you can use added tax rates in your sales invoices, orders quotes and in purchase orders and invoices.
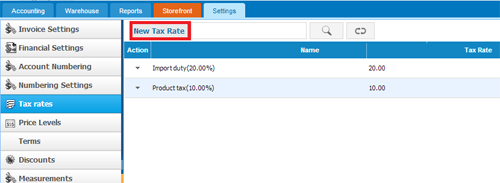
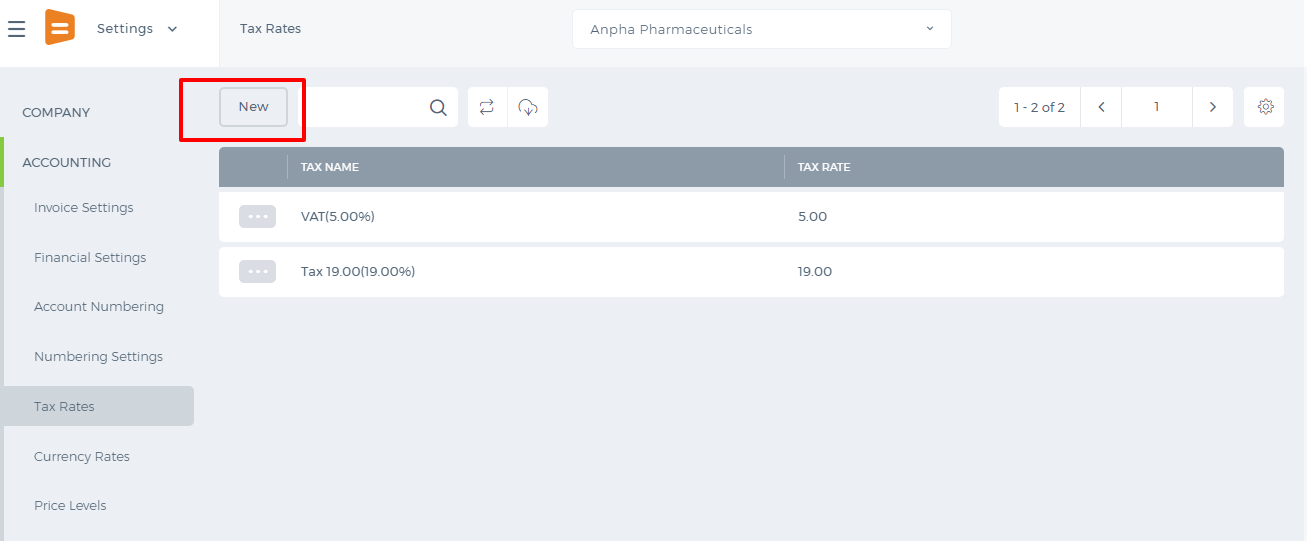
To add tax rate go to
Accounting >> Settings >> Tax rates and in the tax listing page click on the
New Tax Ratebutton.
If you click on the button following window will appear:
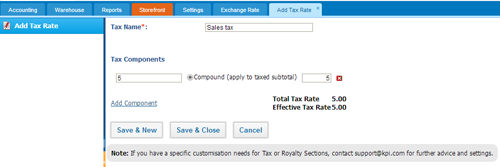
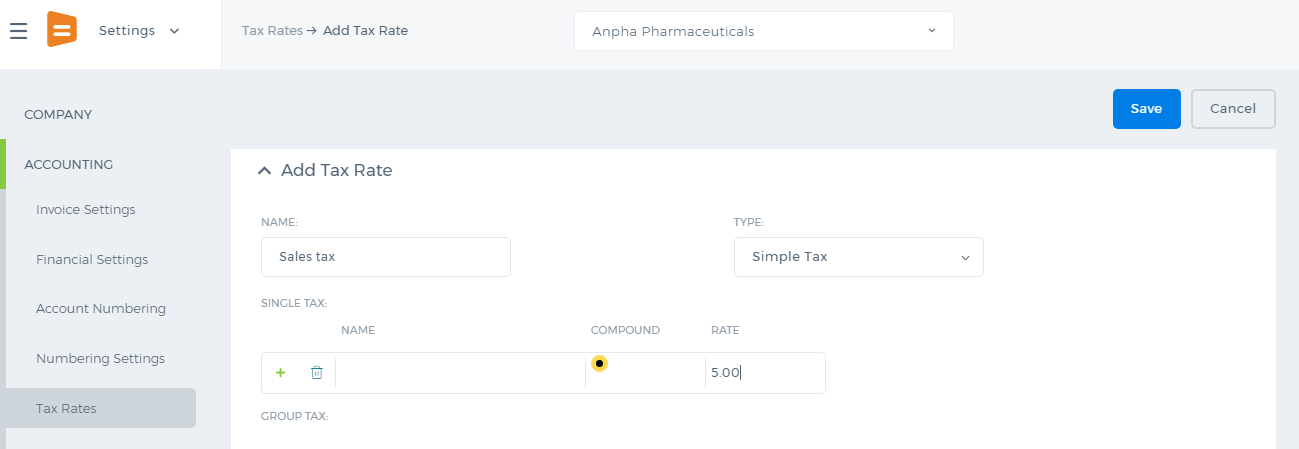
Fill the required fields and after you have made sure that you are done, click on the
Save & Close.
Whenever you add sales quote, order and etc, you can apply your tax rates to your clients and suppliers. If you have enabled
Double Tax Rate Add on you can use two taxes while sending quotas.
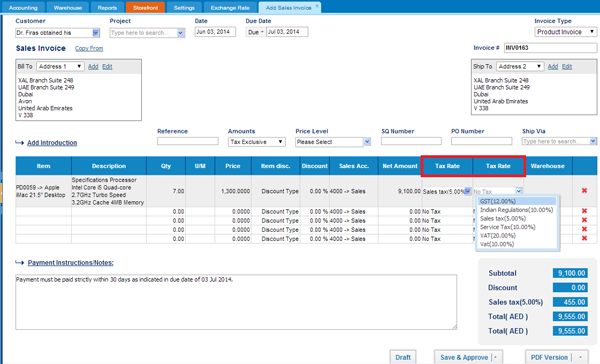
At the bottom right hand side you can see how the total amount is calculated and the amount of each tax.
Multiple Currency
Multiple Currency
You can enable
Multiple Currency feature to view and enter transactions in multiple currencies.
To enable the
Mutiple Currency, perform the following steps:
1. Go to the
Accounting and Finance Module
2. Go to the
Settings subsection
3. Click the
Financial Settings from the left-side bar
4. Check on the Enable Multiple Currency
5. Click the Save Financial Settings to complete the update.
Once you have saved the changes successfully, you will be able to do invoicing in different currencies other than your base currency.
While creating an invoice, you can choose the currency from the Currency dropdown on top right side of the invoice form.
Numbering Settings/Accounts
Numbering Settings/Accounts
You can set up the numbering settings for the following features and transactions in
Settings>>Accounting>>Numbering Settings:
- Products/Services;
- Fixed Asset;
- Expense Claims;
- Manual Entries;
- Bank Payments;
- Bank Receipts;
- Cash Payments;
- Cash Receipts;
- Customer Prepayments;
- Supplier Prepayments;
- Stock Adjustments;
- Sales Quote;
- Sales Invoice;
- Credit Note;
- Purchase Order;
- Purchase Invoice;
- Purchase Credit Note;

 By default Numbering settings in the system were set up as in the picture above. You can easily change and update the settings by saving it.
Invoice Payment
Invoice Payment
Invoice payments.
To add invoice payments, open Accounting and Finance>>Transactions>>Invoice payment.
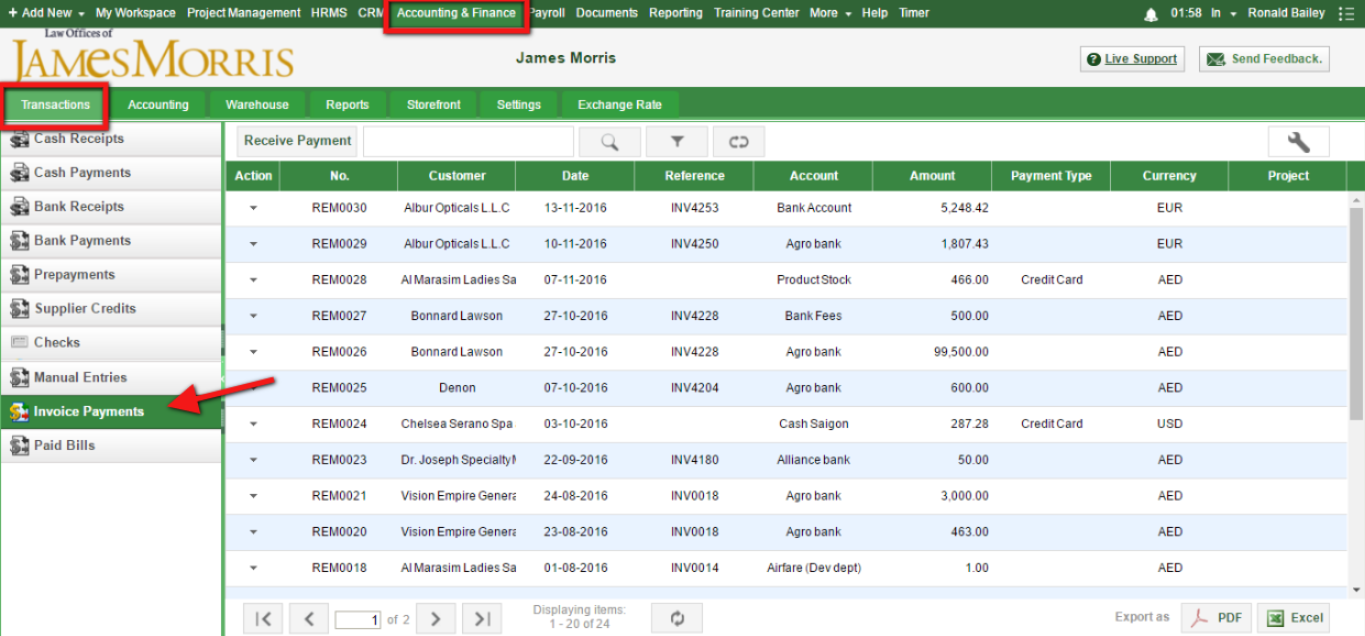
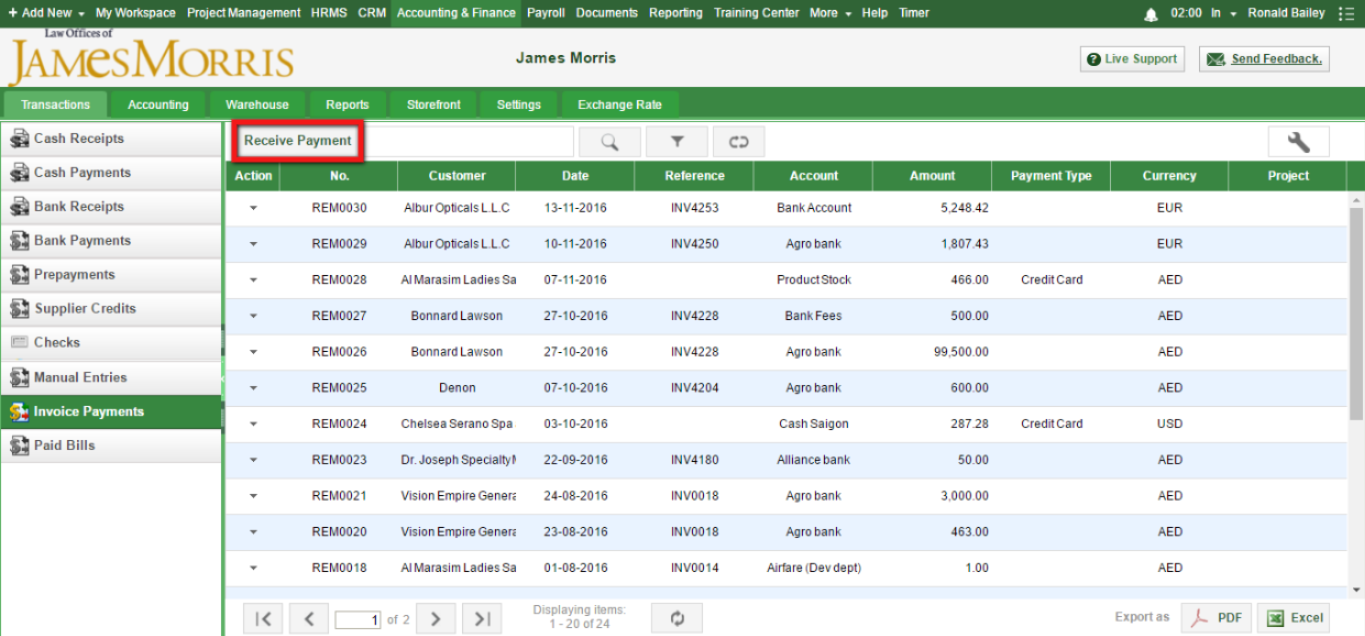
Then click on Receive Payment Button.
Once you click Receive Payment Button, following form appears on the screen:
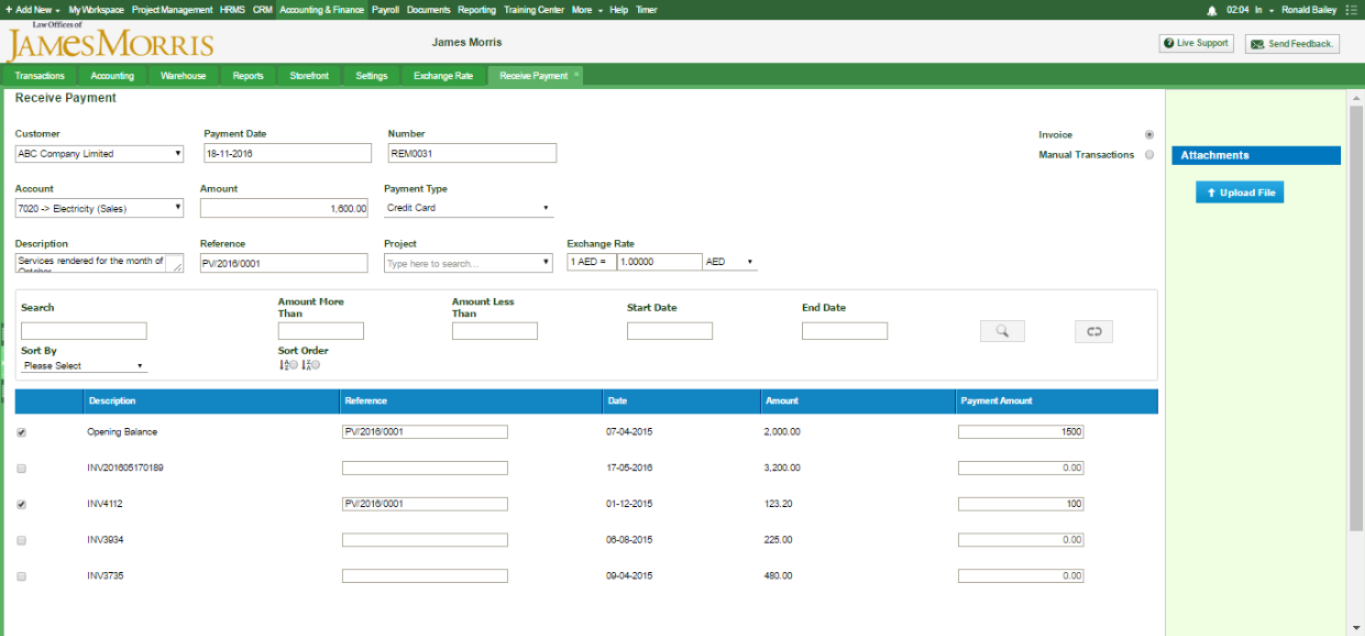
1. Customer-select customer for whom you want to receive payment
2. Payment date-indicate payment date when you receive funds
3. Number-system automatically fills numbering for you
4. Account- choose bank account into which the payment will be posted
5. Amount-system automatically calculates the total payment amount
6. Payment type- choose the method of payment
7. Description- note for this payment
8. Reference- here you specify number for reference
9. Project- You can specify the project if you want to relate the transaction to specific project.
10. Exchange rate- If you want to add payment in another currency you can choose the currency you want
After choosing everything which needs to be filled out, system automatically shows you unpaid invoices.
You should tick invoices you need and indicate amounts. Lastly click on save button
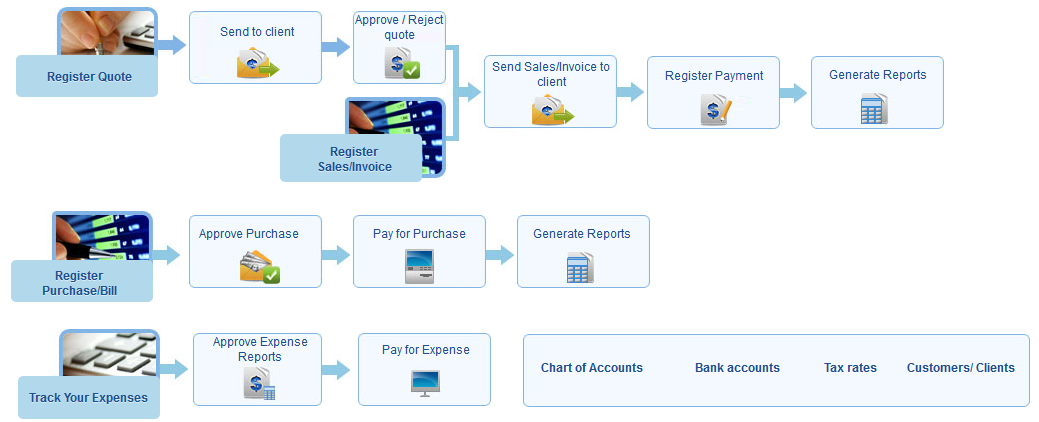
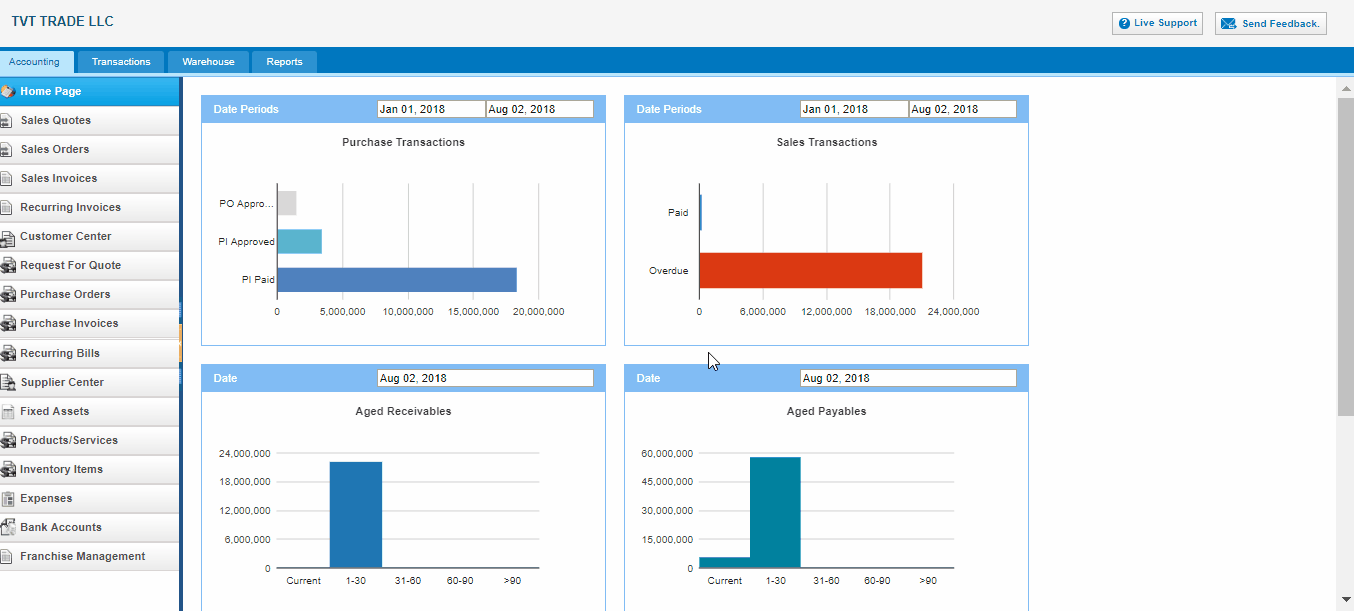
Accounting Overview
Accounting Overview
kpi.com offers accounting solution for small and medium businesses, allowing them to manage their daily sales, purchases, expenses, fixed assets and inventory transactions routine. But there is more than just bookkeeping. With
kpi.com you can offer your services online by setting up a storefront.
Within
kpi.com you can invite your customers into the system allowing them to track quotes, orders and invoices issued.
If you have sales personnel, you can also add them to your company, so they can take care of their sales, and employees can track their expenses within one system, and there is no hassle to maintain separate spreadsheets or extra platforms.
You can use the system for the purposes of bookkeeping, reporting with integrated functionalities of financial documents flow management where you will be able to add sales invoices, sales quotes, purchase orders and purchase invoices. You can either follow the links below or find what you need in appropriate Accounting and Finance Sections on the left.
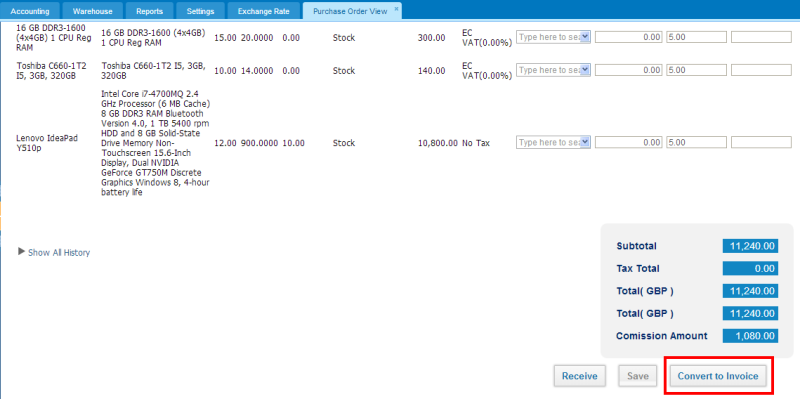
Landing Cost
Landing Cost
To add landed cost to the products in kpi.com, you should take a few steps such as:
- Creating Purchase order
- Adding expense claim
- Connecting purchase order to an expense claim.
- Sending it your Supplier/customer
Firstly, to create a Purchase order, go to
Accounting >> Purchase order and click on the
Add button. The following form will appear:
Fill out the purchase order’s fields and
Save & Approve or if you have two step approvals, submit the purchase order to manager
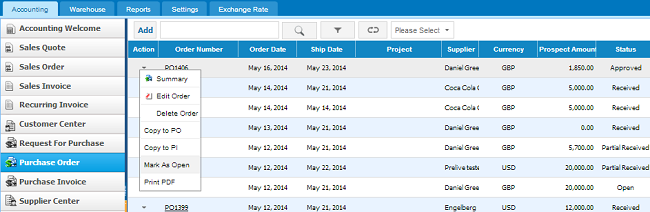
Then in the Purchase order listing page,
mark purchase order as open in the action menu.
In the next step,
create expense claim and
connect it to the purchase order:
In order to create expense claim on the expense claim listing page, click on the
Add button. If you proceed with the link following window will appear:
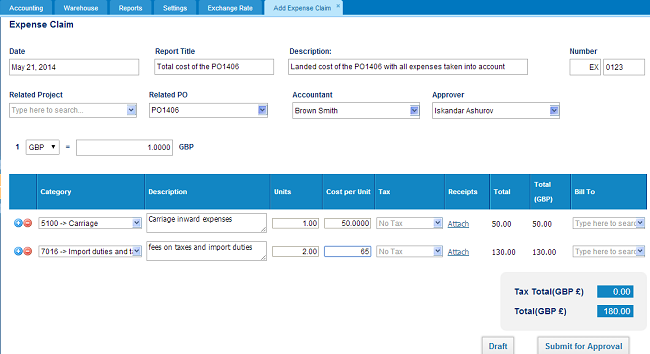
Specify the date, report title, description, and Related project. In the related PO, type the Purchase order number (Note: if you misspell the PO number, expense claim will not be interconnected with the Purchase Order). In the next fields such as Accountant and approver, you can indicate accountant of the company and approver who will approve the expense claim. After filling out the required your fields you can submit for approval.
When the expense claim is approved by your manager, the purchase order that has been connected to the expense claim will have the following form:
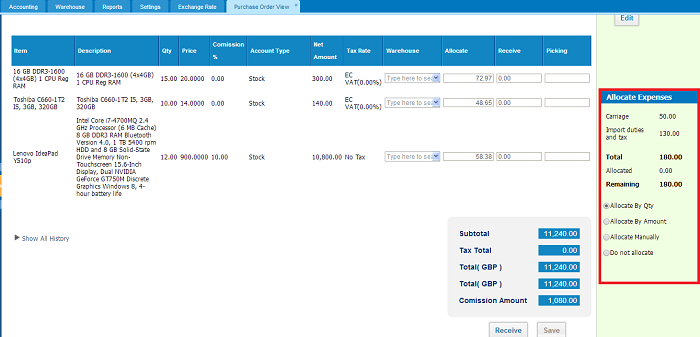
On the right-hand side of the window, you can see
Allocate Expenses box where you can allocate the expense of the products by their quantity, amount or allocate manually as you desire and not allocate at all.
Allocate by Quantity- if you choose this option, the system will give preferences to the product which has more quantity and allocate more expense cost to that product.
Allocate by Amount –if you choose this option, the system will give preferences to the product with the bigger amount and allocate more expense cost to that product
Allocate manually – with this option you can manually allocate expense costs to products
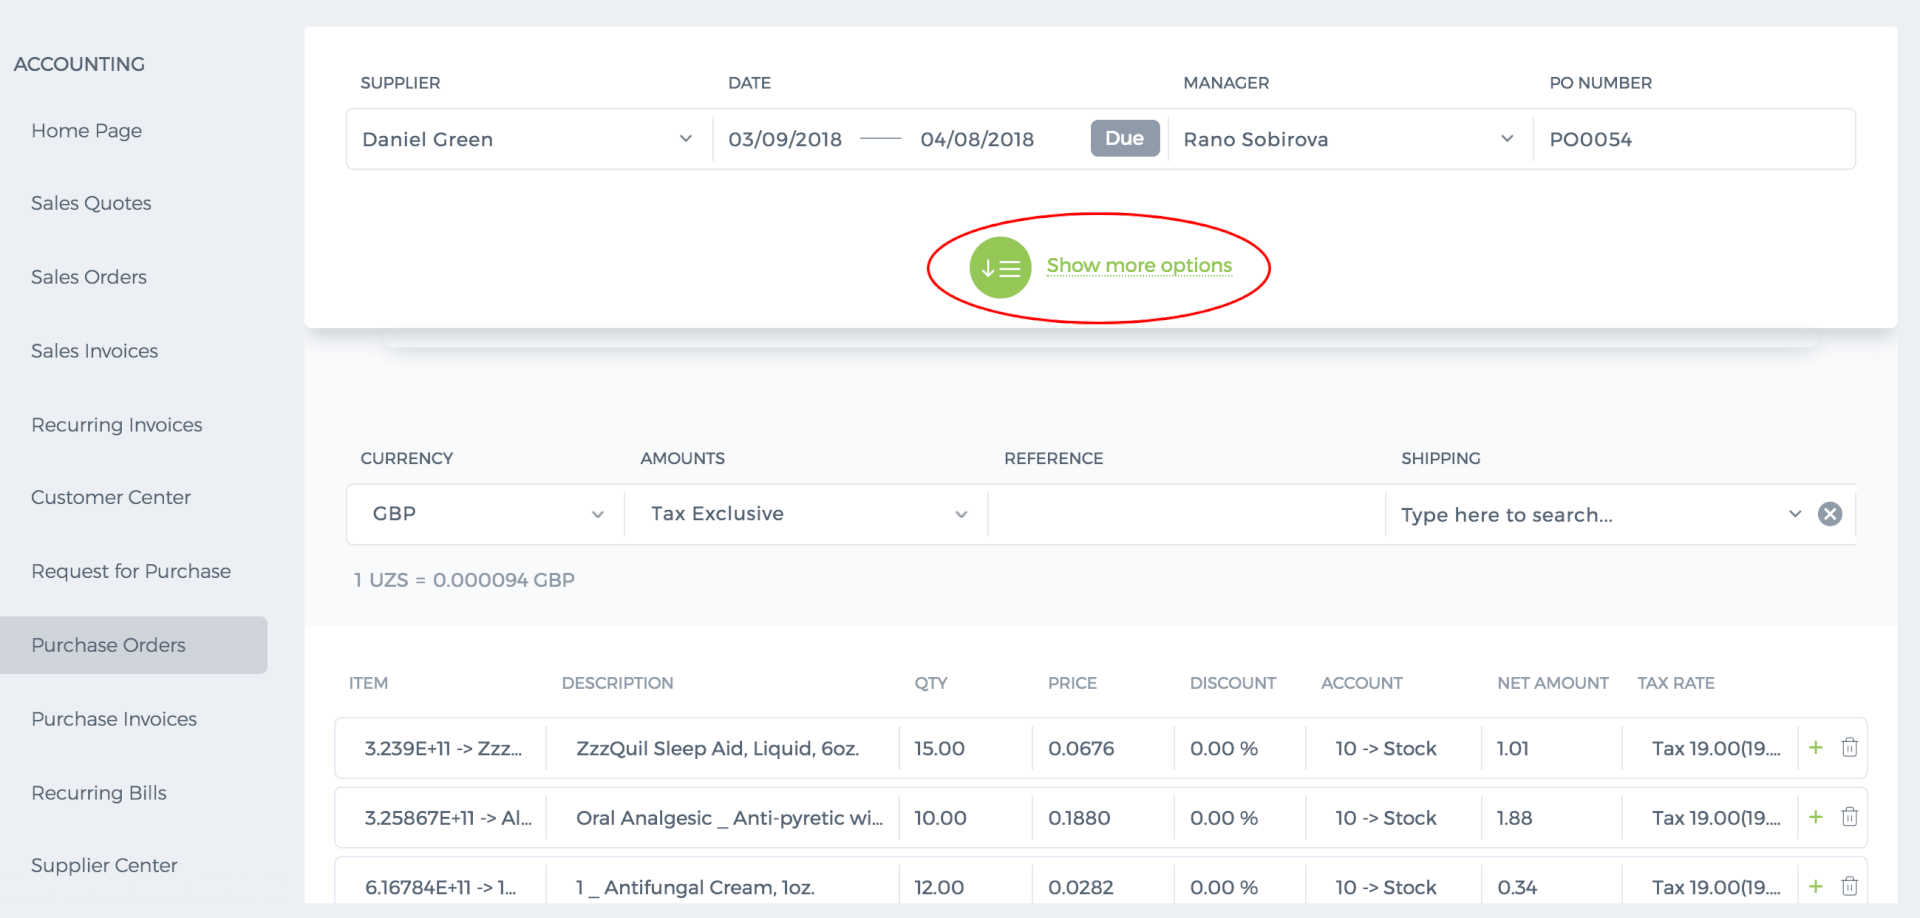
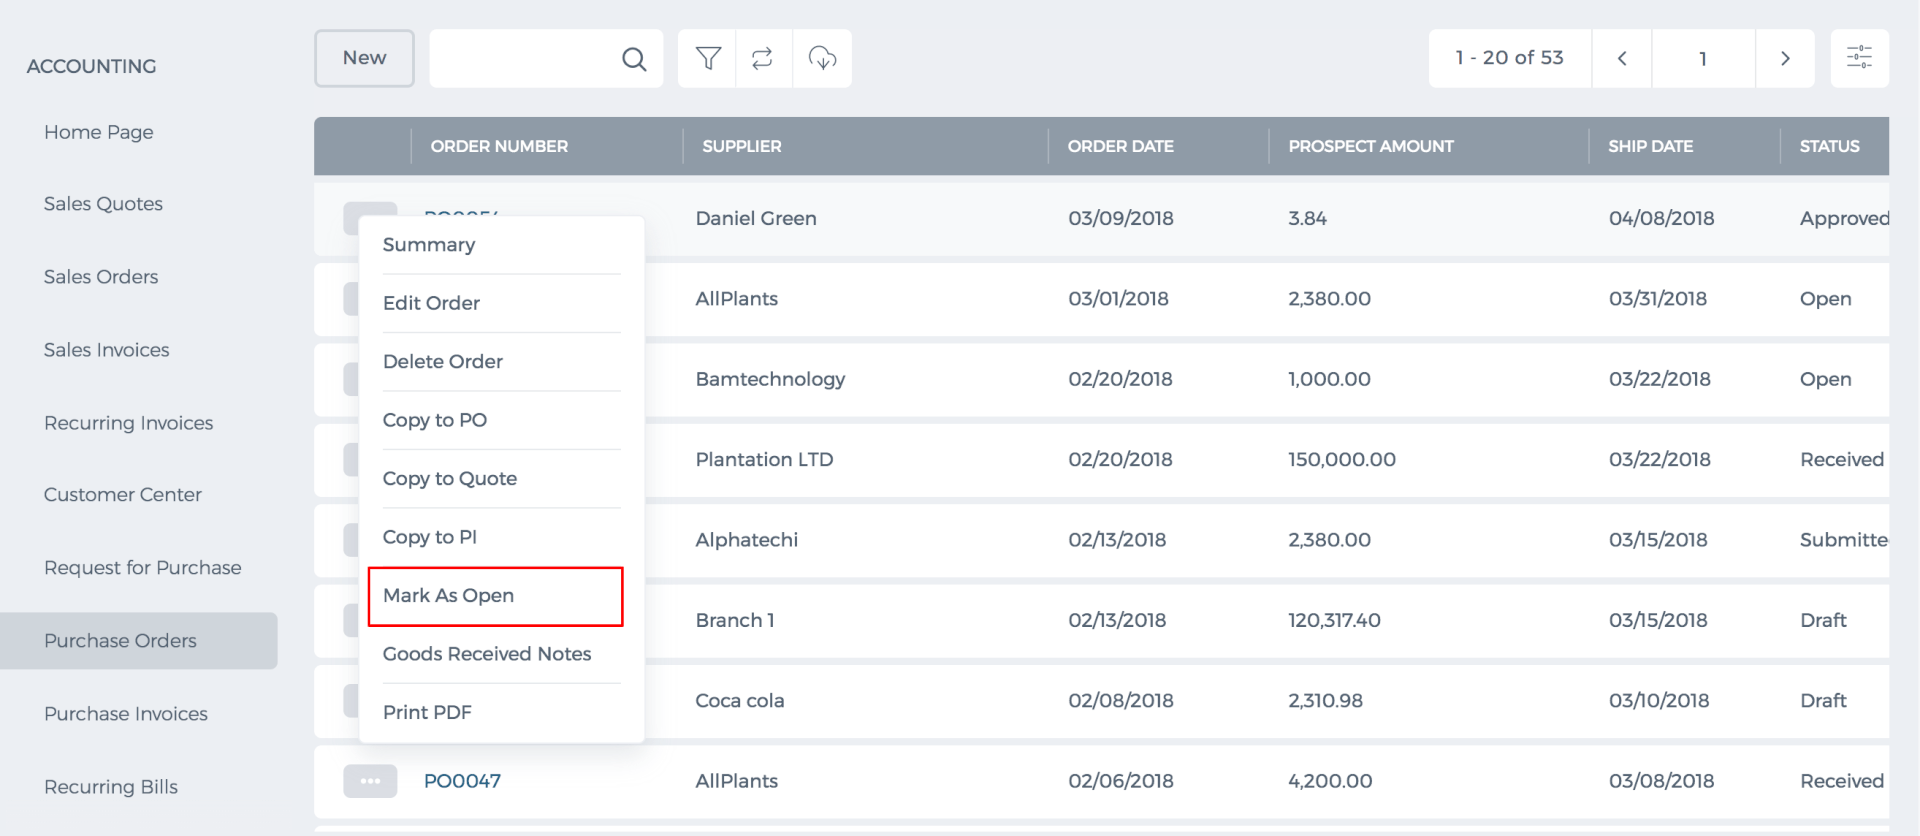
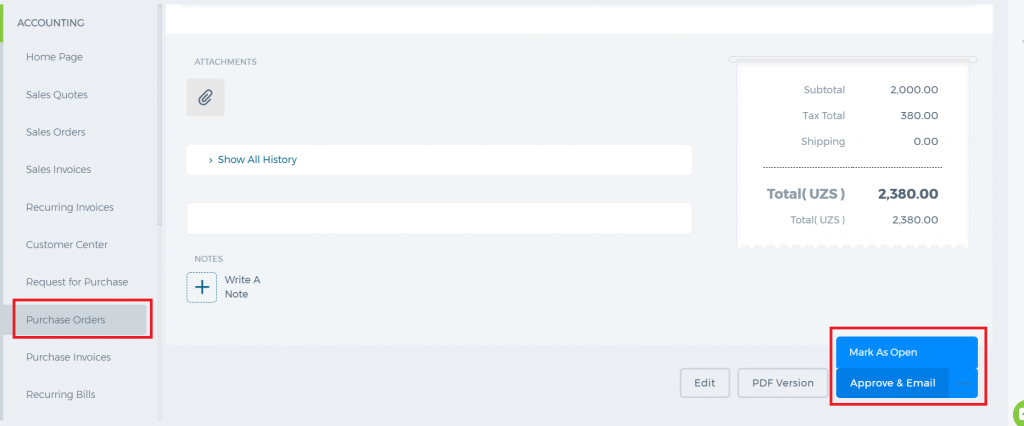
Mark as Open
Mark as Open
Once the Purchase Order has been approved you can send it to Supplier from the Purchase Order view form or change its status to "Open" manually. In order to change the status to "Open", go to Purchase Order listing page, click on the Action menu and click on
Mark as Open.
You can change the status of the Purchase Order from summary view as well. Go to summary view of Purchase Order and click on the right hand side of the "
Approve & Email" button and choose the "
Approve & Open"/ "Mark as Open".
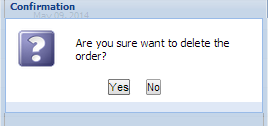
Delete Purchase Order
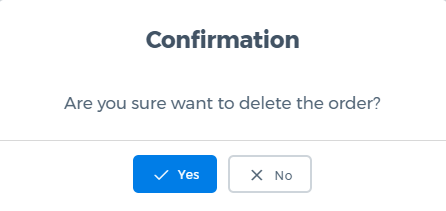
Delete Purchase Order
To delete Purchase Order from the Purchase Order listing page, click on the Action menu and choose
Delete Order.
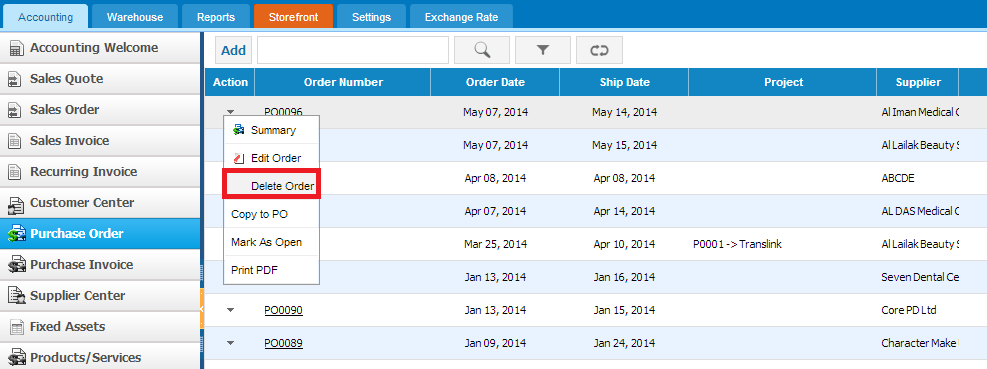
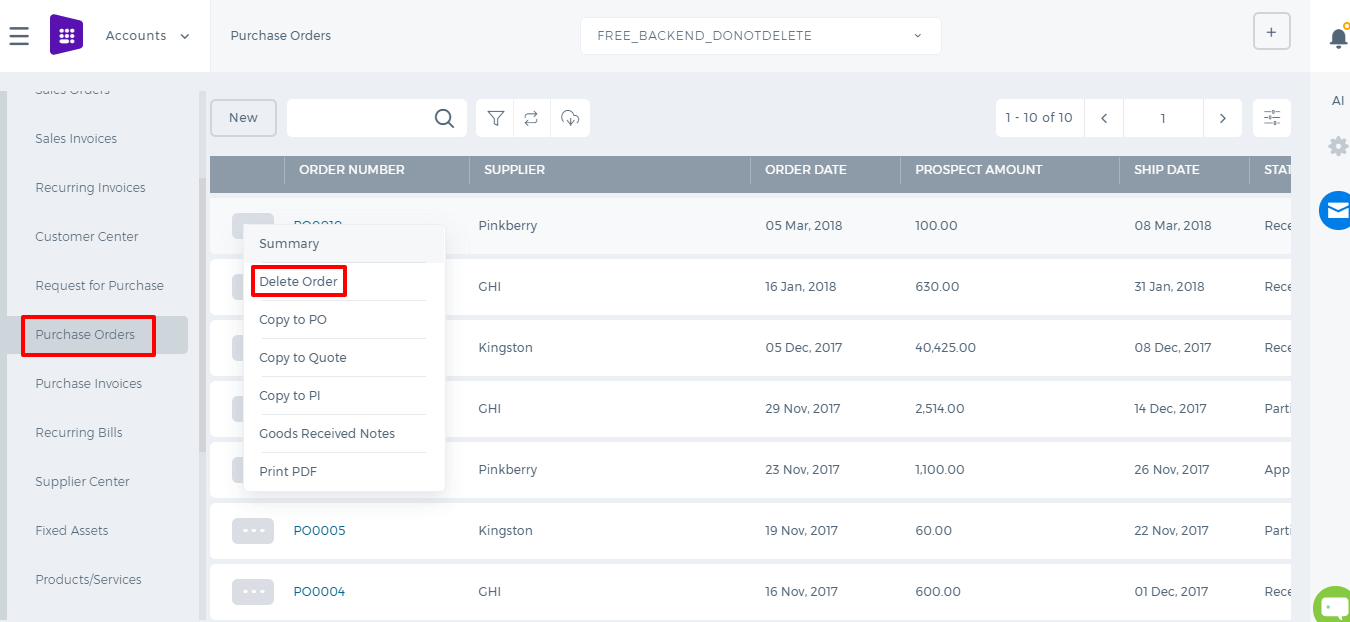
Then confirm that you want to delete this Purchase Order and purchase order will be deleted.
Edit Purchase Order
Edit Purchase Order
To edit Purchase order, click on the Action menu and choose
Edit Order.
Purchase order view will be opened where you can change the supplier, address, items, quantity of items and etc.
After editing the purchase order click on
Save & Approve and changes will be saved.
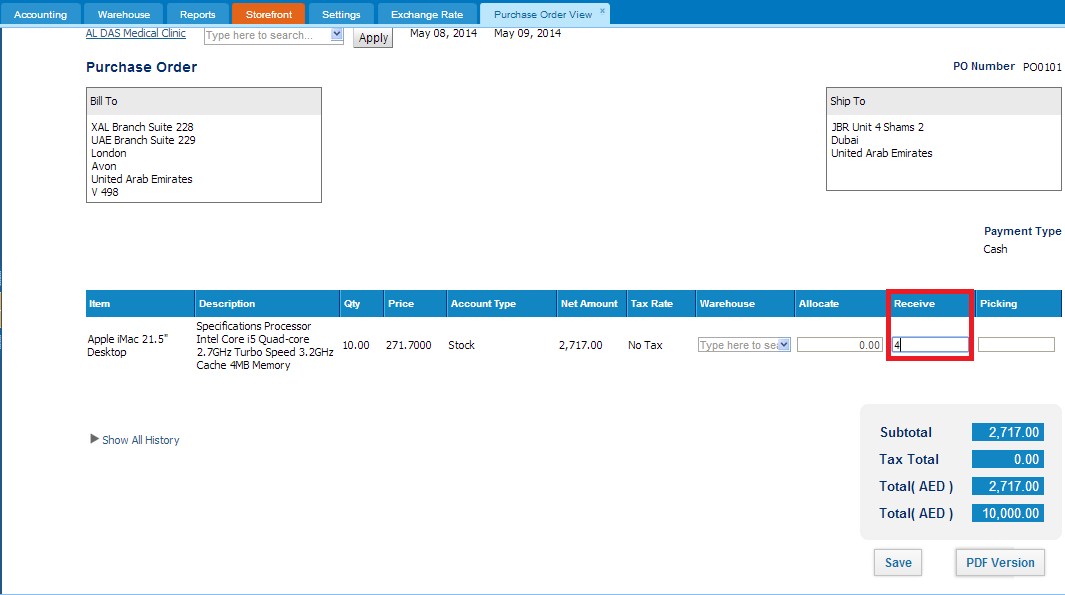
Receive Purchase Order
Receive Purchase Order
In order to receive
Purchase Order go to Summary view page of
"Open" purchase order. (Purchase order Status will be changed to
"Open" after sending it to Supplier).
If you do not need to send Purchase order you can change its status manually via
Action list,
"Mark as Open" or open summary view of Purchase Order and click on the right hand side of the
"Approve & Email" split button and choose the
"Mark as Open".

Open summary view of the Purchase order with
"Open" status and click on
Receive button:
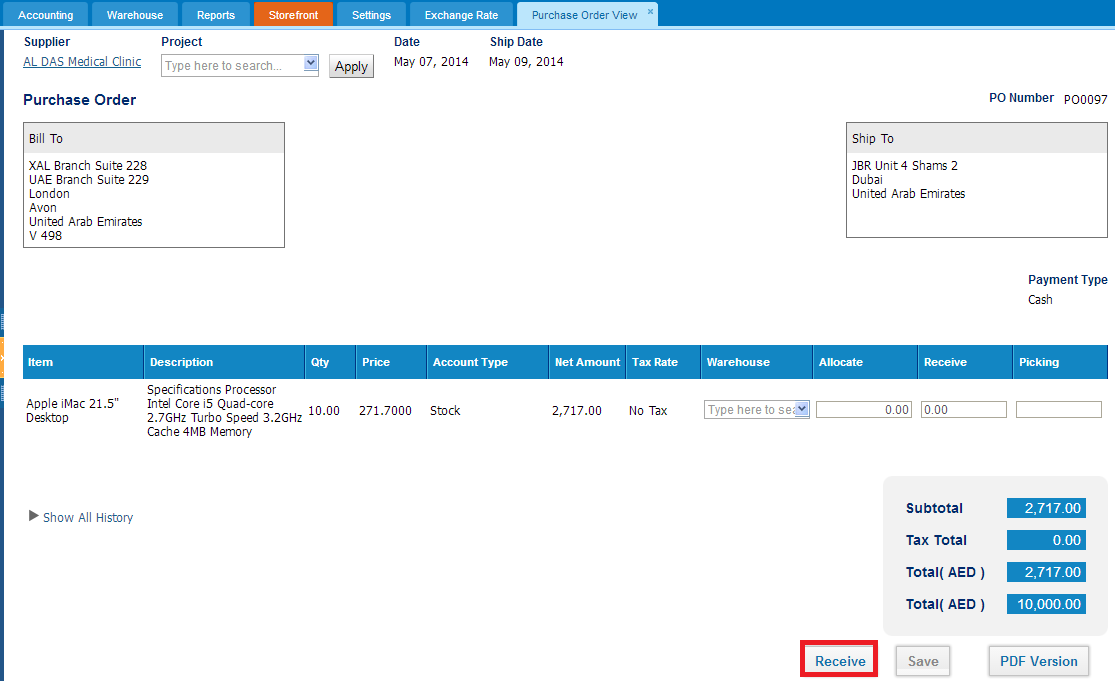
Once you click on
Receive button total quantity of the purchased item will be added to
Receive field. In the
Receive field, you can change the quantity of received items that allow you receive partial amounts, or even more than ordered.
And save it.

Users can receive partial amounts until all items are received. Received amounts can be converted to Purchase invoice.
In some cases all amount of purchase order might not be received, in this case, you may close the purchase order. (This option will be activated upon client’s request, if you need please contact to Support team via
support@kpi.com)
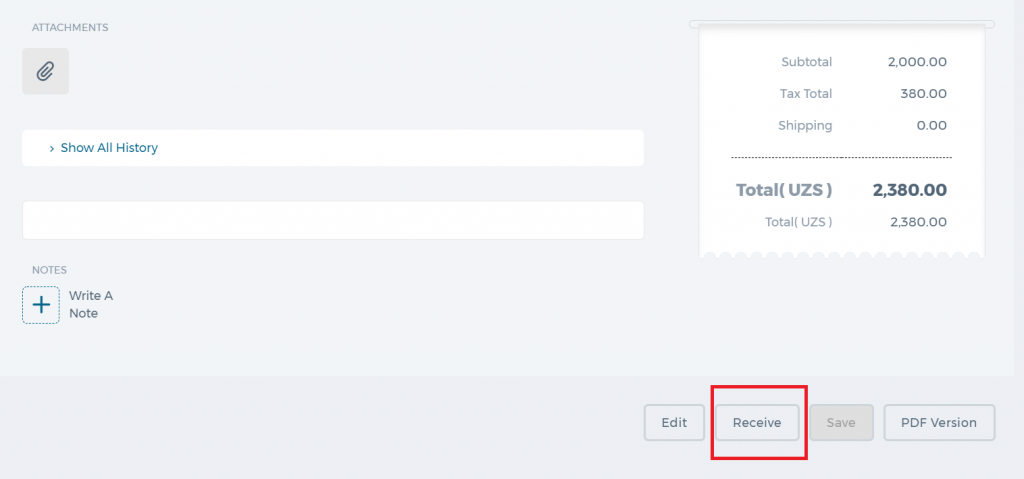
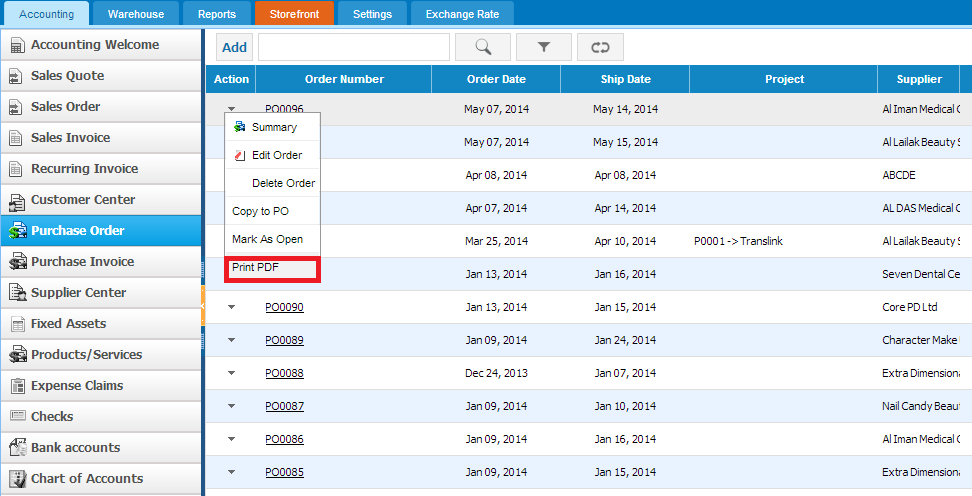
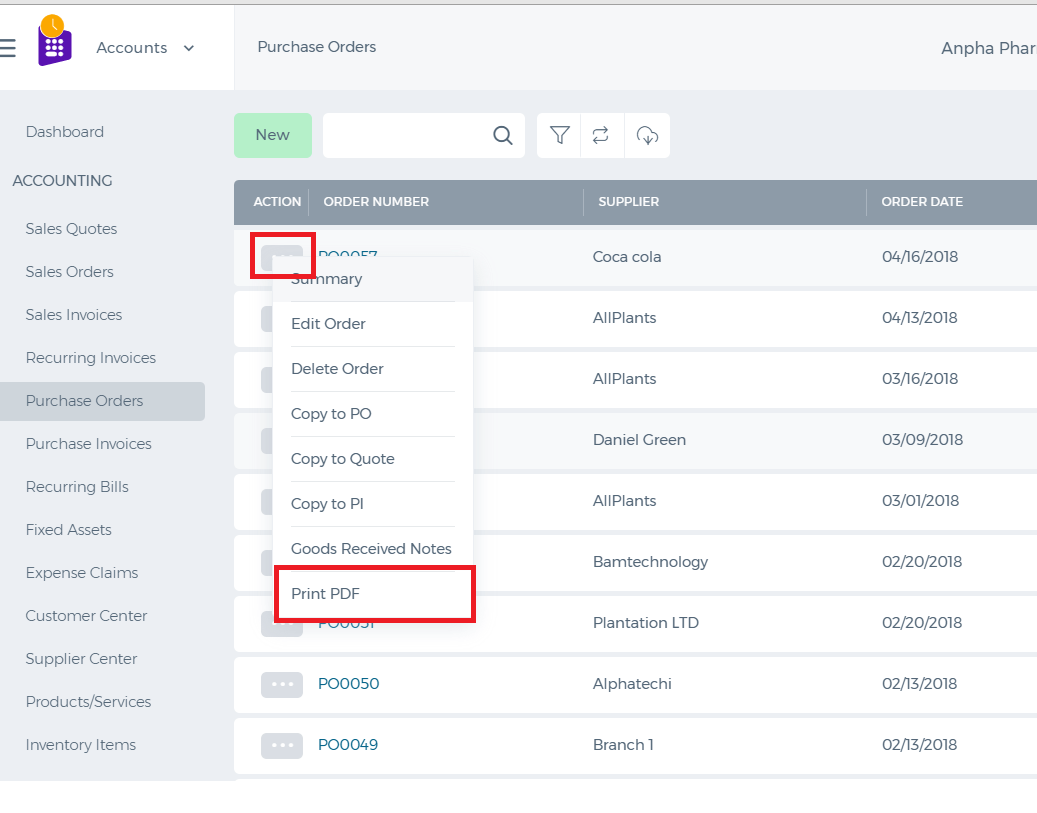
Print Purchase Order
Print Purchase Order
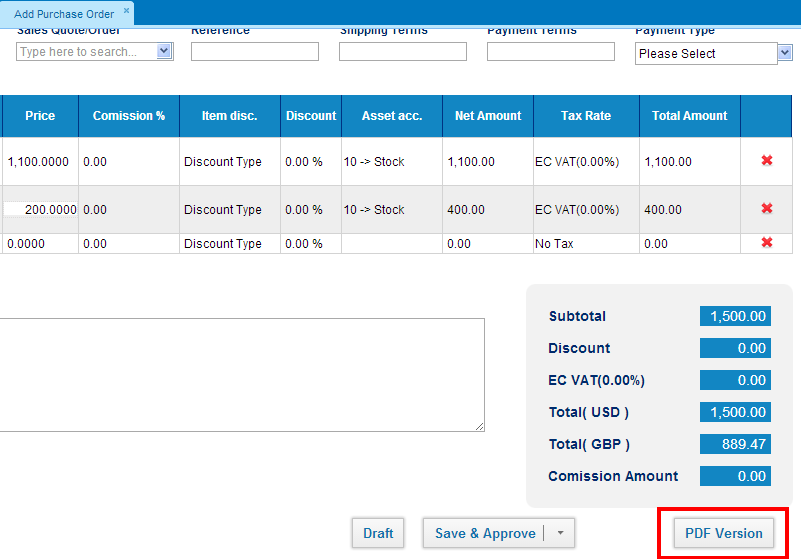
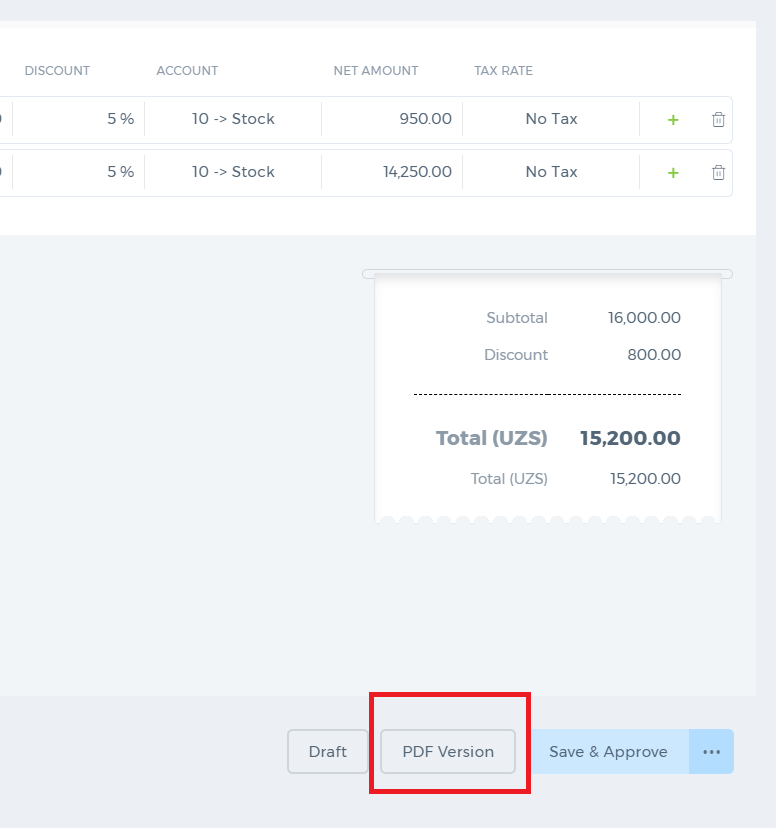
You can get print version of the Purchase Order through
"PDF Version" button once you have filled all the required fields in add Purchase Order form:
In order to print Purchase Order from the Purchase order listing page, click on the action menu and choose
Print PDFoption:
Send Purchase Order
Send Purchase Order
After saving Purchase order, go to summary view of the Purchase order and click on the
Approve & Email in order to send it.
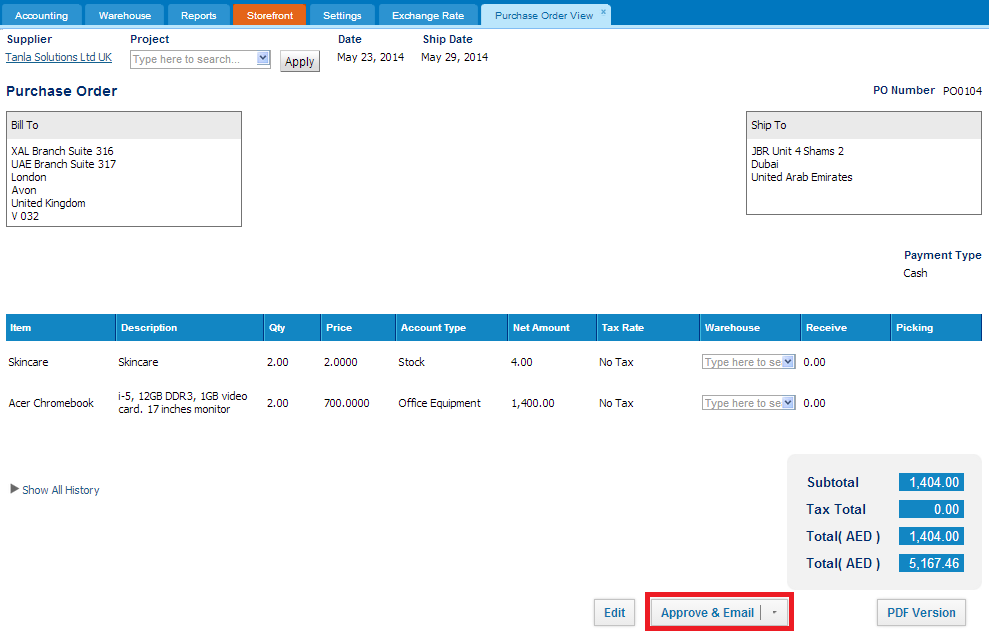
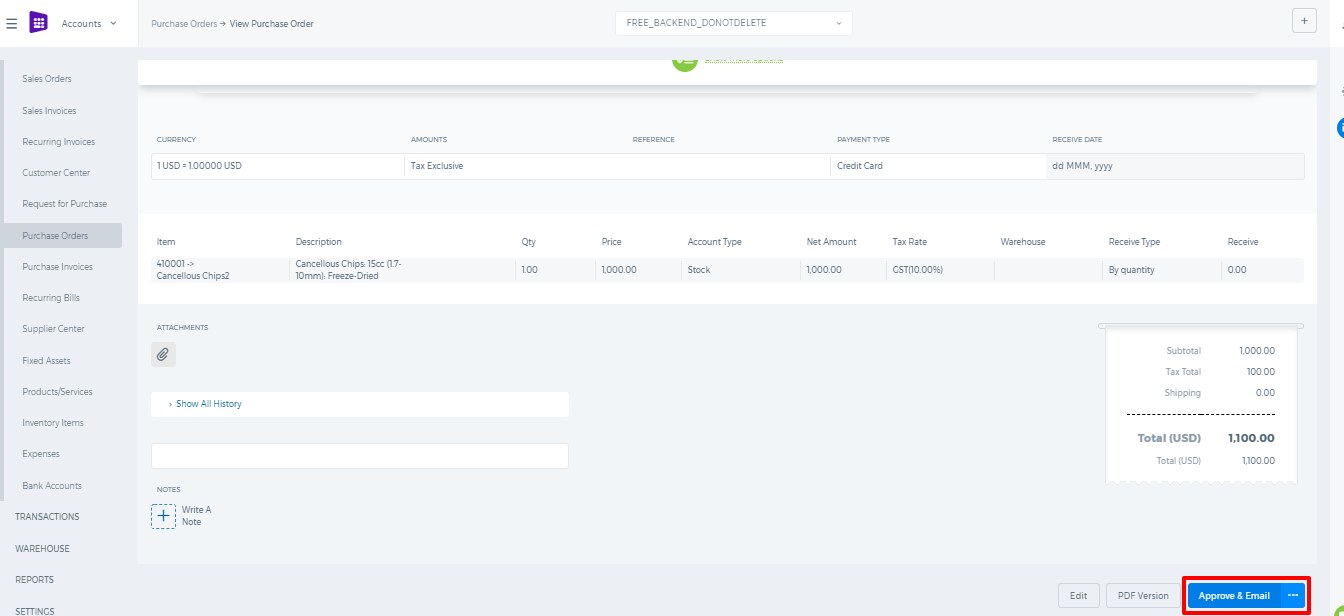
Once click on the
Approve & Email, following pop-up window will appear:
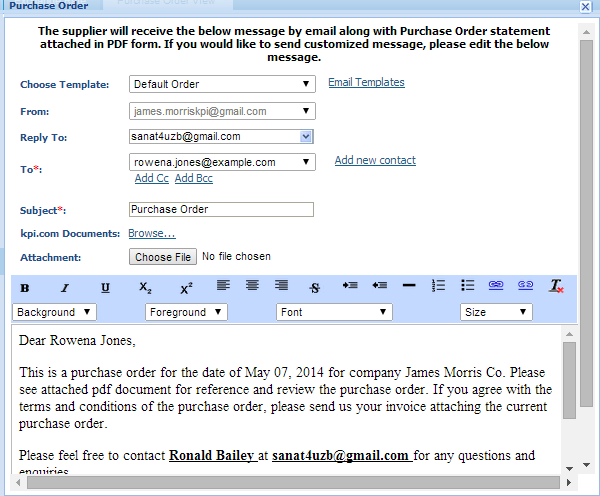
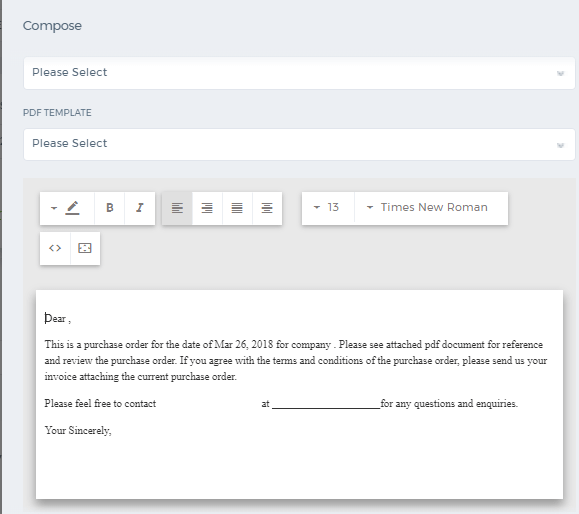
Pop up window shows the default email which will be sent with along purchase order. If you wish you can modify default email message and choose your own template to purchase order. Also, you can attach files from your desktop or from the
kpi.com documents regarding purchase order.
You can send clicking on the
Send button:

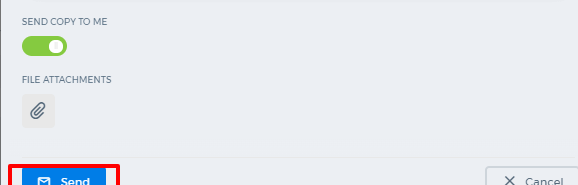
If you do not want to receive copy of the email, you may uncheck
Send copy to me. By default it will be selected.
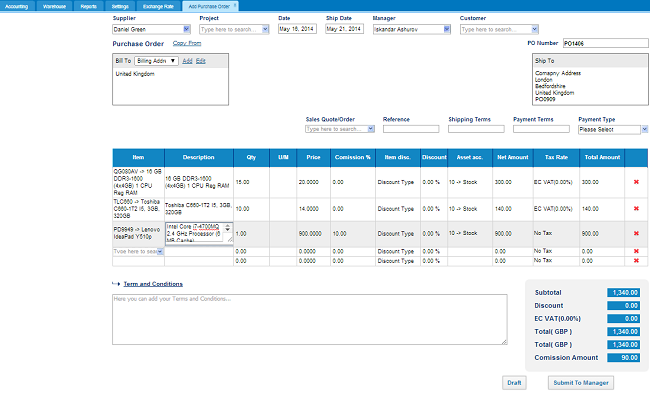
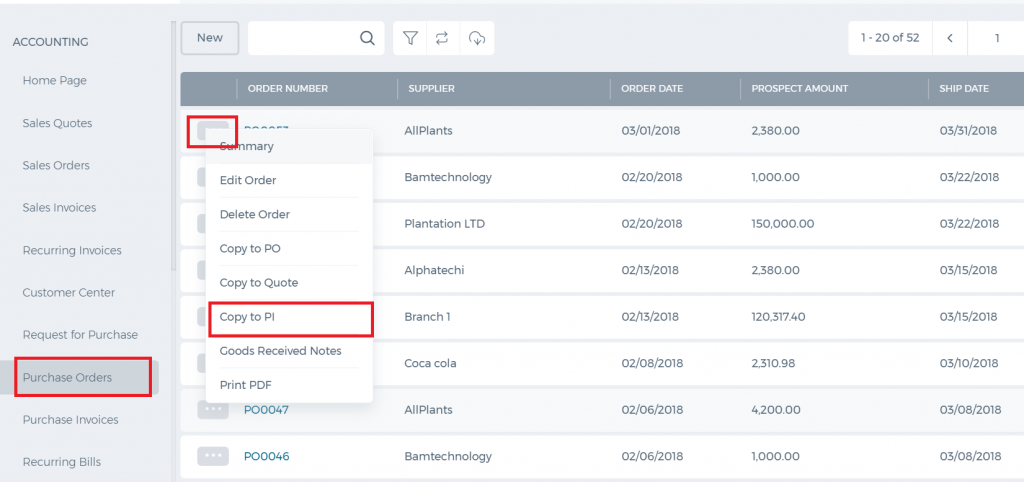
Add Purchase Order
Add Purchase Order
To create
Purchase Order, go to
Purchase Order listing page and click
Add or use hot keys"ALT+o" (for Google Chrome) and "Shift+Alt+o" (for Mozilla Firefox).
If you are already in
Accounting and Finance section you can go to
+ Add New on
top left-corner and drop-down menu will appear, here you can click on the
Purchase Order.

The form will appear in the following fields:
Supplier- Choose a company or an organization or a person you are sending an order from the list of suppliers. You can also lookup the suppliers from the search box. If there are no suppliers registered in your company you can add
new Supplier from
Add new link just in the Supplier dropdown.
Project - Select the project which you want to relate this Purchase Order to.
Date - Indicate the date order is created.
Ship Date - Indicate the expected Ship Date which this order will be shipped.
Order # - Edit or use default order number selected. In order to change the numbering format of the purchase order, please go to Settings, Invoice Settings, Purchase Order Numbering and choose appropriate format there.
Payment type – select a payment method from the drop-down box.
Item – Title of the product or services, required field. You can select from existing products/services or type here not-listed items.
Description – Description of the product or services which can be editable.
Qty – Enter the quantity of the product or services.
U/M – You can specify the unit of measurement.
Price – Cost price of the product or services.
Discount – Enter the discount percentage.
Asset Acc. – Enter an expense or asset type General Ledger (GL) account for bookkeeping purposes.
Net Amount – Net amount displays the amount after applying the discount.
Tax Rate – Choose the tax rate from the tax rate drop-down menu. Tax rates are applied in percentage.
Total Amount – The total amount of each line is displayed here.
Terms and Conditions – Write terms and conditions in the box below. This will be printed in the PDF version of the Purchase Order.
Accounting Getting Started
Accounting Getting Started
To start using the
Accounting and Finance system, you will need to setup your company’s full details including financial settings. Other employees and accountants will not be able to enter the
Accounting and Finance Module, if
Getting Started is not completed by your company’s administrator.
Once your
Accounting and Finance Module is setup, your accountants will be able to view all accounting data and reports.
Setting up the
Accounting and Finance system takes couple of seconds. Enter the following information on
Getting Started screen:
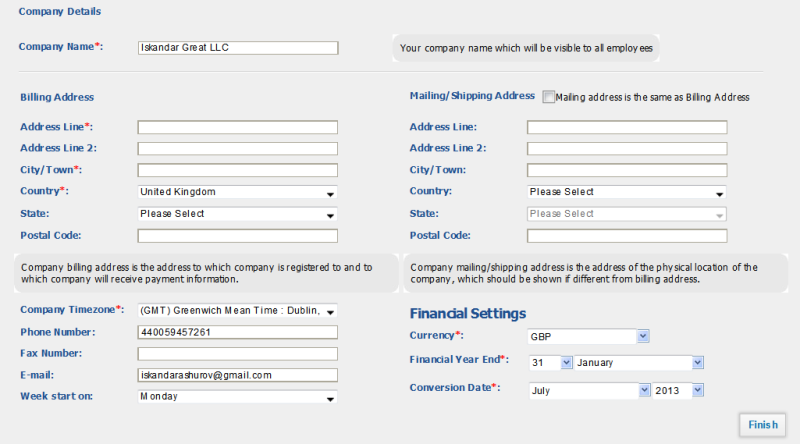
Company Name – Indicate the legal name of the company. This name will appear in your outgoing financial documents (invoices, sales quotes, sales orders, etc) and all financial reports.
Billing Address – The billing address of the company, as it will be indicated in all financial documents. You may change your billing address later in
Settings - Company Settings.
Mailing/Shipping Address – The address indicated here will be included in
Sales Orders and
Sales Quotesas mailing/shipping address field.
Company Time-Zone – Choose the operating time-zone of your company. If you have several other company locations, indicate the time-zone of a parent company (the company which will hold all accounting data). The time-zone is used by kpi.com to determine which date and time is shown in financial documents and transactions.
Phone Number – Enter the phone number of the company.
Email – Indicate the corporate email address. It will be used in sending invoices and other financial documents to your clients.
Currency – Choose the base currency of the company. By default, the currency of your country will be displayed here. You can change the base currency of the company in
Settings – Accounting Settings – Financial Settings. However, we do not recommend you to change the currency and other financial settings once they are setup.
Financial Year End - This will be set to December by default. The year end date is used in generating financial year end reports and in VAT e-Filing.
Conversion date - The date you want to start using
kpi.com for your business. Enter the date that you intend to begin processing all your transactions in
kpi.com.
Important note*.
Conversion date in kpi.com starts on the 1st of a month. All transaction dates should be after conversion date.
Once you have done setting up Accounting and Finance data, click
Finish. You may change your settings later on, however, we do not recommend you to change
Financial Settings frequently for keeping correct consistency of data.
Importing Accounts
Importing Accounts
In order to import CRM Accounts (or Companies), Contacts, Leads or Opportunities, click on the Import button at the bottom right side.
Note that the file should be in a CSV form.
Once you click on the Import button, you will be asked to choose the file to import.
After you have uploaded, you will be asked to match the columns of kpi.com with your file's columns such as: account name, account type, email address etc.
Duplicate Action
If your file has duplicate accounts with the same account name or email, you need to choose "
Skip" option to avoid duplicates.
If you want those duplicates to be aggregated to one account, then you need to choose "
Overwrite" option.
If you want those duplicates to stay as they are, you need to choose "
Clone" option.
Once you have done matching and choosen the duplicate action, you can start importing the accounts. It may take a while for the system to finish the importing process depending on the size of your file.
In order to see the imported items in the system, please refresh the page.
You will be notified about the number of accounts imported in an email sent by the system.
E-mail Marketing
E-mail Marketing
The E-mail Marketing section provides mass mailing tools, allowing sending bulk e-mails to your Leads and Contacts.
Mailing List
The Mailing list is used to send e-mail messages to your Leads and Contacts in bulk. To add a mailing list, go to Contacts/Leads section, filter the list such as Leads under the certain campaign, Contacts from certain location etc and click on Add New and choose Mailing List.
Once you create a mailing list, it will take a while for the system to load the list of recipients depending on the number of contacts you had in the list.
You can check the added mailing lists from the Email Marketing>>Mailing list section.
 Add Message
To add a message for mass mailing, click on Add New button in Waiting Messages section and choose Mail Message.
Type in the Subject, select a mailing list, choose date and time, from email and write the content of the message.
While writing the content, you can make an effective use of personalization attributes which will make the message personalized. If you have templates for the mass mailing, choose from the Choose Template drop-down. You can find more about templates here.
Once the message is ready, you can schedule a time for the message to be sent.
Note that the scheduled time should be at least 5 minutes after the time shown on your computer.
Before scheduling the message, you can send a test message to your own email address to see how the final message looks...
Add Message
To add a message for mass mailing, click on Add New button in Waiting Messages section and choose Mail Message.
Type in the Subject, select a mailing list, choose date and time, from email and write the content of the message.
While writing the content, you can make an effective use of personalization attributes which will make the message personalized. If you have templates for the mass mailing, choose from the Choose Template drop-down. You can find more about templates here.
Once the message is ready, you can schedule a time for the message to be sent.
Note that the scheduled time should be at least 5 minutes after the time shown on your computer.
Before scheduling the message, you can send a test message to your own email address to see how the final message looks...

 Note that your mass email will contain a link for the recipients to unsubscribe.
 Sent Messages
In this page, you can view the statistics about your sent messages such as who viewed, who unsubscribed, how many sent, how many bounced etc.
If you click on the numbers, you will see the name of the contact who viewed or unsubscribed.
Sent Messages
In this page, you can view the statistics about your sent messages such as who viewed, who unsubscribed, how many sent, how many bounced etc.
If you click on the numbers, you will see the name of the contact who viewed or unsubscribed.
E-mail Integration
E-mail Integration
Email integration
Overview
Email Settings
Enable IMAP
Test Connection
Share Your Account Settings
Connection Errors
Tracker Prefix
Frequently Asked Questions
Message Center
Overview
Working with message center
Compose Mail
How to Reply to Email Message
Email View
Message Center Frequently Asked Questions
Case Management
Overview
Email Filters
Email Integration
Kpi.com is integrated with email systems in 2 ways: by setting up message center and case management. You can fetch the emails in your inbox to kpi.com system and create tasks and cases or reply to your messages from the system. In this series of help articles, we will be using Gmail accounts as example.
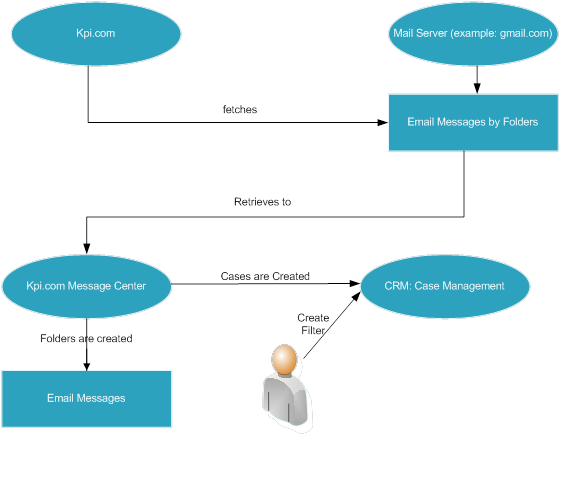
Your email account settings define the email account which will be used in order to fetch emails to the system. Only administrators are able to setup email accounts for any employee in a company. Employees are able to setup emails only for themselves.
You can define email settings at CRM>>Message center>>E-mail Accounts
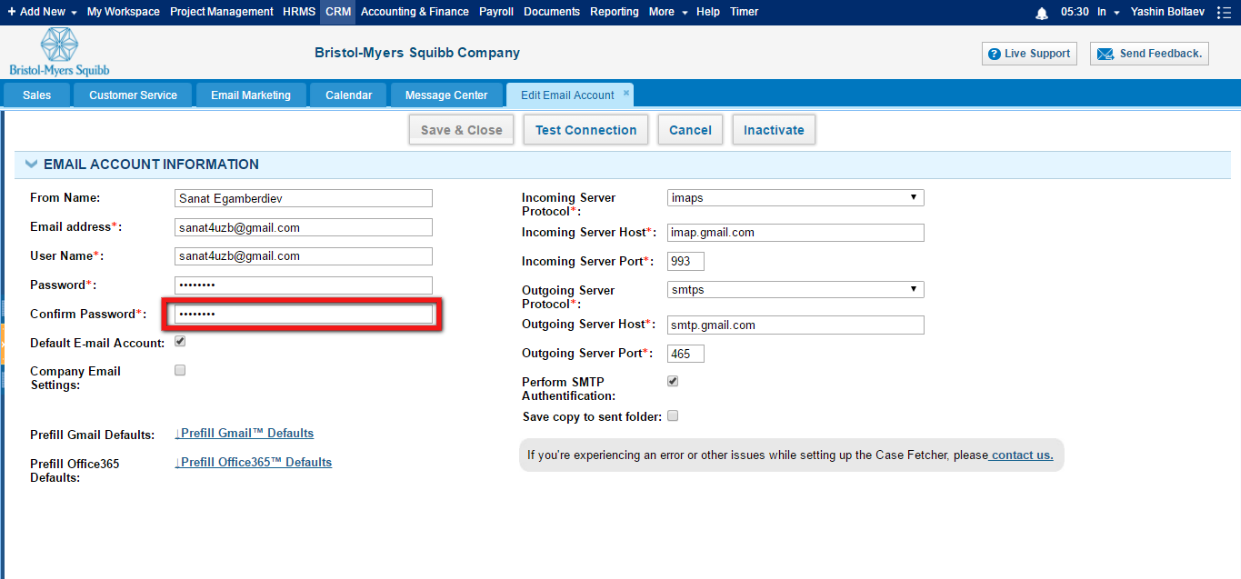
 Add/Edit Account
 – If you are adding a new email account, add new will be left by default. However, you are also able to edit existing employee mail account. Choose Edit if you want to edit email details of existing employee.
Employee – choose an employee from the list (available for administrator only). Employees are able to choose themselves only. Administrators are able to setup emails for all employees in the company.
Default E-mail account – if your employee has one or more emails defined in employee profile of the hrms section, you will be able to choose default email account for which setup will be complete
Email Address – write email address here
Username – by default, email address and username will be the same on most mail servers. However, some mail servers might have the different username for mail servers.
Password, Confirm password – enter a password for your email account.
Mail Server Protocol – we support IMAP and IMAPS for fetching emails to the system. If you are using gmail account, please choose imaps option. Difference between IMAP and IMAPS can be found
here.
Incoming Mail Server - incoming mail server domain which can be found in your mail server’s setup. If you are using gmail account, type: imap.gmail.com.
Incoming Mail Server Port- this field can be left empty by default. However, some mail servers may require you to write specific port here.
Outgoing SMTP Mail Server – choose SMTPS or SMTP options. SMTPS is chosen by default, because it is regarded as secure connection.
SMTP Mail - smtp mail server domain name. If you are using gmail account, write: smtp.gmail.com.
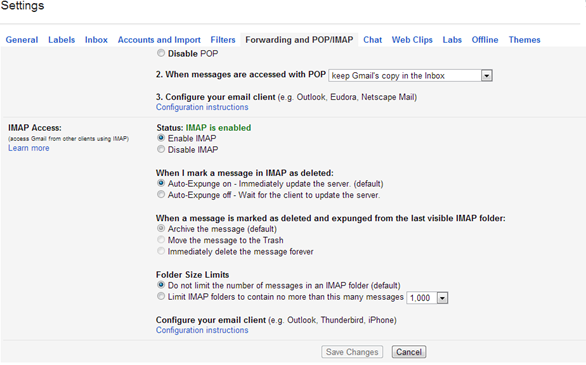
You should enable IMAP from your email account in order for kpi.com system to be able to fetch emails from the mail server.
You can enable imap by logging in to your gmail account, going to
Settings - Forwarding and POP/IMAP section.
Once you have entered all required field, you can test connection and try to connect to one of your mail accounts.
If the test succeeds, then, you may be able to save and close the account setup, and start using emails in message center.
Share Your Account Settings
1. Can't connect to mail server using provided Username and password, please check your login details.
If you receive this error when testing connection, you should write different username and password details in the form and try again or enable imap in your mail server and try again.
However, modern mail servers such as gmail accounts may give this error even if you have imap enabled and even if you have typed login details correctly. In this case, you should check your email, and see if you have received following email:

If you have received similar email, you should click this link:
http://support.google.com/mail?p=client_login and enable kpi.com client to access your gmail account.
2. Couldn't connect to the server.
You will receive such error message if connection has been timed out with the mail server due to number of reasons. Possible reasons can be: mail server is not available; you have indicated wrong imap and smtp protocol details.
3. Connection refused, the protocol you specified, is not enabled in your email server.
You might receive such error message if your mail server does not support imap or imaps protocols that we use in order to fetch emails.
4. Couldn't connect to outgoing server
You might receive such error message if you have indicated wrong smtp server name or if smtp server is down. You should change the settings you have indicated, and try again later.
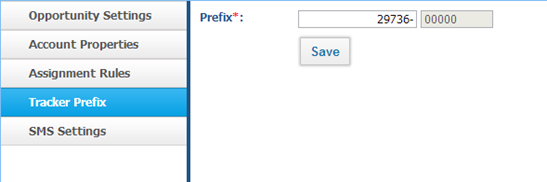
Tracker Prefix
We use tracker numbers in order to track the replies and conversations to individual email messages. The system automatically assigns the tracker number to each received email in message center. It is equivalent with the ticket numbers in case management system. Tracker prefix is incremented every time new message is fetched to kpi.com.
When replying to the message, if you indicate the tracker number, the message will be automatically shown as reply to the original email.
In order to setup the tracker prefix numbers, go to
Settings – CRM Settings – Tracker Prefix. You should change the Prefix figure only. The second part will be incremented automatically, as new message is received.
Frequently Asked Questions
1. How many times a day emails are fetched?
Kpi.com fetches emails in your company about every 5 minutes.
2. Why does not kpi.com fetch all my emails?
If you receive many of emails a day, you might notice that not all of them appear in kpi.com. The reason of it is that, one user cannot fetch as many emails as they want. There is a daily limit of 50 emails per kpi.com user by default. We have set this limit, because, it will be costly from our side to fetch millions of emails per 5 minutes, and our performance might suffer.
However, the limit can be changed based on your needs. In order to increasy daily email fetching limit, you should contact the support team.
3. I do not see messages in sent folder, if I send email from kpi.com. Why?
This happens because kpi.com sends email using smtp protocol that was indicated in settings, and does not send the email directly. Therefore, you should wait about 2-3 minutes before it appears in sent folders in kpi.com.
Message Center
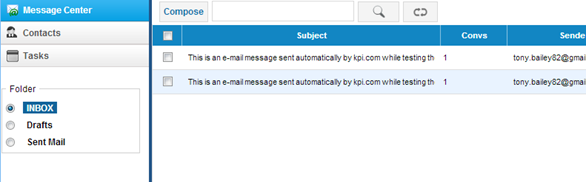
Message centre module at kpi.com allows you to manage your company emails at one place. You can receive mails in your inbox, send emails and relate your emails to tasks and cases at kpi.com.
 Message center works only if it is configured for your company. If it’s not configured for your company, you should contact the support team, after which it will be enabled for your company account. Message center works only if it is configured for your company. If it’s not configured for your company, you should contact the support team, after which it will be enabled for your company account.
|
Working with Message Center
You can work with message center after
setting up the email account for your company or individual user.
After successful setup, the system will start fetching all emails to the system starting from the day when you setup the message center.
Kpi.com system cannot fetch all your emails in your inbox when you setup, because, otherwise, it might take too long and server capacities for your company may not be enough. However, if you need your emails in inbox to work effectively at kpi.com please, contact support department.
|
After setting up the message center, the system will create 3 folders by default: inbox, sent, draft emails to the message center.
You can fetch the other folders from your mailbox by requesting it from
support@kpi.com.
Since, fetching additional folders from your email may incur additional server storage costs; you may enable this option by paying additional fee. In order to enable fetching by multiple folders, please contact support@kpi.com.
|
Once you have multiple folders enabled, you can indicate which folders to receive from:
Settings – CRM Settings – Account Properties
Choose existing setup: indicate the email account from
Add/Edit Account field.

Once you choose existing email account to edit, you will view monitored folders checkbox list. You may check the folder from which you wish to retrieve emails.
There are following options while editing the form:
Reset
Reset button will save the changes and close the form
Inactivate
Inactivate button will inactivate fetching and message center emails for specific employee. System will stop fetching emails once this button is pressed, and confirmed
Test Connection
By pressing this button the system will reconnect to email server, and implement actions like fetching email, sending email.
If the connection has been successful, you should press
Reset button.
You can compose mail by pressing compose button from message center listing:
You can write the message by indicating following fields:
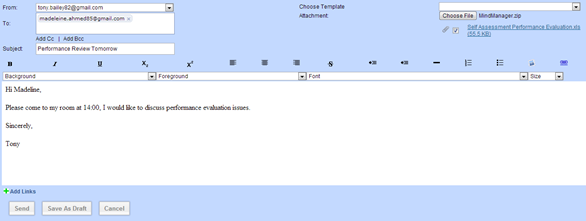 From
From - Choose email account from which email should be sent. Administrators can send email from any of the employee’s account, but employees (members) can only indicate their own email account, and the email account of other members who shared email settings with them. This field is required.
To - indicate to email address here. You may choose email address of existing contacts. You should type the contact name, and the system will retrieve the contact email automatically. This field is required.
Subject - The subject of the email. Unlike the popular emailing systems, the subject is required field at kpi.com
Choose Template - If you setup the email templates from: Settings – Email Settings – Email Templates they will appear here. It’s not required to have a template for the email
Attachment - Attach documents or pictures from your laptop or pc. All formats are allowed except for .exe files. You may attach multiple files, but they should not exceed 10MB per email message.
Email Body - Write your email body here. You may write your content in rich text format.
Send Email - If you press send button, the system will send the email by using the smtp protocol indicated in
email settings.
Sent emails will appear in sent folder. There may be small delay (about 5 minutes) before your message appears in sent folder. If it does not appear in 5 minutes, please check the email provider sent folders, or, contact the kpi.com support department.
Save as Draft - If you save message as draft, you may come back and send it later. Your message will be saved in draft folder. The draft messages will also be synchronized with your email provider.
Cancel - The action will not save any data and close the screen
How to Reply to Email Message
You may reply or compose the new email outside the kpi.com (in your mail provider account), but if you indicate the tracker number in square brackets, the system will relate the email to the relevant conversation.
 Replying inside the kpi.com
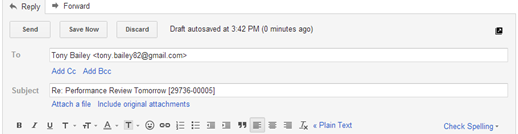
If you have received a new reply for your email, the message will be indicated in bold:

In order to reply to the email, click the message itself and open the mail view and click the reply or reply to all buttons.
In order to view the email details, click the message itself from message center listing. The email view has following subsections:
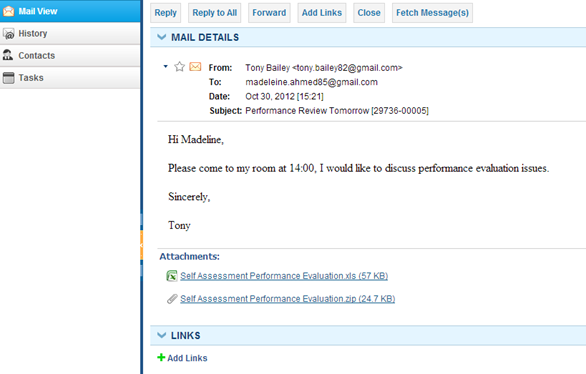
The mail view contains all message details including the attachments. You can do following in this view:
Reply, Reply to All - the reply form will open. You will be able to reply to the message using the tracker number which is inserted automatically at the subject field.
Forward – the action will open the standard forward form.
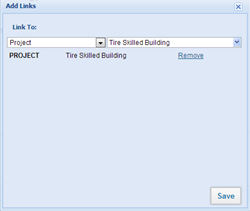
Add Links – you may link the email with all entities at kpi.com: projects, tasks, sales quotes, invoices, appraisals, meetings, etc. If you link the email with existing entities, the message will be shown in the properties of that entity. For example, if you link message with specific project, you will be able to view it while viewing the project.
Fetch Messages - if you click this button, the system will check the server for the new messages that may have been received.
History - The history tab shows all related emails for the selected message. You may view all the conversation histories here.
Message Center Frequently Asked Questions
1. There is a received date field in Message Center Listing. Which date and time does it show, the date/time email has been received, or date/time the email has been fetched?
The system shows the date/time in which the email has been arrived to your mailbox.
Overview
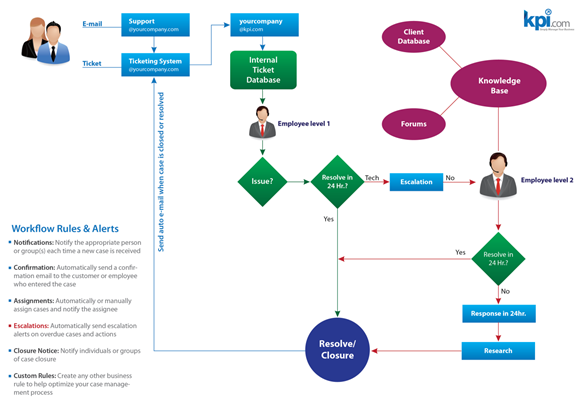
Case Management feature enables you and your team to track customer questions and issues. You can create case, assign assignees, reply to case in the system, and view customer reports.
Case Management is integrated with all parts in the system. You will be able to create invoice/accounting issues, project issues, and other internal issues as cases and assign to your support team.
Cases can be received either by emails (message center) or by web forms. Cases can also be added manually from CRM – Customer Service-Cases.
- Email Filters
- Add/Edit Case
- Case View
- Case Management Actions
- Case Management Filters
- SLAs
- Reference Settings
- Case Management Color Coding
Email Filters or Assignment Rules
Email filters work the same as filters in gmail, yahoo and other popular mail services. Email filters enable you to create cases from messages received in message center. For example, you may specify that if email subject contains ticket number, that email should be assigned to sales manager. Or if from email contains some customer name, then case should be assigned to sales representative of that account.
Email filters can be setup in parent filter – child filter level. Parent filters are general filters which can be applied in all cases. For example, you can sent parent filter including following condition: if the subject contains test, the case should not be created.
If parent filter conditions are true, the child filters are applied one by one in the order specified by the user. The system creates the case if the first child filter’s conditions are true, and does not apply the other filters.
Parent Filters
Add/Edit Parent Filter
In order to add parent filter go to: Settings – CRM Settings – Assignment Rules. Click New Email Filter button from assignment rules listing. Click parent filter checkbox and fill out following details:
Filter Name – indicate the short title or name for a filter
Criteria:
- First column options:
- Subject – the subject of the email which will be matched to indicated criteria
- Sender – the from part of the email
- Recipient – the to part of the email
Second Column options
- Contains – the criteria will check if the indicated text exists in indicated first column entity
- Does not contain - the criteria will check if the indicated text exists in indicated first entity
- Matches – the criteria will check if the indicated text matches 100 % to the entity indicated in first column
- Does not match –the criteria will check if the indicated text does not match the entity indicated in first column
Third Column
- Write a text which will be used to assess the criteria
Fourth Column
- Conditions: and/or – the condition which will be evaluated against the other conditions. And will check that all conditions are true. Or will check if any of the conditions are true.
Save and Close
Press the button in order to save your parent filter.
SMS Tool
SMS Tool
In order to activate SMS tool for your account, you need to buy credits from mVaayoo or Clickatell.
If you have credits, you can set this feature in Settings - CRM Settings - SMS Settings.
Calendar Synchronization
Calendar Synchronization
Configuring kpi.com Calendar with Google Calendar
To synchronize your kpi.com Calendar with your Google Calendar you need to link your kpi.com account to your Google Calendar account. Please follow the steps below and note that your Google Calendar must have been accessed at least once before configuring with kpi.com Calendar to complete successful configuration process:
1. Go to either My Workspace – Calendar or CRM – Calendar page;
2. On the Calendar page, click the Configure with Google link.
2.1. If you are not signed in to Google account you want to configure with kpi.com, you will be redirected to Google sign in page. Sign in to your Google account. You will be redirected to Google Access Consent Page.
2.2. If you are already signed in to your Google account you want to configure with kpi.com, you will be redirected to Google Access Consent Page.
2.3. If you are already signed in to multiple Google accounts, you will have to indicate which Google account you would like to use. Then you will be redirected to Google Access Consent Page.
2.4. If you are already signed in to your Google account and it is not the one you would like to configure with kpi.com, you need to sign out from that account. After that you need to repeat steps 1 and 2.
3. On Google Access Consent Page click the Grant Access button and you will be redirected to pre-configured kpi.com Calendar page (either to My Workspace or CRM section, depending from where you started configuration).
Upon successful configuration, if you go to your Google Calendar, under My Calendars folder you will see two more calendars created and named in the following format (If you cannot find them, refresh your Google Calendar):
1. [Your Company Name in kpi.com] Events (created: [calendar creation date])
2. [Your Company Name in kpi.com] Tasks (created: [calendar creation date])
You can notice that on the kpi.com application kpi.com Calendar page, Configure with Google link will be changed to Synchronize with Google.
Adding Events in Google Calendar
While adding an event in your Google Calendar, please make sure you choose a right calendar:
• If you choose Your Company name Events Calendar, the event will be synchronized with kpi.com Calendar and will be treated as kpi.com event.
• If you choose Your Company name Tasks Calendar, the task will be synchronized with your kpi.com Calendar and will be treated as kpi.com task.
While adding an event, if you do not choose a calendar, the event will automatically be created in My Calendar which cannot be synchronized with kpi.com Calendar. You must select the appropriate calendar in the Google Calendar to complete a successful synchronization of events.
Synchronizing kpi.com Calendar with Google Calendar
1. Open either My Workspace – Calendar or CRM – Calendar page;
2. Click the Synchronize with Google link. When you press the link, a window will pop-up, where you can either choose to synchronize all events and tasks, or you can choose to synchronize only those events and tasks that fall into a certain date range.
3. Please wait until you see the successful synchronization message. Synchronization will take some time depending on the quantity of the tasks and events being synchronized.
• If you cannot find the link, it means you have never configured kpi.com calendar to get synchronized with your Google Calendar and you need to follow the steps in Configuring kpi.com Calendar with Google Calendar.
• Maximum 5000 calendar entries will be synchronized in a single synchronization. If date range for synchronization is not indicated, by default, calendar entries for the whole current month and next 2 months will be synchronized.
• If some events/tasks are deleted from your Google Calendars which were created in Configuring kpi.com Calendar with Google Calendar steps, corresponding events/task will not be deleted in kpi.com calendar. You will have to delete them from kpi.com manually. Furthermore, those events/tasks will not be synchronized even though details are edited in the kpi.com.
Enabling Auto Synchronization
You can enable auto synchronization option by going to Settings - Recurrence Settings - Sync with Google Calendar. This feature is turned off by default. After enabling this option, your events/tasks get synchronized every 1 hour.
Revoking Calendar Synchronization
If you choose to revoke the synchronization between kpi.com Calendar and your Google Calendar, please make sure you do it from kpi.com.
1. Go to Settings - User Credentials. Under Authorized Access to your kpi.com Account heading:
2. Find Google Calendar from the list and click the Revoke Access link next to it.
3. Upon successful revoke, two Calendars from your Google Calendar will also get deleted.
4. You will see message of successful revoke of the Calendar Synchronization upon completion of the process.
You must revoke synchronization only from kpi.com and do not use the Delete calendar feature of Google Calendar. There is a revoke option in Google Calendar which is not recommended to be used to revoke synchronization process.
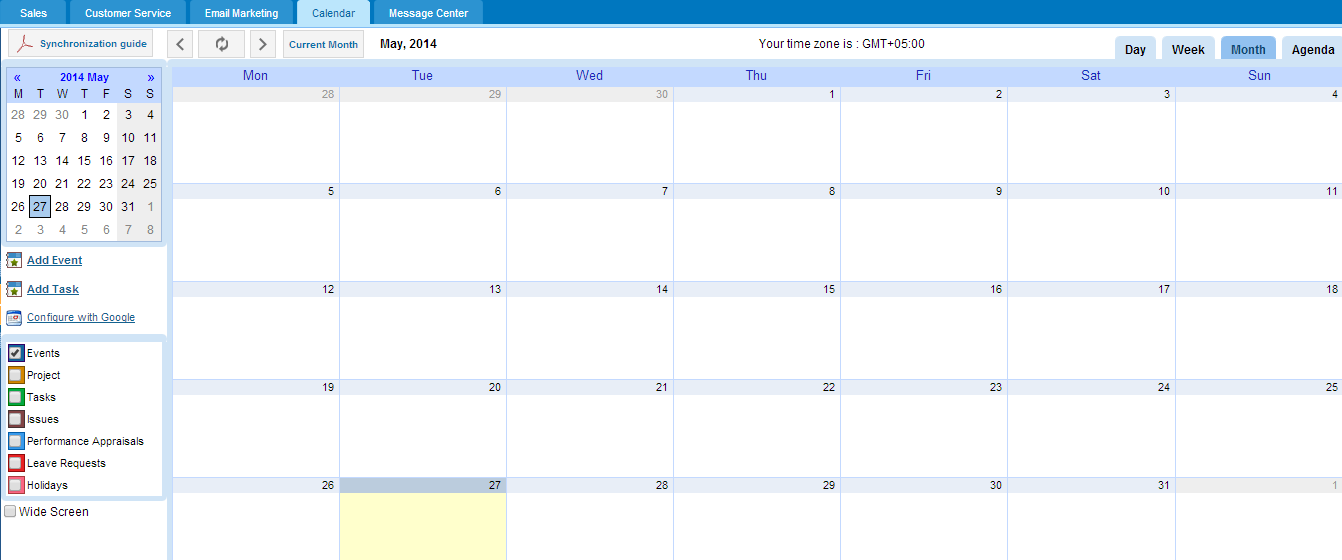
Calendar
Calendar
The kpi.com Calendar is a handy tool for organizing events and activities. You may add events, tasks and activities using your calendar. The kpi.com Calendar is configurable with your Google Calendar: enabling you to synchronize both calendars with one another.
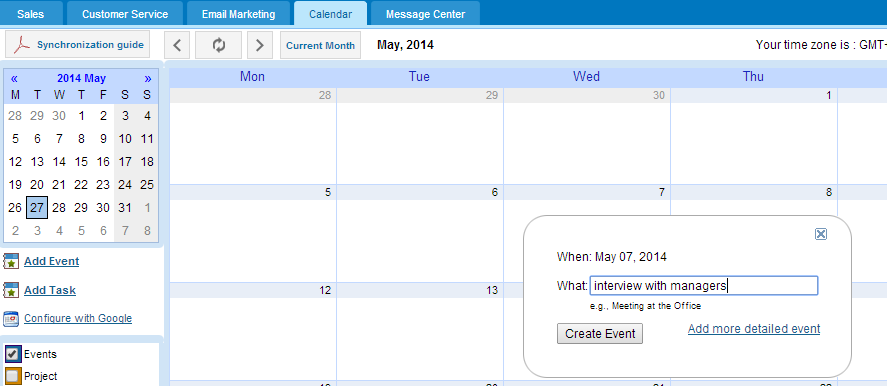
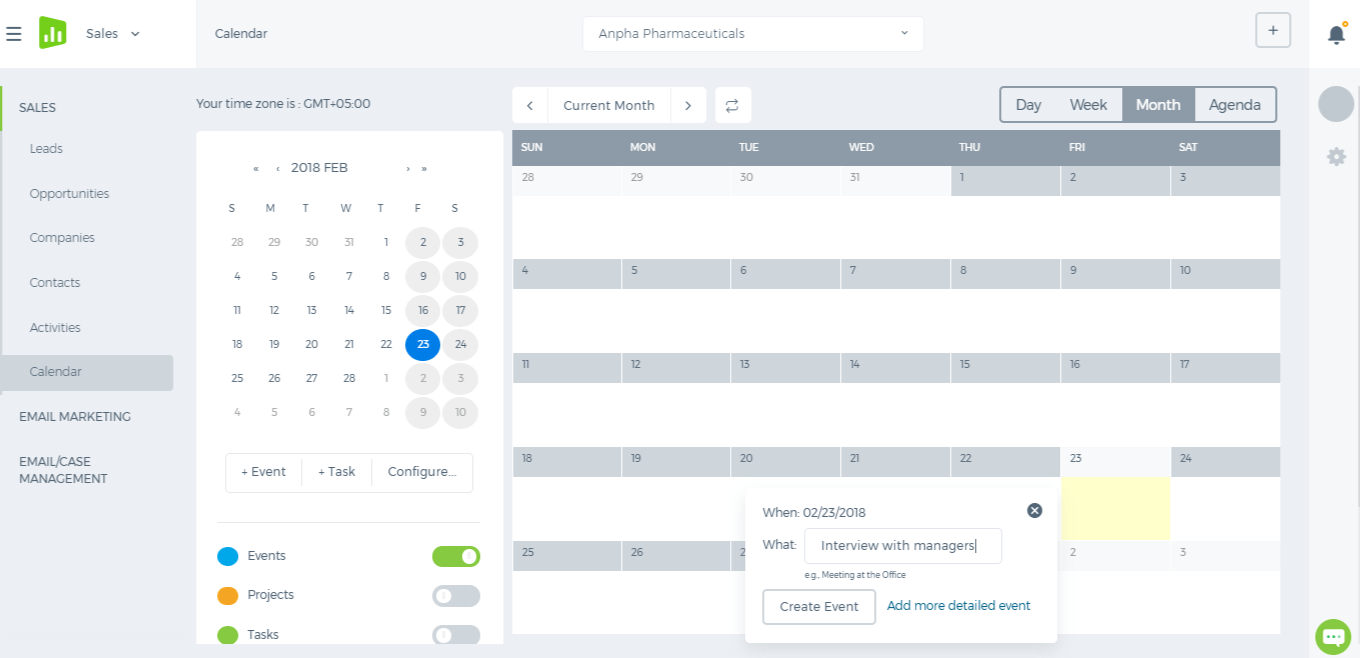
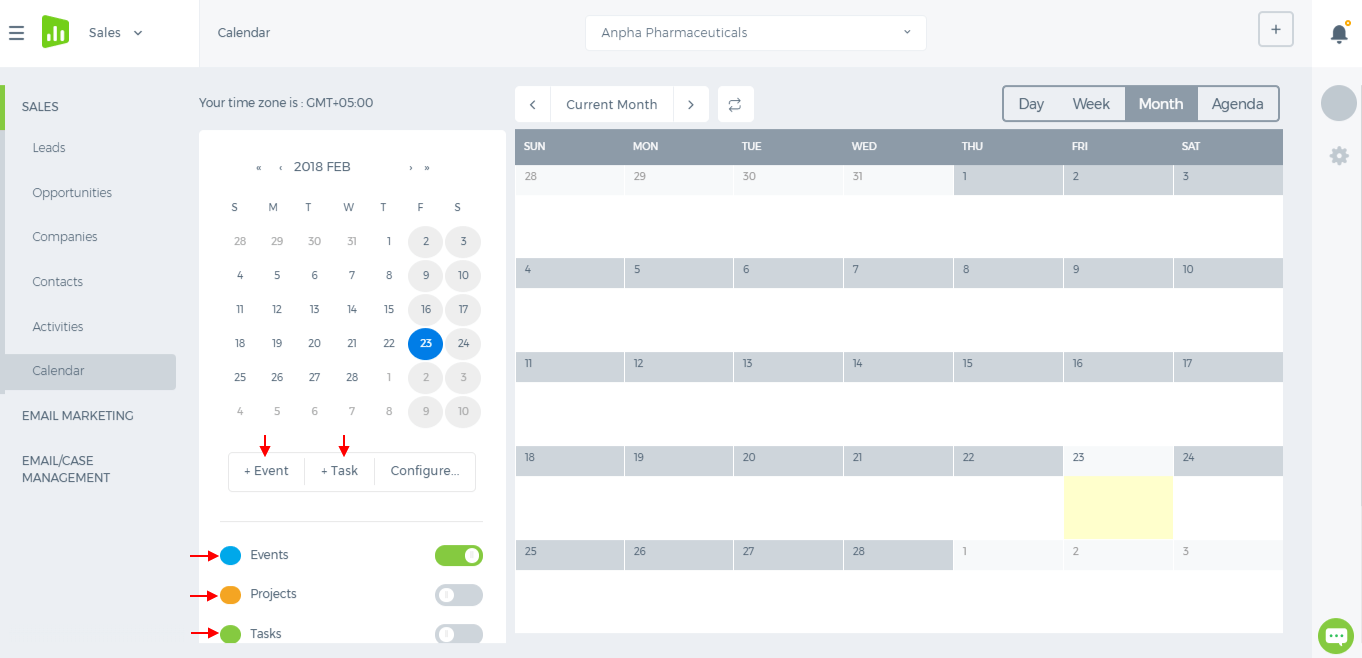 Add Event/Task in My Calendar
To add a new event, click the Add Event/Add Task feature from the left navigation bar of the page. Fill in the form and click Save & Close. You may also add an event by clicking the corresponding calendar area.
Add Event/Task in My Calendar
To add a new event, click the Add Event/Add Task feature from the left navigation bar of the page. Fill in the form and click Save & Close. You may also add an event by clicking the corresponding calendar area.
 Synchronize with Google Calendar
In order to synchronize your kpi.com Calendar with your Google Mail Calendar you need to link your kpi.com account to your Google account. Please follow the steps below:
Synchronize with Google Calendar
In order to synchronize your kpi.com Calendar with your Google Mail Calendar you need to link your kpi.com account to your Google account. Please follow the steps below:
- Sign into your Google mail account on the same browser that you opened the kpi.com Calendar tool.
- On the kpi.com Calendar section, click the Configure with Google link. Select your Google account for configuring in the page that opens. Click Continue after selecting the account.
- In the Grant Access page that opens, select Grant Access button to confirm access. To deny the access, click Deny access.
Once you have completed the above steps, you have linked up your kpi.com account with your Google account.
View Daily, Weekly and Monthly Calendar
To see daily, weekly or monthly calendar, you need to choose Day, Week or Month tabs from the top menu. You are able to add/delete/edit calendar activities in this mode from the main panel or using the links at the left.