Payroll Settings
Payroll Settings
Add New Pension Providers
Go to the Payroll Settings and click the Pension Providers function which forwards you to add a new pension provider. Fill in the fields such as pension provider details and pension provider bank details. Click Save & Close to finish the operation.
Add New Pension Scheme
To add a new pension scheme, go to Payroll Settings, click the Pension Schemes function and click Add Newfrom the top menu. It records the list of all pension schemes registered for your company. Provide information in fields such as pension scheme details, employee contribution, stake holder and employer contribution. For more information about each field you can find in kpi.com Payroll Guidebook that can be viewed through the Help function located on the top main menu.
View Pension Scheme Details
Go to the Payroll Settings and click Pension Schemes where you will find the Pension Scheme Details option from the Actions dropdown list. You can view the information you have entered while adding the scheme. The details form can be edited directly from this page.
Edit Pension Scheme Details
To edit pension scheme details, the Actions dropdown helps you; it has an Edit Pension Scheme option. Make changes in the scheme and click Save & Close below.
Remove Pension Scheme
Go to the Payroll Settings and click the Pension Schemes feature. The list of pension schemes will appear. From the Actions dropdown, choose Remove to delete the scheme from the list.
View PAYE Tax Bands
The PAYE tax brands feature helps you keep records of PAYE tax bands in the system. To view the PAYE tax bands, you need to open the Payroll Settings page and click PAYE Tax Bands.
View NI Bands
To view NI bands, go to the Payroll Settings and click the NI Bands & Rates function. It helps you record the NI rates in the system.
Maintain Student Loan Limits
To maintain student loan limits, go to the Payroll Settings section and click the Student Loan function. Fill in the form which appears on your screen and click Save & Close.
Add New Payment Categories
Payment categories can be added through the Payment Categories page in the Payroll Settings section. You need to provide information in fields that are highlighted with red signs.
Edit Payment Categories
Edit Payment Category is located in the Action dropdown list of the Payment Categories page. Click this option to make changes and save the operation.
Remove Payment Categories
You can find the Remove Payment Category function from the Actions dropdown in the Payment Categorysection. Once you choose this option, you will need to choose Yes to continue or No to cancel the operation.
Add New Deduction Category
The deduction category can be added through the Payroll Settings page. Open the Deduction Categories list and click Add New and fill in the fields such as code and name of the category, select PAYE purposes, NIC purposes, pension purposes, etc from the dropdown, and then after you have completed the operation, click Save & Close.
Edit Deduction Category
The Edit Category function can be found in the Actions dropdown of the Deduction Categories section. You need to make changes and click Save & Close below.
Remove Deduction Category
The deduction category can be deleted using the Remove Deduction Category function which is located in theActions list.
Single Payrun
Single Payrun
You can create payruns per employee or per group of employees. Using the Single Payrun, you can create one payslip for a specified period for one of your employees.
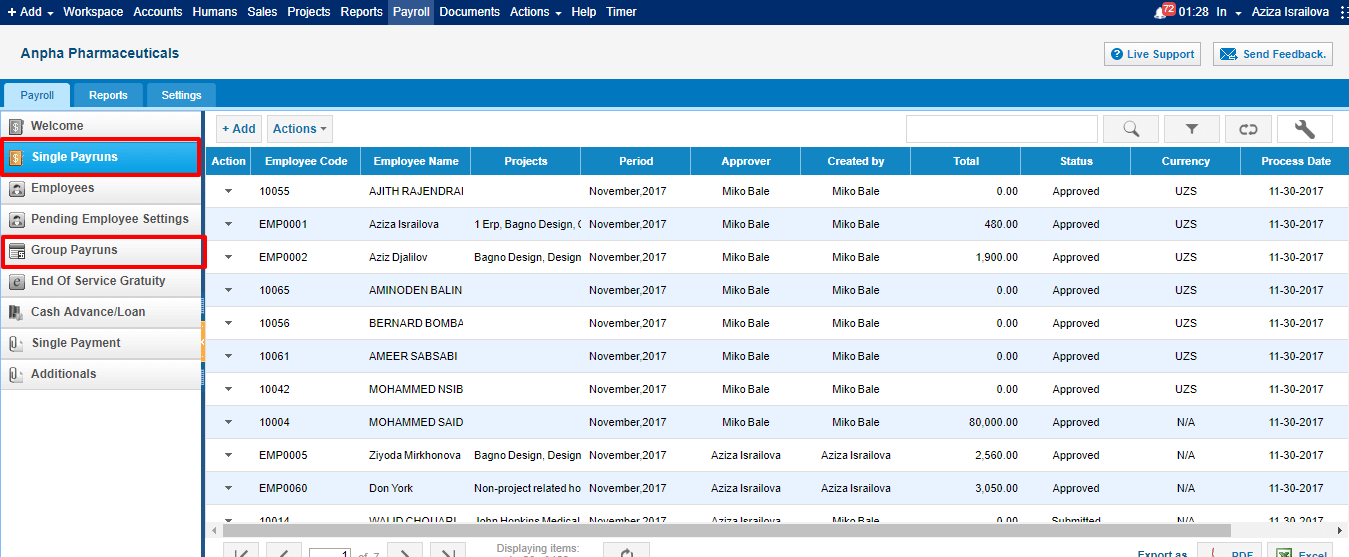
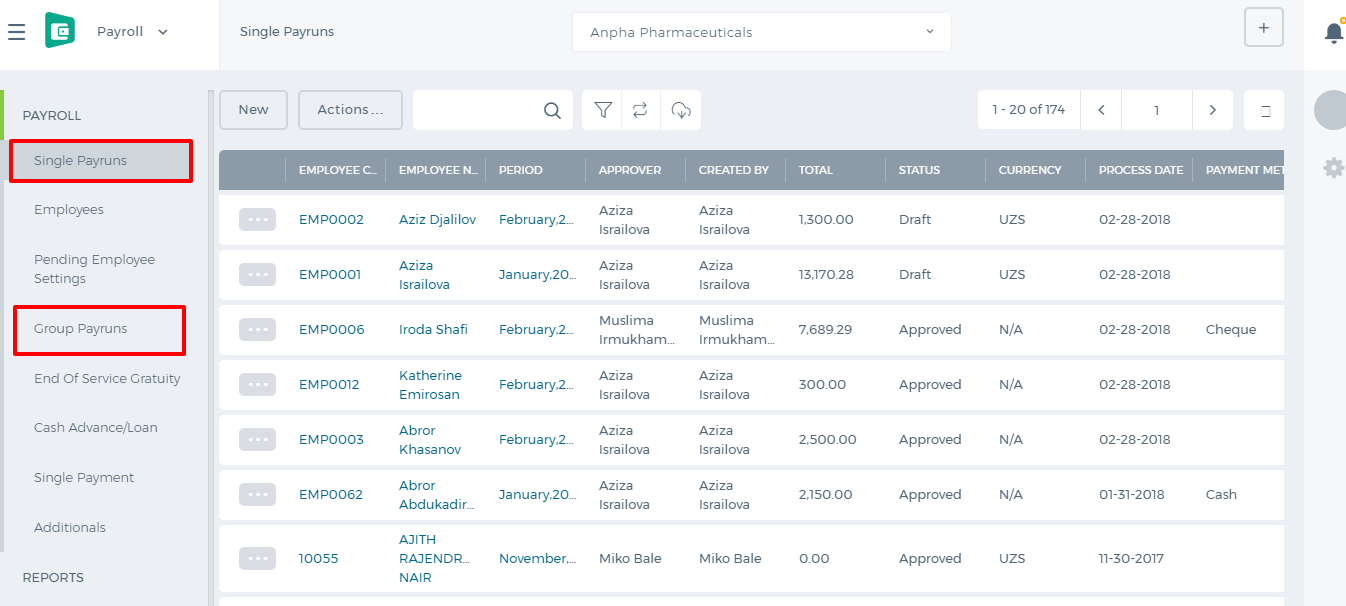 Click the Add button on top of the list and fill in the form.
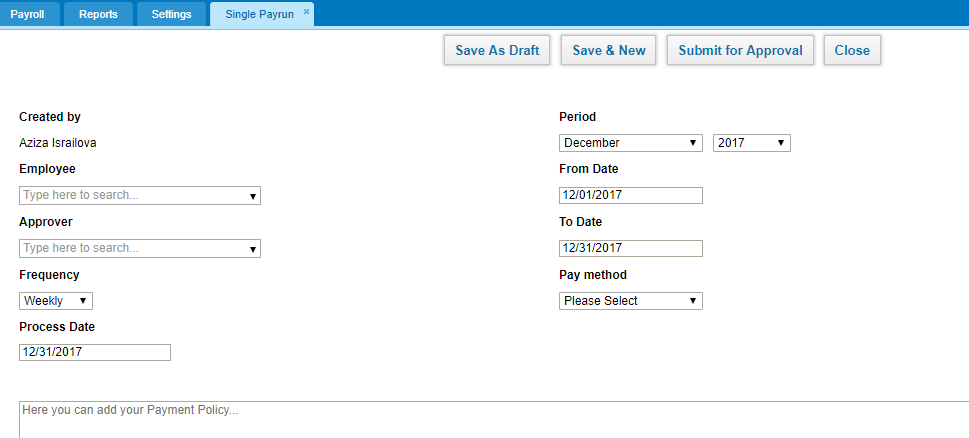
 Created by - the field shows up the person who is creating the payrun.
Employee - choose the person for whom you are creating the payrun. It is a lookup field, you need to type in the employee name, then the system will populate the related employee names.
Approver - choose the manager who will be approving the payrun. This field populates HR Managers, Admins, and Directors.
Frequency - choose the payrun frequency Daily, Weekly, 2 Weekly, and Monthly.
Process Date - choose the date when the payrun should be processed.
Period - choose the period for which you are making the payrun.
Dates - when you choose the period, the dates are automatically chosen, however, you can amend the dates manually.
Pay Method - choose the payment method whether it is a cash payment, bank transfer, check etc.
Below the form, you will see the Payments, Deductions and Expenses table. The table will populate the amounts according to the employee's payrun settings.
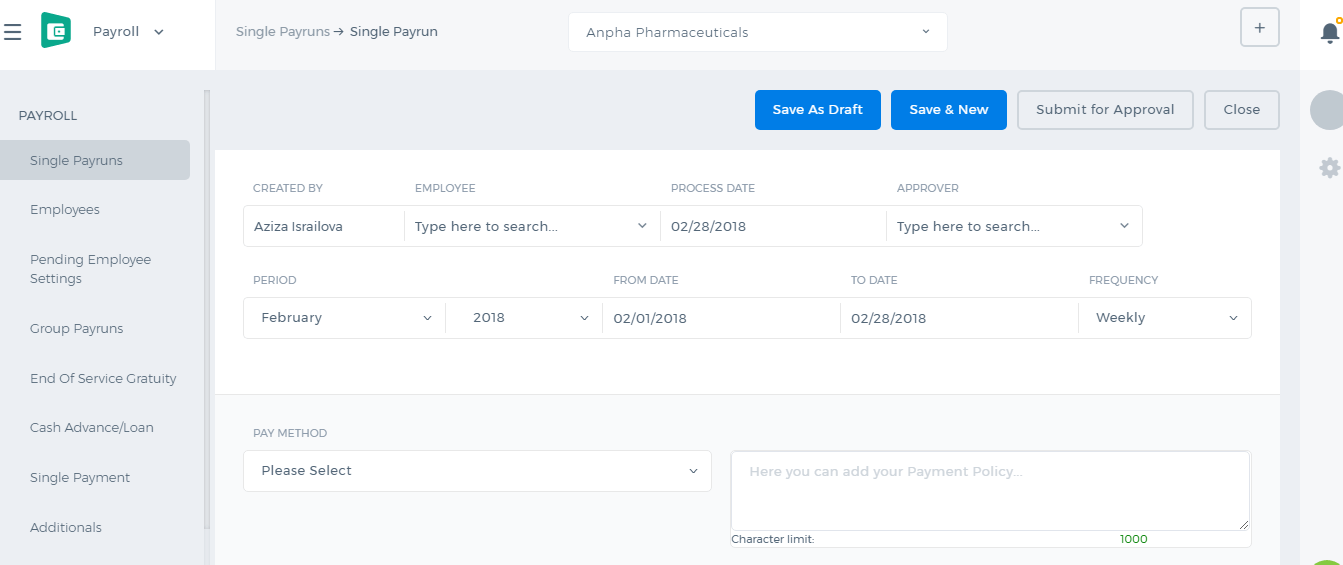
Created by - the field shows up the person who is creating the payrun.
Employee - choose the person for whom you are creating the payrun. It is a lookup field, you need to type in the employee name, then the system will populate the related employee names.
Approver - choose the manager who will be approving the payrun. This field populates HR Managers, Admins, and Directors.
Frequency - choose the payrun frequency Daily, Weekly, 2 Weekly, and Monthly.
Process Date - choose the date when the payrun should be processed.
Period - choose the period for which you are making the payrun.
Dates - when you choose the period, the dates are automatically chosen, however, you can amend the dates manually.
Pay Method - choose the payment method whether it is a cash payment, bank transfer, check etc.
Below the form, you will see the Payments, Deductions and Expenses table. The table will populate the amounts according to the employee's payrun settings.
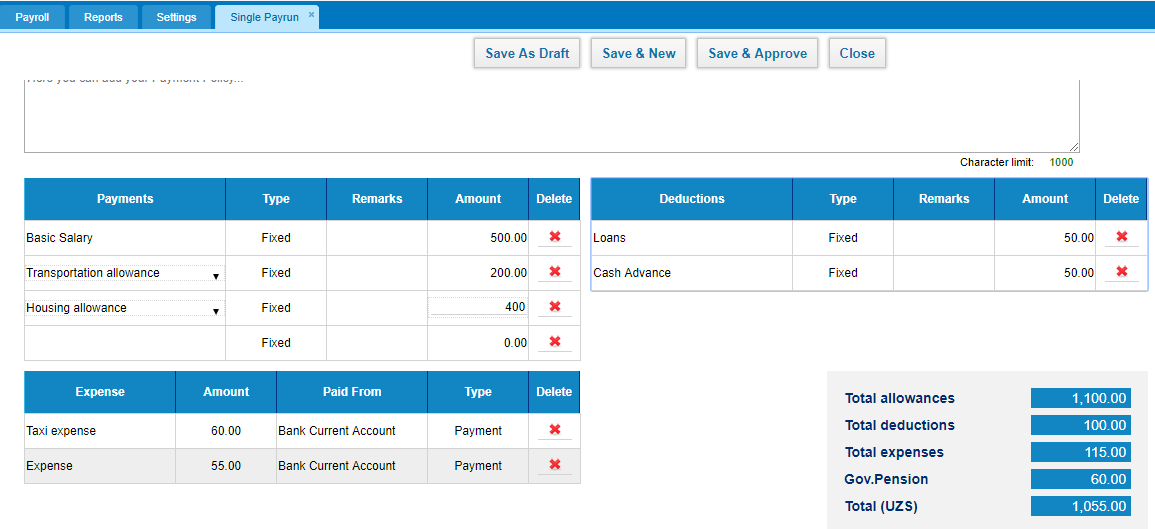
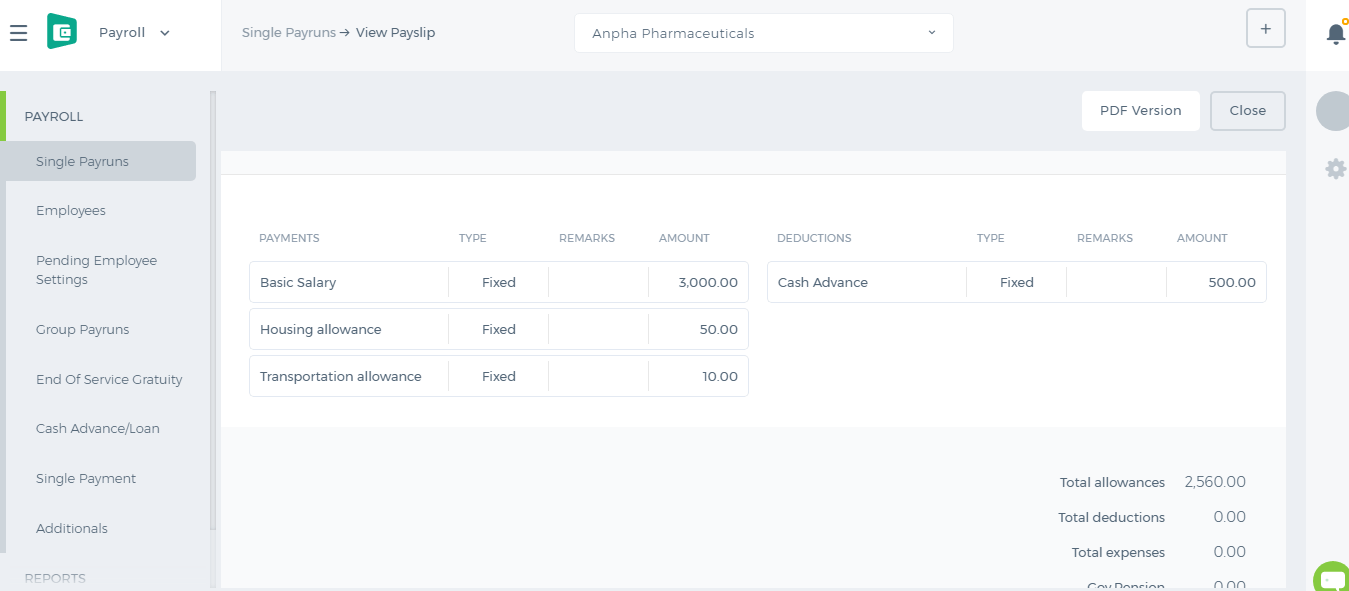 All the payments and deductions available in the employee profile will show up in the payrun. If the employee has taken a loan or a cash advance on that period, they will be also deducted. If the employee has incurred any expenses on that period, the expenses will be paid off. Gov. Pension is also deducted which is set up in the Pension Scheme.
If you are the approver, you will have the "Save and Approve" option. Otherwise, you will need to submit the payrun for manager's approval or save it as Draft.
All the payments and deductions available in the employee profile will show up in the payrun. If the employee has taken a loan or a cash advance on that period, they will be also deducted. If the employee has incurred any expenses on that period, the expenses will be paid off. Gov. Pension is also deducted which is set up in the Pension Scheme.
If you are the approver, you will have the "Save and Approve" option. Otherwise, you will need to submit the payrun for manager's approval or save it as Draft.
Payment/Deduction
Payment/Deduction
Add New Payment or Deduction List
Go to the Payment/Deduction List and click Add New which is located on the top menu near search box. The form prompts you to select the category from the dropdown list. If there is no category in the list, click the Add a New Category function found next to the category dropdown. Then, choose the employee, provide pay the amount ($), select the pay date from the calendar and click Save & New. The payment you have registered will appear in thePayment/Deduction List.
View summary of payment
The summary of each payment can be viewed using the Actions dropdown. You can view the information as Category of Payment, Employee Name, Pay Amount, Status of Payment and Pay Date.
Bank reconcilation
Bank reconcilation
Bank statement reconciliation is a process of verifying the amounts in bank statement with the company’ Cash account or vice versa. The benefit of this report is that will allow you to compare reports of bank with the reports of your company cash account in order to uncover any possible discrepancies. Sometimes there may be differences between your company cash account and Bank statement because you may write hundreds of checks each month and make several deposits. Some items appear in your Cash account in different months with the bank statement. In kpi.com you can import your bank statements into the system and reconcile them with the company Cash account and even if your company Cash account does not have some transactions you can record a new transaction and reconcile it. For reconciling bank statement with your company Bank account in kpi.com, follow these instructions.
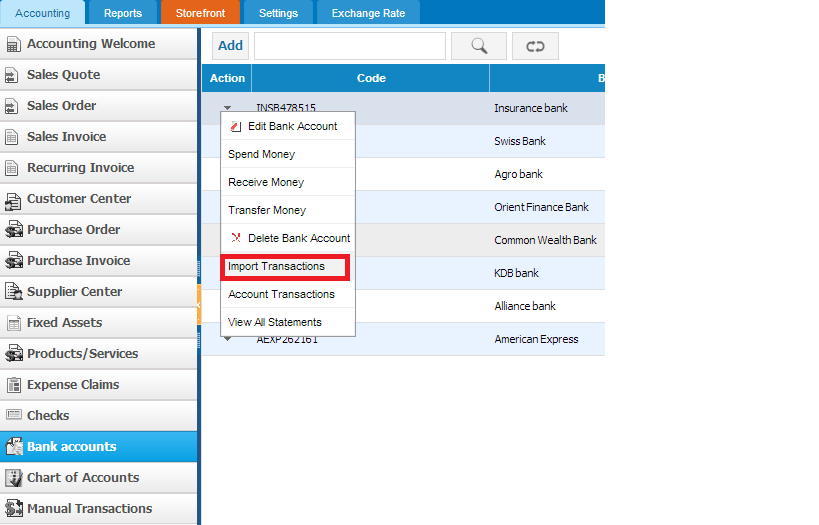
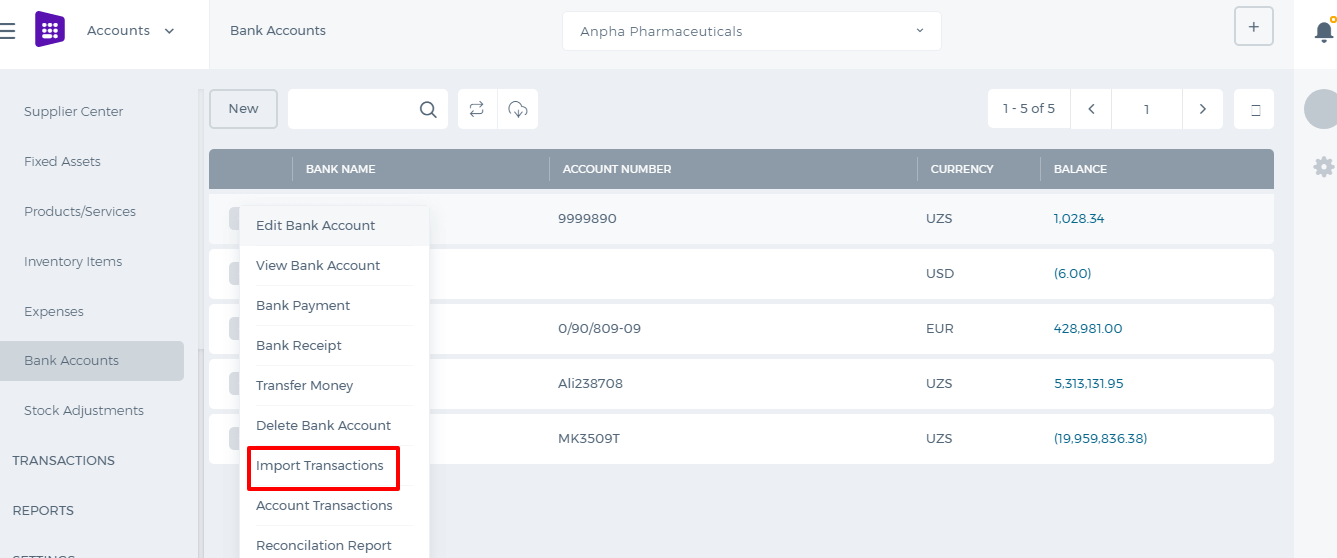
Go to Accounting & Finance
Click Bank Accounts section
Select a bank to import statement
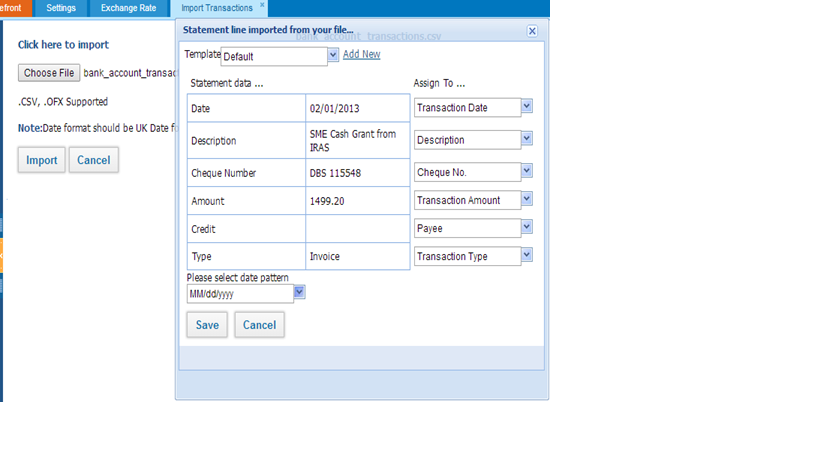
Click Action menu and choose Import transactions
Before uploading statement save the file in .CSV or .OFX format
Finally upload the file into the system
Once you have uploaded the bank statement, match headers with the system columns as shown in the second screenshot and do remember that date pattern should be the same with the file’s date you are importing into the system.
Once you have uploaded the file, following pop-up window will appear with the transactions list where you can match transactions with the bank transactions, which already have been created in kpi.com account or
Create New Transaction.
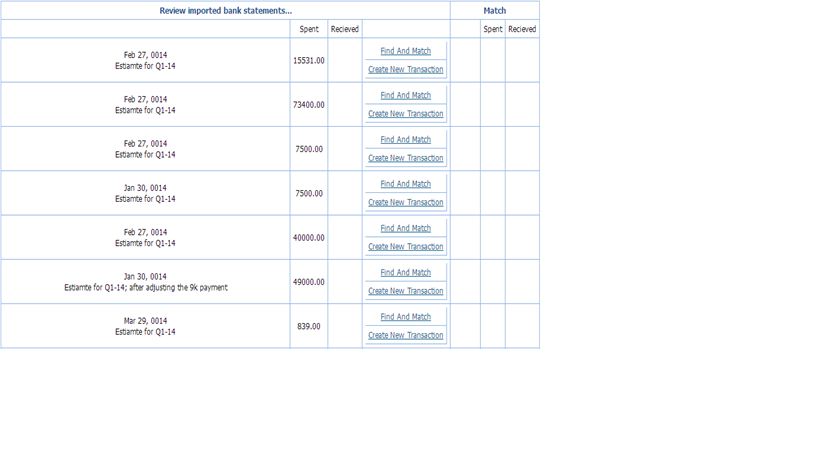
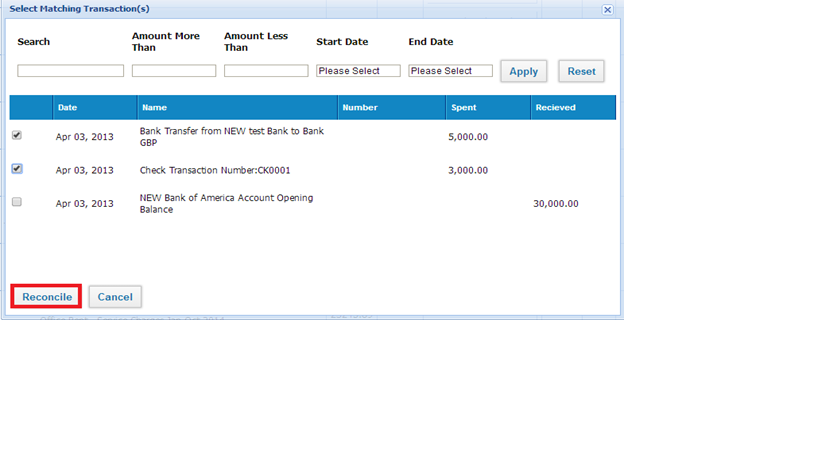
Further, when you click
Find and Match you can select transactions to reconcile by ticking transaction line and clicking
Reconcile. Moreover, in this pop-up window users will be able to filter transactions by
Amount more/less and
give period.
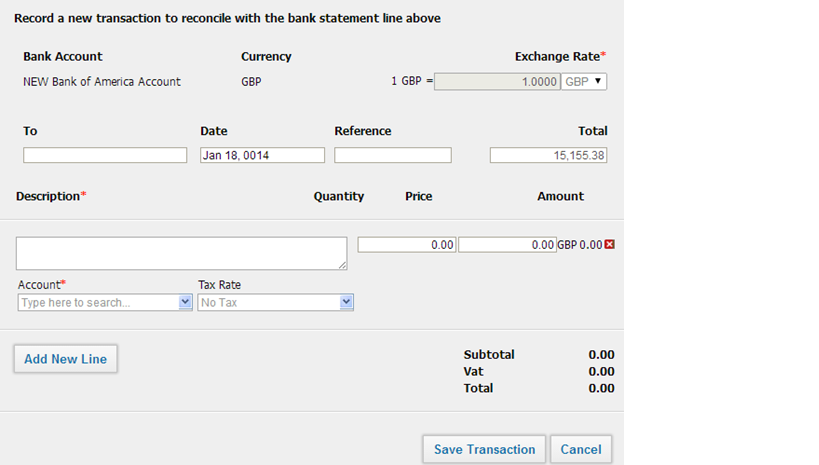
If some transactions are not recorded in the system, you can create a new transaction in order to reconcile with the bank statement. For creating new transactions click on
Create New transaction, then fill the required fields and save it.
After you have reconciled all the transactions with the bank statement your company Bank account balance at kpi.com will be the same with the bank account balance in your Bank.
Spend Money
Spend Money
To spend money from Bank accounts, go to the Bank account from listing page and click action bar. select bank payment
.
To - write description for money spending
Date –Indicate the date
Reference - write some reference if it has
Amounts - Tax types: tax inclusive or exclusive
Number - Spend money number
Account - spending money account
Tax rate - tax rates
Description - enter some extra descriptions related to the supplier
Quantity - quantity of money amount which is going to be spent
Price - amount of money
Name - name of supplier ( if there are Accounts Payable in Account part, the Name part can be enabled to choose supplier )
Remove - delete entered transactions
3.
Save transactions - save all inserted transactions.
Receive Money
Bank Receipts
1. To receive money from Bank accounts, go to the Bank account from listing page and click action bar and select
Bank Receipts 2. The
Bank Receipt page
 From
From - Indicates receiving account from whom
Date –Indicate the date
Reference - Write some reference if it has
Amounts - Tax types: Tax inclusive or exclusive
Number - Receive money number
Account - Select account from chart of account
Tax rate - Tax rates
Description - Enter some extra discriptions related to the account
Quantity - Quantity of money amount which is going to receive
Price - Amount of money
Name - Name of customer ( if there is Accounts Receivable in Account part, the Name part can be enable to choose Customer )
Remove - Delete entered transactions
3.
Save transactions - Save all inserted transactions.
Storefront
Storefront
In kpi.com you can synchronize your kpi.com account with the online store. To synchronize your kpi.com you should buy Host and DNS, while creating online store we will connect website to your kpi.com account. After getting online store website, you can add products in the system and added products will be shown on your online store. The process of adding goods to the system quite simple and requires a few steps to accomplish. You can familiarize how to synchronize online store in the following paragraphs.
To add storefront go
to Accounting >> Storefront and click on the
Add Storefront button.
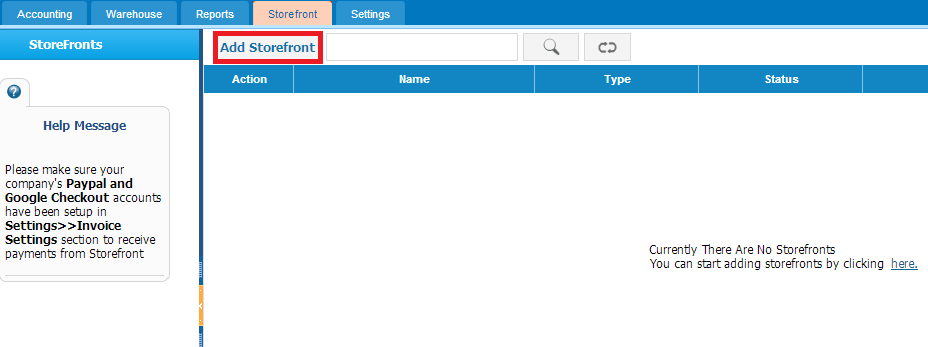
If you click on the button, following window will appear:
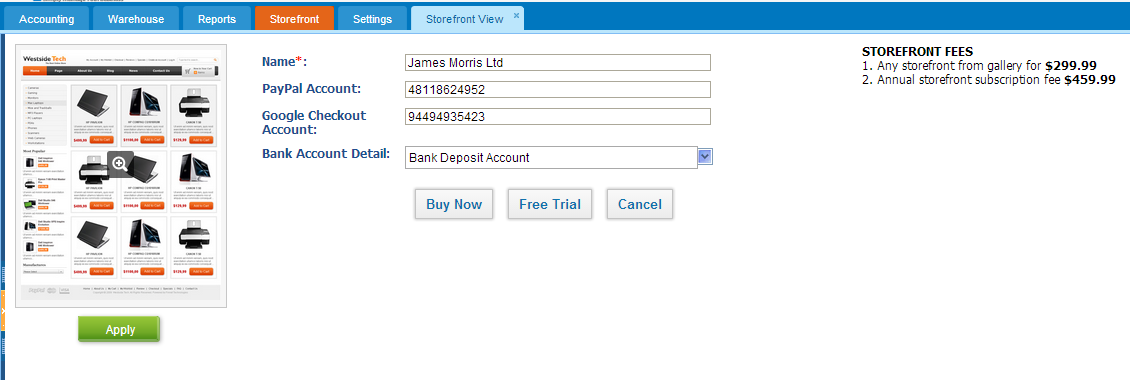
Fill out the form and click on the
Free Trial button to see how it works. After you have added products to storefront you can preview it on the sample website which is given in the system.
Note: Please make sure your company's
Paypal account has been setup in
Settings >> Invoice Settings section to receive payments from Storefront .
Adding a new product/service to the online store requires a few steps to accomplish:
1. Go to
Accounting >> Products/services.
2. While adding a new product/service, tick the storefront checkbox.
3. Specify the order, condition and tick the checkbox if the product is featured, free shipping or special.
4. Attach images of the product
5. Click on the button Save & Close or Save & New

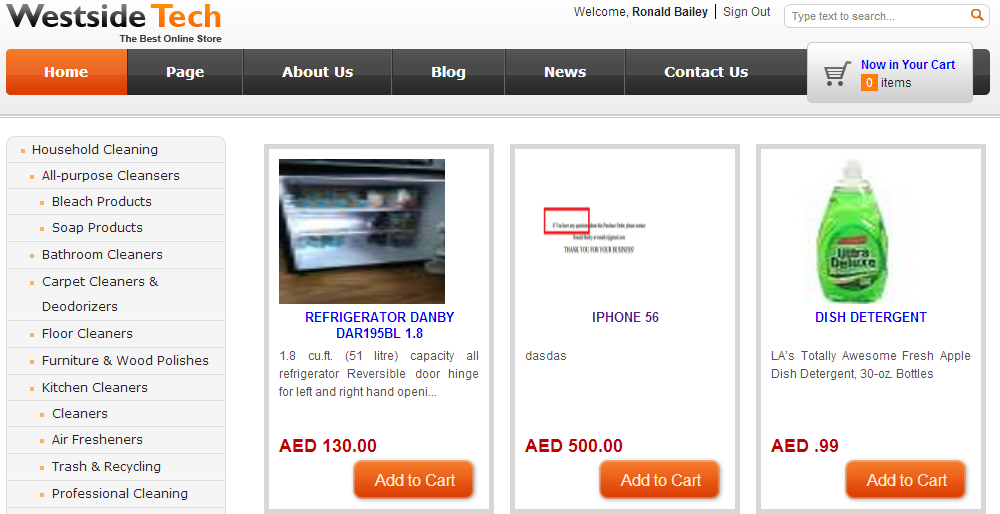
After saving the product you can preview it in the
Storefront tab of the accounting section.
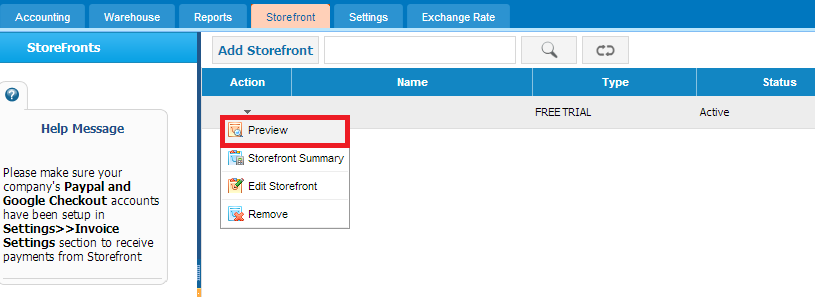
You can see your added product in your online store.
To enable this feature contact our support staff for demo training and to have full information about pricing. You can contact our support team on phone numbers given in kpi.com and you can send request to support@kpi.com
Stock Valuation
Stock Valuation
1. The
Stock Valuation shows the product transaction dates, its balance and quantities. To see Stock Valuation details, go to
Reports page. Choose the
Stock Valuation from list of menu in left corner. Click it:
Accounts>>Reports>>Stock Valuation
2. Firstly, select the date From to
To date the product actions. Select the
Product from the dropdown list and choose
Warehouse. Then click
Update button for the refreshing page.
3. When you updated the page you may see
Product details in identified date. There are shown Beginning Balance, Products transactions with Purchase / (Sales) information and Ending Balance respectively.
 Type
Type - Type of product, it's balances
Entry Date - The date that product has entered
Transaction Date - Transaction date
Name - Name of customer/supplier
No. - PO / SO numbers
Quantity - Product quantity
Transaction Value - The value of transactions
Quantity on Hand - Quantity of product in hand
Balance Value - The final value of items
Reports Overview
Reports Overview
Reports
After all of your endeavoring, it is time to generate reports and be on top of every transaction and
kpi.com comes with a Reporting system, that lets you drill down into any transaction, run vital reports from reports library; add reports to your favorites folder, and share results with your company contacts with a certain recurrence you prefer.
More about Reporting system.
Chart of Accounts Overview
Chart of Accounts Overview
Chart of Accounts
Managing ledger accounts at
kpi.com is quite easy and lets you create your own accounts. To do that, go to Settings>>Accounting>>Chart of Accounts>>Add New. Then choose the right account type – be it Asset, Liability, Income, Expense or Equity. But if you already have your accounts list, you can import them via CSV upload which is available in the bottom right side of the page.
Dividends Payable
Dividends Payable
A current liability account that reports the amounts of cash dividends that have been declared by the board of directors but not yet distributed to the stockholders.
How to build Assembly Item?
How to build Assembly Item?
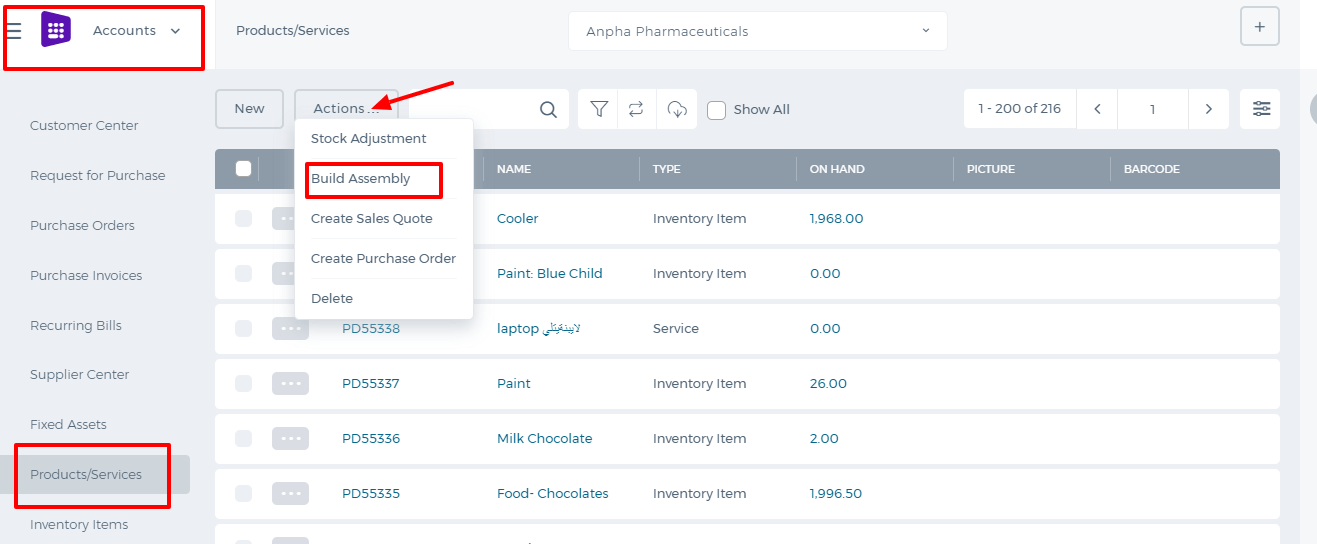
In order to build Assembly Item, go to
Accounting & Finance >>
Product/Services, click “
More” menu and select a
Build Assembly.
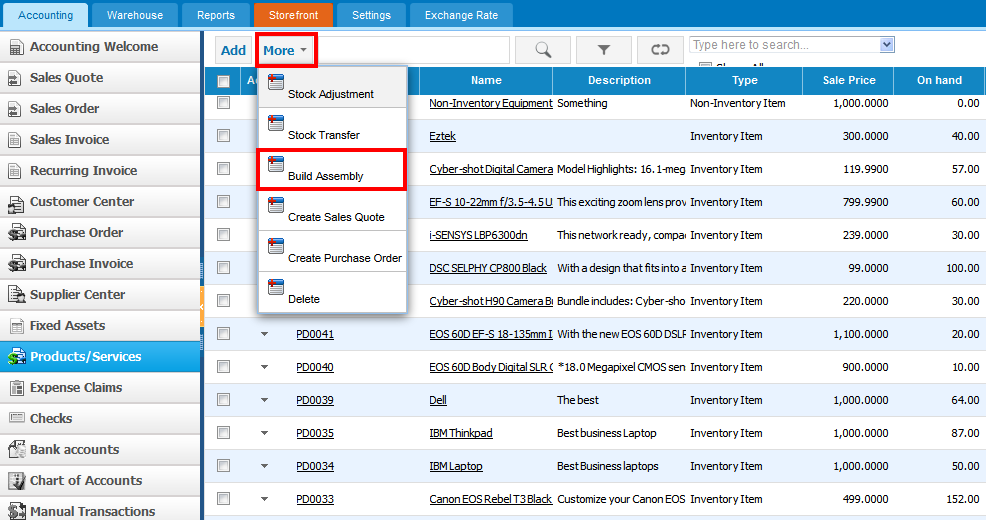
The form will appear with the following fields:
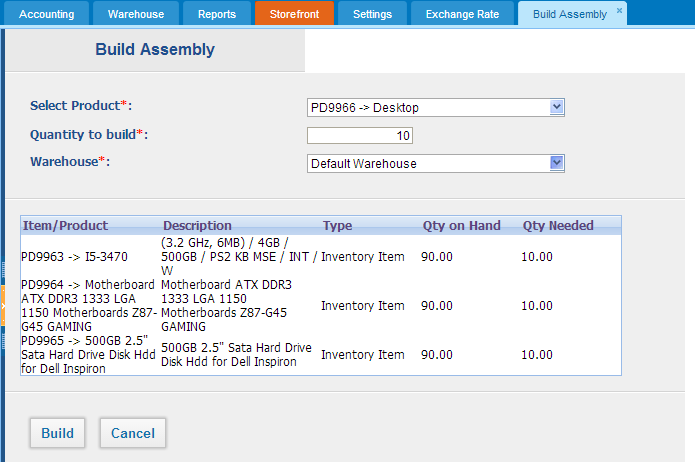
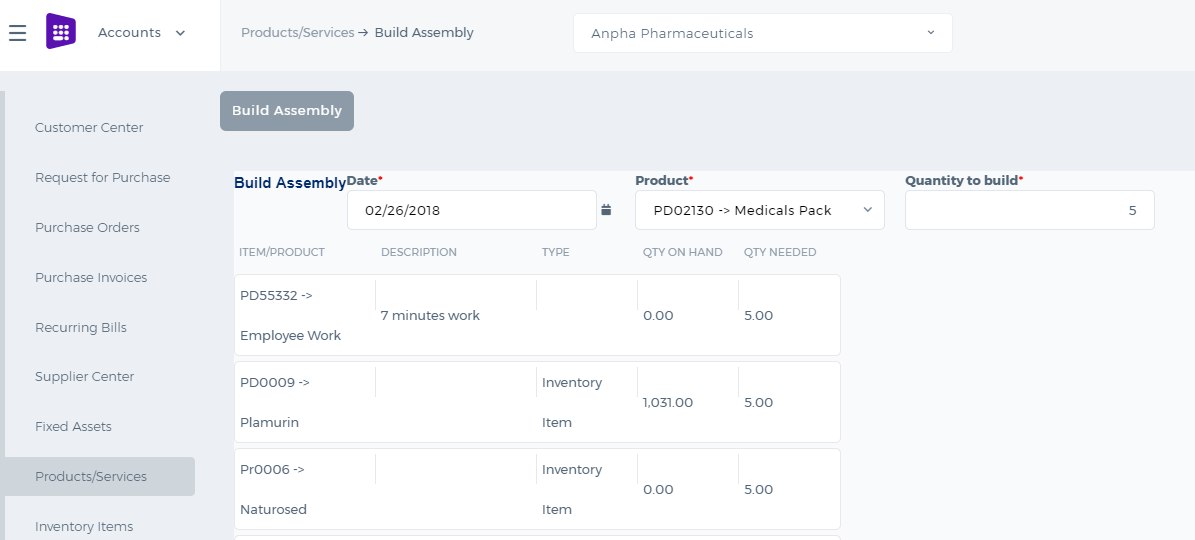 Select Product –
 in this field you can choose only assembly type products in the system.
Quantity to build –enter the quantity of the built assembly item.
Warehouse – select warehouse where build assembly will be hold. (Warehouse feature is added by the request of the user. You can see more about
Add-ons here).
After you have built Assembly Item, Inventory items’ (bill of materials) quantity on hand will be decreased by the quantity used for building assembly item. In the example of former screenshot, quantity of the each item in the products/service listing page will be decreased by 10 units and quantity on hand will be 90 units. As 10 units of the items were used for building Assembly item.
What is Assembly Item?
What is Assembly Item?
Assembly Item – is a type of line items, which is used in filling sales or purchase form. Assembly item consists of inventories and assemblies (subassemblies) which build a single Assembly item. Items in the assembly is called Bill of Materials, those are the components parts of Assembly item.
Assembly items can be used when you are dealing with the customer related process on (Sales Quotes, Sales Orders, Sales Invoices, or customer Credit Notes). If you selected "purchased from supplier" while building an assembly item, Assembly item would appear in the supplier process on Purchase Orders, Purchase Invoices, or supplier Credit Notes).
Use Assembly item in order to:
· Customize the price of assembled items
· Quick access to information about finished goods
What's the difference between
Assembly Item and
Product Groups?
Assembly item and Product group may seem the same as they include a group of items which are under one item in the list of Product/services in
kpi.com. However, they are not the same and have distinctive differences between each other.
Product Group is used when you often enter the same items and their quantity while recording sale or purchase form. You can make a group of inventory, non-inventory and service items to include in one product group. You can avoid entering the same line items each time individually and add only one product group of items.
Assembly items let you to combine inventory items and all this inventories make a new price into new finished goods that you offer to your customers. Also in assembly item you can add assembly cost or other services which should be included in the list of
Bill of materials.
Add New Assembly Item
Add New Assembly Item
To add an
Assembly item, go to Product/services listing page and click
Add or use hot keys “Alt+T” (for Google Chrome) and “Shift+Alt+T (for Mozilla Firefox).
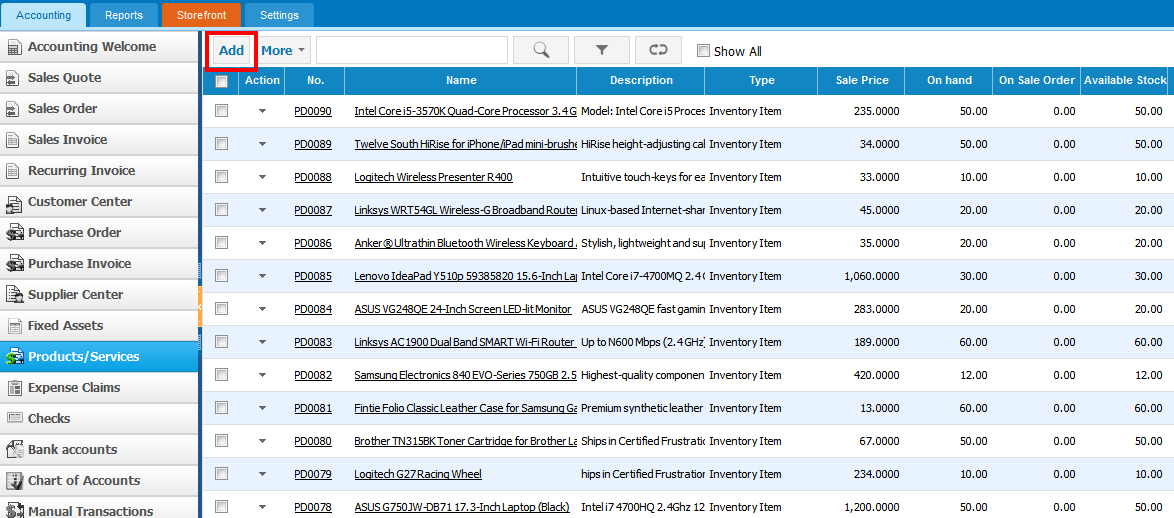
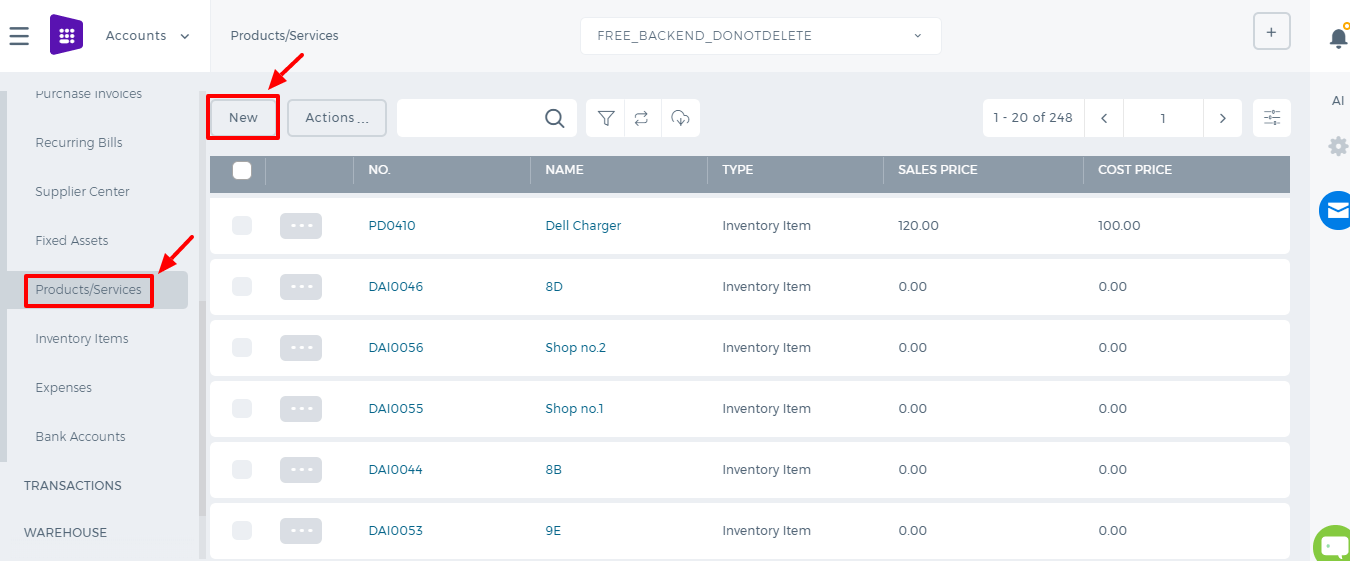
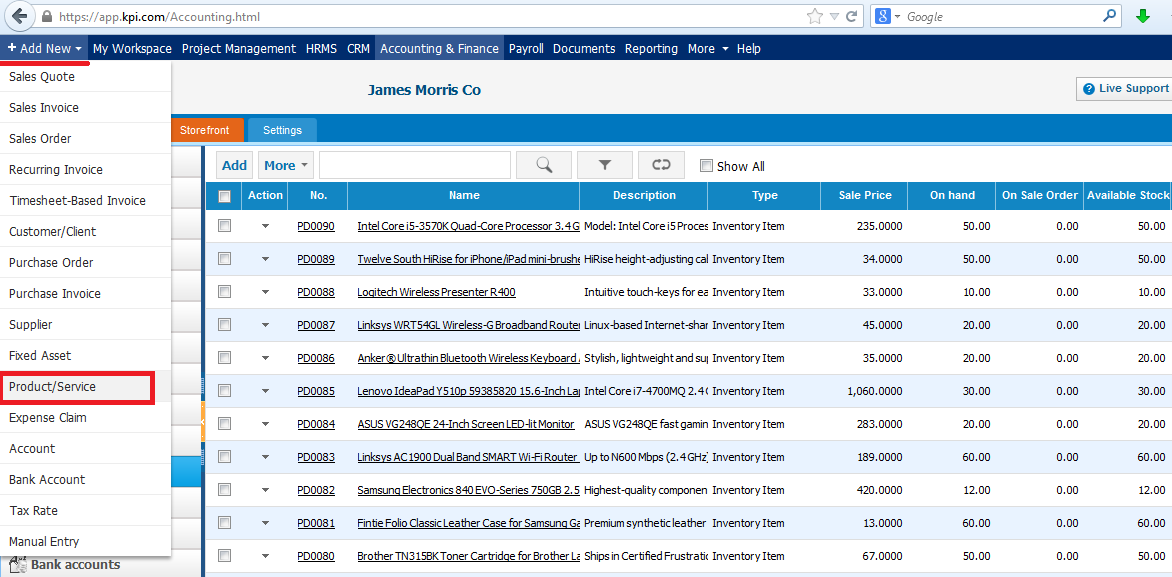
If you are already in
Accounting and Finance section you can go to
+ Add New on top left-corner and dropdown menu will appear, here you can click on the
Product/Service.
The form will appear with the following fields:
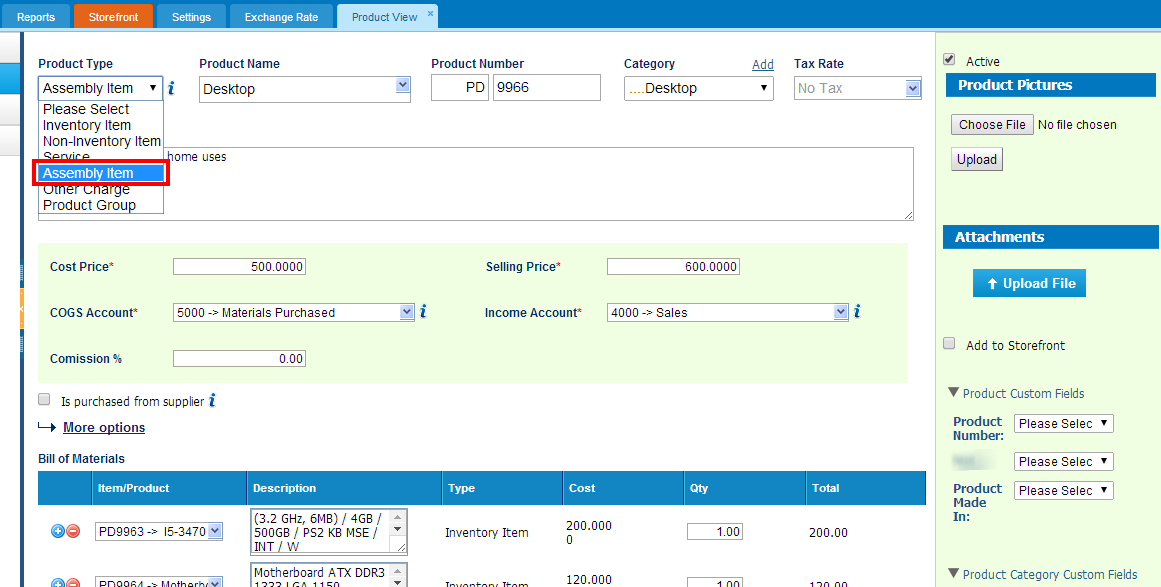
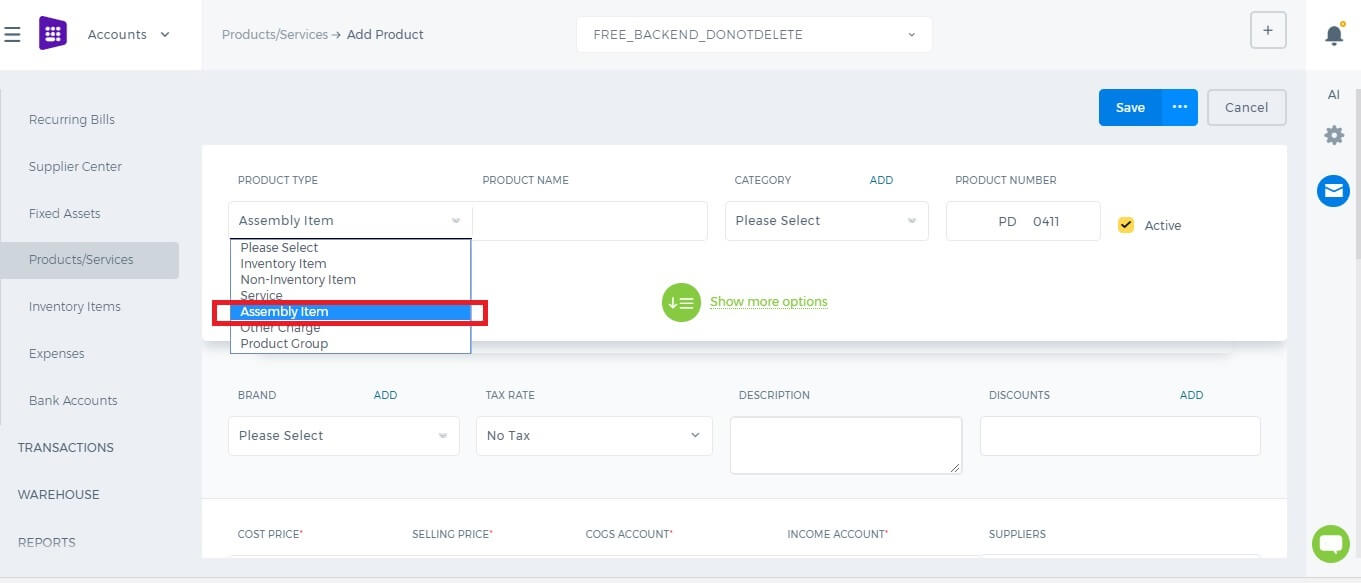 Product Type –
 Select
Assembly Item type and following fields will be available:
Product Name – Write name of the Assembly Item.
Product Number – Product number will be set automatically. You can set your own numbering in Settings, Numbering Settings and Product Numbering.
Category – Choose a category of the Assembly Item. You can add new Category here in dropdown clicking
Add New or in Settings, Product Categories and Add Category.
Tax Rate – Tax rate to the per unit of Assembly Item.
Cost Price – Cost price of the Assembly Item to the company.
Selling Price – Selling price of the Assembly Item to customers.
COGS Account – Cost of Goods Sold account. By default
Materials Purchased will be set, you can choose other COGS account in dropdown menu.
Income Account –
Sales account will be set by default, you can choose another income account from dropdown menu.
Is purchased from supplier – tick the check box if the Assembly item is purchased from supplier and you can select assembly in order to include it on the Purchase Order/Purchase Invoice form.
Bill of Materials – in this box select inventory items to include it on the materials list, the fields such as: Description, type, cost will be automatically filled after selecting an item. Then specify, how many of the item is needed in the “
Qty” box. Total box will calculate total cost of the item. If you wish to add more items to build assembly item, click on

button and select another item to add in the materials list. At the right hand of the B
ill of materials, total cost of the materials will be indicated.
Quantity on Hand – Number of the Assembly Item that company has currently in Stock.
Reorder Point – Enter the level of inventory when an order should be made with suppliers to bring the inventory up.
Asset Account – Choose an asset account from dropdown menu to register your Assembly Item to your Stock.
Total Value – Total cost of the product/services, it will be calculated automatically based on the cost price and Quantity on Hand of the Assembly Item.
As of – Select the date that Assembly item came to your Stock, if you have Assembly Item in your Stock.
If you are going to input more data about the Assembly Item you can push
More options:
SKU number
UPC number
Unit measurement
Vendor
Manufacturer
Part number
What is Non-Inventory Item?
What is Non-Inventory Item?
Non-Inventory Item - is a type of product that is purchased or sold but whose quantity is not tracked. This type of items are purchased for company use or custom product purchased for Projects.
Non-Inventory Items appear in the customer process (on Sales Quotes, Sales Orders, Sales Invoices, or customer Credit Notes). If you select the
Is purchased from supplier check box on the
Non-Inventory Item Add form, non-inventory items appear in the supplier process (on Purchase Orders, Purchase Invoices, or supplier Credit Notes).
Use Non-Inventory Items to track merchandise that:
- You sell but do not purchase.
- You purchase but do not resell.
- You purchase and resell but do not track as inventory.
What's the difference between Inventory and Non-Inventory Items?
Inventory Items are items that you buy and then stock for a while before selling.
kpi.com Accounting and Financetracks the quantity on hand, the current stock value (transaction value), and the
FIFO method of inventory valuation. It also tracks some accounting information like "cost of goods sold" for inventory items that you have sold.
Non-inventory items are items that you purchase (usually on behalf of a specific customer) and then immediately sell or install, or items that you sell without ever buying. For non-inventory items,
kpi.com Accounting and Finance will only track how much you have spent or taken in. Some people use non-inventory items even for items that they stock because they prefer a simpler approach—even though it gives them less information
Add New Non-Inventory Item
Add New Non-Inventory Item
To create
Non-Inventory Item, go to Product/Services listing page and click
Add or use hot keys "ALT+t" (for Google Chrome) and "Shift+Alt+t" (for Mozilla Firefox).
If you are already in
Accounting and Finance section you can go to
+ Add New on top left-corner and dropdown menu will appear, here you can click on the
Product/Service.
If you select
Non-Inventory Item in Product Type the form will appear with the following fields:
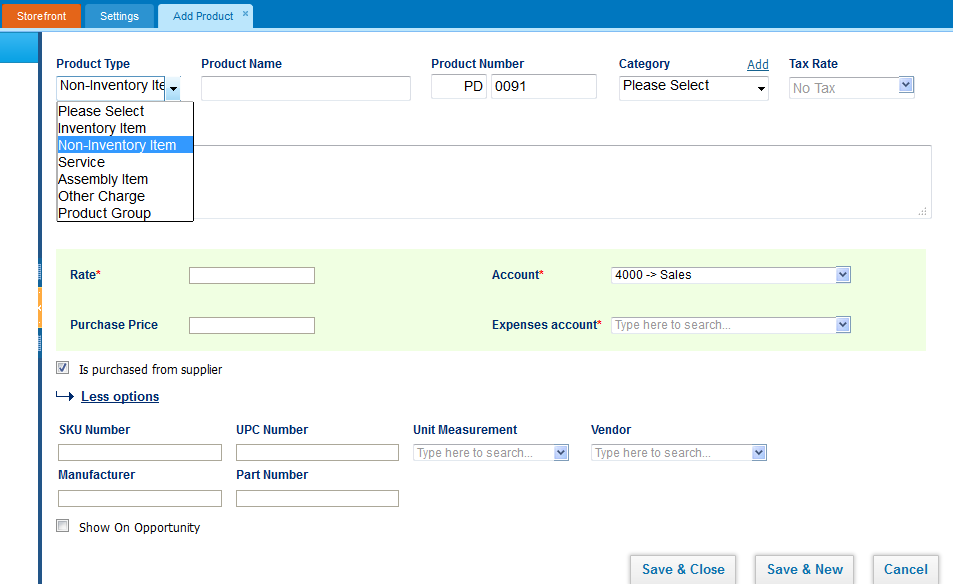
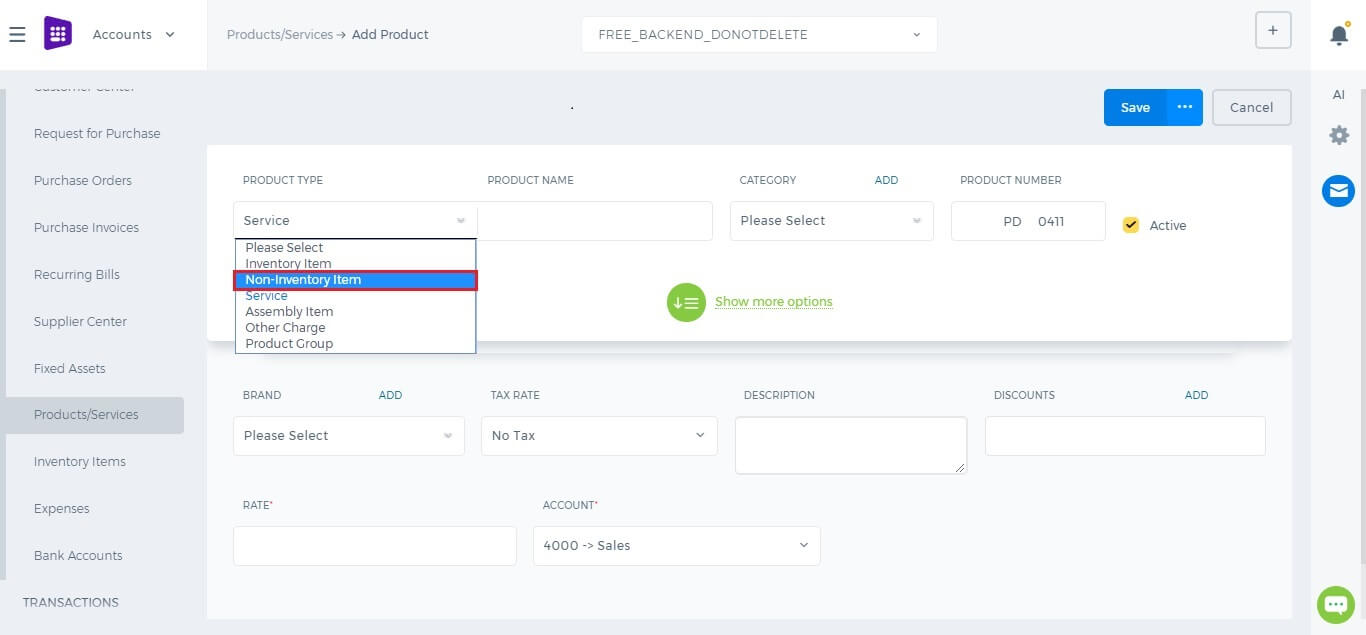 Product Type –
 Select
Non-Inventory Item type and following fields will be available:
Product Name – Write the name of Non-Inventory Item.
Product Number – Product number will be set automatically. You can set your own numbering in Settings, Numbering Settings, Product Numbering.
Category – Choose a category of the Non-Inventory Item. You can add new Category here in dropdown clicking
Add New or in Settings, Product Categories and Add Category.
Tax Rate – Tax rate to the per unit of Non-Inventory Item.
Rate – Selling price of the Non-Inventory Item to customers.
Account –
Sales account will be set by default, you can choose another income account from dropdown menu.
If you want to show this Non-Inventory Item in purchase documents (Purchase Order, Purchase Invoice, or supplier Credit Note), you need to check
"Is purchased from supplier" check-box. And following fields show up:
Purchase Price – Cost price of the Non-Inventory Item to the company.
Expenses Account – Select an expense account to track spendings.
If you are going to input more data about the Non-Inventory Item you can push
More options:
SKU number
UPC number
Unit measurement
Vendor
Manufacturer
Part number
FIFO method of inventory valuation
FIFO method of inventory valuation
kpi.com Accounting and Finance uses the
first-in, first-out (FIFO) method of costing inventory. This method assumes that oldest items are sold first. The cost of the oldest item is assigned to the first item sold, and the cost of the newest item is assigned to inventory. The value of the inventory is close to its actual replacement cost.
You might purchase items at a certain price, and then purchase more of the same items at a different price. The FIFO method treats items that are purchased at the same price as a layer of inventory. Although the sales price is the same for all the layers, the cost of goods sold is determined from the purchase price of the first layer until all its items are gone, and then from each succeeding layer until all its items are gone.
When prices are going up, your cost of goods sold is lowest with FIFO, because you take the oldest, and therefore least expensive, items out of inventory first. Your income is higher, although your taxes are higher as well.
Cost of inventory can also be accounted for in the following ways:
Last-in, first-out (LIFO) This method assumes that newest items are sold first. The cost of the newest item is assigned to the first item sold, and the cost of the oldest item is assigned to inventory.
Weighted average This method uses an average cost. Item cost is assigned by dividing the total cost by the number of items.
What is Inventory Item?
What is Inventory Item?
Inventory item – is a separate product which can be specified in stock.
If your company sells stock items, you can track inventory. An inventory item is a product that is purchased for resale and is tracked in Stock and on the Balance Sheet. Inventory items appear in the customer process (on sales quotes, sales orders, sales invoices, or customer credit notes) and in the supplier process (on purchase orders, purchase invoices - Supplier bills, or supplier credit notes).
Working with inventory items
After you set your company and finish
Accounting Getting Started page, you can add new inventory items on the Products/Services listing page. This form allows you to enter detailed information about the item, including the accounts to charge when you buy and sell the item, quantity on hand, and reorder point.
When you purchase and receive items,
kpi.com Accounting and Finance credits the Pending Goods Received Notes account and debits the Stock asset account. When you convert this Purchase order to purchase invoice it credits the Accounts Payable account for the supplier and debits the Pending Goods Received Notes account. When you sell the items,
kpi.com Accounting and Finance credits the Stock asset account and debits the Materials Purchased, cost of goods sold account.
kpi.com Accounting and Finance uses the
FIFO method of inventory valuation.
Add New Inventory Item
Add New Inventory Item
To create
Inventory Item, go to Product/Services listing page and click
Add or use hot keys "ALT+t" (for Google Chrome) and "Shift+Alt+t" (for Mozilla Firefox).
If you are already in
Accounting and Finance section you can go to
+ Add New on top left-corner and dropdown menu will appear, here you can click on the
Product/Service.
The form will appear with the following fields:

 Product Type –
 Select
Inventory Item type following fields will be available:
Product Name – Write the name of Inventory Item.
Product Number – Product number will be set automatically. You can set your own numbering in Settings, Numbering Settings, Product Numbering.
Category – Choose a category of the product or service. You can add new Category here in dropdown clicking
Add New or in Settings, Product Categories and Add Category.
Tax Rate – Tax rate to the per unit of Inventory Item.
Cost Price – Cost price of the Inventory Item to the company.
Selling Price – Selling price of the Inventory Item to customers.
COGS Account – Cost of Goods Sold account. By default
Materials Purchased will be set, you can choose other COGS account in dropdown menu.
Income Account –
Sales account will be set by default, you can choose another income account from dropdown menu.
Quantity on Hand – Number of the Inventory Item that company has currently in Stock.
Reorder Point – Enter the level of inventory when an order should be made with suppliers to bring the inventory up.
Asset Account – Choose an asset account from dropdown menu to register your Inventory Item to your Stock.
Total Value – Total cost of the product/services, it will calculated automatically based on the cost price and Quantity on Hand of the Inventory Item.
As of – Select the date that Inventory item came to your Stock.
If you are going to input more data about the Inventory Item you can push
More options:
SKU number
UPC number
Unit measurement
Vendor
Manufacturer
Part number
Products/Services Import
Products/Services Import
1. To
upload Product/Services, go to Product/Services listing page and click Import on the bottom of right- side of the page. There are CSV file.
2. When click CSV there are pop up information about import csv file. Firstly you should download sample file of csv.
3. When open excel file you may see columns called "name, description, product type" and etc. you may insert related informations into these columns respectively, and save it as a CSV form

4. Finally, after inserting excel informations select this file from your computer and
upload it.
5. After
upload you should refresh the page.