How to Change Account Details at kpi.com
How to Change Account Details at kpi.com
To change account details, go to the
Humans >> Employee Profile. By pressing
Edit button, you can change your personal, contact, address and bank account information.
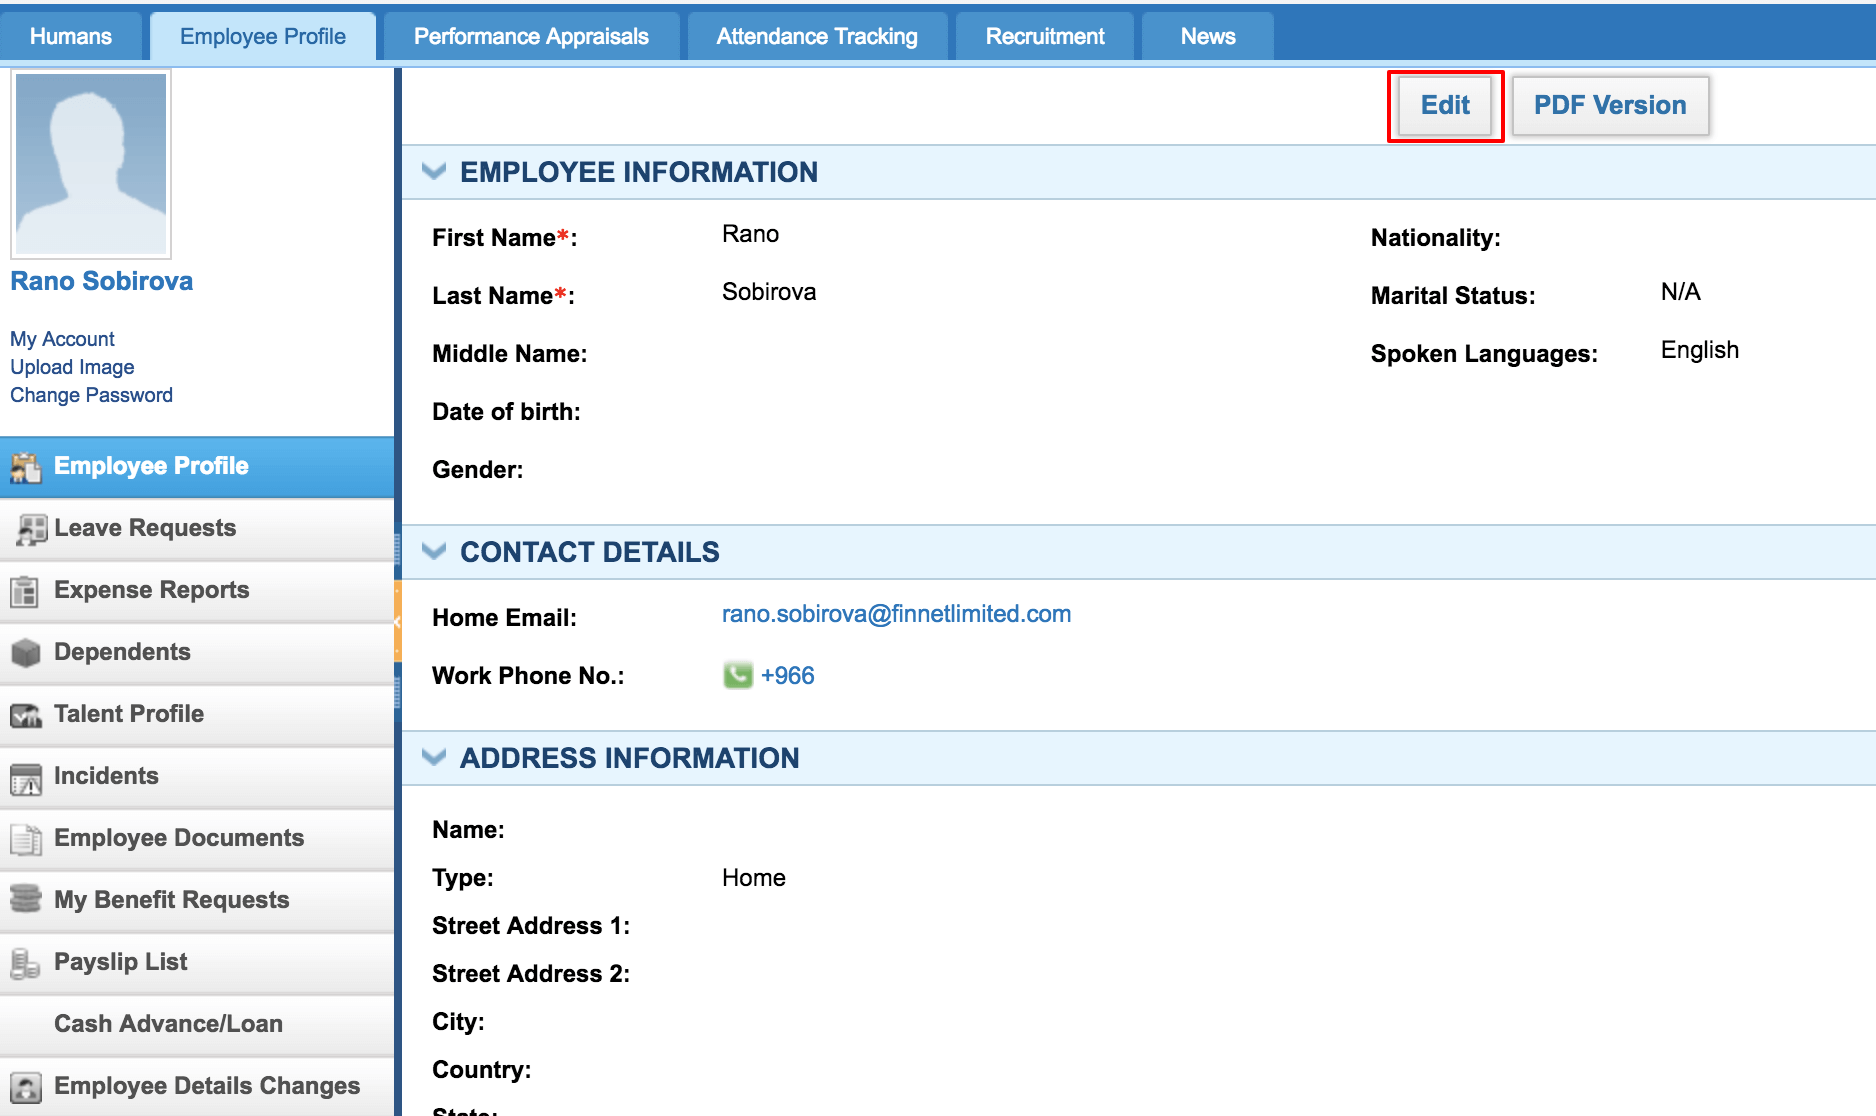
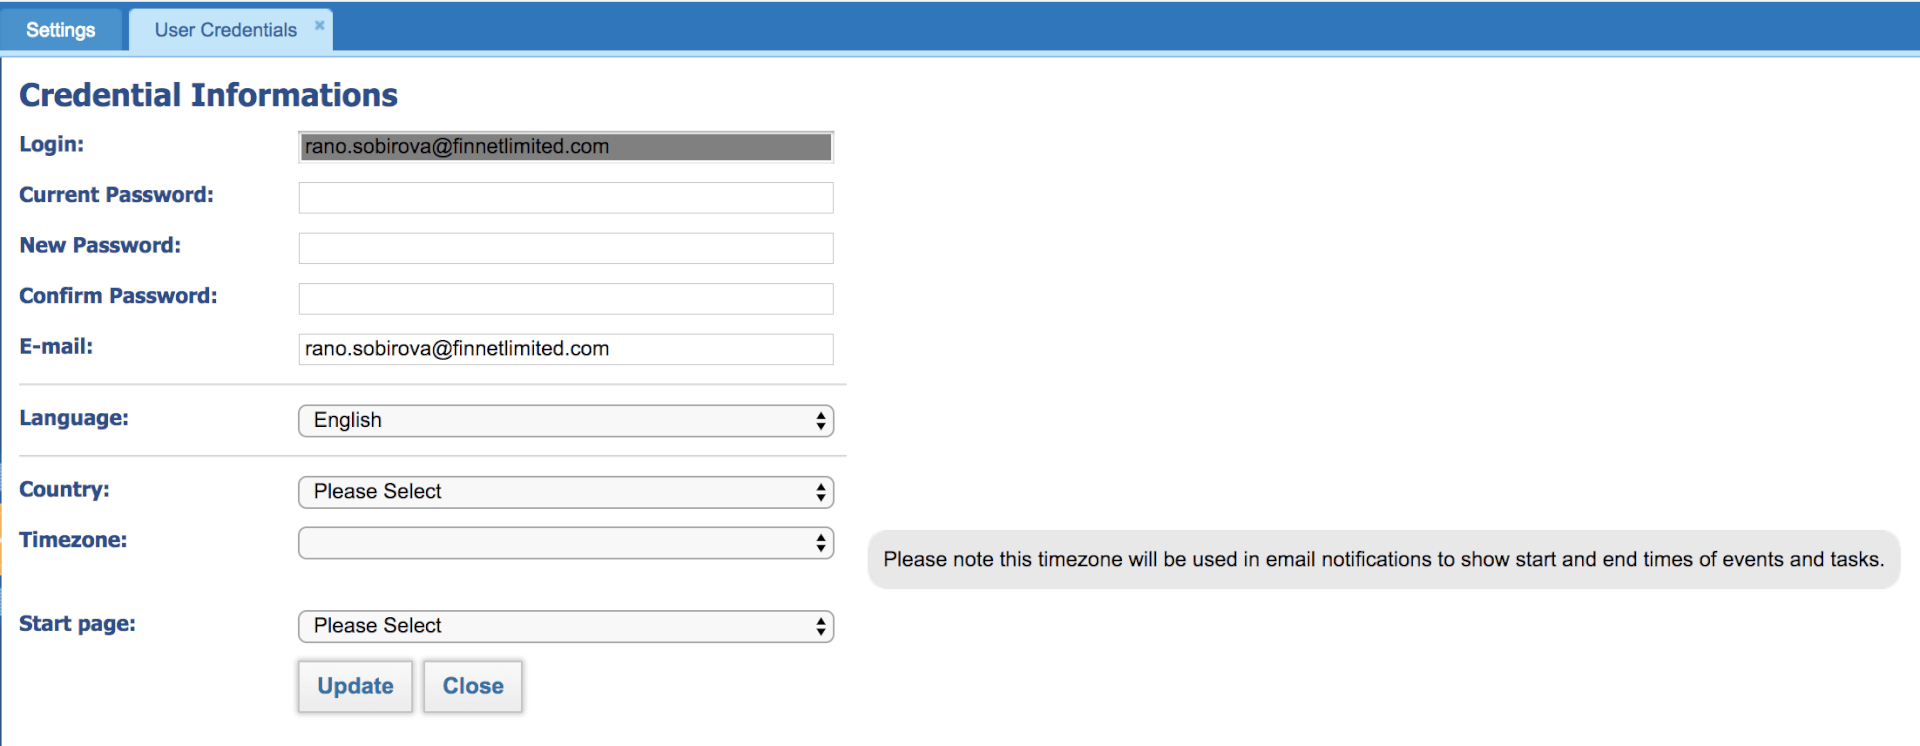
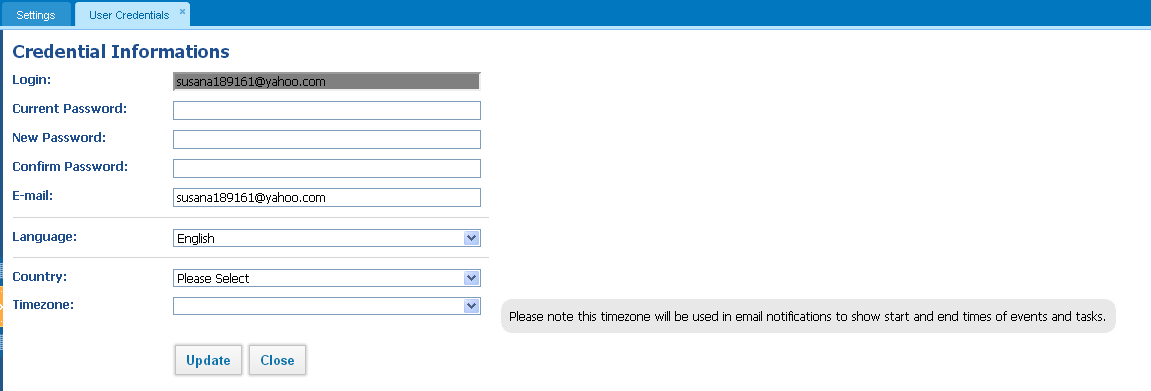
In addition, you can see your account, upload/edit image and alter your password. By pressing
Change Password, you go to another window, where you can change the password, set language, country, and timezone. However, you
cannot change your credential (username) by yourself. You can
contact kpi.com Support team in live chat or
send a message to support@kpi.com to alter your login credentials.

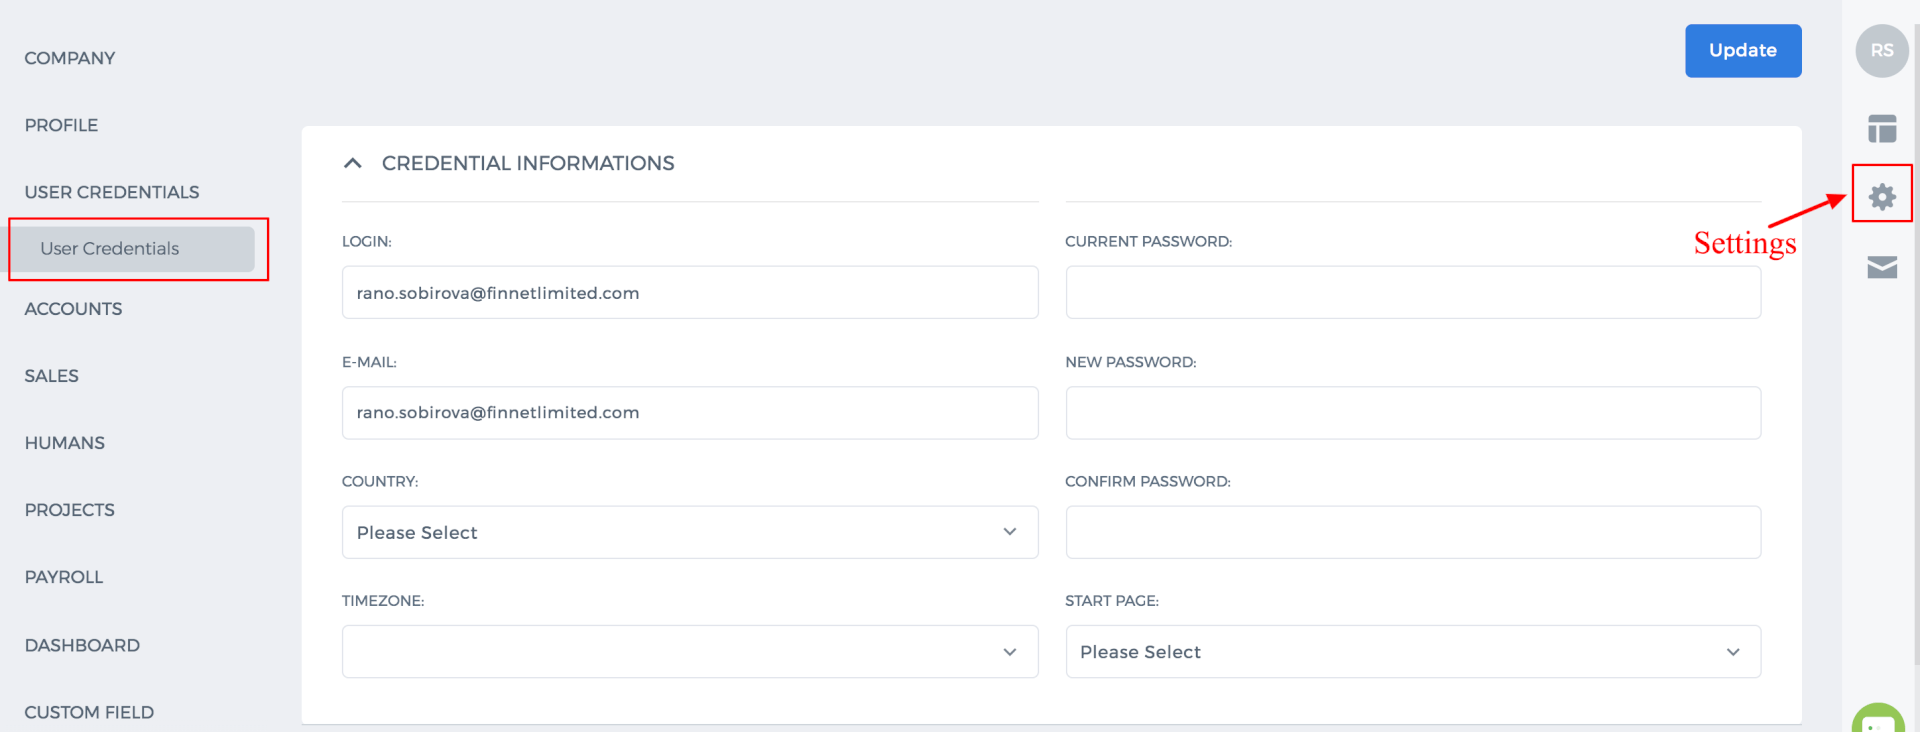
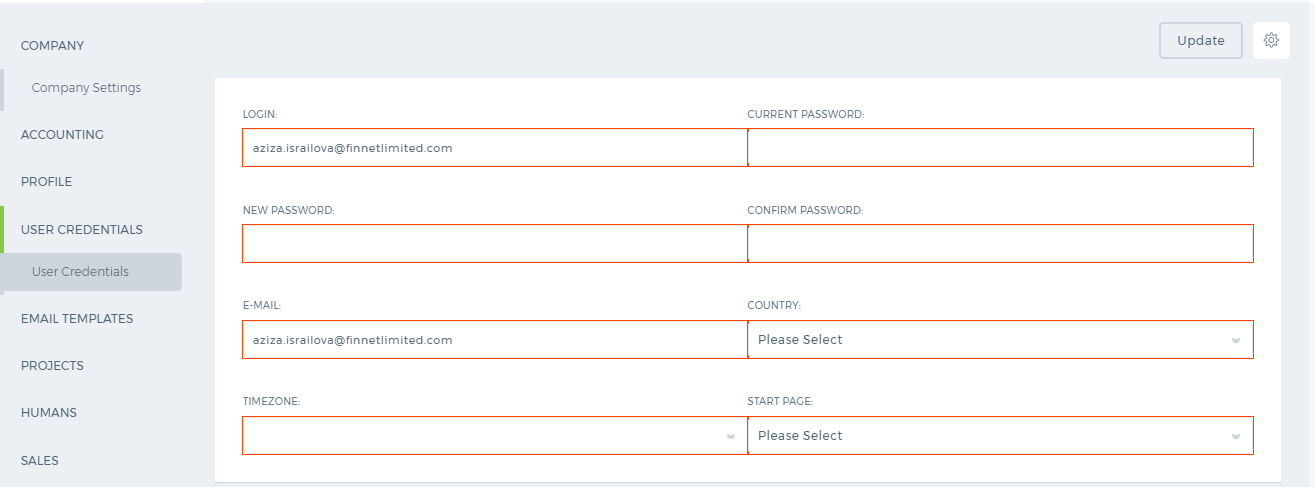
In New UI you can amend Your Password, set timezone and start page, and select country by going
Settings >> User Credentials. However, you
cannot change your login by yourself. You can
contact kpi.com Support team in live chat or
send a message to support@kpi.com to alter your login credentials.
CRM Custom Fields
CRM Custom Fields
To add extra fields to the CRM module, go to the
Settings>>Custom Fields Management Settings>>CRM Custom Fields.
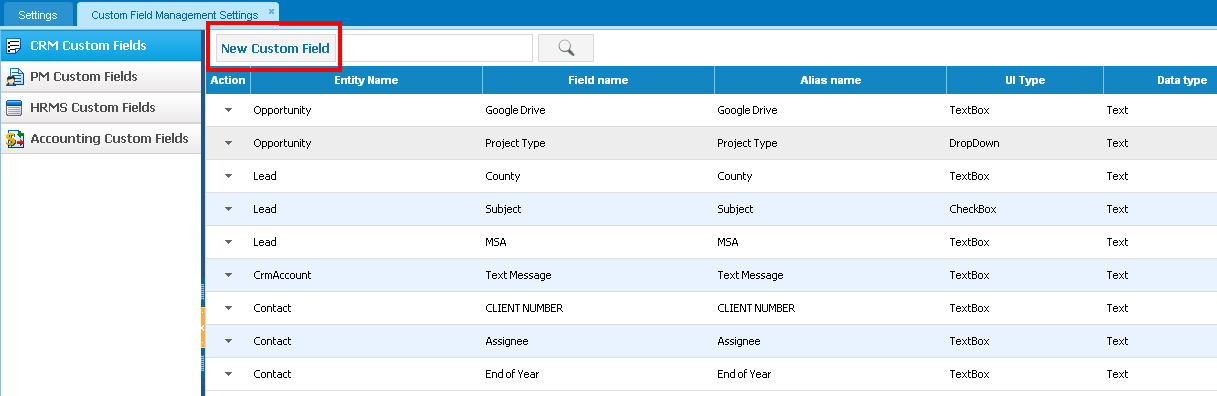
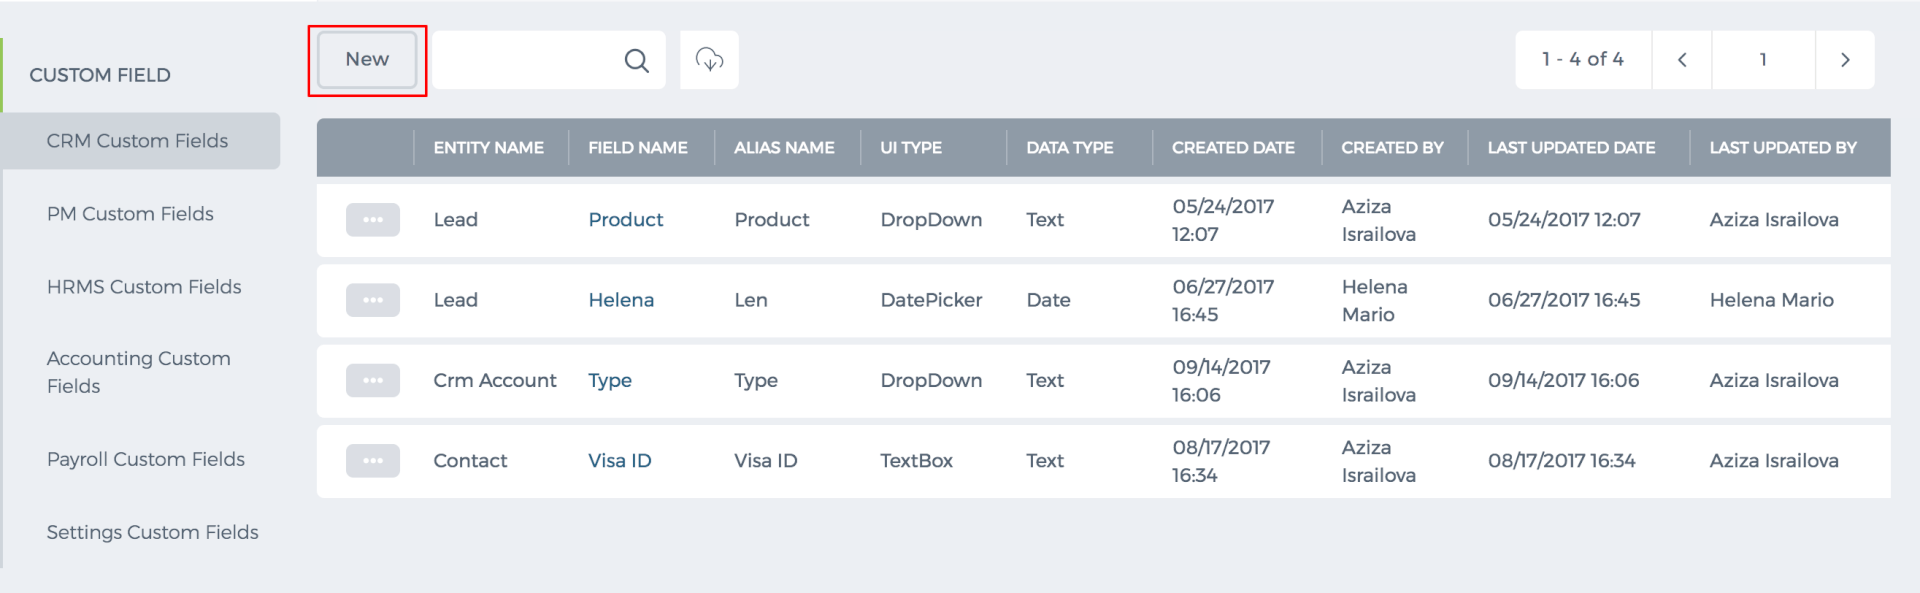
You need to specify which item it relates to Lead, Opportunity, Account, Contact or Case. Then you need to set the Field Name, Alias Name, Data type, and Field Type.
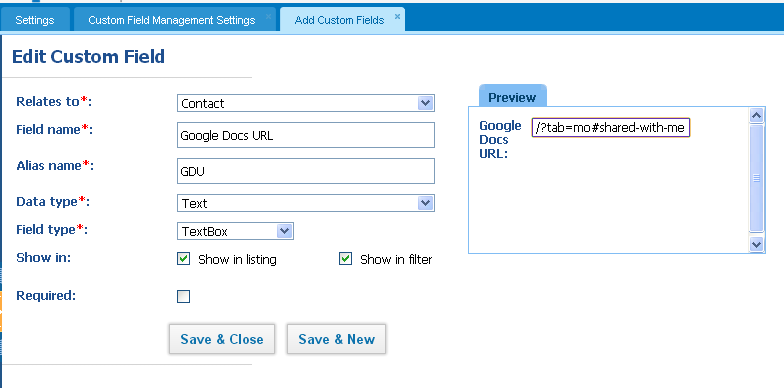
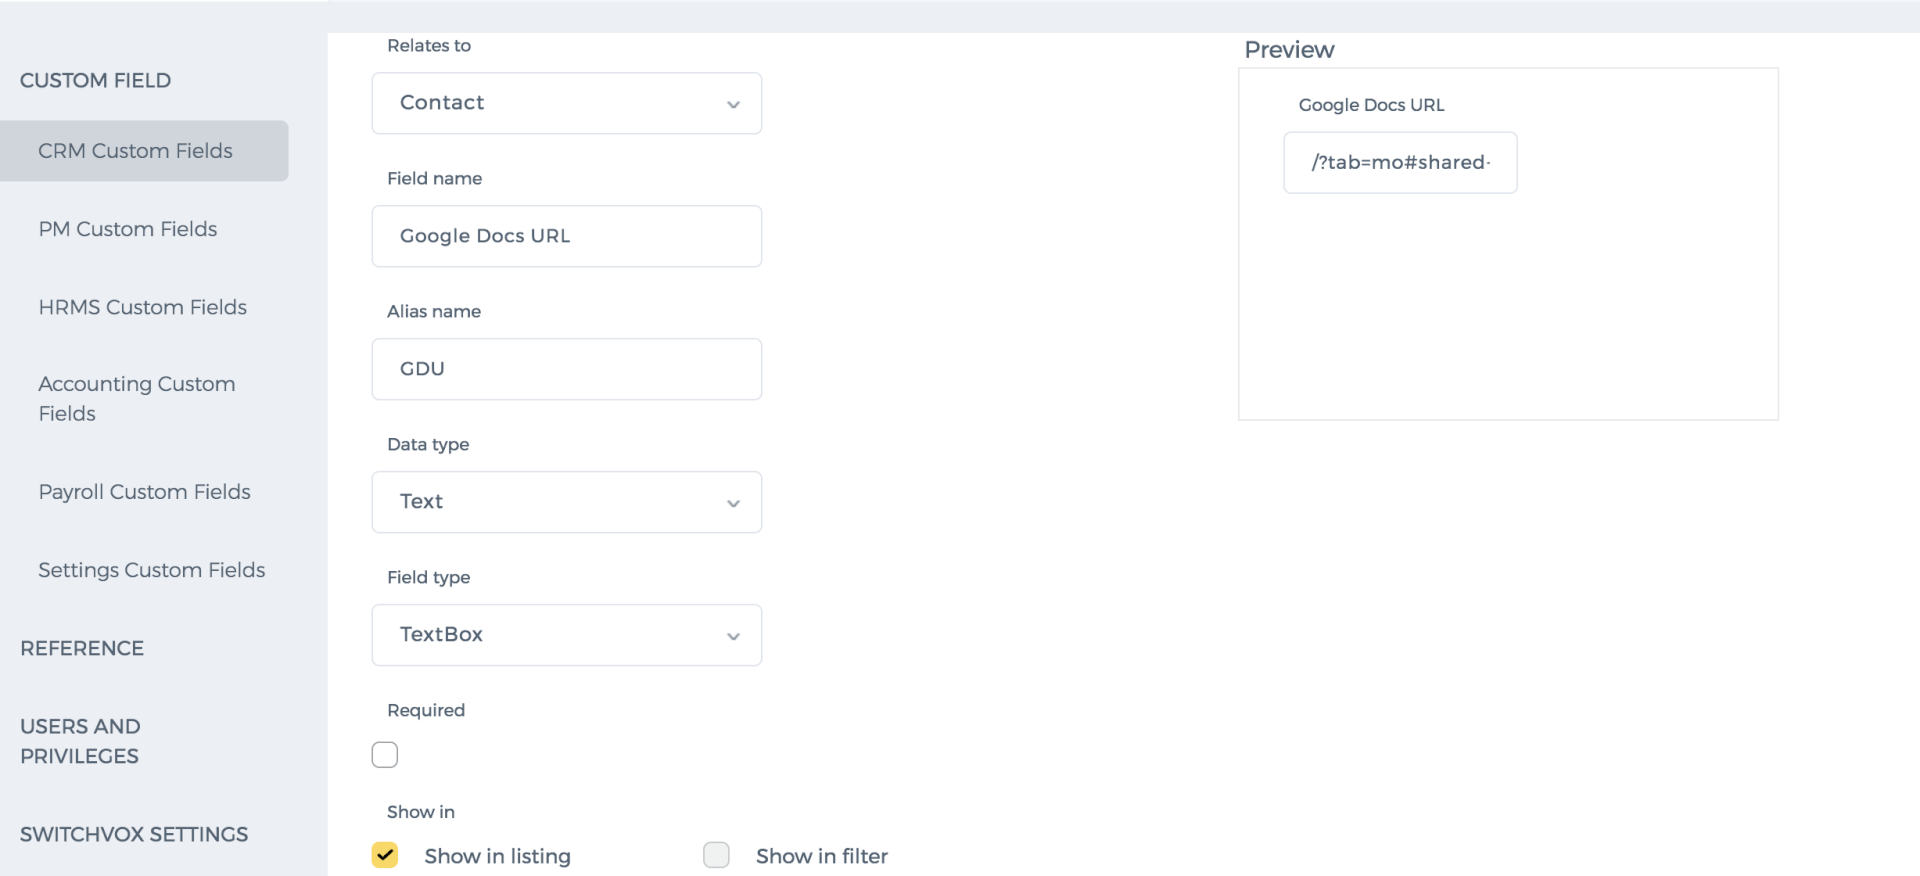 Show in listing
If you check this box, the field will show up as a column in the Contacts List for the quick view. So you do not have to go to the Contact Summary page to see the custom field data.
Show in filter
If you want to make the new field filterable, you need to check this box. After that, you will be able to filter your Contacts based on this field as well.
Alias Name
This is the additional name of the new field that helps you to move data to other sections. For example, you have the custom field in Opportunity and in the Projects section. If the Alias name is the same for the custom fields in these sections, the custom fields data will also be moved to the Projects section when you Convert an Opportunity to a Project. So the Alias Name is needed when you convert items.
Data Type
Here you specify what kind of information the new custom field carries: Date, Text, or Number.
Field Type
The field types can be Text, Date Picker (if you have chosen Date as Data Type), Radio Button, CheckBox, Entity Dropdown, or Text Area where you can add longer text.
Required
If you check this box, the field will be a mandatory one to fill in, so you will not be able to save the item without entering data into the custom field.
Timesheet Settings
Timesheet Settings
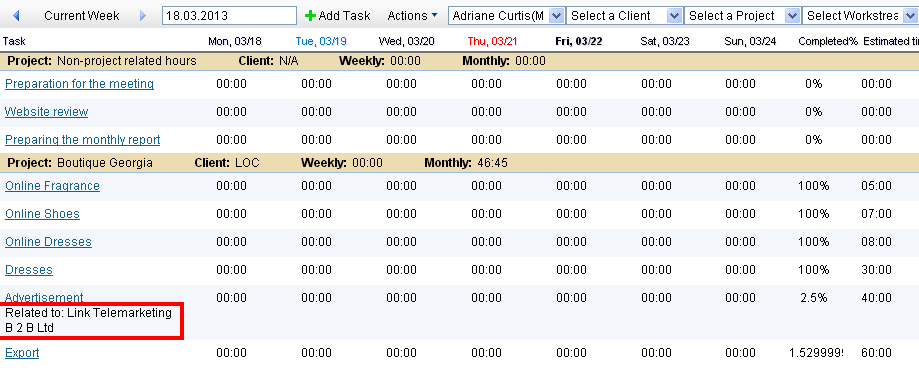
Showing Links to the Task
As you know, tasks may have links to other section items such as contacts, accounts, projects, cases and many others. Timesheet can also show this relation just below the task name. You can set this up from
Settings - Project Management Settings - Timesheet Settings and tick the option called
Show Timesheet Relation.
Auto Approved Time Entries
If you want time entries to get automatically approved without manager’s review, you can set it up from
Settings - Project Management Settings - Timesheet Settings and check the
Automatically checkbox for the
Approve Timesheet option.
All further time entries registered will become green which means approved in the Timesheet.
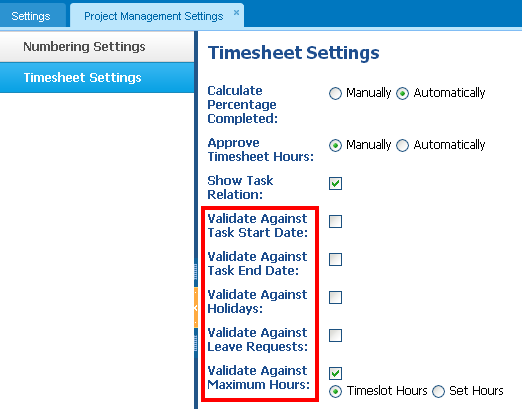
Timesheet Validation
You can set limits to the
Timesheet by validating against:
Maximum Hours - employees will not be able to enter more time than that is shown in their timeslot or planned estimated time. If you check the “Set Hours” you can set maximum hours that employee can set per day regardless of their timeslot hours
Task Start Date - employees will not be able to enter time before the task start date.
Task End Date – employee will not be able to enter time after the task end date.
Holidays – employees will not be able to enter time in Holidays.
Leave Request – employees will not be able to enter time for approved leave periods.
Set Timesheet Start Day
Here you can set the day when the working day starts in your country. By default, the timesheet shows Monday as a start of the week.
Show Completed Tasks until the Task Completion Week
By default, completed tasks are not reflected in the Timesheet. However, you can set the task to show up in the Timesheet just for one week which is the last week of the task.
Show Tasks from To-Do List
To do list is a quick panel to enter tasks and assign them to employees. This panel is located in the
Workspace page (if enabled to your account).
If you tick the
Show Tasks Added from To Do List option, the timesheet will reflect those tasks and you will be able to enter time for those tasks directly from the timesheet.
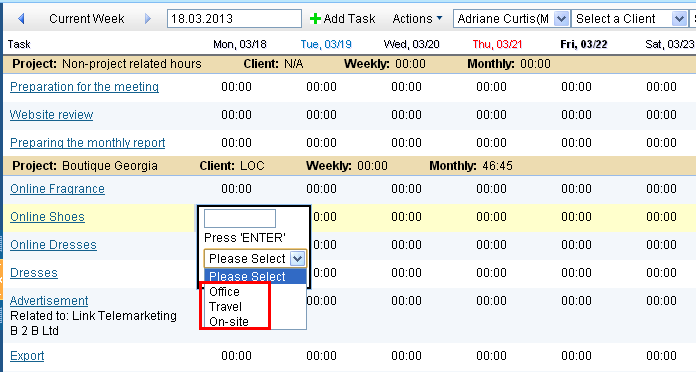
Show Hour Type dropdown
Some employees want to show where they worked when they enter hours into timesheet such as in the office, or while traveling or on-site. This option enables users to show the type of hour in the timesheet. The values in the dropdown can be changed to your own customized
Hour Types from the
Settings.
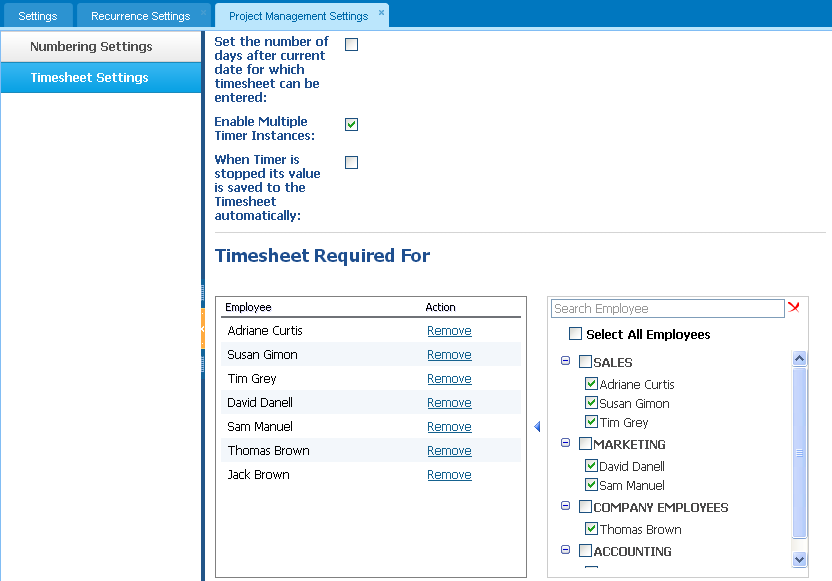
Multiple Timer Instances
Some users want to run timer for several tasks at a time. This option enables them to do so.
Save Timer Value to Timesheet Automatically
This option enables users to register timer value to timesheet when a timer is stopped. Otherwise, they may choose to log it to timesheet or cancel it.
Send Timesheet Notification
From the
Timesheet Required for, you can choose those employees whom the timesheet notification will be sent.
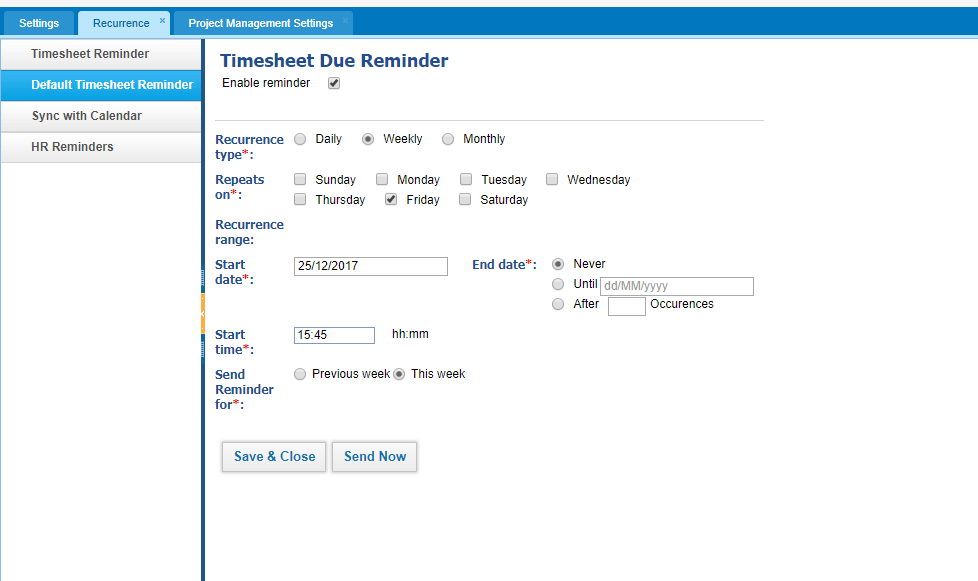
Timesheet Reminder
The
Timesheet Reminder Settings can be found from
Settings - Recurrence Settings. Once you set the timesheet
Reminder, you will start getting an email notification for the specified period of your timesheet hours registered.
Administrators can set Timesheet Reminder for all users in the system, as they have access to the
Default Timesheet Reminder which can also be found from
Settings - Recurrence Settings. Once the Timesheet Reminder specifications are set, all users will start receiving email notification on their Timesheet.
You can switch off
Timesheet Reminder for some of your users from the Timesheet Required part of the
Timesheet Settings.
Numbering Settings/Projects
Numbering Settings/Projects
The
Numbering Settings enables you to create your own numbering set to Tasks, Projects, Workstreams and Employees.
If your projects are related to customers, you can add the customer code in the Project numbering.
You can drag the boxes and add a delimiter between numbers such as comma, semi colon, colon etc. The Preview box shows how the sample number to get the real picture.
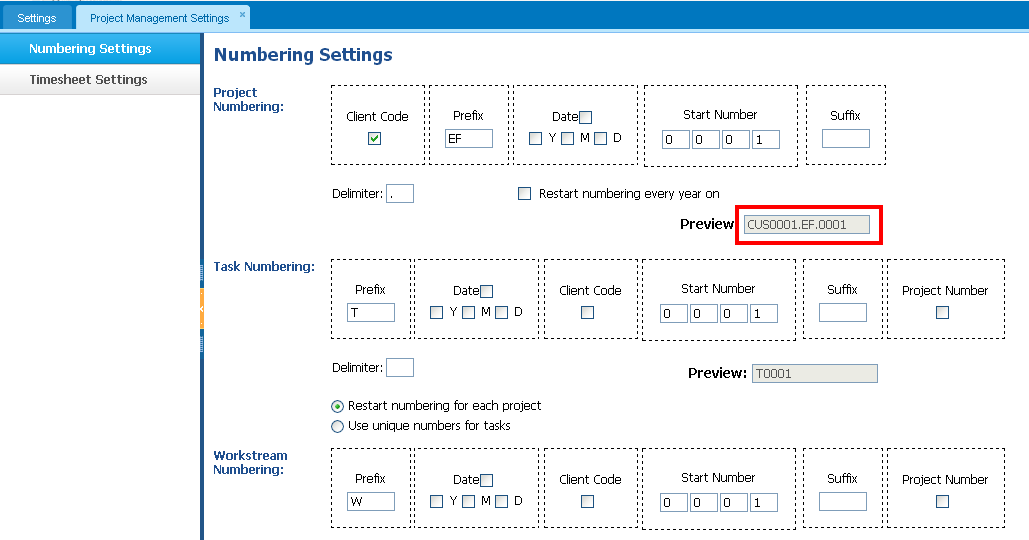
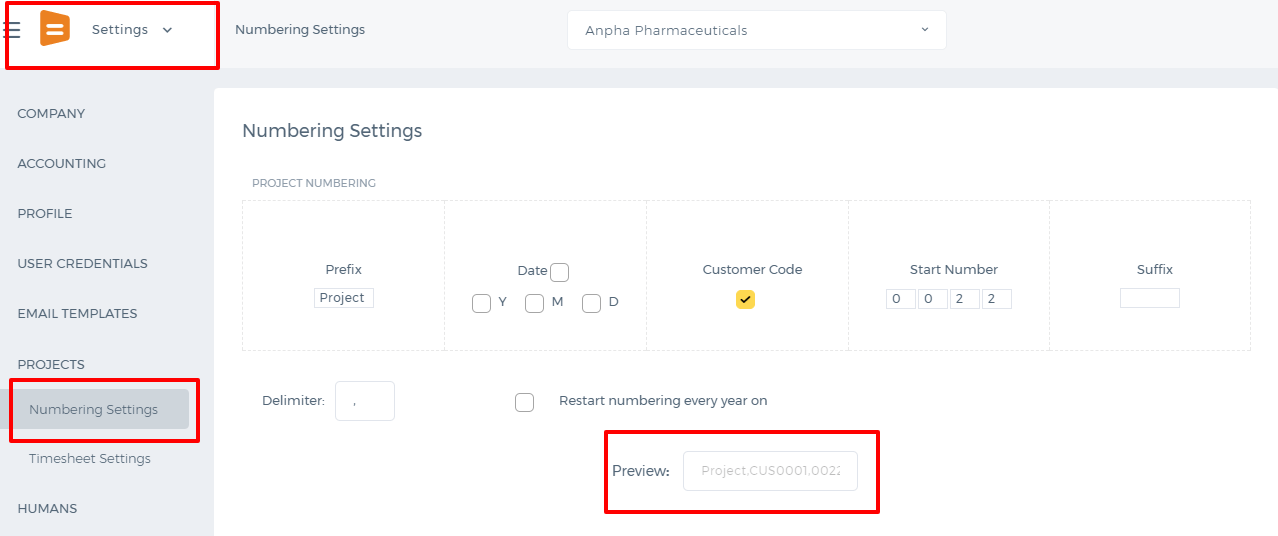
The numbers can be restarted every year. So you can choose which date they should be restarted (January 1, for example).
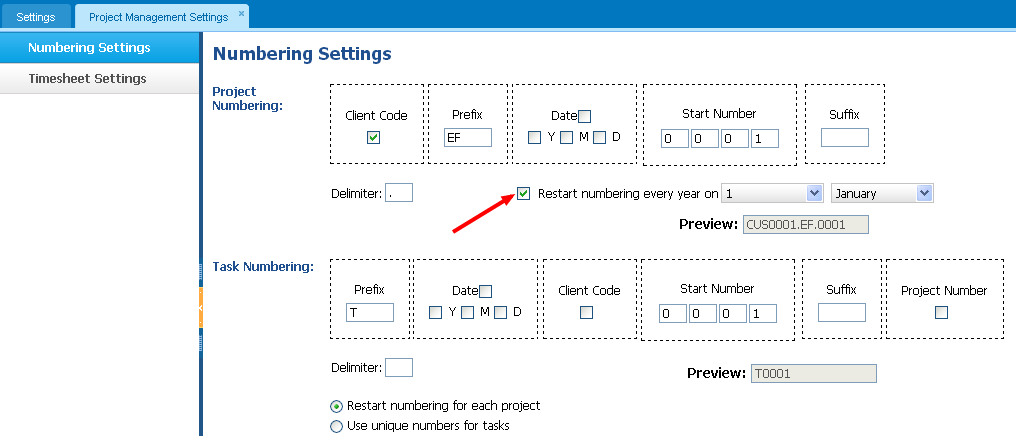
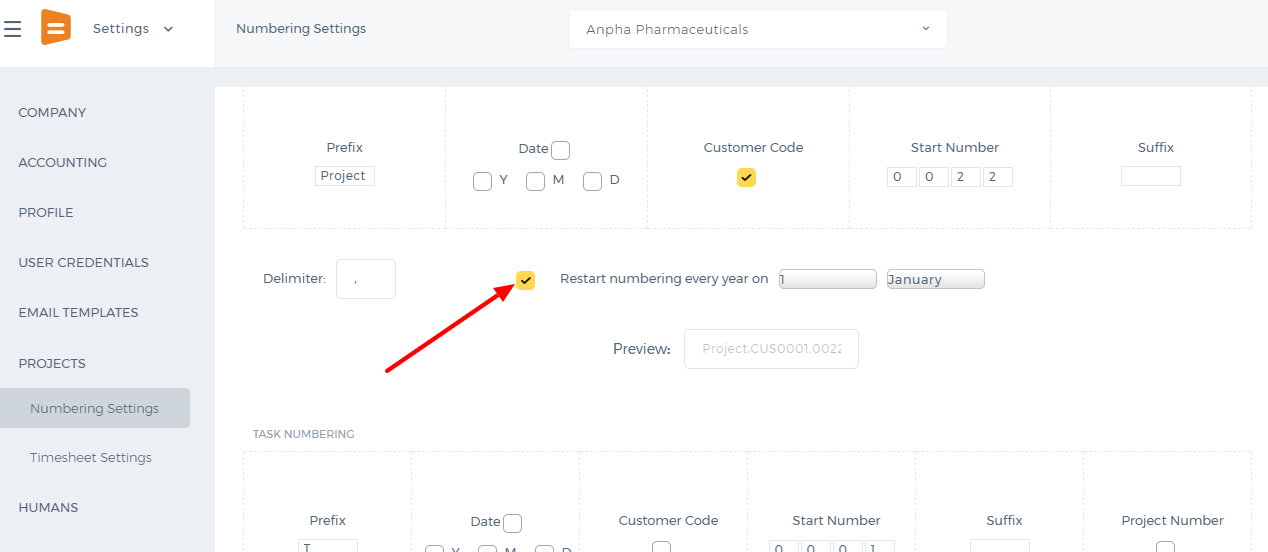
The same you can apply to Task, Workstream and Employee numbers.
Once you have made necessary changes to the Numbering Settings, click on "
Save" button at the bottom of the page.
Signatures
Signatures
Email Templates
Email Templates
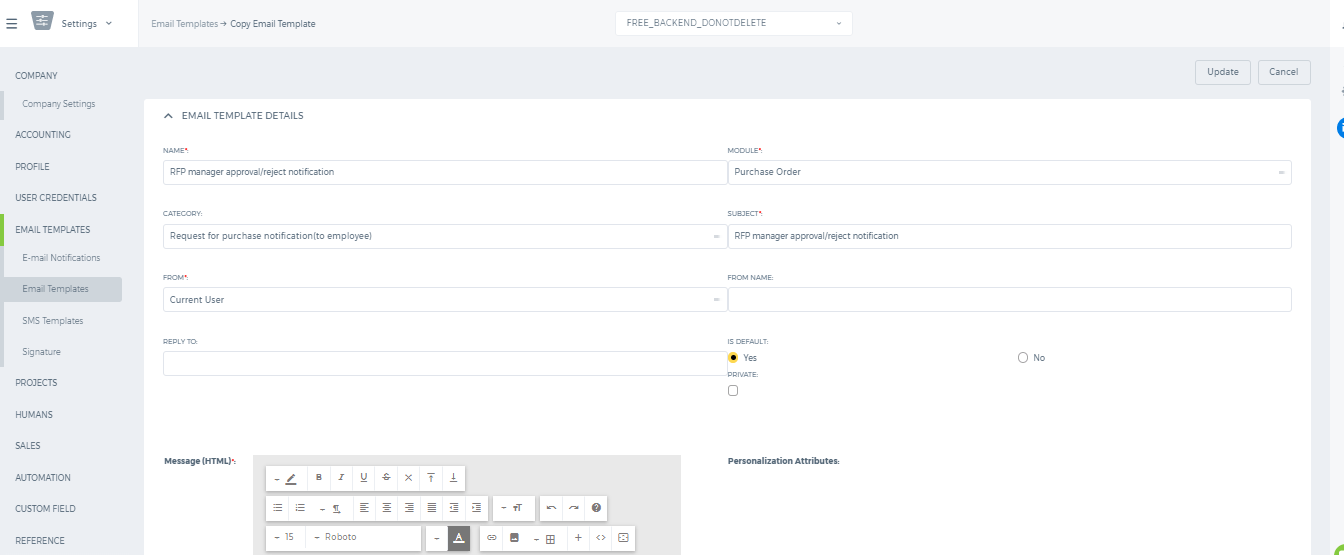
This section stores all email templates including default and custom templates.
If you want to change the default template's content that is used in the email notifications, search the name of it in the search box and create a copy.


Then you can make changes to the template and update. All further emails will use the new template depending for whom you created it (current user or specific user).
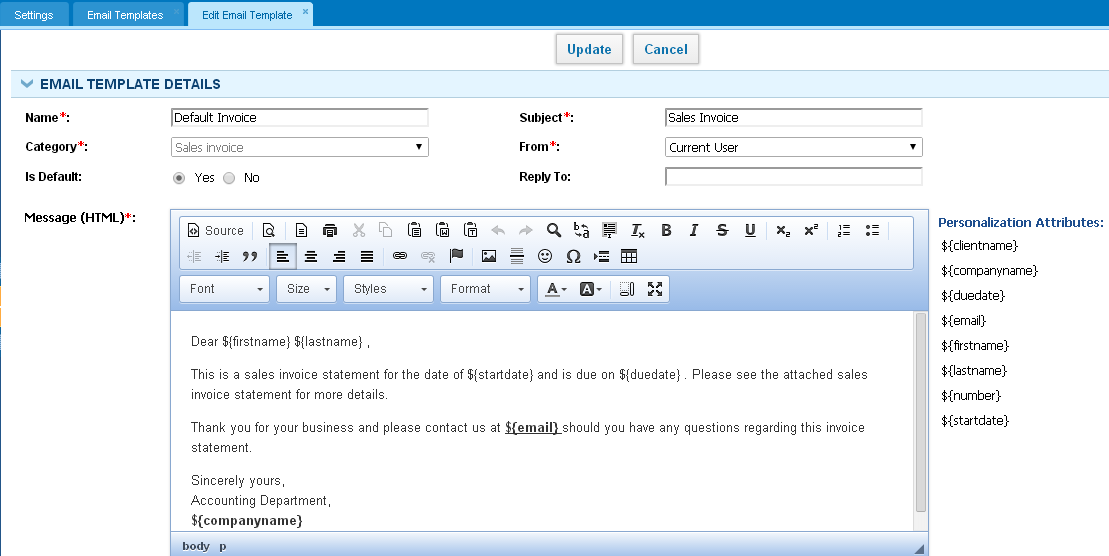
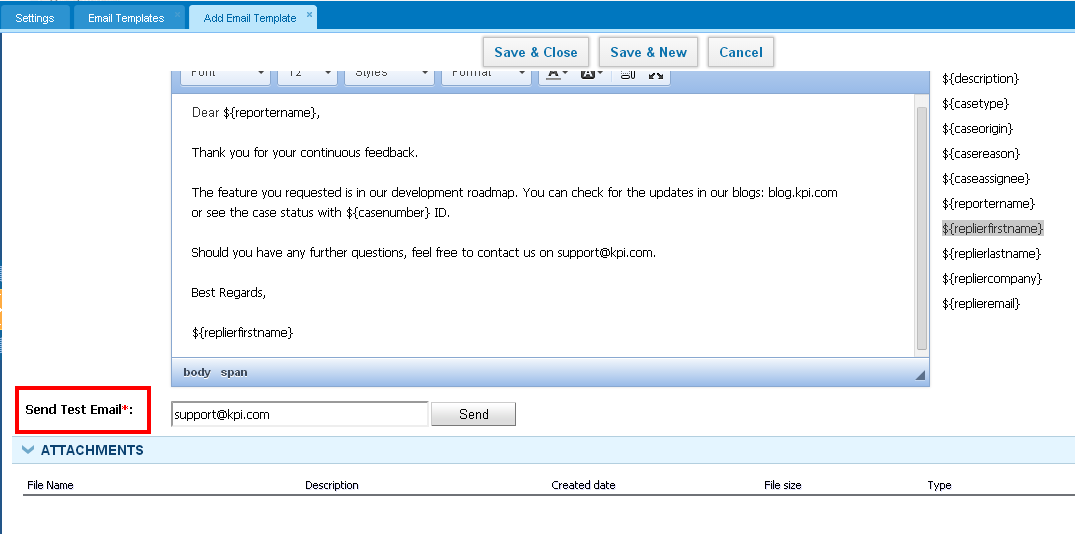
You can create a new template using the
Add Email Template button on top. While adding, you need to specify the category whether it is a case template, message center template, invoice template and others.
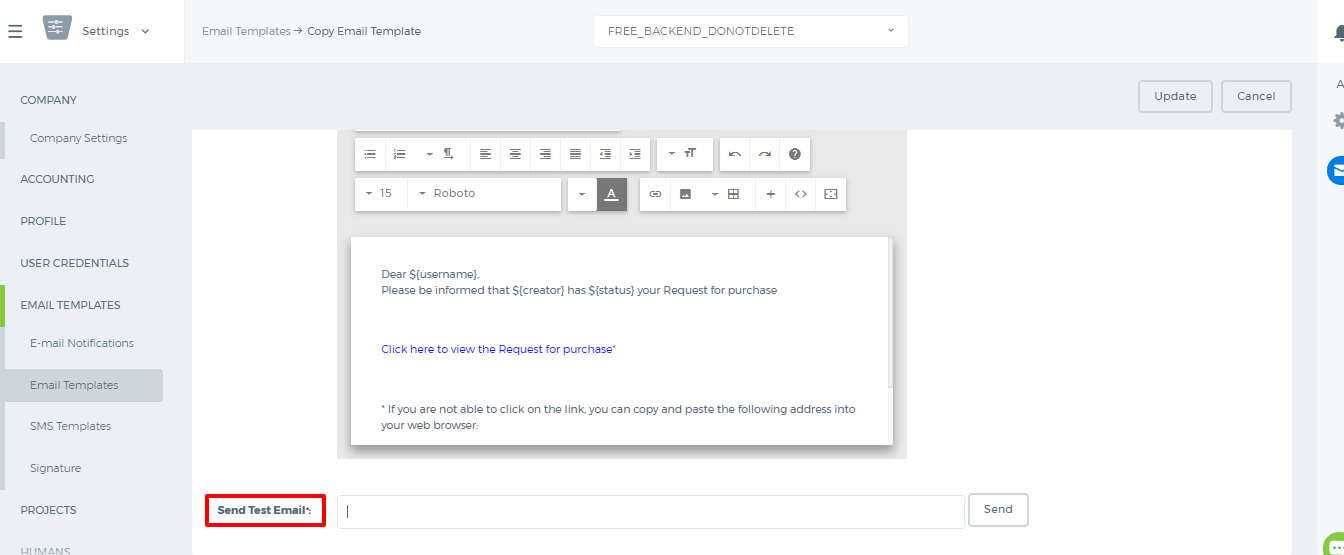
In order to check how the final content looks, you can send a test email using the new template.
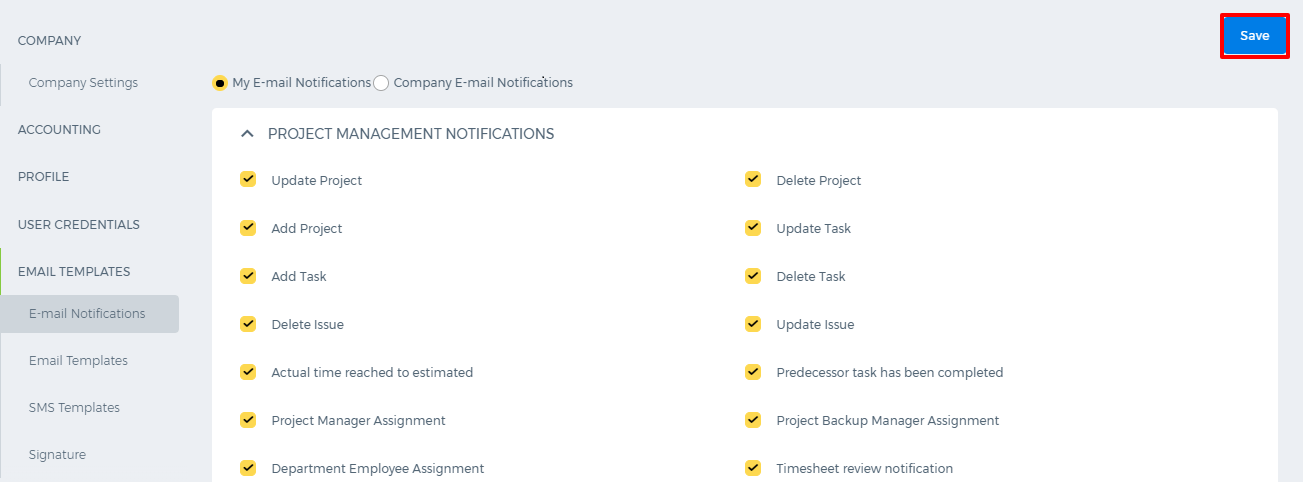
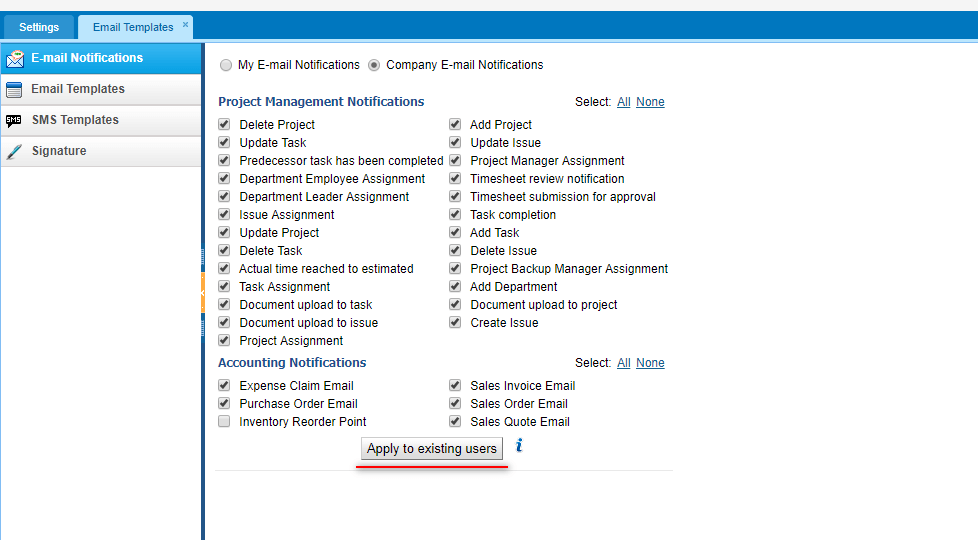
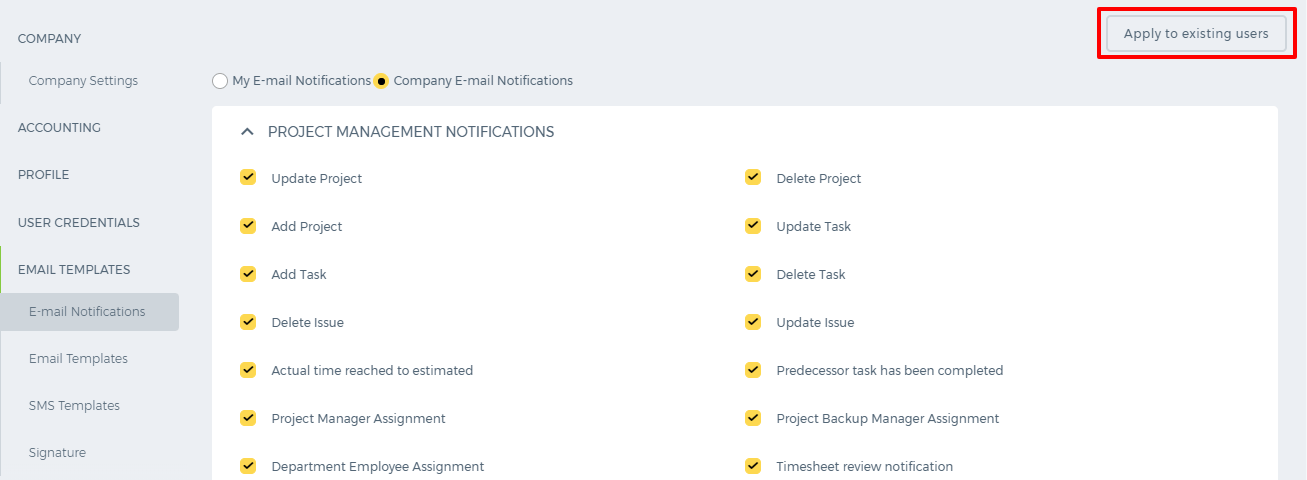
Email Notifications
Email Notifications
You can enable notifications that are sent by the system to your email address (in
My E-mail Notifications).
Tick the boxes of the notifications that you want to be sent such as whenever a task is added, a project updated and so on. After selecting the boxes, just click on the
Save button.
This feature helps you to be updated about the activities in the system and track the actions of your employees. In order to stop notifications, remove the ticks from the boxes and save.
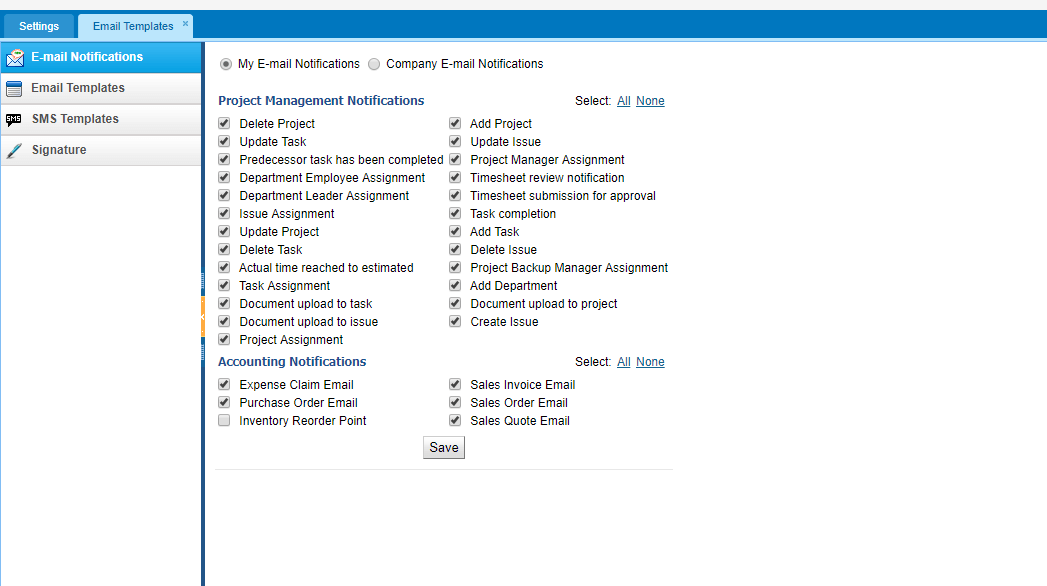
If you are an Administrator, you have the privilege of enabling
Notifications for
all users in the system. You can do this by clicking on the
Apply to existing users button at the bottom of the page "
Company E-mail Notifications".
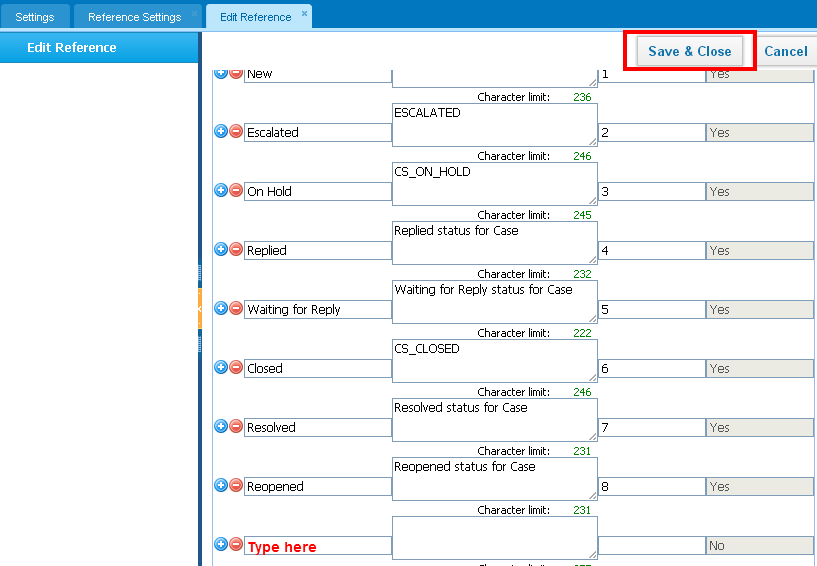
Remove Reference
Remove Reference
To remove a reference, perform the following steps:
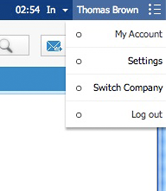
1. Click on the icon next to the username on the right-upper corner of the screen
2. Select the
Settings from the dropdown

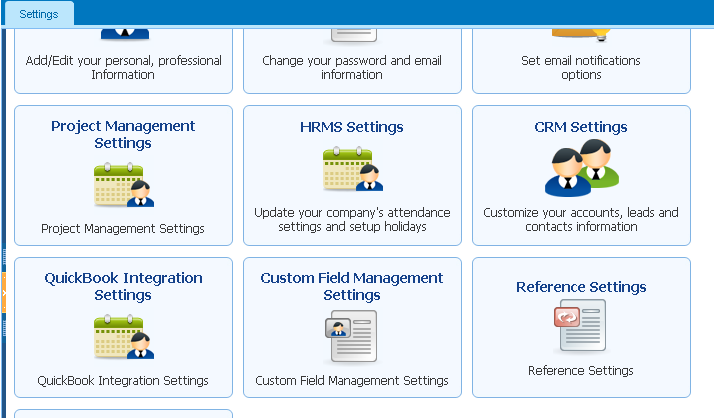
3. Click on
Reference Settings
4. Choose the category
5. Click on
Actions dropdown and edit
6. Click on the Minus ("-" or "delete") icon and save the changes.
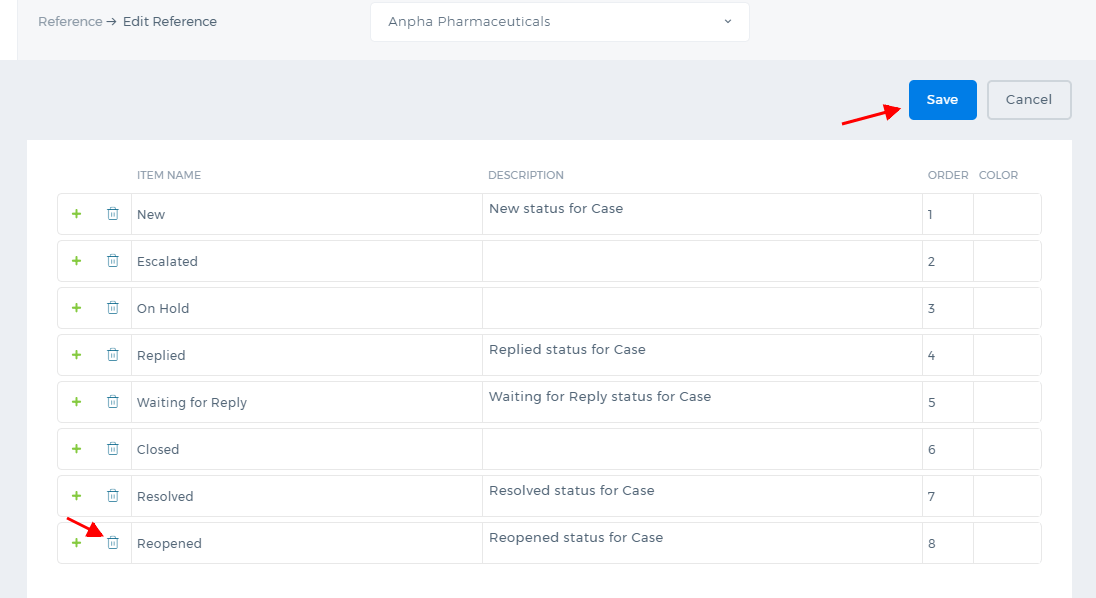
The reference item will be deleted from the list.

Note that system reference items cannot be deleted.
Add Reference
Add Reference
If the
Reference Settings is enabled in your account, you will be able to add extra status, priority, types and many others to many sections of the system such as leads, projects, accounts, tasks, etc.
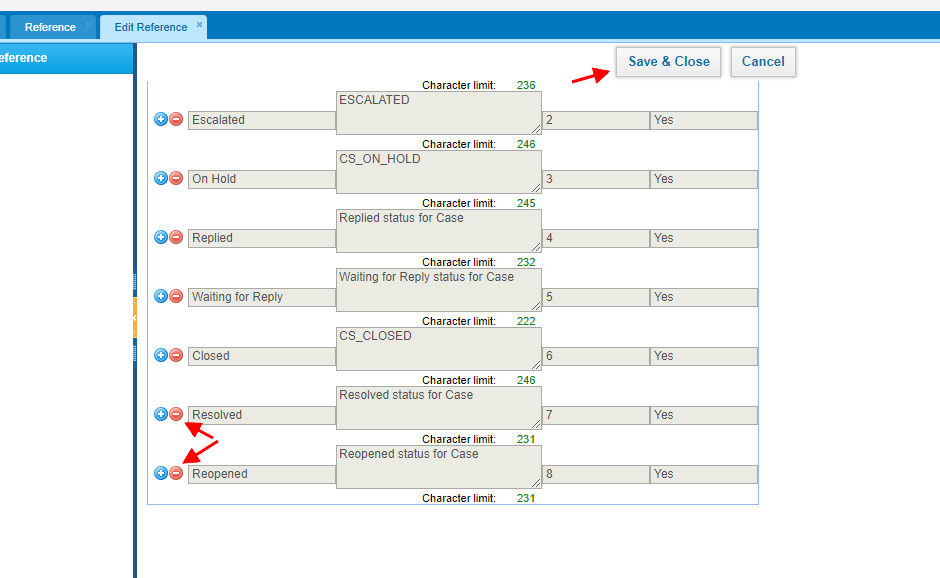
For example: To add a new case status, perform the following steps:
1. Click on the icon next to the username on the right-upper corner of the screen
2. Select the
Settings from the dropdown
3. Click the
Reference Settings on the
Settings tab
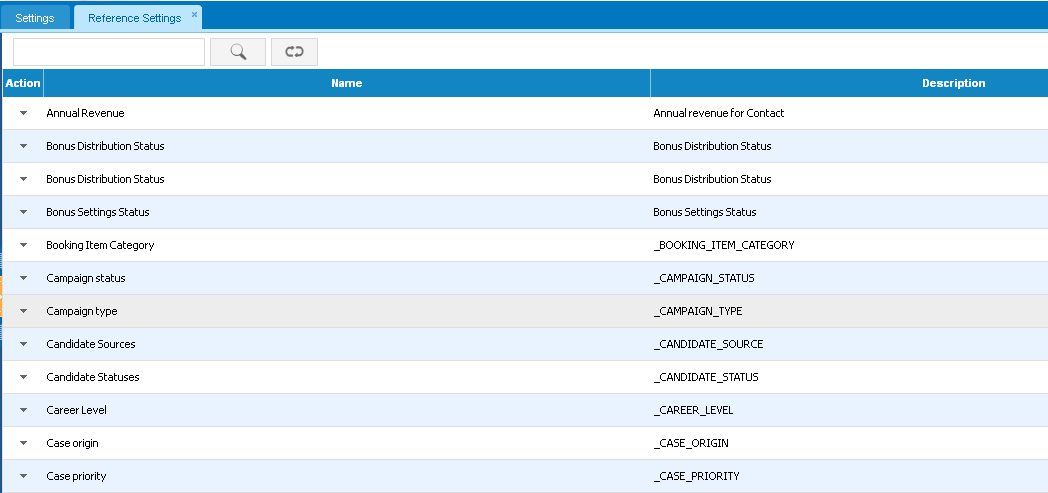
4. Choose the
Case Status
5. Click the
Action dropdown and Edit
6. Click on Plus (
+) icon which will populate a new line to add a new status
7. Type the name and the description of the status and save.
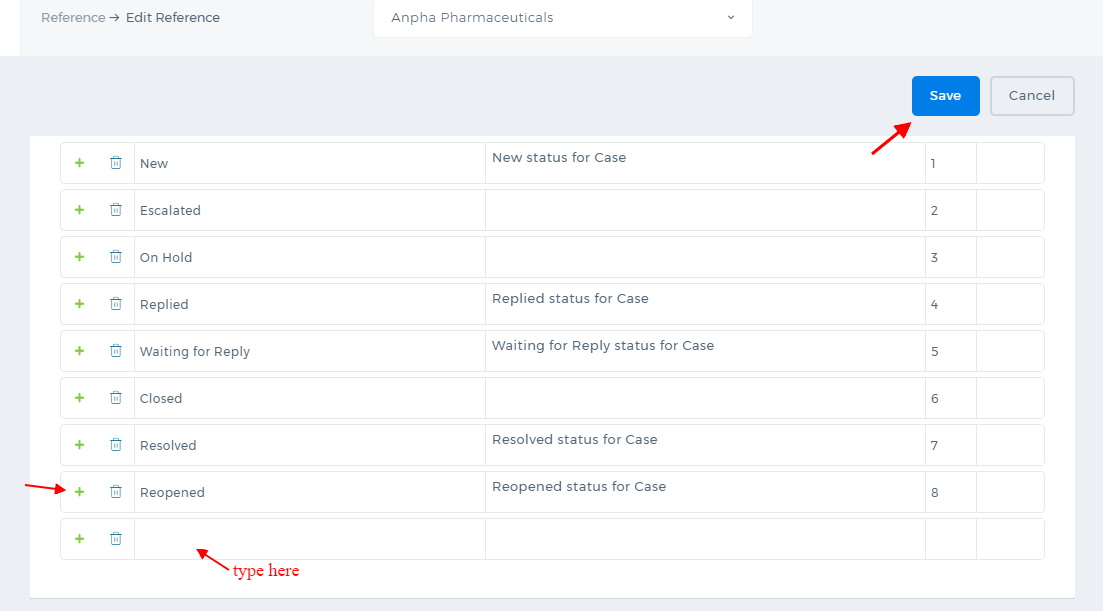
Once you save the changes, the new case status will be available in the
Cases.
The
Reference Settings is not available by default. To enable the feature, contact our technical support team.
Default Timesheet Reminder
Default Timesheet Reminder
Default Timesheet Reminder is available only for Administrators who enable timesheet reminder for all the users in the system.
You can find it from Settings>>Recurrence Settings>>Default Timesheet Reminder.
Once it is set, every user/employee using the system will receive a notification about their Timesheet entries.
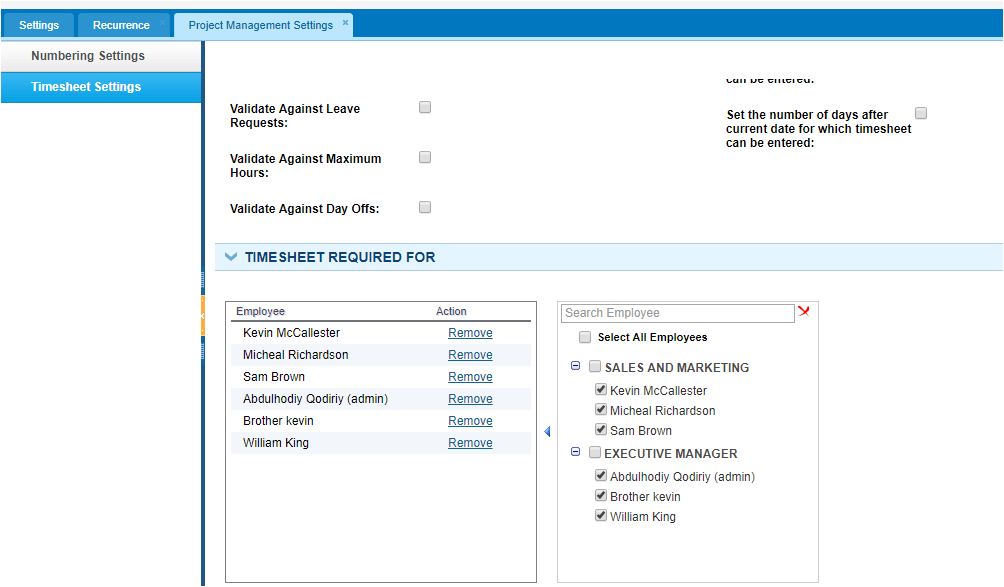
Timesheet Required For
If you do not need any information about some user's Timesheet Entries, you can disable the reminder for their entries from Settings>>Project Management Settings>>Timesheet Settings. You just need to uncheck the employee needs.
Timesheet Reminder
Timesheet Reminder
The
Timesheet Reminder is an email notification about the Timesheet that is sent to the user who enables it. Its primary purpose is to remind that the user has forgotten to fill in timesheet.
You can set this up from Settings>>Recurrence Settings. You need to set the Recurrence time and type for the reminder, and after that, you will receive an email about how much time you have registered for the day/week/month.
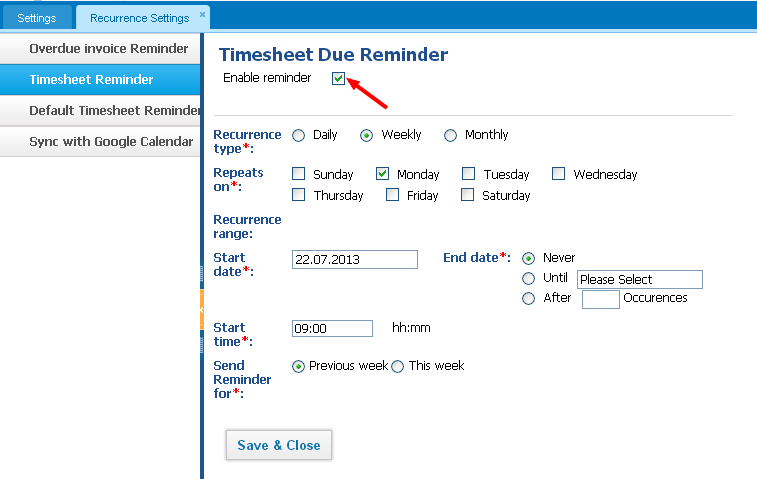
The Timesheet Reminder Settings is available for every user.
If you are a simple user (Member role), you will receive notification about your own Timesheet entries.
If you are the Department Leader, you will receive notification about your Department Members' entries.
If you are the Project Manager, you will receive notification about the Project Members' entries.
Administrator and Directors receive Timesheet notification about all user's time entries.
Timesheet Required For
If you do not need any information about some user's Timesheet Entries, you can disable the reminder for their entries from Settings>>Project Management Settings>>Timesheet Settings. You just need to uncheck the employee needs.
Change System Language
Change System Language
To change the system language, perform the following steps:
1. Click the icon next to the username at the upper-right corner of the screen
2. Click to the
Settings

3. Click the
Company Settings from the
Settings tab.

4. Scroll down and select the preferred language
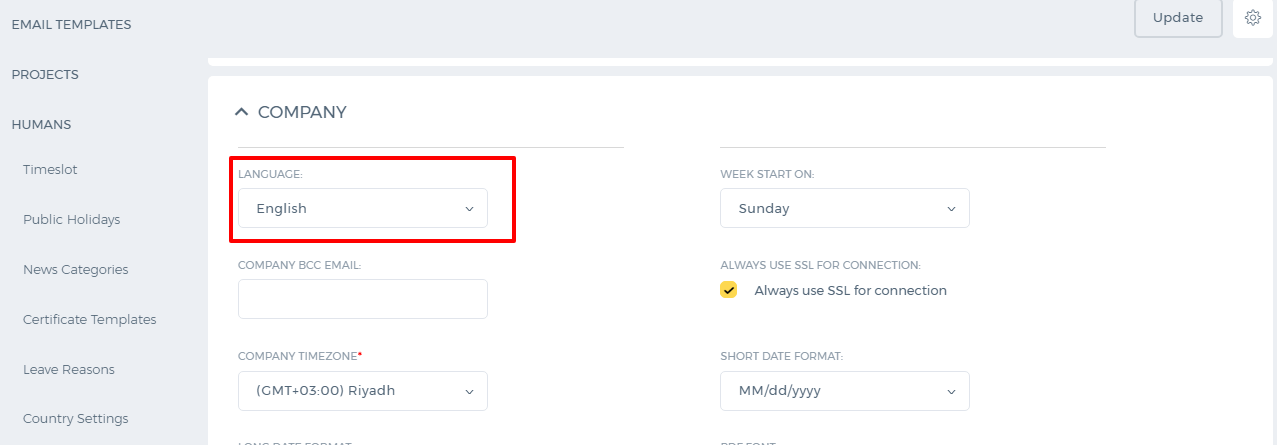
5. Click the
Update to save the changes.
Only administrators are entitled to set the language for the company and individual users.
Company Setup
Company Setup
Adding Subsidiary Companies
Sign-up with kpi.com as a usual user and request kpi.com Support Team to enable
Multi-Company feature. You will do it only once.

After filling in the
Getting Started page in the
Accounting & Finance, click the icon next to the username at the right-upper corner of the screen.
Once
Multi-Company feature is enabled in your company, you will find additional settings
Setup Company Subsidiaries.
Proceed with the link to arrive at
Subsidiaries listings page. Click
Add New button to invite your subsidiary company or companies.
When adding a subsidiary company you would need to provide a basic information under
COMPANY INFORMATION,
ADDRESS INFORMATION and
FINANCIAL INFORMATION.
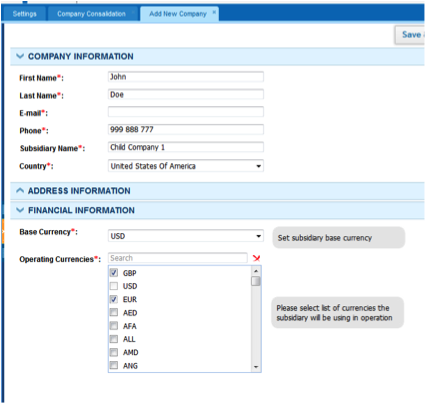
Under
COMPANY INFORMATION you would input subsidiary administrator's data such as, First Name, Last Name, Phone Number, Email, Child Company country. The administrator's email will be used to send the invitation into the system.
You may optionally fill in subsidiary company billing and shipping addresses under the
ADDRESS INFORMATIONsection. Otherwise, you can leave it at the discretion of the Child Company's admin.
Under
FINANCIAL INFORMATION you will need to provide subsidiary's
Base Currency and select what other functional currencies that child company will be dealing with in their daily activity under
Operating Currencies. For example, Child Company prepares its reports for their own purposes in USD, but that company also uses EUR, GBP. In this example, child company base currency would be USD and EUR and GBP would be regarded as
Operating Currencies in kpi.com.
You need to make sure that Parent Company's base currency coincides with child companies base currency or is listed under
Operating Currencies.
Next option would be to
Save & Close or
Save & New after which the subsidiary company admin will receive email from kpi.com to activate their company. Following the link, the admin would need to set their passwords.
Intercompany Sales
To conduct intercompany sales, which could be between subsidiaries from bottom to up sales, from parent company to subsidiaries or vice versa, you would need to add a customer and relate one of companies in the network.
Adding Intercompany as a Customer
When adding a customer, you would have an additional field
Subsidiary visible only if
Multi-Company feature is enabled.
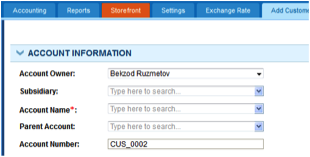
To relate a customer a subsidiary company, you would need to select from the list of active subsidiaries. Once you have the subsidiary as a customer you can start selling services and inventory items the companies. (Product Group and Assembly items cannot participate in intercompany sales).
If the items you are selling to your subsidiary is not listed in that company's
Products/Services listings page, those items will be automatically created in child company's account.
Creating Intercompany Sales Invoice
Select the customer related to a subsidiary company and choose the right currency, which is limited to the base currencies of the parent and subsidiary company.
Once a sales invoice issued by a parent company will be listed in
Purchase Invoice listings page of the child company with
Pending status. Accountants of the subsidiary company would then need to login to their account and click the button under
Action in
Purchase Invoice listings as is shown in the screenshot to the right.
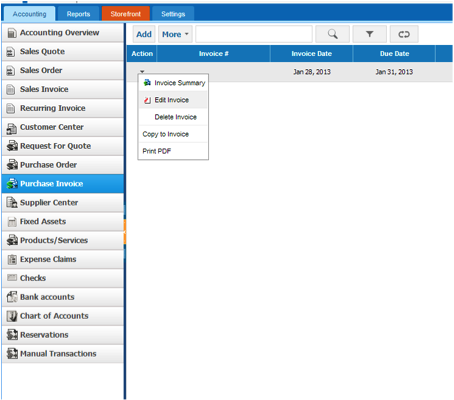
Child company accountant or admin would need to set
Purchase Invoice number and double check the exchange rate in the right bar and click
Draft button, which would set the status of the purchase invoice into
Draft. An accountant would need to revisit the
Purchase Invoice and click the
Approve Invoice to finalize intercompany sales.
Consolidation
To consolidate
Profit & Loss and
Balance Sheet reports, the parent company admin or accountant need to set proper exchange rates under
Exchange Rates tab, which is available only in the parent company account and lock the ex-rates by clicking
Save. After saving, ex-rates cannot be altered.
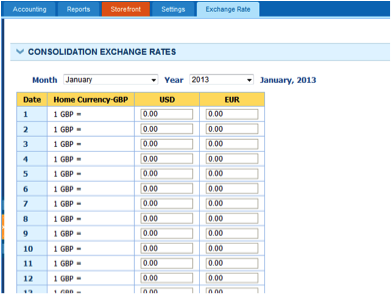
If no exchange rates are set in the
Exchange Rate tab, in consolidation, transactions will be divided by 1 for the missing date.
Once the exchange rates are set and locked, the parent company can see consolidated
Profit & Loss and
Balance Sheet statements, all they need to do for this purpose is reports is to check
Consolidation and click
Update to see the up-to-date report.

Change Password
Change Password
To change your current password, perform the following steps:
1. Go to
Settings and then to
User Credentials
2. Type your current password in the
Current Password field
3. Type your new password in
New Password and
Confirm Password fields.
4. Click on
Update
Next time, you will be able to login to the system with the new password.
Change Username
Change Username
The username is the email address chosen during the signup process and is used when logging in to the site.
Currently, it is not possible to change the username. However, you can change your email address. To change the username, contact kpi.com Support Team.
Changing your email address will not change your username.
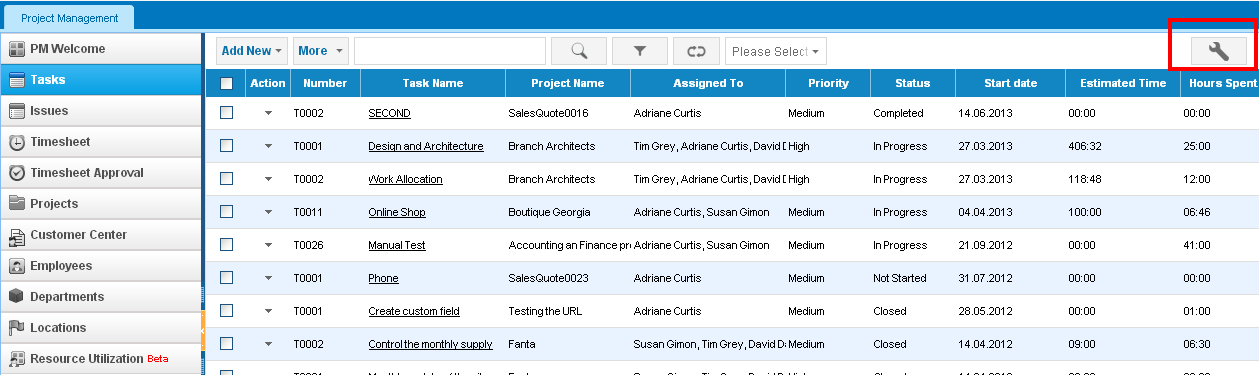
Customize Listing pages
Customize Listing pages
Using the
Customize button, you can change the list of items shown based on your needs.
This button can be found anywhere where you see the items listed in the system such as projects, tasks, leads, accounts, opportunities, contacts etc.
You can increase the number of items shown per page up to 200.
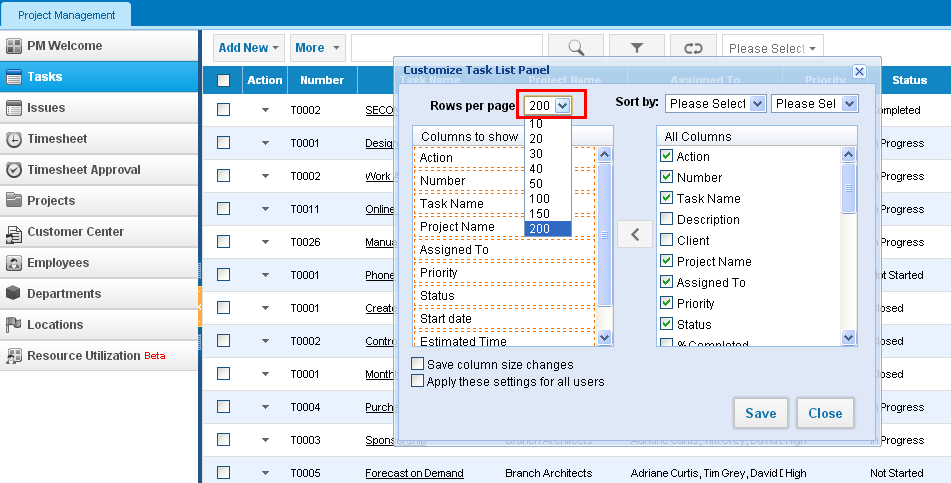
You can add or remove columns from your list by ticking/unticking the boxes on the right side.
The columns that are displayed in your list are in the left box which you can order by dragging and dropping to determine which columns should come first.
In order to sort a column in ascending or decending order, use the dropdown called
Sort by.
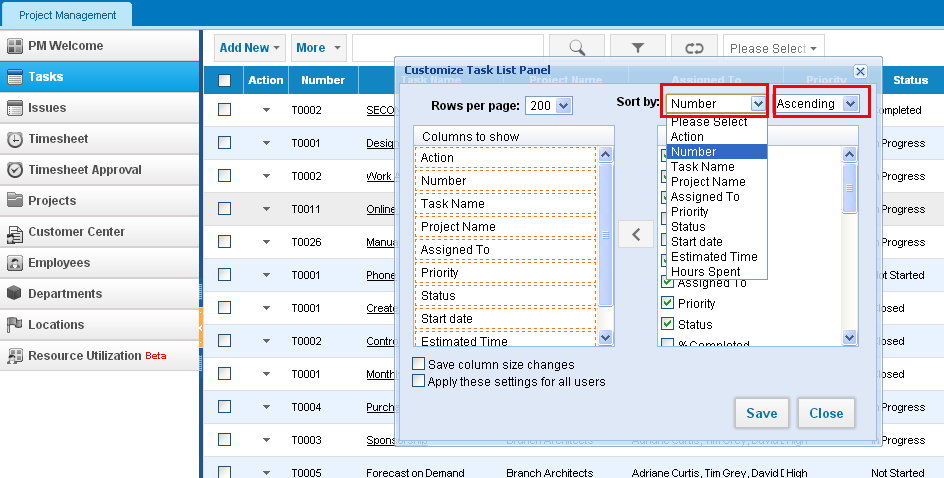
You can save the column size changes and apply the changes made to all users' accounts.
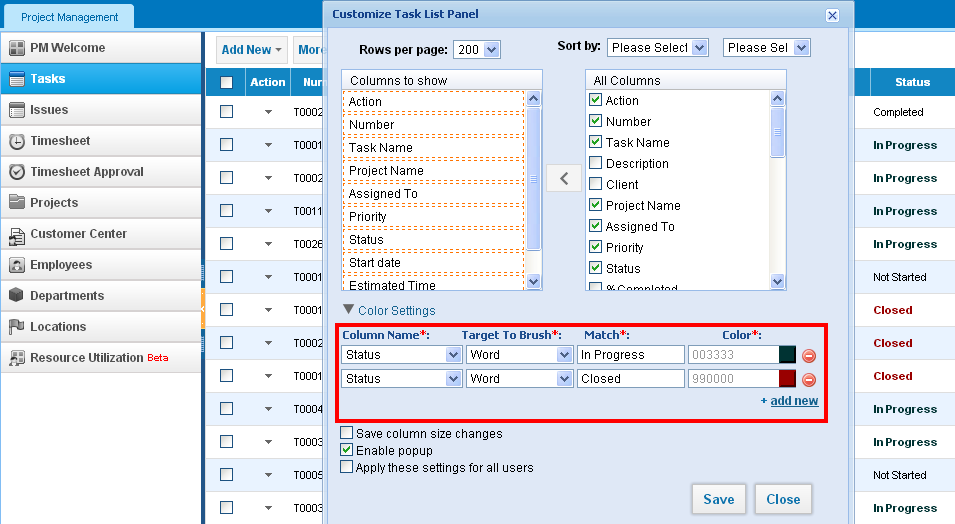
Color Settings
If Colorize option is enabled to your account, you will be able to apply colors to columns and words in your list.
If this options is not enabled, please contact your account manager or support team.
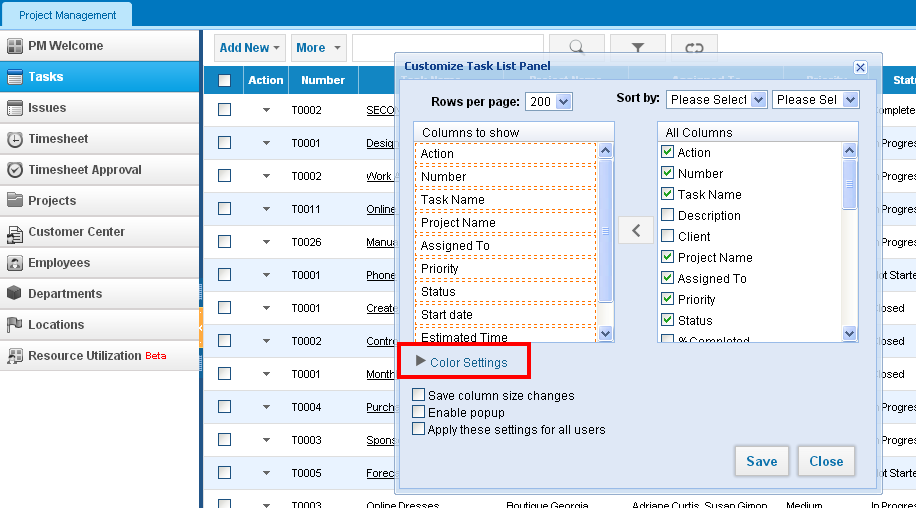
Click on the
Color Settings, and specify if you want to apply color to a Column, Raw, or Word and then select the Color.
If you want to add more colors, click on
add new link and make the changes. Once you save, the list will change accordigly.
Filter
Filter
Filter is an important tool to organize and sort items in your lists. You can find
Filter button on any page at the top side.
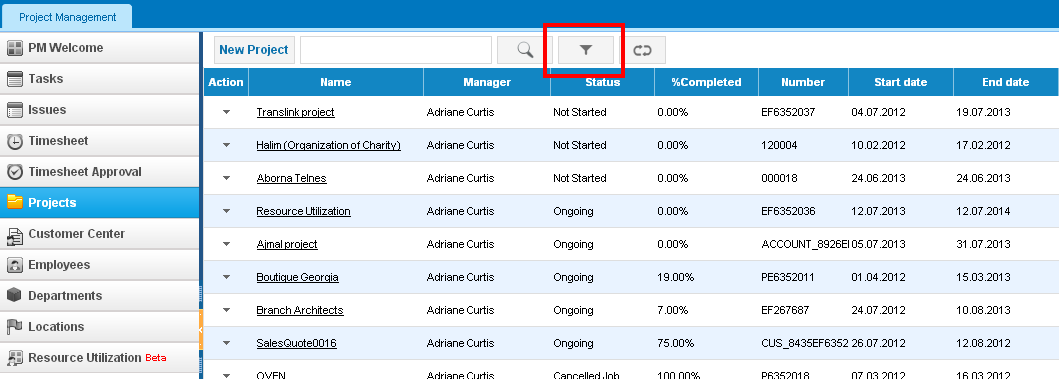
You can filter by main columns like period, assignees, client, status, priority and etc.
Once you select the needed columns, you can save this filter and apply it immediately. If you check the box "Default", your filtered list will show up everytime you open the page.
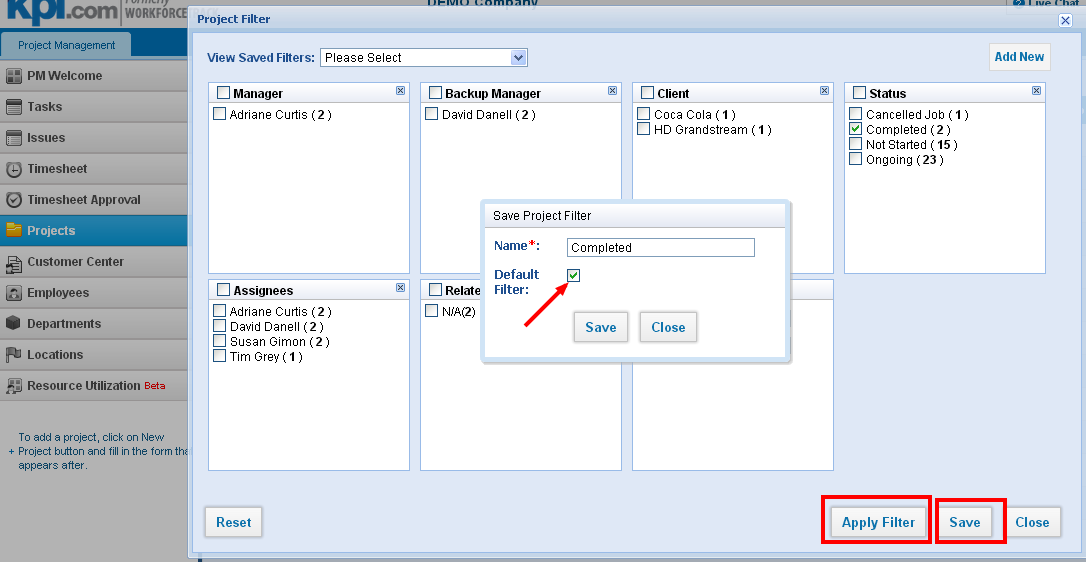
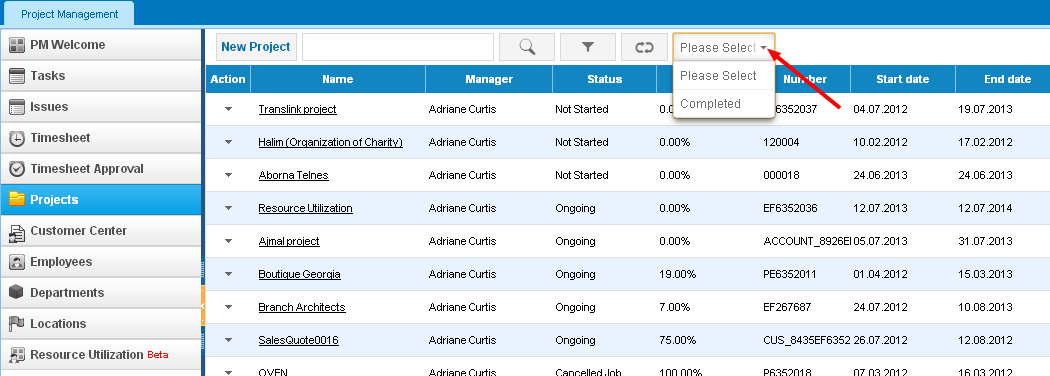
You can always switch to the normal list or other filters from the dropdown on top of the page.
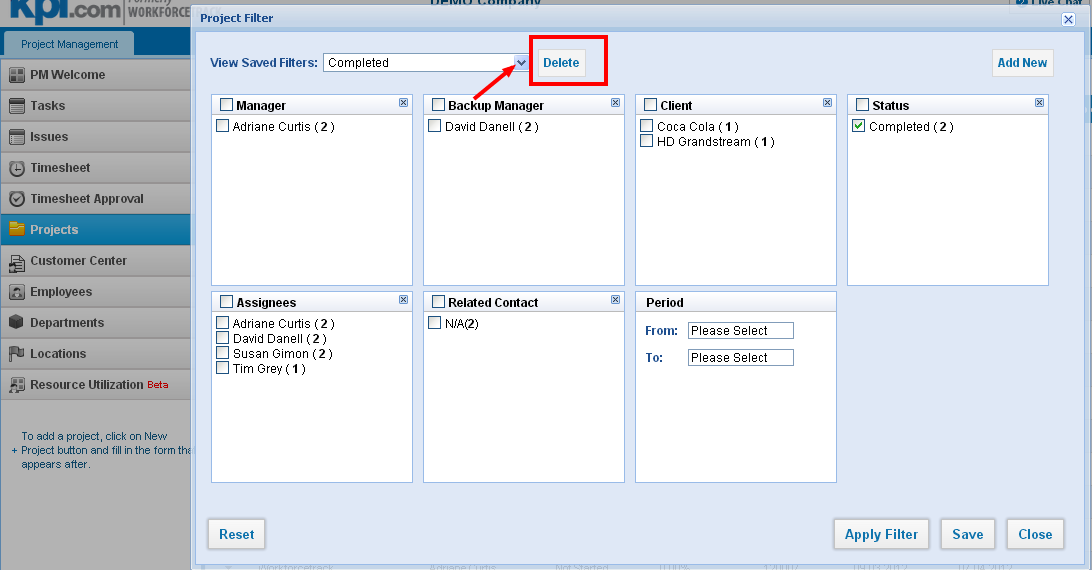
In order to remove a filter, please go the main Filter pop-up, choose the filter from the saved filters dropdown and click on Delete.
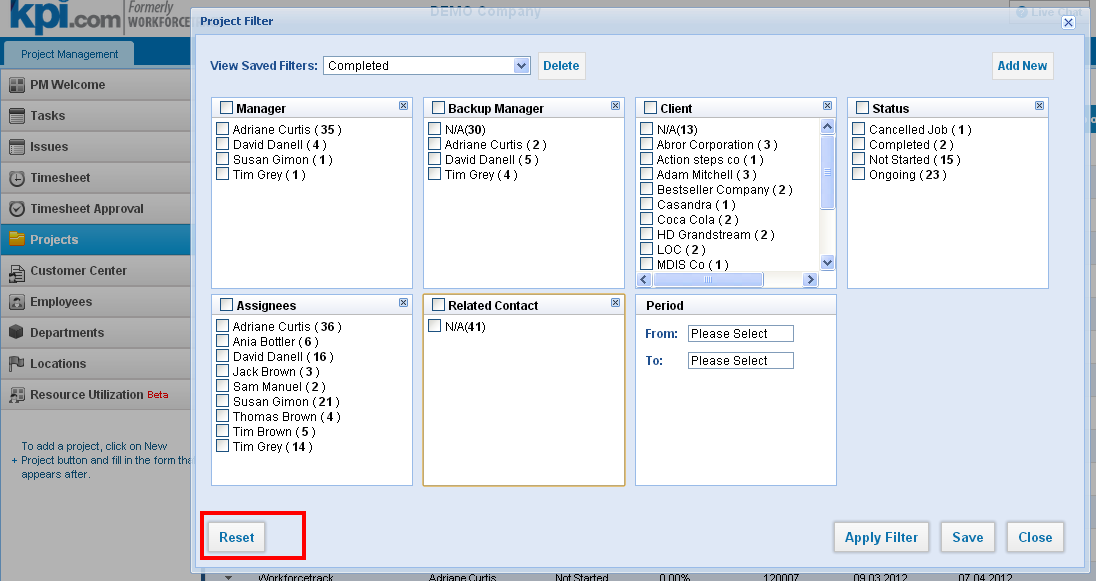
If you want to modify your saved filter, choose the filter and click on Reset. Make the necessary changes and Save.
Reporting System
Reporting System
The
Reporting System is very handy for creating reports based on the data you have in the system, saving them and sharing with your colleagues. The
Reporting tool already has some necessary reports built in for each section such as Sales Reports, Lead Reports, Overdue Projects reports and so on.
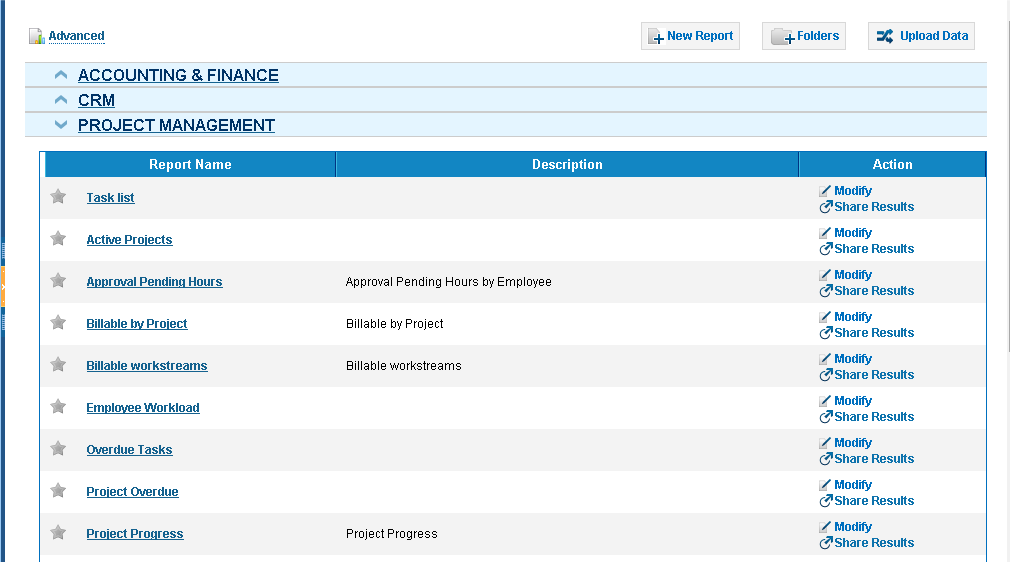
REPORT FOLDERS
In order to see
Report Folders list, click on '
Folders’ button, where you can find created folders in the system. You can directly
Edit and
Delete the folder you choose.
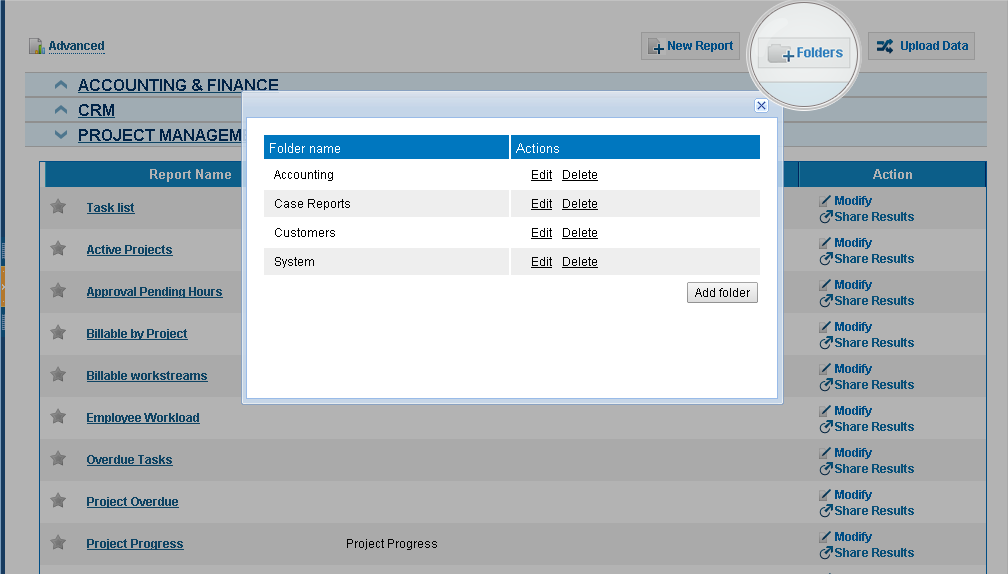
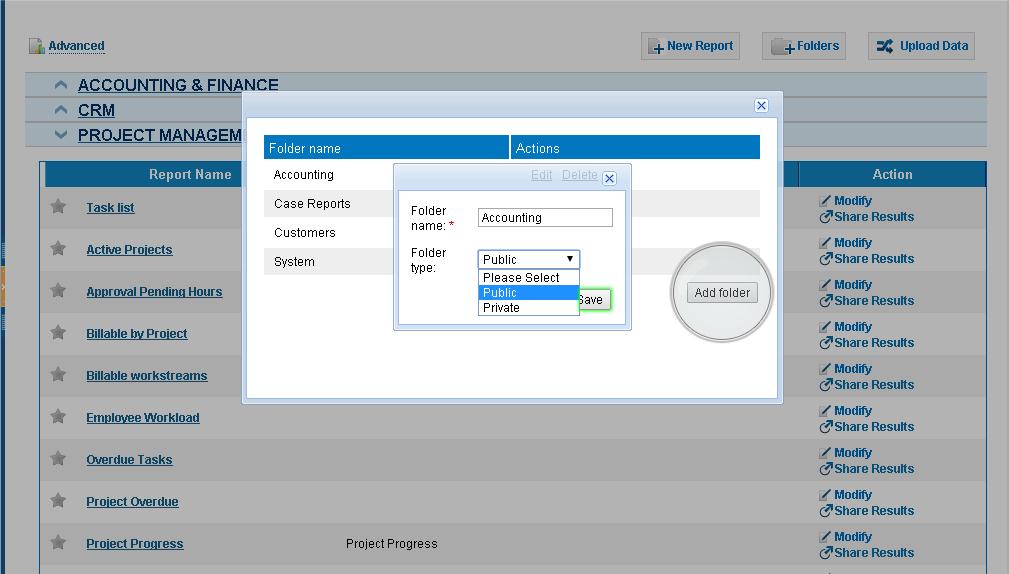
Add Folder
You can add a new folder by clicking on
Folders button. In order to create a new folder you need to enter Folder name and choose
Folder type and click on
Add Folder button to save it. There are two default folder types:
Publicand
Private. If you choose Public, your created folders will be visible to all users, whereas if you choose Private option the folders will be visible to you only.
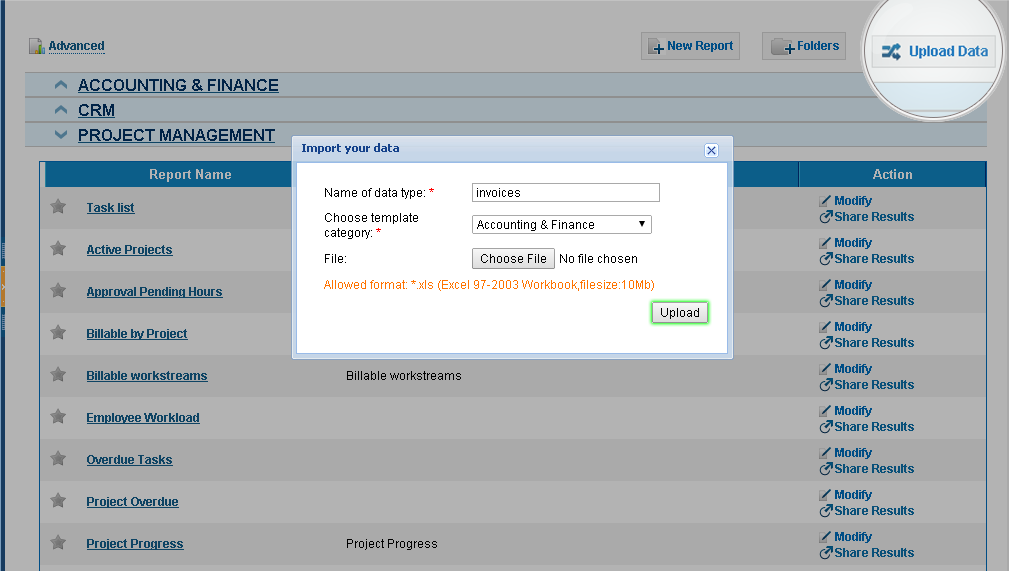
Import your Data
In order to import your data, click on
Uploads Data button. Then, write the name of your data type in the Import Your Data section, choose template category and click on the
Choose File button and
Upload it.
 CREATING A REPORT
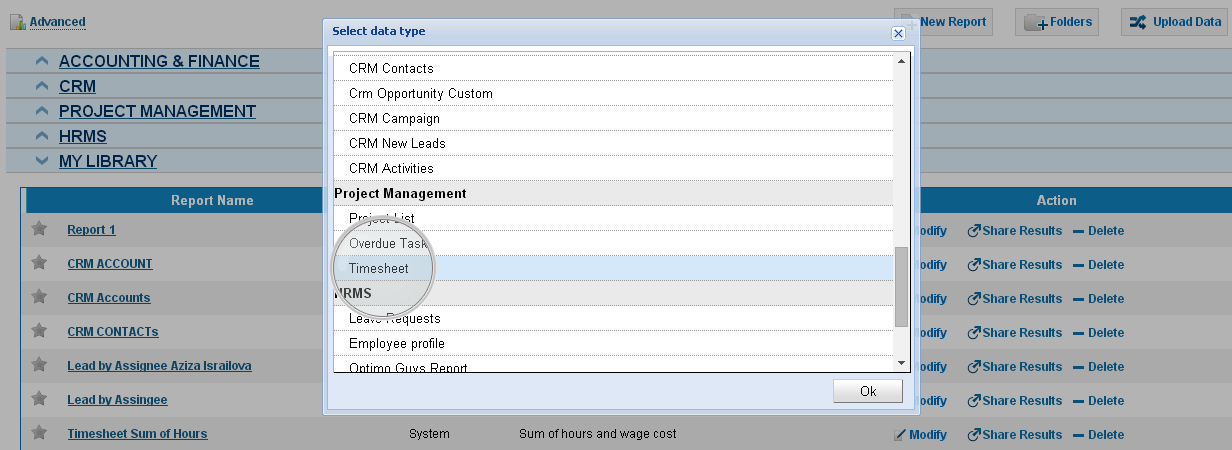
Step 1: Selecting Data Type
You will be given several options to choose and it’s up to a report type you are going to create. Select the type of data from Accounting and Finance, CRM, Project Management, Surveys & Polls and HRMS sections.
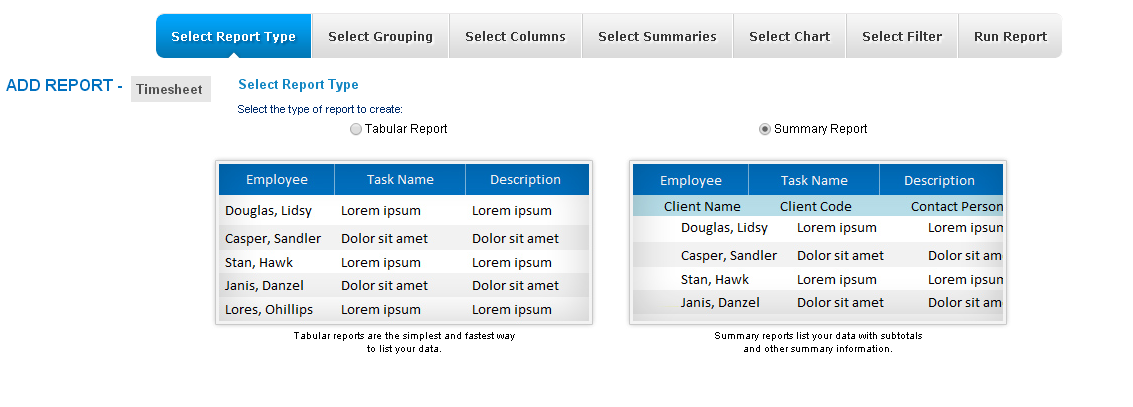
Step 2: Select Report Type
The next step is selecting the report type. You will be given two options: either
Tabular Report or
Summary Report. The former type of report is the fastest and easiest way to list your data. From the latter report type you will be able to view data with subtotals and other summary information.
Step 3: Select Report Grouping
This step will be visible if you choose
Summary Report type from the previous step. In this step you can select fields to be grouped and summarized in your final report. Also, there is a dropdown called
Sort Order where you can choose
Ascending or
Descending orders.

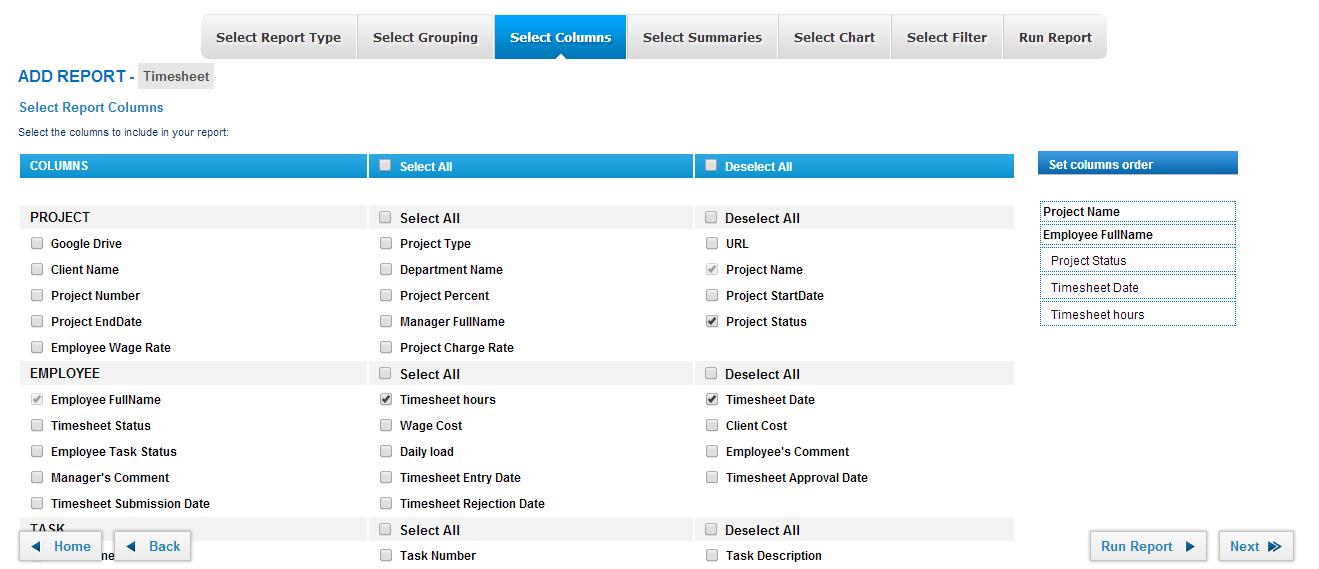
Step 4: Select Columns
In this step, you can select the fields to be added to your report by ticking on respective column labels. Also, there is a
Set Columns Order option where you can set the order of those chosen columns by dragging and dropping them.
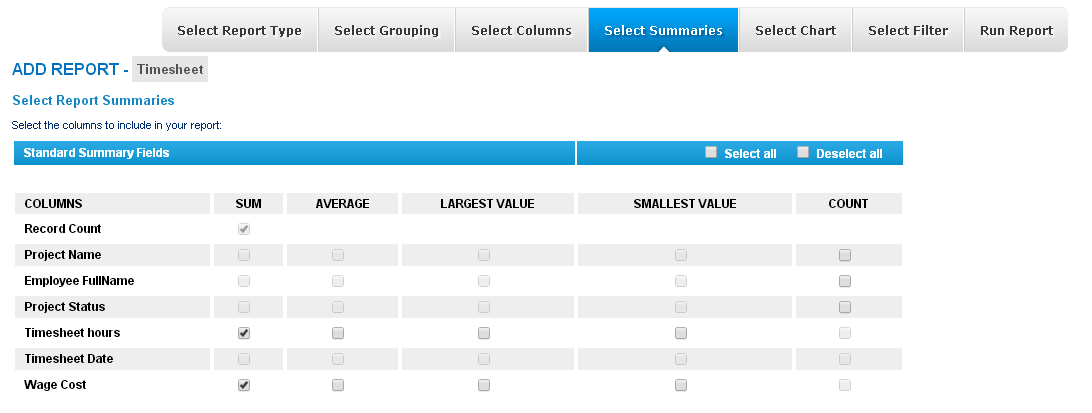
Step 5: Select Summaries
In this section, you can choose to view the Sum, Average, Largest Value, Smallest Value and the number of items by ticking for each item in the row.
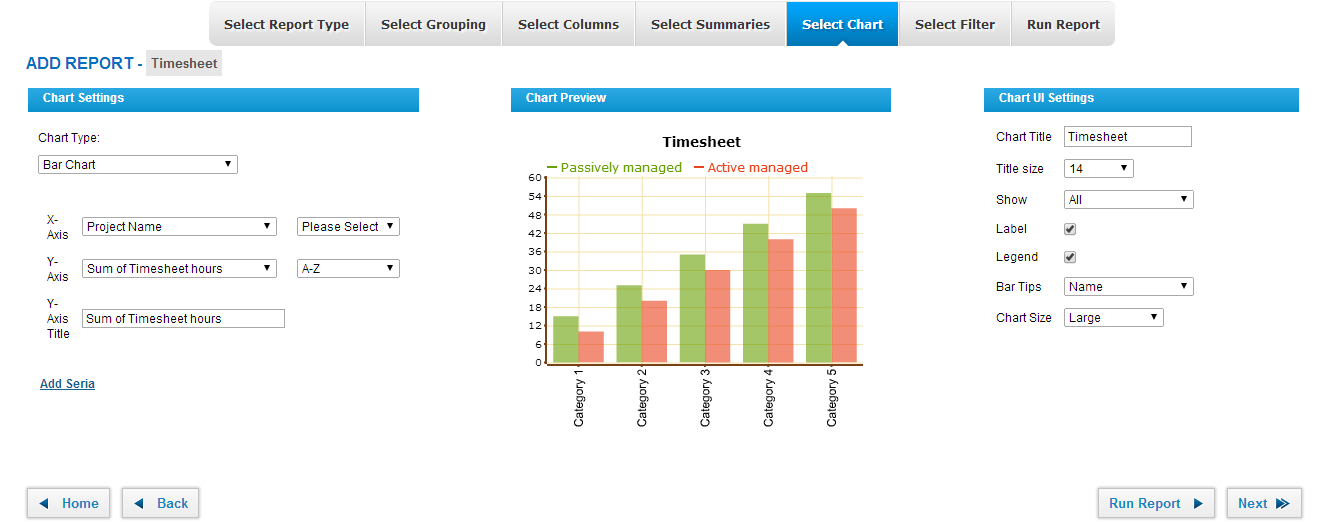
Step 6: Select Chart
In
Chart Settings, there is a list of
Chart Types. You can select any kind of chart (Bar chart, Pie chart, Horizontal Bar, etc) as regards to the type of your report. Also, you can see the preview of the chart you chose in
Chart Preview. You can customize the selected chart in the way you want in
Chart UI Settings.Chart UI Settings enable such features as title size, label, chart size and so on.
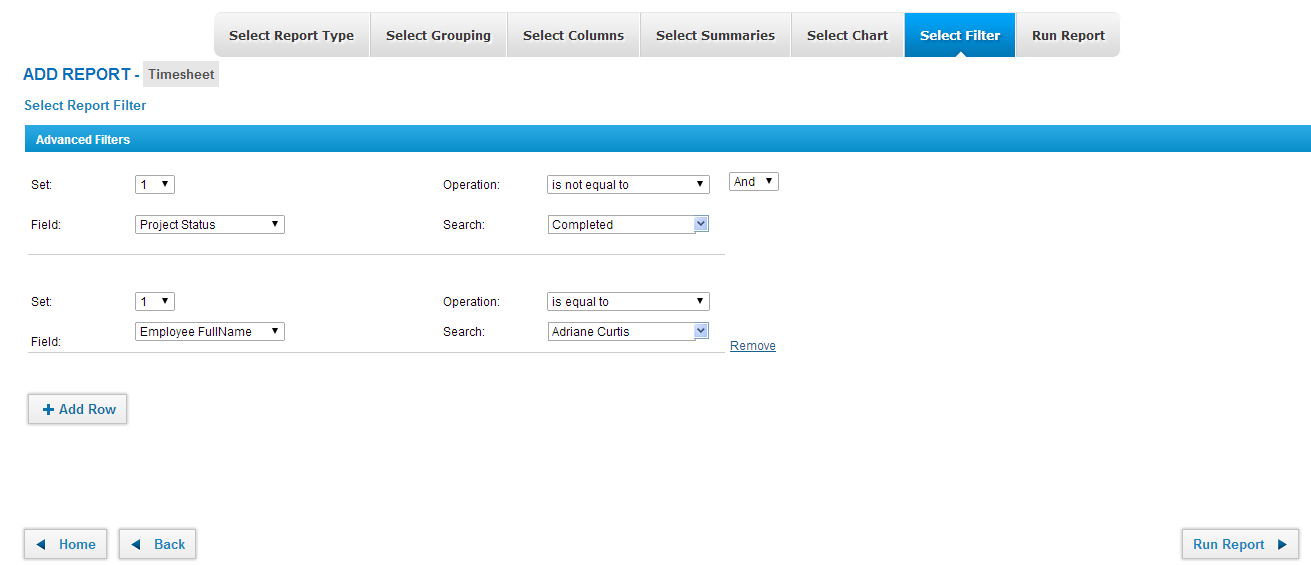
Step 7: Select Filter
In this step, you can set filters for your report fields depending on data type you selected.
Step 8: RUN REPORT
In this step, you can see the results of six steps which you filled in.
Run Report page enables to view the whole report as well as filtering feature where you can filter some needed information once more. Also, you can view the report chart in this page. You can export your report as
CSV,
XLS and
PDF formats from this page as well. Also, note that you don’t need to go by each step to run your report, you can use Run report button on any previous steps.

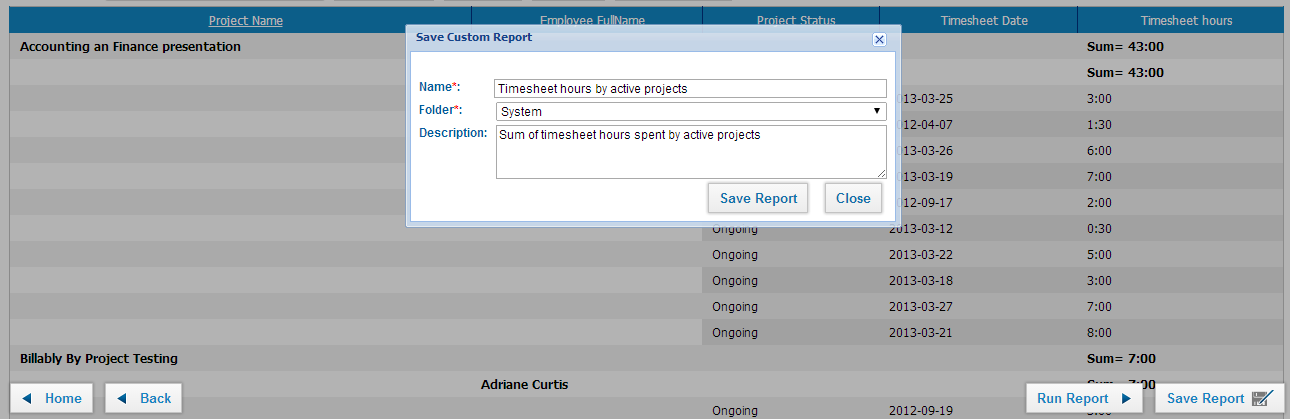
Save Report
In order to save the report you need to click
Save Report button and fill in the fields given.

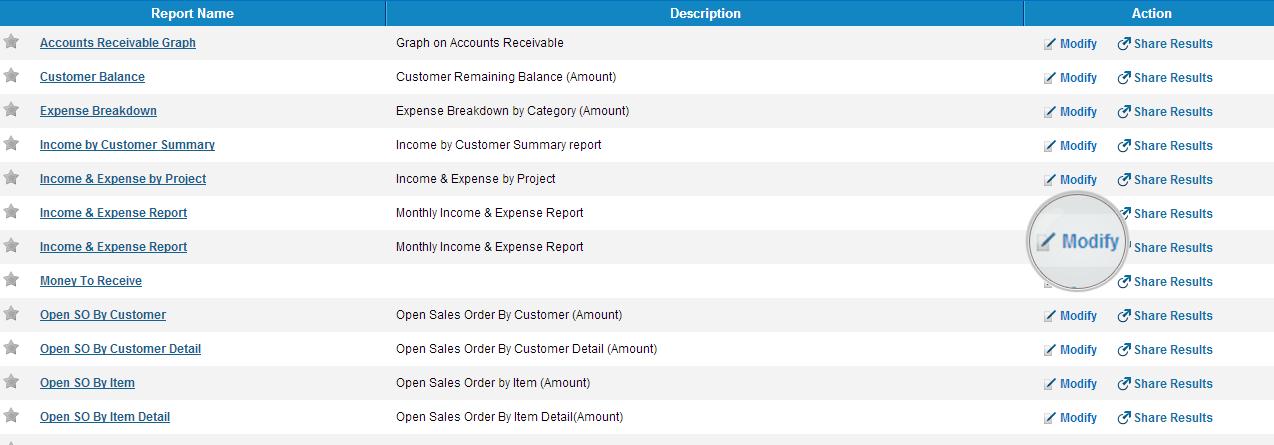
Modify Report
You can edit previously saved reports by clicking on
Modify option of the report on Reports list.
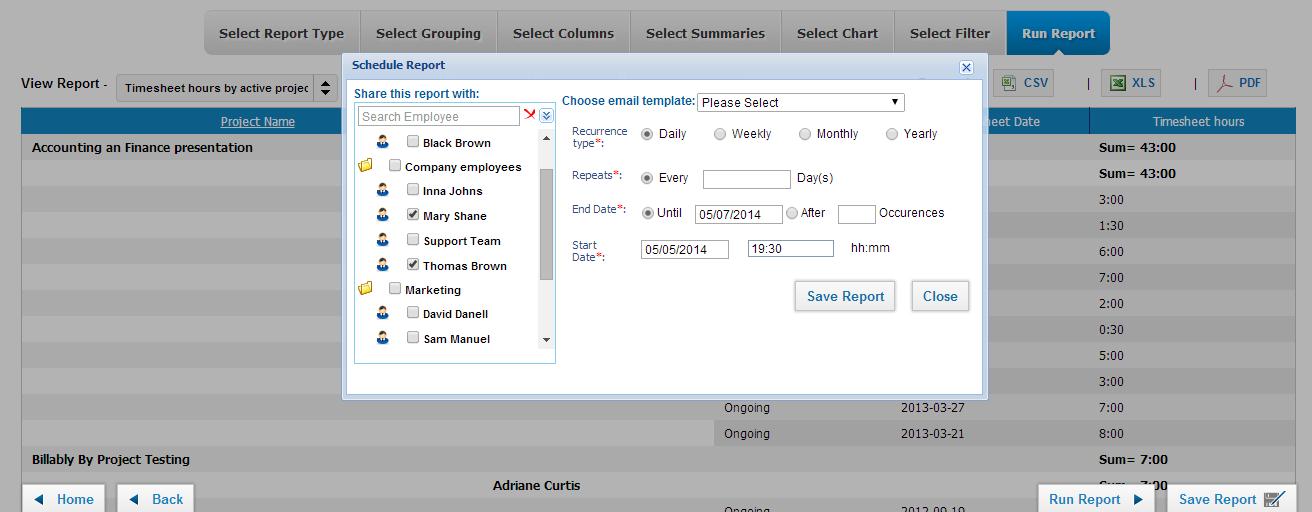
Share Results Function
With this function you are able to share the ready reports with your collaborators and even schedule recurring emails with attached report. You can find
Share Results Function feature in the view page of the report.
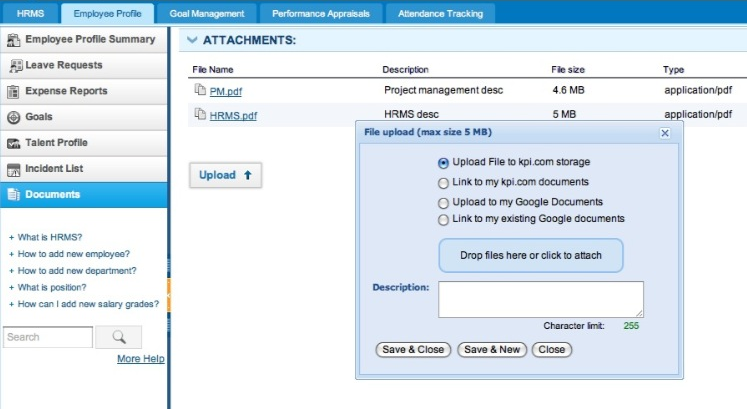
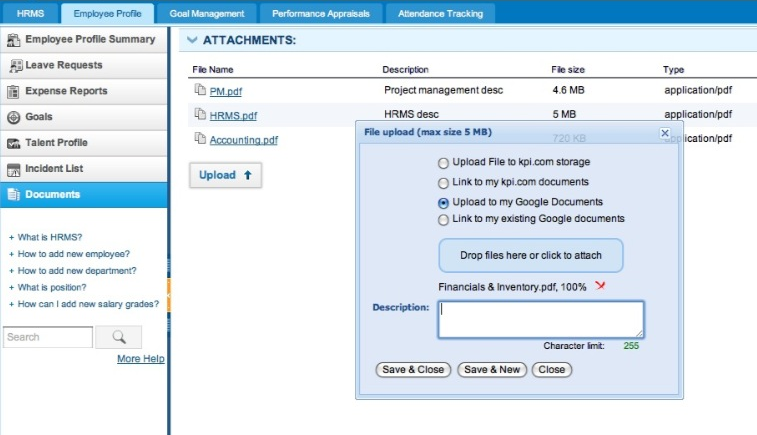
Employee's Documents
Employee's Documents
The
Documents section of the
Employee Profile enables employees to upload work-related documents and files to the system.
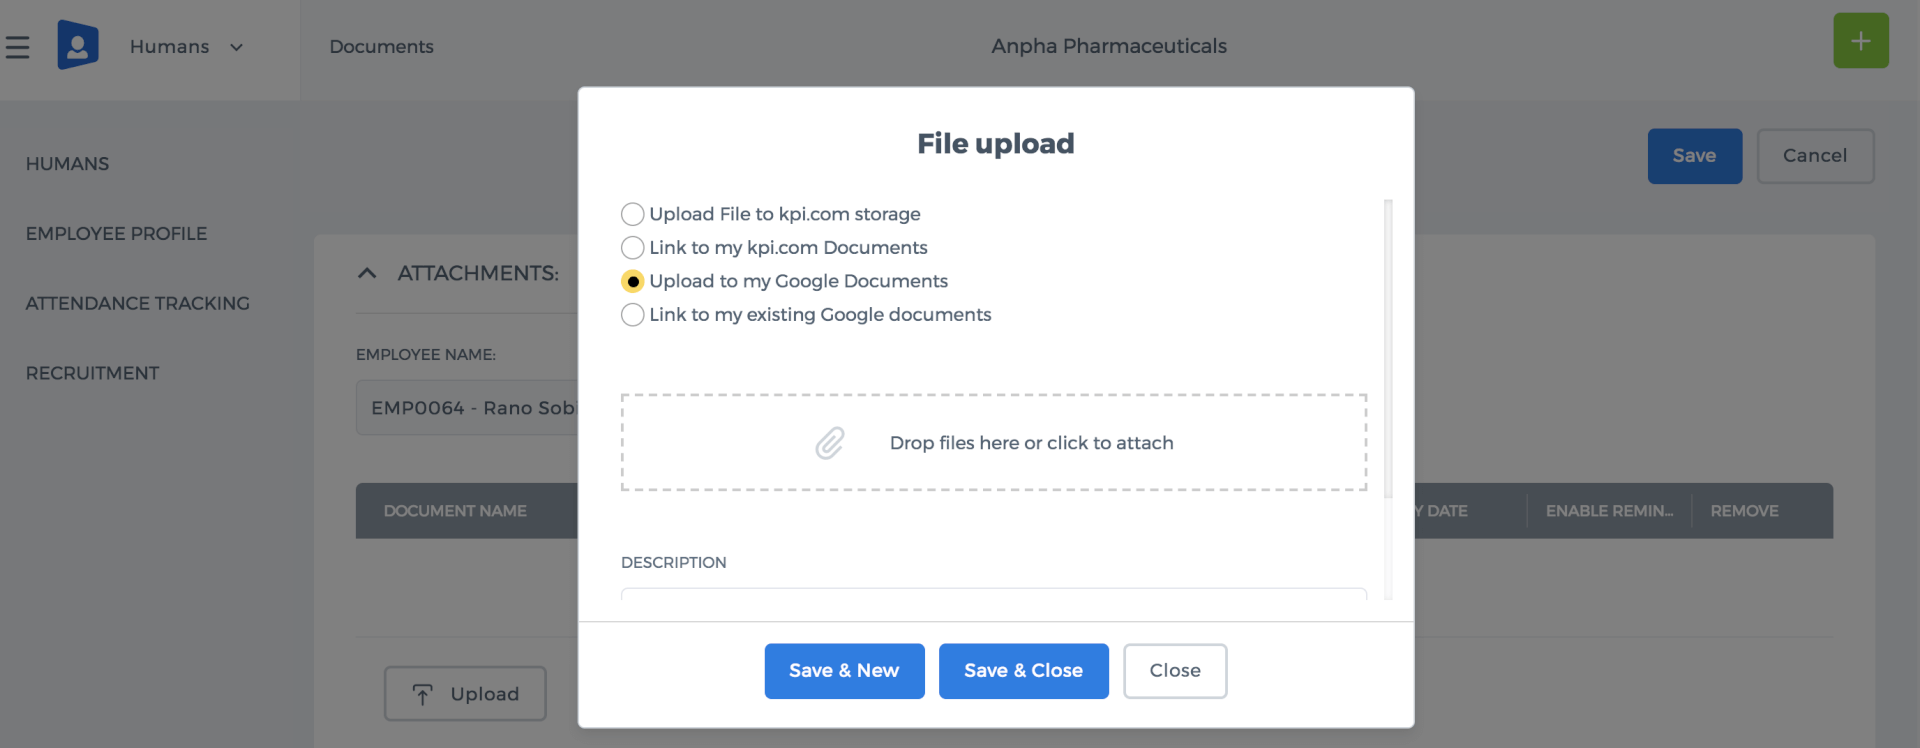
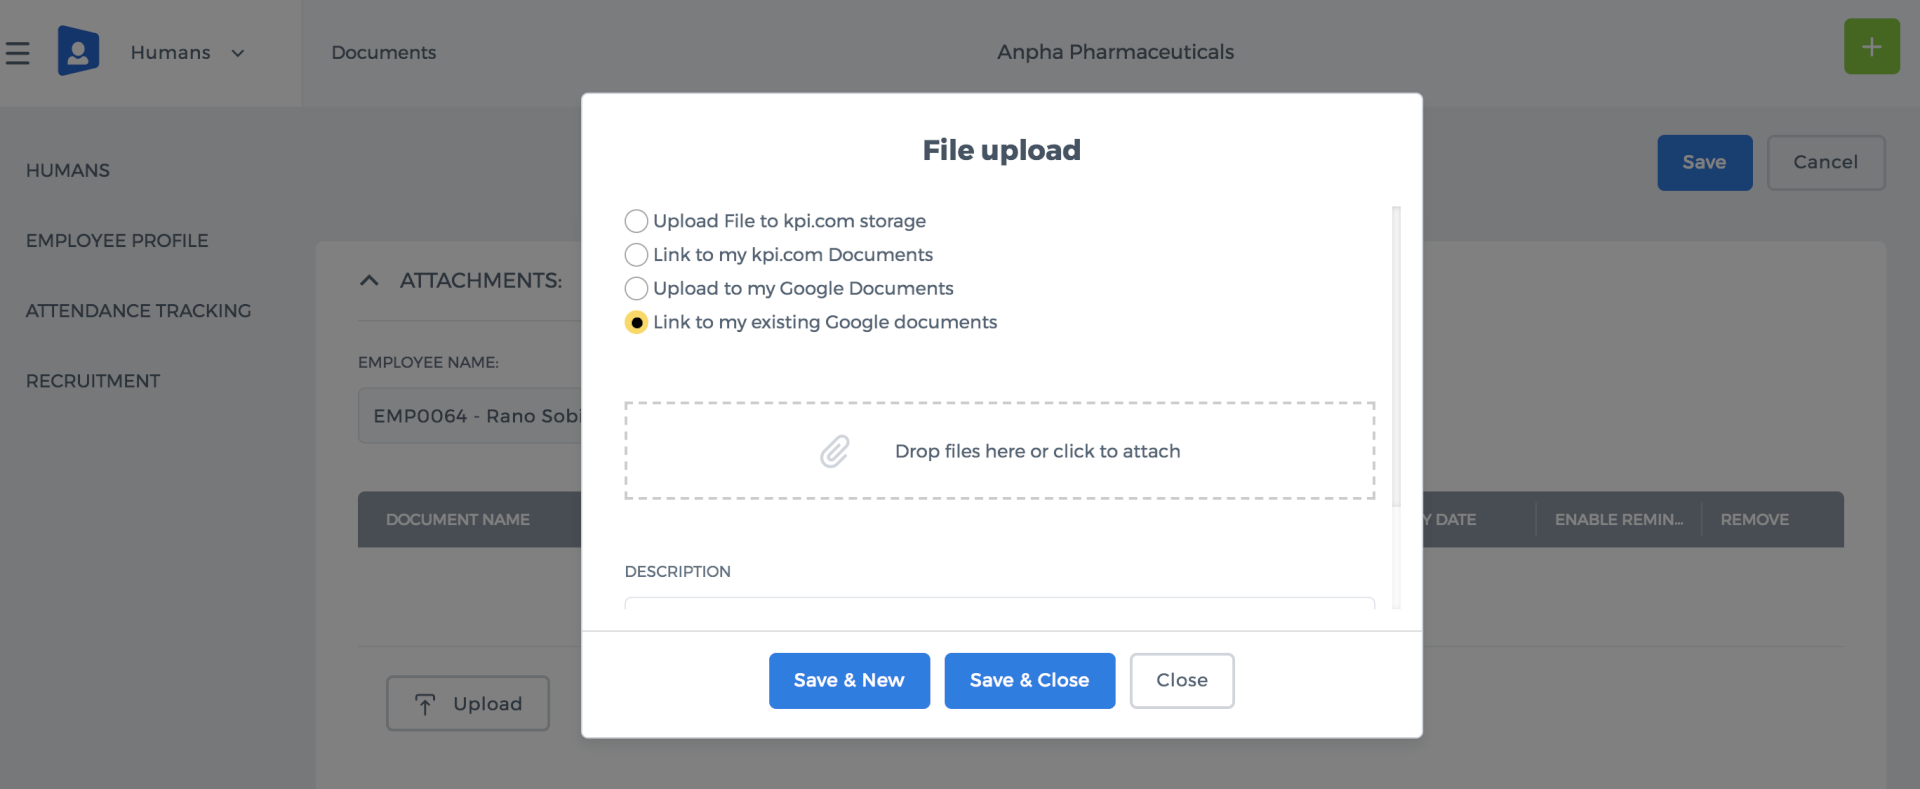
To upload a file to the system, select from the following options:
- Upload File to kpi.com storage
- Link to my kpi.com documents
- Upload to my Google Documents
- Link to my existing Google Documents
Upload File to kpi.com Storage
- Select Upload File to kpi.com storage
- Click Drop files here or click to attach
- Locate the file you want to upload
- Enter a brief description of the file
- Click Save & Close.
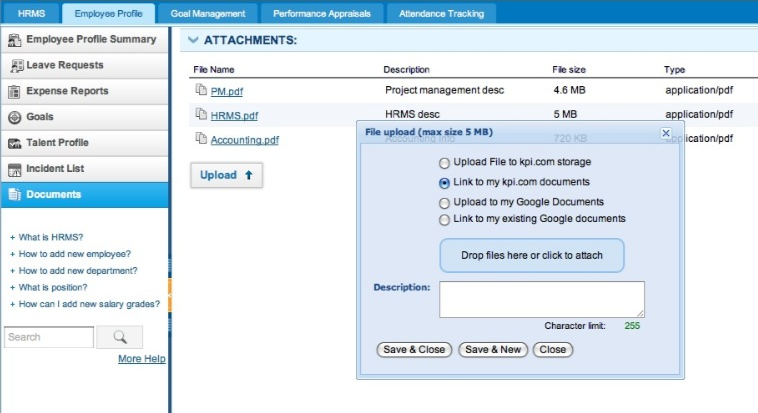
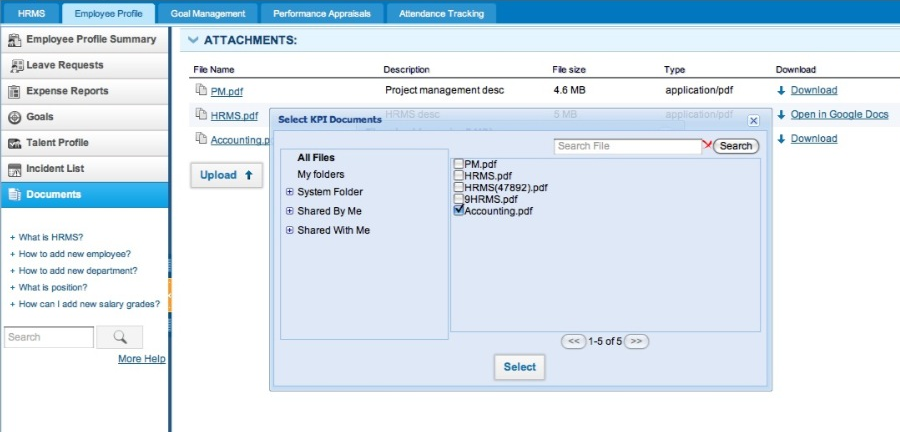
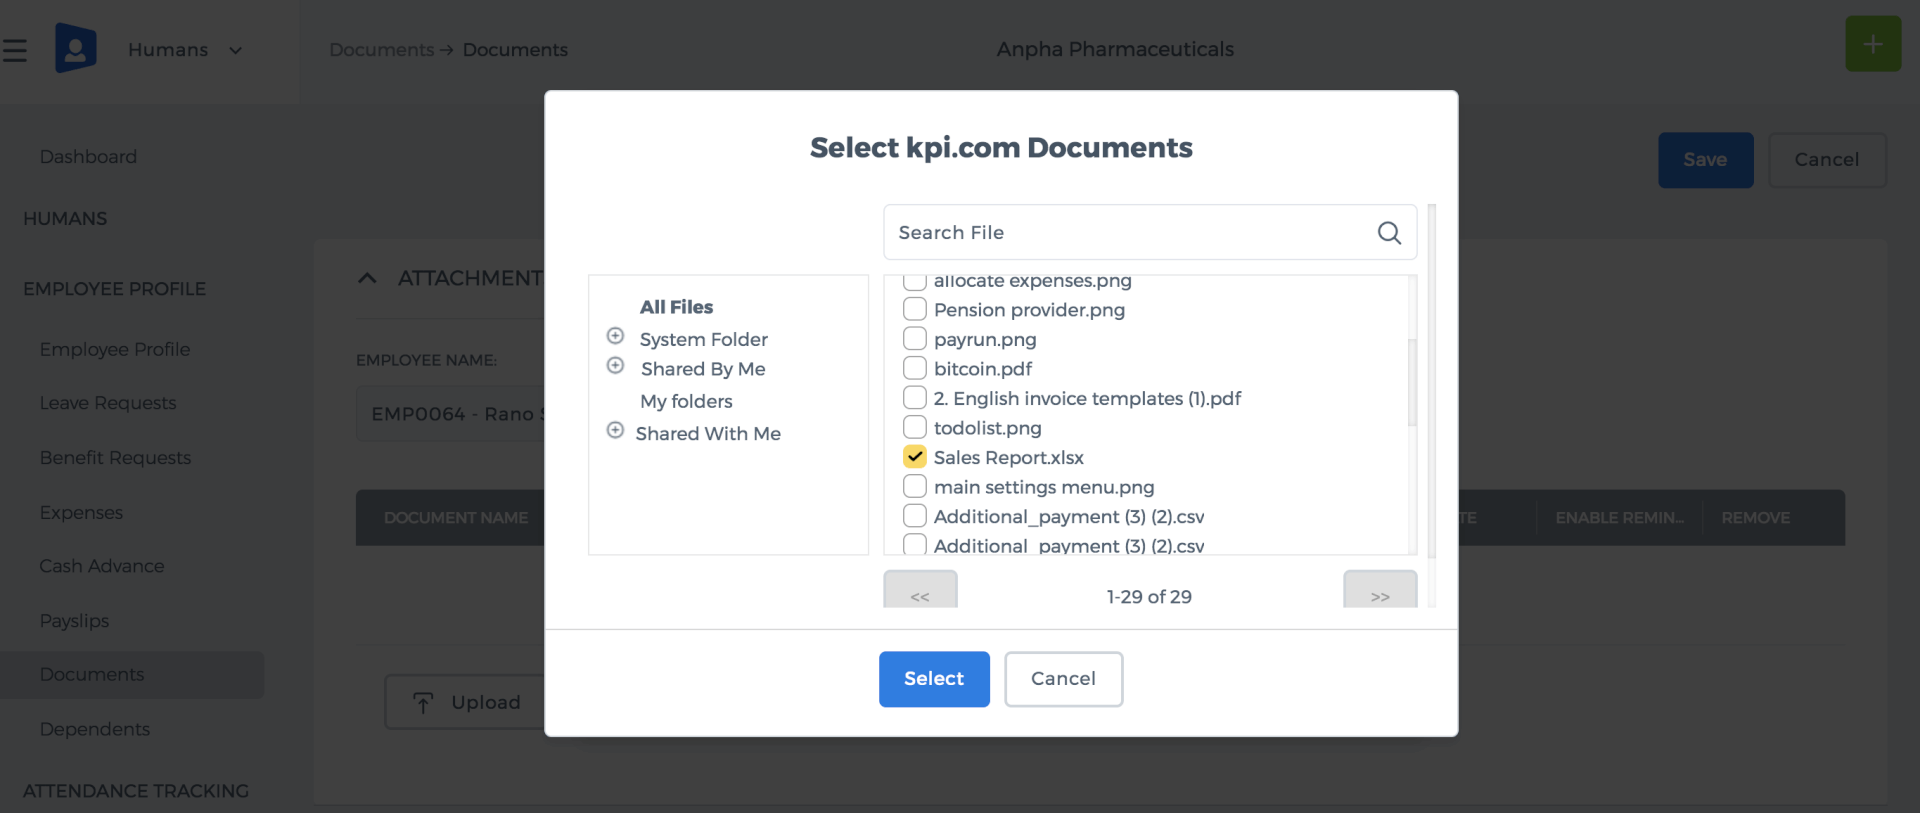
Link to My kpi.com Documents
- Select Link to my kpi.com documents
- Click Drop files here or click to attach
- Locate the file you want to link
- Enter a brief description of the file
- Click Save & Close

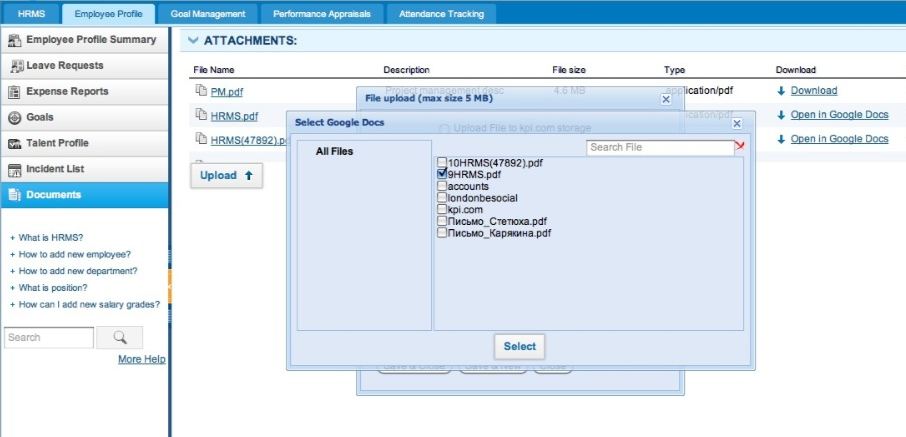
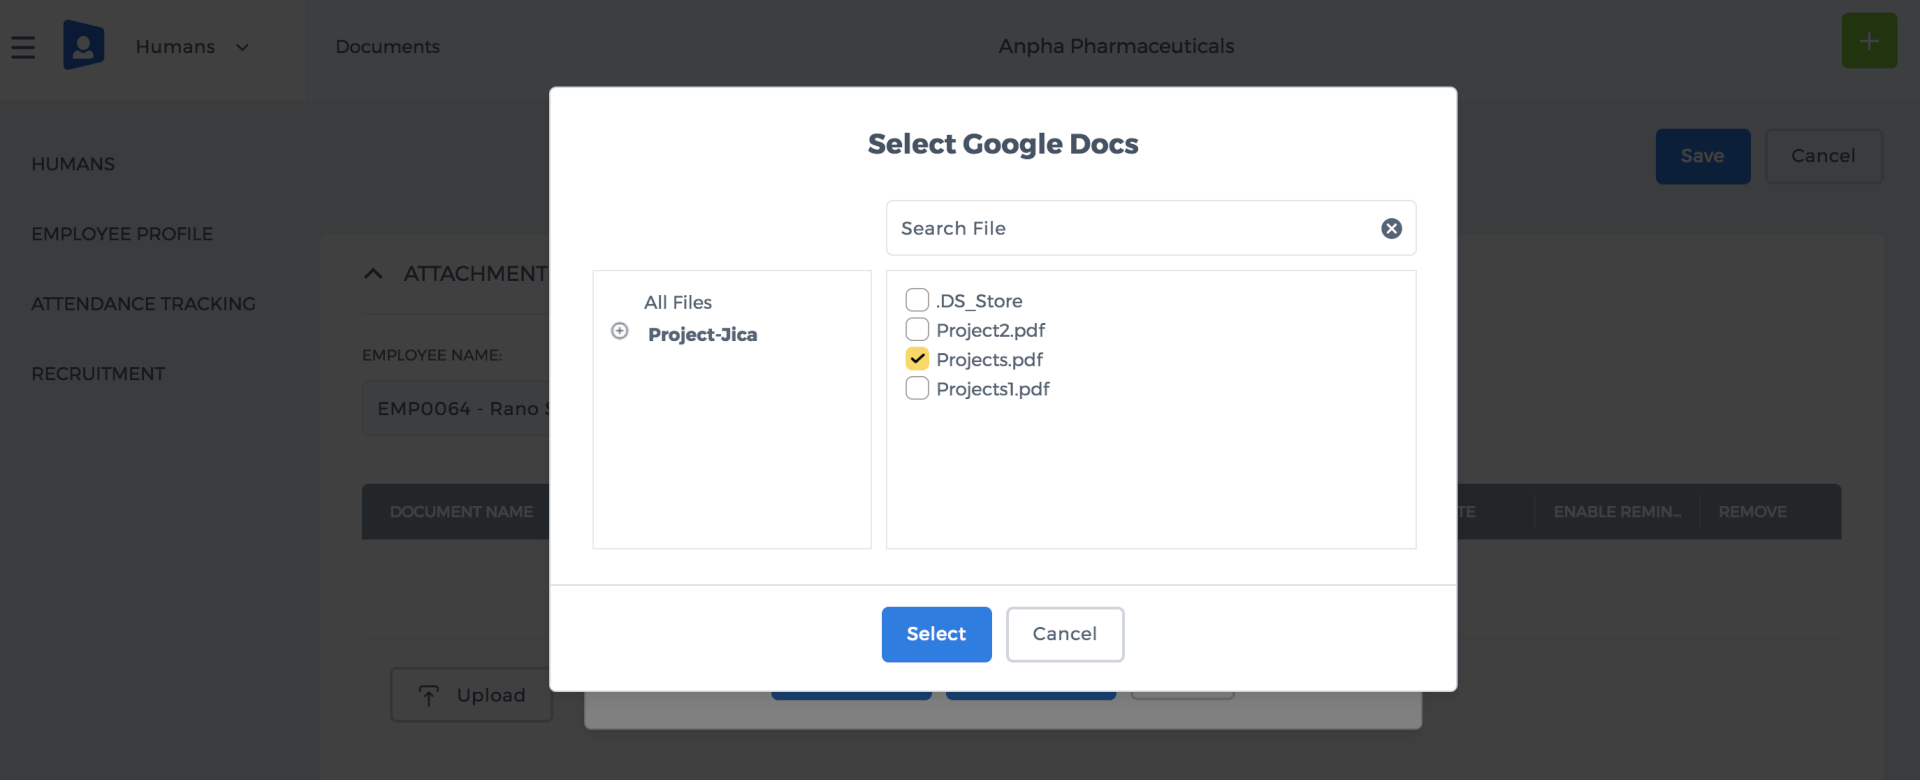
Upload to My Google Documents
Kpi.com’s
Documents section is integrated with the Google Documents, so that users may retrieve existing documents directly from the Google Drive. They can make changes and save the changed document as a new to the Google Documents without leaving the application.
Before uploading any files to the Google Documents, you need to authorize the Google Documents.
To authorize the Google Documents, click
OK
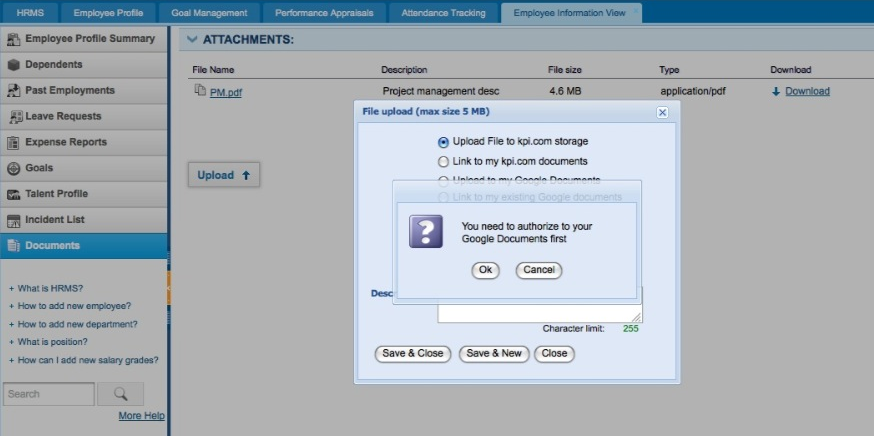
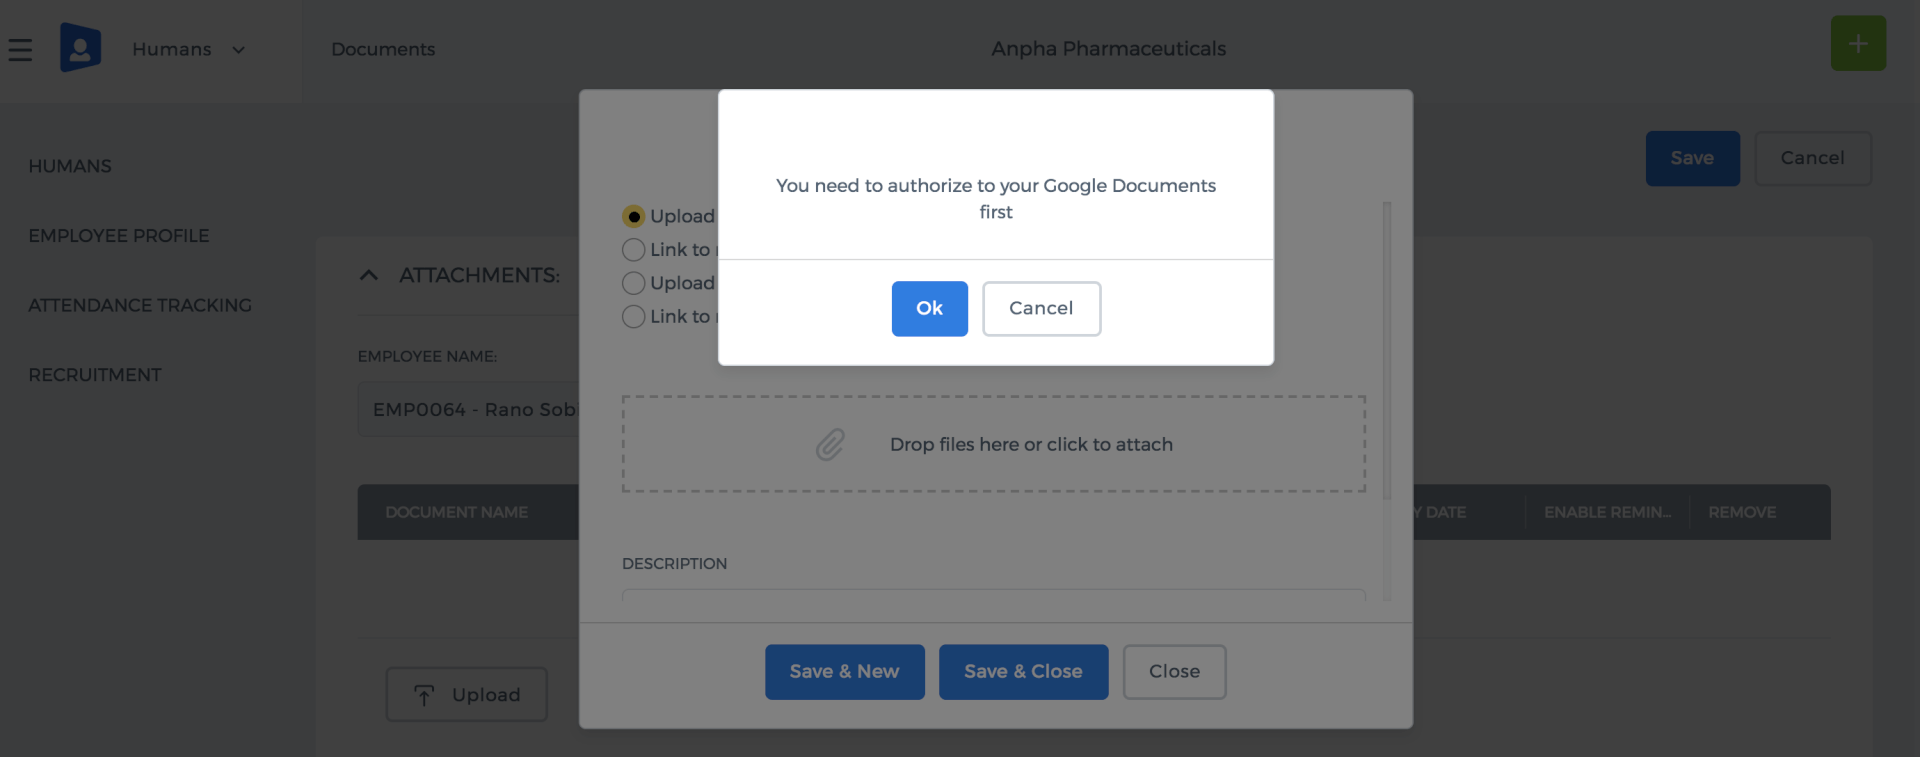
The
Google My Account notification page appears as displayed in the screenshot.
Click
Access Granted to complete the authorization process
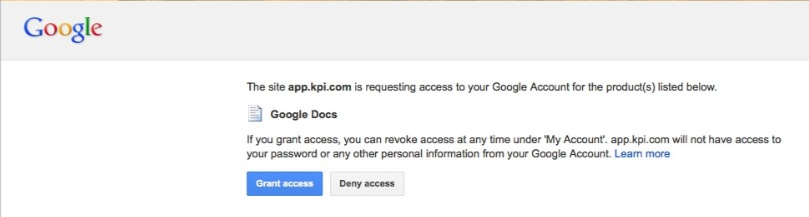
If the Google My Account notification page is not displayed automatically, check your browser settings. Disable
Block Pop-Up windows and repeat the steps again.
- Select Upload to my Google Documents
- Click Drop files here or click to attach
- Locate the file you want to upload to the Google Documents
- Enter a brief description of the file
- Click Save & Close
Link to My Existing Google Documents
- Select Link to my existing Google documents
- Click Drop files here or click to attach
- Locate the file you want to link
- Enter a brief description of the file
- Click Save & Close

Payroll Welcome
Payroll Welcome
The Payroll Welcome page lets you perform several function such as maintaining employer settings, adding new starter, making payments & issue payslips and other functions.
Maintain Employer Settings
The Employer Settings function is located in the Payroll Settings where you can maintain your employment. You need to fill in the necessary fields such as employer PAYE reference, check pay date, provide e-file submission details and save the form.
Add New Starter
To add a new starter, go to the Payroll Welcome page and click Add New Starter. Now, you need to fill in the fields for the employee details, payment settings and payroll settings, and then save the form after you have finished this section. The information about the starter you have added will be saved in the list of Employees.
Make Payments & Issue Payslips
You are able to make payments & issue payslips using two features:
- The default page called Payroll Welcome gives you Make Payment & Issue Payslip option in the third step.
- You can also go to Payslips List and click the Add New function to make payments & issue payslips.
Now, you need to select employee name, payment method and period from the dropdown list which appears in the form. The finished form can be Previewed, Saved as Draft, Committed to P11, exported as PDF Version and seen as Gross Pay Calculator.
View Forms & Reports
If you are on the Payroll Welcome page, click View Forms and Reports, which then forwards you to theForms/Reports section. For more information about the types of forms, refer to Forms/Reports below.
View Employer P32
Employer P32 can be viewed through the Payroll Welcome page or the Forms/Reports section. These forms present the necessary figures that are recorded electronically once you paid to your employees.

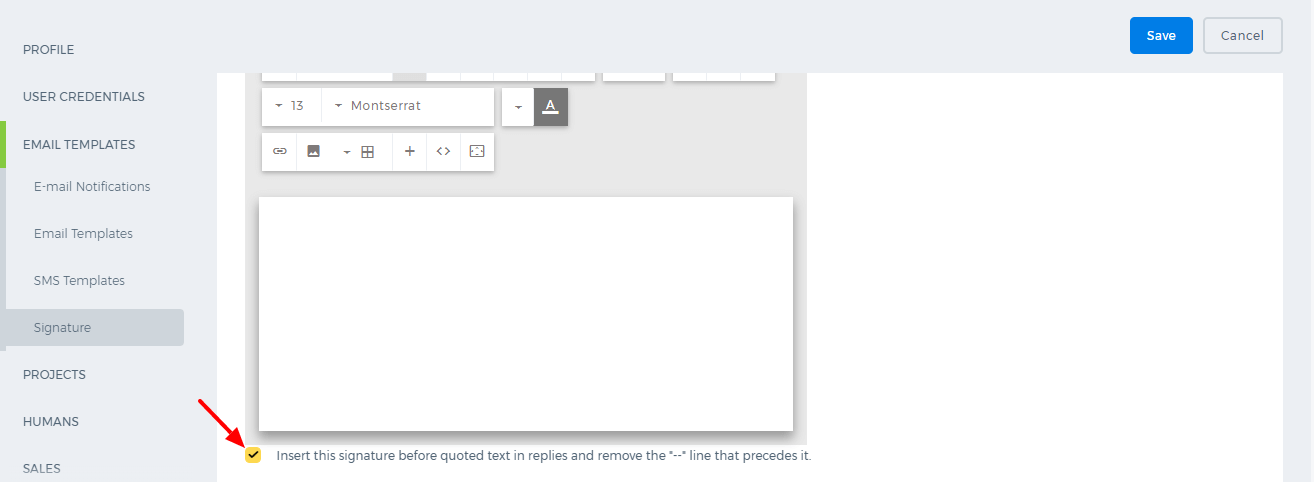
 "Insert this signature before quoted text in replies and remove the "--" line that precedes it" box is ticked if you want the signature to appear before the quoted text and after your new reply (otherwise, the signature will show up at the end of the conversation thread).