Documents Overview
Documents Overview
In kpi.com all the files uploaded into the system are stored in the Documents section. This section is divided into separate categories such as My folder, System folder, Public, Shared by me and Shared with me.
My folder section contains all the documents uploaded by the user. These files can also be stored or linked to My Google Documents, so the user will be able to retrieve or upload files to his Google account straight away.
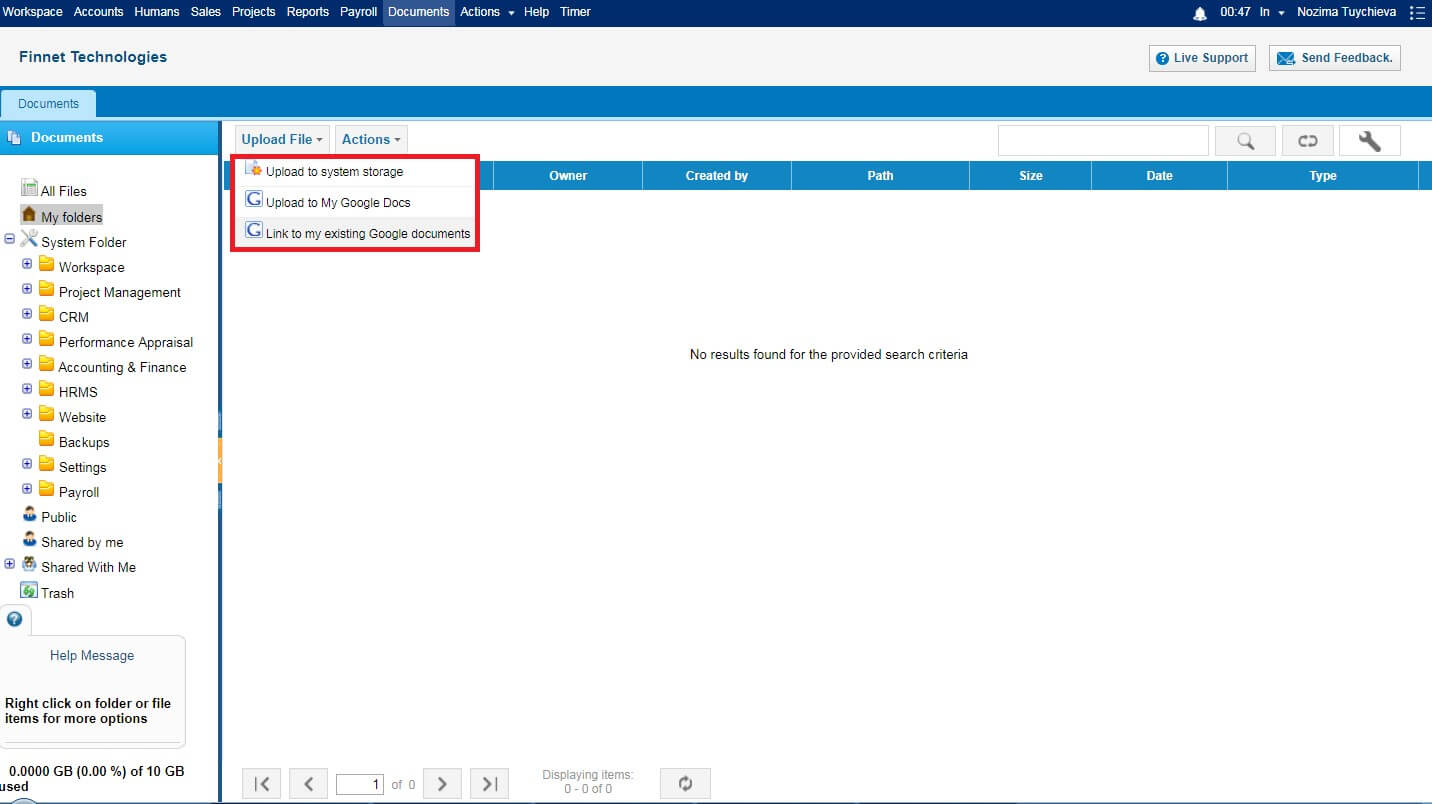
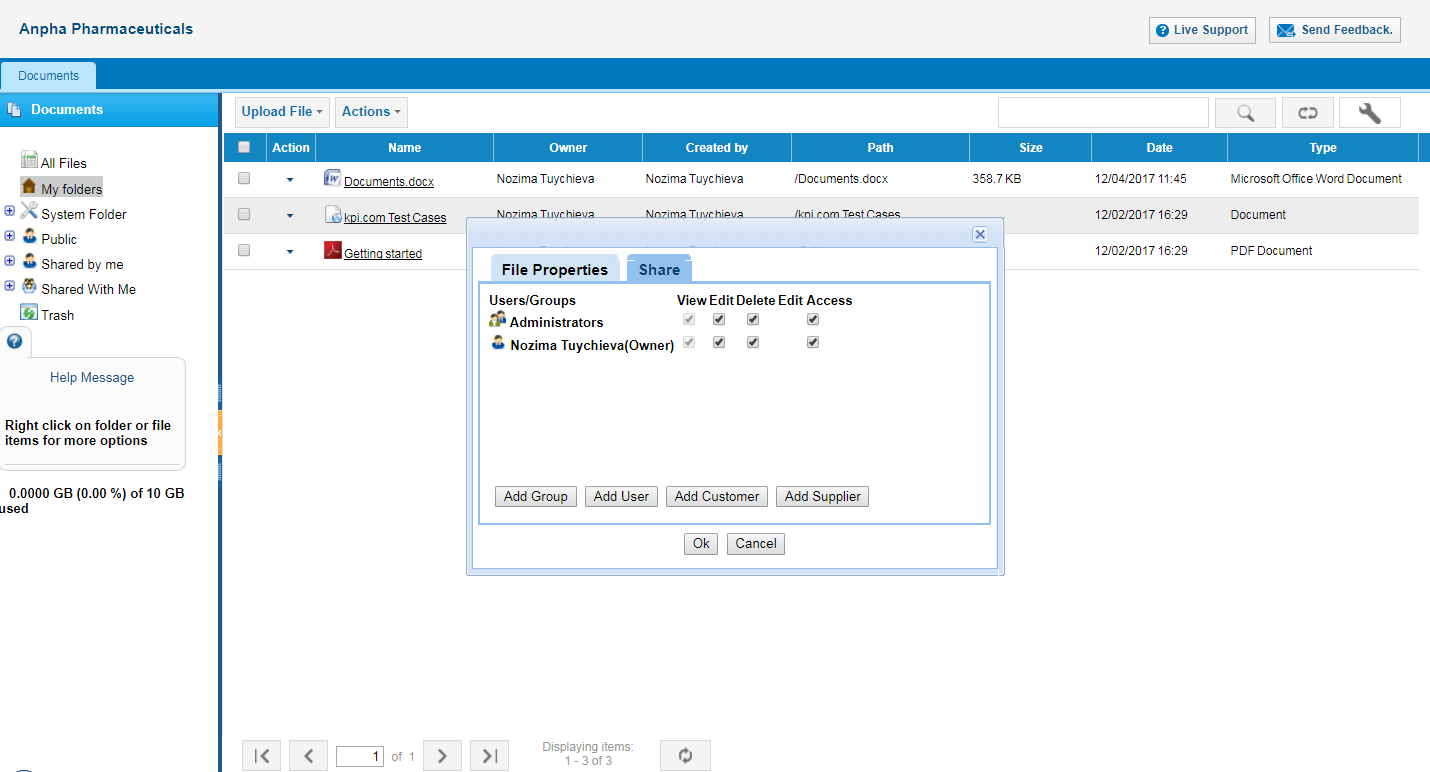
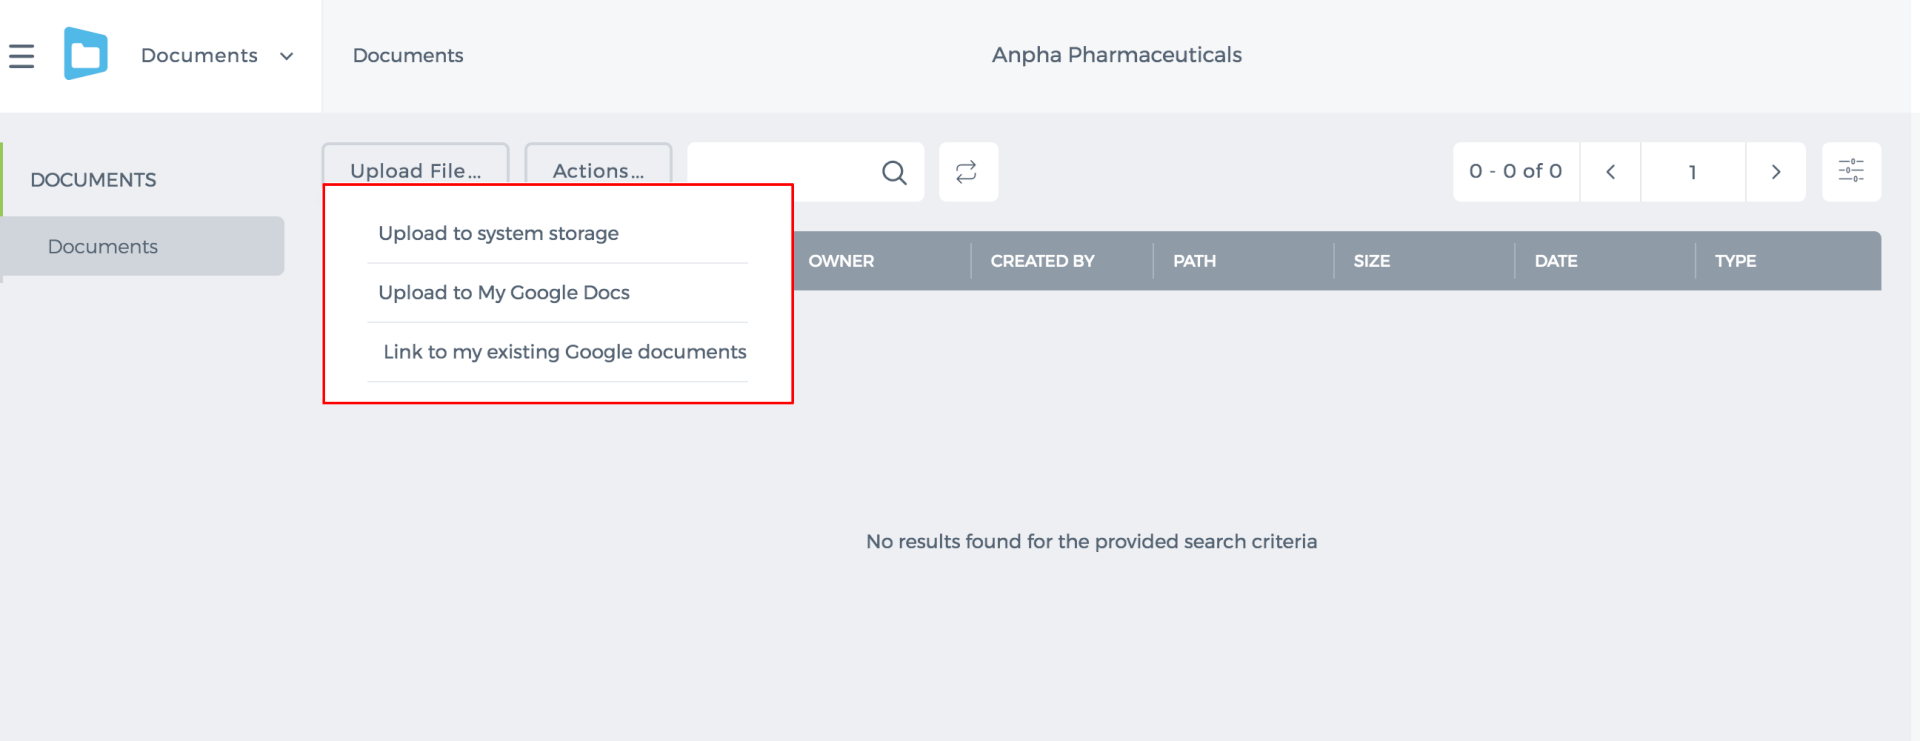 Besides, these files can be shared with any other user in the system or specific group. In order to create this group, go to Actions>>Groups>>Add Group.
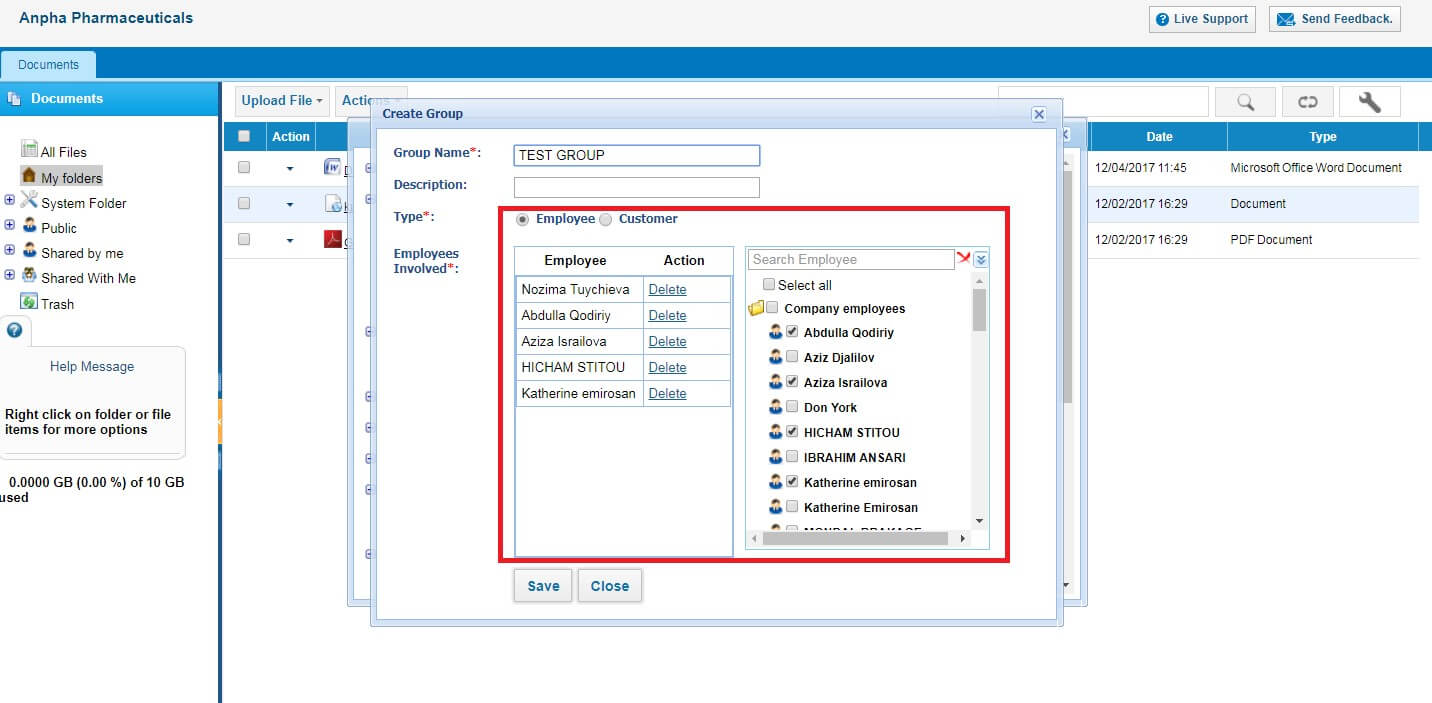 Once the group is created, any document can be shared with this group.
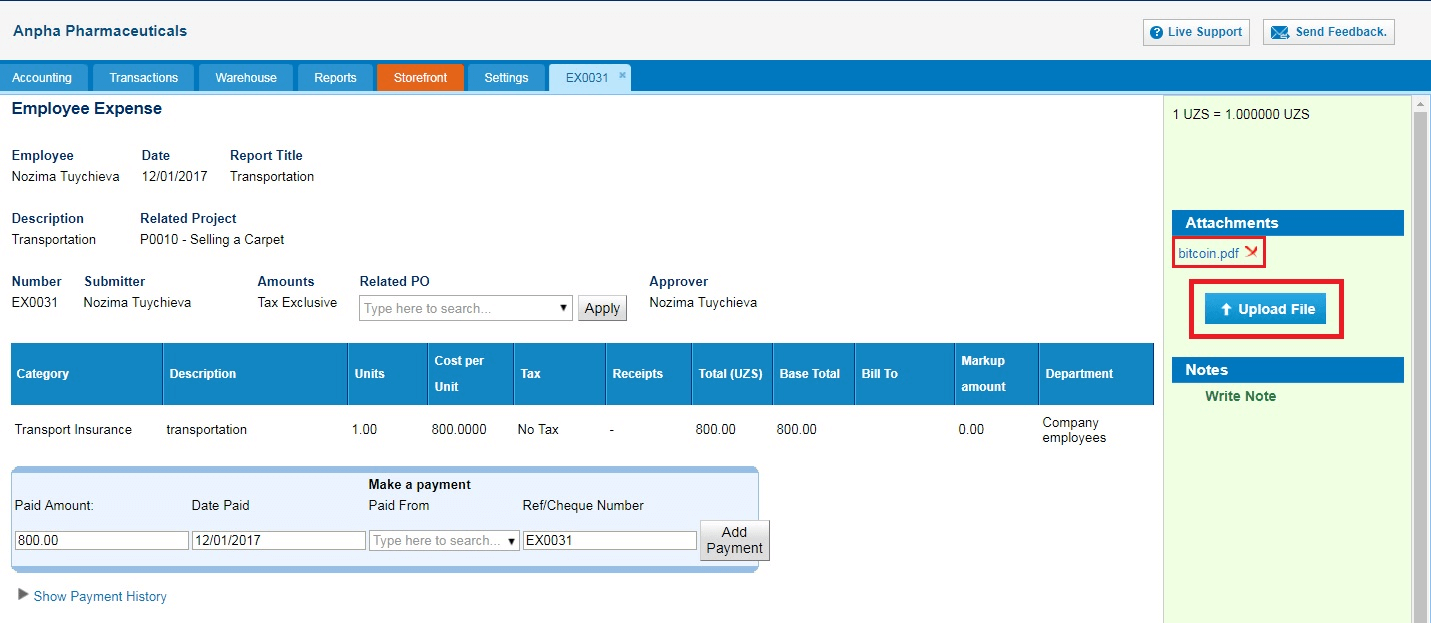
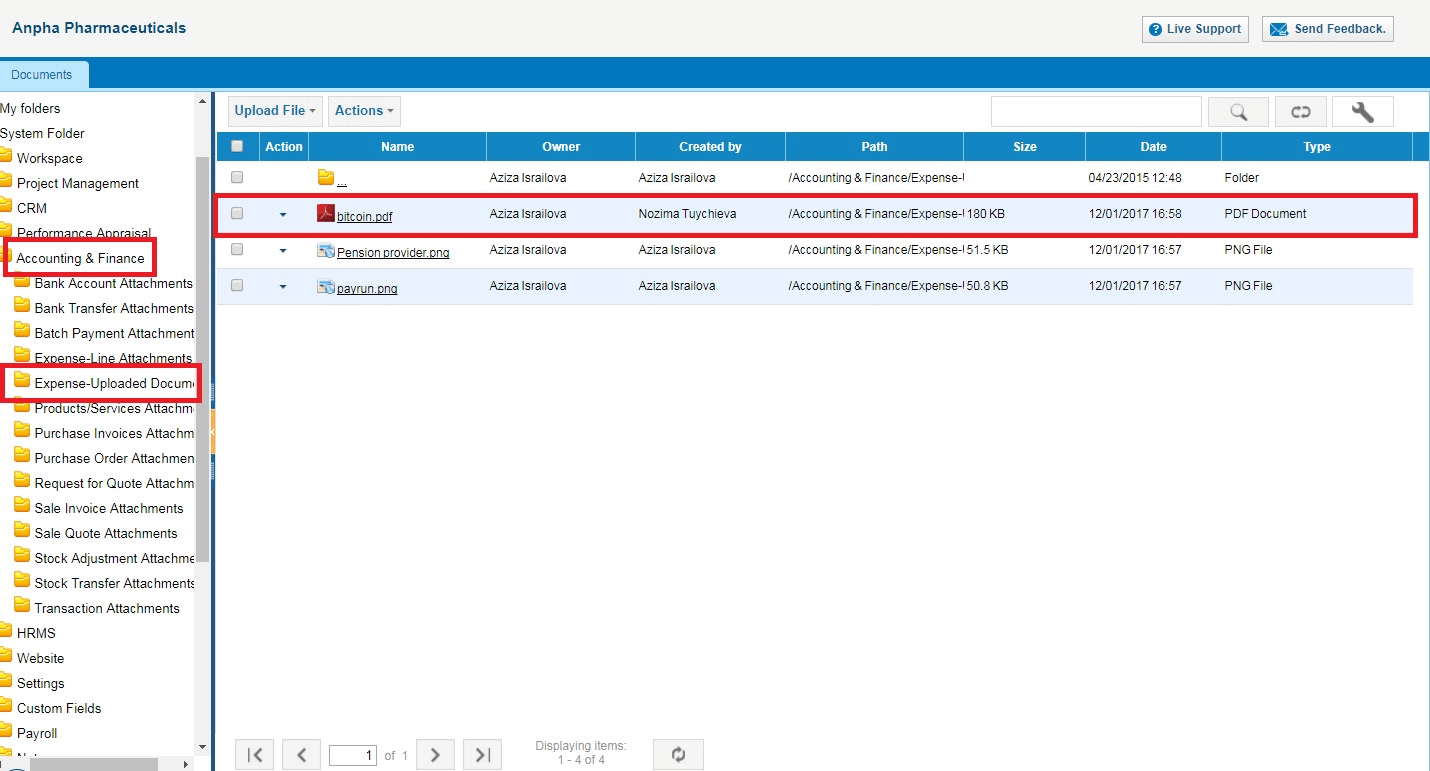
 System Folder includes all the modules of the system, e.g. Project Management, CRM, Accounting and Finance, etc. For instance, receipts uploaded in Expense claim will be reflected in Accounting>>Expense Uploaded documents.
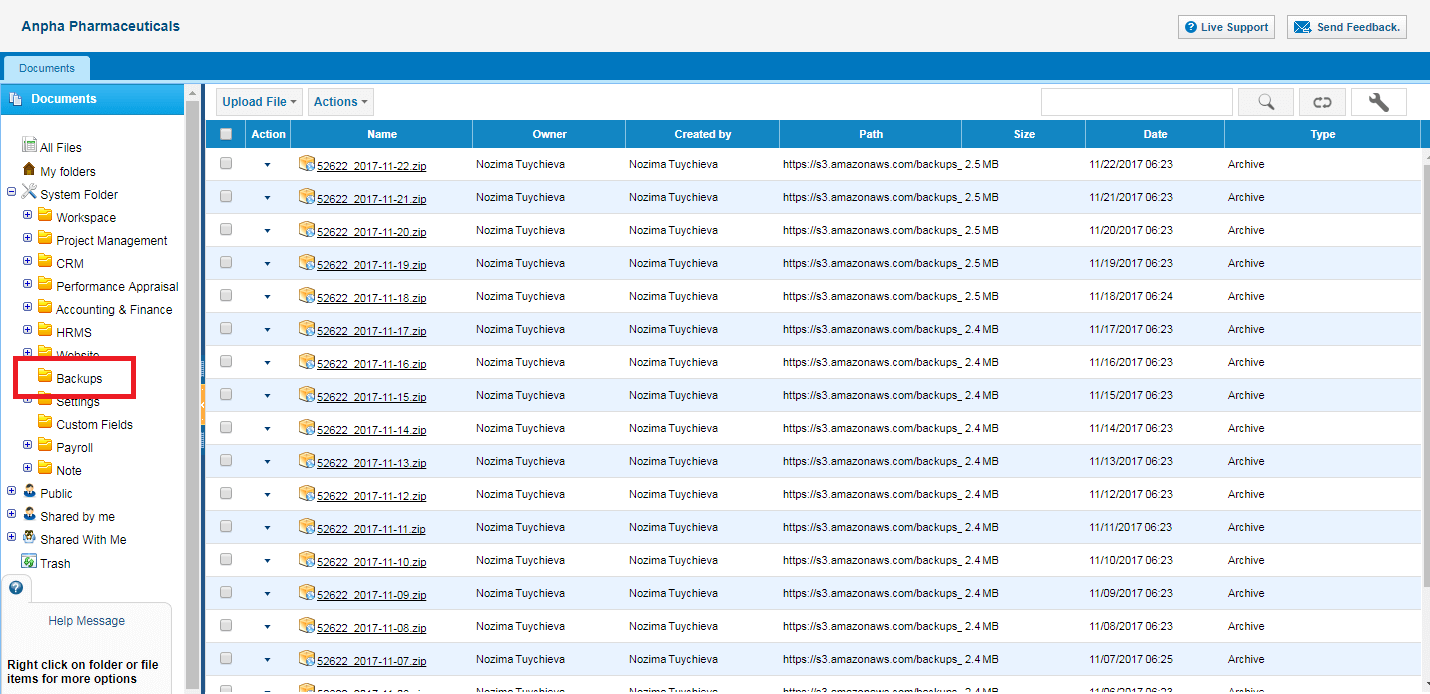
 Backup folder can be enabled by request, where all the files (csv, pdf) can be retrieved. This folder is visible only for the Administrator of the system.
Public folder
Files in Public folder are visible for all the users, including the customers and suppliers.
Shared With me
All the files that have been shared with a user will be reflected in this section.
Shared by me
All the files that have been shared by the user will be reflected in this section.
File Attachments
In order to compose an email, it is 5MBs per attachment file and overall storage of user is 10GBs.
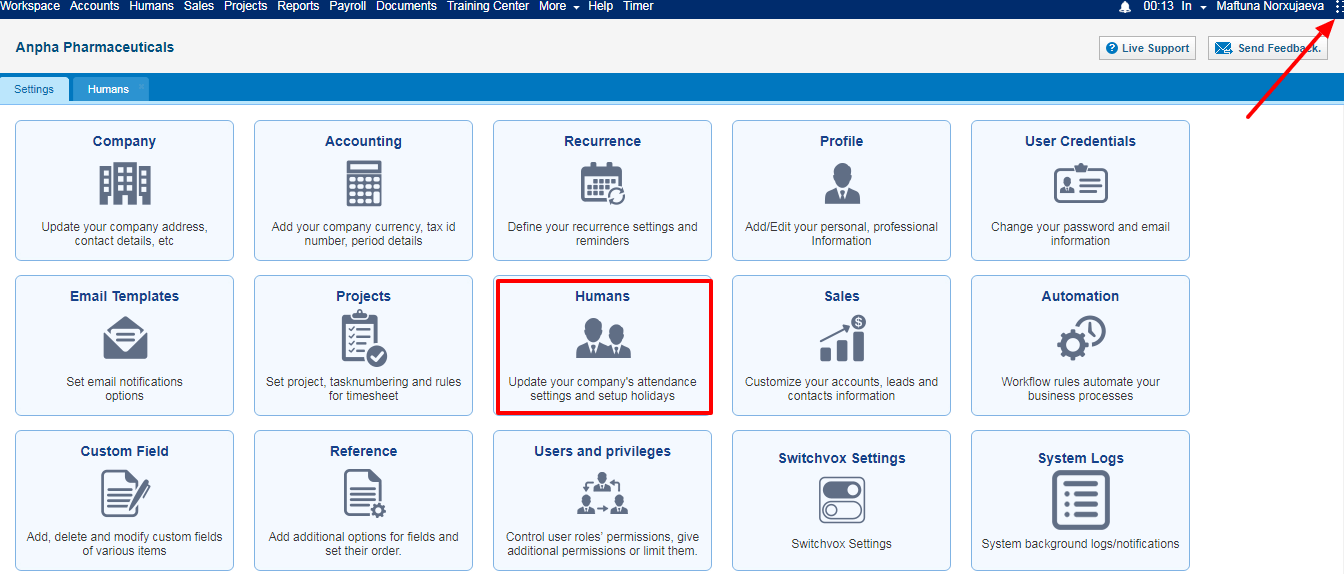
Users and Privileges
Users and Privileges
Users and Privileges give administrators a great control over what their employees can see, add and edit in the application.
To manage your users access level, go to Settings>>Users and Privileges.
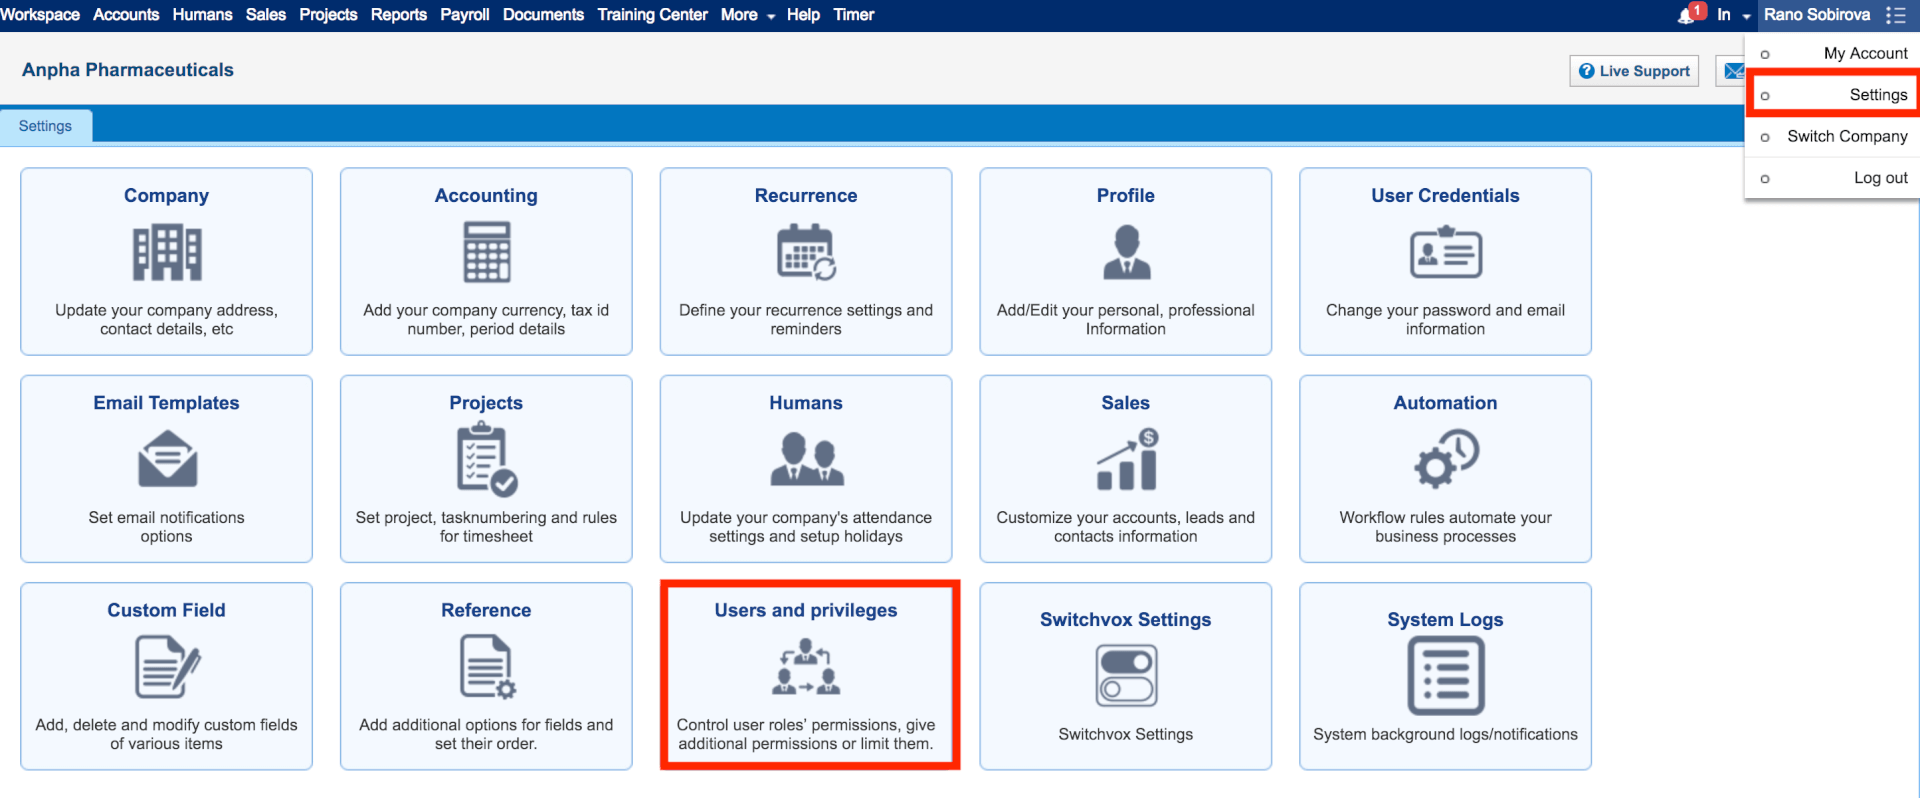
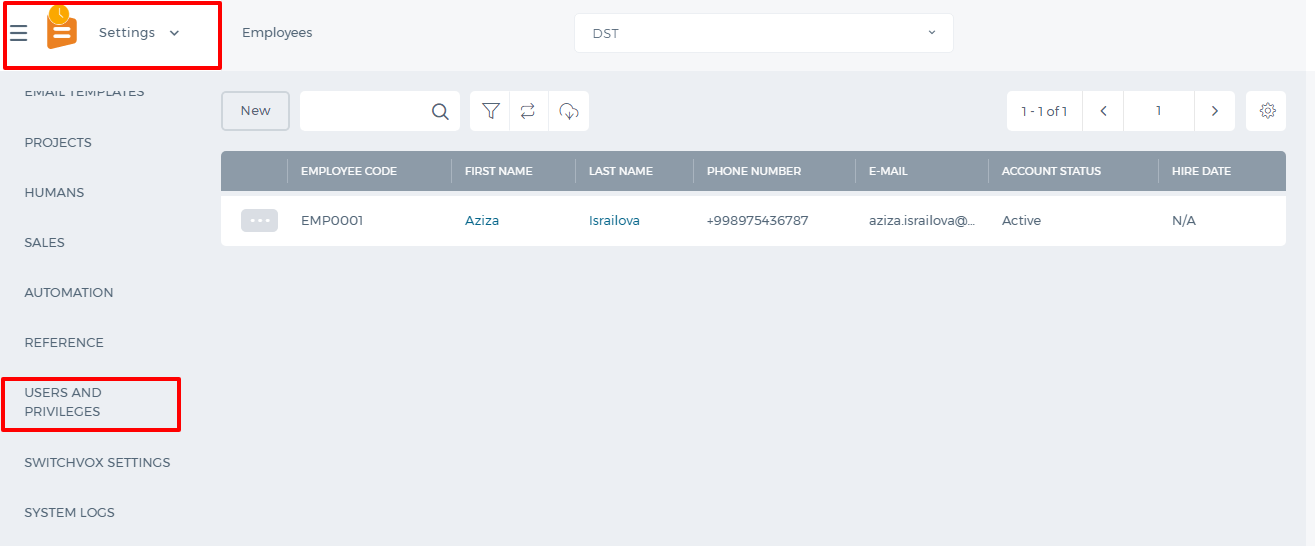 There are three subsections under it: Employees, Roles, Permission Management.
In the Employees section, you will see all the employees added either from Humans or Projects and their statuses. The Employees section works the same as the Employees section available in Humans and Projects.
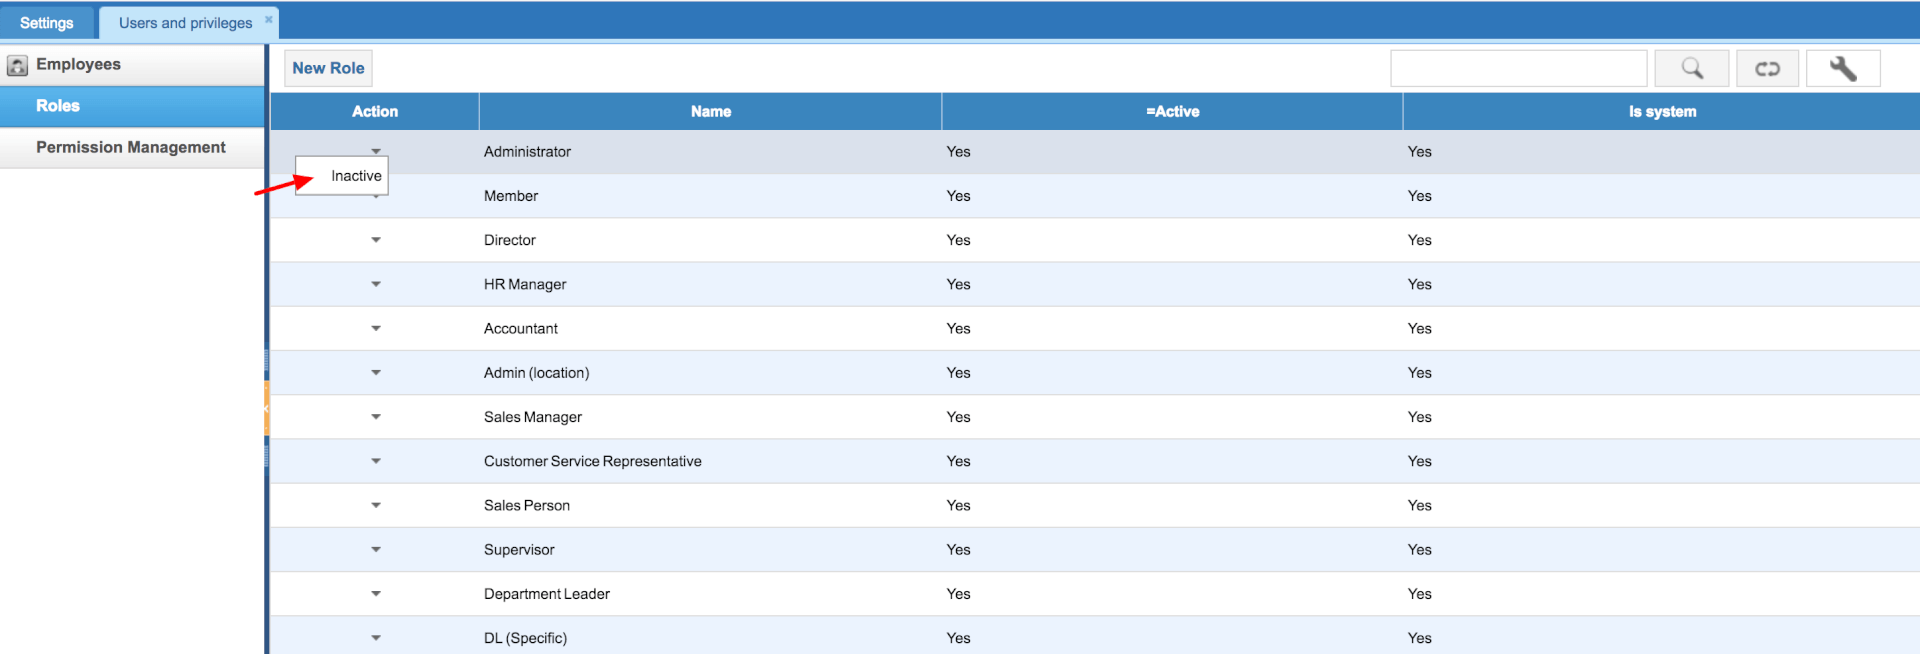
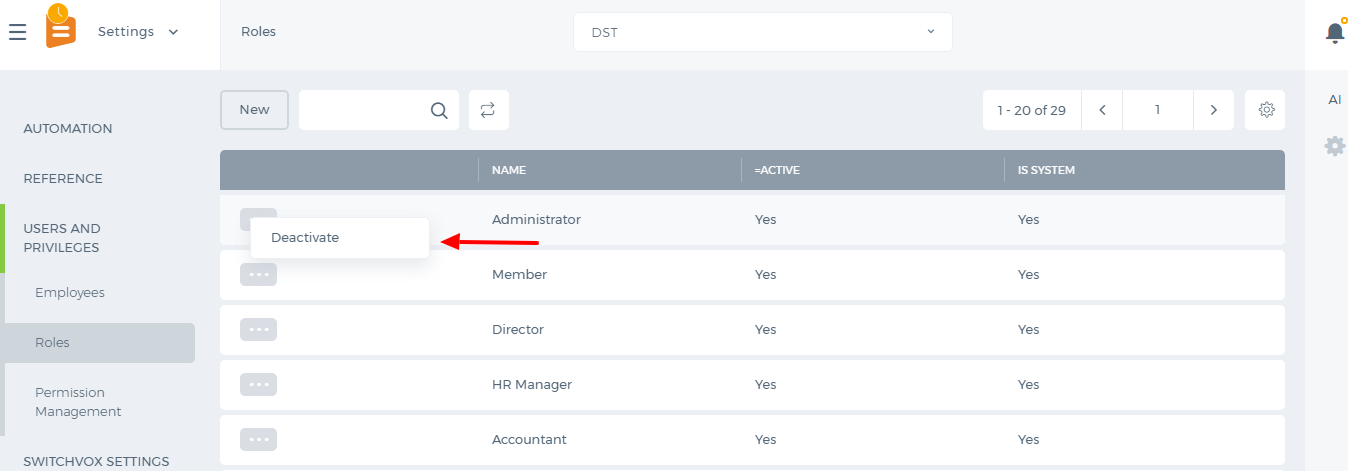
Roles section enables the admin to activate and deactivate all the user roles both custom and default ones.
Admin can also create a new custom user role using the New Role button.
There are three subsections under it: Employees, Roles, Permission Management.
In the Employees section, you will see all the employees added either from Humans or Projects and their statuses. The Employees section works the same as the Employees section available in Humans and Projects.
Roles section enables the admin to activate and deactivate all the user roles both custom and default ones.
Admin can also create a new custom user role using the New Role button.
 In the Permission Management, you can manage the access level of your users. There are modules on top of the table and user roles under them. On the horizontal list, you will see the options like list view, add, edit etc. A tick on those options will enable the user to have access to that option. There is no "Save" button on this page, a change is automatically saved.
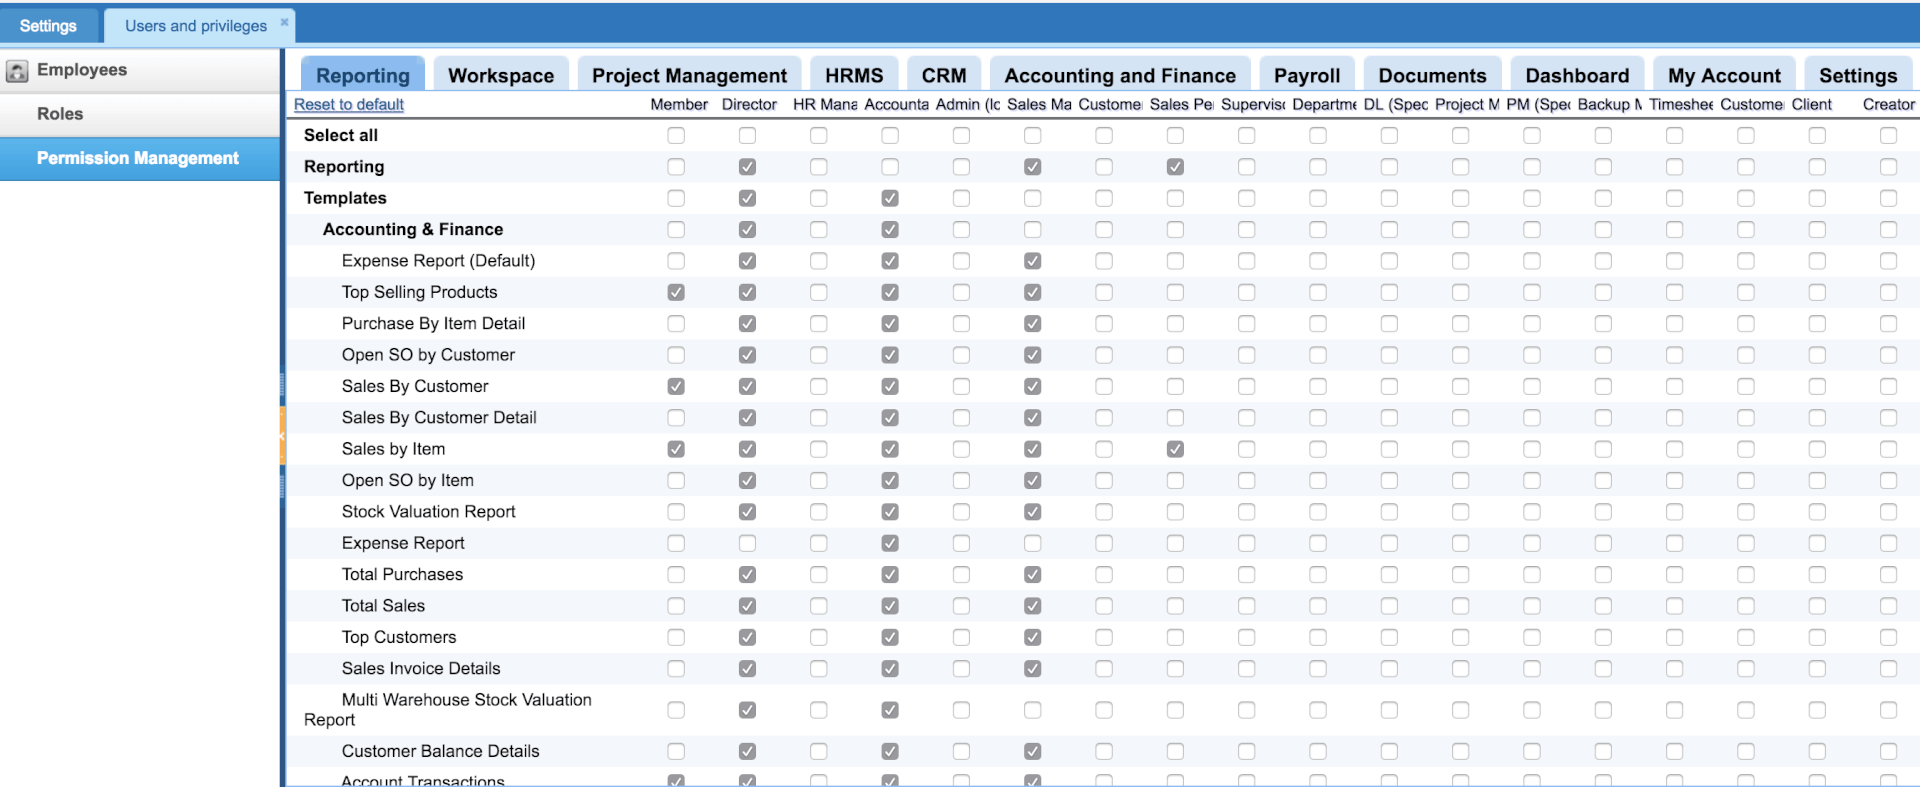
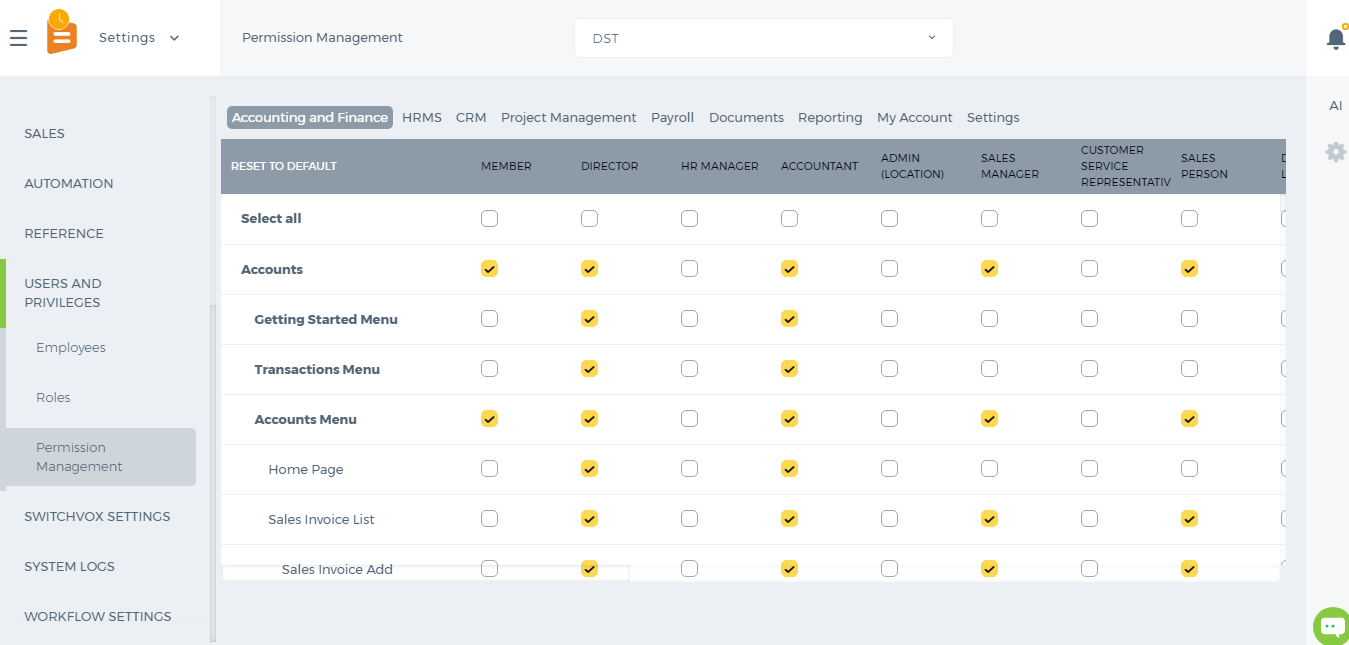 This setting is available only for Administrators. Administrators are not listed in the Permissions table since they are power users and their access cannot be changed.
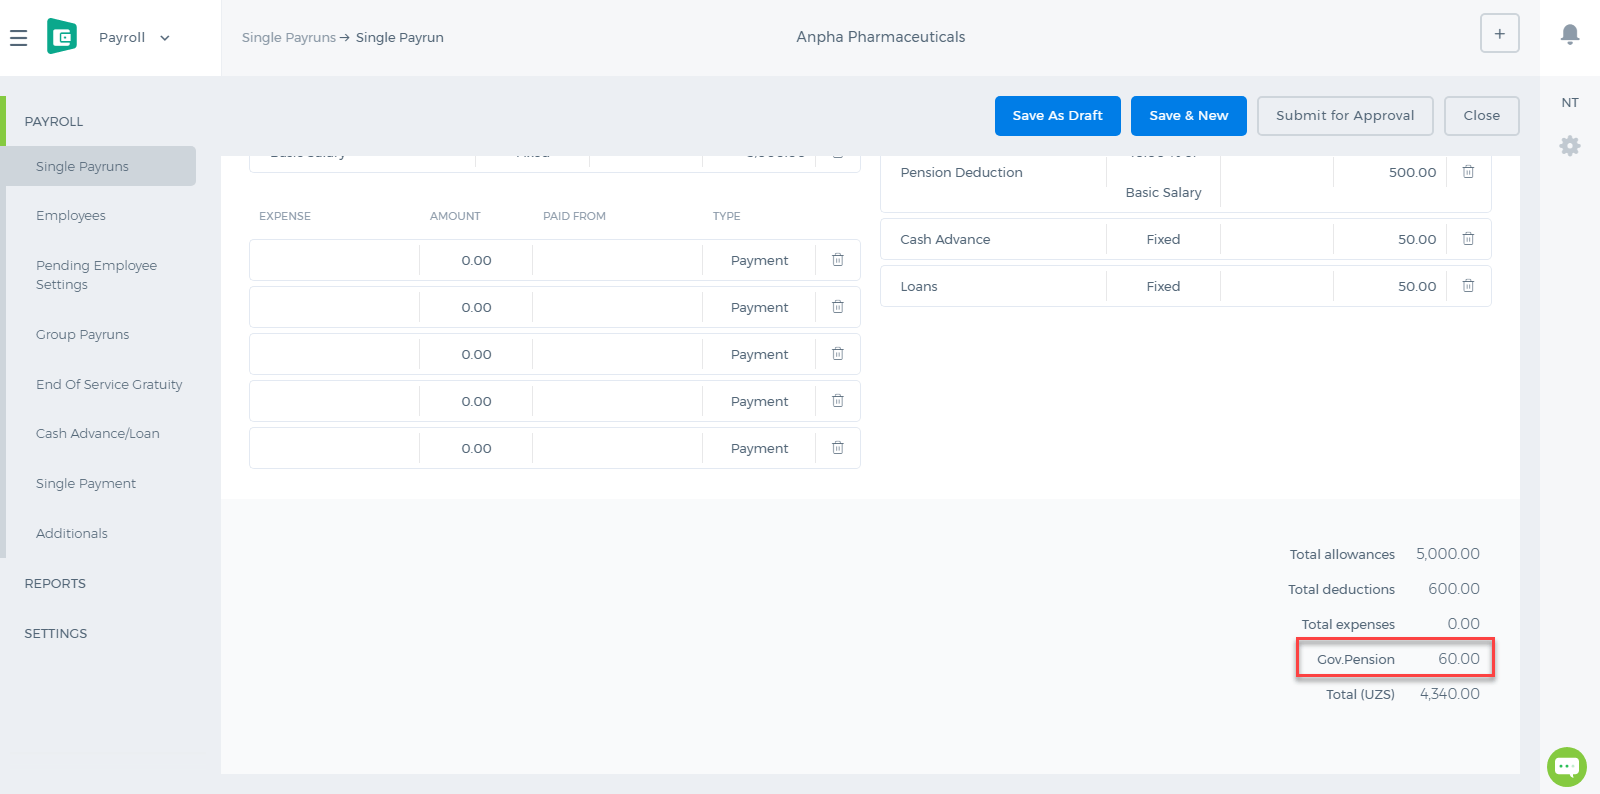
Pension Scheme
Pension Scheme
Pension scheme is a long term savings plan. According the countries pension scheme, employees save little money from their salary during their working life so that they have enough funds when they retire.
You can set up the pension scheme from Payroll>>Pension Scheme page. Before the Pension Scheme is set up, you need to provide information about the Pension Provider.
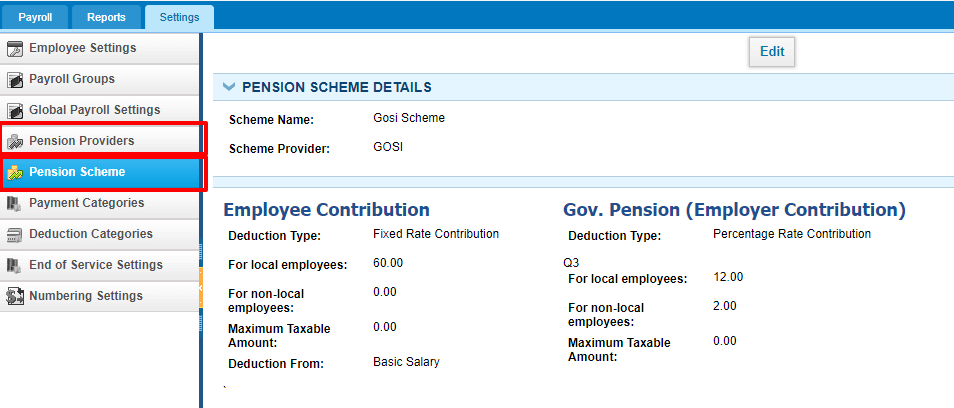
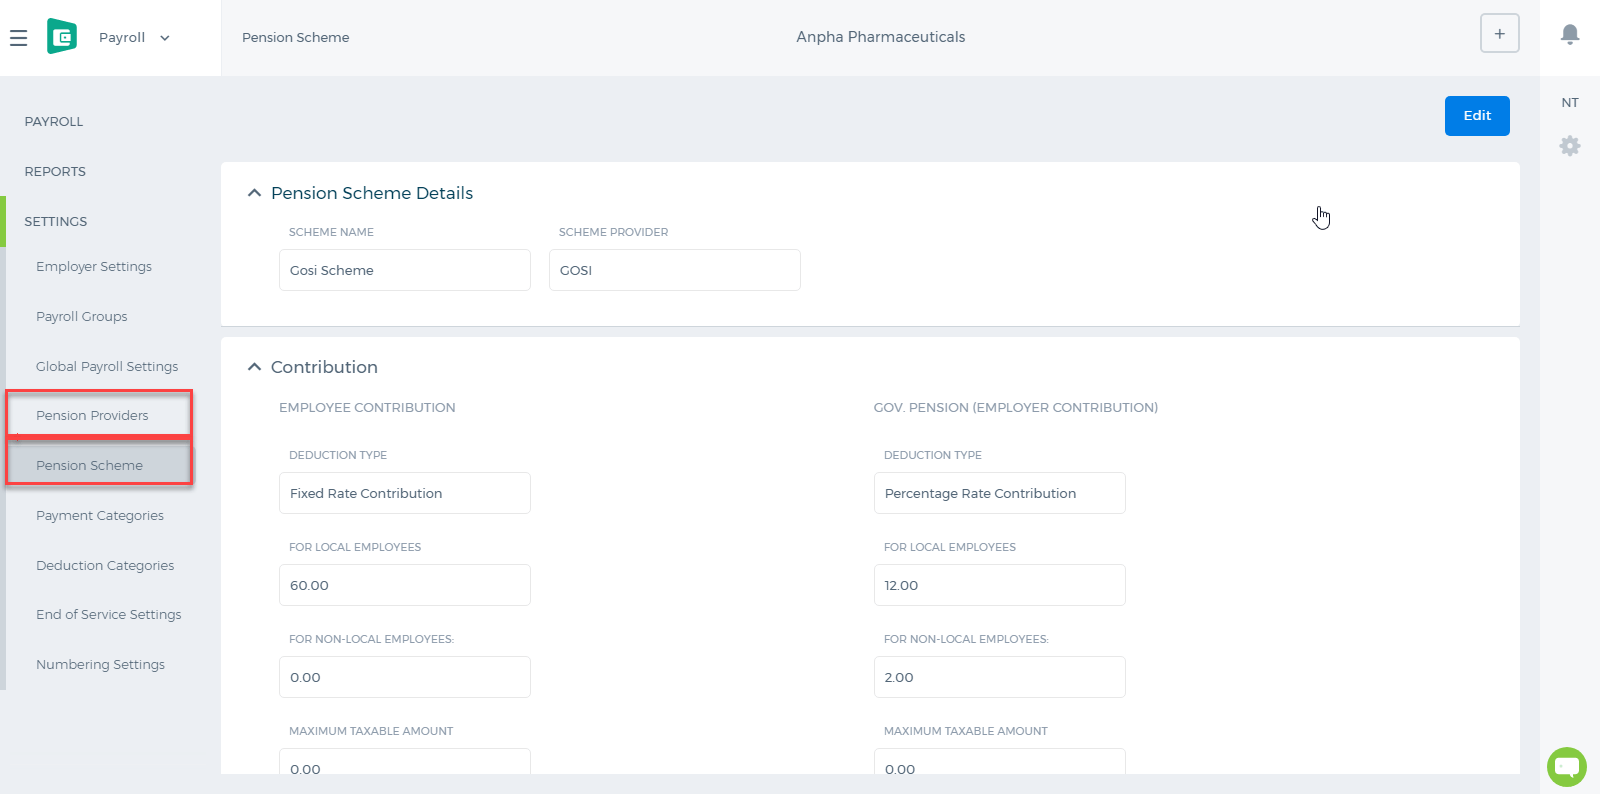 While setting up the Pension Scheme, choose the Provider's name and enter the Scheme name. Then enter the Contribution details per employee and per employer.
Local Employees are identified by their Country, Passport Number and Passport Issue By fields available at HRMS>>Edit Employee Profile page. If their country is the same as employer's country, then they will use the pension scheme for local employees. The pension scheme can be based on percentage or a fixed amount. If it is a percentage, you need to set up from which allowance/salary it should be deducted from: Basic Salary or Basic Salary + Allowances.
After the scheme is correctly set up, it will be deducted from employee's payruns.
While setting up the Pension Scheme, choose the Provider's name and enter the Scheme name. Then enter the Contribution details per employee and per employer.
Local Employees are identified by their Country, Passport Number and Passport Issue By fields available at HRMS>>Edit Employee Profile page. If their country is the same as employer's country, then they will use the pension scheme for local employees. The pension scheme can be based on percentage or a fixed amount. If it is a percentage, you need to set up from which allowance/salary it should be deducted from: Basic Salary or Basic Salary + Allowances.
After the scheme is correctly set up, it will be deducted from employee's payruns.
Run Time Calculation of Exchange gain/loss
Run Time Calculation of Exchange gain/loss
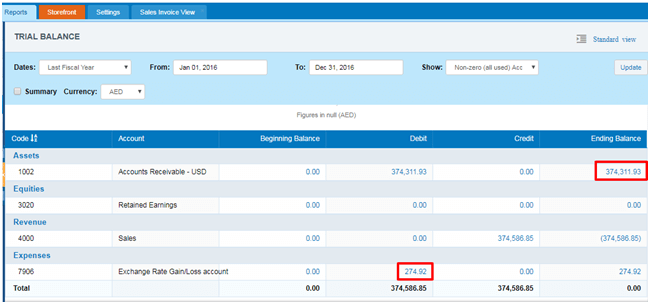
The calculation is explained with an example below.
Company base currency is AED.
Trail Balance
Ending balance
Accounts Receivable in foreign currency
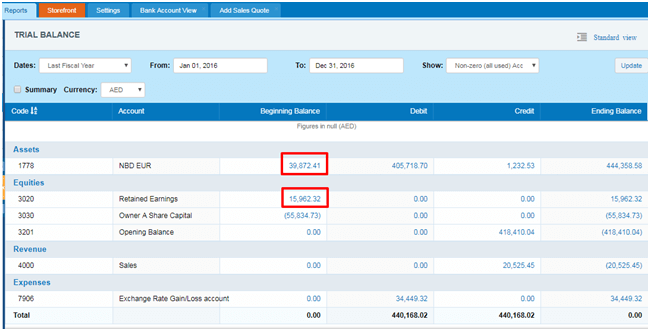
Trial balance report is generated for Jan 1, 2016 to Dec 31, 2016.
Let’s say Accounts Receivable – USD account has balance at the end of reporting period (Dec 31, 2016) -102,000.00
This amount will be converted to base currency (operating currency) with the rate of reporting end date. Exchange Rate as of Dec 31, 2016 – 1 AED = 0.2725 USD
So, Accounts Receivable – USD account’s balance in base currency (AED) will be – 102,000.00/0.2725 = 374,311.93
Next, this amount will be compared to the base equivalent of the Accounts Receivable – USD account’s USD amount. This amount will be calculated from all historical transactions. Base amount is 374,586.85
Then, system will calculate gain or loss subtracting Base Amount from Converted amount: 374,311.93 – 374,586.85 = 274.92.
This amount (274.92) will be shown as loss in Exchange Rate Gain/Loss account.
 And, if Accounts Receivable – USD account has balance for the previous period (Dec 31, 2015). This amount will be converted to base currency with rate at the end date of previous reporting period. It will be Dec 31, 2015 in our case. And if converted amount is different from the amount in base currency, gain or loss will be recorded to Retained Earning account.
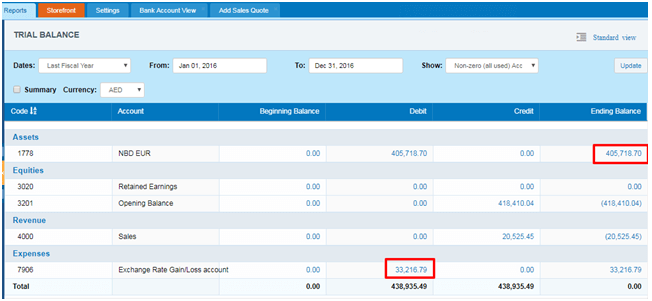
Foreign Bank Account Revaluation
Trial balance report is generated for Jan 1, 2016 to Dec 31, 2016.
Let’s say NBD EUR bank account has balance at the end of reporting period (Dec 31, 2016) -105,000.00
This amount will be converted to base currency (operating currency) with the rate of reporting end date. Exchange Rate as of Dec 31, 2016 – 1 AED = 0.2588 USD
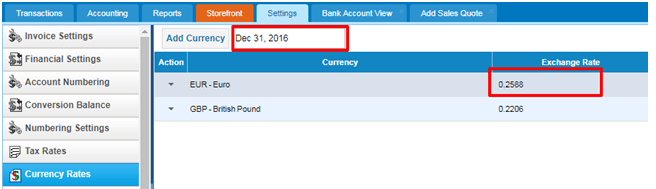 So, NBD EUR bank account’s balance in base currency (AED) will be – 105,000.00/0.2588 = 405,718.70
Next, this amount will be compared to the base equivalent of the NBD EUR bank account’s EUR amount. This amount will be calculated from all historical transactions. Base amount is 438,935.49
Then, system will calculate gain or loss subtracting Base Amount from Converted amount: 405,718.70 – 438,935.49 = - 33,216.79.
This amount (- 33,216.79) will be shown as loss in Exchange Rate Gain/Loss account.
So, NBD EUR bank account’s balance in base currency (AED) will be – 105,000.00/0.2588 = 405,718.70
Next, this amount will be compared to the base equivalent of the NBD EUR bank account’s EUR amount. This amount will be calculated from all historical transactions. Base amount is 438,935.49
Then, system will calculate gain or loss subtracting Base Amount from Converted amount: 405,718.70 – 438,935.49 = - 33,216.79.
This amount (- 33,216.79) will be shown as loss in Exchange Rate Gain/Loss account.
 And, if NBD EUR bank account has balance for the previous period (Dec 31, 2015). This amount will be converted to base currency with rate at the end date of previous reporting period. It will be Dec 31, 2015 in our case.
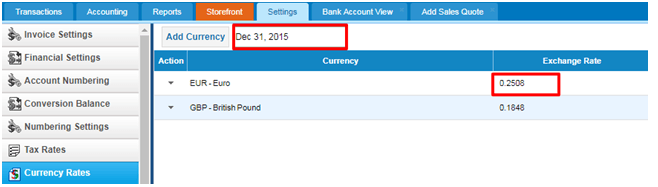
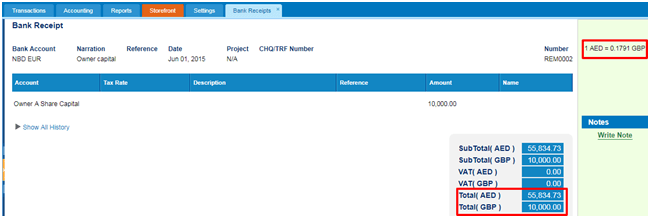 EUR amount at the end of 2015 is 10,000.00 EUR. This amount will be converted to base currency with the rate of at the end date of previous reporting period: 10,000.00/0.2508 = 39,872.41
And, if the converted amount is different from the amount in base currency, gain or loss will be recorded to Retained Earning account.
39,872.41 – 55,834.73 = 15,962.32
15,962.32 - this is loss amount reflected in Retained Earnings.
EUR amount at the end of 2015 is 10,000.00 EUR. This amount will be converted to base currency with the rate of at the end date of previous reporting period: 10,000.00/0.2508 = 39,872.41
And, if the converted amount is different from the amount in base currency, gain or loss will be recorded to Retained Earning account.
39,872.41 – 55,834.73 = 15,962.32
15,962.32 - this is loss amount reflected in Retained Earnings.
Exporting to Excel and PDF
Exporting to Excel and PDF
The export option is available in almost all lists. The option is available at the end of the list (bottom right-hand side).
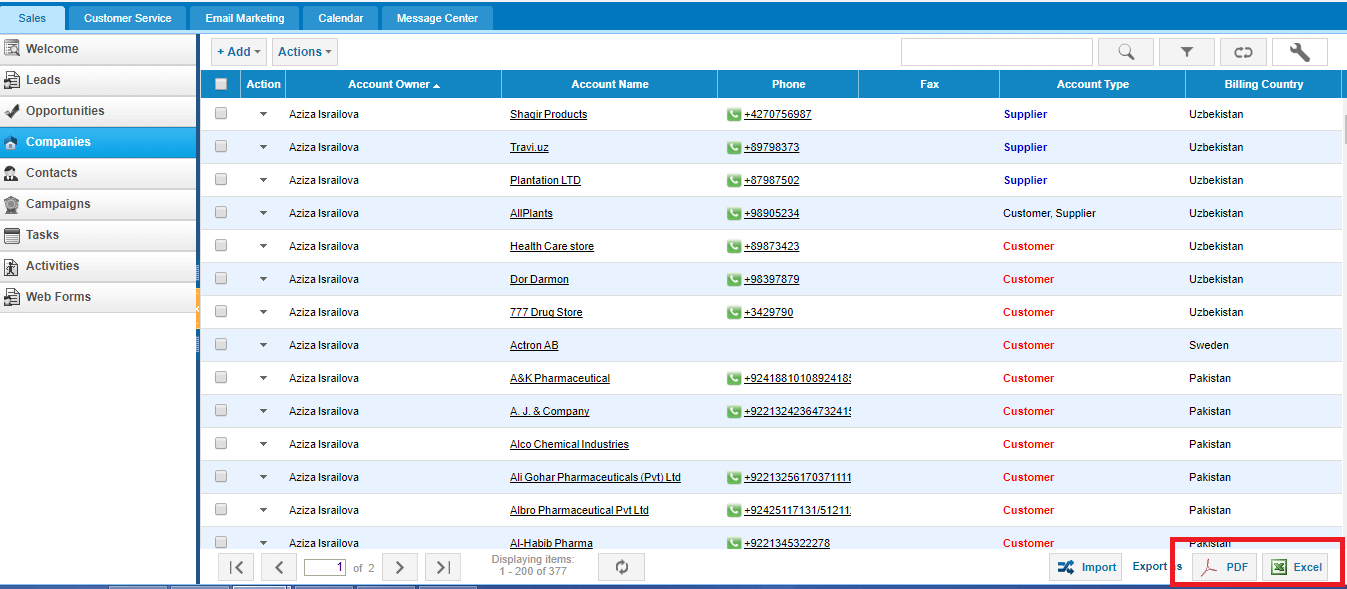
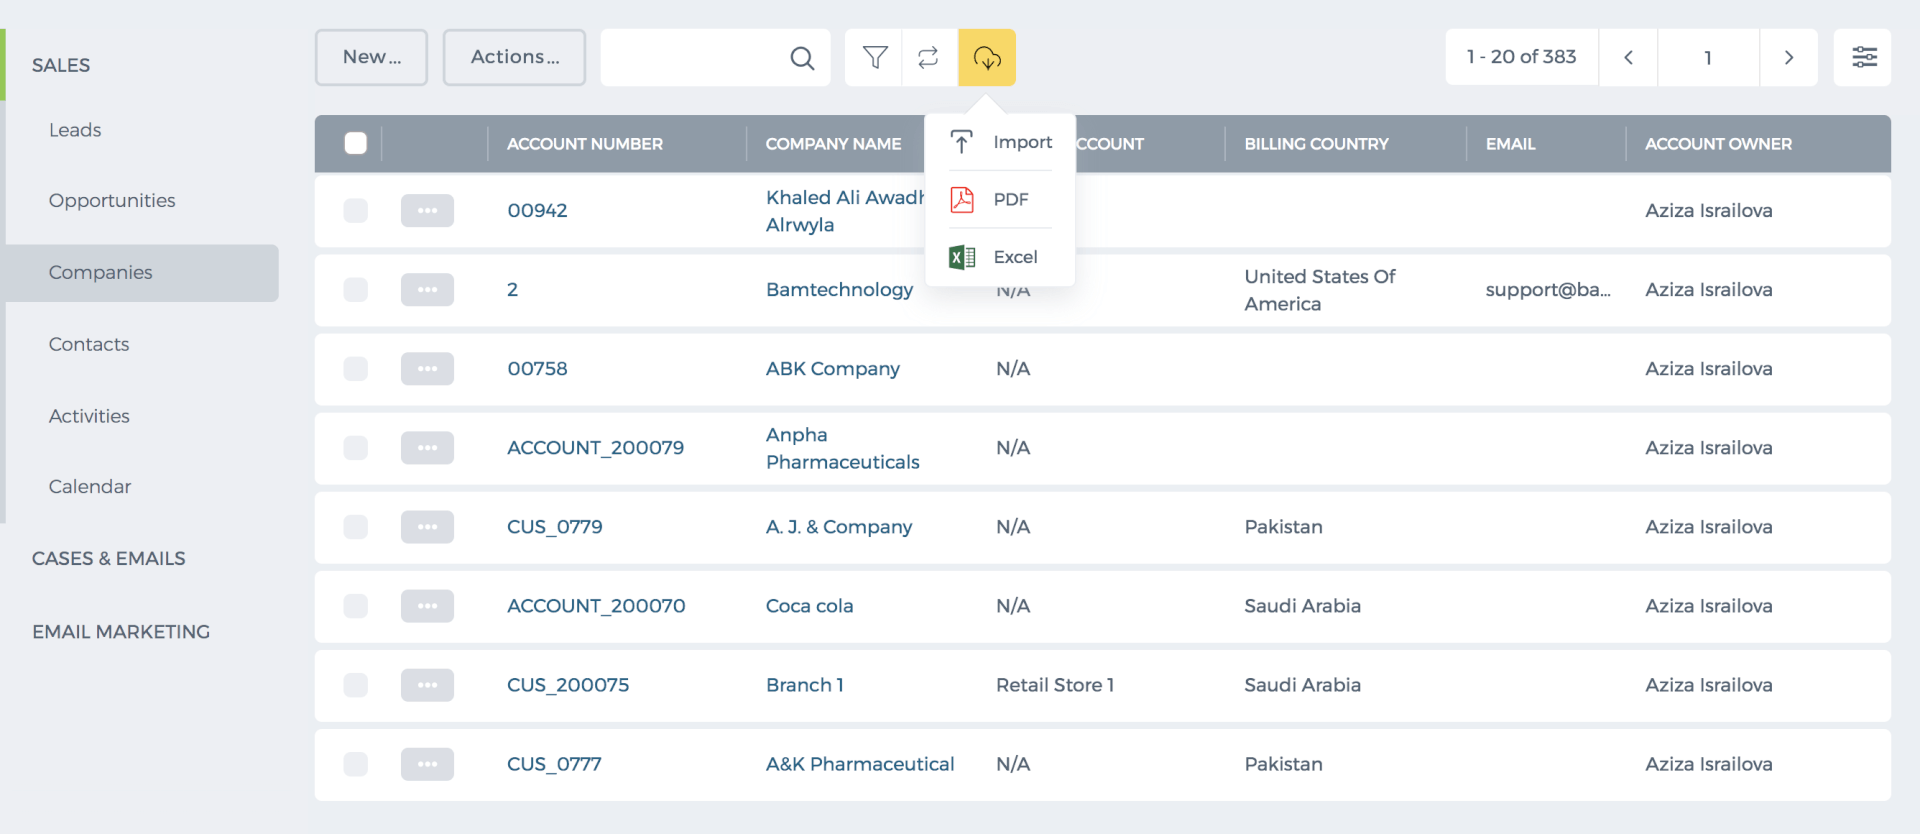 The list shows up to 200 items per page. You can view the number of pages and the total number of items in the bottom of the page.
If you export the list from the first page, the system export all items. If the export is clicked from 2,3, and further pages, the system export all next items starting from the page you are on.
For example, I have 377 companies and when I export the list from the first page, the Excel and PDF shows all 377.
However, when I go to the second page and export the list, the system export all next items (remaining 177).
Thus, if you would like to export all items, then you need to go to the first page and then click Export.
Export Limit
If you list includes more than 1000 items, you cannot export all items into one Excel of PDF because each exported file can have up to 1000 items.
For example, I have 2000 companies and I want to export all. So from the first page, I can export 1000 and then I go to the page number 6 and export the rest 1000 items.
You can request the support team to increase the export limit to ease your processes. Please contact support@kpi.com.
The list shows up to 200 items per page. You can view the number of pages and the total number of items in the bottom of the page.
If you export the list from the first page, the system export all items. If the export is clicked from 2,3, and further pages, the system export all next items starting from the page you are on.
For example, I have 377 companies and when I export the list from the first page, the Excel and PDF shows all 377.
However, when I go to the second page and export the list, the system export all next items (remaining 177).
Thus, if you would like to export all items, then you need to go to the first page and then click Export.
Export Limit
If you list includes more than 1000 items, you cannot export all items into one Excel of PDF because each exported file can have up to 1000 items.
For example, I have 2000 companies and I want to export all. So from the first page, I can export 1000 and then I go to the page number 6 and export the rest 1000 items.
You can request the support team to increase the export limit to ease your processes. Please contact support@kpi.com.
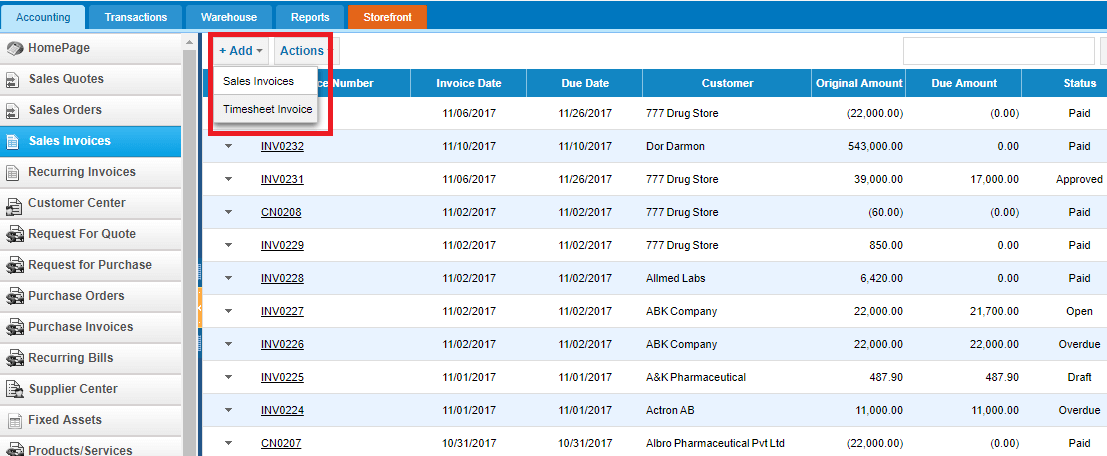
Timesheet Invoice
Timesheet Invoice
Timesheet Invoice is used to bill customers based on employees worked hours on customers' projects.
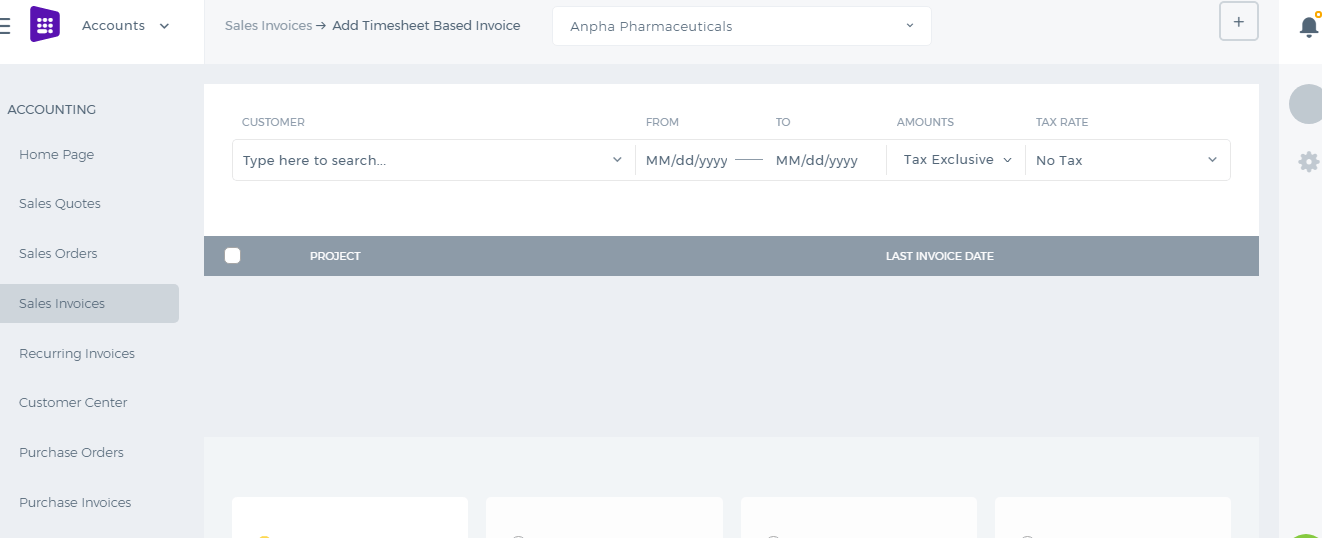
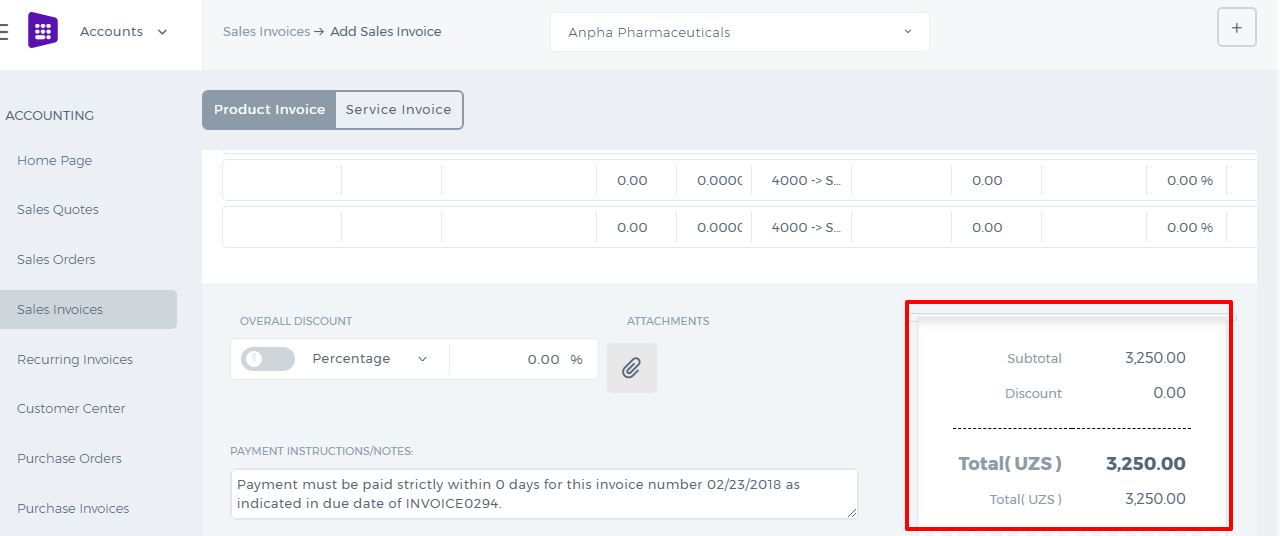
Timesheet invoice can be added to Accounts>>Sales Invoices>>Add>>Timesheet Invoice as shown in the below image:
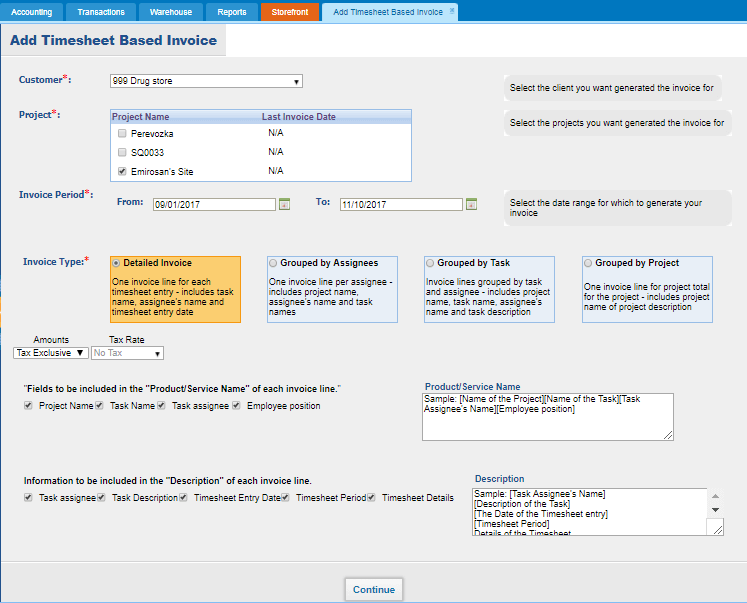
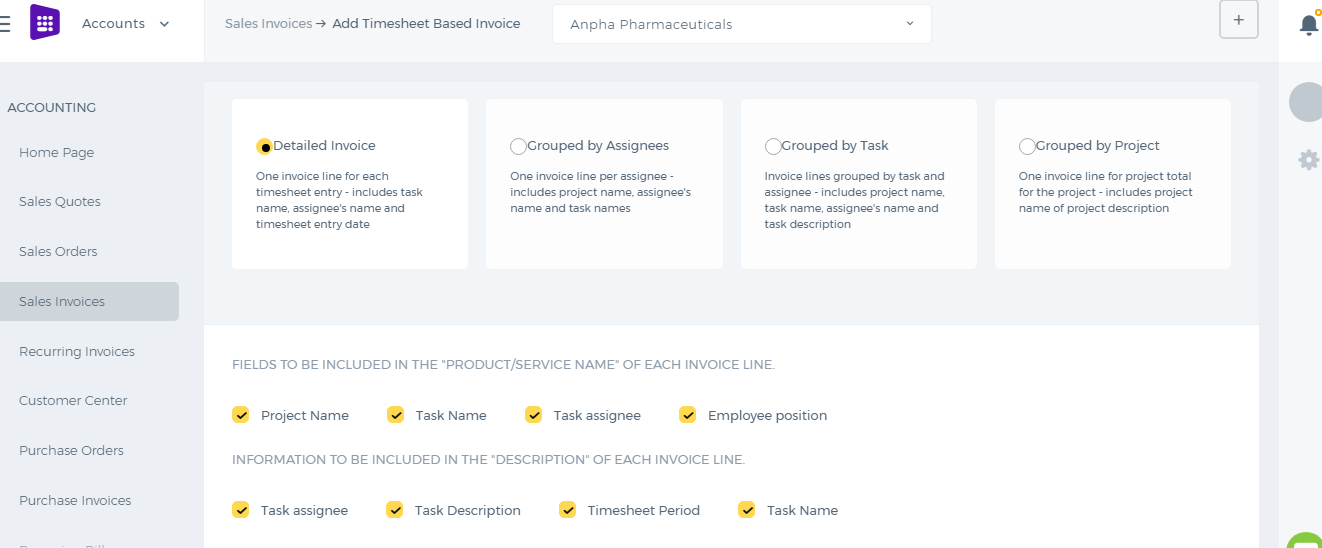
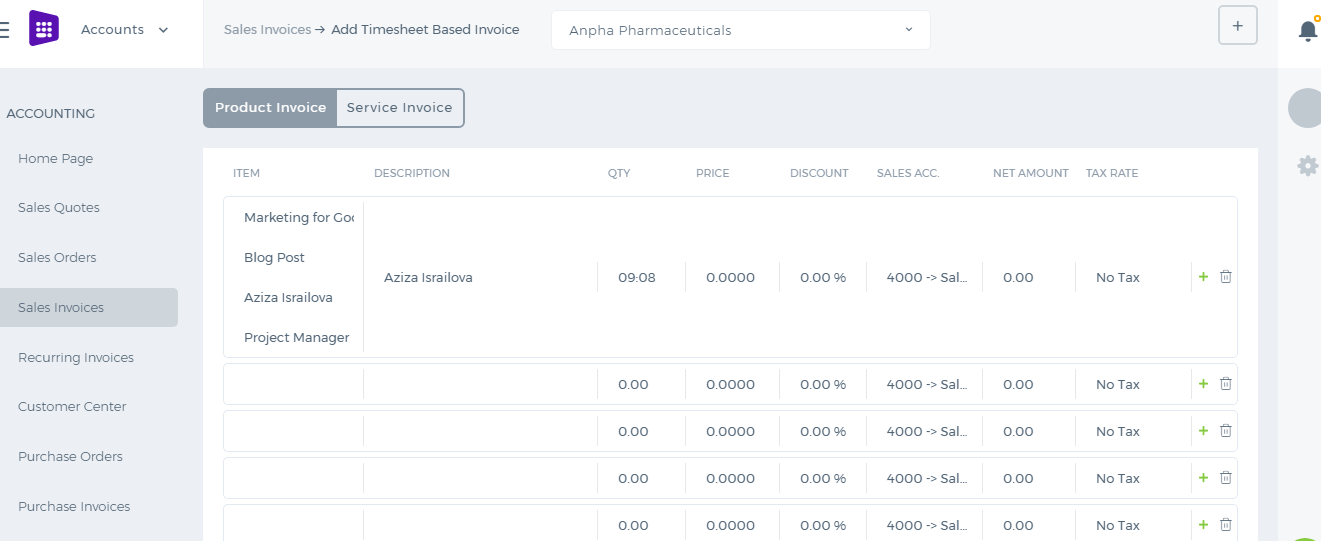
 While adding the timesheet invoice, choose the customer, projects of the customer, invoice period, invoice type and check the fields to be available in the invoice line item field and description field then click Continue.
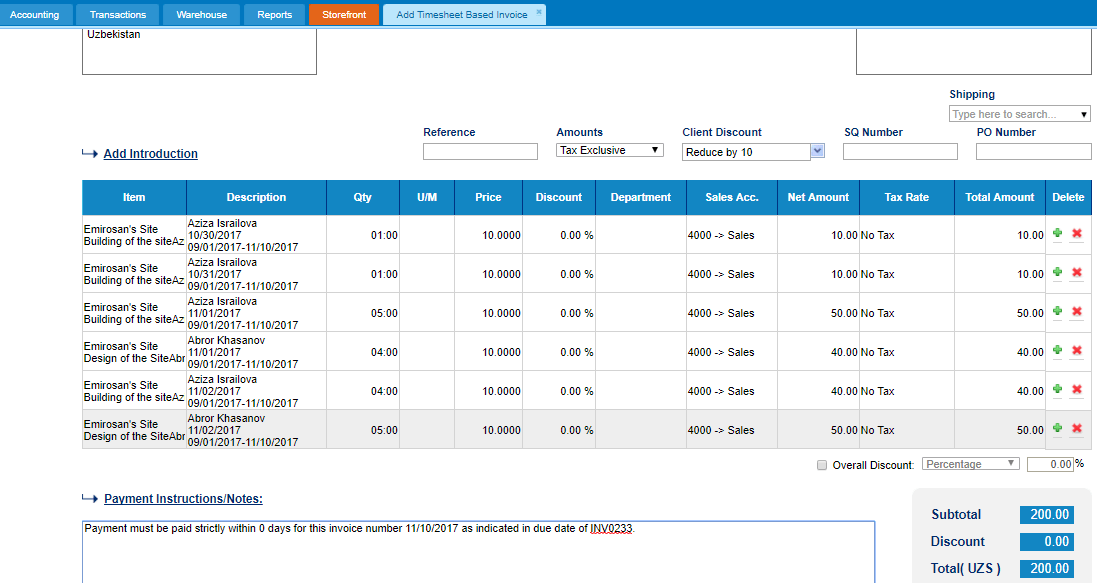
 The Timesheet Invoice populates all the employees approved hours in the Quantity field. The Price field shows the customer charge rate of the project per each employee.
 The invoice can be saved as Draft, Approved or Open. When you click “Save & Approve”, the status of the invoice changes to Approved. When you save and email the invoice to your client, the status changes to “Open”. Whenever the invoice due date is exceeded, the invoice status changes to “Overdue”.
When you approve an email, the client receives the invoice as an attachment in the PDF form.
For any Overdue, Approved or Open invoices, you can receive payments.
The invoice can be saved as Draft, Approved or Open. When you click “Save & Approve”, the status of the invoice changes to Approved. When you save and email the invoice to your client, the status changes to “Open”. Whenever the invoice due date is exceeded, the invoice status changes to “Overdue”.
When you approve an email, the client receives the invoice as an attachment in the PDF form.
For any Overdue, Approved or Open invoices, you can receive payments.
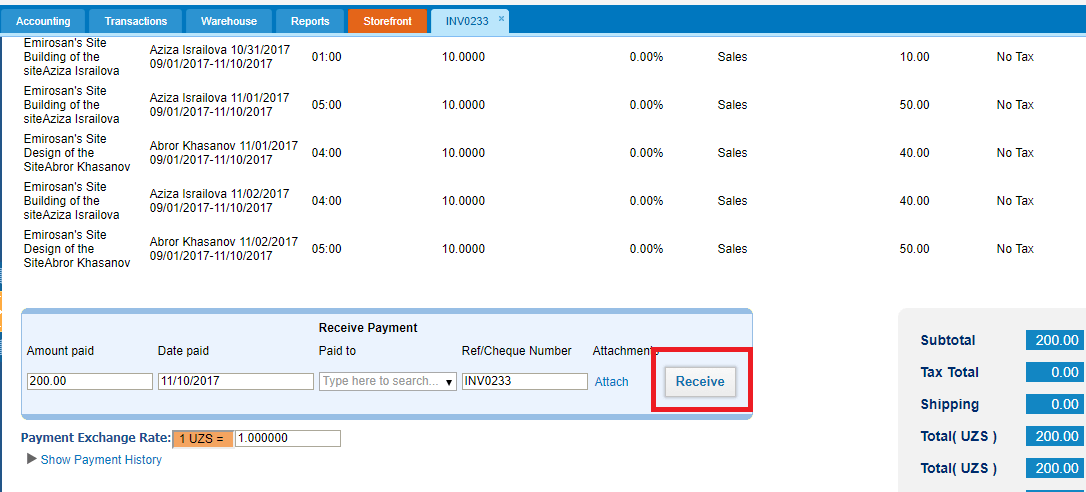
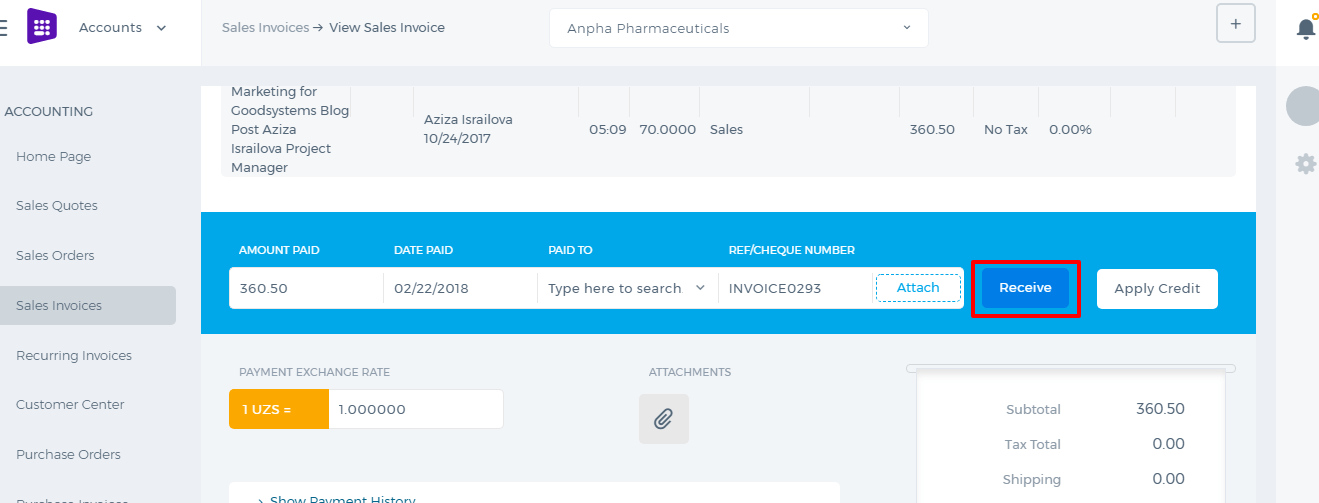 Enter the amount paid, date paid and the account the payment is made to. Then click the Receive button. The invoice status changes to Paid.
The PDF version of the invoice can be generated either from the Actions dropdown in the listing page or from the Invoice summary.
Enter the amount paid, date paid and the account the payment is made to. Then click the Receive button. The invoice status changes to Paid.
The PDF version of the invoice can be generated either from the Actions dropdown in the listing page or from the Invoice summary.
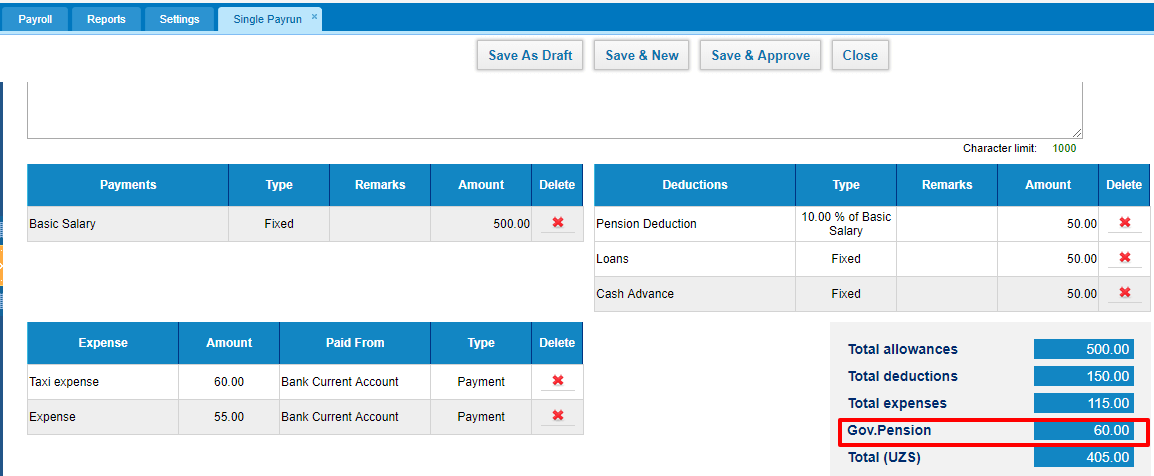
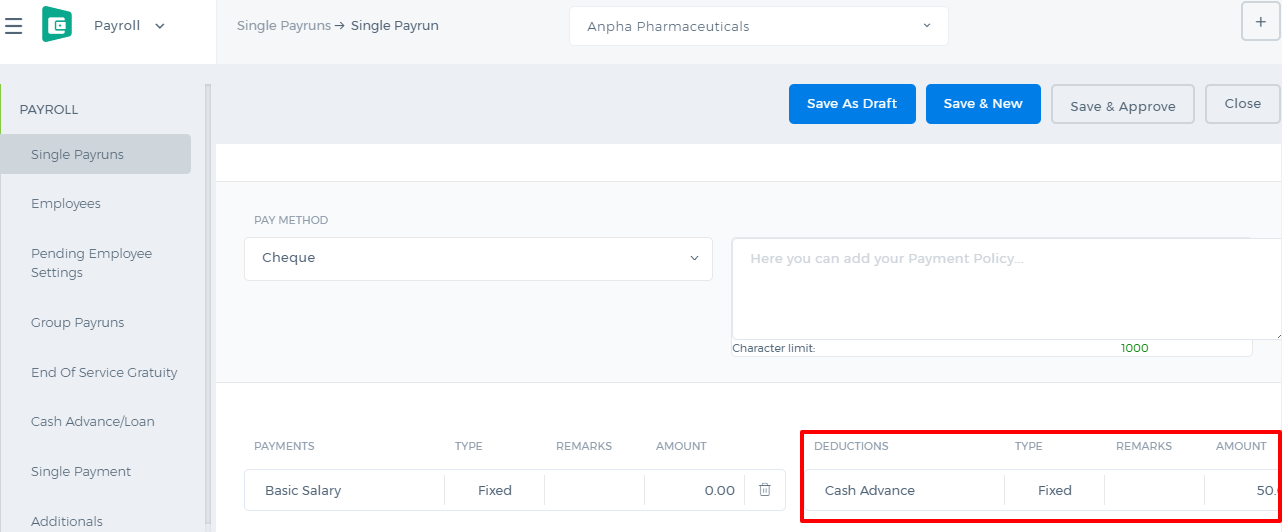
Cash Advance
Cash Advance/Loans
Cash advances can be requested by employees themselves from their Profile under Humans or they can be created by other power users on behalf of other employees from the Payroll section.
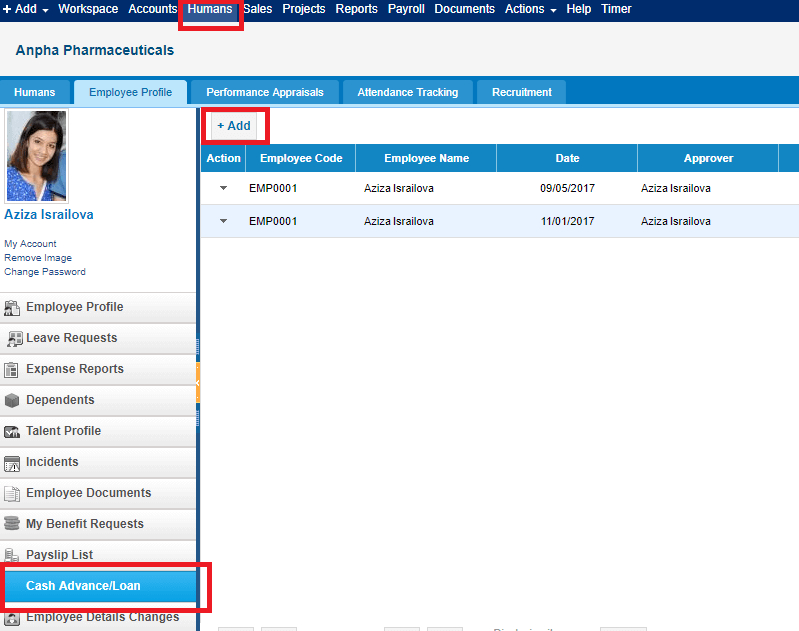
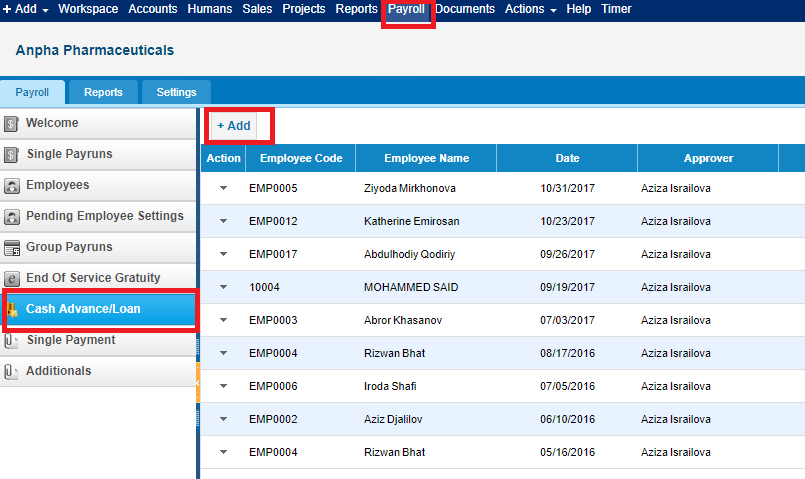
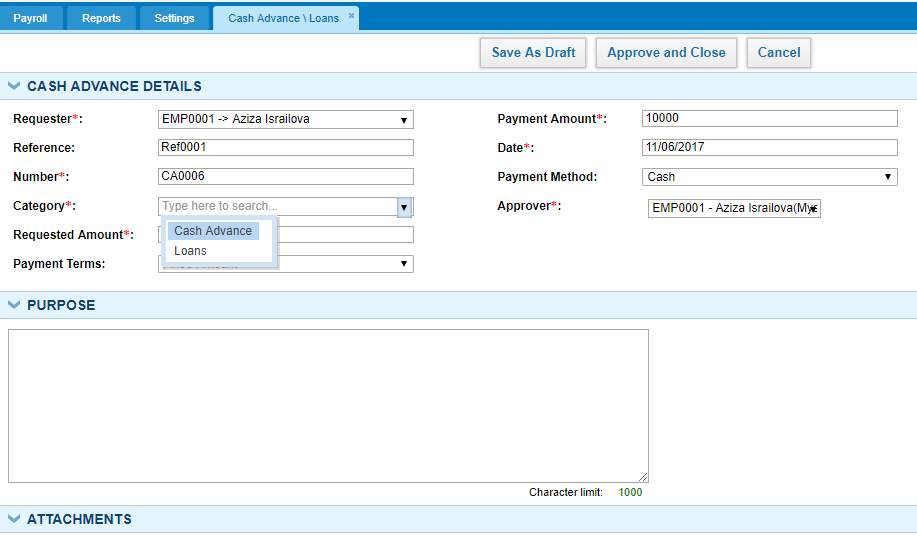
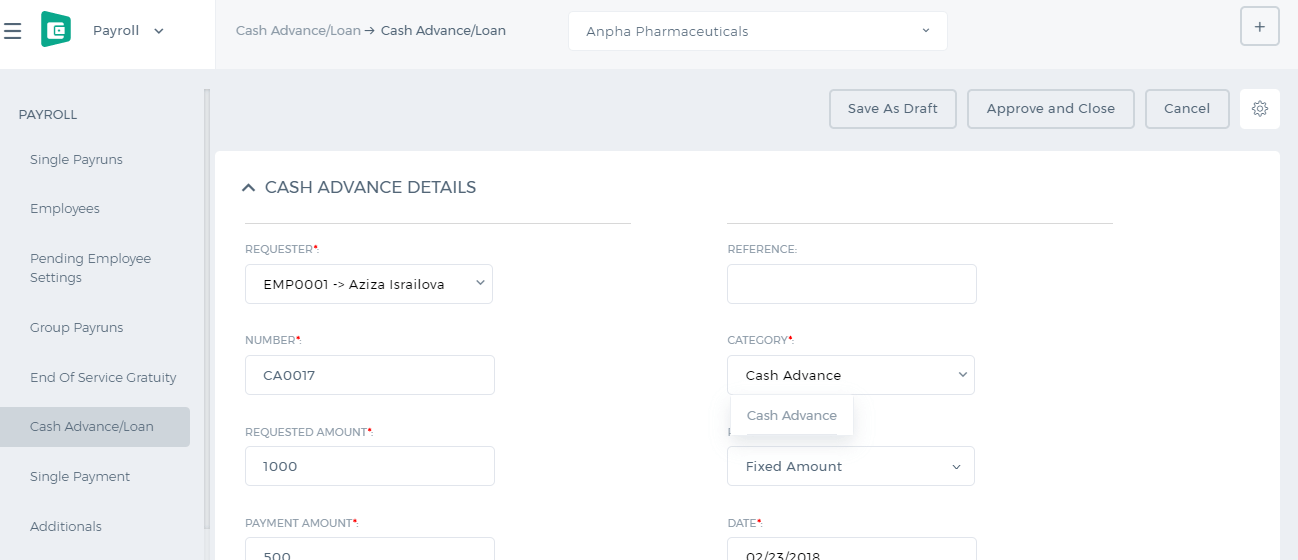
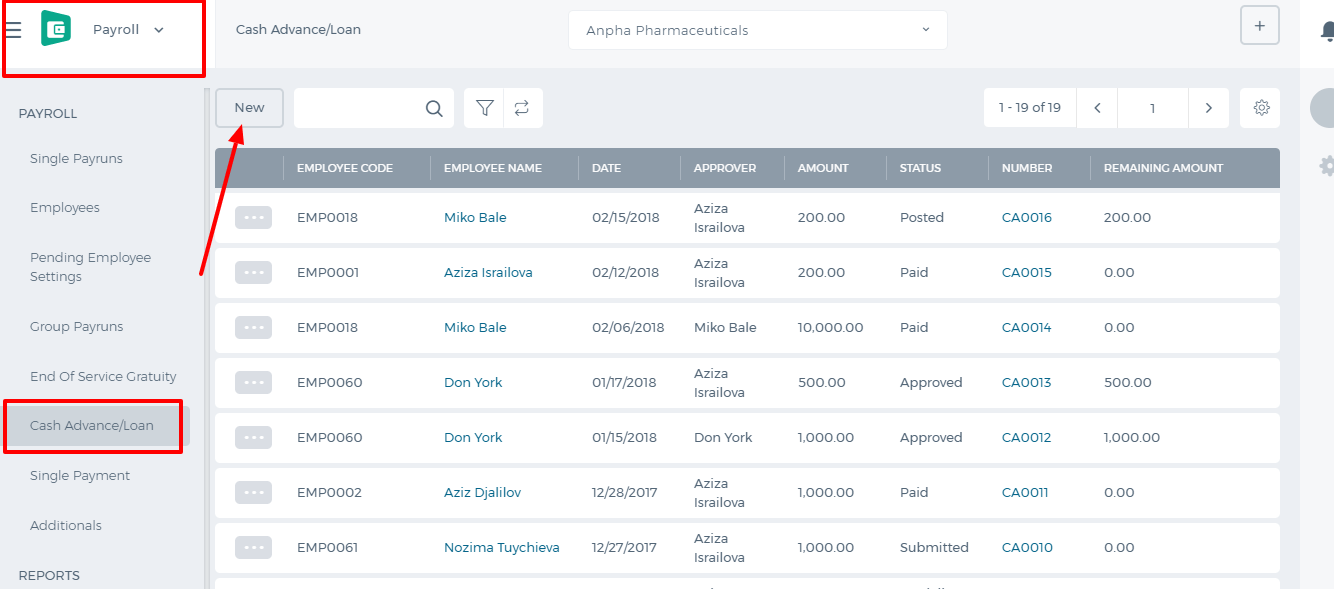 Adding Cash Advance
Requester is the person who is asking for the cash advance.
Category is the deduction category whether it is cash advance or loan.
Requested amount is the full amount the employee is requesting.
Payment amount is the deduction amount which is deducted from each recurring payrun.
Date is the requested date.
Approver is the manager who should approve/reject the cash advance.
Adding Cash Advance
Requester is the person who is asking for the cash advance.
Category is the deduction category whether it is cash advance or loan.
Requested amount is the full amount the employee is requesting.
Payment amount is the deduction amount which is deducted from each recurring payrun.
Date is the requested date.
Approver is the manager who should approve/reject the cash advance.
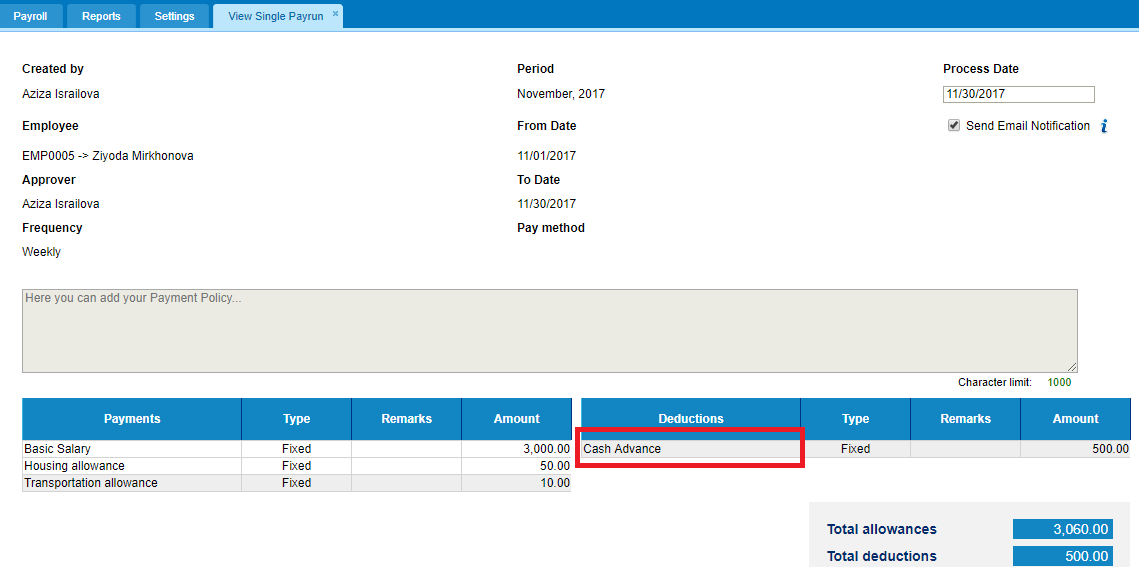
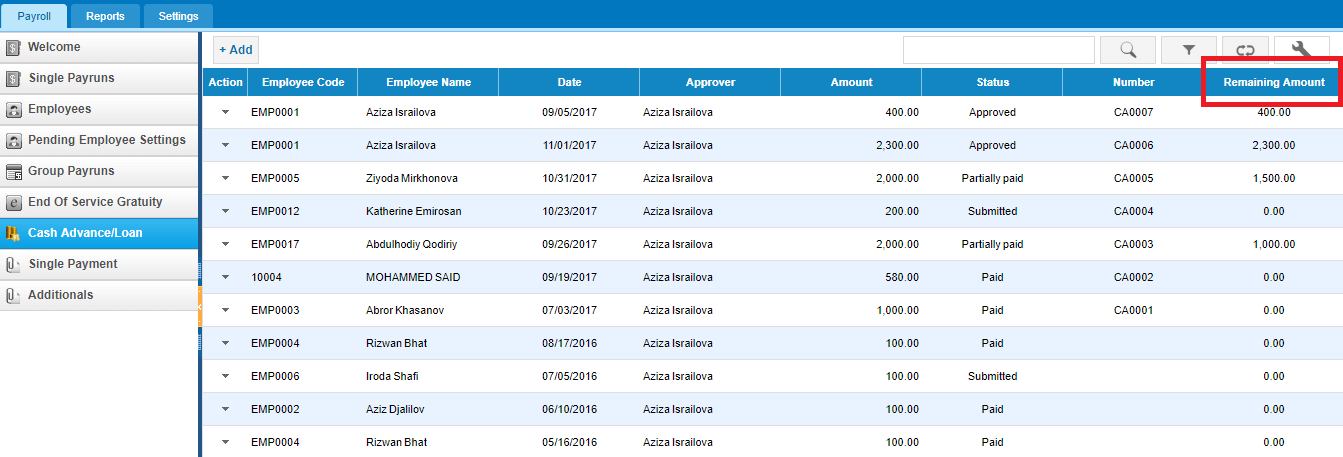
 After the cash advance is approved, it will be deducted from the next payrun.
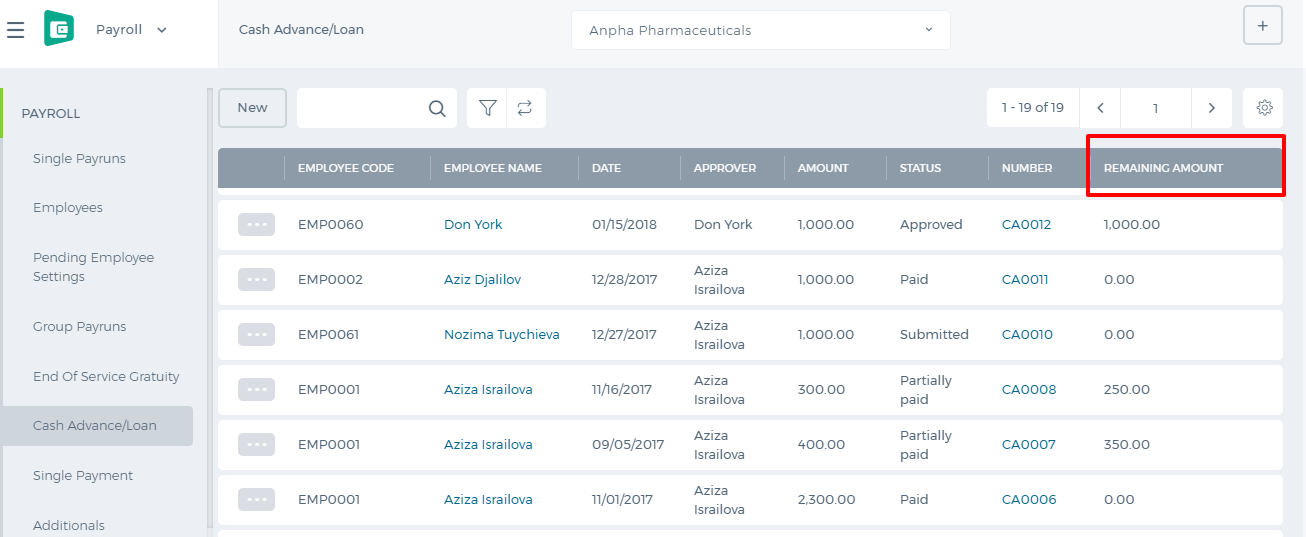
 The remaining payments of the cash advance can be viewed from the cash advance listing under the Remaining Amount column.
 If you want to make the payment for the cash advance without deducting it from each payrun, you can open the cash advance and choose the Paid From account and Cash Advance account and Post.
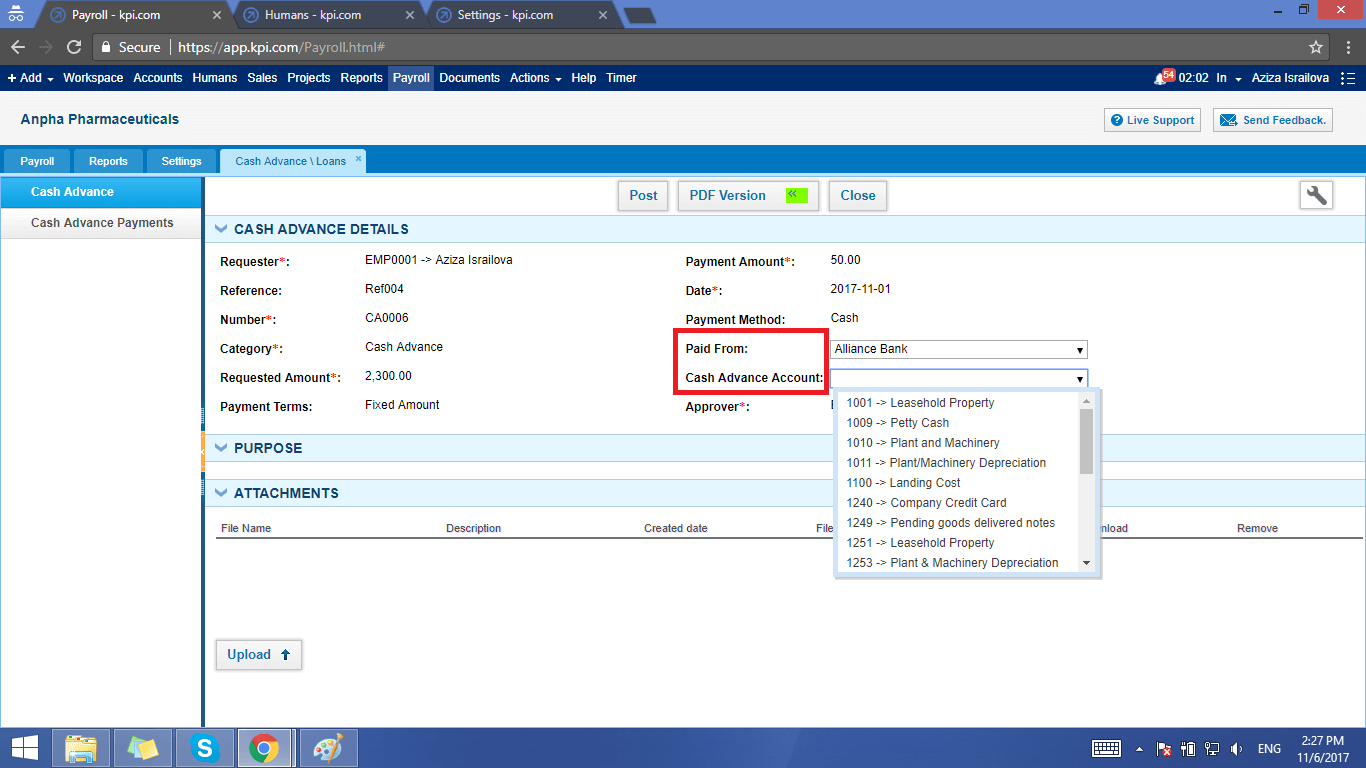
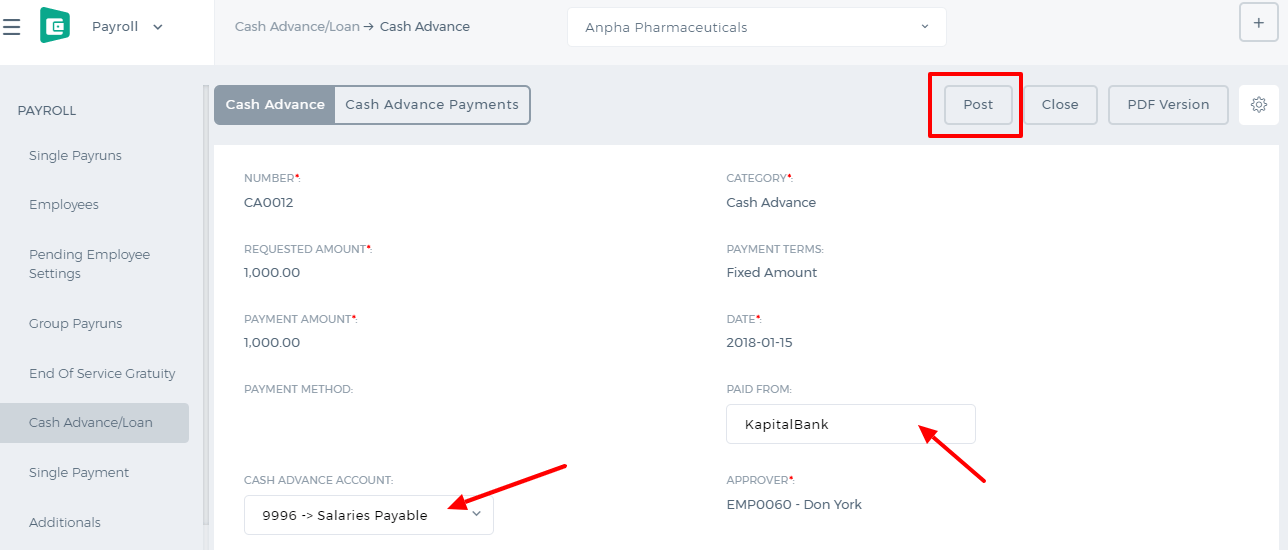 The status of the cash advance changes to Posted. Then you can receive the payment by clicking the Payment button and entering the amount, account and date.
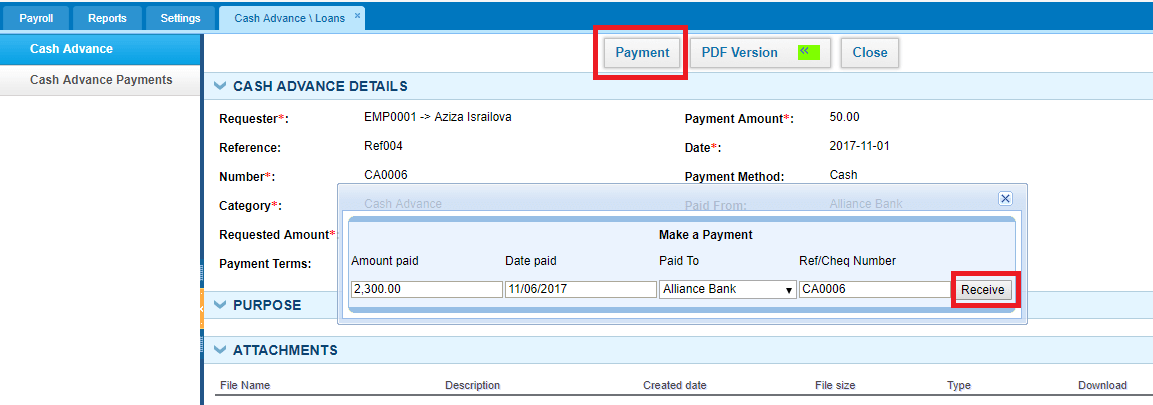 The status of the cash advance then changes to Paid.
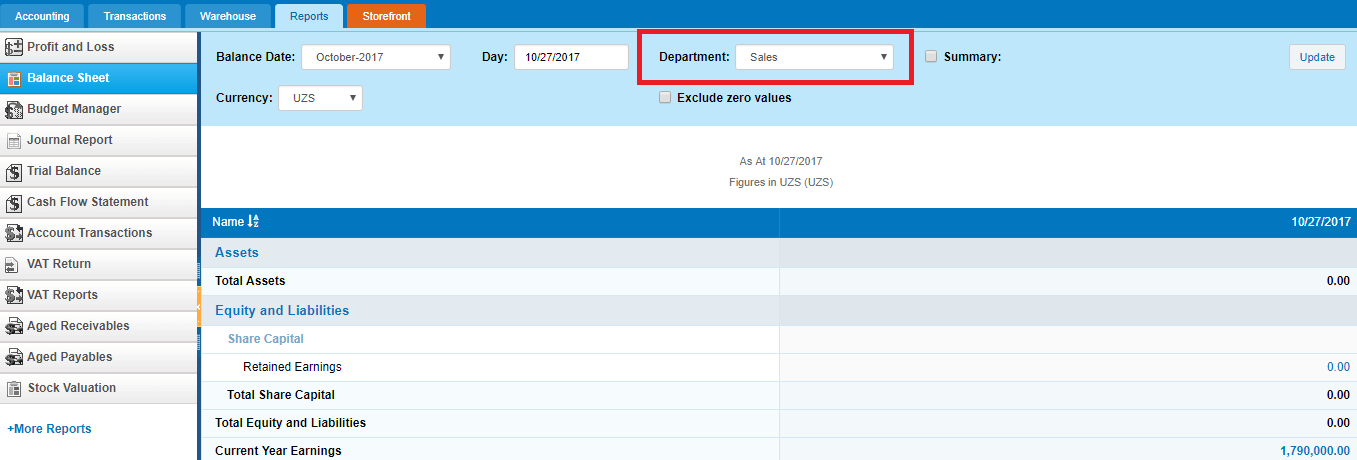
Budget per Department
Budget Per Department. Cost and Profit Centers
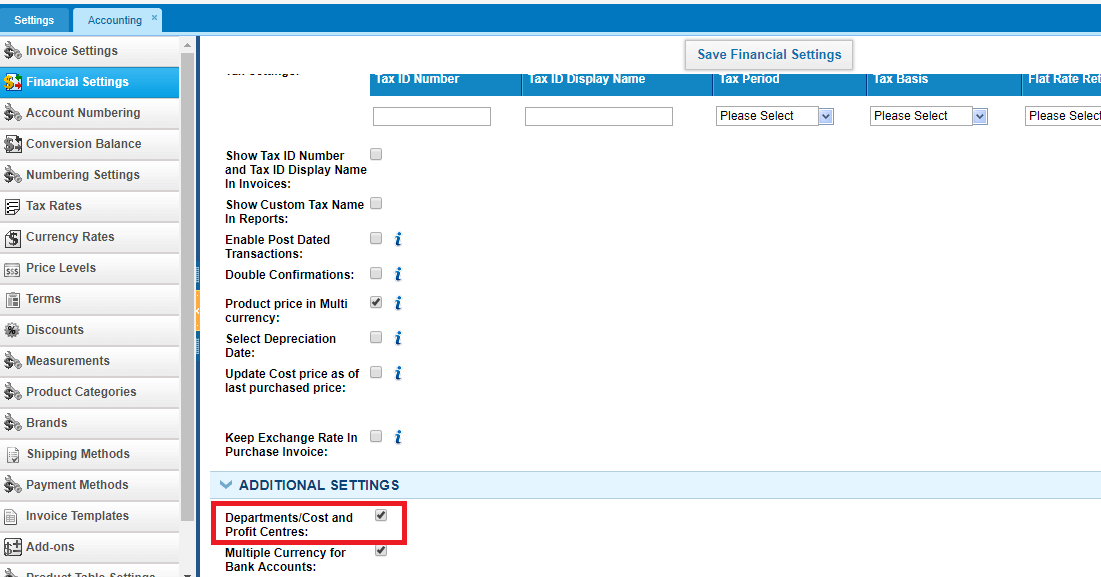
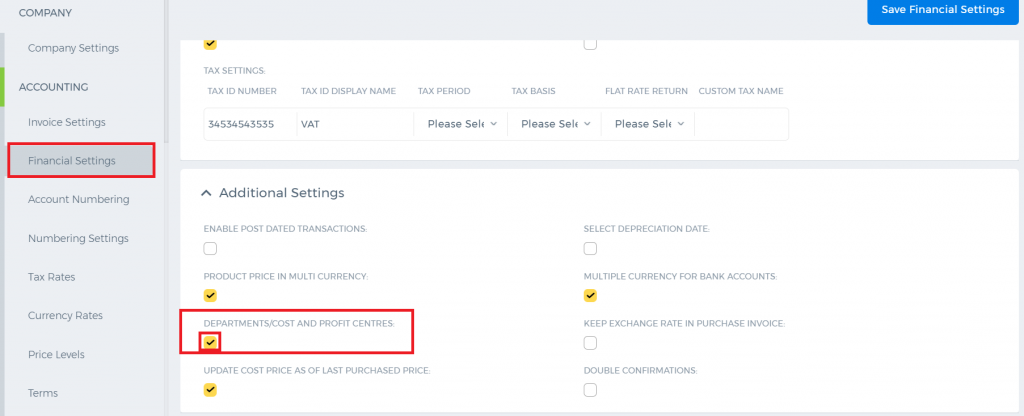
If you have sister companies and franchises and want to manage the financial reports per each sub-company separately, then you are recommended to use the Budget Per Department feature.
This feature is enabled from Settings>>Accounting>>Financial Settings. Check the box Departments/Cost and Profit Centres and save the settings.
 Before allocating any transactions to different sub-companies(departments), make sure you have all the departments set in the Humans module.
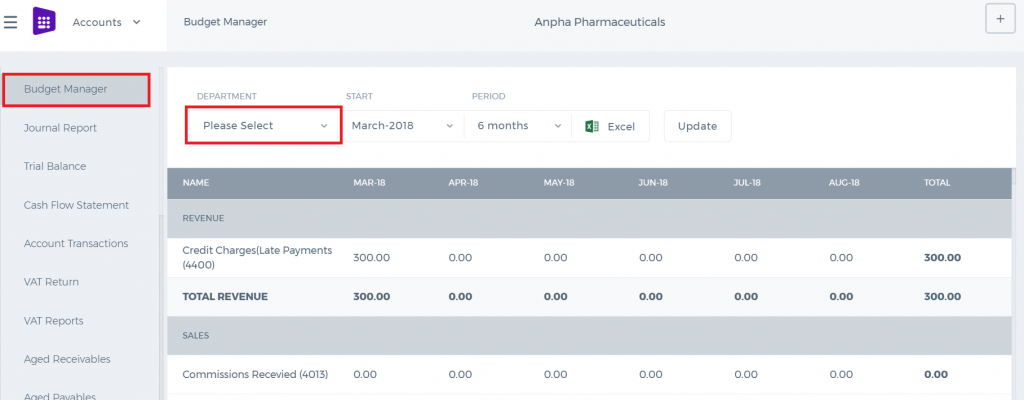
You can save your forecast budget per each department in the Budget Manager available from the Accounting reports.
Before allocating any transactions to different sub-companies(departments), make sure you have all the departments set in the Humans module.
You can save your forecast budget per each department in the Budget Manager available from the Accounting reports.

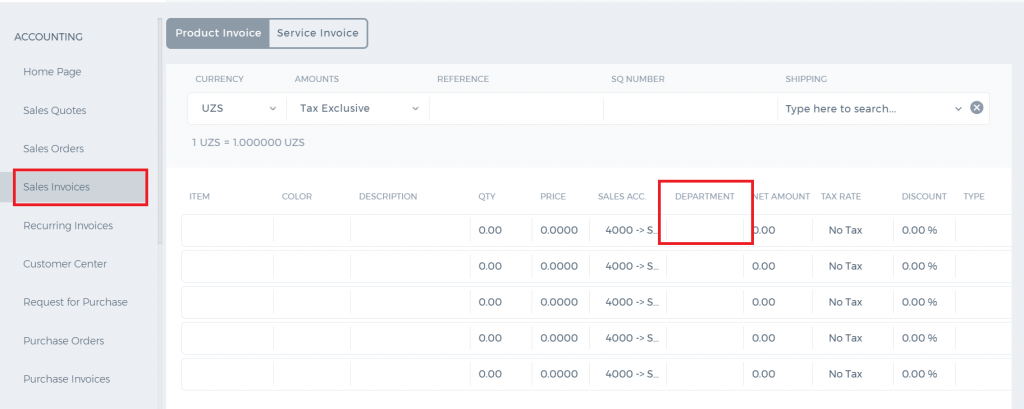
 You can allocate transactions to different departments per line in the sales invoice, purchase order, expenses, purchase invoice, spend/receive money, manual transaction forms.

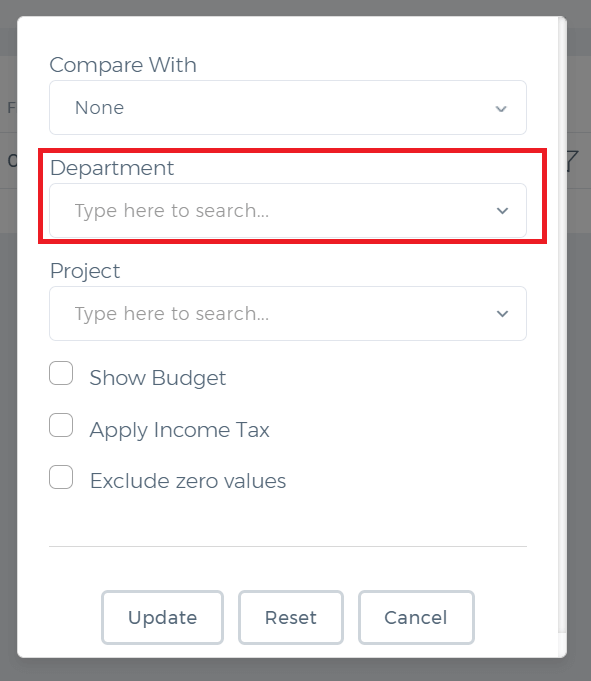
 From the allocated income and expenses, per department Profit and Loss report can be generated and it can also be compared with the budget using the "Show Budget" checkbox.
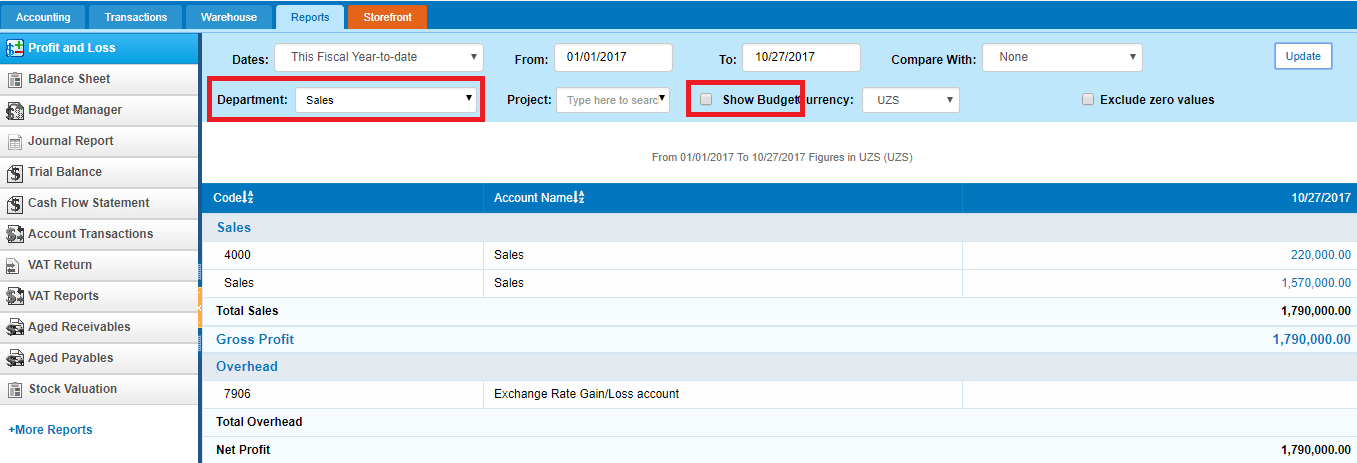

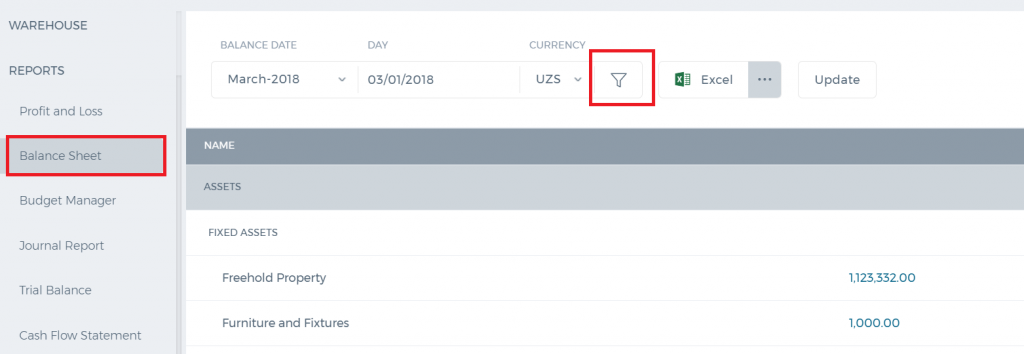
 Balance sheet report can also be generated per department.
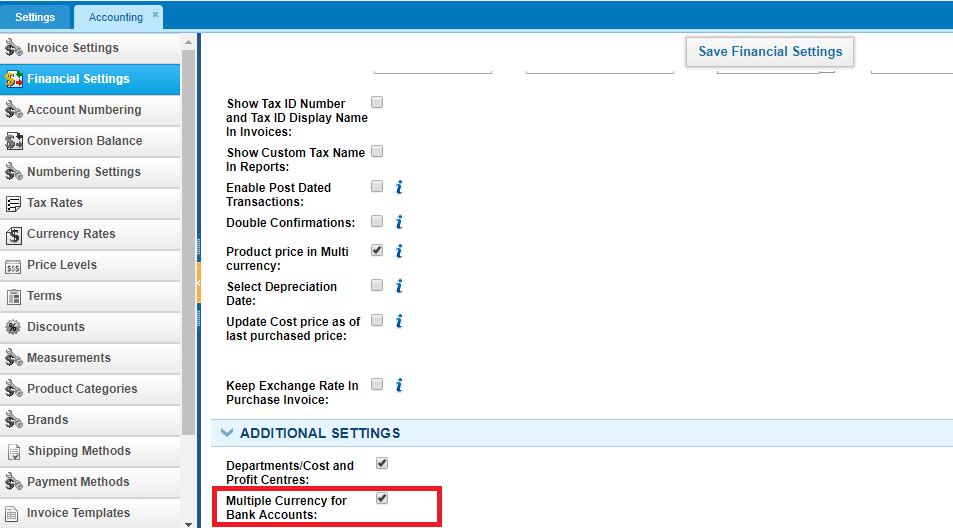
Foreign Currency Bank
Foreign Currency Bank
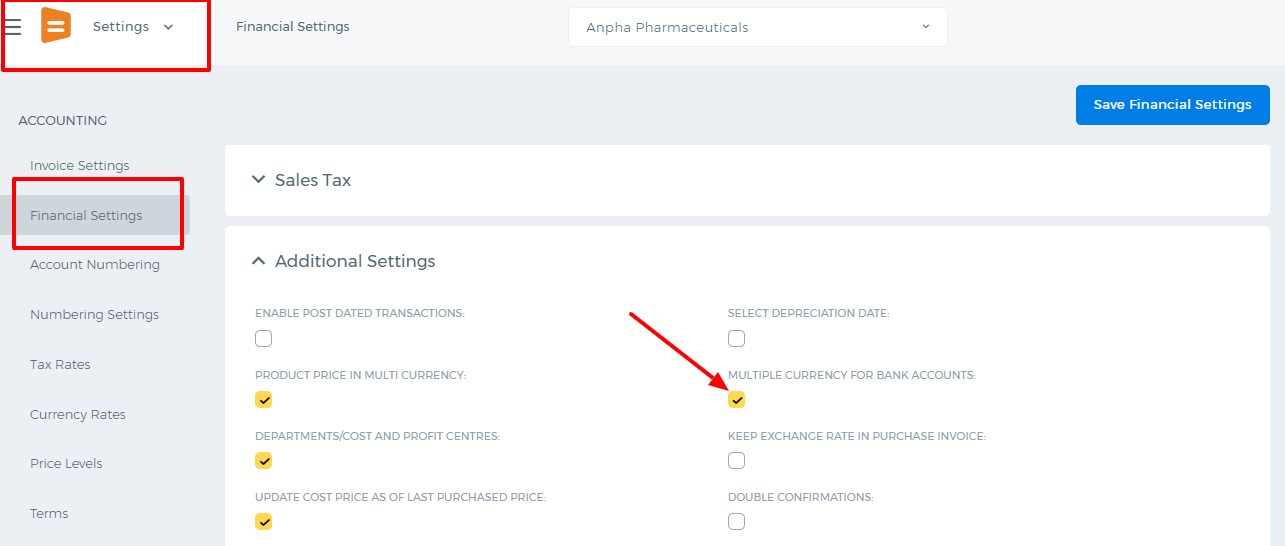
If you have a foreign currency account and if you want to manage your transactions in that currency, then you are welcome to use the Bank Foreign Currency feature in the application.
To enable the feature, go to Settings>>Accounting>>Financial Settings and check "Multiple Currency for Bank Accounts" and save the changes.
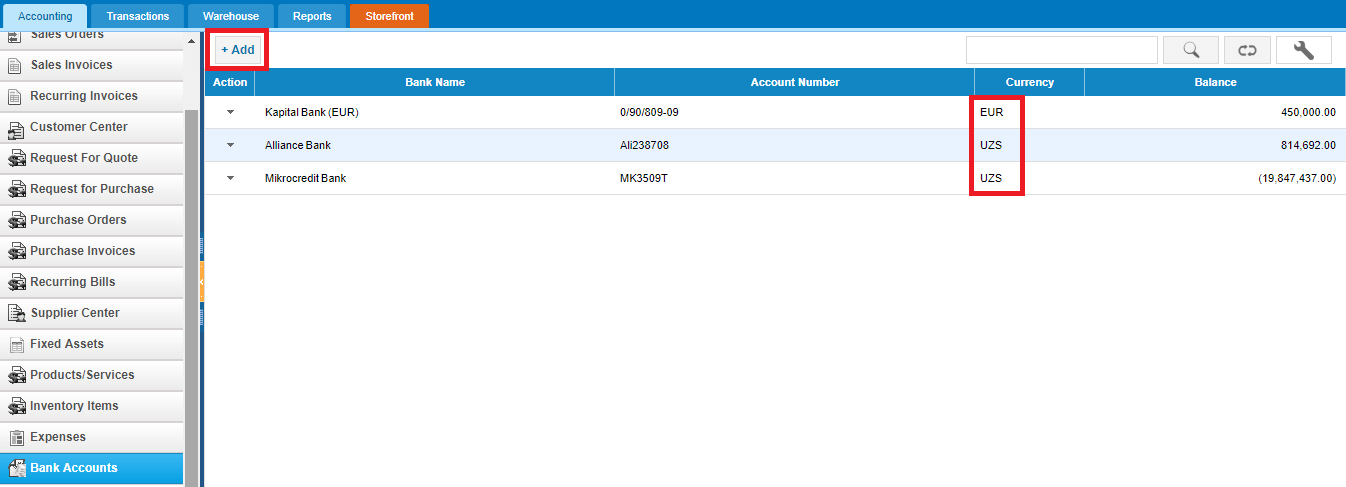
 Then you can add your foreign currency bank from Accounts>>Accounting>>Bank Accounts.
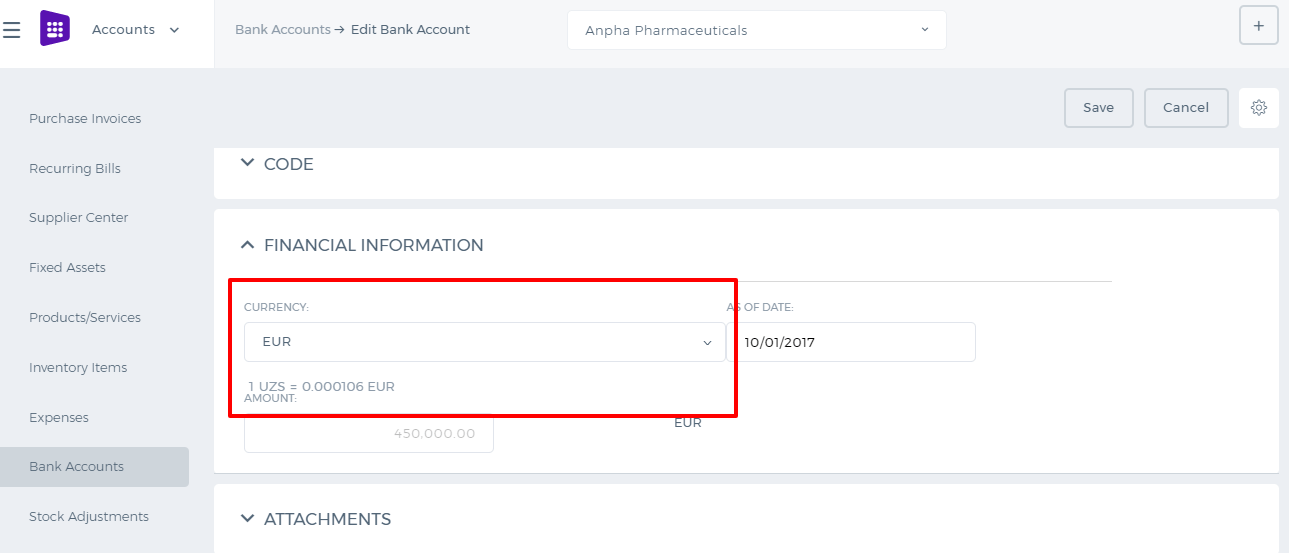
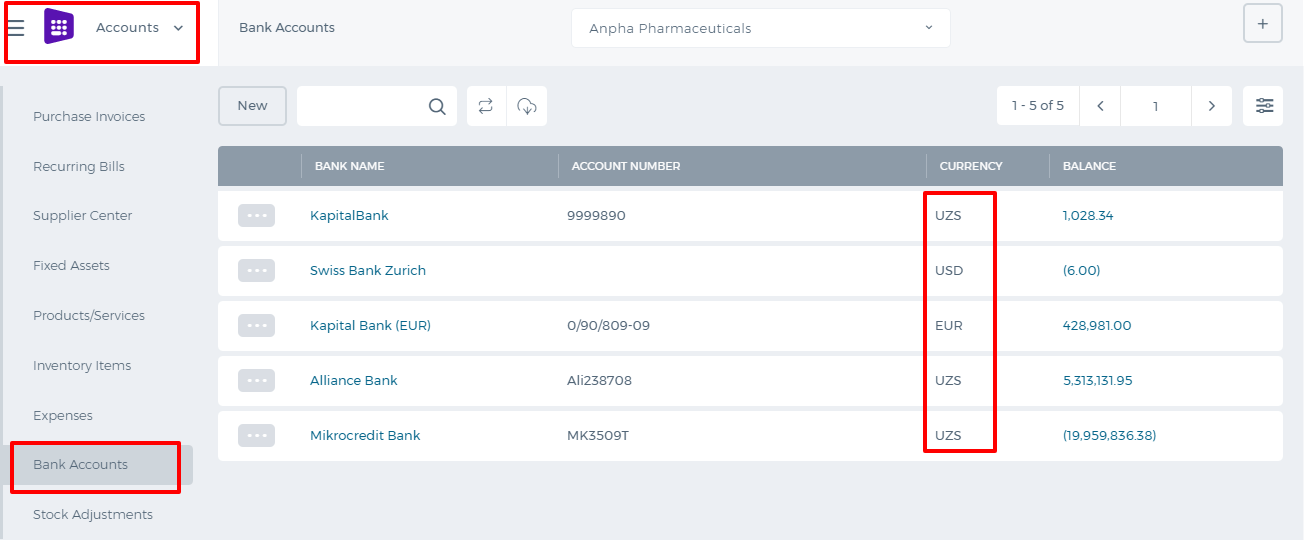 While adding the bank details, you will have an option to choose another currency from the Currency field. So choose the currency (EUR for example), enter the as of date amount in that currency and save.
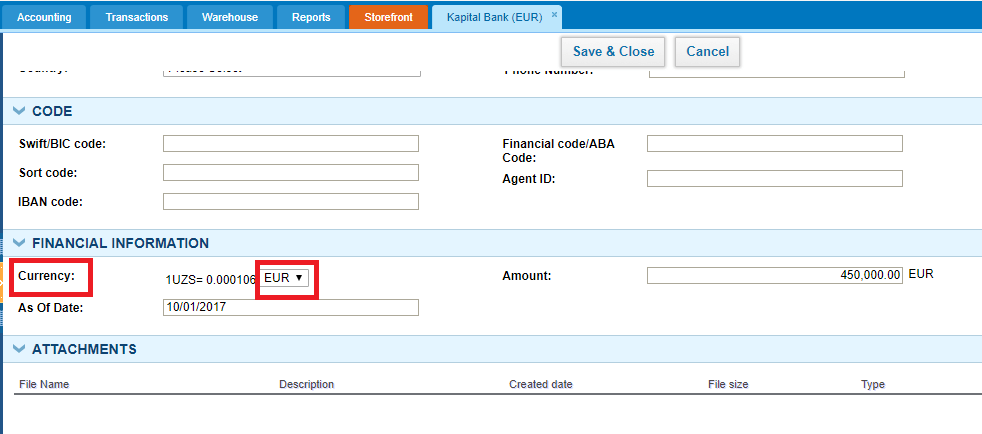
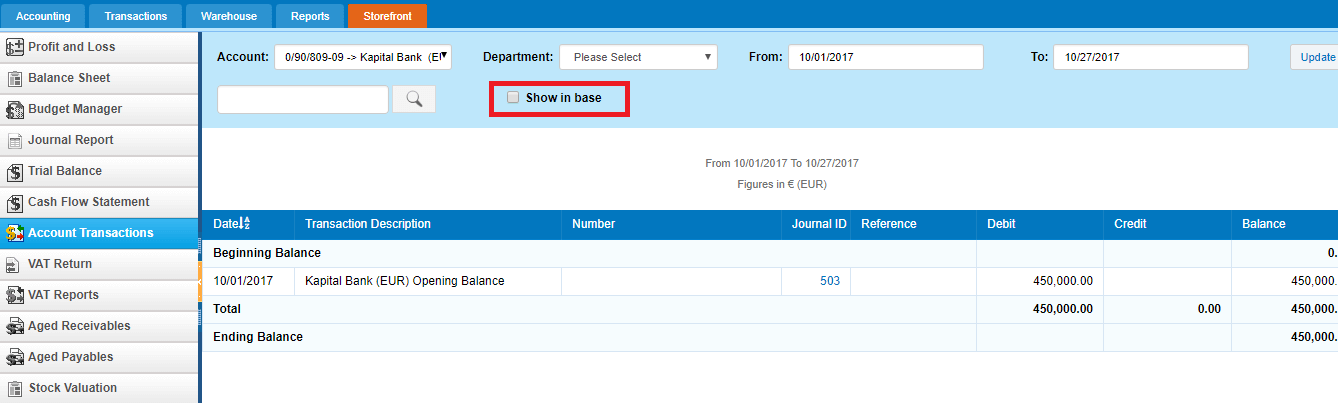
 So for any transactions made in that bank currency(EUR), the bank will show up as an option for payments.
Your bank statement shows the balance in both your base currency and foreign currency (EUR). You just need to check the box "Show in base".
So for any transactions made in that bank currency(EUR), the bank will show up as an option for payments.
Your bank statement shows the balance in both your base currency and foreign currency (EUR). You just need to check the box "Show in base".
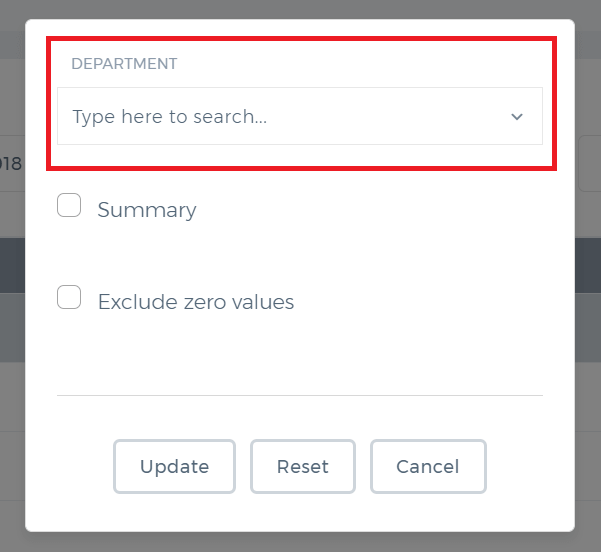
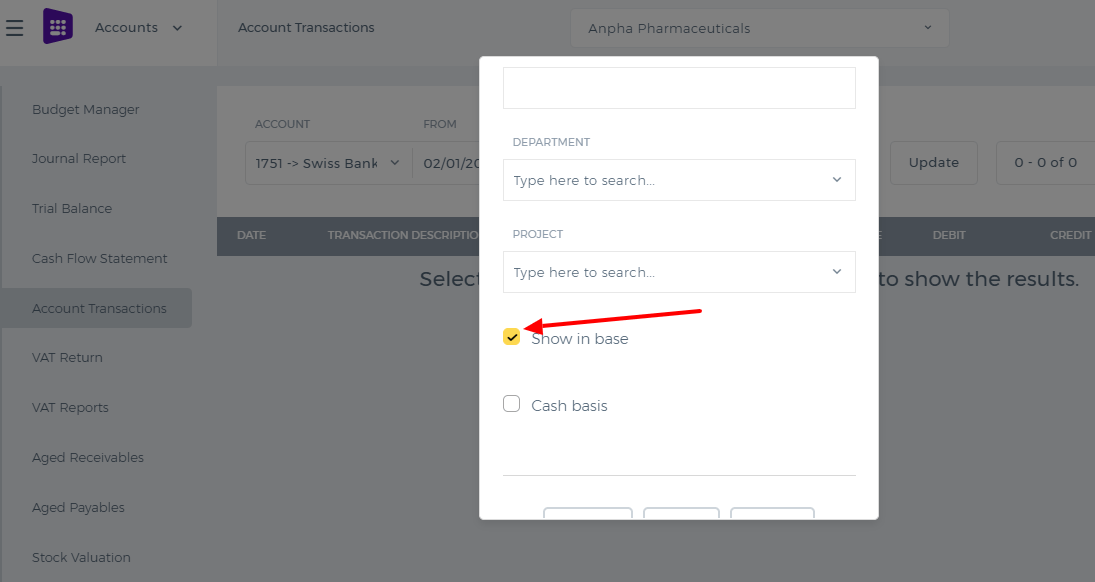
 In the new user interface, you need to click Filter icon first and after that the option will show up.
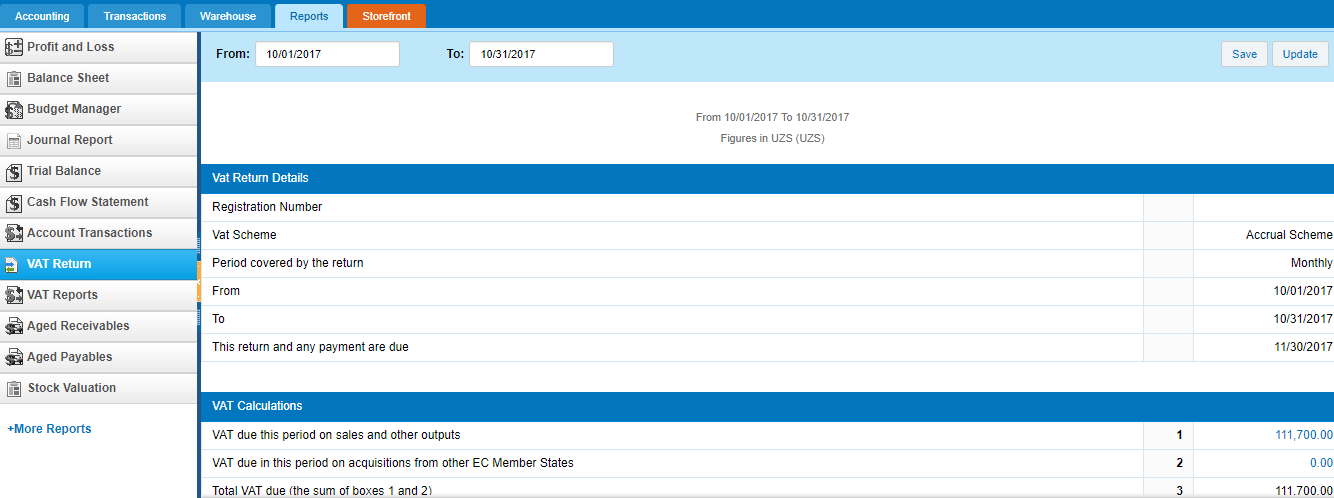
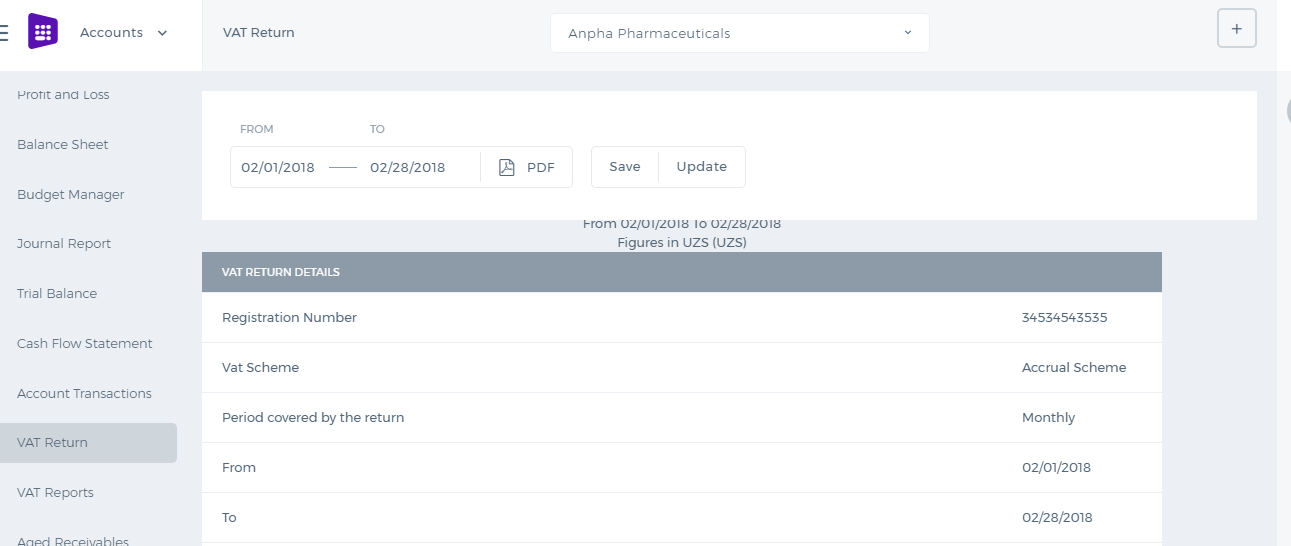
VAT Return
Value Added Tax
Value Added Tax (or VAT) is an indirect tax. Occasionally you might also see it referred to as a type of general consumption tax. In a country which has a VAT, it is imposed on most supplies of goods and services that are bought and sold.
A VAT return is a form you file to show how much VAT you are due to pay to government. If you're not registered for VAT, you won't file VAT returns.
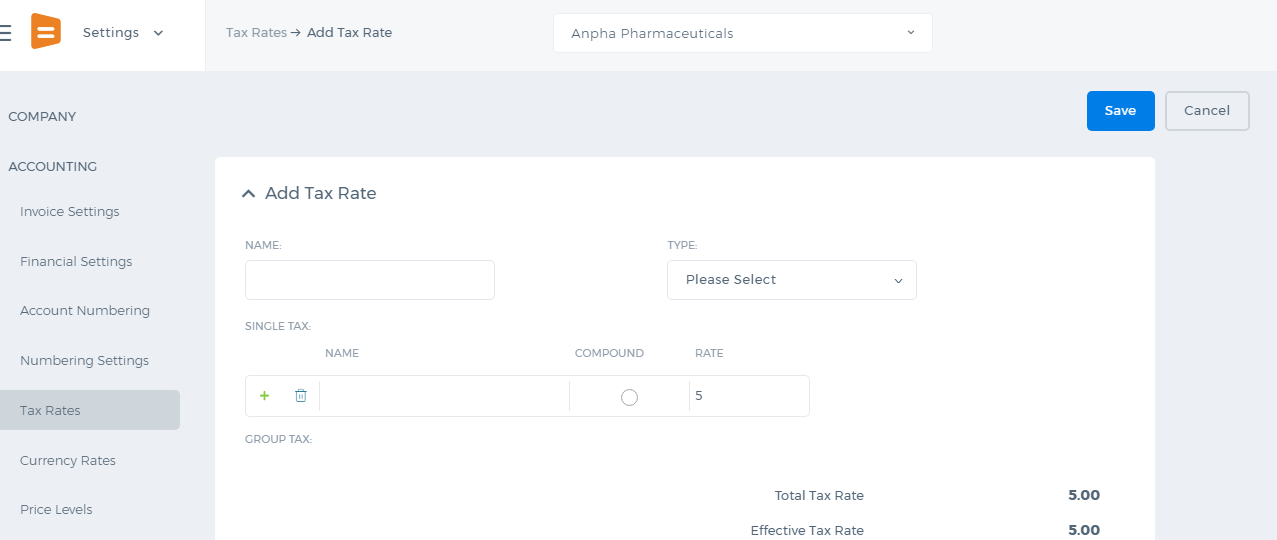
To enable the VAT Return in the application, go to Settings»Accounting»Financial Reports and tick the VAT Return Report and save the changes.
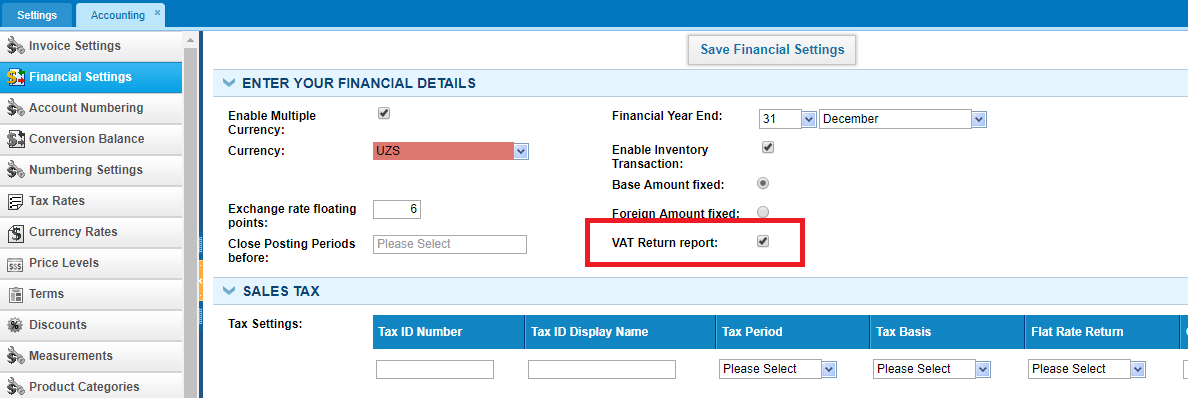
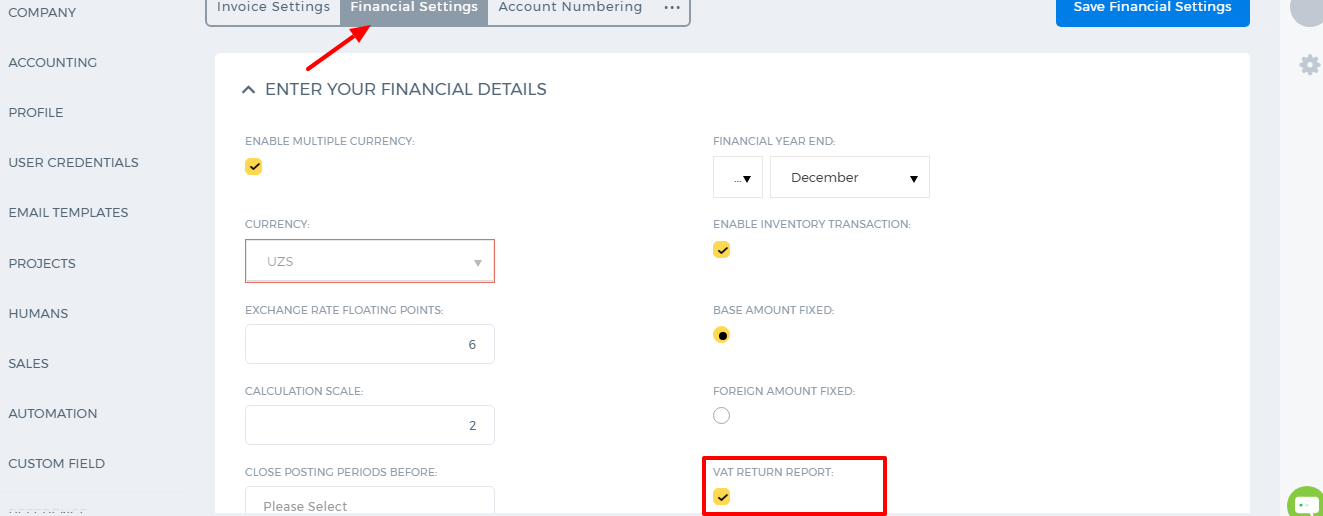 After that you will be able to create VAT from the Tax rates and use it in your invoices.
Make sure that Flat Rate Return is not selected in your Tax Settings under Financial Settings, otherwise the VAT Return will not show balances.
After that you will be able to create VAT from the Tax rates and use it in your invoices.
Make sure that Flat Rate Return is not selected in your Tax Settings under Financial Settings, otherwise the VAT Return will not show balances.
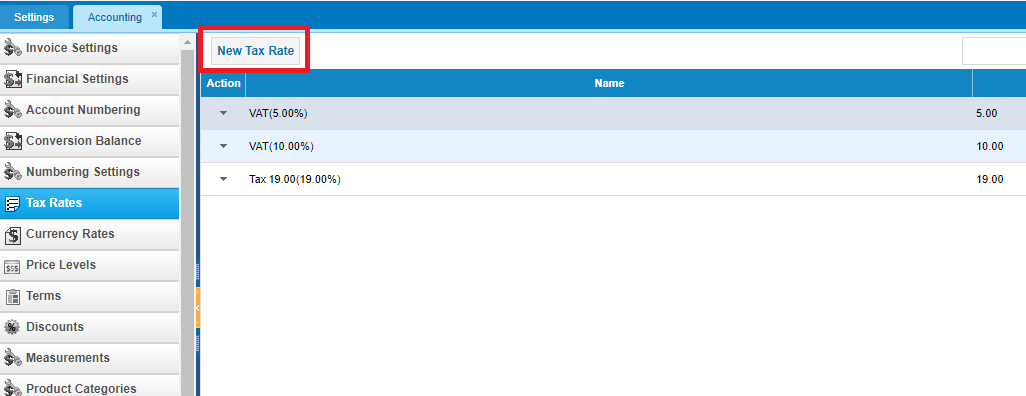
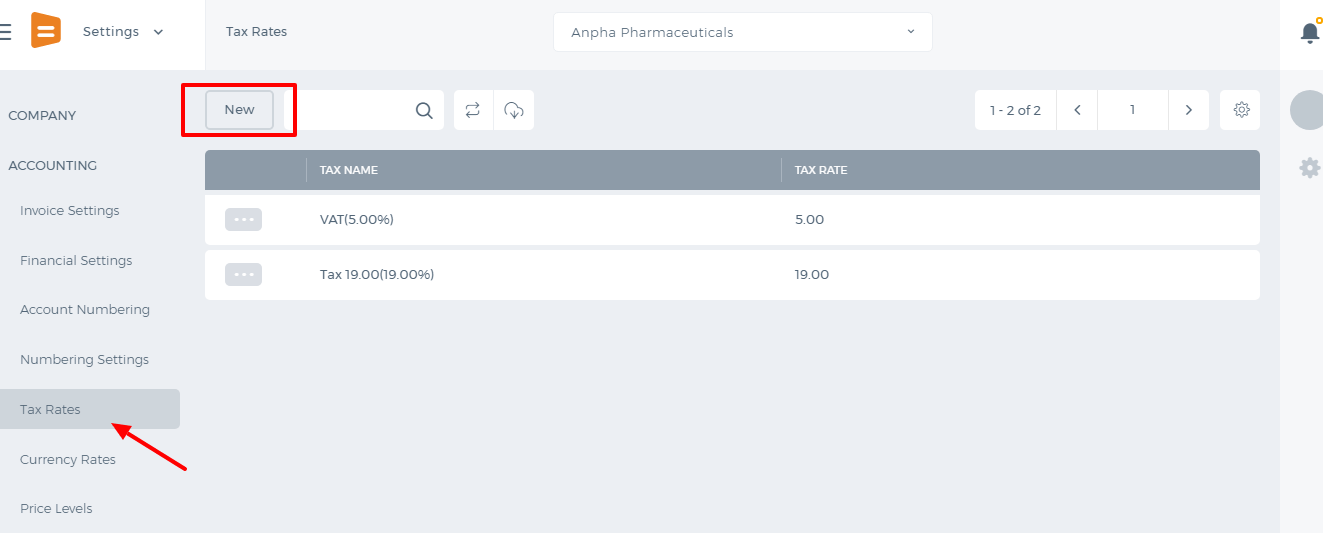
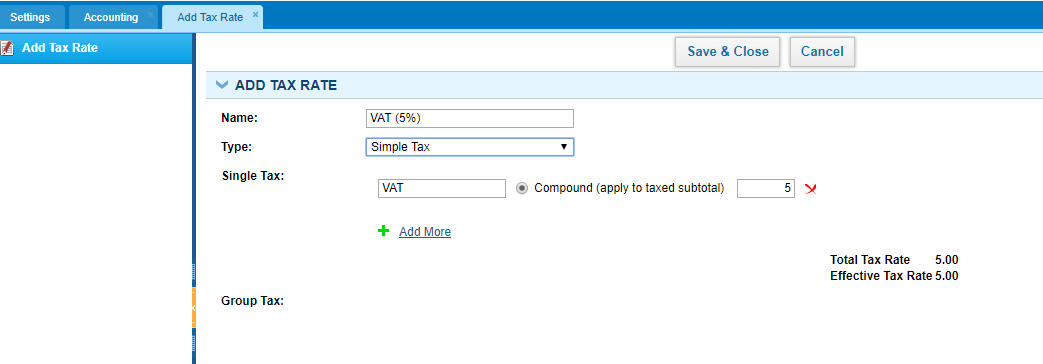
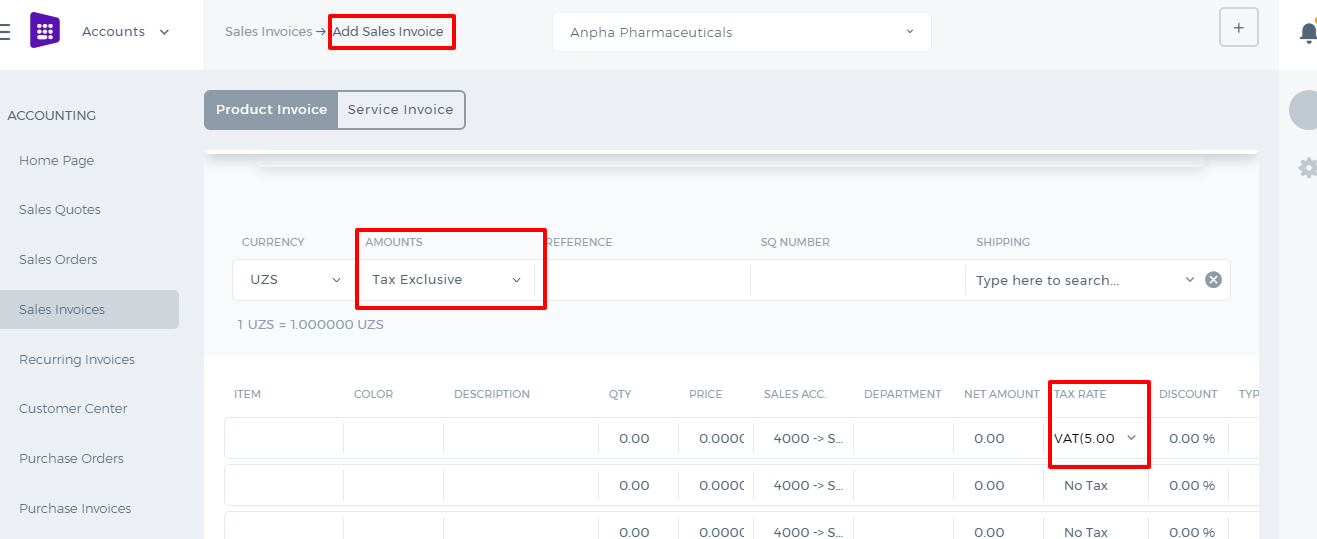
 After the VAT tax is created, it can be used in transactions like Sales Invoice and Purchase Invoice.
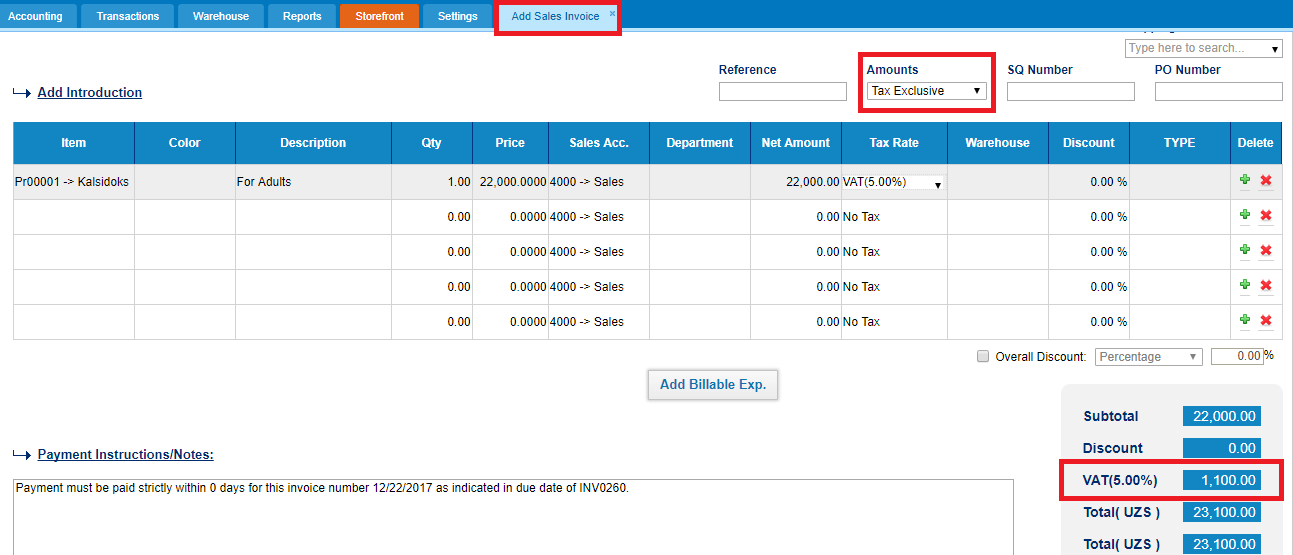
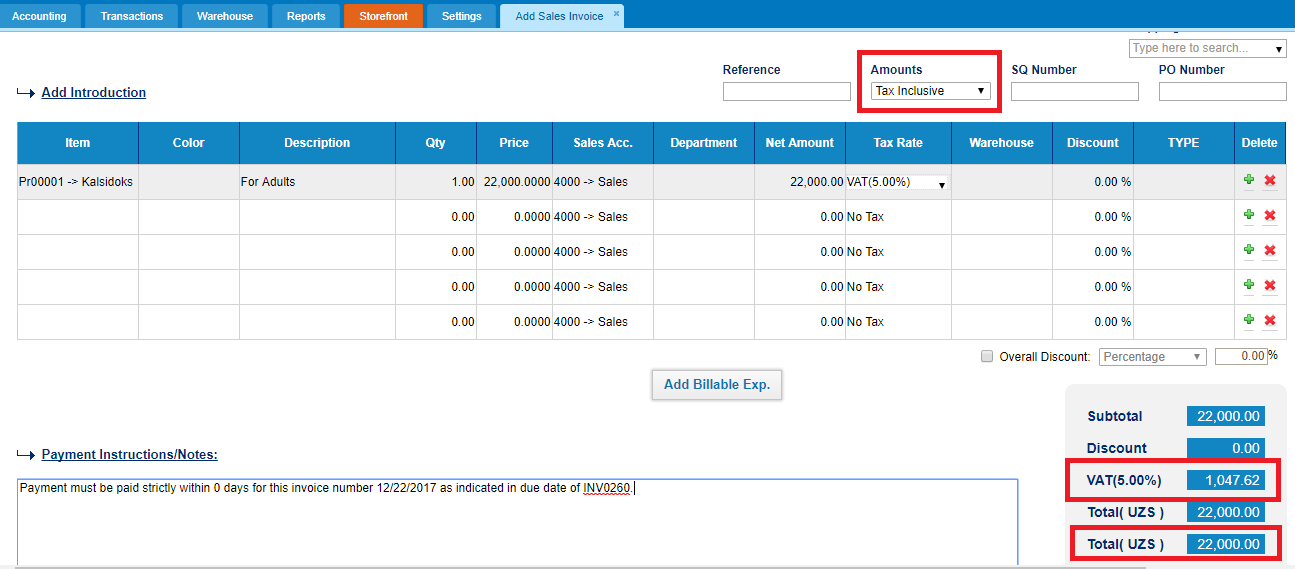
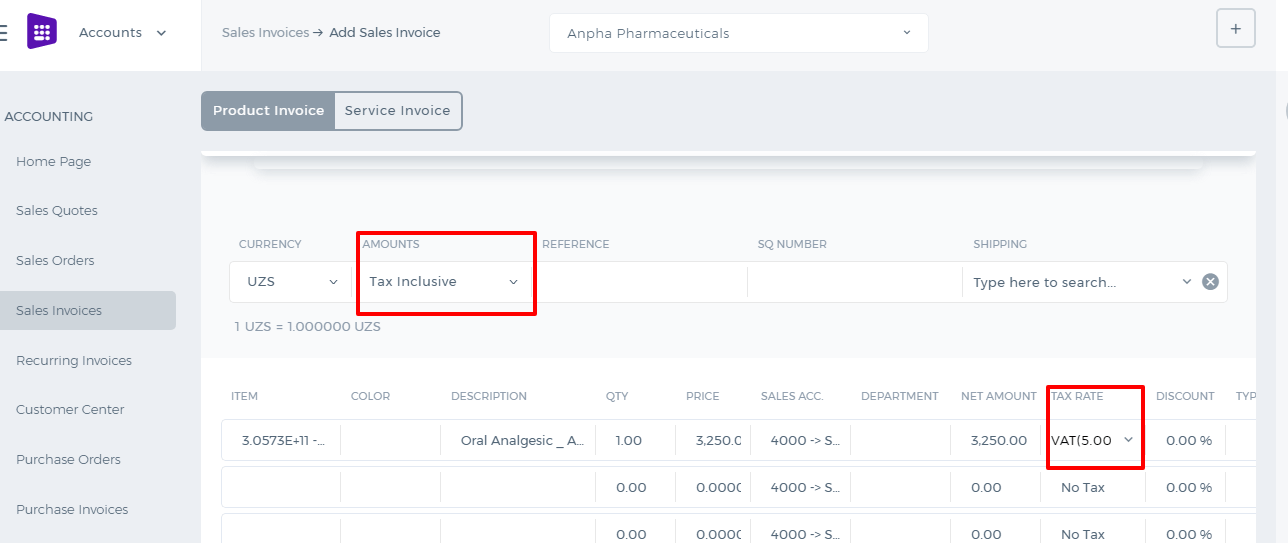
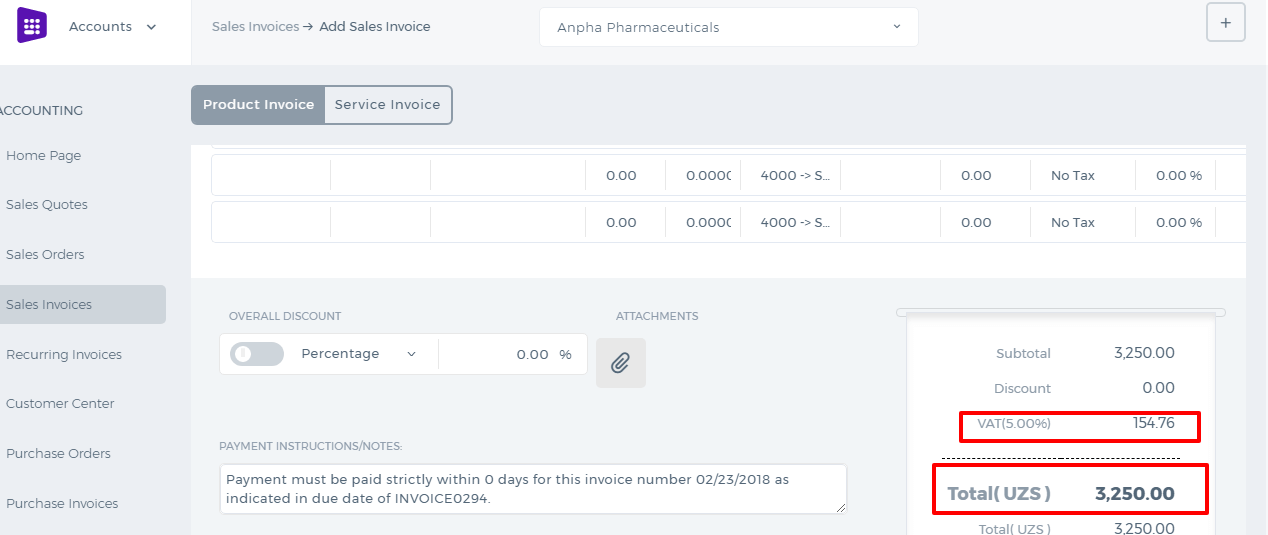
 When Tax Inclusive is chosen, the system takes your total price of 22,000 and then calculates what the rate would need to be to reach the total of 22,000 when a 5% tax is applied. Here is the formula:
- tax excluded price = total item price / ((tax rate /100) + 1)
- inclusive tax amount = tax excluded price * tax rate
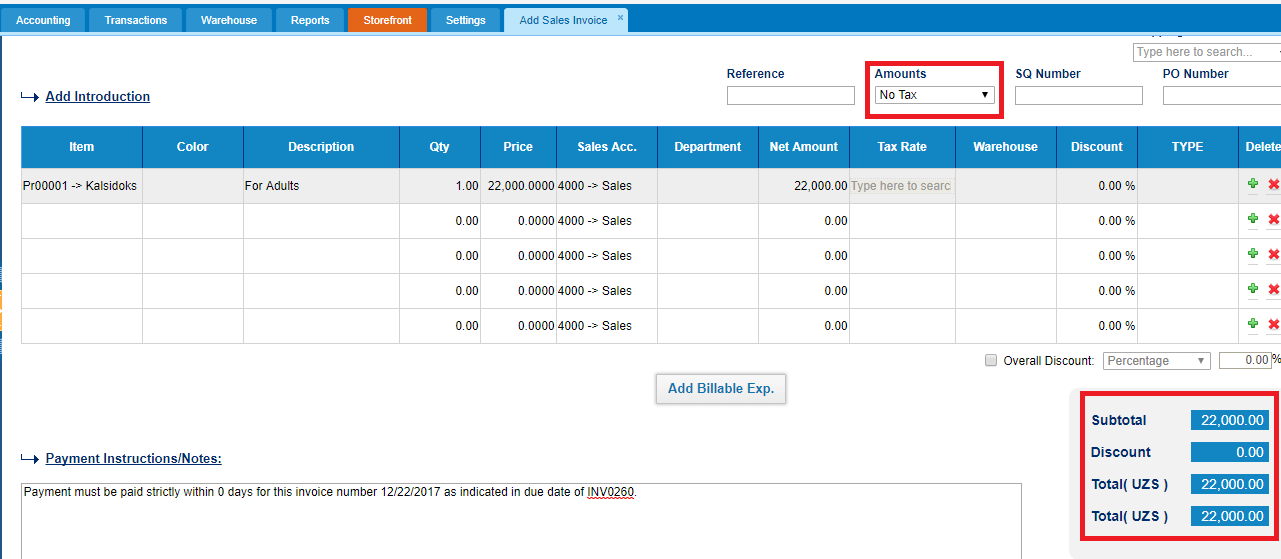
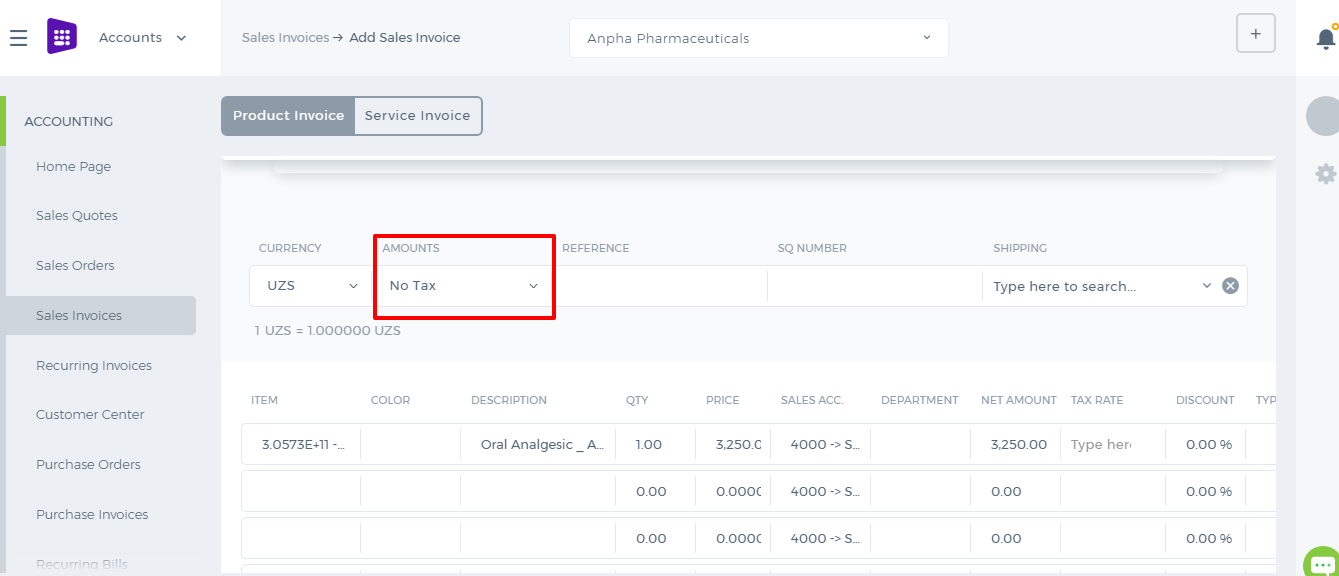
 By setting up No Tax, the system considers there is no tax at all in the transaction and the Tax column becomes disabled.
 The VAT can be tracked using the VAT Return available from the Accounts Reports.
Once you save the VAT Return it will be copied to the VAT Report.
The VAT can be tracked using the VAT Return available from the Accounts Reports.
Once you save the VAT Return it will be copied to the VAT Report.
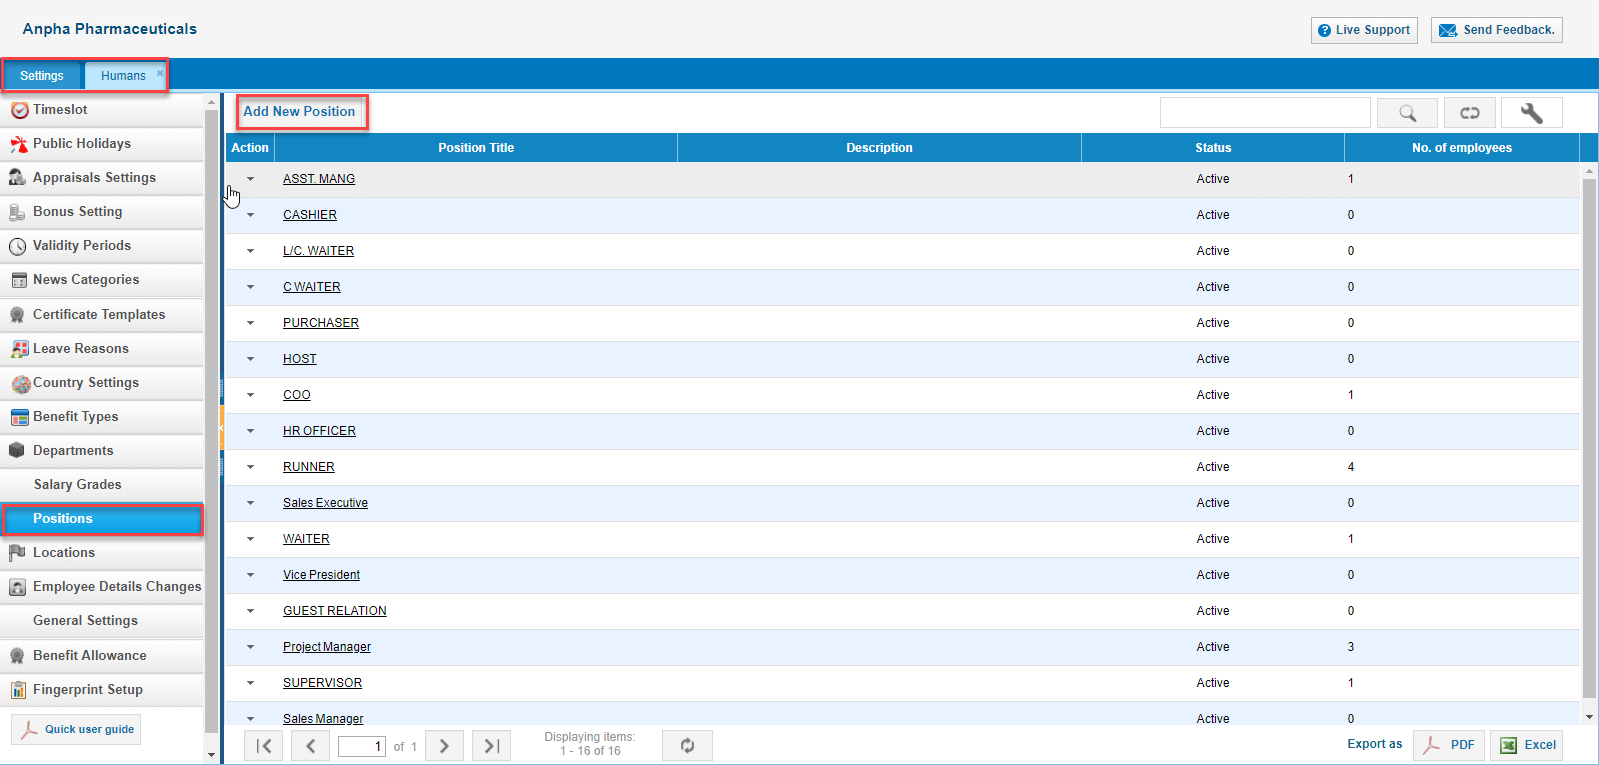
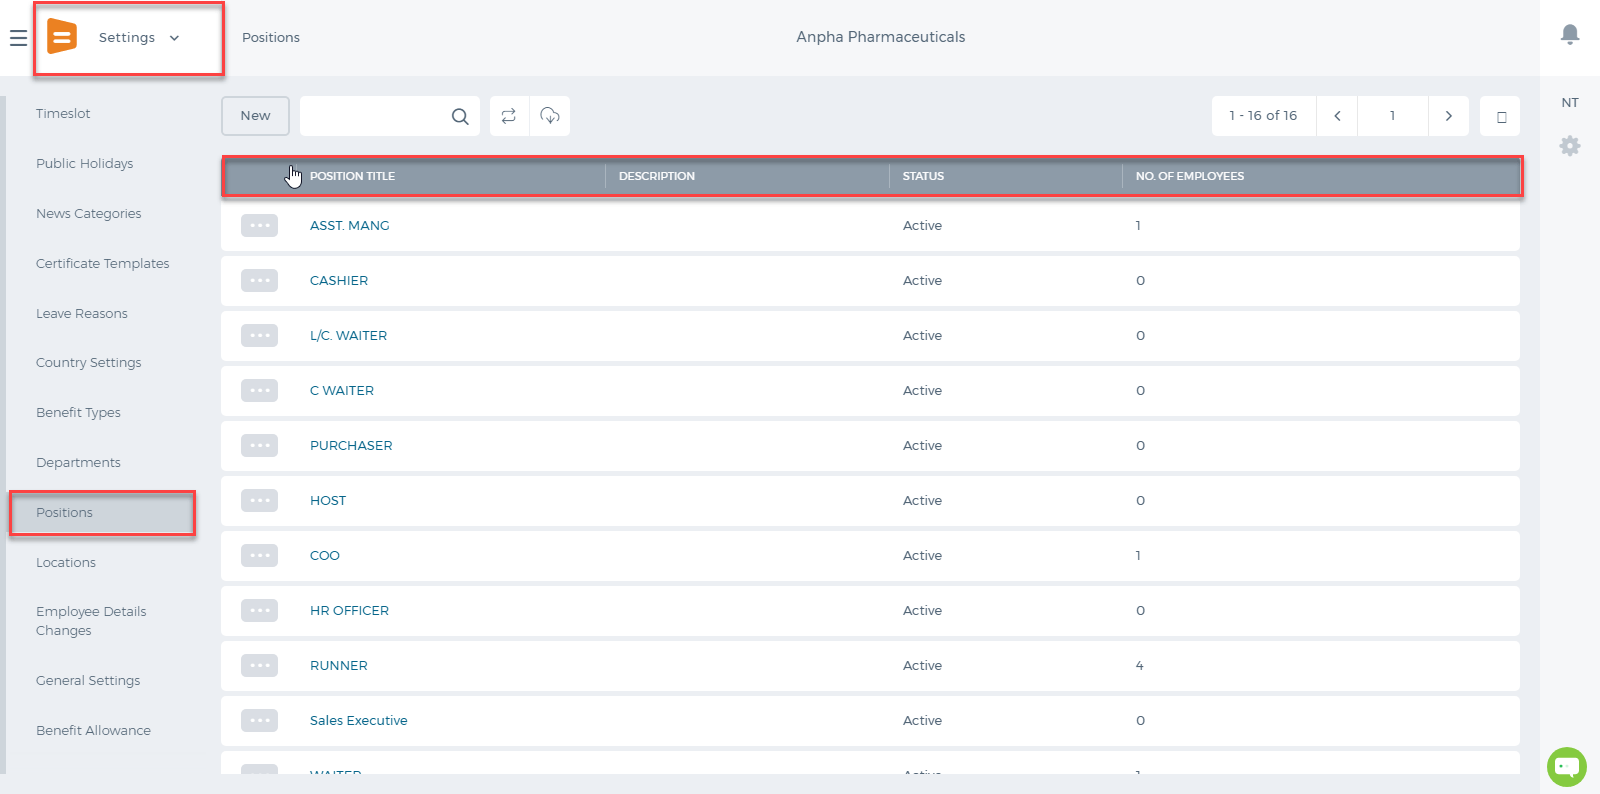
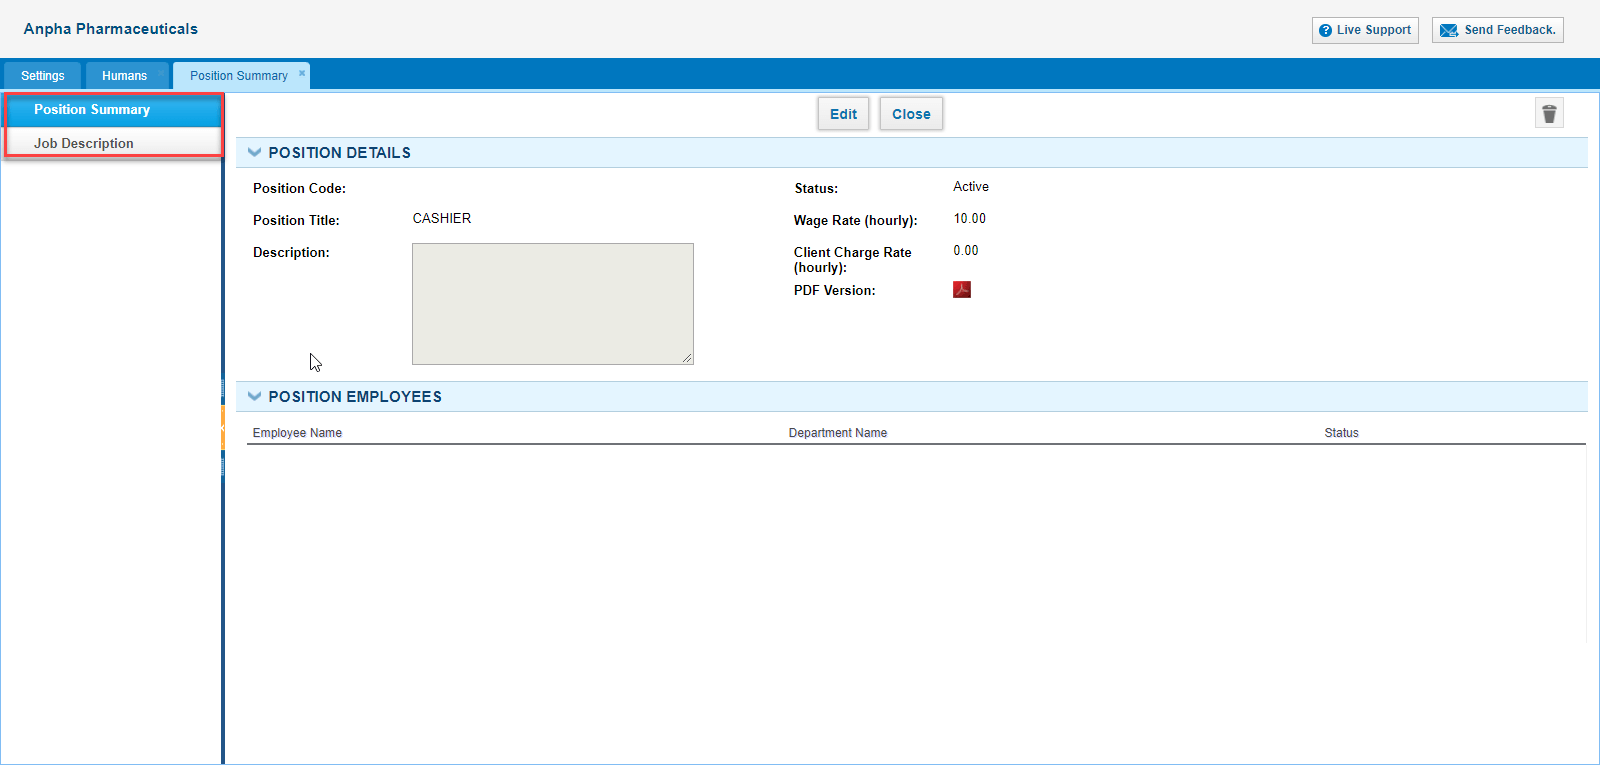
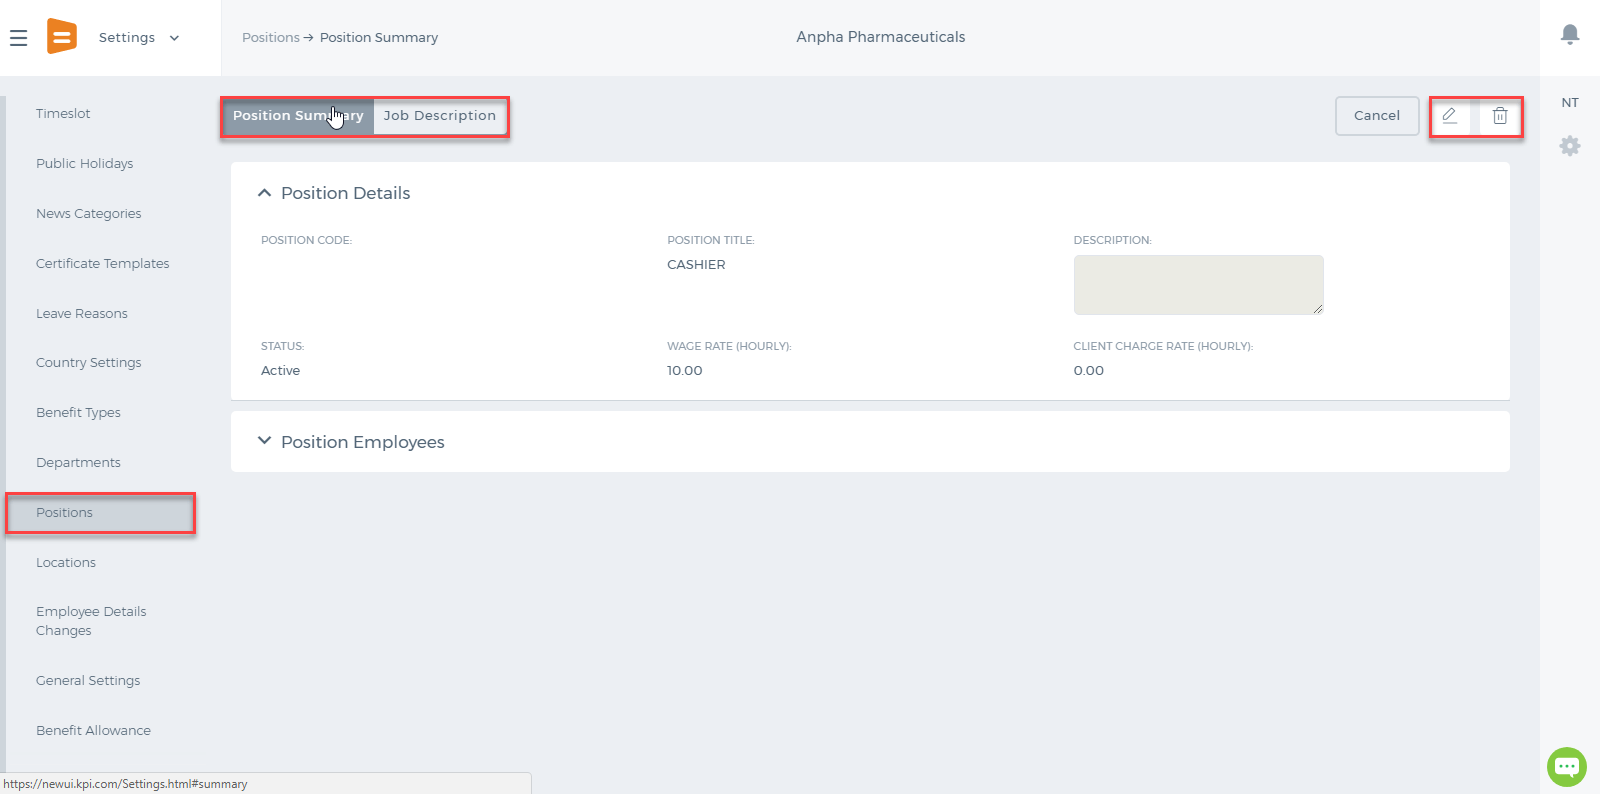
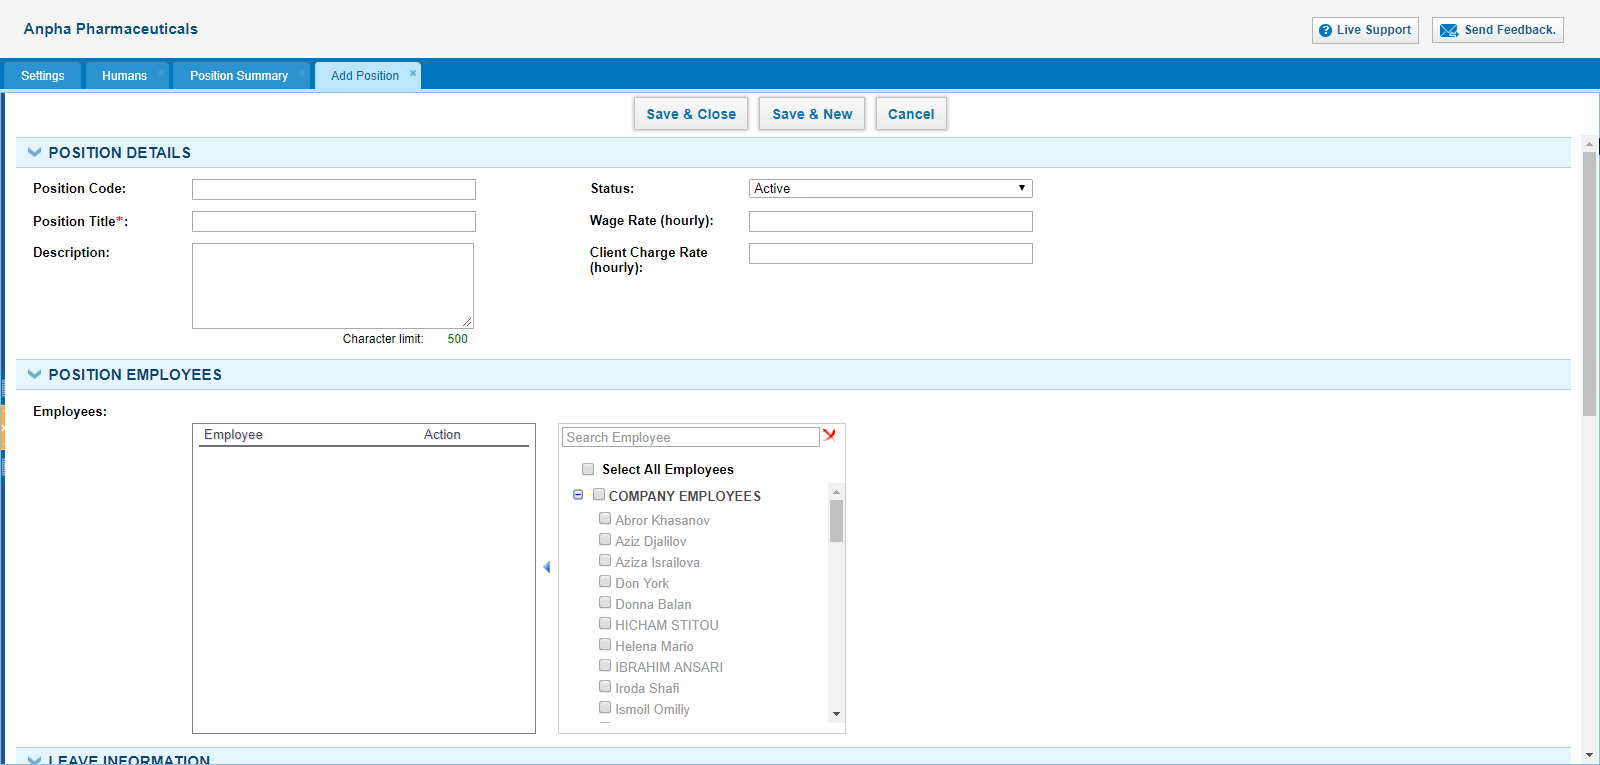
Positions
Positions
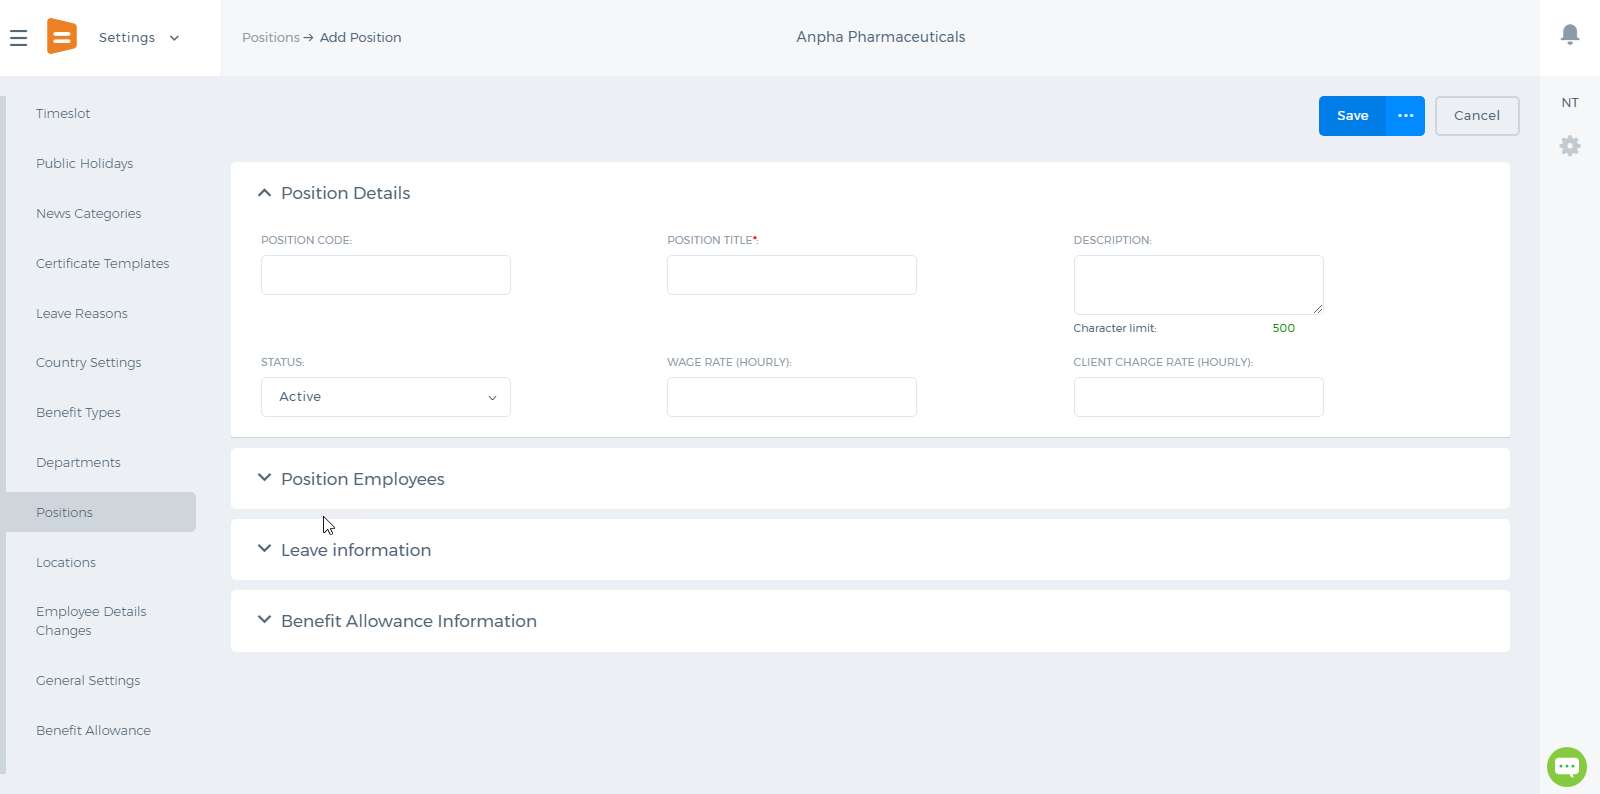
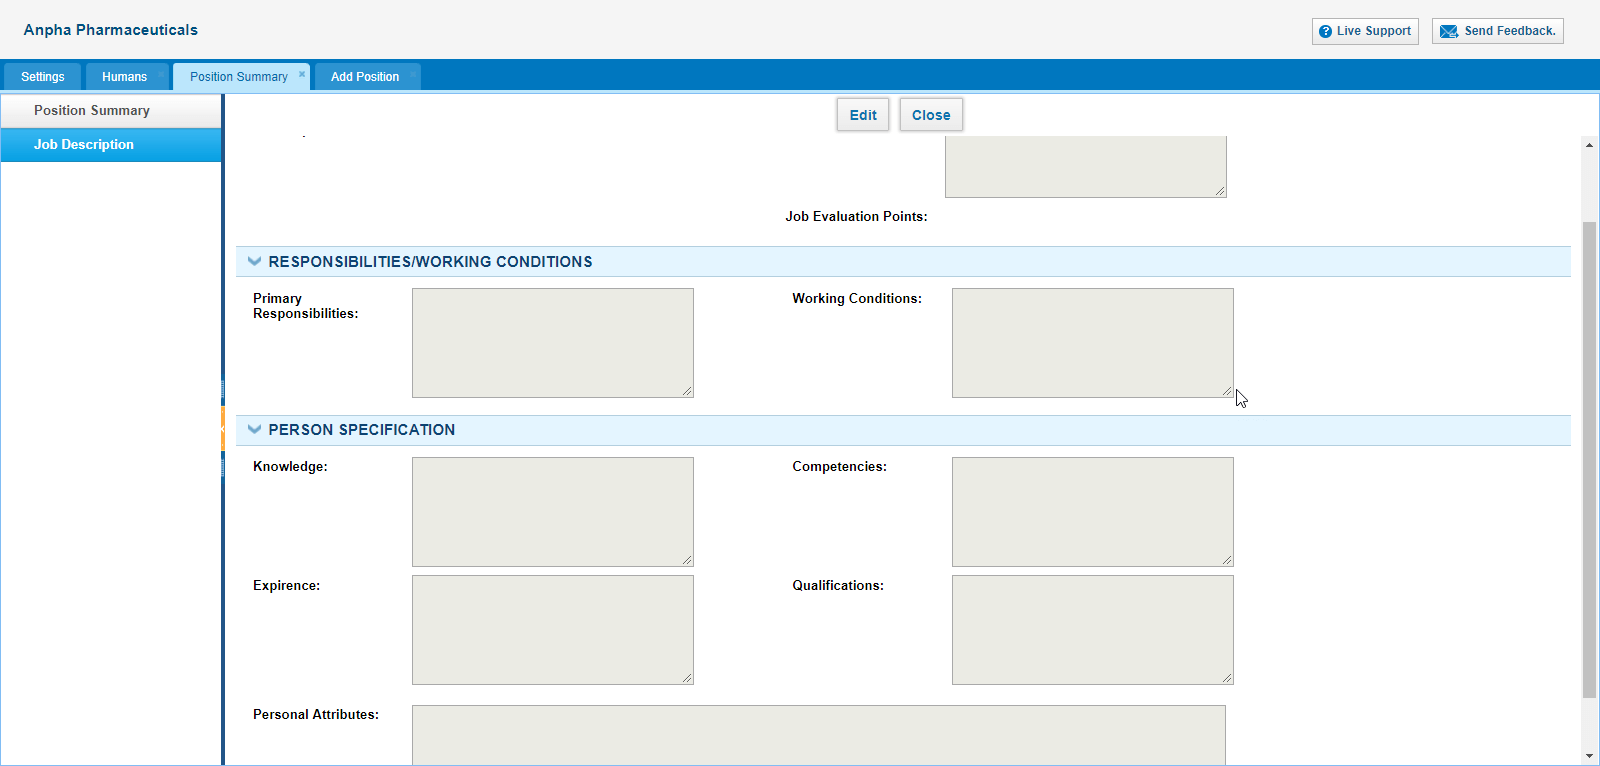
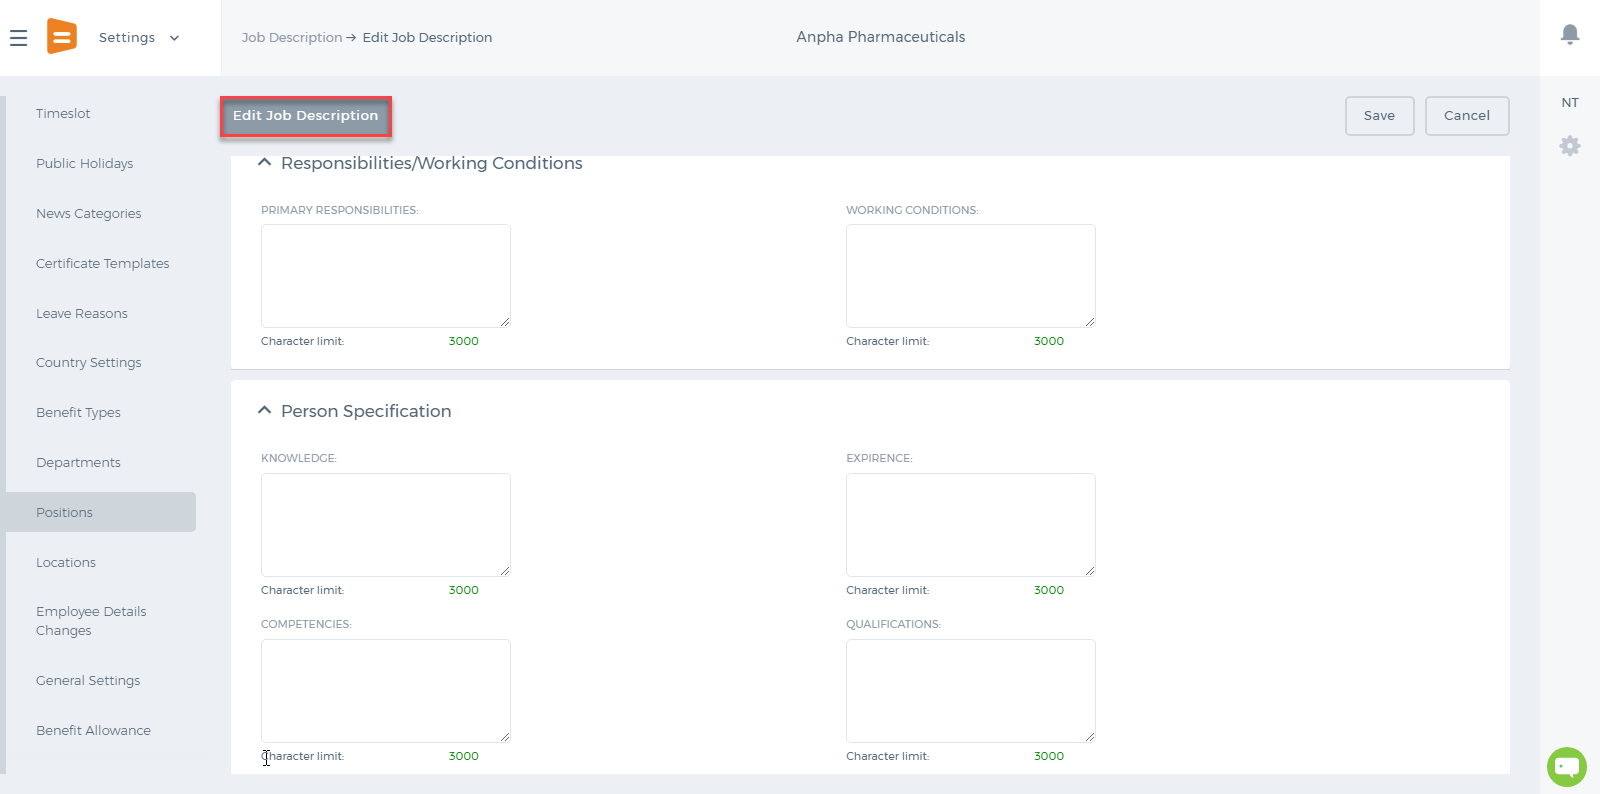
Kpi.com’s Humans module also includes the option of managing available Positions in an organization (e.g. Salesperson, Lawyer, Marketing Manager, etc.). For this, go to Settings>>Humans>>Positions. In this section, users (managers) can add new, edit, or view the summary of a position in the list, as well as adding a Job Description to each Position. While adding a new Position, users (managers) are able to specify Position Code, Description, Position Title, Department, Number of Planned Incumbents, Job Family, and other details. Simple, easy to use, and as all other sections in kpi.com, it is integrated to other related sections of the system.
Screenshots:
Task Management
Project Management
Project Management
Project Management is the section, consisting of tasks, issues, timesheets, project, and department to meet the project requirements. You can see the workflow for project management:
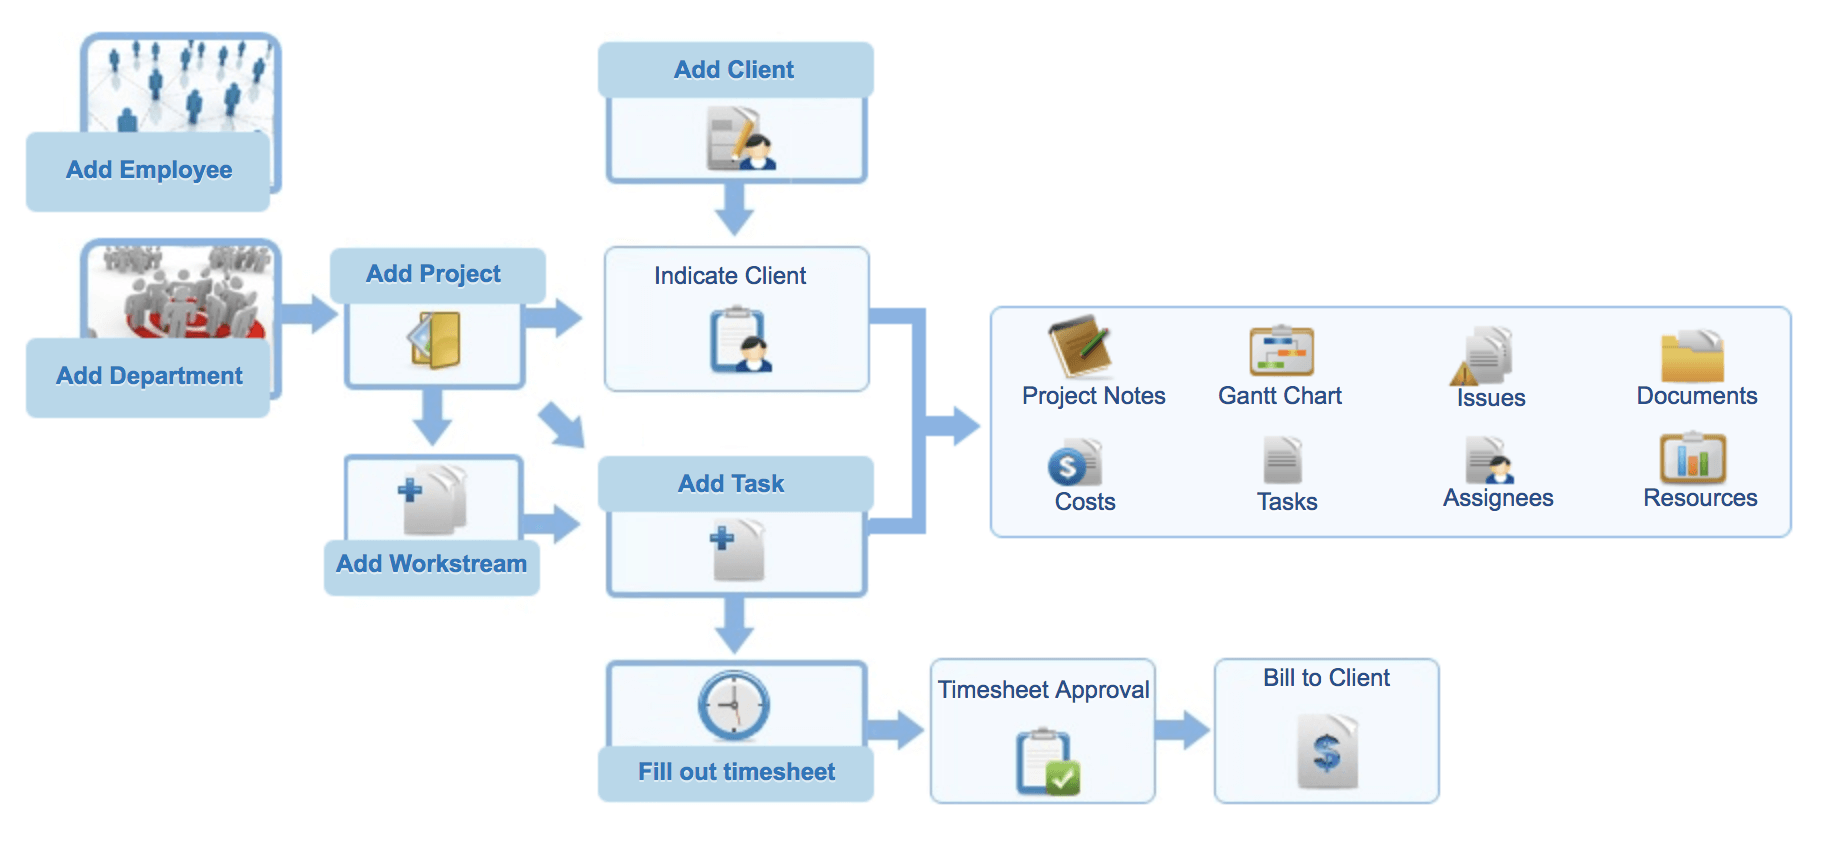 The project management tab is located as below

 The Project Management is comprised of several sub-sections:
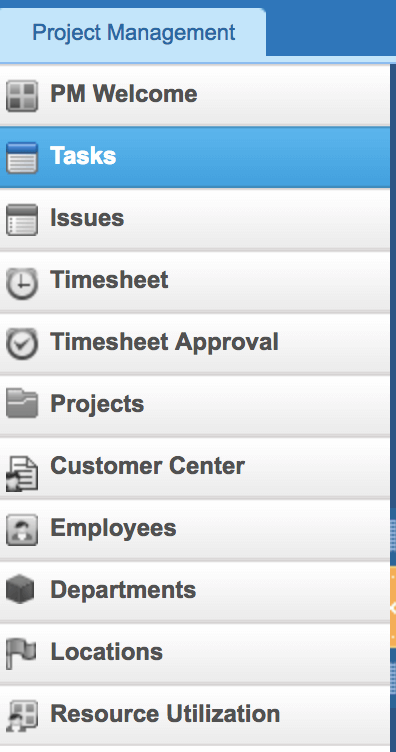
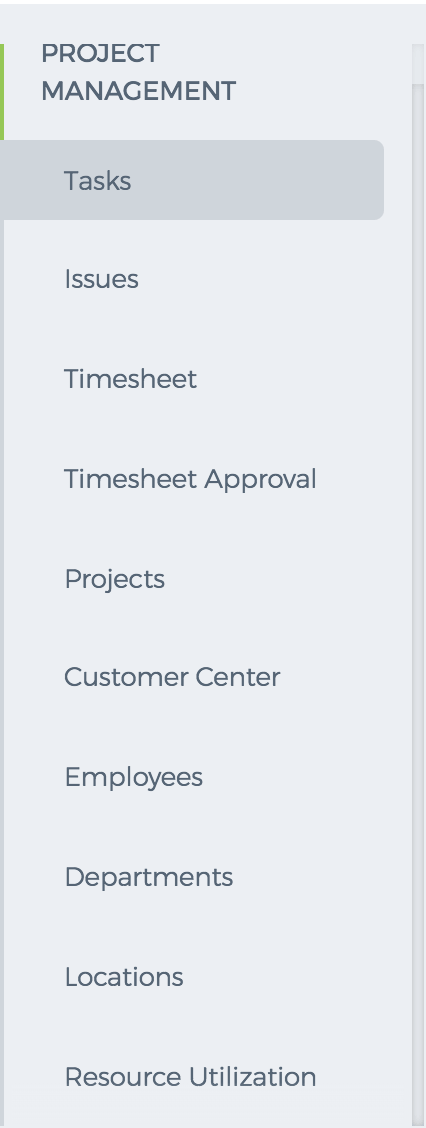
My Workspace
Automation Settings
Automation Settings
Workflow Management helps you to automate your sales, marketing, and support processes. In business, there are numerous everyday activities and processes that need to be done and when automated will save time and effort. For example, a sales manager may be required to assign the leads to various sales reps based on certain criteria.
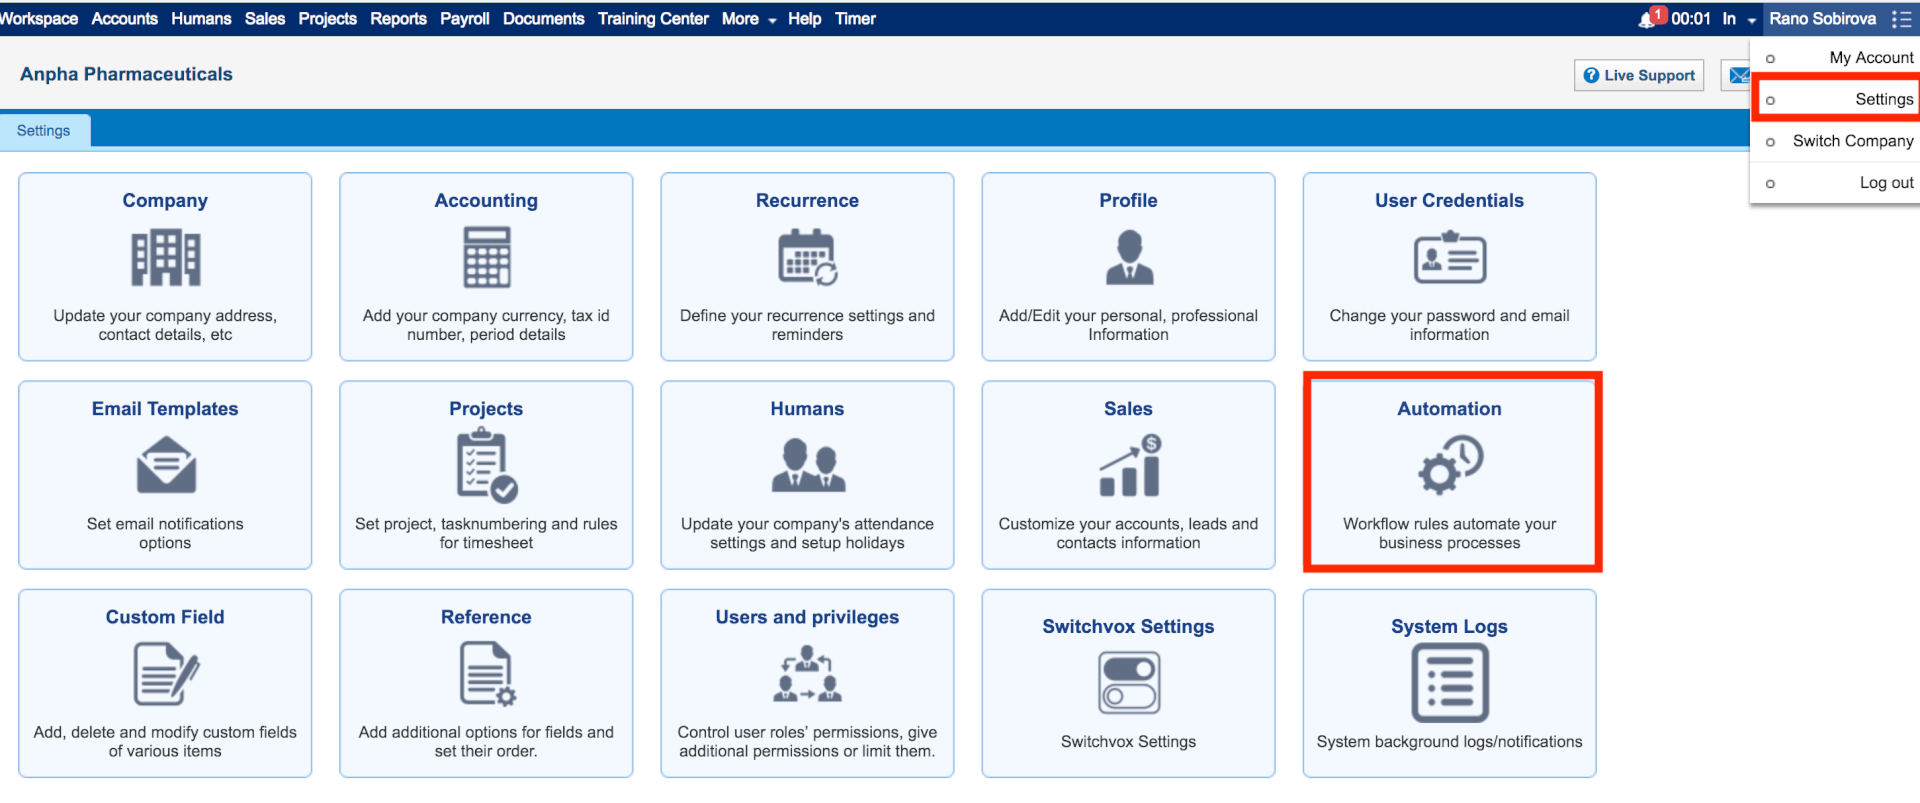
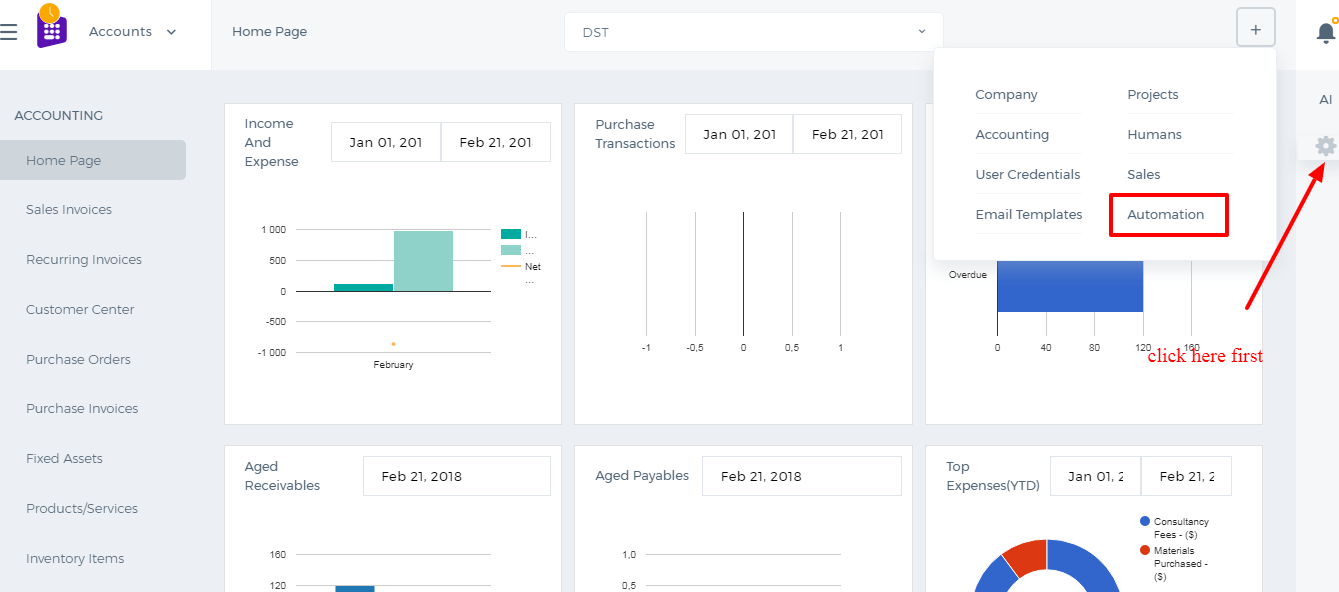
The Automation Settings is located on the
Settings page. If you cannot find these Settings among other settings available, please make sure you have Administrator rights and if it is still not available for you, contact
support@kpi.com to enable the Settings for your account.
Here are some of the terminology and their description:
Workflow Rules - A set of rules that are executed when specified conditions are met.
Workflow Alerts - Automated email notifications sent on triggering a workflow rule.
Workflow Tasks - Tasks that are assigned to the users when workflow rules are triggered.
Workflow Field Updates - Automatically updating specified field values when workflow rules are triggered.
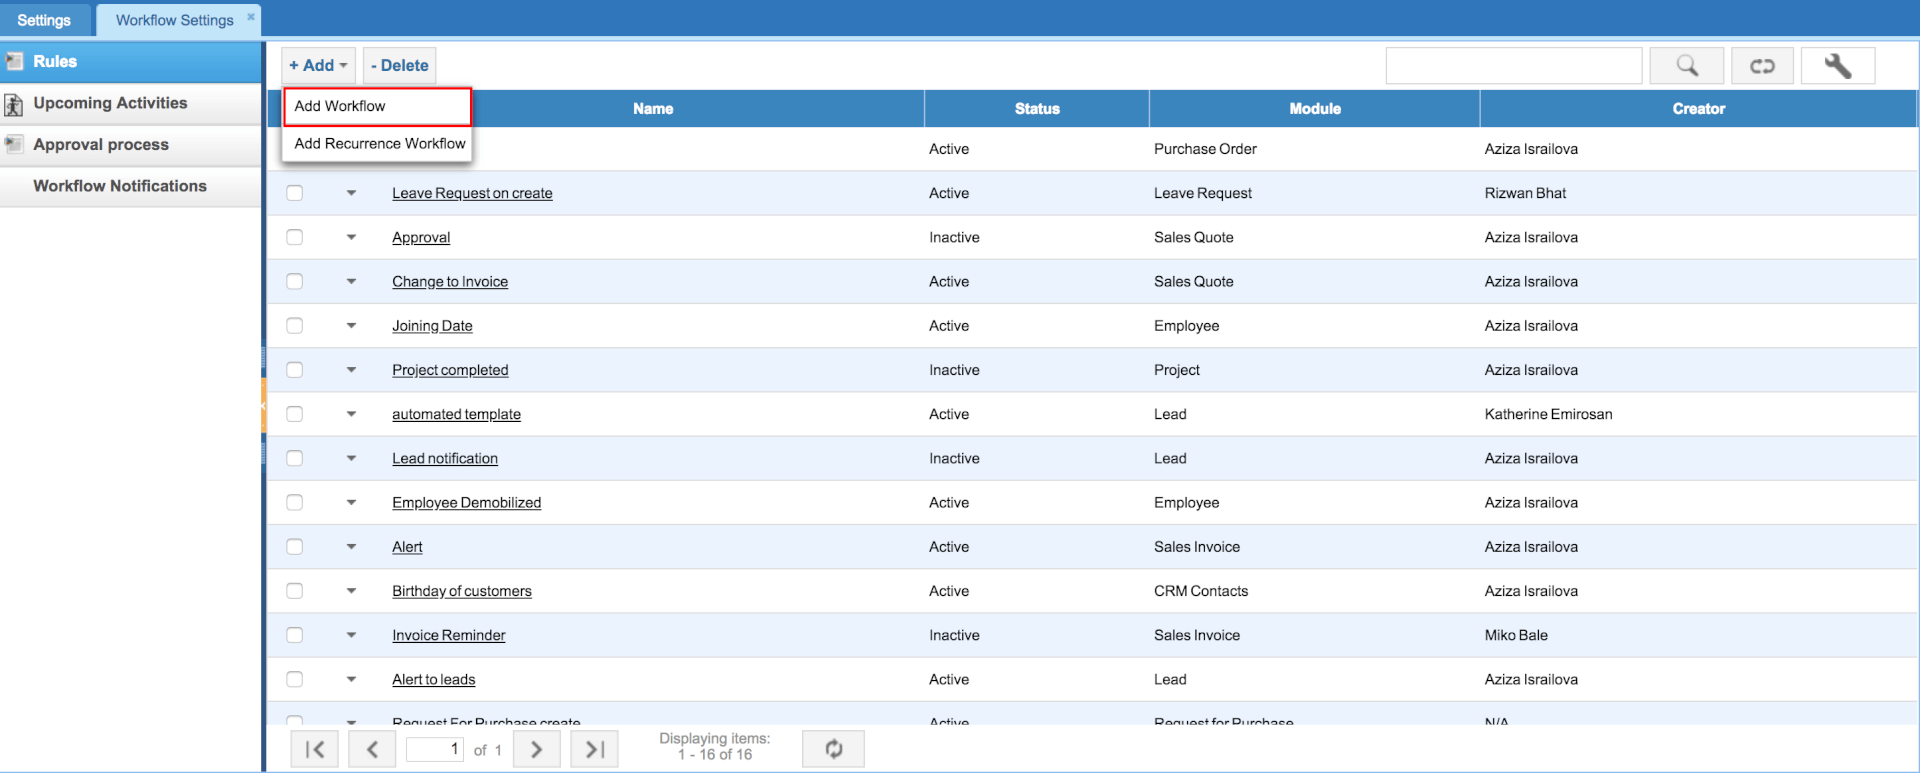
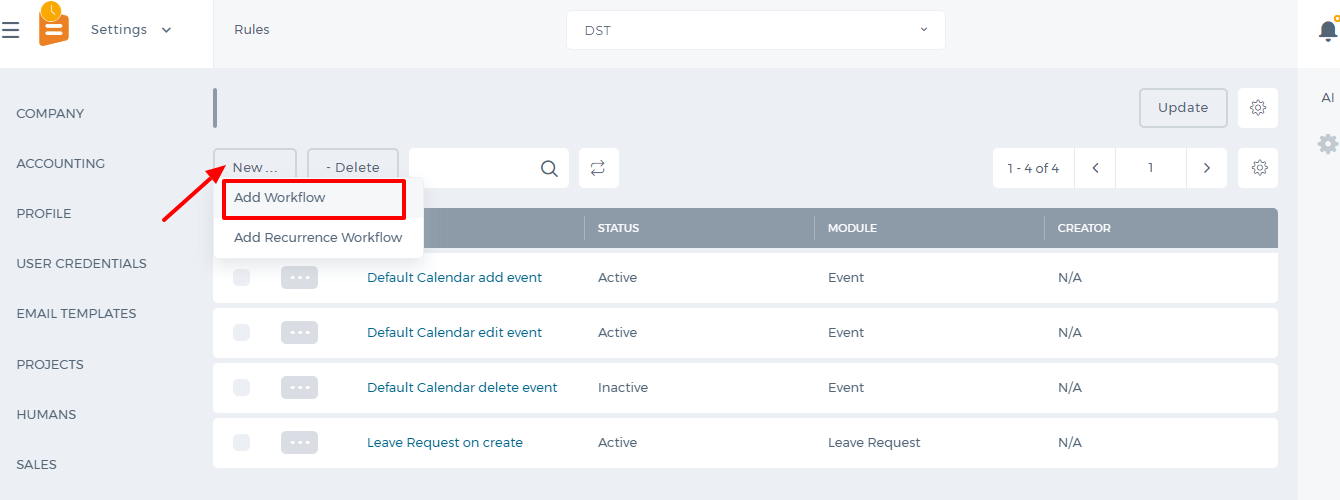
The first step in Automation Settings is to
specify the rule. Click on the
Add New button to create a new rule. Write the name of the rule, select a module, choose status, and then select the
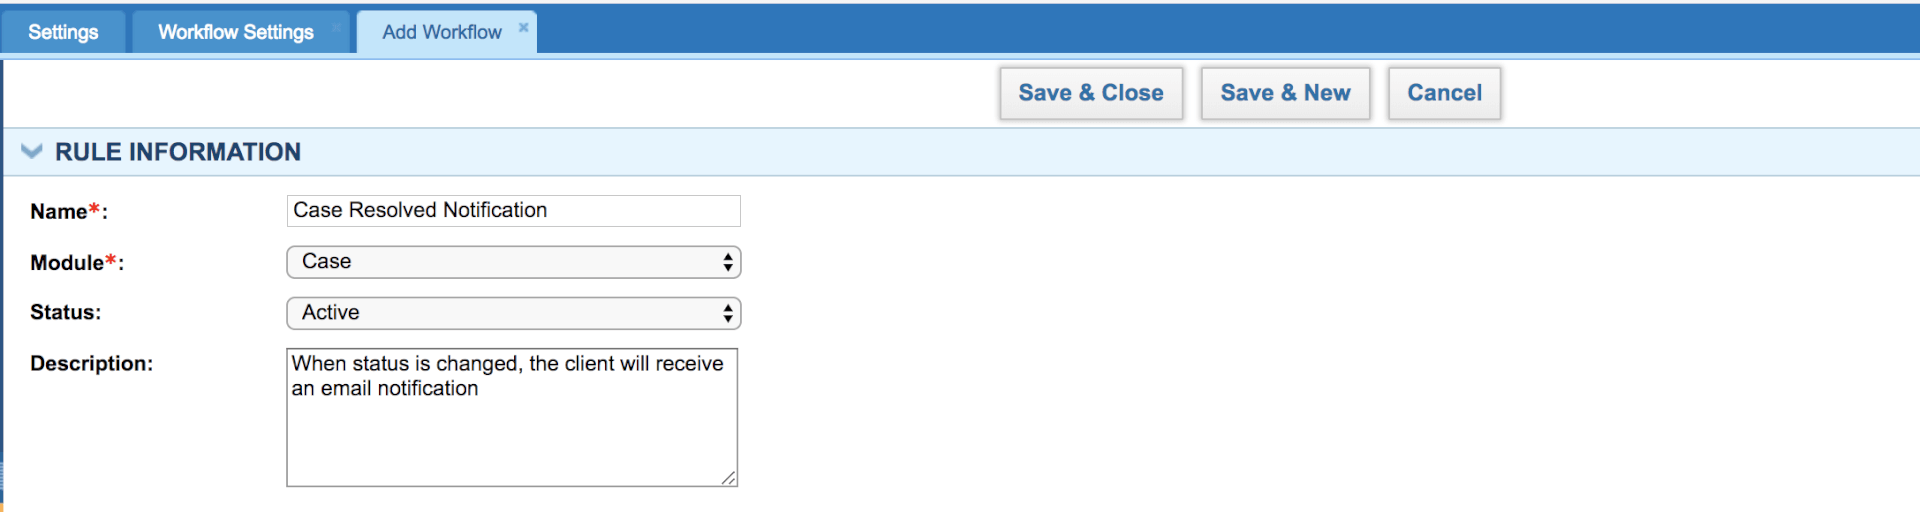
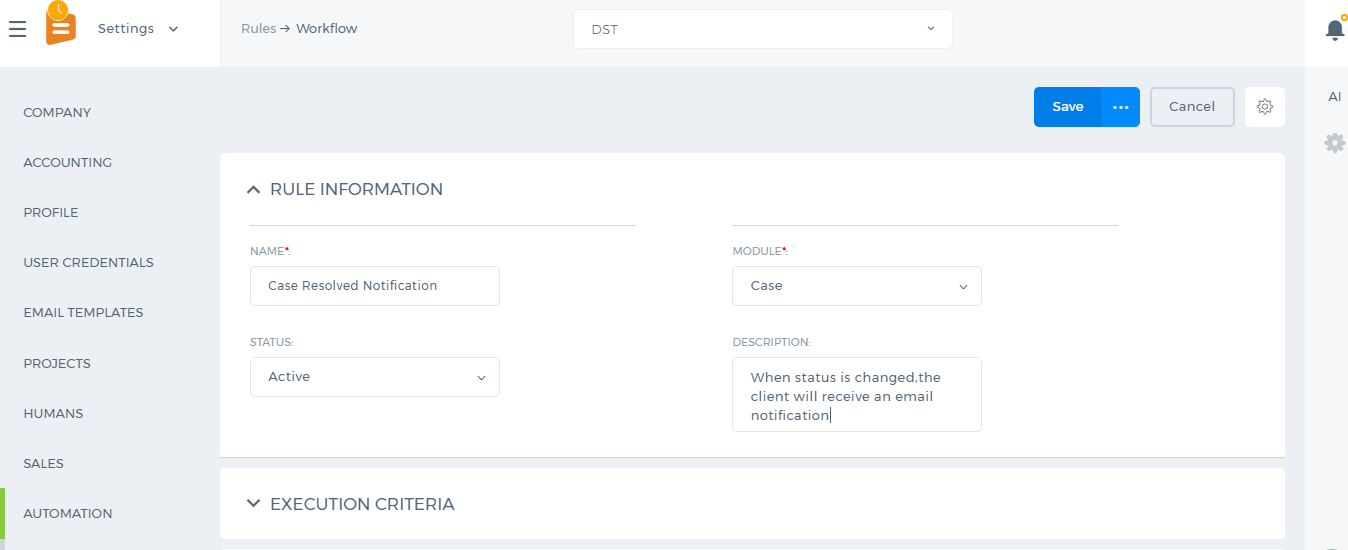
Execution Criteria and finally specify the rule. For Example, you want to set a case workflow that sends a notification to your customers when the case is resolved or closed. You choose “Update Specified Field” – “Status” as an execution criterion and set that the rule should work when the status is changed to “Resolved”. Below you can see the screenshot of the rule:
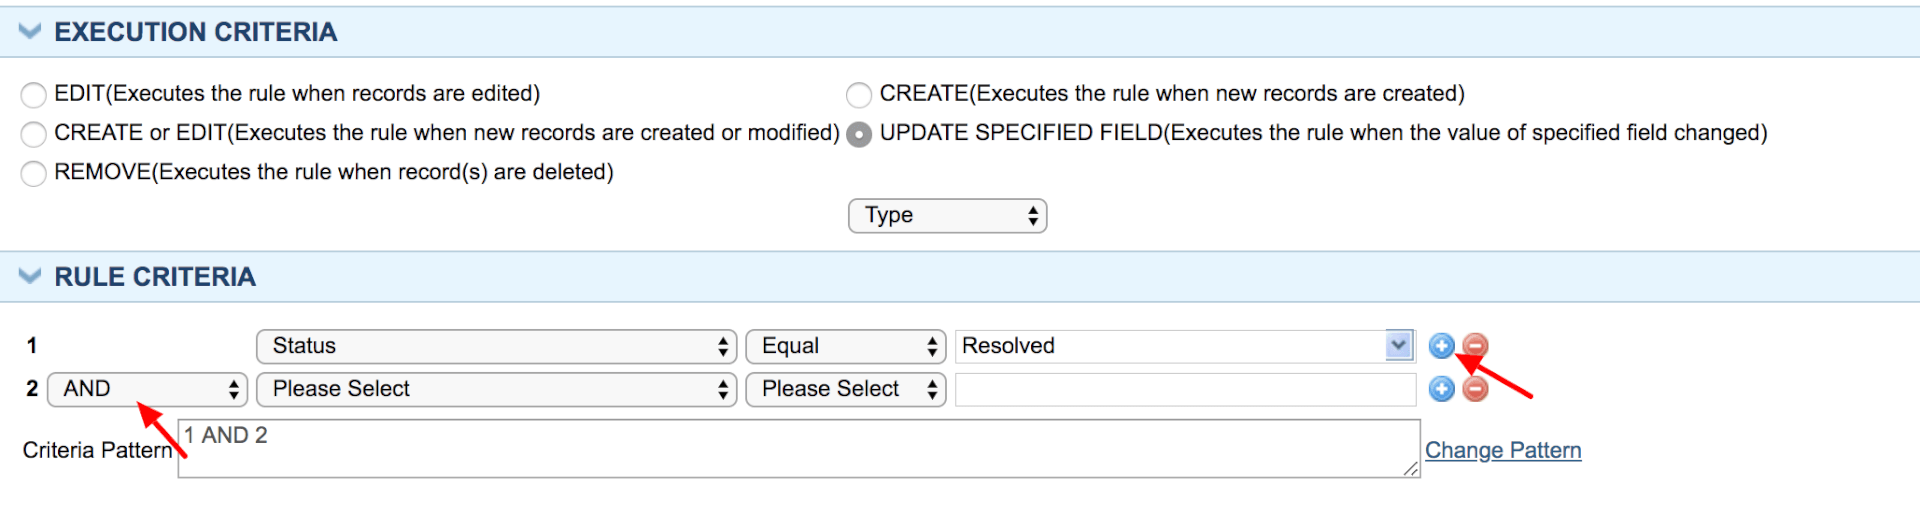

You can also set up more complex rule criteria by adding new lines using the
“Plus” icon. For example, the rule should work when the case type is a problem. So whenever the case’s type is a problem and its status is changed to “Resolved” the workflow will work. Make sure that you set
“And” between the rule criteria.
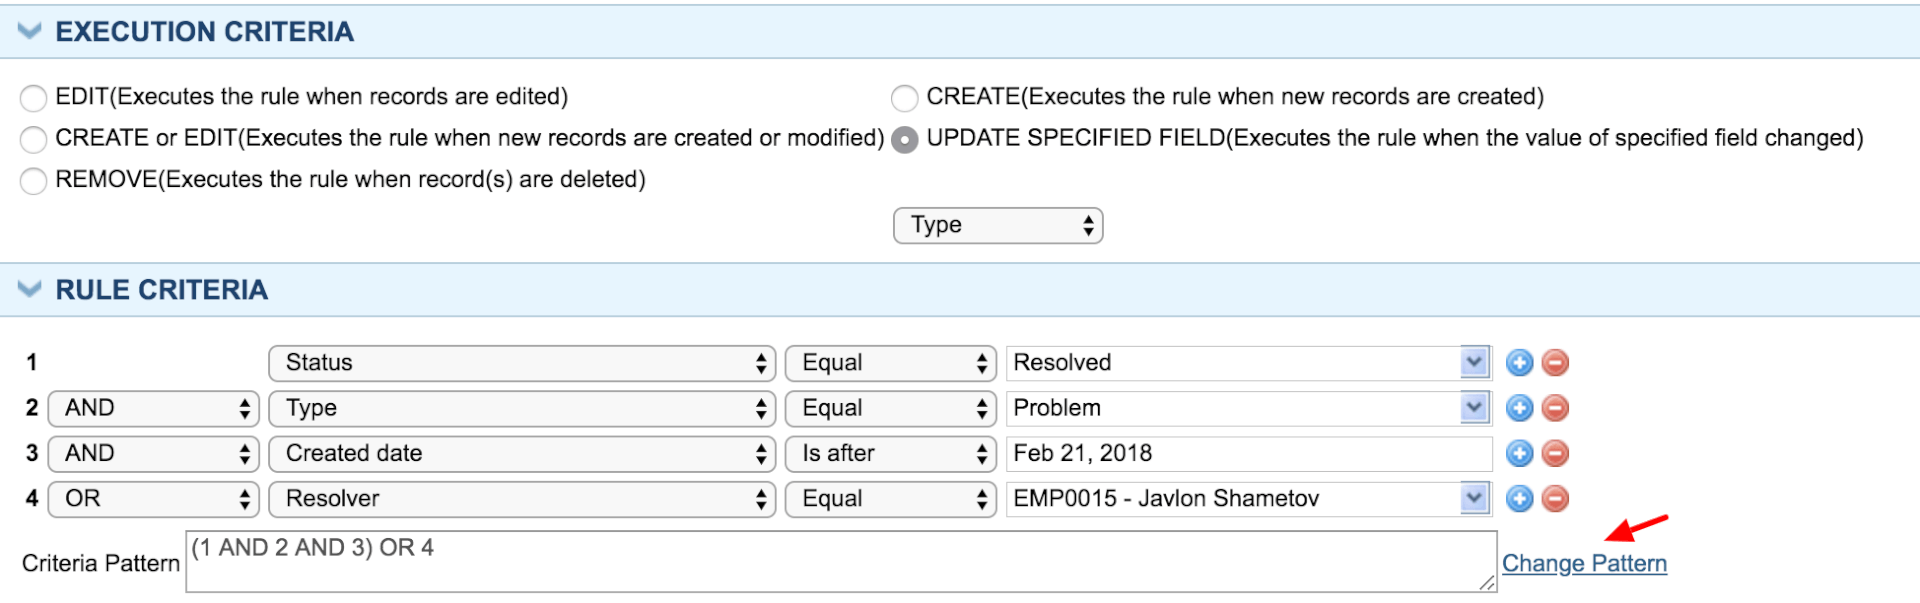
You can add more criteria the same way and change the criteria pattern
“And”, “Or”.
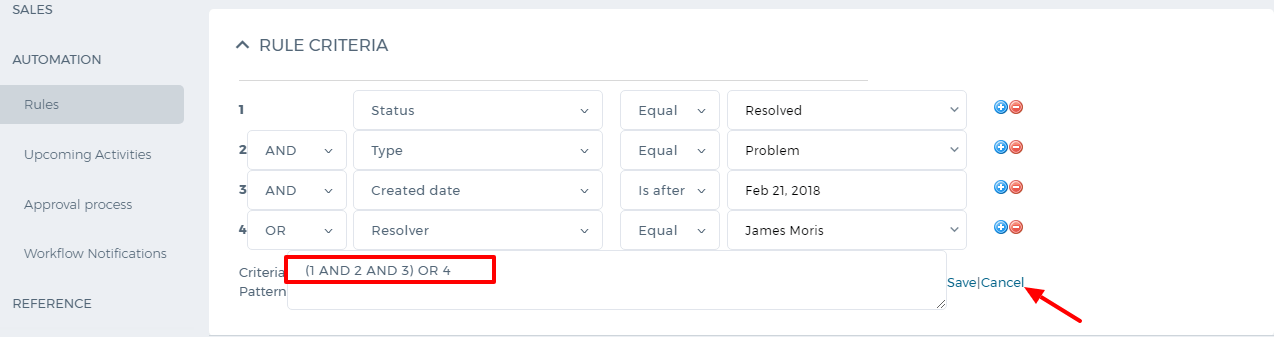
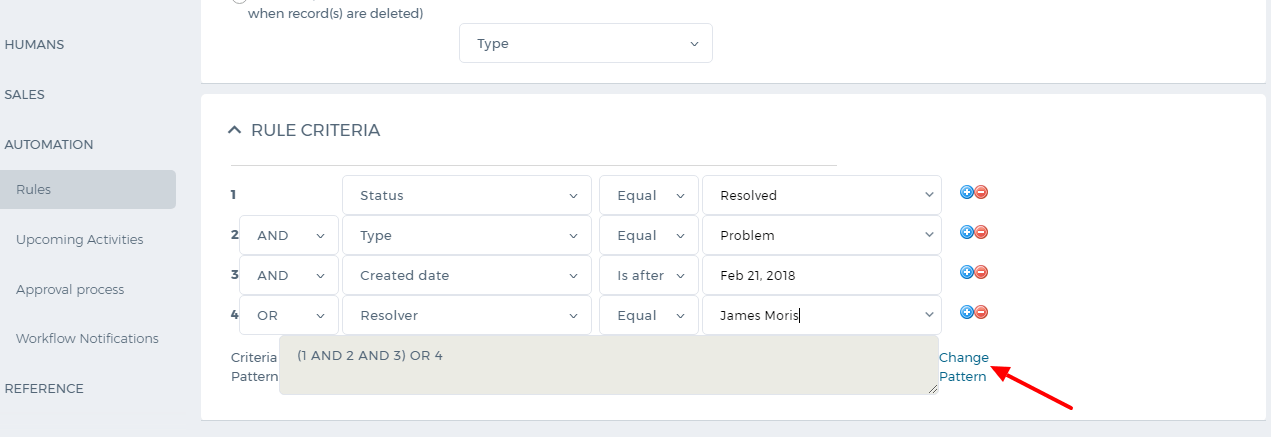
Using the
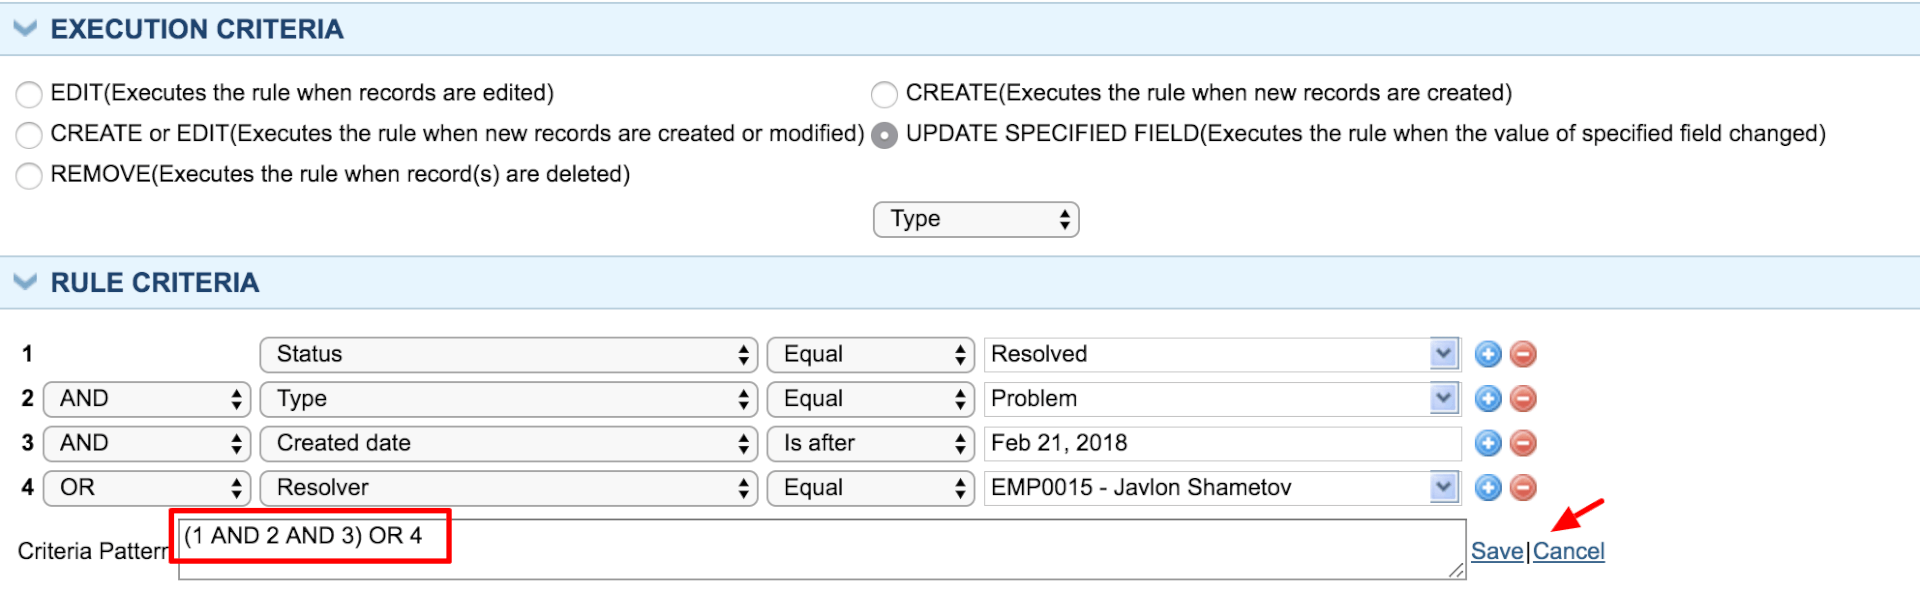
“Change Pattern” button you can apply a different rule to the set of criteria. In the screenshot below the pattern has been changed manually.
After you are done with setting up the rules, click on
“Save and Close” button. Now you can add alerts, tasks, activities or updates to the workflow.
To add an email notification, click on “Add Alert” button or go to Alerts subsection and add new. Choose from whom the notification should be sent in the “From Name”. Type the address of the recipient (if there is only one recipient) or choose a personalization attribute and paste it in the field.
Enter the notification’s subject, enter the content and save.
Now the workflow has been created. The same way, you can add tasks, events, and updates to the rule.
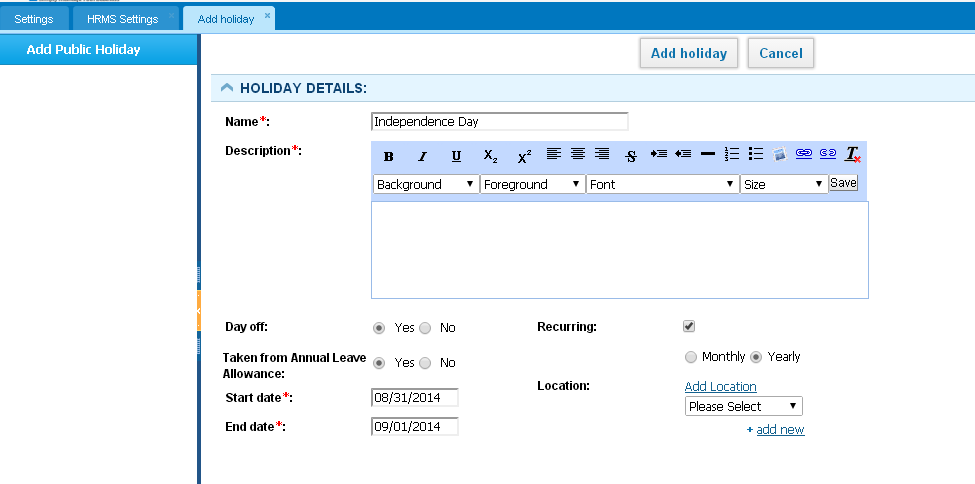
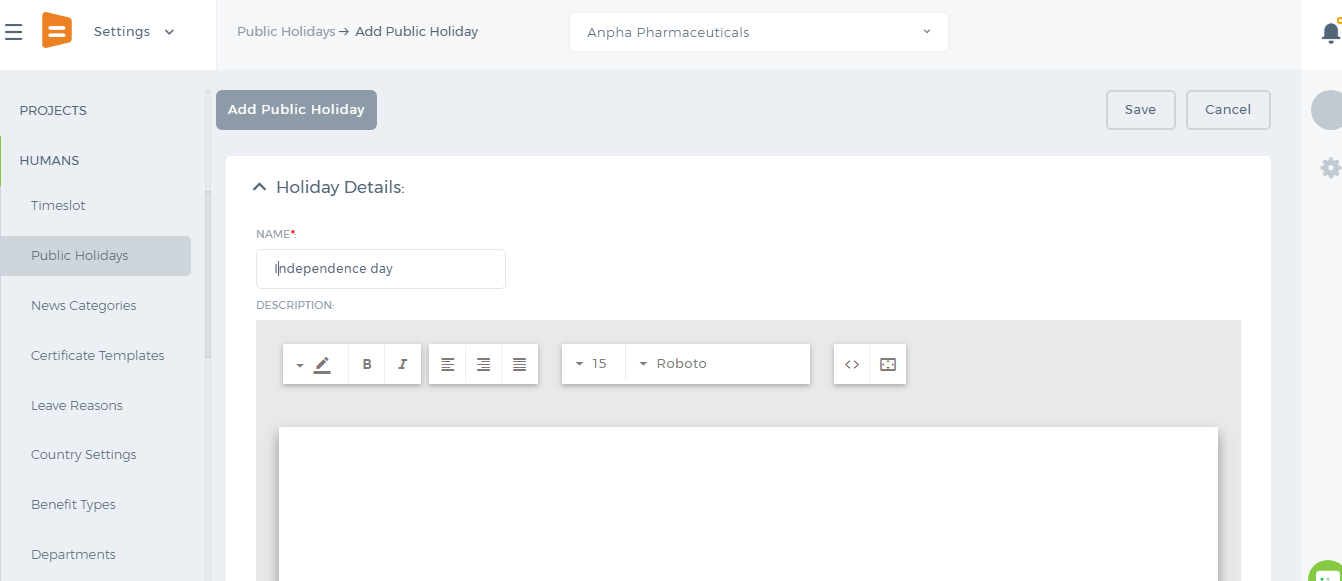
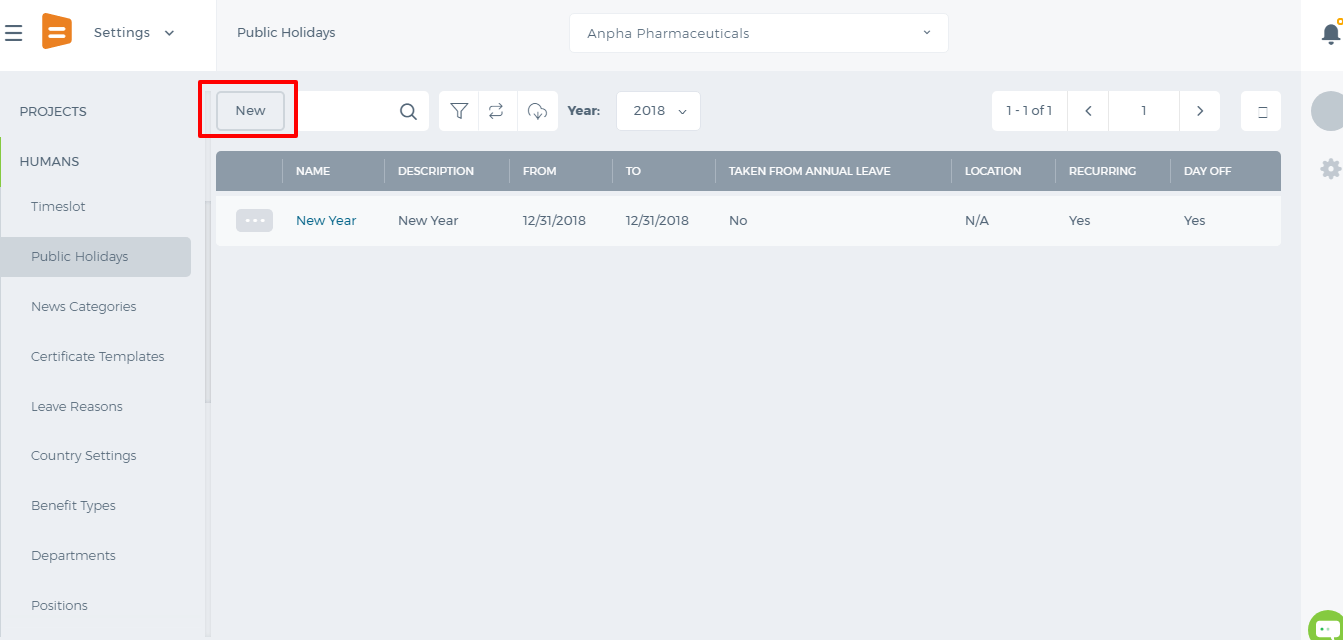
Public Holidays
Public Holidays
Timeslots
Timeslots
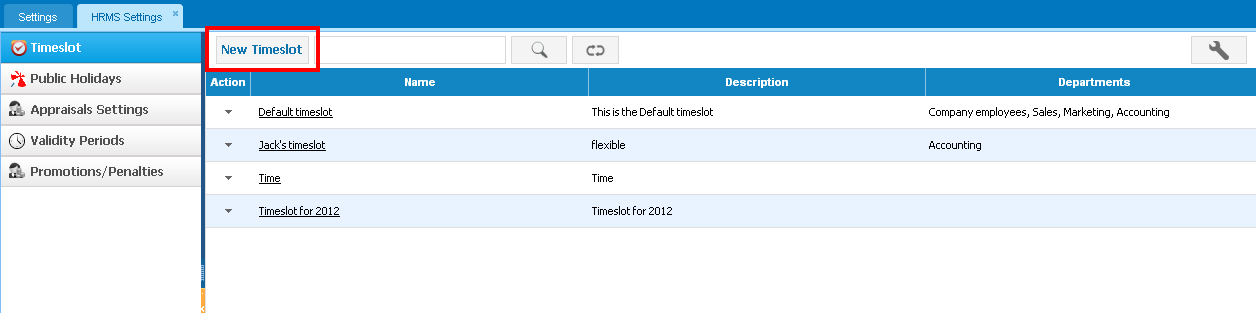
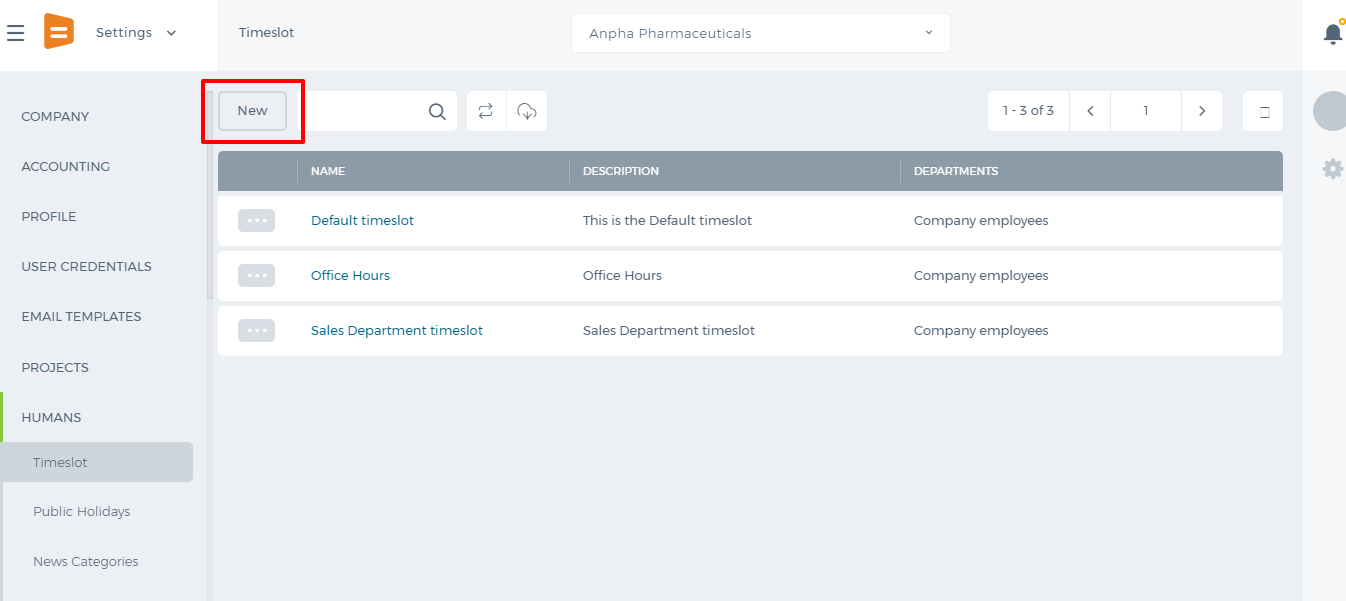
To add working timeslots, go to Settings>>HRMS Settings>>Timeslots page and click on
New Timeslot button.
Enter Name, Description of the timeslot and then specify working hours. You can also use the
Copy To All option if the working hours for the rest weekdays are the same.
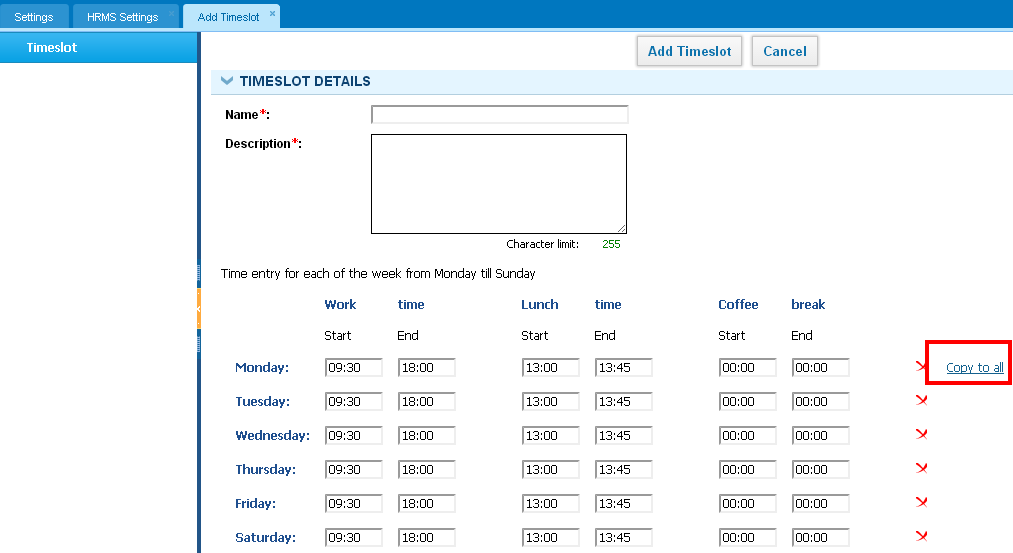
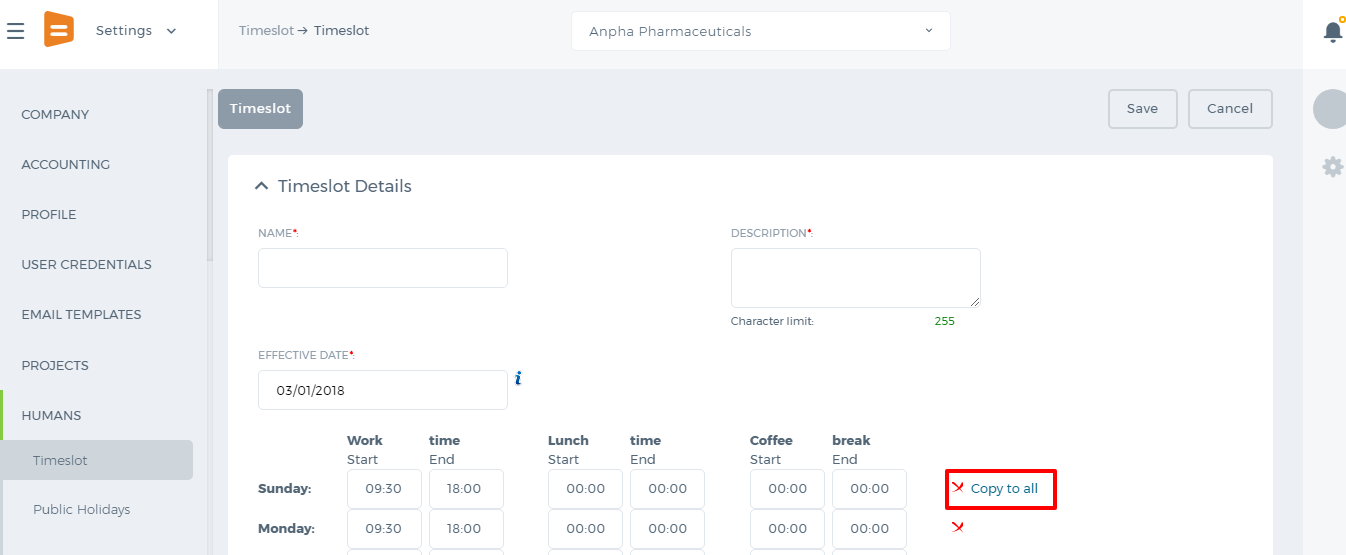
You can choose to remove a day (using the X icon) which is not a working day or just set 00:00 working hours instead.
You can add
Exceptional Cases when a working day starts/ends at a different time.

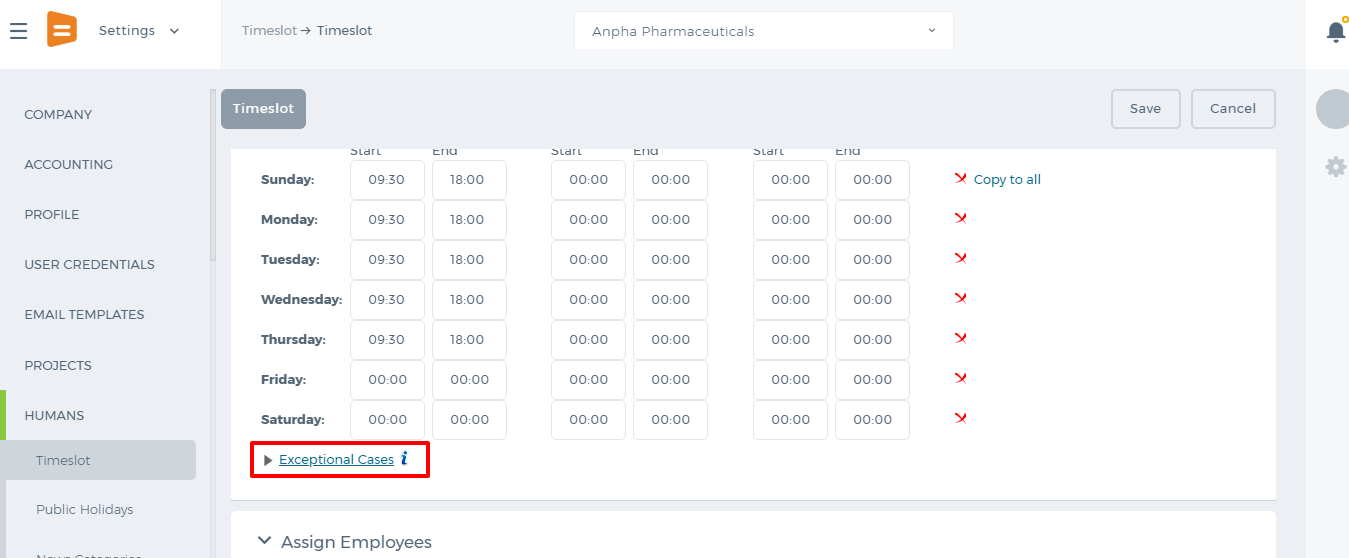
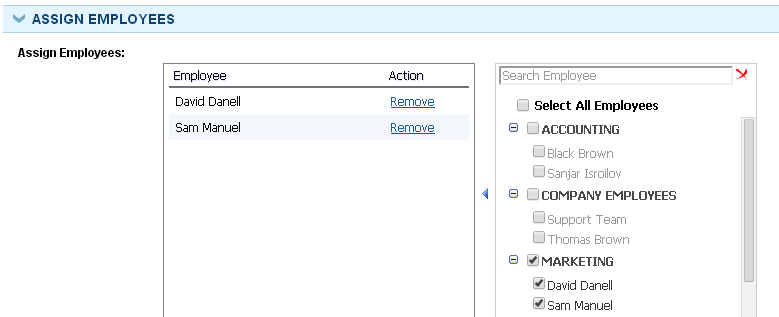
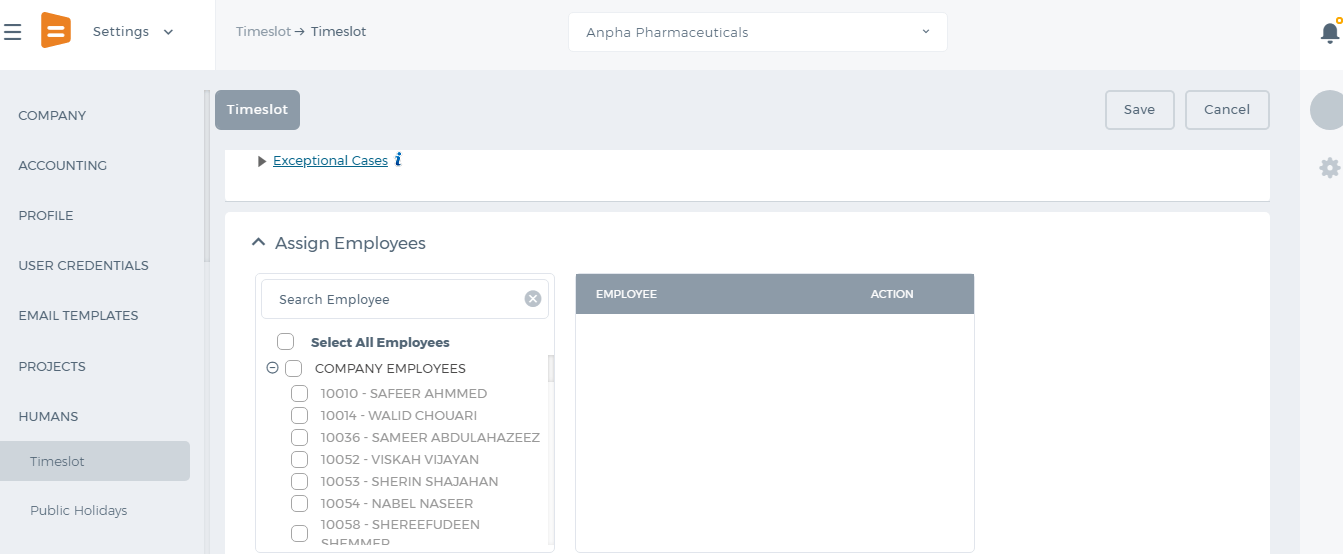
Once you have finished adding timeslot hours, you can assign employees who will be working according to that timeslot.
The set timeslots will be reflected in Timesheet and in HRMS Attendance Tracking.
Bonus Settings
Bonus Settings
The
Bonus Settings define how employees will score under the forced distribution ranking percentage schemes. Once the bonus settings are defined, the appraisal scores are calculated according to the forced distribution ranking schemes.
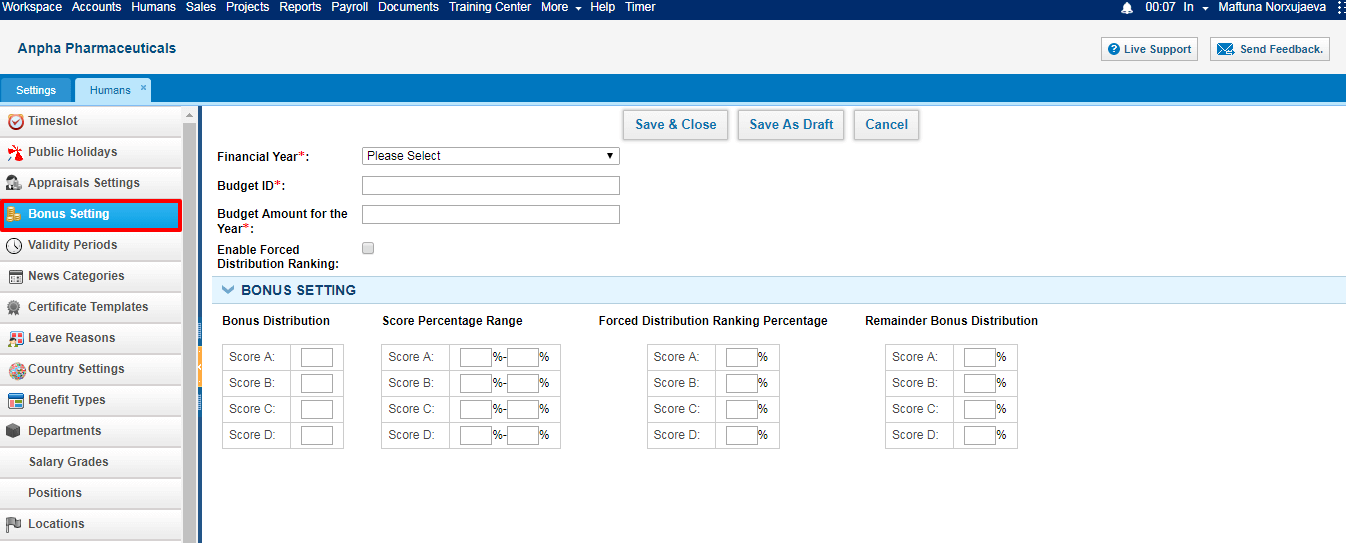
here are 4 scores in the
Forced Distribution Ranking Scheme – scores
A,
B,
C,
D. You can define the bonus distribution settings – how much salaries will A employees and B employees get, you can define how much employees should score in order to be in the A category.
Add Bonus Settings
While adding the bonus settings to the system, the following fields need to be defined:
Financial Year – The drop-down displays all “Bonus Type” validity periods added in
HRMS Settings -
Validity Periods. You can define your own validity periods
here.
Budget ID – The field is used for information
Budget Amount for the Year – Choose the budget amount for the financial year or the indicated bonus type of the validity period.
Enable Forced Distribution Ranking – If the forced distribution ranking is enabled, the Department Leader will not be able to send all period appraisals for approval, unless the performance appraisal scores fit the forced distribution ranking percentages.
Bonus Distribution - Define how many basic salaries employees will receive depending on their scores. For example, if A score employees receive 3 basic salaries as the bonus, write 3 to A field, etc…
Score Percentage Ranges – Define how much employees should score in order to get A, B, C, D scores. You should define the scores from 0 to 100 and the score percentage ranges cannot overlap.
Forced Distribution Ranking Percentage – Define how much bonus employees will get from bonus pot under forced distribution ranking percentage. For example, if employees score A, they will get 35% of the bonus pot.
Remainder Bonus Distribution – The remainder bonus distribution percentages if there is a remainder.
To receive more training on forced distribution ranking percentages, please contact kpi.com Support Team.
Validity Periods
Validity Periods
Validity Periods are used to configure performance appraisals, goal management and bonus distribution cycles. You can use validity periods while adding goals and performance appraisals.
Add/Edit Validity Period
In order to add validity period, go to
HRMS Settings -
Validity Periods -
Add Validity Period.

Indicate the following details and save the validity period:
Validity Period Name – a Short name like “Setting SMART Goals"
Description –Short description
Date – Date when validity period starts
To Date – Date when validity period ends
Related to – Select related to options: appraisal, goal, and bonus.

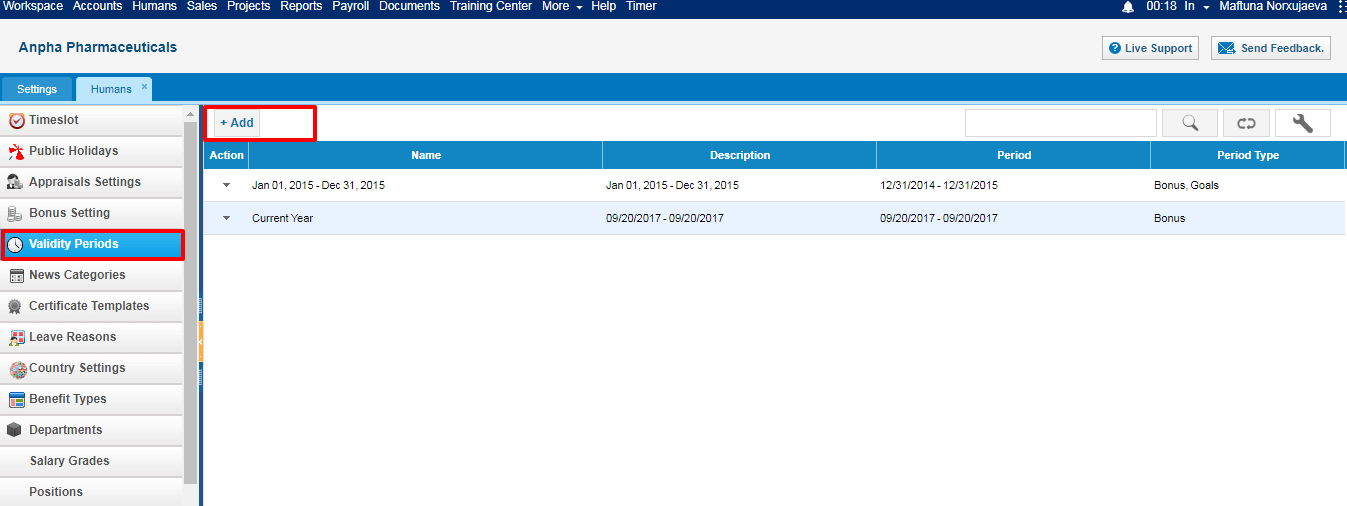
Contact kpi.com Support Team to enable the
Add Bonus Type of Validity Period feature.
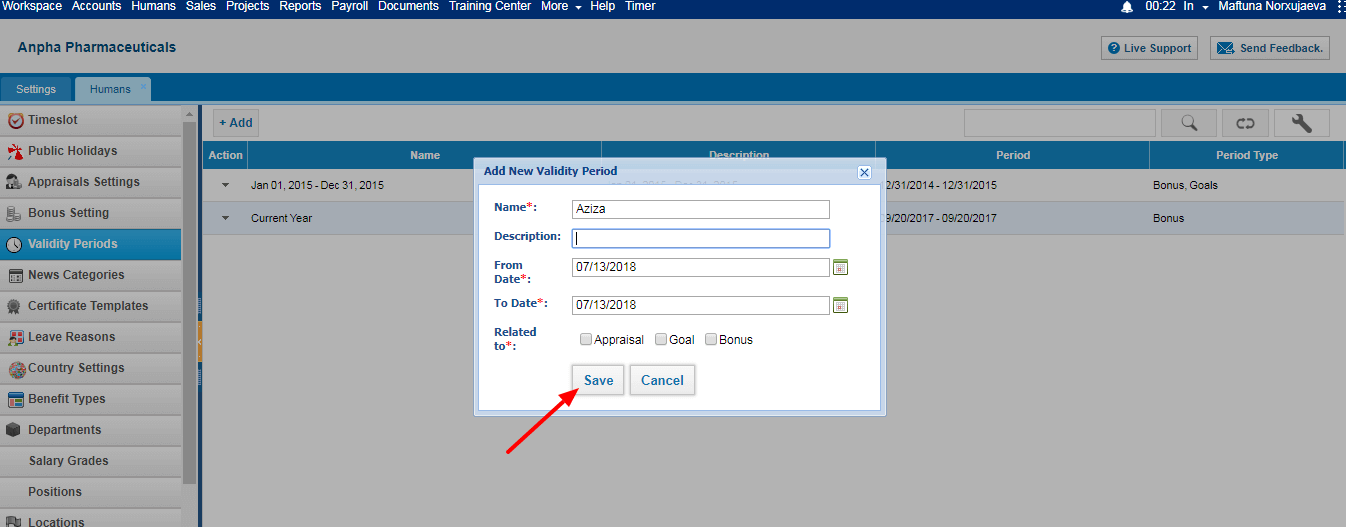
If there are already validity periods in the system which overlap from and to dates, the system will give an error message.
Remove Validity Period
You can remove the validity period, only if the period has not been used in appraisals, goals or in bonus distributions. To remove the validity period, select the Period from
Validity Period's listing and click
Remove from the Action dropdown.
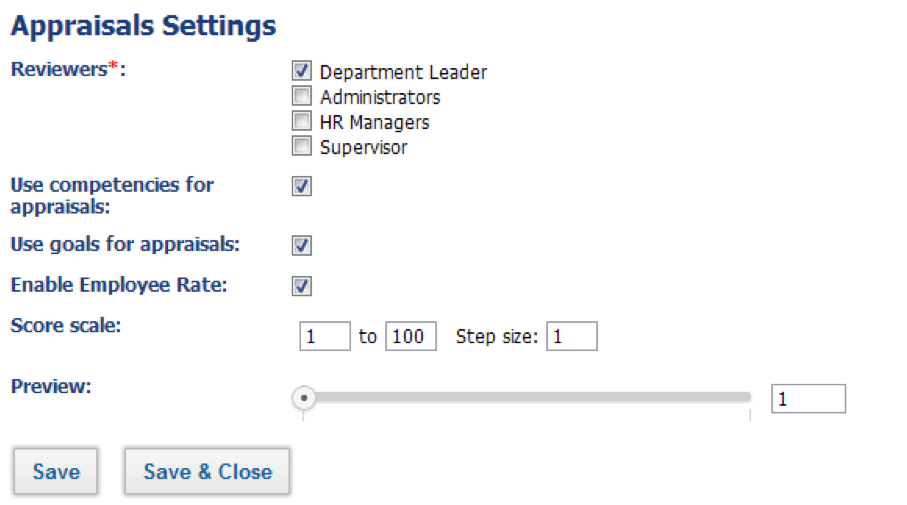
Appraisal Settings
Appraisal Settings
The
Appraisal Settings define who can review employees (administrators, directors, department leaders or supervisors) and how
reviews will be conducted.

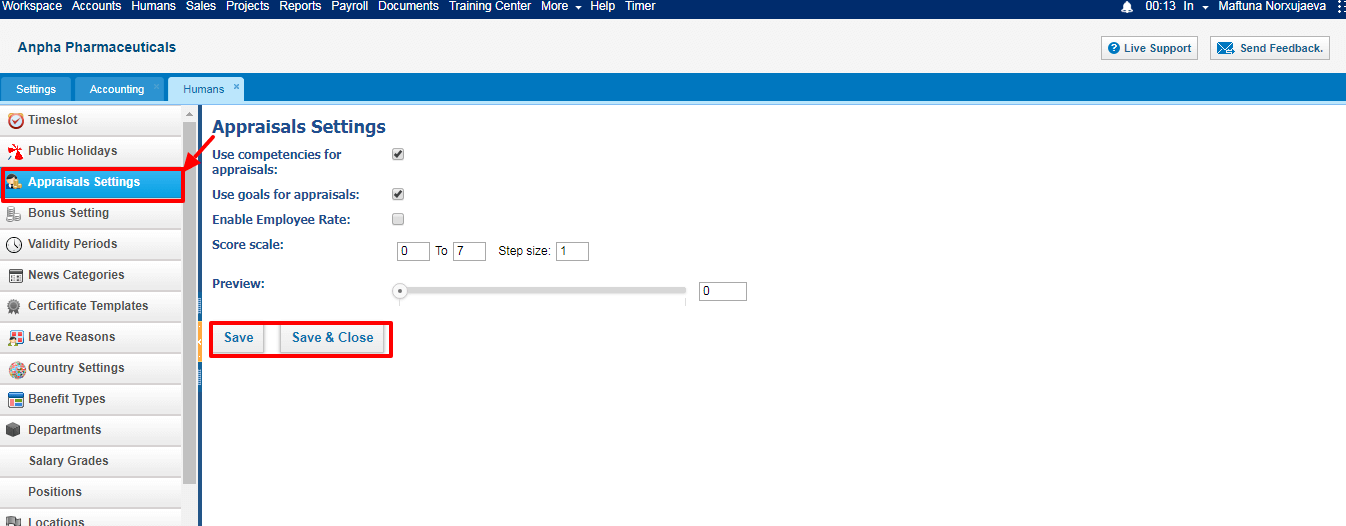 Reviewers
 - Default reviewers of performance appraisals are: Administrators, HR Managers and Department Leaders. If your company works under the Forced Distribution Ranking Percentage Scheme, you should choose department leaders only as reviewers.
Use Competencies for Appraisal – If you enable the checkbox, you will be able to review employees by their competencies.
Use goals for appraisals - If you enable the checkbox, you will be able to review employees by their assigned goals.
Enable Employee Rate – You can choose if employee can rate himself/herself in this checkbox.
Score Scale – Default score scales of appraisals from 1 to 7. You can define your own score scales.
If your company operates under the Forced Distribution Ranking Percentage Scheme, you should define scores from 1 to 100.

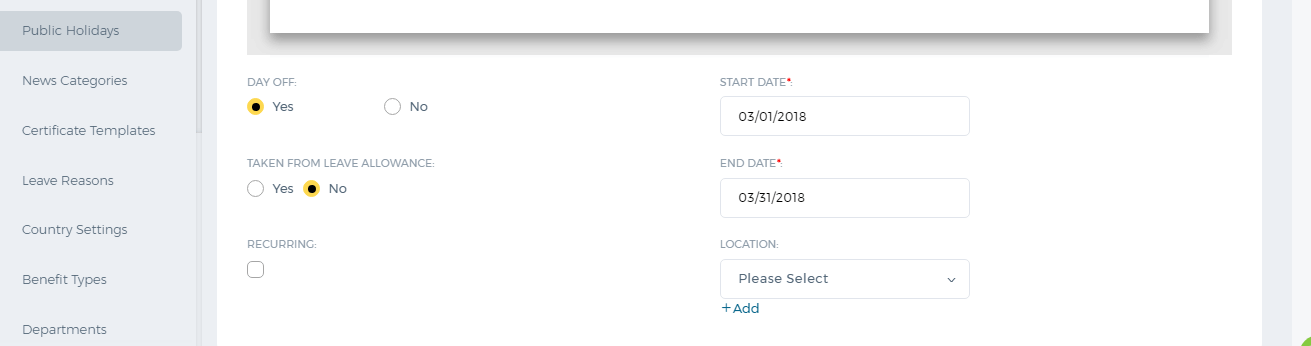
 If it is a recurring holiday, check "Recurring" box and choose "Monthly" or "Yearly".
Once the Recurring box is checked, the holiday will be added automatically to each coming year/month.
If it is a day off, the leave requests added to that date will not be counted and the left leave days per year will not decrease.
However, you can choose that it is taken from the annual leave allowance which will decrease the number of allowed leave days.
If it is a recurring holiday, check "Recurring" box and choose "Monthly" or "Yearly".
Once the Recurring box is checked, the holiday will be added automatically to each coming year/month.
If it is a day off, the leave requests added to that date will not be counted and the left leave days per year will not decrease.
However, you can choose that it is taken from the annual leave allowance which will decrease the number of allowed leave days.