Welcome to the new edition of kpi.com Accounting & Finance Guidebook.
- The section of «Getting Started» will view the whole accounting diagram to make your work easier with the Accounting software.
- «Accounting» is the first default tool in Accounting & Finance. It shows the whole features and explains the user how to manage, create and delete things like sales quotes, sales orders and purchase invoices.
- The second section, «Reports«, is the most important tool for accountants and managers since it illustrates all types of reports as Budget/Forecast, Journal Report, Profit & Loss, VAT Return, VAT Reports, Stick Valuation, Trial Balance, Account Transactions, Manual Transactions and Balance Sheet.
- «Settings» section gives you information on how to manage and set features and reports in the system. There are several types of settings as Company Settings, Tax Rates, Price Levels, Discounts, Measurements, Brands, Product Categories, etc.
- «Importing and Exporting» fully describes how to import and export files and what other applications can be integrated with kpi.com Accounting & Finance.
- «Customization Tool» makes your management on accounting easier and quicker with what you can control the existing files and documents by customizing.
- «Filtration Tool» provides you with an overview of all files and classes of documents.
- About KPI Software Companykpi.com ™ Software Company privately held by UK-based Finnet Limited firm. kpi.com provides an integrated stripe of software products for project management, customer relationship management, management of accounting and finance, e-commerce, reporting and human resources management. KPI enables companies to integrate the products to personal computers, minicomputers, network computers and personal digital assistants.kpi.com, is a simple, low-cost ‘All-In-One’ Cloud based Business application platform. The integrated suite of applications has been designed to remove the necessity of investing in on-site back office administration and control systems, thereby allowing firms to concentrate on delivering their core, value adding services to their customers. Delivering the solution via the Cloud enables management and staff to share information and manage their operations regardless of location, thereby increasing their efficiency, responsiveness and competitiveness whilst minimizing their investment in operational overhead.kpi.com’s cloud delivered SaaS ensures that all elements of the business are connected. Information, staff, sales and service, front office operations, back office functions, management and control are available immediately from any location and can be shared across the organization.Customer FeedbackWe appreciate you using our kpi.com Accounting & Finance and this Guidebook.Our customers’ comments and feedback are always welcome. You will find the Reader’s Questionnaire Form about kpi.com features at the end of the guide. Do not hesitate to mail your comments and wishes to the following e-mail address or you can directly contact with your kpi.com Support Manager.
E-mail: support@www.kpi.comPhone:(UK) +44 (0) 173 261 7967
(US) +1 844 726 84 46
(UAE) +971 4 424 3033Getting started will guide you through the each step in order for you to setup the base configuration under
which your Accounting and Finance system will operate.ACCOUNTING AND FINANCE OVERVIEW
kpi.com Accounting and Finance consists of following modules:
- Sales Quote, Sales Order and Sales Invoices, Credit Notes
- Purchase Order and Purchase Invoice
- Inventory – Products and Services
- Fixed Assets
- Expense Claims
- Bank Accounts, Chart of Accounts
- Accounting Reporting: Budgeting; Journal Report; Trial Balance; Profit and Loss, Balance Sheet
- Accounting Settings
-
Overall Accounting and Finance module can be used by both accountants and non accountants easily.
Accounting and Finance Module is integrated with Project Management and CRM, making your sales and
purchase cycles easier.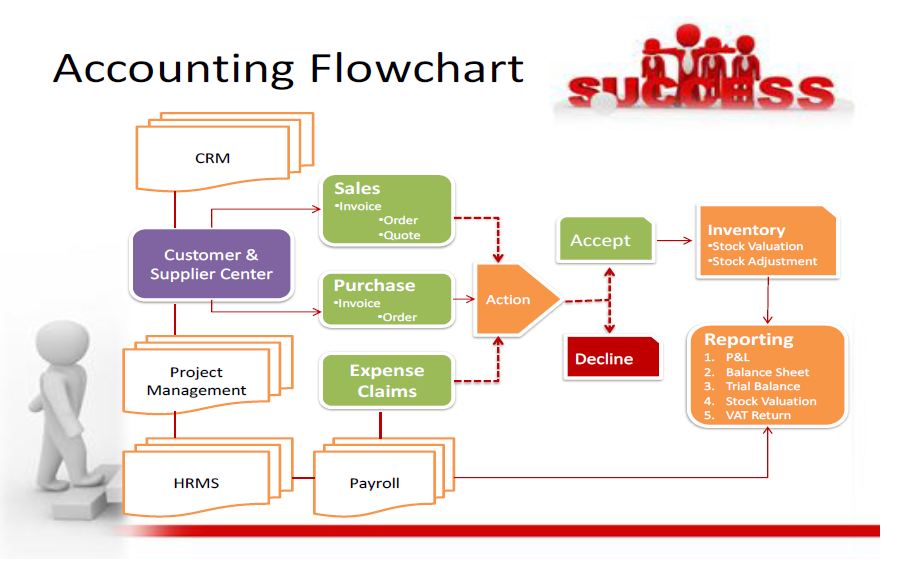 WHAT ARE THE STEPS?
There are 9 steps involved in Getting Started. In order to be able to complete each step, you will be needed to be logged in to kpi.com as a director of the organization. Introduction gives you general overview of the system, after which follows Company Settings, Add Employees, Financial Settings, Invoice Settings, Chart of Accounts, Account Balances, Balance Invoices and Done. It may take a few minutes to complete each step depending on the amount of data you wish to enter to the software.
HOW TO GET AN ACCESS
kpi.com Accounting & Finance tool is located on the top tab of the main menu as shown in the screenshot:

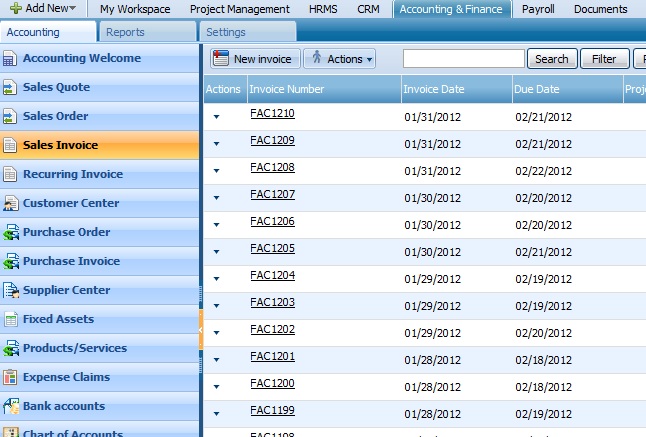
Accounting is known as a backbone of business to keep it profitable. The first section of kpi.com Accounting & Finance is the Accounting as it`s shown in the screenshot:
ACCOUNTING WELCOME
Accounting Welcome page gives you a chance to perform several functions as follows: - After logging on to the Accounting & Finance section you can view the ‘Accounting Welcome’ page where it visually describes the workflow of the system. You can Register a Quote [Sales Quote}
- Sales Quotes and proposals can be used in kpi.com as part of the CRM and Project Management Modules. Sales Quotes can be sent to contacts, leads, accounts and clients. Project Managers can use sales quotes in order to create proposals and send them to the clients before the start of the project.
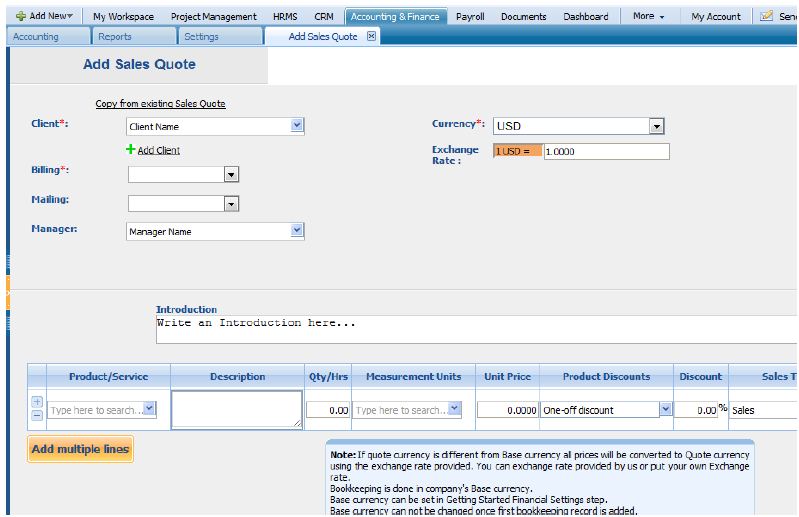
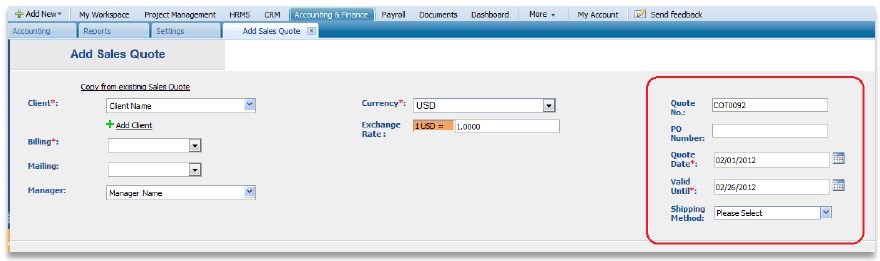
 NEW SALES QUOTESales Quotes can also be used to create Sales Orders for Inventory Management module.The form will appear with the following fields:Client — Select a company or an organization or a person you are sending a quote from the list of clients. You can also lookup the clients from the search box. If there are no clients registered in your company you can add new client from Add New Client link just below the client dropdown. You can edit the billing address by clicking edit billing address link below the address box. Address of Customer/Client can be defined from add/edit customer linksCurrency — Choose currency from the list of available currencies in the dropdown box. All the amounts in base currency (company currency) will be converted to the quote currency using the exchange rate on that dateExchange rate — You can use exchange rate automatically retrieved from today’s exchange rate. You can change the rate as for the date you are invoicing. All multi currency bookkeeping entries are done to Exchange Rate Loss/Gain account in Journal Report
Quote no. — Edit or use default quote number selected using Accounting Settings, Sales Quote Numbering Settings. In order to change the numbering format of the quote, please go to settings, accounting settings, invoice settings, invoice numbering and choose appropriate format there.
Quote Date — Indicate the date quote is created.
Valid Until — Indicate the deadline until which the sales quote will be valid for.
Shipping Method. – Choose a shipping method from the search box. If there is no shipping method, you can click on the Add Shipping Method button to fill in the form and save it.
Amounts Are:
Tax Inclusive – if amounts are tax inclusive, taxes will be retrieved from product prices.Tax Exclusive – if amounts are tax exclusive, then tax amount will be added to total price.No Tax — no tax will be included in invoice lines.Related Project — Select the project related to the client. Note that only the projects that belong to the clients will appear here.
Introduction — Enter introduction text to the body of the quote. Introduction text will appear at the header of the sales quote.
Products/Services:
Use add new line button in order to add new products or services to your sales quote.
Product Name – title of the product, required field
Product Description –description of the product which can be editable
Quantity/Hours – enter the quantity of the product.
Unit Price – selling price of the product
Discount – enter the discount percentage
Sales Type – enter the GL account for bookkeeping purposes
Net Amount – net amount displays the amount after applying the discount
Tax Rate – choose the tax rate from the tax rate dropdown menu. Tax rates are applied in percentage
Tax Amount – will indicate the value of tax after applying tax rate to net amount
Total Amount – the total of each line is displayed here
Terms and Conditions — Write terms and conditions in the box below. There is a character limit of up to 1000 characters in the box.

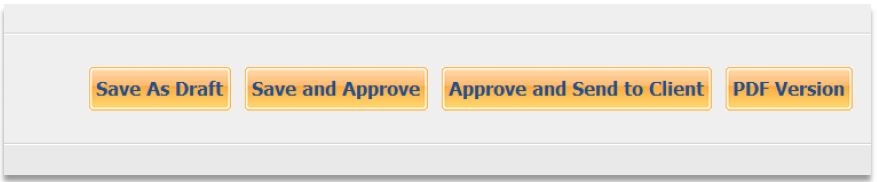
- Save as a draft – use draft status in order to be able to make changes and edit the items later. Draft Quotes can both be edited and deleted.
- Save and Approve – approved sales quotes cannot be edited or deleted.
- Approve and Send to Client – popup with your email templates opens. Once the quote is sent to client, client can approve the quote by logging in to KPI, or you can approve quote yourself once invoice is marked as open.
- PDF Version – print sales quote to PDF.
 Client Approval of the Sales QuoteOnce the sales quote is in open status, and the client has approved quote, you can record that by clicking client approve button.
 If client has rejected the quote, you can change the quote terms and send the quote back to client later. For that click reject button, and the quote.DELETE SELECTED QUOTETo delete one or several quotes, select those quotes and click on the Delete Selected Quotes button and choose Yes or No option.
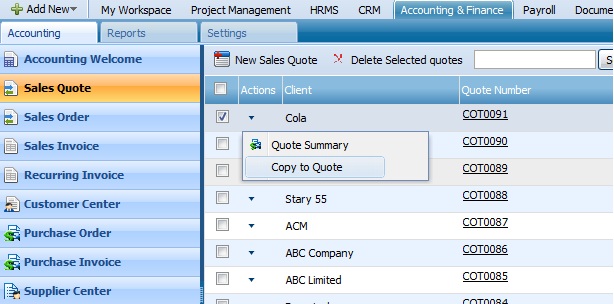
ACTIONS LIST
By default the Actions list drop-down is available on the first column of the Sales Quotes list. Once clicked, drop-down gives several options as displayed on the screenshot:
Quote Summary
The quote summary is located in the Actions list of each payment. Click on the Quote Summary to see details of the quote:
Client Approval of the Sales Quote
Once the sales quote is in open status, and the client has approved quote, you can record that by clicking client approve button.
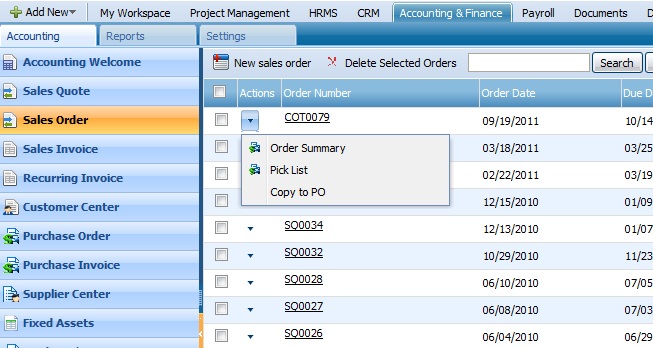
Converting Quote to Sales Order
Once the quote is approved by client, convert your quote to sales order using convert to sales order button.
Pick list is generated to each sales order converted. When you convert quote to sales order, you will be automatically redirected to pick list view.

Checking one of the radio buttons picked, packed, shipped, you can change the status of the sales order to picked, packed or shipped one. Fill out following fields:
- Carrier Account ID
- Ship Date – write date when the products will be shipped
- Expected Date – expected arrival date
- Carrier – carrier name
- Picked, packed, shipped radio buttons
- Select the warehouse from which product will be picked, packed or shipped using warehouse dropdown in products table.Copy to QuoteSelect the sales quote which you want to copy and select copy to new quote from the dropdown menu. All items except quote number will be copied to a new quote.
 SALES ORDERSales order is the list of items to be ordered to fulfill the promise in the client-approved sales quote.
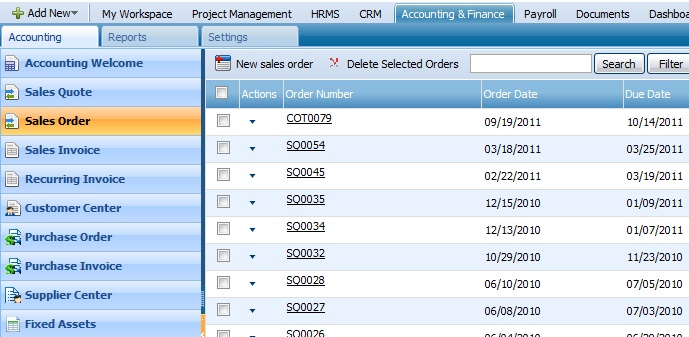 Copy to PO function in the action drop-down menu can copy the items in that sales order into a purchase order to be purchased.
SALES INVOICE
You can track your accounts receivables using Sales Invoices in kpi.com. You can add sales invoices, recurring invoices, and credit notes.
NEW INVOICE
To add a new invoice, go to Sales Invoice and click on New Invoice tab located on the top side of the page.
 Client — Select company or organization or a person you are invoicing to from the list of clients. You can also lookup the clients from the search box. If there are no clients registered in your company you can add new client from Add New Client link just below the client dropdown. You can edit the billing address by clicking edit billing address link below the address box. Address of Customer/Client can be defined from add/edit customer links.Related ProjectList of projects that belongs to the client will appear in the dropdown box. You can select related project and invoice details to the clients using this dropdown. If you are invoicing timesheet data to your clients, please use Project Based Invoice.Currency— Choose currency from the list of available currencies in the dropdown box. All the amounts in base currency (company currency) will be converted to the invoice currency using the exchange rate on that dateExchange rate — You can use exchange rate automatically retrieved from today’s exchange rate. You can change the rate as for the date you are invoicing. All multi currency bookkeeping entries are done to Exchange Rate Loss/Gain account in Journal Report.Invoice Date — The date of the invoice. If you’re entering an invoice issued prior to your conversion date from a previous system, make sure the date is prior to your conversion date so that this invoice can be associated with your Accounts Receivable conversion balance.Due Date — Enter the date the invoice is due to be paid to you.Period — Enter the start date and end date of the period you are invoicing to.
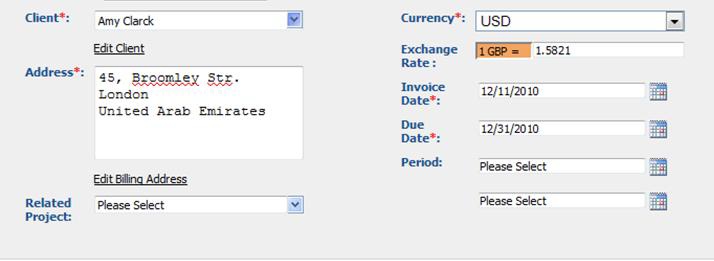 Invoice Number — Invoice number automatically generated from Accounting Settings, Invoice Settings. Define your own numbering standards in Invoice Settings. You can change invoice number and make it differently, while the sequence of invoice numbers will be continued from next invoiceQuote Number — Enter quote number of the invoice if available
PO Number — Enter the PO number being invoiced
Reference # — Enter a combination of letters and/or numbers as a reference if applicable.Amounts Are:Choose how VAT/Sales Tax will be calculated on invoice.Tax Inclusive – if amounts are tax inclusive, taxes will be retrieved from product prices.Tax Exclusive – if amounts are tax exclusive, then tax amount will be added to total price.No Tax — no tax will be included in invoice linesShipping Method — Choose Shipping Method from the list of shipping methods. You can define a shipping method here: Inventory tab -> Inventory Settings -> Shipping Methods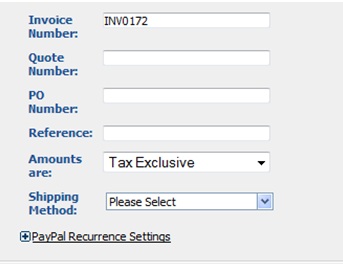 Products Services — Add new line item in order to add product/services to invoice. In order to add new product, click on product dropdown, select add new product, and add product using popup.Product Name– title of the product, required field
Product Description–description of the product which can be editable
Quantity/Hours– enter the quantity of the product.Unit Price– selling price of the productDiscount – enter the discount percentageSales Type – enter the GL account for bookkeeping purposesNet Amount – net amount displays the amount after applying the discountTax Rate – choose the tax rate from the tax rate dropdown menu. Tax rates are applied in percentageTax Amount – will indicate the value of tax after applying tax rate to net amountTotal Amount – the total of each line is displayed herePayment Instructions — Use payment instructions defined in Accounting Settings here.Bank Details — Choose the bank account that should be shown in invoice from the bank accounts indicated here.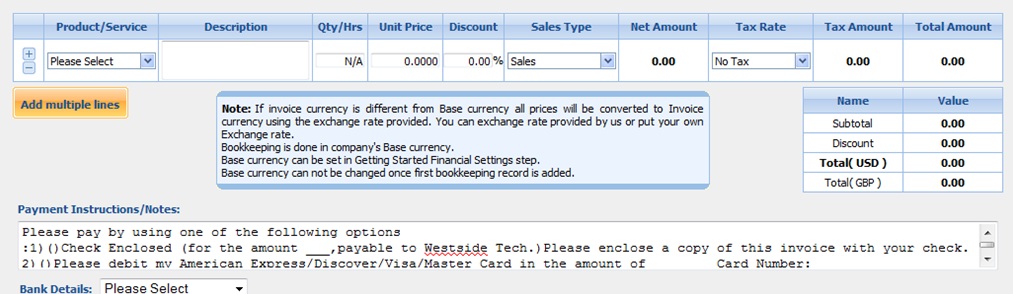 Invoice Options:Save as a draft – will save invoice in draft status. Draft invoices can be changed laterSave and approve – when the invoice is approved, the journal report is updated with the Accounts Receivable transaction. Approved invoices can also be edited and editing approved invoice will also edit the transaction created in journal reportApprove and Send to Client – the invoice will be sent to client by email using email templates.PDF Version
– allows to print the invoice in PDF Format
Invoice Statuses:Draft – draft status which can be edited laterApproved – payment can be made to approved invoices
Open – open invoices are those which are sent to the client, and awaiting paymentOverdue – if the due date of the invoice has already passed, and payment has not been made, the invoice will be in overdue statusPaid – paid invoices are already closed with the payment received. Only fully paid invoices will be closed with the paid statusACTIONS LIST IN SALES INVOICE LIST VIEW
The Actions list drop-down is available on the main tab of Sales Invoice page. Once clicked, drop-down gives several options as displayed on the screenshot:
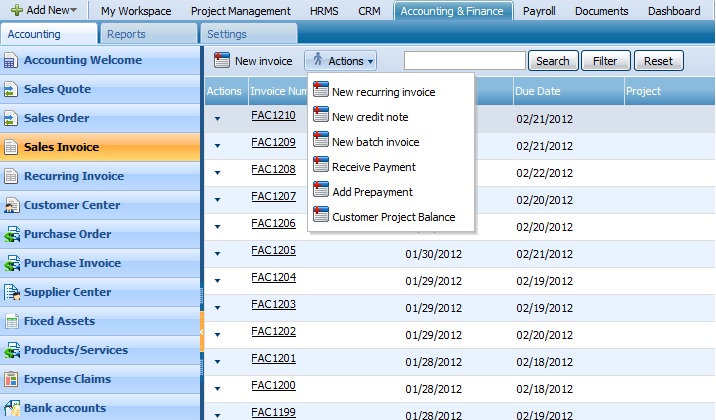 New Recurring InvoiceRecurring Invoice is recurring service that creates invoices at a give date and time. This feature can be used to create invoice which are automatically send to a client as well as creating invoices as a draft, to be reviewed before being sent to a client.
New Credit Note
You can add Credit Note from link in Invoice List.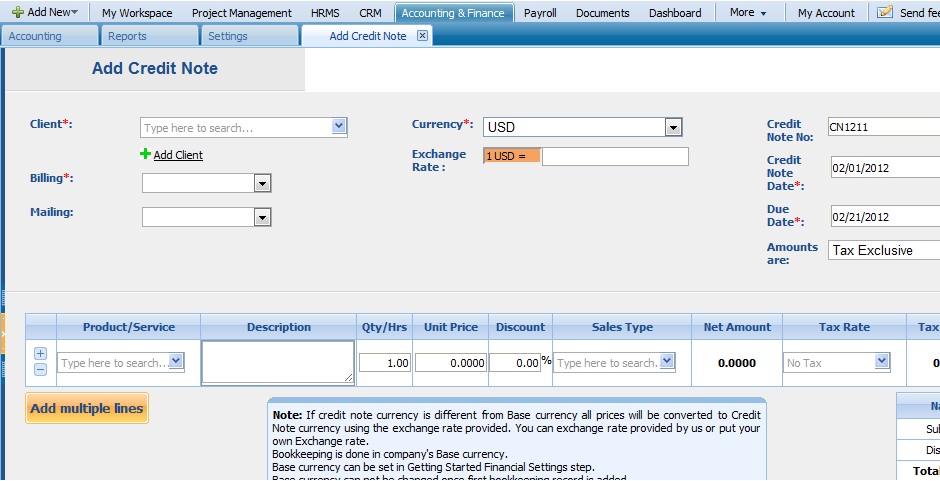 Click on Credit Note Fields for more information.
New Batch Invoice
Batch Invoice writes an invoice for more than customer. In the first step you can select the items to be put on the invoice and in the next step you can select the client it needs to be sent.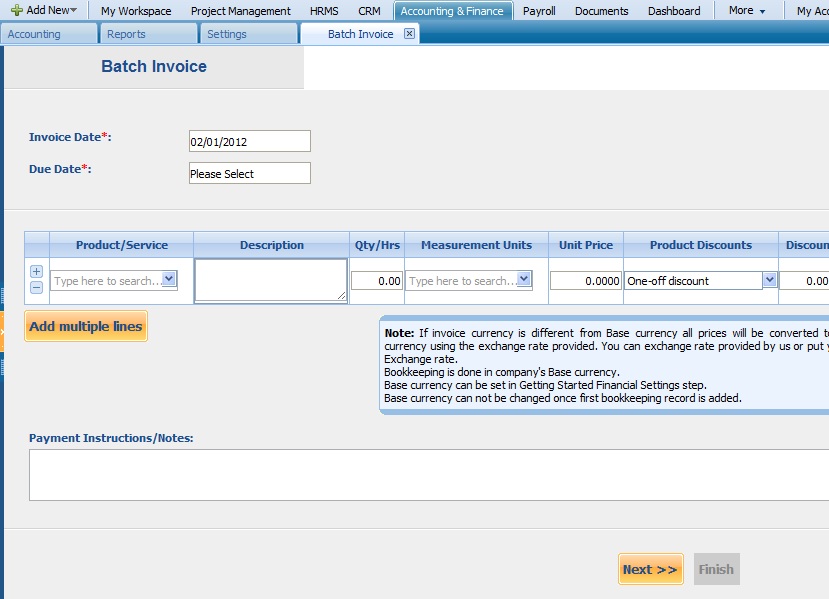
Receive Payment
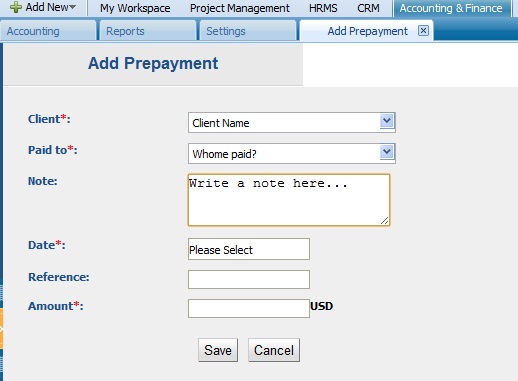
Receive payment option in the actions drop down allows you to make payment to multiple invoice of a single client at once. First, the client is selected and ‘Apply’ and it will show all outstanding invoices of that client. After typing the payment for each invoice ‘Save’ needs to be clicked to save the payments entered.Add Prepayment
This new feature is similar to down payment for the invoice. In some case the amount of the invoice is so big is that a down payment is required. This feature is used to solve this problem. This feature also relates the project invoicing and customer project balance together.To add a prepayment, go to Sales Invoice section and click on the main Actions List button and choose Add Prepayment tab: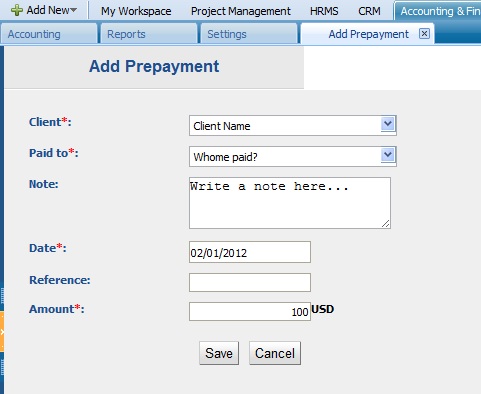
Customer Project Balance
Customer Project balance is related to balance of the client and project that the client has been procured the company with. For example, a single client may various project and they may require different percentage of funding different stages of each individual projects.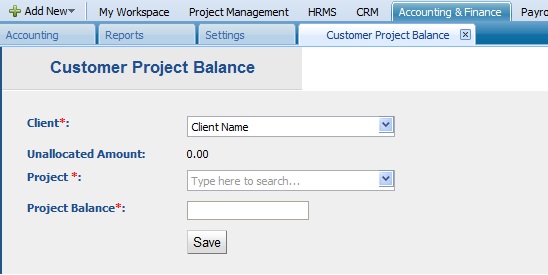 ACTIONS LIST 2By default the Actions list drop-down is available on the first column of the Sales Invoice list. Once clicked, drop-down gives several options as displayed on the screenshot:
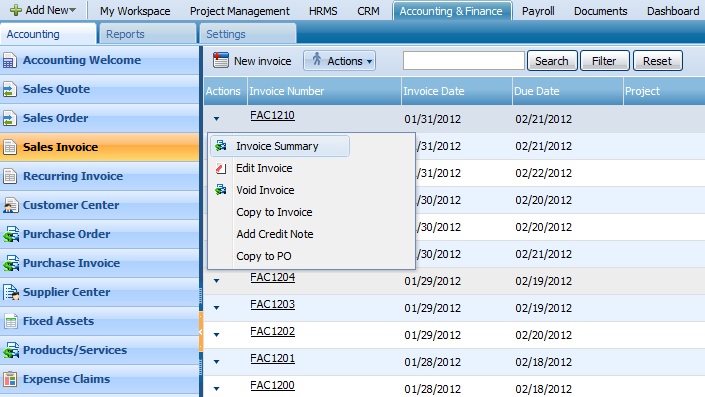
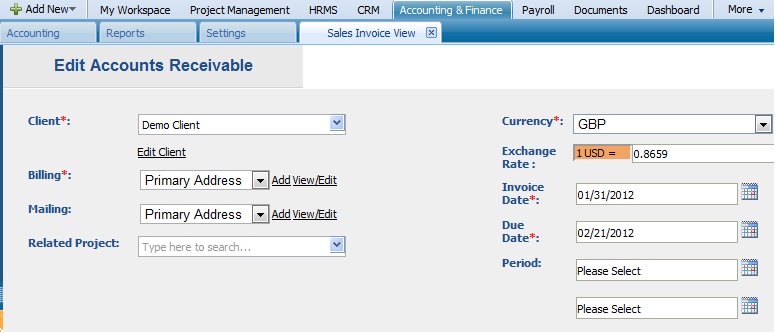
Invoice Summary
To view the summary of an invoice, click on the Actions List from Sales Invoice section and choose Sales Invoice View function:
Edit Invoice
To edit an invoice, click on the Edit Invoice button through Actions List of Sales Invoice.
 Void Invoice
You can void the given invoice in action menu of the chosen invoice in invoice list. When an invoice is voided, a reverse transaction is created in the Journal Report. Accounts Receivable will be credited and the sales type for which the invoice is being voided will be debited, thus cancelling out the transaction.
Void Invoice
You can void the given invoice in action menu of the chosen invoice in invoice list. When an invoice is voided, a reverse transaction is created in the Journal Report. Accounts Receivable will be credited and the sales type for which the invoice is being voided will be debited, thus cancelling out the transaction.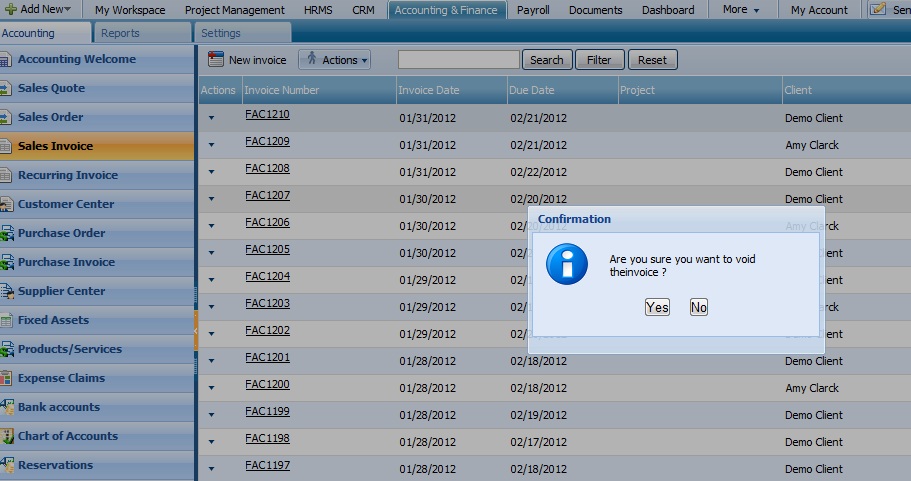
Copy to Invoice
Record a payment received by customer by clicking the approved or open invoices. Payment screen will automatically be opened in the approved or open invoices. You can record either partial or full payments done by customers.Indicate following information when making payment:Payment Amount – is the amount of payment received by customers. If your invoice is multi currency invoice, record the amount received in client currency.Date – choose the date when payment was made.Account – choose the GL account from which payment will be credited.Ref. no# — Reference or slipnumbers associated with the payment.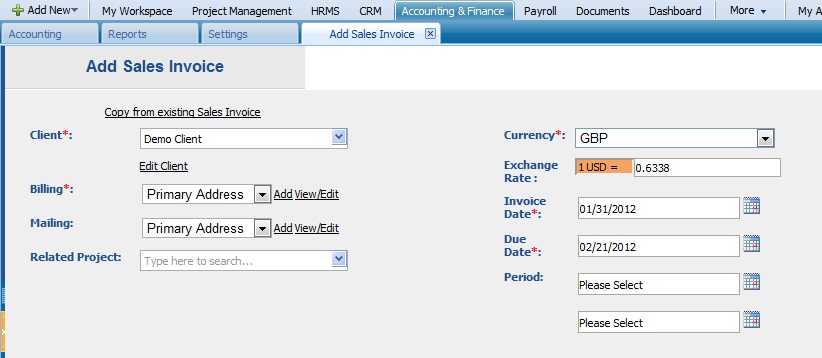
Add Credit Note
To add a credit note, click on the Add Credit Note button through Actions List of Sales Invoice and fill in the form appeared: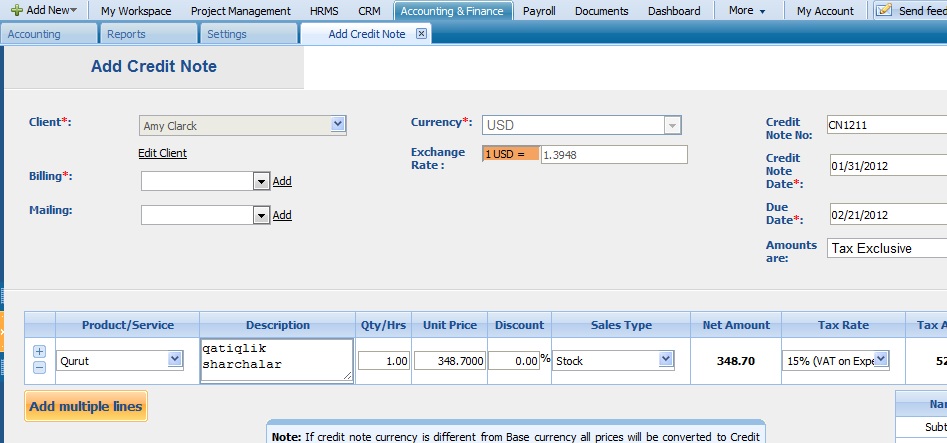
Copy to PO
Copy to PO function in the action drop-down menu of the sales invoice can copy the items in that sales invoice into a purchase order to be purchased. When copied from a sales invoice it copies the items and puts the cost amount of the product.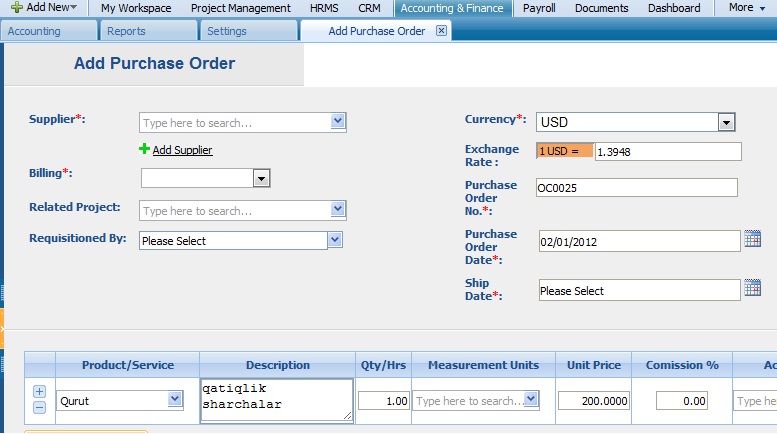
RECURRING INVOICE
Recurring invoice is creates a draft or invoice at a given time with deserved products or service. This feature is useful where there are many clients and they are charged a certain amount in every certain time (i.e. every day/week/month/year). The feature also includes creating the draft version to be reviewed before sending to a client as well as the invoice version which can be emailed without a review.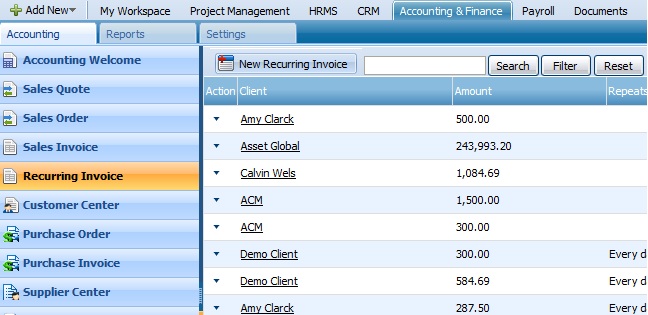
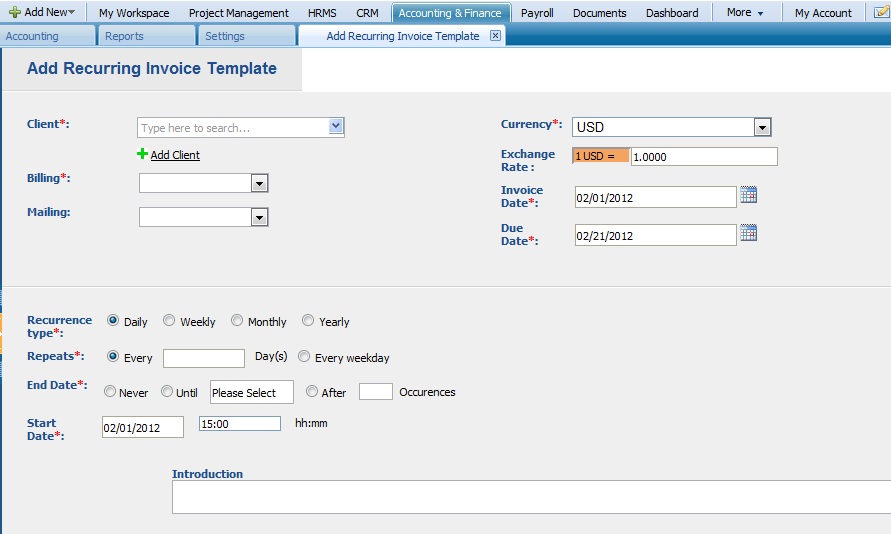
NEW RECURRING INVOICE
To add a new recurring invoice, go to the section of Recurring Invoice and click on the New Recurring Invoice button. You should fill in the form in order to save the new recurring invoice: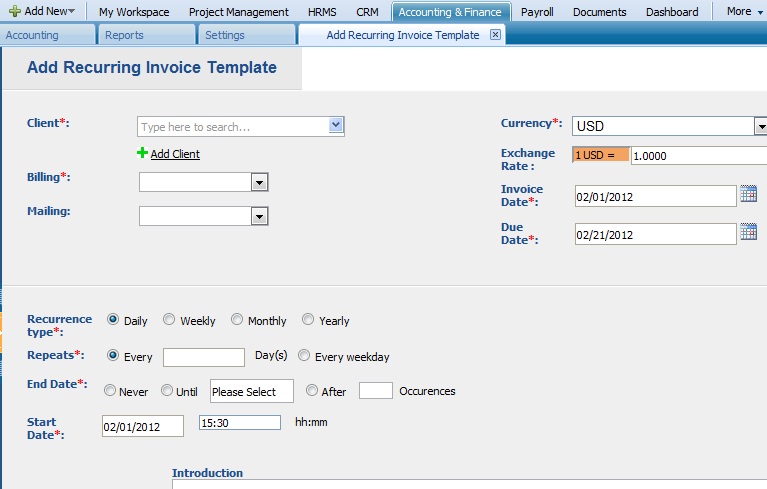
ACTIONS LIST
By default the Actions list drop-down is available on the first column of the Recurring Invoice list. Once clicked, drop-down gives several options as displayed on the screenshot: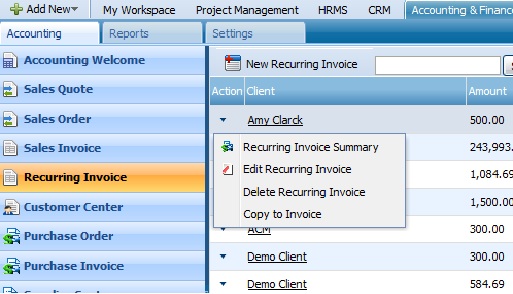
Recurring Invoice Summary
To view a recurring invoice summary, click on the Recurring Invoice Summary from the Actions List drop down of Recurring Invoice section.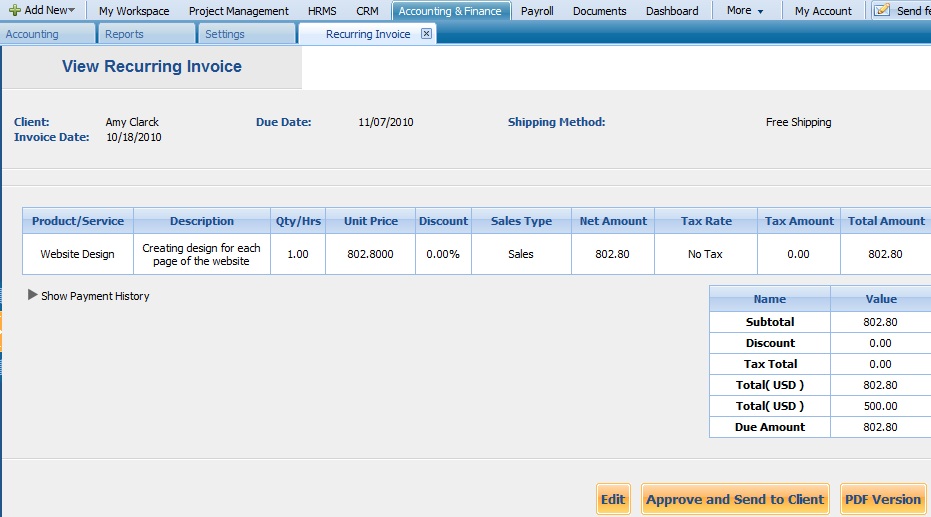
Edit Recurring Invoice
To edit a recurring invoice, click on the Edit Recurring Invoice from the Actions List drop down of the Recurring Invoice section: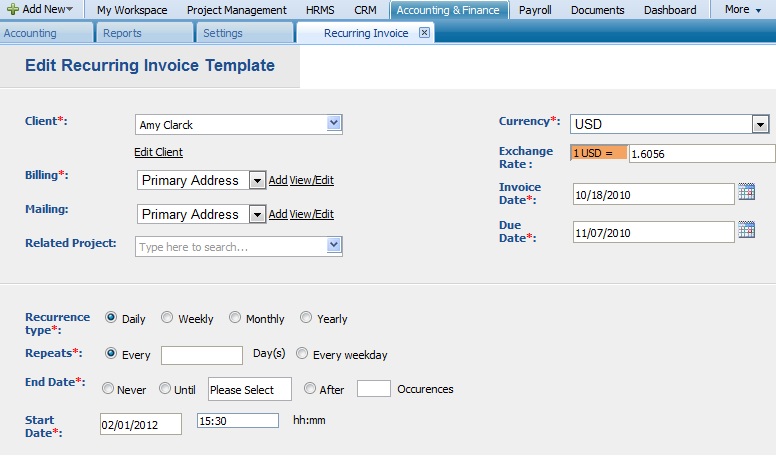
Delete Recurring Invoice
In order to delete a recurring invoice, click on the Delete Recurring Invoice button from the Actions List of the Recurring Invoice section:Copy to Invoice
To copy the recurring invoice to invoice, click on the Copy to Invoice feature in the Actions List drop down of the Recurring Invoice section:CUSTOMER CENTER
Customer Center is where everything is located about the customer with regards to accounting information can be found. This can be billing address, terms and conditions, customer balance, etc. Customer Center List View also displays the customer and along with their balances and that view can be customized and sorted as desired.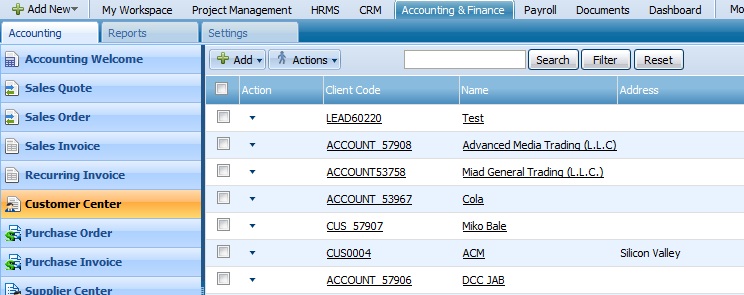
ADD CLIENT
You can add a new client by clicking on the New Client button that is located on the top menu of Customer Center page: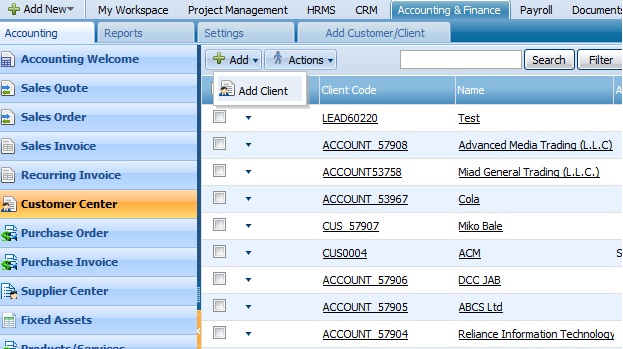
ACTIONS LIST 1
By default the Actions list drop-down is available on the first column of the Customer Center list. Once clicked, drop-down gives several options as displayed on the screenshot: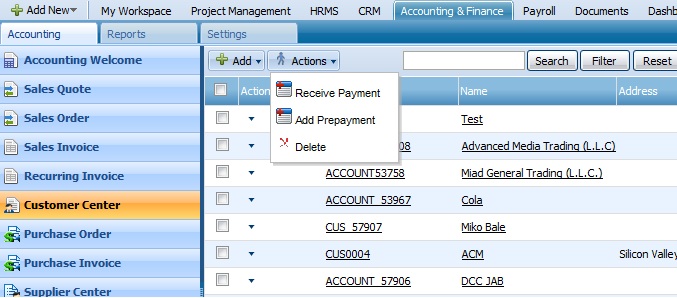
Receive Payment
Receive payment option in the actions drop down allows you to make payments from the customer center. First, the client is selected and ‘Apply’ and it will show all outstanding invoices of that client. After typing the payment for each invoice ‘Save’ needs to be clicked to save the payments entered.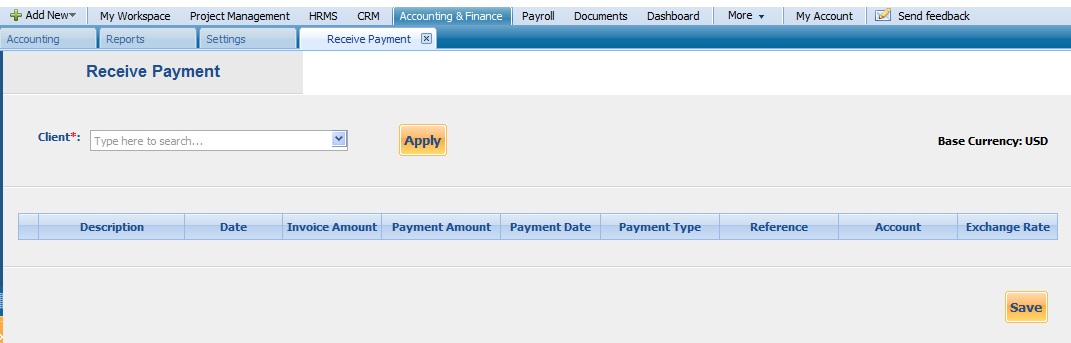
Add Prepayment
Prepayment can be added through Actions list that is located on the main tab of the Customer Center section:
ACTIONS LIST 2
By default the Actions list drop-down is available on the first column of the Customer Center list. Once clicked, drop-down gives several options as displayed on the screenshot: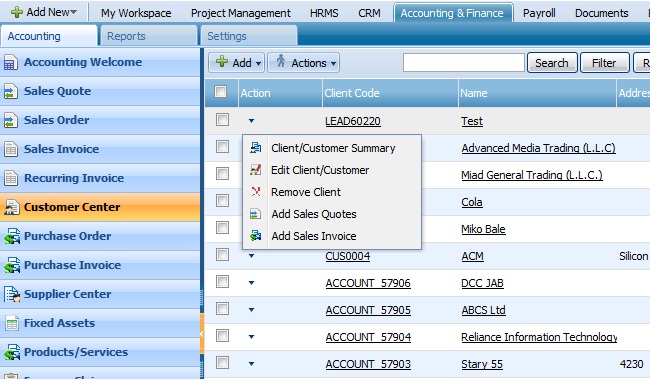
Client/Customer Summary
The client/customer summary is located in the Actions list of each client. Click on the Client/Customer Summary to see details of the client/customer.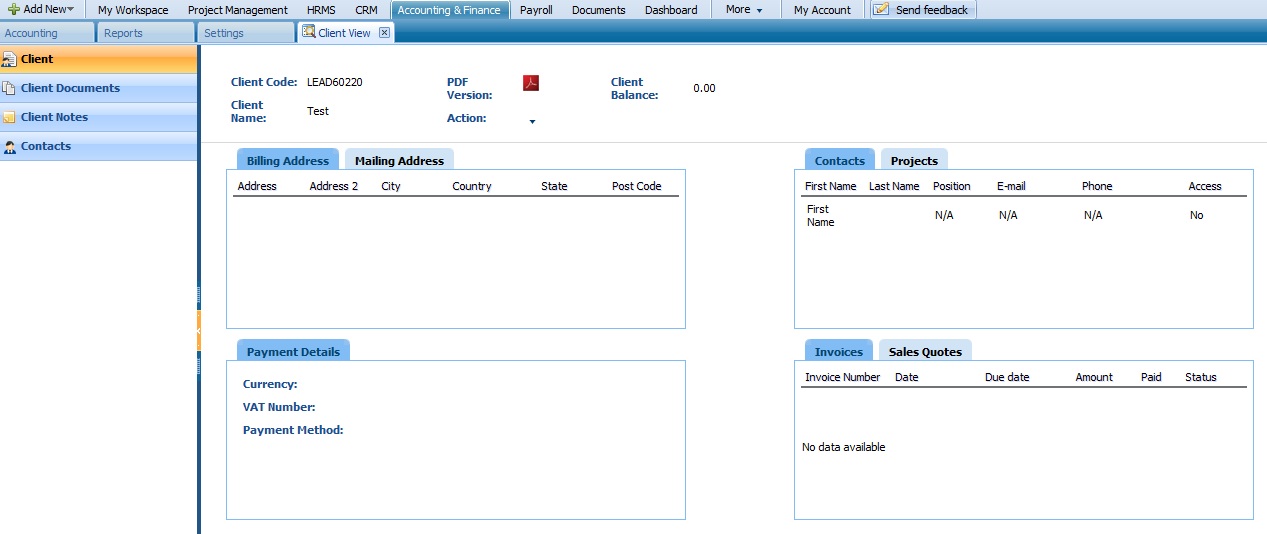
Edit Client/Customer
To edit a client/customer details, click on the Edit Client/Customer from the Actions List drop down of the Customer Center section: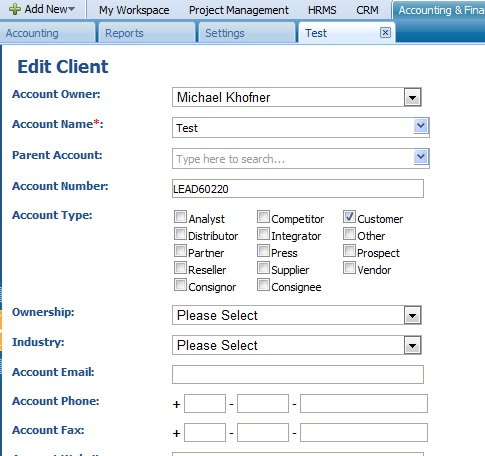
Remove Client
To remove one of the clients from the list, click on the Remove Client button and choose an option from Yes or No.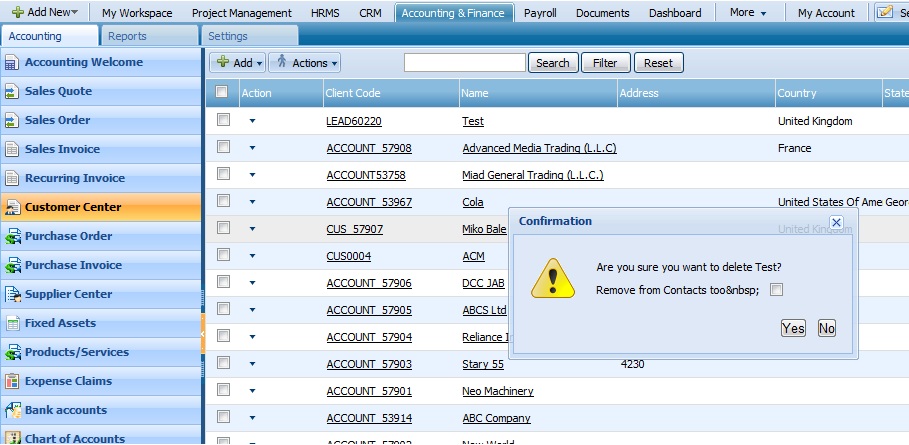
Add Sales Quotes
You can add sales quotes directly from Customer Center section through Actions List:Add Sales Invoice
You can add sales invoice directly from Customer Center section through Actions List:
PURCHASE ORDER
Purchase Order is list of products or services to be promised to be purchased from a supplier. Purchase orders can be used in kpi.com for Supplier Relationship Management Purposes. Send your purchase orders for projects online, and use them for project costing purposes. All purchase orders related to project can be seen from project management, project summary view.
NEW PURCHASE ORDER
You can add new purchase order either from Purchase Orders menu or from Add New Menu in Accounting. Purchase Order Fields — Complete all required field of purchase order in order to be able to save it.Supplier — Choose the supplier from the dropdown of suppliers you’ve created. You can add new supplier if there are no suppliers in the list. You can either search your suppliers from lookup or use dropdown in order to select the supplier. Use edit billing Address Link in order to change the details in billing address field.
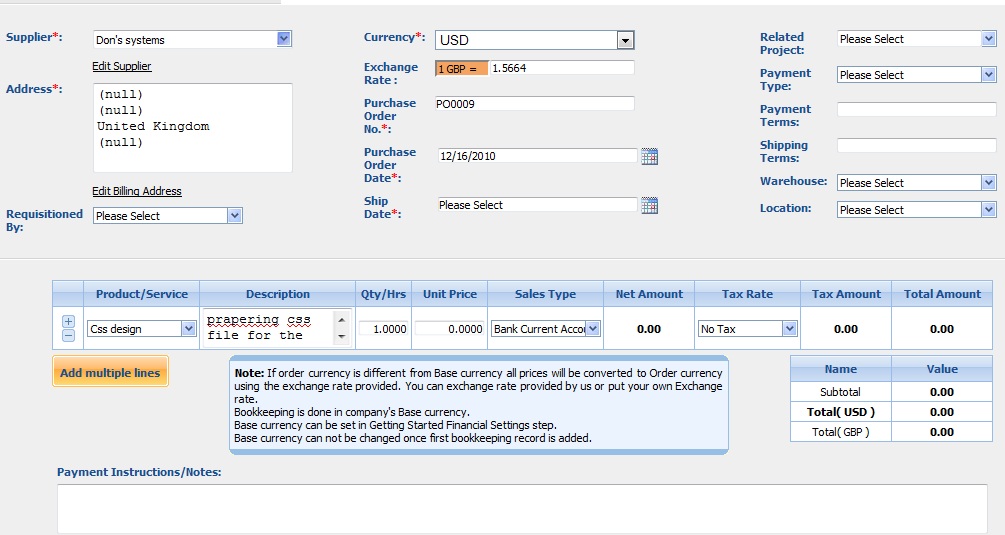
div>Related Project — Choose the related project from the list of available projects. Once the order is related to project, the order can be seen in project details too.
Requisitioned By — Choose the project manager or backup manager by whom the order was requisitioned.Currency — Choose the currency of the supplier. The currency chosen can be different from company currency, and once the order is converted to purchase invoice, the amounts will be converted to base currency in bookkeeping entries.Exchange Rate — Choose the default exchange rate or edit the exchange rate given. Once exchange rate is edited, the amounts will be changed.Purchase Order No — Enter the purchase Order Number as required by your company.Purchase Order Date -Enter the date when the purchase order is created. By default, today’s date is shownShip Date — Enter the date when the products or services are expected to be shipped.Payment Type — Enter the terms of payment as agreed by your supplierShipping Terms — Enter the shipping terms as agreed by your supplierWarehouse — Choose the warehouse for which the products are related to. When the warehouse is not chosen, non inventory items appear in the list of products and services.Warehouse Location — Choose the location in the warehouse where products should arrive.Products/Services:Use add new line button in order to add new products or services to your purchase order.Product Name – title of the product, required fieldProduct Description –description of the product which can be editableQuantity/Hours – enter the quantity of the product.Unit Price – selling price of the productDiscount – enter the discount percentageSales Type – enter the GL account for bookkeeping purposesNet Amount – net amount displays the amount after applying the discountTax Rate – choose the tax rate from the tax rate dropdown menu. Tax rates are applied in percentageTax Amount – will indicate the value of tax after applying tax rate to net amountTotal Amount – the total of each line is displayed hereTerms and Conditions — Write terms and conditions in the box below. There is a character limit of up to 1000 characters in the box.VIEW SUMMARY
To view a purchase order summary, click on the View Summary from the Actions List drop down of Purchase Order section.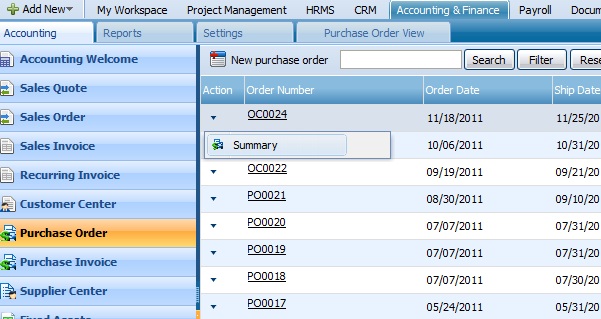
PURCHASE INVOICE
You can record the invoices received by your suppliers in by creating new purchase invoice and adding purchase items in the invoice lines. Purchase invoices are used to track accounts payable in journal report. They can also be used as Project Related Document. All purchase invoices related to the project can be viewed in the project view.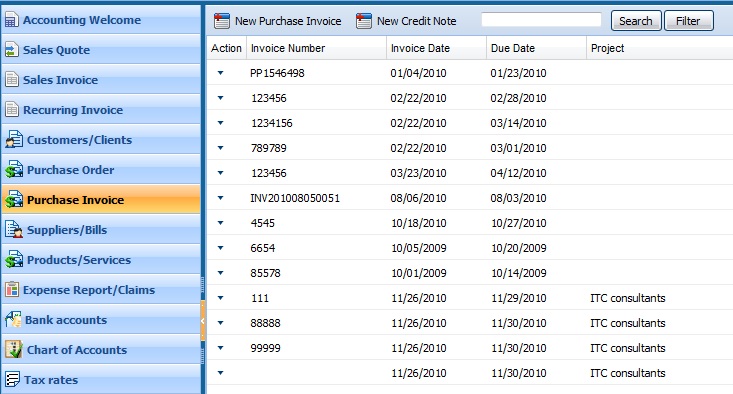
NEW PURCHASE INVOICE
You can add a new purchase invoice through Purchase Invoice section by clicking on the first button called New Purchase Invoice.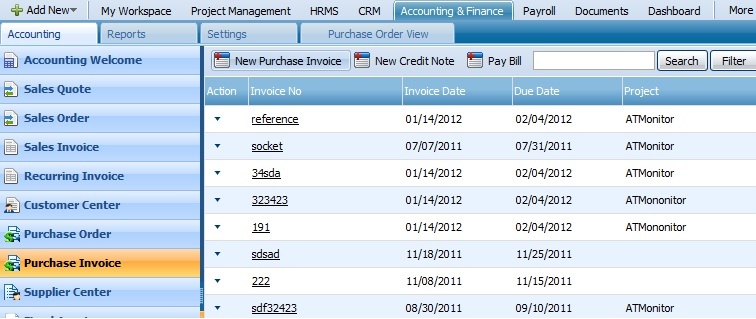 Supplier — Choose the supplier from the dropdown of suppliers you’ve created. You can add new supplier if there are no suppliers in the list. You can either search your suppliers from lookup or use dropdown in order to select the supplier. Use edit billing Address Link in order to change the details in billing address field.Related Project — Choose the related project from the list of available projects. Once the invoice is related to project, the order can be seen in project details too.Currency — Choose the currency of the supplier. The currency chosen can be different from company currency, the amounts will be converted to base currency in bookkeeping entries.Exchange Rate — Choose the default exchange rate or edit the exchange rate given. Once exchange rate is edited, the amounts will be changed.Invoice Number — Enter the invoice number received by the supplier. The invoice number is required field.
PO Number — Enter the corresponding PO number of the invoice.Invoice Date — Enter the date the invoice was received. By default, today’s date is selected.Due Date — Enter the date due for the payment to be made by your organization. If the due date has already passed, the invoice will be in overdue status.Amounts Are
Choose how VAT/Sales Tax will be calculated on invoice.Tax Inclusive – if amounts are tax inclusive, taxes will be retrieved from product prices.,Tax Exclusive – if amounts are tax exclusive, then tax amount will be added to total price.
No Tax — no tax will be included in invoice linesProducts/Services — Use add new line button in order to add new products or services to your purchase invoice.Product Name – title of the product, required fieldProduct Description –description of the product which can be editableQuantity/Hours – enter the quantity of the product.Unit Price – selling price of the productDiscount – enter the discount percentageSales Type – enter the GL account for bookkeeping purposesNet Amount – net amount displays the amount after applying the discountTax Rate – choose the tax rate from the tax rate dropdown menu.Tax rates are applied in percentageTax Amount – will indicate the value of tax after applying tax rate to net amount Total Amount – the total of each line is displayed herePayment Instructions/Notes:
Payment instructions is optional, you may add them for reference in purchase invoice.Purchase Invoice OptionsSave as a draft – draft purchase invoices can be edited and deleted laterSave and Approve – once invoice is approved, bookkeeping entries are made in journal reportPDF Version – print invoice to PDFInvoice Statuses
Draft – draft status which can be edited laterApproved – payment can be made to approved invoicesOpen – open invoices are those which are sent to the client, and awaiting paymentOverdue – if the due date of the invoice has already passed, and payment has not been made, the invoice will be in overdue statusPaid – paid invoices are already closed with the payment received. Only fully paid invoices will be closed with the paid status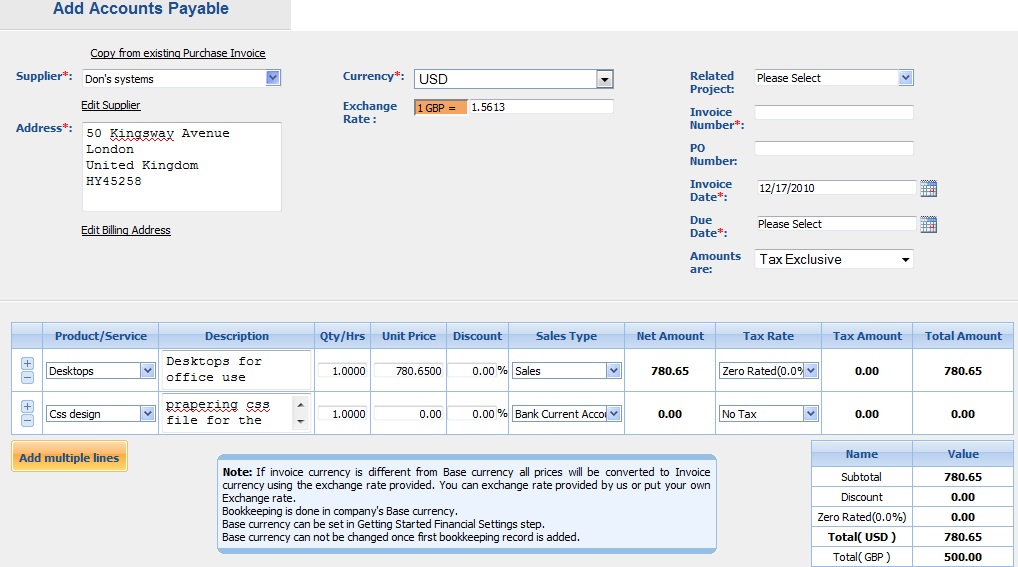 NEW CREDIT NOTECredit Notes can be used in kpi.com in order to correct the invoice amount already sent or approved, or making refunds based on the invoice. Credit notes can be added as much for the customer, and then allocate the credit to invoices later. When the credit is allocated to invoice, invoice amount will be lessened to the amount being credited.You can add credit note from link in Invoice List.Client — Select company or organization or a person you are invoicing to from the list of clients. You can also lookup the clients from the search box. If there are no clients registered in your company you can add new client from Add New Client link just below the client dropdown. You can edit the billing address by clicking edit billing address link below the address box. Address of Customer/Client can be defined from add/edit customer links.Currency — Choose currency from the list of available currencies in the dropdown box. All the amounts in base currency (company currency) will be converted to the credit note currency using the exchange rate on that dateExchange rate — You can use exchange rate automatically retrieved from today’s exchange rate. You can change the rate as for the date you are invoicing. All multi currency bookkeeping entries are done to Exchange Rate Loss/Gain account in Journal Report.Credit Note Date — The date of the credit note.Due Date — Select the due date of the credit note. The due date in the credit note indicates the date due for the refunds to be made.Amounts are:Tax Inclusive – if amounts are tax inclusive, taxes will be retrieved from product prices.Tax Exclusive – if amounts are tax exclusive, then tax amount will be added to total price.No Tax — no tax will be included in invoice linesCredit Note LinesDescription –description of the product which has to be creditedQuantity/Hours – enter the quantity of the product.Unit Price – selling price of the productDiscount – enter the discount percentageSales Type – enter the GL account for bookkeeping purposesNet Amount – net amount displays the amount after applying the discountTax Rate – choose the tax rate from the tax rate dropdown menu.Tax rates are applied in percentage.Tax Amount – will indicate the value of tax after applying tax rate to net amountTotal Amount – the total of each line is displayed herePayment Instructions — Use payment instructions defined in Accounting Settings here.PAY BILL‘Pay Bill’ feature is similar to receive payment feature in the sales invoice, except it is used to make the payment to a Supplier. A supplier is selected from a drop down menu and after clicking apply, the list of outstanding purchase invoices are displayed, which allows the amounts to be entered for the payment.ACTIONS LISTBy default the Actions list drop-down is available on the first column of the Purchase Invoice list. Once clicked, drop-down gives several options as displayed on the screenshot:
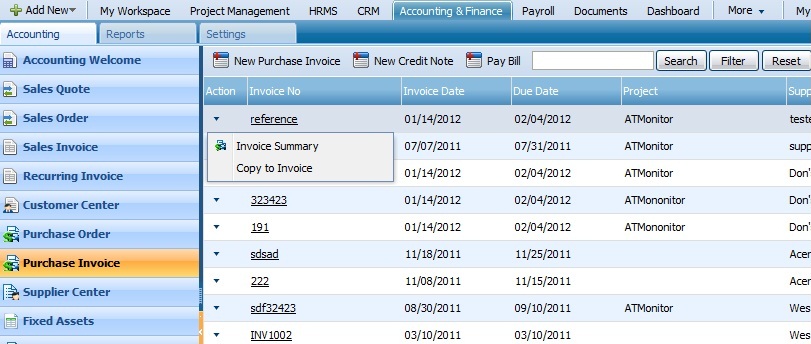 Invoice SummaryTo view an invoice summary, click on the Invoice Summary from the Actions List drop down of Purchase Invoice section.
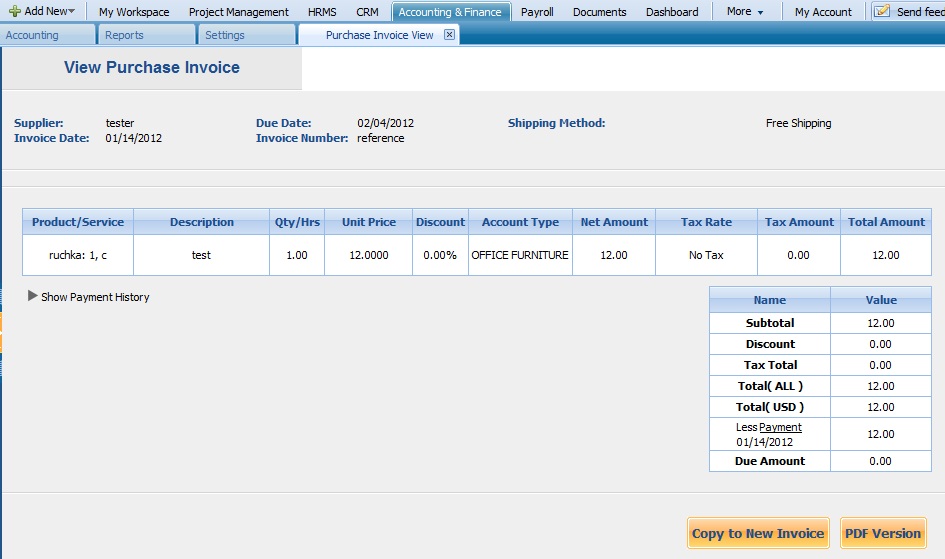 Copy to InvoiceCopy to Invoice feature for the Purchase Invoice is located in the Action drop down menu of the each purchase invoice. This feature allows copying the purchase invoice to create another purchase invoice.SUPPLIER CENTER
div>Supplier Center is where everything is located about a supplier with regards to accounting information can be found. This can be billing address, terms and conditions, supplier balance, etc. Supplier Center List View also displays the supplier and along with their balances and that view can be customized and sorted as desired. @Abdullo: Description.
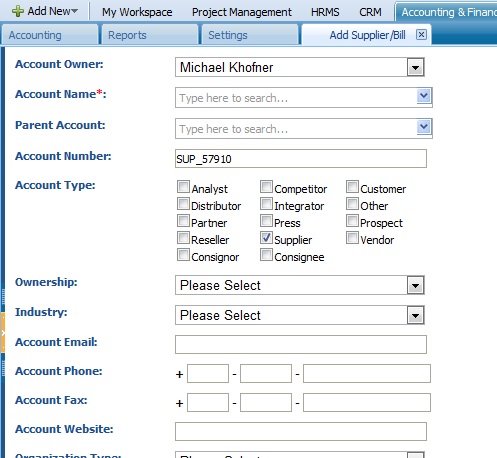
Supplier Center is located in the first section of Accounting & Finance as it`s shown on the screenshot: ADD SUPPLIERThis feature is located in the Supplier Center section. To add a supplier, you will be asked to fill in the form and save it.
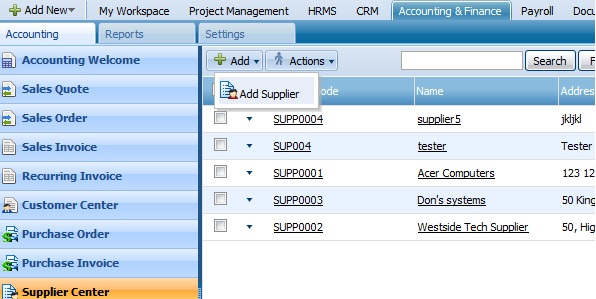
 ACTIONS LIST 1The first actions list can be found on the main tab of the Supplier Center section. You can perform two functions there: Pay Bill and Delete one of the suppliers from the list:
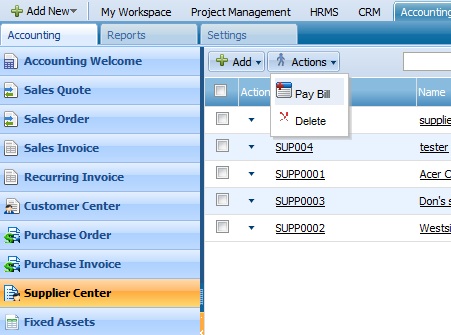 Pay Bill‘Pay Bill’ feature is similar to receive payment feature in the sales invoice, except it is used to make the payment to a Supplier. A supplier is selected from a drop down menu and after clicking apply, the list of outstanding purchase invoices are displayed, which allows the amounts to be entered for the payment.DeleteTo remove one of the suppliers, click on the Delete button from the Actions List of the Supplier Center page.ACTIONS LIST 2By default the Actions list drop-down is available on the first column of the Supplier Center list. Once clicked, drop-down gives several options as displayed on the screenshot:
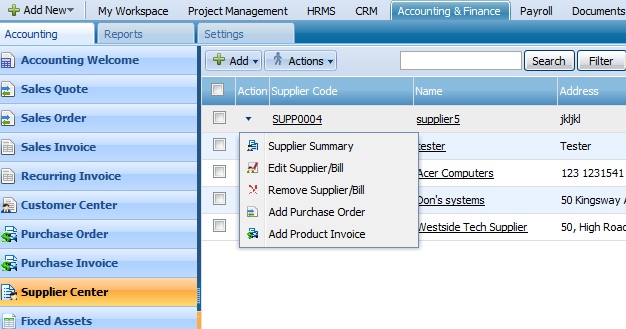 Supplier SummaryTo view supplier summary, click on the Supplier Summary from the Actions List drop down of Supplier Center section.Edit Supplier/BillTo edit a supplier/bill details, you need to click on the Edit Supplier/Bill button from the Actions list of the Suppliers list.
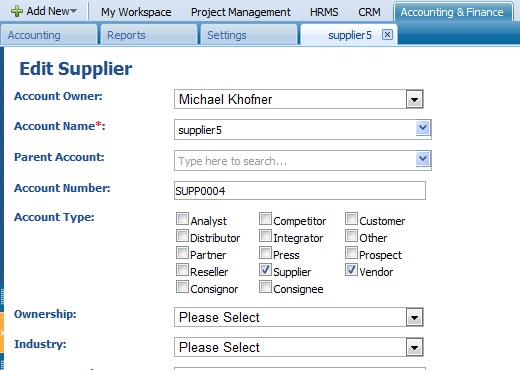 Remove Supplier/BillTo remove the supplier from the list, click on the Remove Supplier/Bill button from the Actions List in the Supplier Center section.Add Purchase OrderTo add a purchase order, click on the Add Purchase Order from the Actions List of the Supplier Center section:Click to view more information on Purchase OrderAdd Product InvoiceTo add a product invoice, click on the Add Product Invoice button from the Actions List of Supplier Center section:
FIXED ASSETS
General
If you had acquired a Fixed asset before conversion period, you can add a Fixed Asset by choosing an Account.Suggested account in this case is Opening Equity.
Calculate depreciation checkbox will automatically apply Depreciation expense on Straight-line depreciation method. To update depreciation and arrive at book value at any time, click Update Depreciation button from fixed assets listings.You can generate barcode and apply on the fixed asset. Using our mobile apps you can easily keep track of your fixed assets and feed the data directly into the system.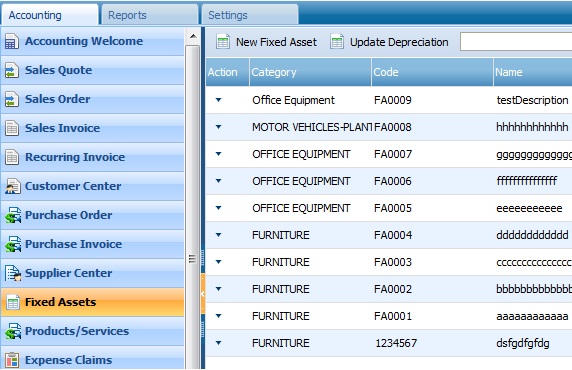
NEW FIXED ASSET
To add a new fixed you must fill all the required fields.Category — field is related to an asset account that corresponds to the type of fixed asset. The categories shown are on the drop-down menu are the accounts classified as “Fixed Assets” in the Chart of Accounts.Code — field is automatically generated to number fixed assets and it gives “FA” prefix, which can be changed.Name — of the Fixed Asset as it is shown on Fixed Asset ListingDescription — field further describes the fixed asset and you can enter 255 characters.Cost — of the asset to have it running for the business. This value is used as numerator in the depreciation calculation.Purchase date — is the date of purchase of the fixed asset. This date is used as the beginning date of depreciation.Useful life — is entered in years, which in the depreciation calculation used as the denominator.Residual Value — is subtracted from cost of the fixed asset in calculating depreciation expense throughout the useful life of the asset.Purchase Invoice link will lead you to add new screen for purchase invoices.Account — field completes the required input fields and it is related to an account from chart of accounts. This is field is the account that the fixed asset financed by.After entering all fields and clicking save, fixed asset is created and it is saved in the system.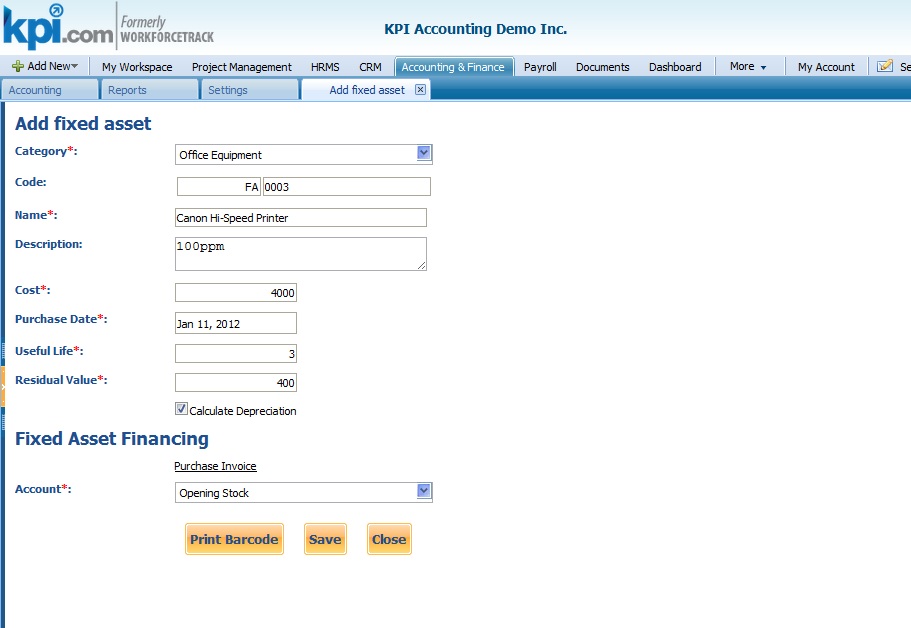 BarcodeNew feature has been added to help our clients to keep track of the fixed assets that they own. Barcode is generated on-demand and can be printed out. This barcode includes in itself basic information about the fixed asset. QR Code has been used to codify the fixed asset information.
UPDATE DEPRECIATION
This feature brings the depreciation calculation up to date and displays the current accumulated depreciation in the accounts.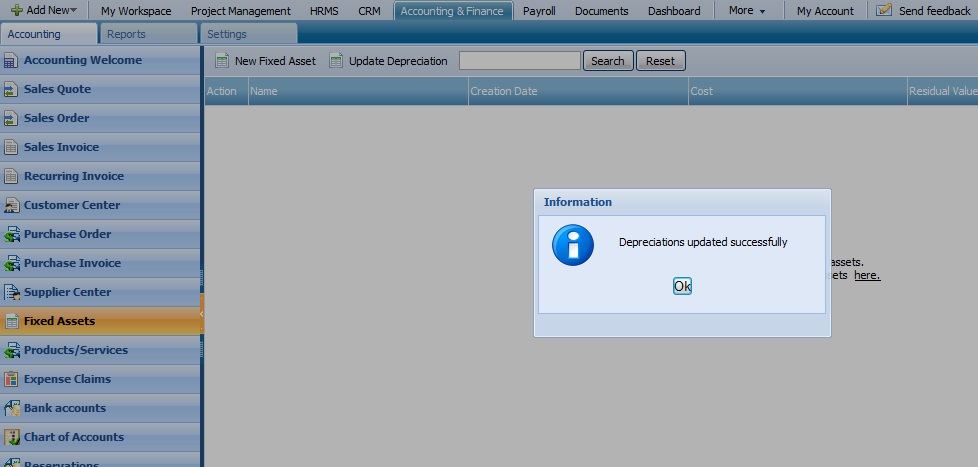 ACTIONS LISTBy default the Actions list drop-down is available on the first column of the Fixed Assets list. Once clicked, drop-down gives several options as displayed on the screenshot:
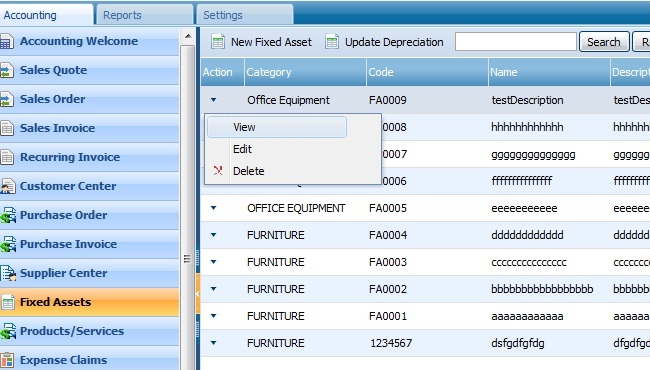
View, Edit and Delete
To view, edit or delete one of the assets from the list, click on the necessary button from the Actions List.Keep in mind that Fixed Assets that have started depreciating cannot be edited.PRODUCTS/SERVICES
Product/Services section keeps NEW PRODUCT/SERVICETo add a new product or service to the list, you need to go to the Products/Services section from Accounting and open New Product/Service form:
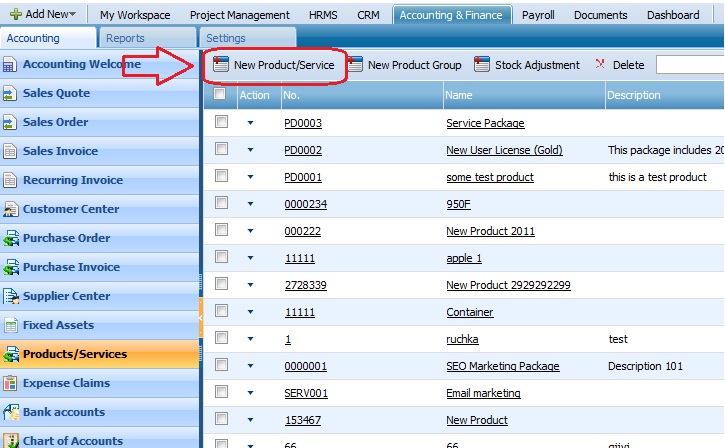
NEW PRODUCT GROUP
To add a new product group, you need to go to the Products /Services section and click on the New Product Group to fill in the form appeared: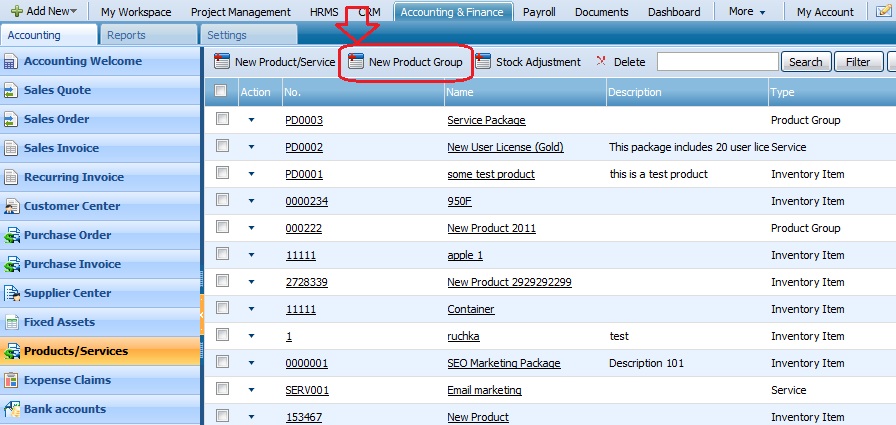 STOCK ADJUSTMENTStock Adjustment is where you can adjust inventory to bring it in line with actual quantity. You can increase or decrease stock quantity by typing into New Quantity field.
 - If you decrease inventory item, it will be accounted for by FIFO method and apply the cost to Adjustment Account.
- If you increase stock on hand the new items will be added at an item average cost, unless you set the cost per added item manually.
- Remember, Stock Adjustment will transpire on transaction date not on Adjustment Date. Selected Adjustment Date will serve as additional information for your bookkeeping
-

DELETE
To delete a product or service from the list, click on the Delete button as shown in the screenshot: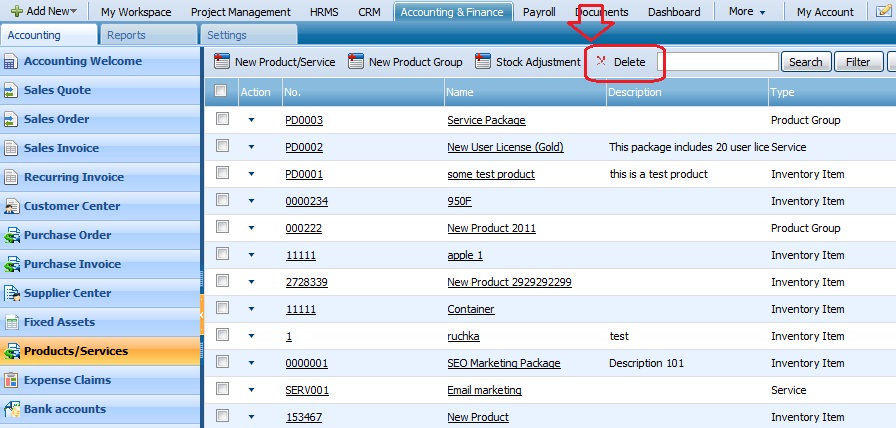
ACTIONS LIST
By default the Actions list drop-down is available on the first column of the Products/Services list. Once clicked, drop-down gives several options as displayed on the screenshot: Product SummaryTo view the product summary, click on the Product Summary from the Actions List of the Products/Services section:
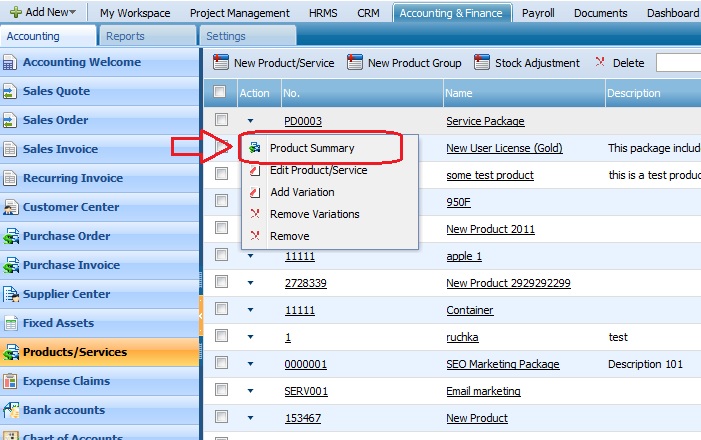
Edit Product/Service
To edit some details of a product, click on the Edit Product/Service through Actions List: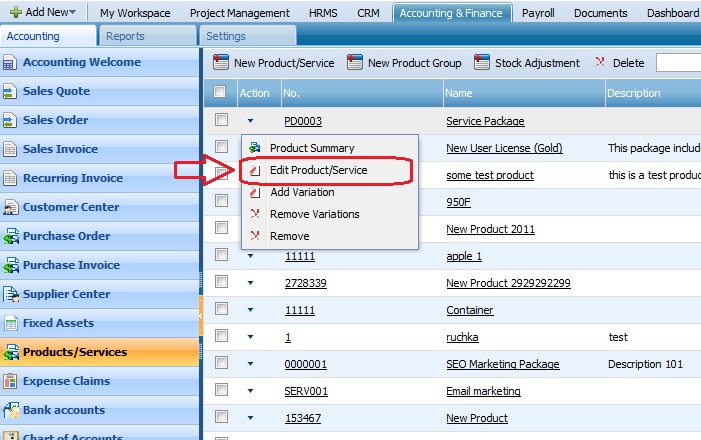
Add Variation
To add a variation, click on the Add Variation button and fill in the form appeared on your screen: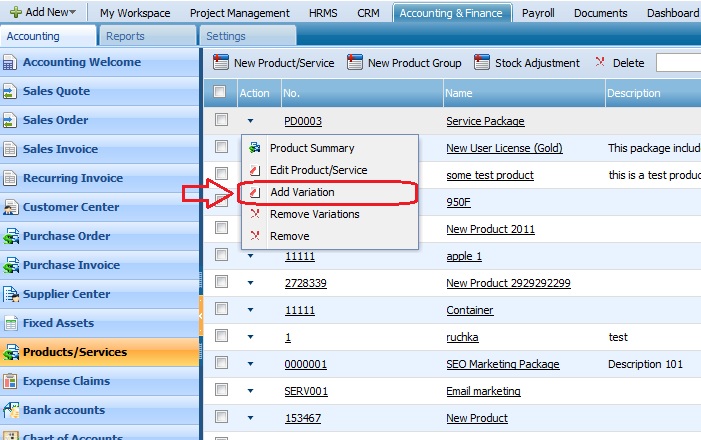
Remove Variation
To remove variation, click on the Remove Variation button from the Actions List of the Products/Services section: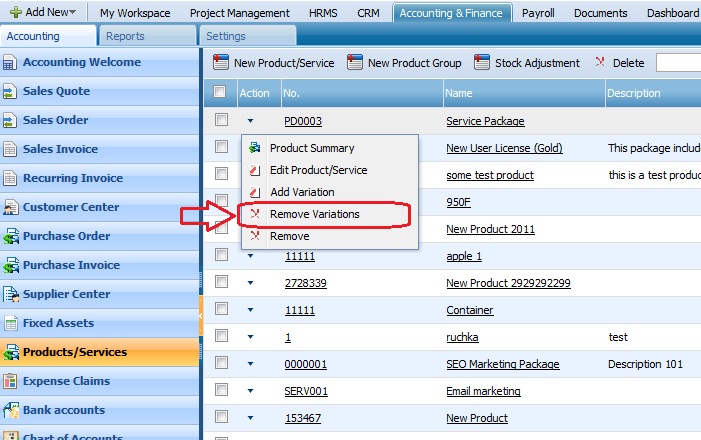
Remove
To remove the product or service from the list, click on the Remove button from the Actions List of the Products/Services section: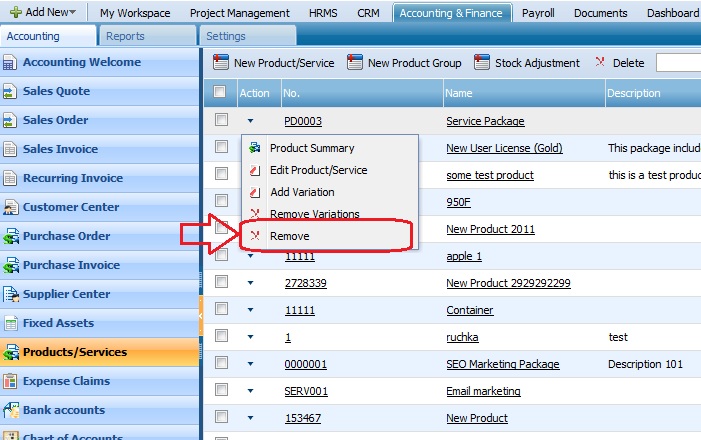
EXPENSE CLAIMS
Expense claims can be seen by each employee once their accounting and finance module is fully setup by administrators. Employees can leave various forms of expense claims and send them for managers’ approval.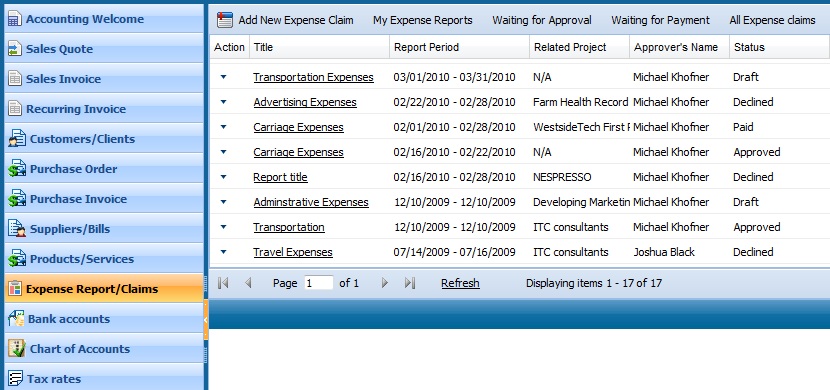
Workflow of Expense Claims:
- Employees are able to submit expense claim for approval
- Department Leaders and project managers review expense claim and choose to approve or reject it
- Rejected expense claims can be changed and re-submitted again
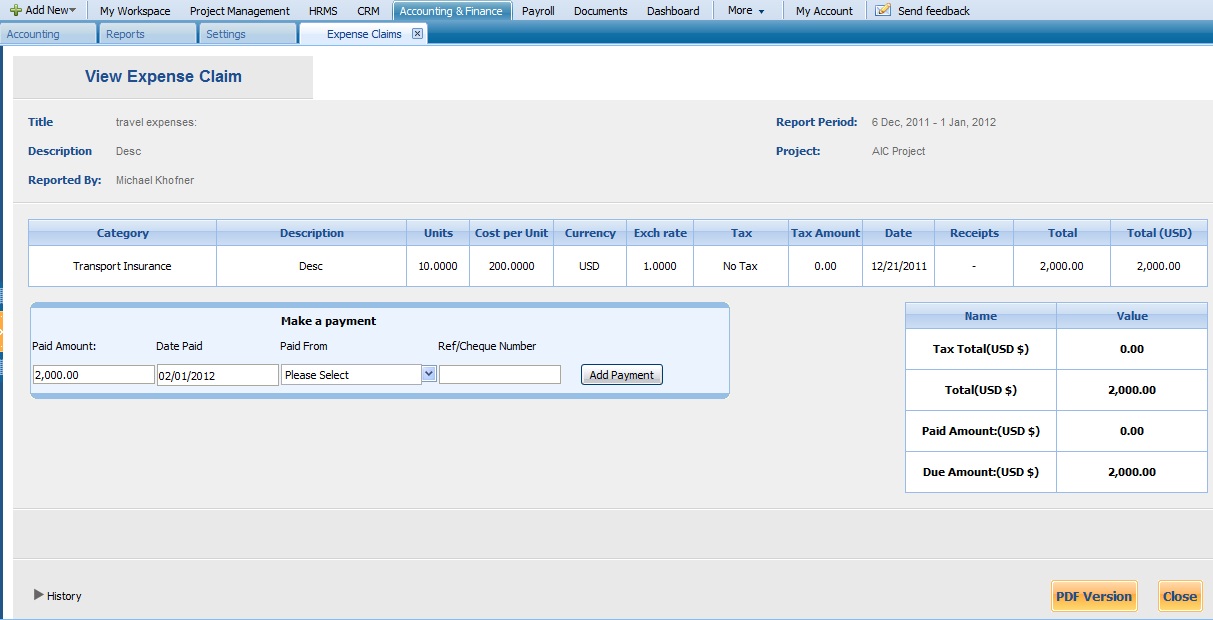
- Once Expense Claim is approved, accountants can make payment to expense claim.
-

ADD NEW EXPENSE CLAIM
Expense Claim can be added from 2 places: Accounting and Finance and HRMS sections.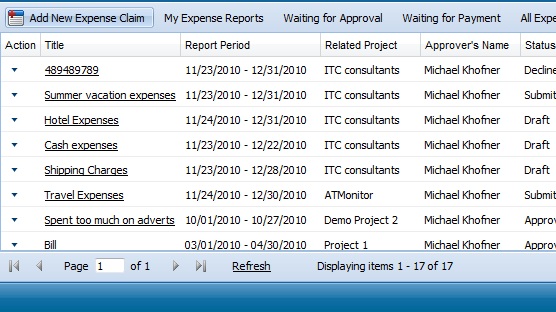 In order to add expense claim from Accounting and Finance, go to add new menu, or in Expense Claims List. You user role will determine whether you are able to add expense claim or approve it.Expense Claim ReceiptsYou can add collection of receipts to expense claim and attach those receipts indicating date, currency and amounts. Many receipts can be added to one expense claim, which has details like employee, related project and report title.Expense Claim Fields:Start Date — Enter the start date of the period when the expense is reported.End Date — Enter the end date for the period of expense the current report is included.Related Project — Choose the project for which expense claim is related. It is possible to leave this field blank, then, the managers can be selected in Approver Field.Approver — Choose the approver of the expense claim in the dropdown. By default, project managers and directors are available in the dropdown for the approvers.Report Title — Enter the title of the Expense Claim. The title will be visible in the expense claim list and in the project view.Report Description — Enter a short description of the current expense claim.Receipts — Use add new line, or + — buttons in order to add receipts to expense claim. As many receipts can be added to expense claim chosen.Category — Choose the expense claim category from expense claim dropdown. The expense categories of GL accounts will be shown in category dropdown. In order to add, edit or delete categories, go to Chart of Accounts, Expenses. Any GL account that has a mark “show in expense claims” will be shown in expense receipts category.Description — The short description of the receipt item.Units — Enter the quantity of the expense item, if available.Cost Per Unit — The cost of the item being reported in the receipt. Total Amount will be calculated by multiplying units to cost per unit.Currency — If there are receipts in other currencies, they can be entered to expense claim. Choose the currency in which cost per unit and units are given. All amounts will be calculated to base currency for bookkeeping purposes.Exchange Rate — Enter the exchange rate for the date when the receipt was reported.Date — Choose the date of the receipt. Multiple receipts can be added at multiple date ranges.Receipts — Attach scanned form of the receipts electronically. The receipts will be available to view in PDF form.Total — The total amount of the receipt in base currency is displayed here.Total (GBP) — The total amount in the receipt currency is displayed here.
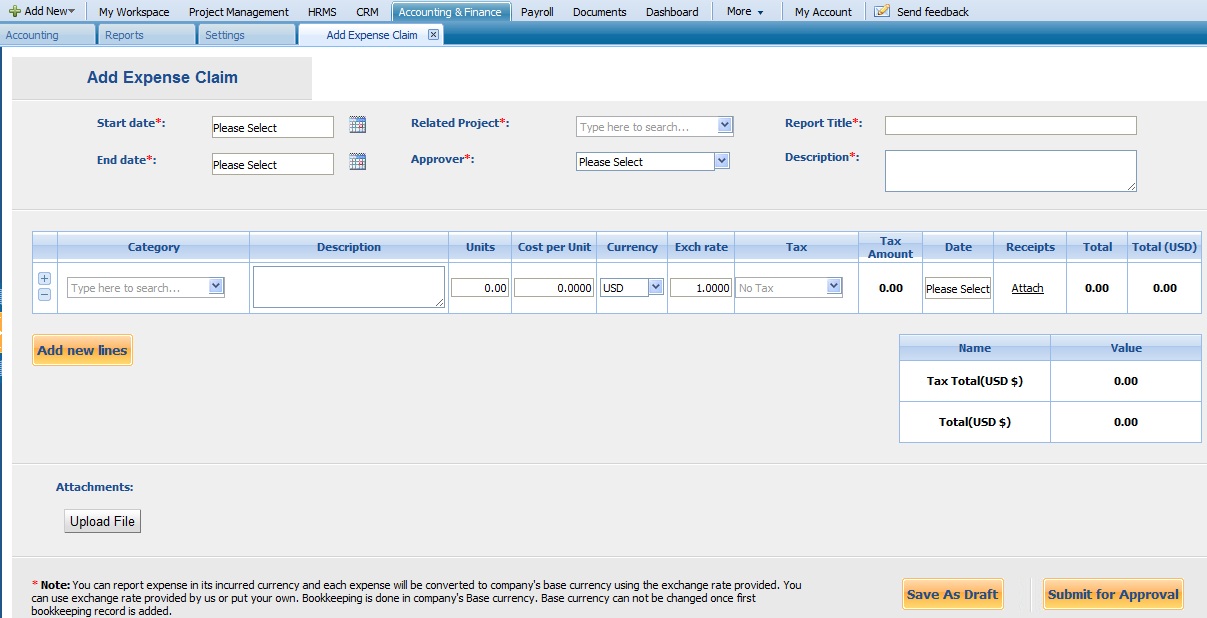
EXPENSE REPORT SUMMARY
To view the expense report summary, click on the Expense Report Summary button from the Actions List of the Expense Claims section.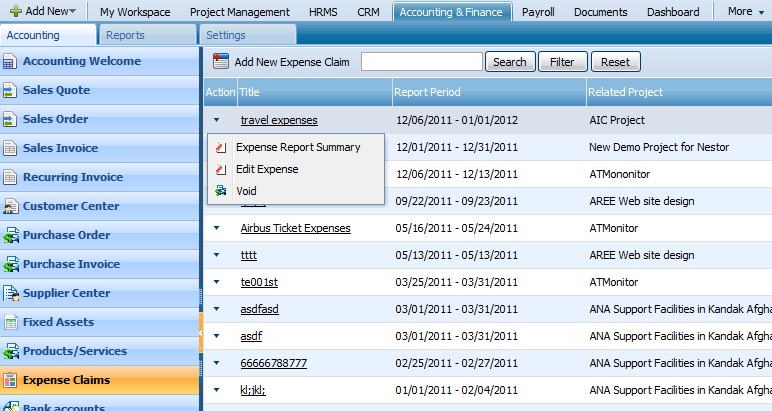
Edit Expense
To edit expense details, click on the Edit Expense button from the Actions List of the Expense Claims section.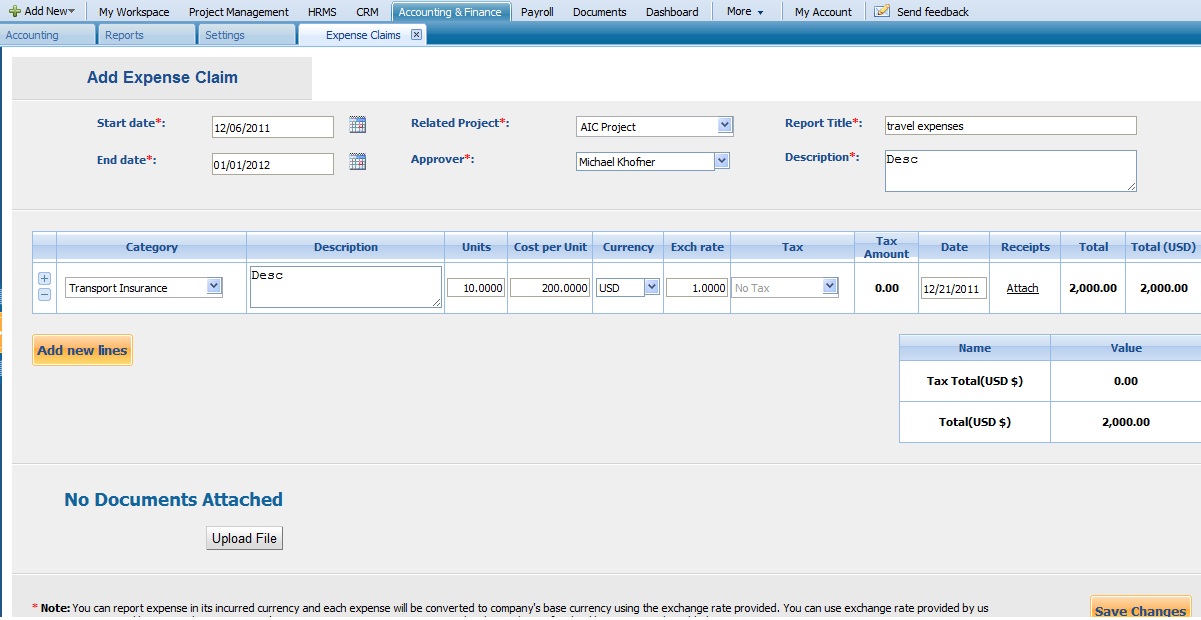
Void
To void an expense claim you must click on the action drop down menu of each expense claim. Keep in mind only Approved or Paid expense claims can be voided. This feature reverses the entries to correct any major mistake in the process of administering that expense claim. Remove function is also available to remove declined or draft expense claims under the same menu.
BANK ACCOUNTS
Bank Accounts section is where information regarding all bank accounts can be found. Bank Reconciliation along with uploading bank statements can be performed from this section as well.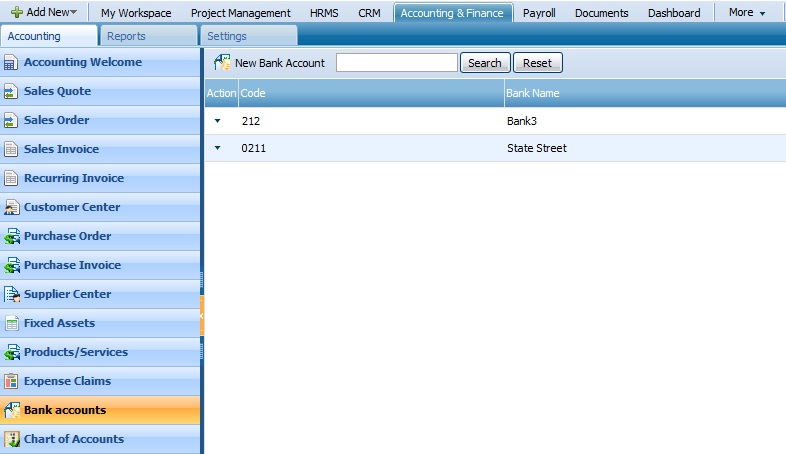
NEW BANK ACCOUNT
Clicking a ‘New Bank Account’ brings the screen to enter the details of a new bank account.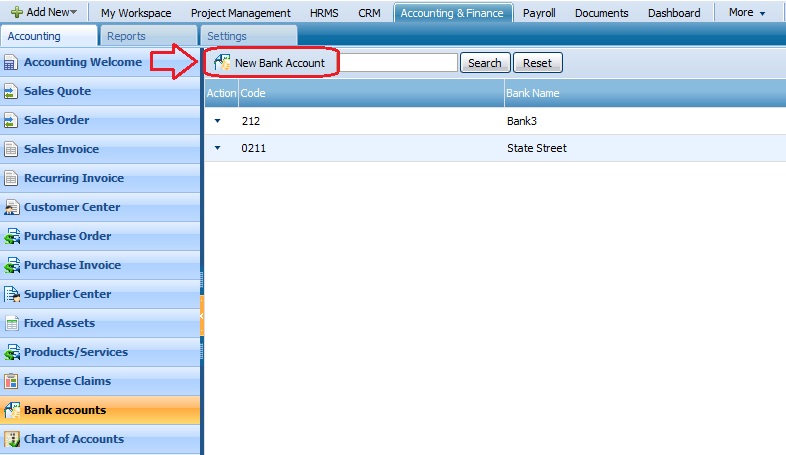 ACTIONS LISTBy default the Actions list drop-down is available on the first column of the Bank Accounts list. Once clicked, drop-down gives several options as displayed on the screenshot:
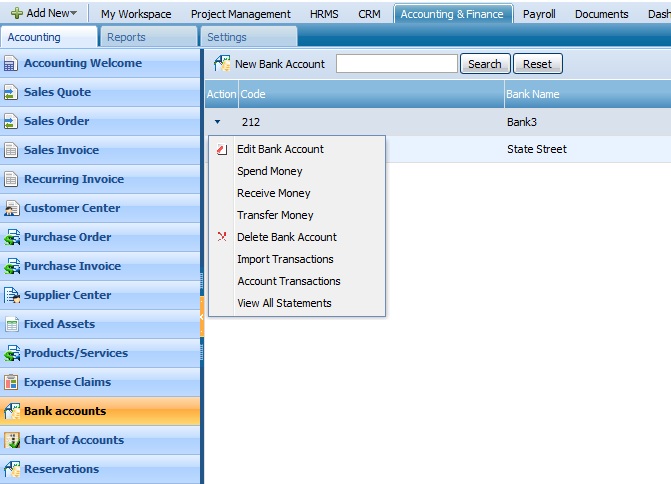 Edit Bank AccountTo edit details of a bank account, click on the Edit Bank Account button through the Actions List of the Bank Accounts section:
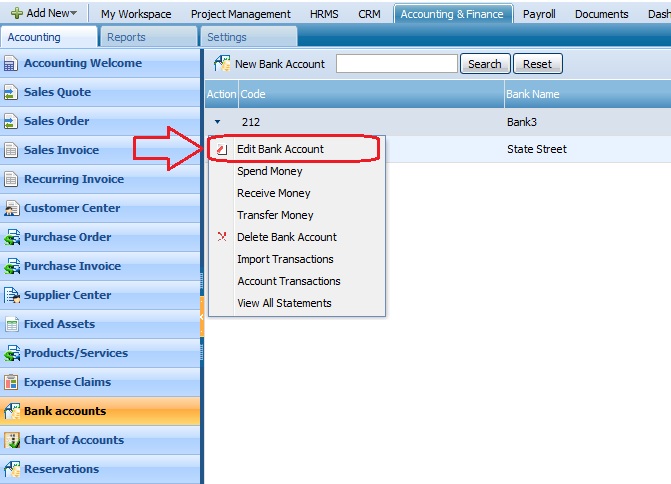 Spend MoneySpending Money from a bank account is a transfer from that bank account into an account from chart of accounts.
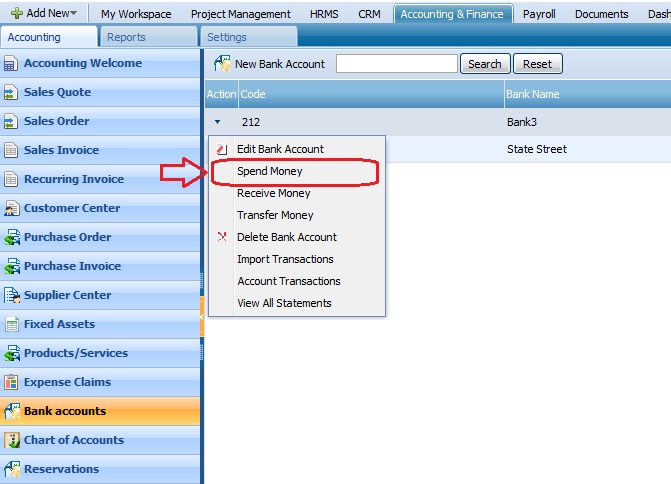 Receive MoneyReceiving Money from in a bank account is a transfer to that bank account from an account from chart of accounts.
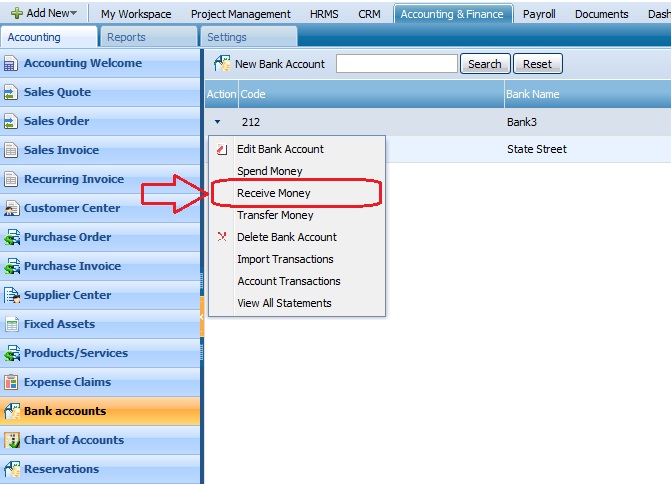 Transfer MoneyTransfer Money’ feature is used directly between bank accounts and it transfer money from the bank account selected into a bank account in the list.
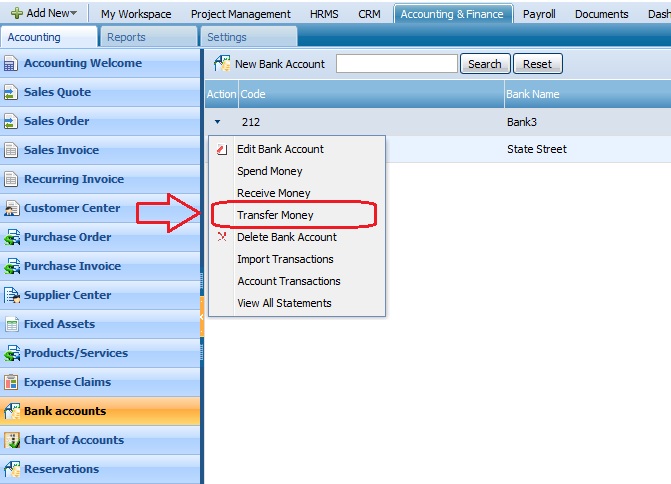
Delete Bank Account
To delete the bank account, you need to go to the Bank Accounts section and click on the Delete Bank Account through Actions List:
Import Transactions
To import transactions, click on the Import Transactions through Actions List of the Bank Accounts section: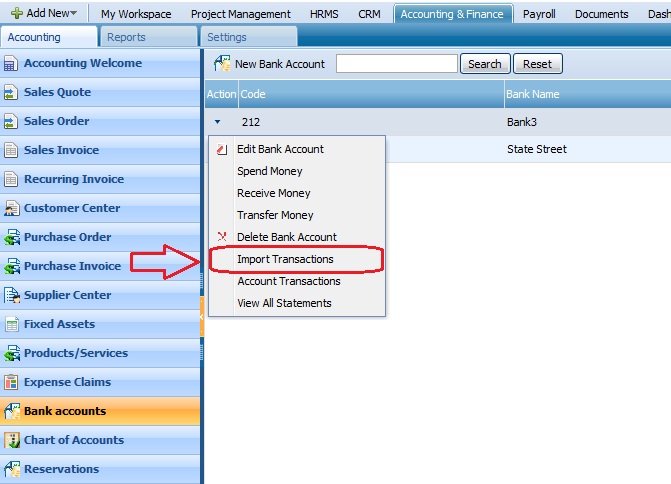
Account Transactions
‘Account Transaction’ feature brings a new screen where all transaction from and to that bank account can be viewed. Notice reconciliation of each individual entry can also be managed from this section.
View All Statements
To view the statements, please go to Bank Accounts section and click on the View All Statement through the Actions List: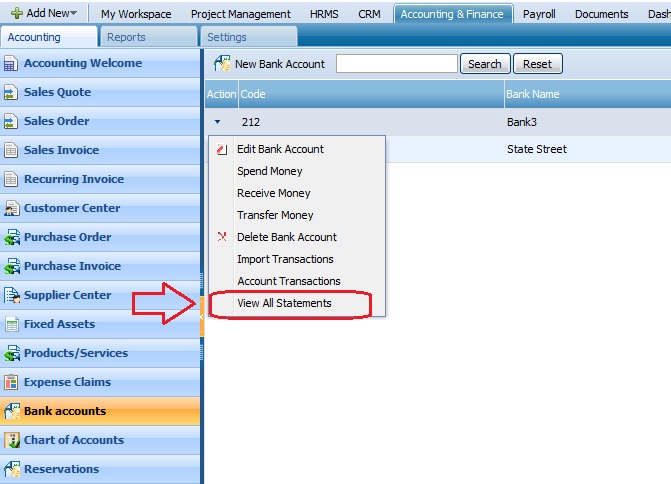
CHART OF ACCOUNTS
Your Chart of Accounts is a list of accounts that every transaction you enter into kpi.com is ‘coded’ for management and reporting. You can leave the Chart of Accounts as it was originally set up when you passed getting started steps in kpi.com, or edit and delete items from it, or add your own to suit your business. Your user role will determine whether you have access to chart of accounts or not.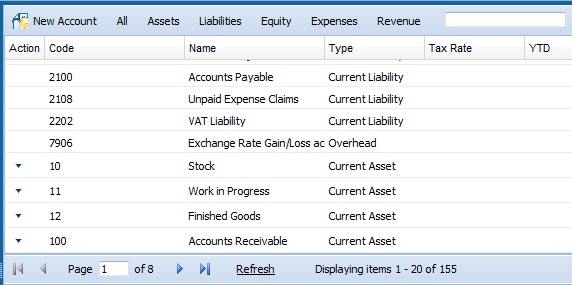 There are 6 GL accounts that are created by default in KPI and cannot be edited. They are: accounts receivable, accounts payable, unpaid expense claims, vat liability, and Historical Adjustment. These accounts are needed for internal accounting operation of KPI (e.g. all invoices are recorded in accounts receivable account).Coding of Chart of Accounts and view is customizable fully. We can change the view of the chart of accounts list by adding grouping and other options.
NEW ACCOUNT
You can add account either in add new menu of kpi.com Accounting or in Chart of Accounts List.
New Account Fields
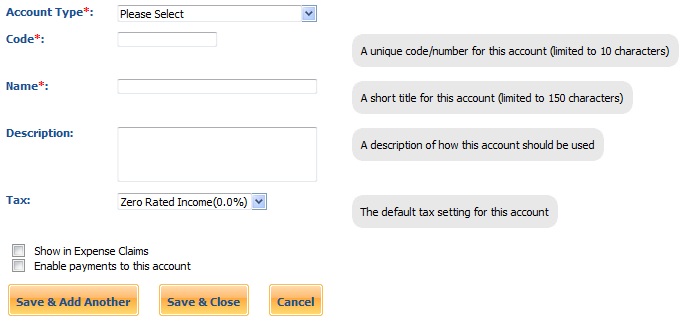 Account Type — Select the account type of the GL Account. Each account has a type and this determines which category in the Chart of Accounts it displays and where on the various financial reports, transactions of this type will appear.Table below shows how account types affect the reports:
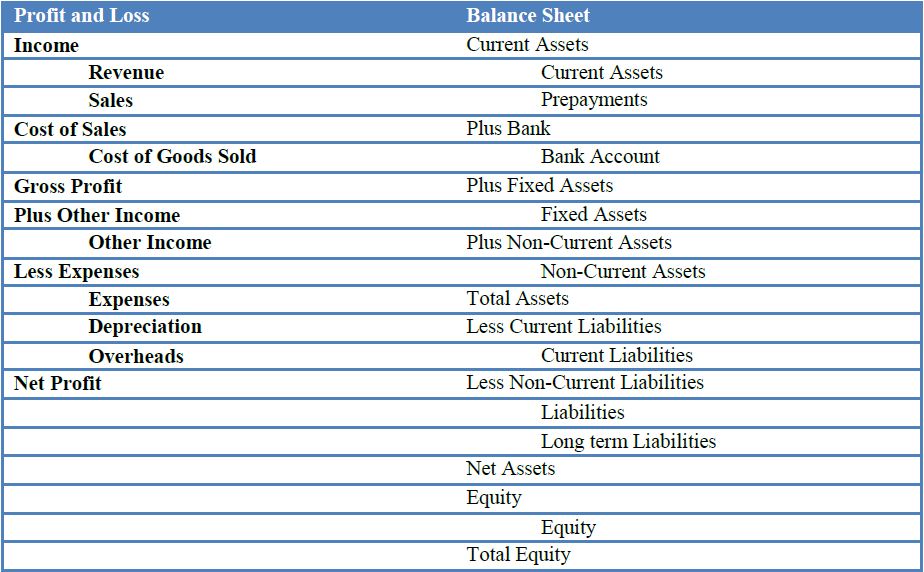 Account Code — Choose a numbering system adopted by KPI for the different types of accounts (revenue, expenses, fixed asset overhead etc). An account code is simply an identifier that can be used to group like or frequently used accounts together in your Chart of Accounts and there is no one right code for each account. You can code your accounts based on Accounting rules and legislation of Your Country.Name — Choose Short Name for the accountDescription — Enter a brief description for the account.Tax — Each account has a default tax type applied depending on the account type and determines how the transactions in each account should be treated with respect to tax. Each transaction using each different tax rate is listed on the VAT Report for the tax filing period you’ve chosen.Show in Expense Claims — When the account is ticked, the account will be shown in expense claim receipt categories.Enable Payments to This Account — When ticked, the account will be shown in invoice and expense claim payment accounts.
ACTIONS LIST
By default the Actions list drop-down is available on the first column of the Chart of Accounts list. Once clicked, drop-down gives several options as displayed on the screenshot: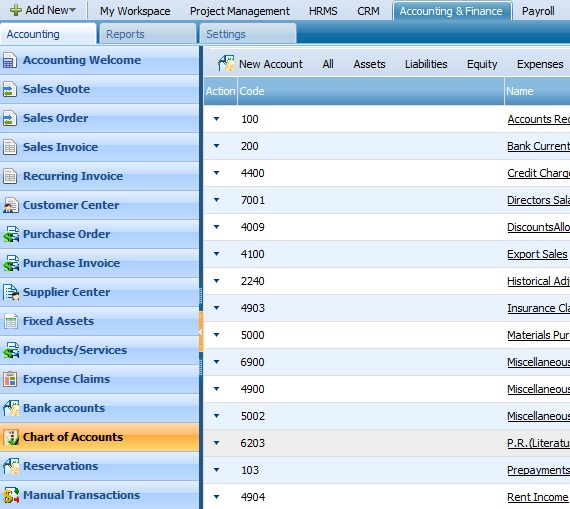
Account Summary
To view the summary of an account, click on the Account Summary from the Actions List.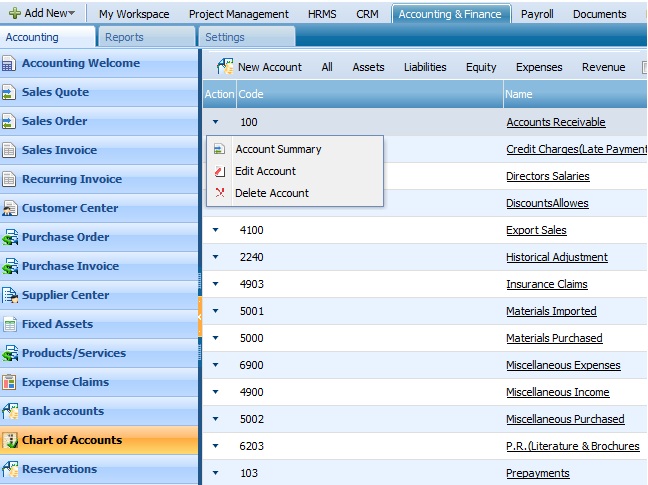
Edit or Delete an Account
To edit or delete an account, you need to open Actions List box and click on the Edit or Delete Account buttons.RESERVATIONS
Reservation is a feature that creates reservation for assets to be reserved. This section is under development to improve functionality.MANUAL TRANSACTIONS
Journal (General Ledger) Entries that are not automatically entered in the system can be entered in the Manual Transactions module.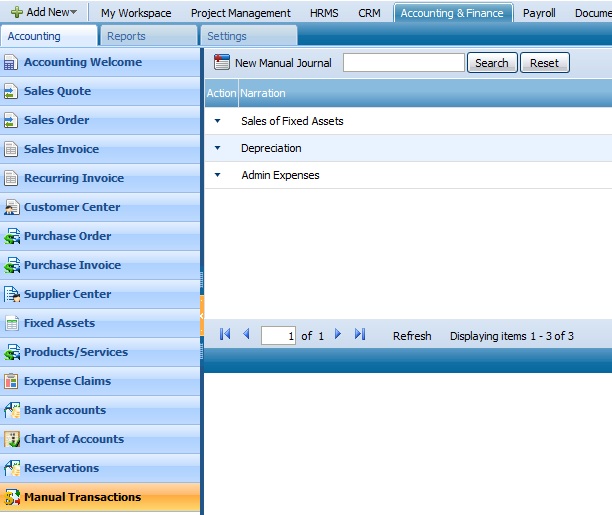
NEW MANUAL JOURNAL
If you need to add a new manual journal, open Manual Transactions page and click on the New Manual Journal button that is located on the main tab of the section: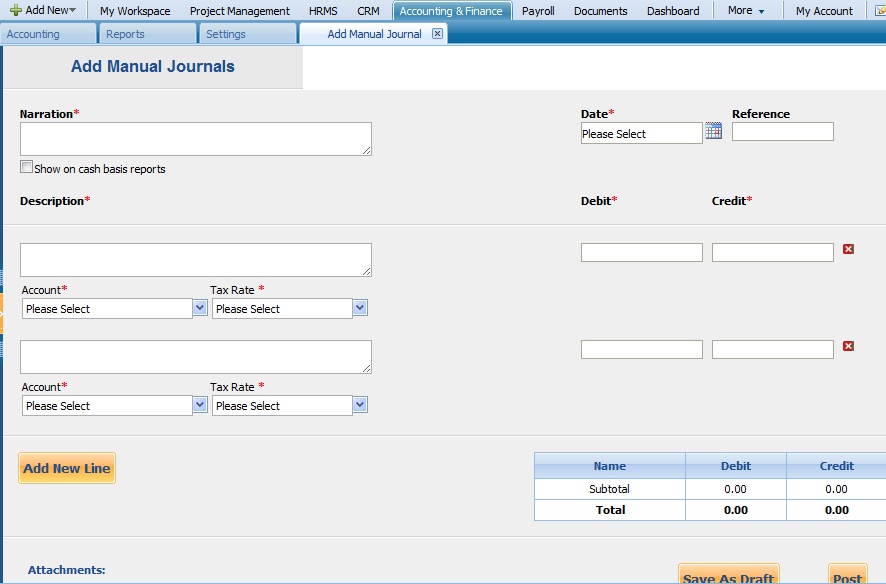
ACTIONS LIST
By default the Actions list drop-down is available on the first column of the Manual Transactions list. Once clicked, drop-down gives several options as displayed on the screenshot: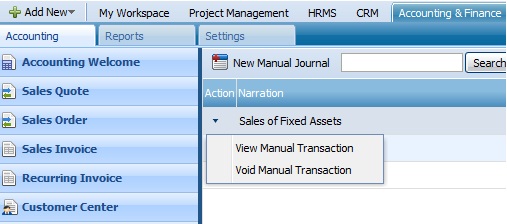
View Manual Transaction
To see the details of the manual transaction, click on the View Manual Transaction button through Actions List.VOID Manual Transaction
Manual Journal entries can be voided from the action drop down menu. Confirmation of deletion is necessary.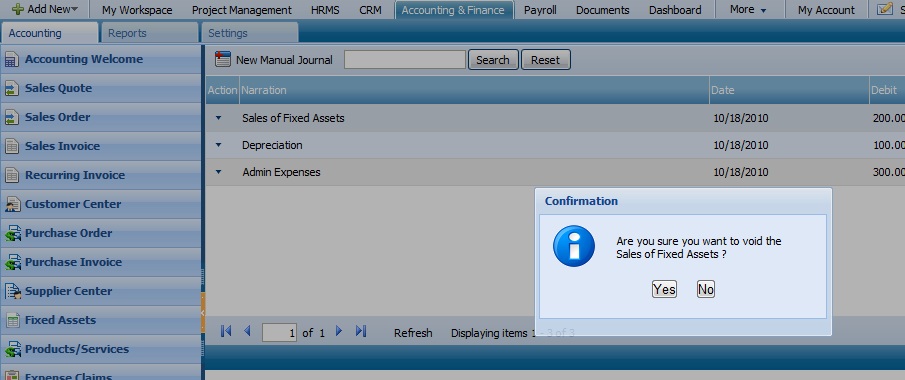
REPORTS
Reports section includes all standardized reports in the Accounting section. Budget, Journal Report, Trial Balance, Balance Sheet and VAT Reports can be found under this tab.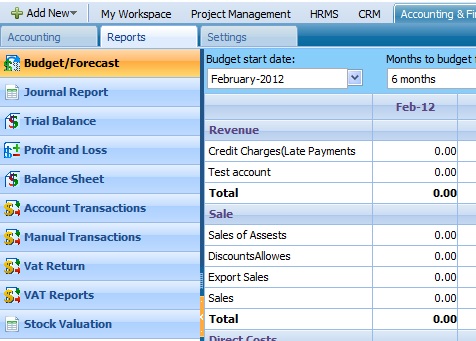
BUDGET/FORECAST
Budget/Forecast is a form to be used to enter budget information that will be used to compare to Profit and Loss statement. After clicking each cell you can enter desired amount and budgeted totals are calculated upon clicking the ‘Update’ button.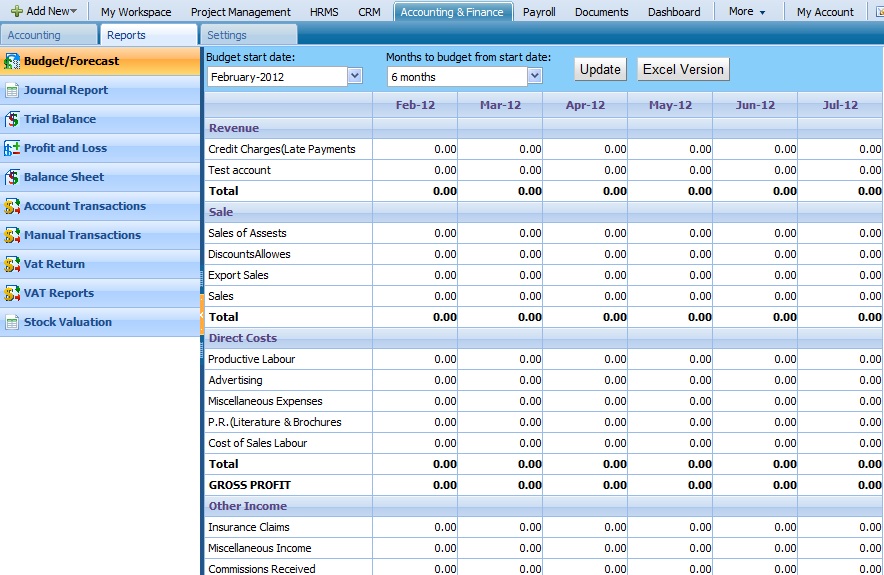
JOURNAL REPORT
Journal Report lists all transactions in an accounting format. Standard double journal entry format is used and ID is assigned along with date of transaction.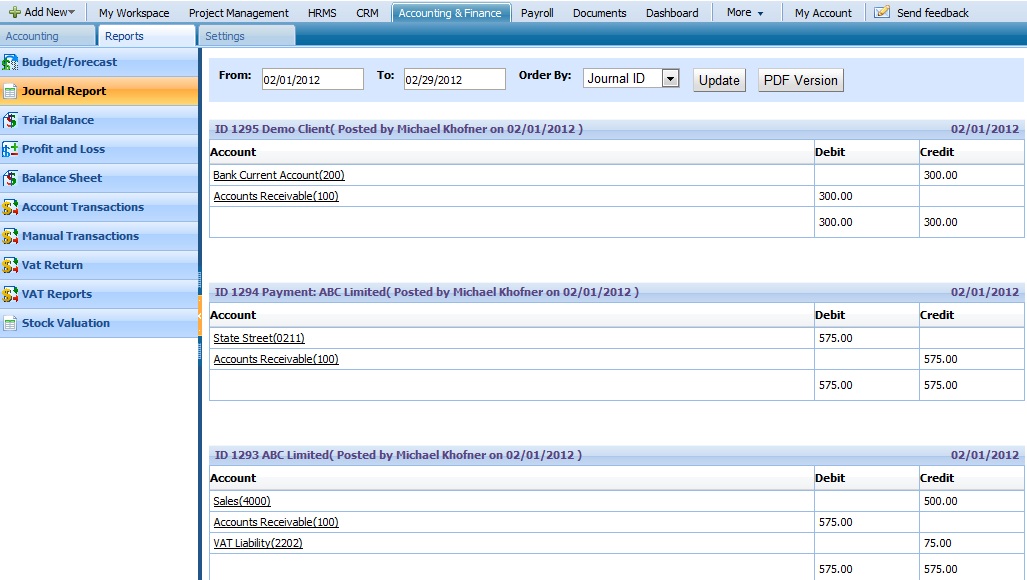
TRIAL BALANCE
Trial Balance is by definition displays the current debit and credit balances of each account from the chart of accounts. This feature additionally displays year-to-date balances that uses the January 1st as the beginning of the year.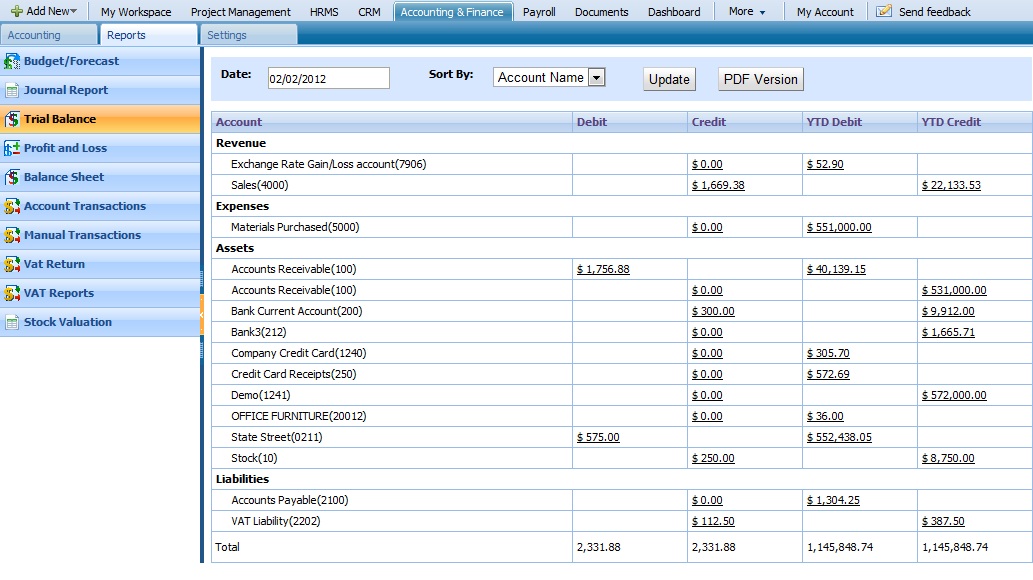
PROFIT AND LOSS
Profit and Loss statement is view that displays the profit or loss of the company by sales and subtracting any expenses after that.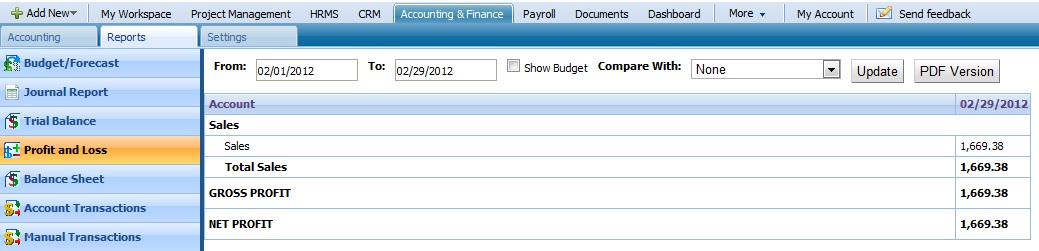
BALANCE SHEET
Balance sheet classifies the Asset, Liability and Equity in an accounting equation format. This feature lists these accounts as: Assets =Liabilities + Equities. Retained profit is used to connect this statement with the Profit and Losses.
ACCOUNT TRANSACTIONS
Accounts transaction can be used to view transaction of each account from chart of accounts. After the selection of the accounts and date update must be clicked to view the data.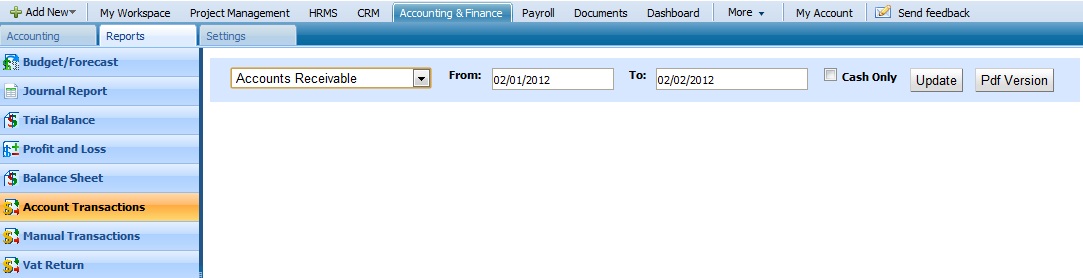
MANUAL TRANSACTIONS
Journal (General Ledger) Entries that are not automatically entered in the system can be entered in the Manual Transactions module. Please refer to Manual Transaction section in the Accounting Tab.VAT RETURN
VAT Return table is automatically generated according to the information entered in the payroll section.
VAT REPORTS
VAT Reports displays current VAT report and gives the status of the report.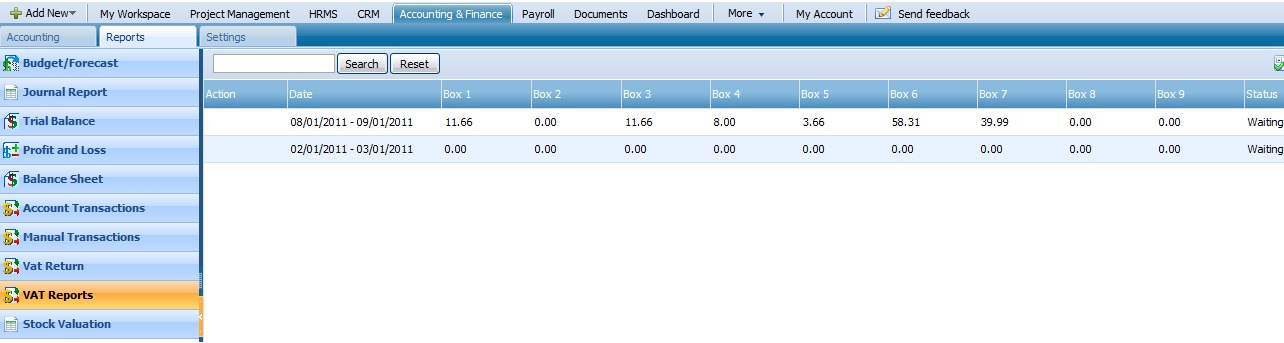
STOCK VALUATION
Stock valuation displays beginning and ending balances and quantities of all products. This feature also refers to any changes in the stock by showing the transaction date and entry date.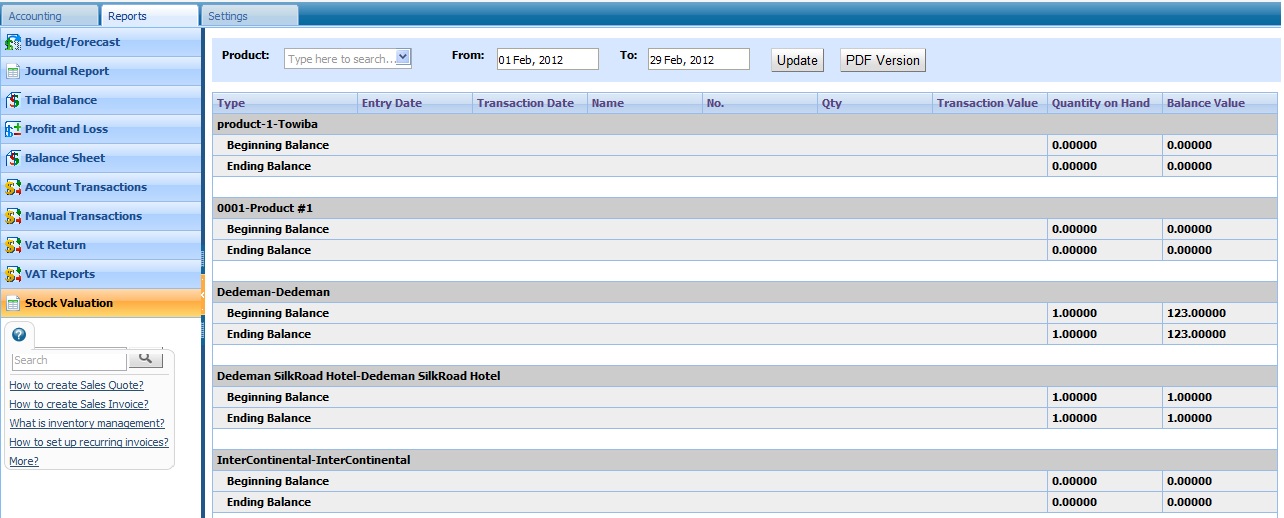
SETTINGS
Company Settings The company settings contains the information about company details, addresses and time zone, email phone information to be used in the system generated letters and PDF documents. The following information is needed in order to setup the organization’s settings. - Company details include Company Name as required fields.
- Company billing address is the address to which company is registered to and to which company will receive payment information. Company mailing/shipping address is the address of the physical location of the company, which should be shown if different from billing address. Company billing address will also appear on top of the quotes, purchase orders and invoices.
- Time zone information is the current time zone in which your company is located. This is needed in order to display correct time in reports and trial balances.
- Phone number, and fax numbers should be given as regular
- Email should be corporate email where customers can send their enquiries.
- You can also add company’s logo to be displayed accounts of your Company employees’ instead of KPI logo.
-
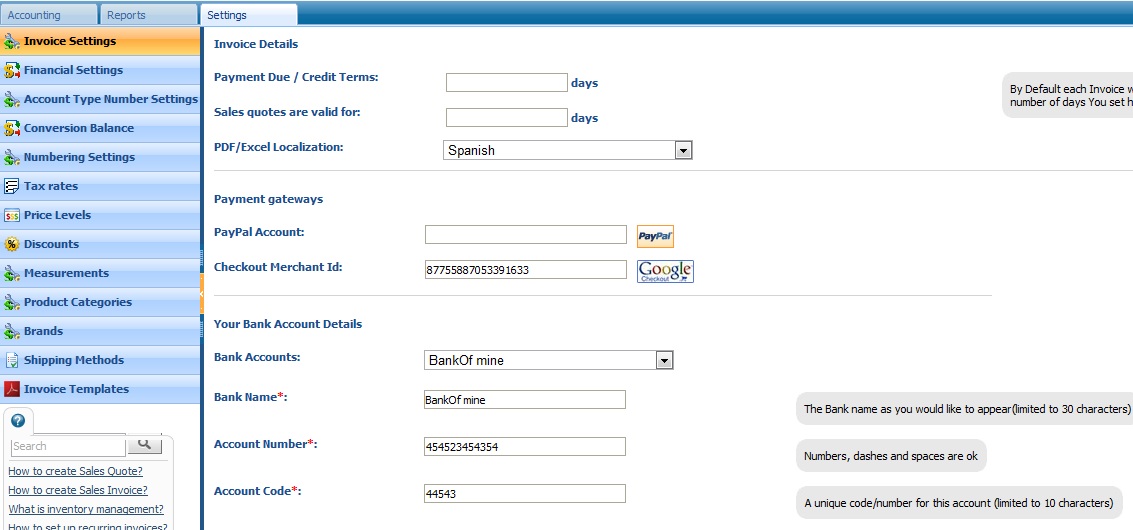
INVOICE SETTINGS
Invoice settings contain the information to be displayed on your outgoing sales invoices, incoming purchase invoices and in project based invoices.Invoice Settings include following fields that need to be filled:Payment Due Credit Terms – The amount of days selected here is needed to identify automatically invoice due date on your invoices. Invoice due date can be changed while creating your invoices if different invoice due date is needed. Your client might use the bank details for payment purposes, e.g. for sending bank wire paymentsAutomatic Number Sequencing – the unique number will be used to identify all outgoing invoices of the company for credit tracking and bookkeeping purposes. The number will be generated automatically by including prefix, date, client code and 4 numbers. You can select which numbering can be used for invoices demanded by the needs of your company.Your company Logo – choose the company logo file in .jpg, .jpeg, .gif, .png, .tiff formats with maximum size of 235x58px. The logo you selected here will appear in sales quotes, invoices, purchase orders, purchase invoices, and etcFINANCIAL SETTINGS
The financial settings are essential part of Accounting and Finance section, because every bookkeeping entry or invoice documents will reference it when needed. However, financial settings can be entered or changed later in kpi.com Accounting and Finance Settings tab.Currency – choose the base currency by which your company operates. All bookkeeping entries will be done in base currency, however, you will be able to send invoices and receive payments in different currencies. For bookkeeping purposes, all other currencies will be converted to your base currency chosen here.End of financial year – choose the end of financial year for your company to prepare yearly reports for. This will be needed for the system to generate yearly reports like profit and loss accounts and balance sheets at the end of the financial year.Tax ID number – unique number that identifies your company with the tax authority of your country. This field is used to show your tax information in reports needed by tax authorities. If you are not tax registered company, then there is no need to fill in the tax fields.Tax ID display number – this is the display number of your tax ID to appear in Tax reports.Tax period – choose periods to report tax information for your organization. It can be monthly, once every 2 months, once in 3 months, yearly and etc. Depending on your selection, the tax reporting will be shown in a period basis.Tax basis— select the method by which you pay taxes, can be cash or accrual basis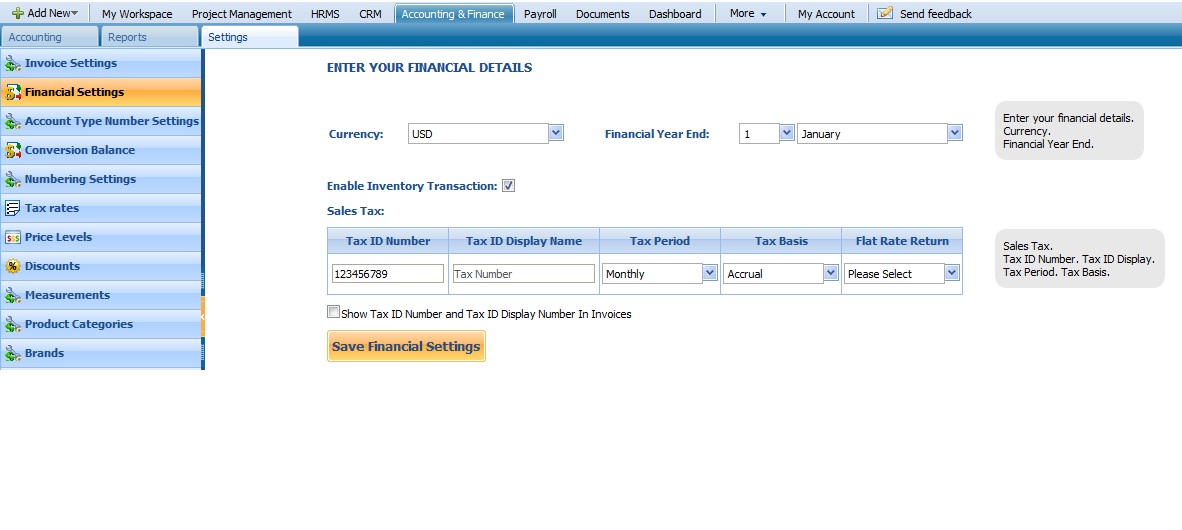
ACCOUNT TYPE NUMBER SETTINGS
Chart of Accounts has default numbering which can be changed in the Account Type Number Settings.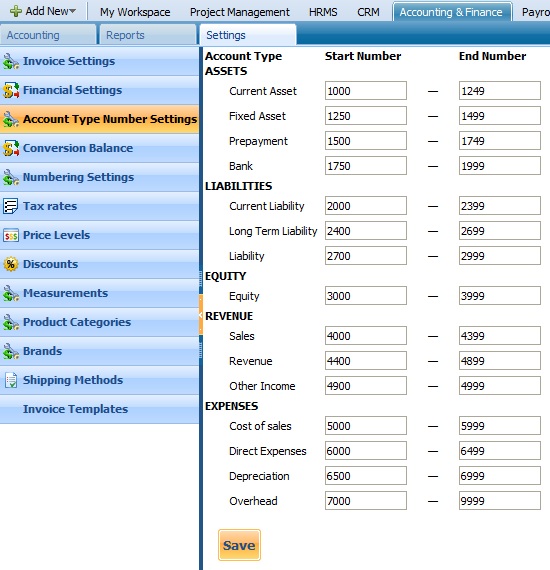
CONVERSION BALANCE
Conversion balance information can be entered in through conversion balance menu. This feature can also be used to convert customer balance and to enter related sales invoice and accounts payable information.
NUMBERING SETTINGS
Product numbering and Fixed Asset numbering can be found under Numbering settings.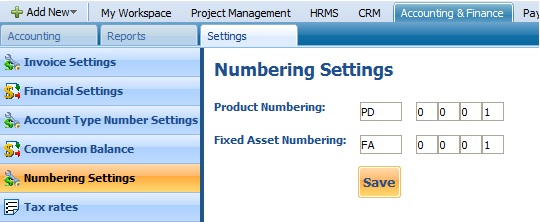
TAX RATES
Tax rates are needed in order to withdraw tax rates from the accounts and sales automatically when required. Tax rates can be defined on your own, or you can choose default ones provided by the system. You can edit and delete default tax rates provided, too. In order to define your own tax rates, you need to enter tax name and the tax rate.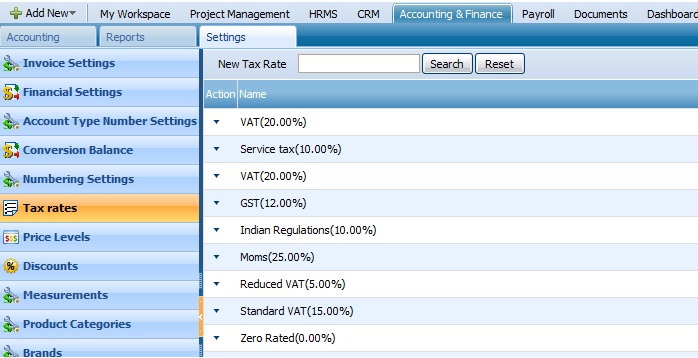
NEW TAX RATE
To add a new tax rate, you should open a form by clicking on the New Tax Rate button on the Tax Rates page: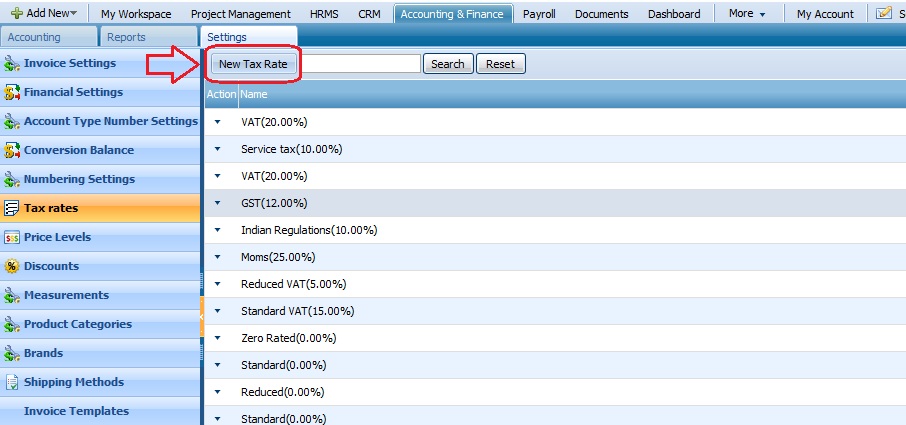
ACTIONS LIST
By default the Actions list drop-down is available on the first column of the Tax Rates list. Once clicked, drop-down gives several options as displayed on the screenshot: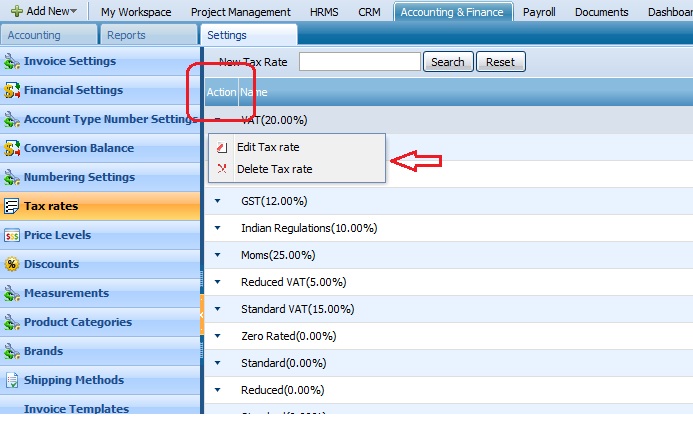
Edit/Delete Tax Rate
To edit or delete the tax rate, you need to go to the Tax Rates section and click on the Edit or Delete Tax Rate through Actions List: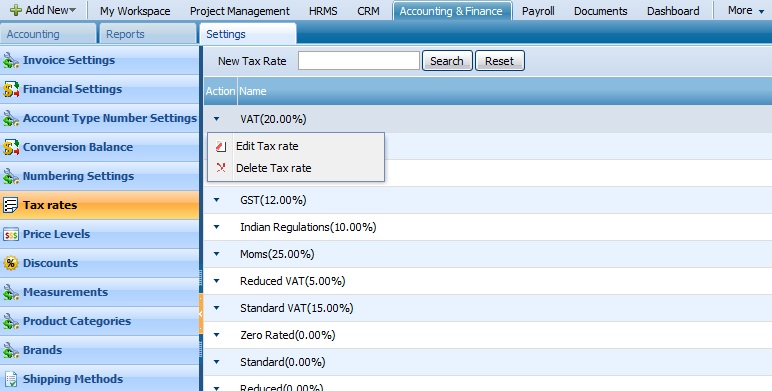
PRICE LEVELS
Price levels are changes in price that can be activated by quantity. Currently, you can have price levels by dollar amount and percentage off.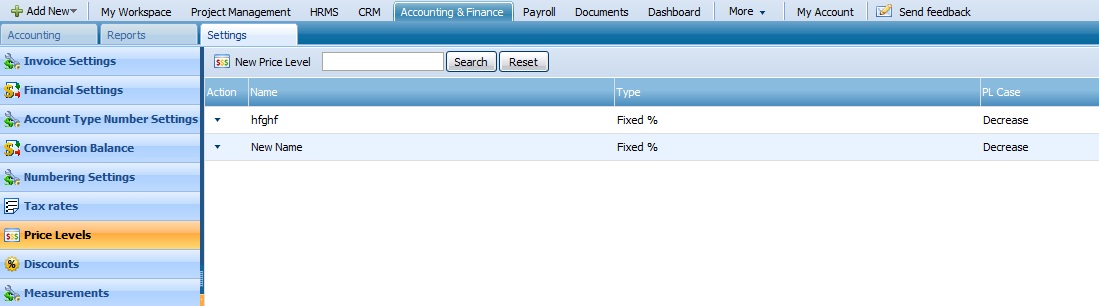
NEW PRICE LEVEL
To add a new price level, you should open a form by clicking on the New Price Level button on the Price Levels page: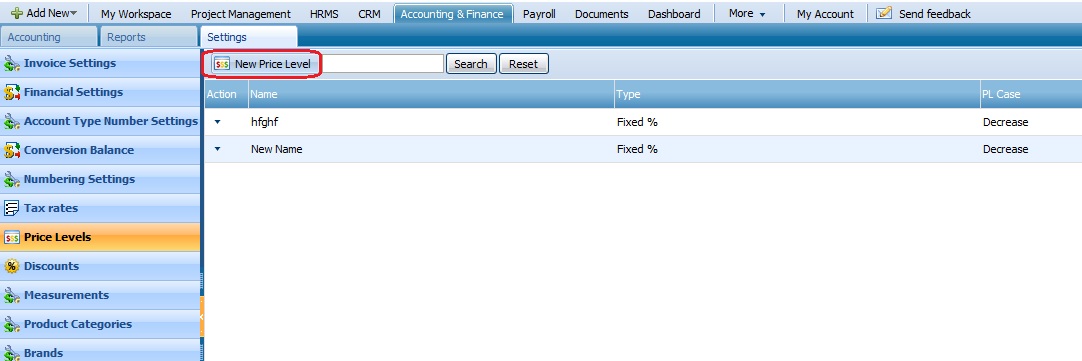
ACTIONS LIST
By default the Actions list drop-down is available on the first column of the Price Level list. Once clicked, drop-down gives several options as displayed on the screenshot: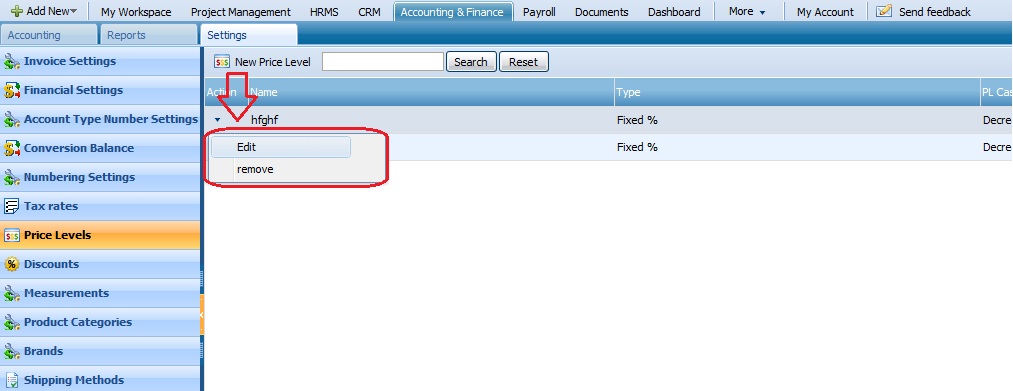
Edit/Remove Price Level
To edit or delete the price level, you need to go to the Price Levels section and click on the Edit or Remove Price Level through Actions List:DISCOUNTS
Frequently used discounts can be entered in to be recalled quickly when writing sales invoice and quotes.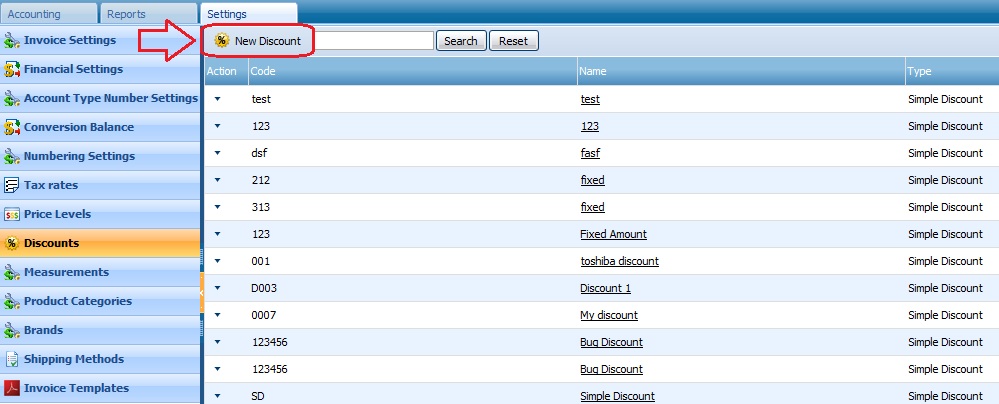
NEW DISCOUNT
To add a new discount, you should open a form by clicking on the New Discount button on the Discounts page:ACTIONS LIST
By default the Actions list drop-down is available on the first column of the Discounts list. Once clicked, drop-down gives several options as displayed on the screenshot:
Edit/Remove Discount
To edit or delete the discount, you need to go to the Discounts section and click on the Edit or Remove Discount through Actions List:Measurements
This is a section different types of measurement information can be entered in to be used with Products
and Services as well as in sales invoice and quotes.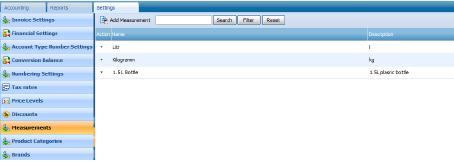
Add measurement
To add a new measurement, you should open a form by clicking on the Add Measurement button on the
Measurements page:
ACTION LIST
By default the Actions list drop-down is available on the first column of the Measurements list. Once clicked, drop-down gives several options as displayed on the screenshot:
Edit/Delete Measurement
To edit or delete the measurement, you need to go to the Measurements section and click on the Edit or
Delete Measurement through Actions List:
PRODUCT CATEGORIES
Category of Products can be entered in to create variations of that product such as color and size. This
feature is also to be used in the products and services section.
ADD CATEGORY
To add a new category, you should open a form by clicking on the Add Category button on the Product
Categories page:
ACTIONS LIST
By default the Actions list drop-down is available on the first column of the Product Categories list. Once
clicked, drop-down gives several options as displayed on the screenshot:
Edit Category
To edit a category,click on the Edit Category from the Actions List drop down of the Product Categories
section:
Category Products
Category of Products can be entered in to create variations of that product such as color and size. This
feature is also to be used in the products and services section

Custom Fields
Custom Fields are additional fields to be generated when entering product or service information. Please
contact support personnel with the way you would like to utilize Custom Fields and to receive basic
training.
Delete Category
To remove one of the categories from the list, click on the Remove Category button and choose an option
from Yes or No.
BRANDS
Brands are customized fields where brand information entered in to be used when creating products and
services.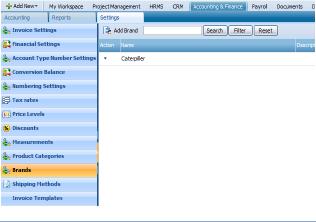
ADD BRANDS
To add a new brand, you should open a form by clicking on the Add Brand button on the Brands page

Actions List
By default the Actions list drop-down is available on the first column of the Brands list. Once clicked, drop-
down gives several options as displayed on the screenshot:
Edit/Delete Brand
To edit or delete the brand, you need to go to the Brands section and click on the Edit or Remove Brand
through Actions List:
SHIPPING METHODS
Shipping Methods list view displays all saved shipping methods. This is where you can view and sort these
options.
NEW SHIPPING METHODS
To add a new shipping method, you should open a form by clicking on the New Shipping Method button
on the Shipping Methods page:
ACTIONS LISTBy default the Actions list drop-down is available on the first column of the Shipping Methods list. Once
clicked, drop-down gives several options as displayed on the screenshot: page:
Edit Shipping MethodTo edit a shipping method, click on the Edit Shipping Method from the Actions List drop down of the
Shipping Methods section:
Export to PDF
To export the list to PDF, click on the Export to PDF button through the Actions List of the Shipping
Methods section:
INVOICE TEMPLATES
Invoice templates are a new feature and where new invoice templates can be purchased and utilized while
sending and generating invoices. Please contact you sales support regarding how to purchase a new
invoice template.

IMPORTING AND EXPORTING FILES
You are able to perform two additional functions as Importing and Exporting your files with integration of
Microsoft Office and Google Apps. Each section of the Project Management tool includes such functions in
the right bottom of the page as shown on the picture.
CUSTOMIZATION TOOL
Customization Tool is a tool primarily used by users to set buttons you want to see on the each page. Every
section has a customization tool on the top side of the page:
FILTRATION TOOL
Filtration Tool is a tool where you can filter the information you need or vice versa. It can be found in every
section of the Project Management on the top side of the page as shown in the picture:
Since the form viewed, you can click on the necessary filter details as Clients, Status and Prospect Amount.

READER’S COMMENT FORM
kpi.com Accounting & Finance welcomes your comments and suggestions on the quality and this publication. Next revisions will be based on your information. - Were there any errors in the Guidebook?
- Do you need more information? And in what section?
- Were the screenshot examples enough?
- What features were useful in this manual?
- If any errors are found or you have other suggestions for the product and its manual improvement, please send us your comments through the following ways:
E-mail: support@www.kpi.com
Phone:
(UK) +44 (0) 173 261 7967
(US) +1 844 726 84 46
(UAE) +971 4 424 3033